Article directory
- 6 ways to turn off Windows automatic updates!
-
- Method 1: Turn off Windows Automatic Updates through Windows Settings
- Method 2: Turn off Windows automatic updates through the Group Policy Editor [Win10 Professional Edition recommended]
- Method three: Turn off Windows automatic updates through the Registry Editor
- Method 4: Turn off Windows automatic updates through Windows services [win10 home version recommended]
- Method 5: Turn off Windows automatic updates through Task Scheduler
- Method 6: Turn off Windows automatic updates through specific tools
- Back up your system regularly to prevent unexpected situations!
6 ways to turn off Windows automatic updates!
Method 1: Turn off Windows Automatic Updates through Windows Settings
- Step 1. Press
Win+IOpenWindows设置页面. - Step 2. Click
“更新和安全”>“Windows更新”and then select on the details page on the right“暂停更新7天”选项to turn off Windows updates within the next 7 days (you can also enter the advanced options to freely select the time to pause updates).

Note: If you want to resume updates, you can click the "Continue Updates" button in the Windows Update tab or follow the steps above to change the date on which updates are paused.
Method 2: Turn off Windows automatic updates through the Group Policy Editor [Win10 Professional Edition recommended]
The Local Group Policy Editor is a utility on Windows that allows you to configure local Group Policy settings. You can turn off Windows Updates completely through the Local Group Policy Editor, or adjust Windows Updates to manual installation. Everything can be set according to the actual situation.
Note: The Local Group Policy Editor is not available in Windows 10 Home Edition, so the following steps will not apply to that version.
1. Disable Windows Updates Completely
-
Step 1. Press
Win+REntergpedit.mscandEnter键press Open本地组策略编辑器. -
Step 2. Navigate to this path:
计算机设置>管理模板>Windows组件>Windows更新. -
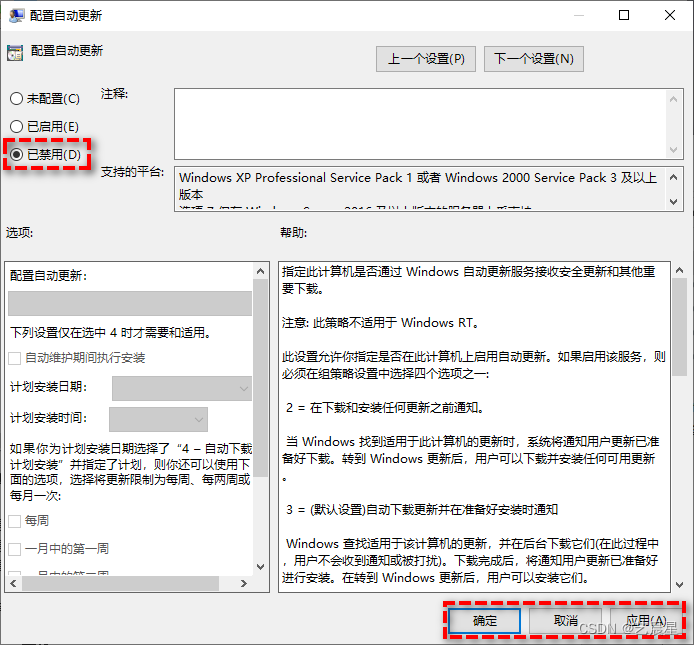
Step 3. Find and double-click it in the left panel
“配置自动更新”选项to open it, then click“已禁用”Options in the upper left corner. Click“应用”>“确定”to completely disable Windows automatic updates. -
Note: If you want to resume updates, you can check "Enabled" in this window, then apply and confirm.
2. Adjust Windows Updates to Manual Installation
Step 1. Repeat steps 1-2 above.
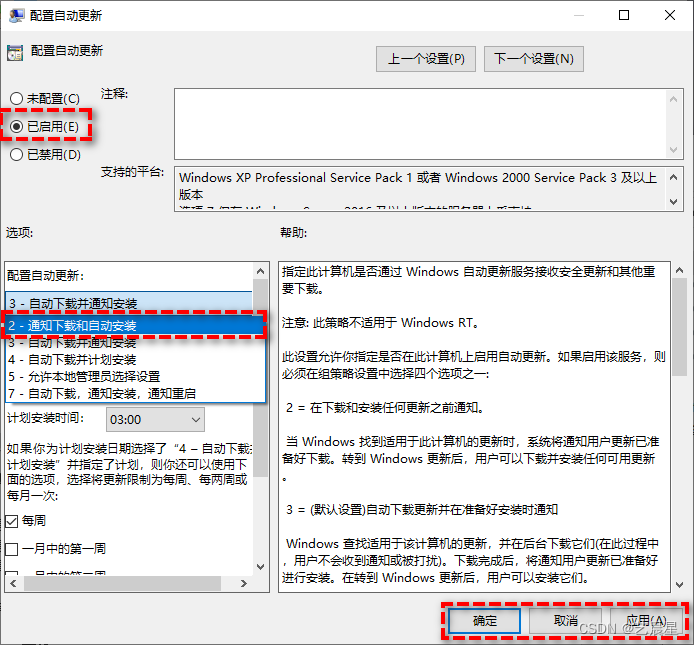
Step 2. Select in the Configure automatic updates window “已启用”, then select in the options section below “2-通知下载和自动安装”, and then click “应用”>“确定”.
Method three: Turn off Windows automatic updates through the Registry Editor
The Registry Editor is an important hierarchical database in the Microsoft Windows operating system and its applications, used to store system and application setting information. As with the Local Group Policy Editor, you can also disable automatic updates entirely or adjust Windows Updates to manual installation through the Registry Editor.
Note: There are risks in modifying the registry editor. Please install the demo steps carefully, otherwise it may cause irreversible damage to the system. Or you can also back up your system or important files before modification to avoid accidents.
1. Disable Windows Updates Completely
-
Step 1. Press
Win+REnterregeditandEnter键press Open注册表编辑器. -
Step 2. Navigate to this path:
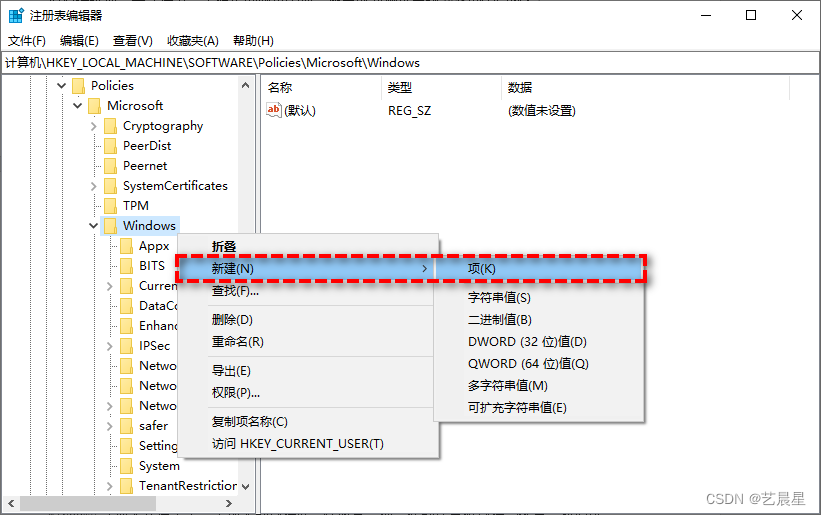
HKEY_LOCAL_MACHINE\SOFTWARE\Policies\Microsoft\Windows. -
Step 3. Right-click the Windows folder, select New > Item, and name it
“WindowsUpdate”.
-
Step 4. Right-click the new one
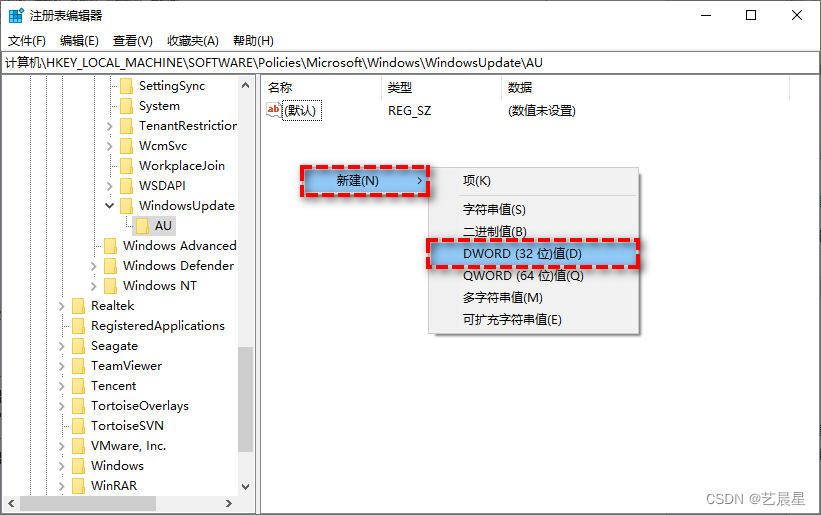
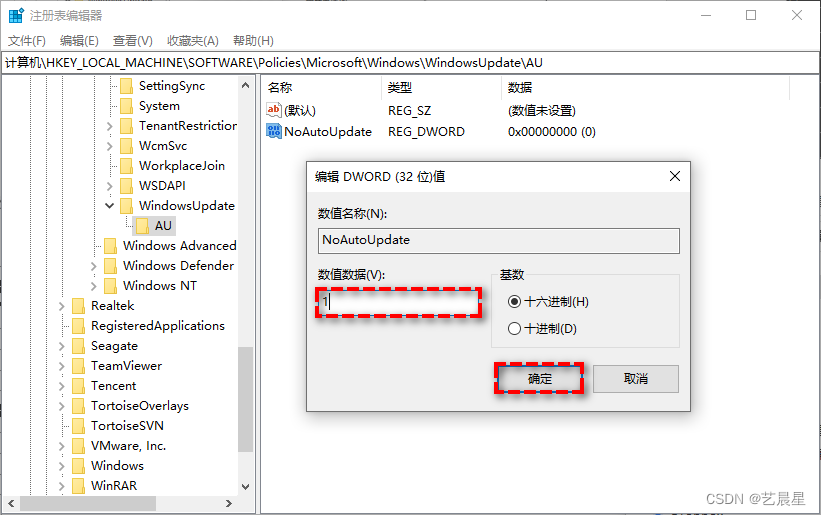
WindowsUpdate文件夹, select“新建”>“项”, and name it“AU”. -
AU文件夹Step 5. Right-click and select in the newly created blank page on the right“新建”>“DWORD(32位)值”, and then name it“NoAutoUpdate”.
-
Step 6. Double-click the newly created one
NoAutoUpdate, change its numerical data from 0 to 1 in the pop-up window, and then click“确定”to completely turn off Windows automatic updates.
Adjust Windows updates to manual installation
- Step 1. Repeat steps 1-4 above.
AU文件夹Step 2. Right-click and select in the newly created blank page on the right“新建”>“DWORD(32位)值”, and then name it“AUOptions”.- Step 3. Double-click to open
AUOptions项, change its value data from0to2, and then click“确定”to adjust Windows Update to manual installation mode.
2 - Notify to download and automatically install
3 - Automatically download and notify to install
4 - Automatically download and schedule installation
5 - Allow local administrator to choose settings
6 - Automatic download, notify to install, notify to restart
Method 4: Turn off Windows automatic updates through Windows services [win10 home version recommended]
Windows Update (Windows Automatic Updates) is essentially just a service in your Windows system, which means you can disable the Windows Update service just like any other service. It’s worth noting that this method is the preferred way to get Windows to turn off automatic updates on Windows 10 Home edition.
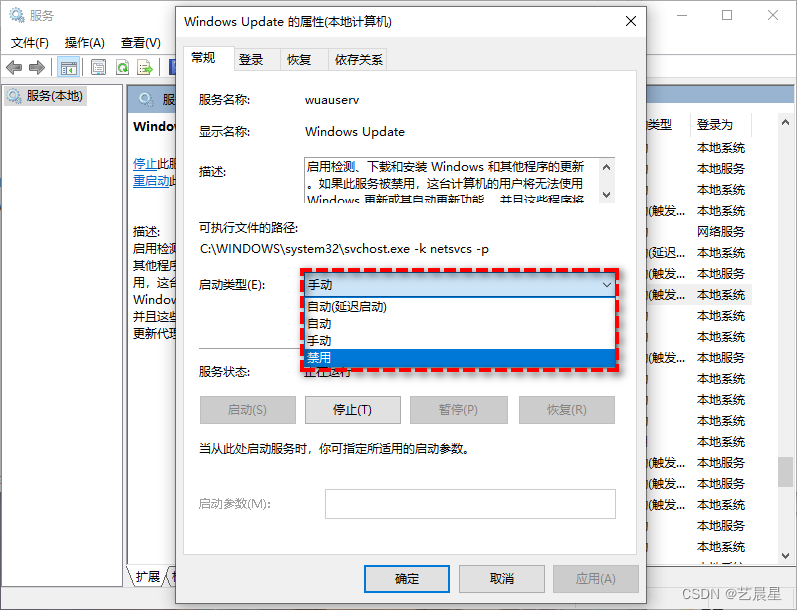
- Step 1. Press
Win+REnterservices.mscandEnter键press Open服务页面. - Step 2. Find it in the list on the right
“Windows Update”选项, double-click to enter the detailed properties page, configure its startup type as“禁用”, and then click“应用”>“确定”to turn off Windows automatic updates. - Note: If you want to resume updates, you can select them in this window
“自动”, then apply and OK.
Method 5: Turn off Windows automatic updates through Task Scheduler
To tell Windows to turn off automatic updates, you can also try disabling the Windows Update task in Task Scheduler.
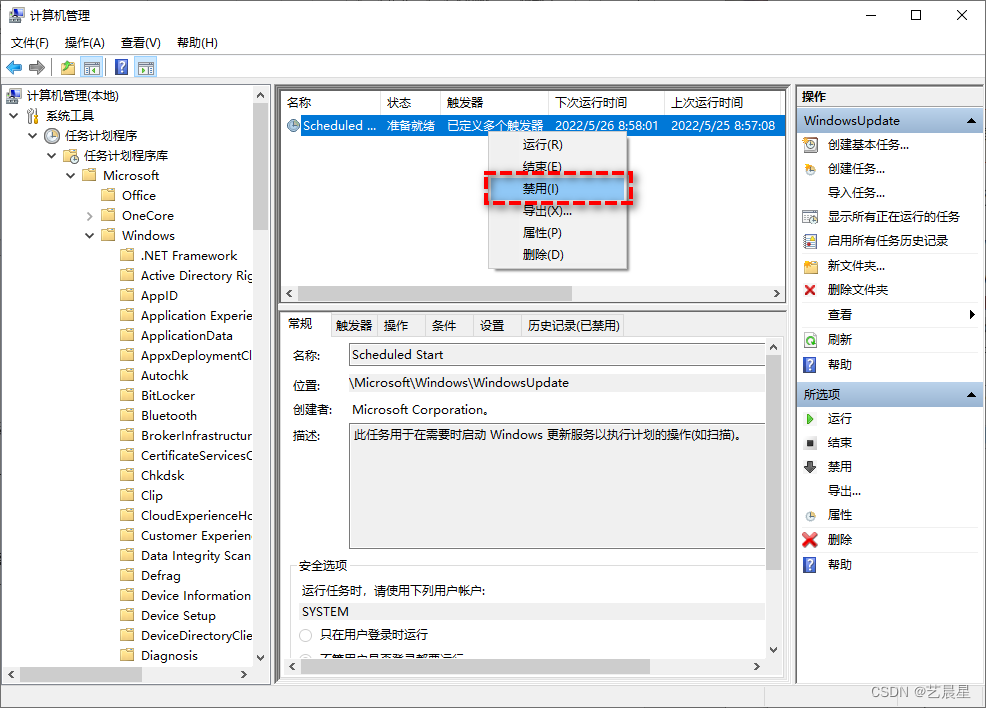
- Step 1. Right-click
“此电脑”and click“管理”. - Step 2. Navigate to this path:
任务计划程序>任务计划程序库>Microsoft>Windows> WindowsUpdate. - Step 3. Right-click
Scheduled Start任务and click“禁用”.
Method 6: Turn off Windows automatic updates through specific tools
In addition to the above methods, you can also use some specific tools to tell Windows to turn off automatic updates. For example, tools officially released by Microsoft “显示或隐藏更新”and other Windows Update Blocker、Win Update Stop、Win Updates Disablerthird-party tools can disable Windows automatic updates.
Back up your system regularly to prevent unexpected situations!
Windows updates are a way to fix system security vulnerabilities and improve user experience, but if you want to fully control the Windows update time and avoid compatibility or system damage caused by Windows automatic updates, you need to refer to the 6 methods provided in this article to temporarily or completely Turn off Windows automatic updates.
In addition, in order to ensure that the system and important data are safe and not lost, we still recommend that you use AOMEI Backup to regularly back up the system when the computer is running normally. This can quickly restore the system to its previous normal state when you encounter system problems. state.
Please click the button below directly to enter the download center to download and install AOMEI Backup, and then follow our demonstration tutorial to learn how to back up the system!
AOMEI Backup-Download Center
-
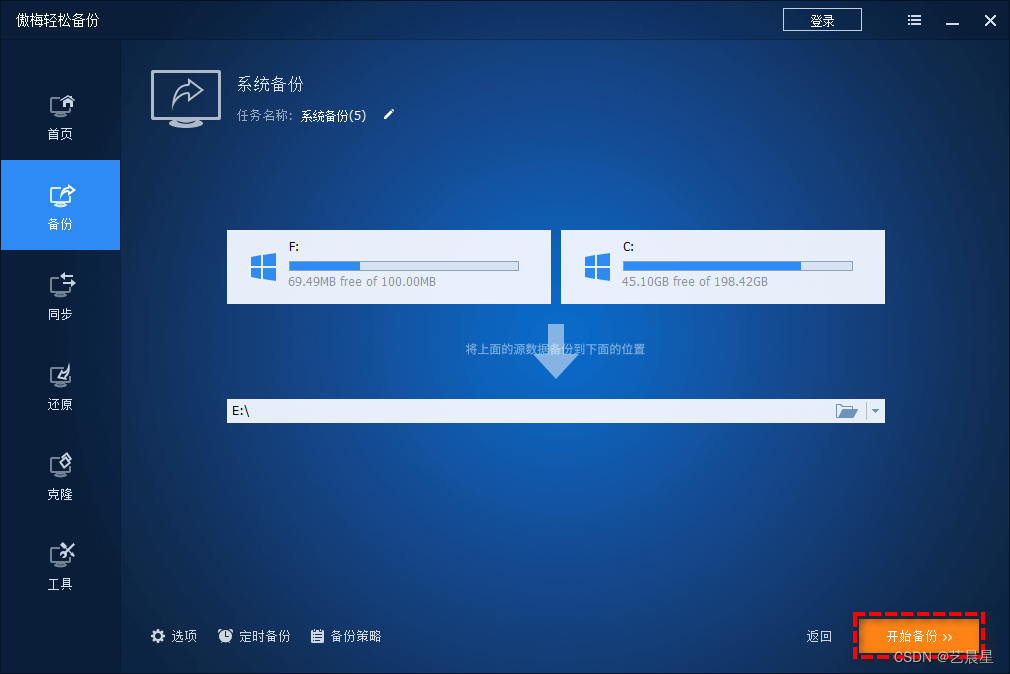
Step 1. Open AOMEI Backup and click on the main interface
“备份”>“系统备份”.

-
Step 2. The software will automatically select system-related partitions. You only need to select a target location to store the system backup image. After confirming that it is correct, click "Start Backup" to perform the system backup task.
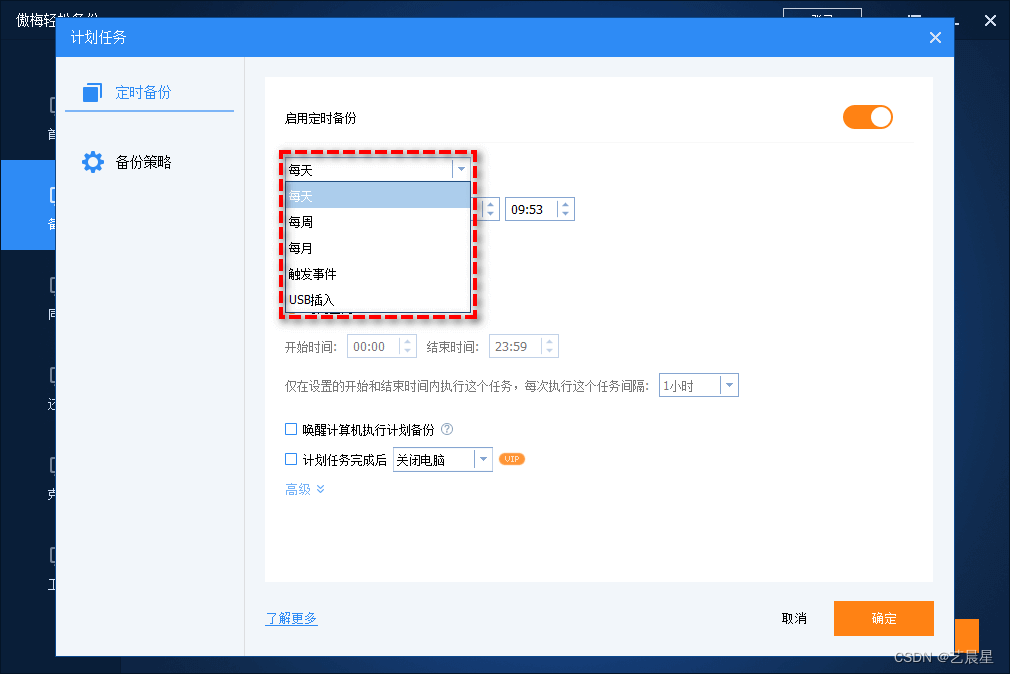
✎ Tips about settings in the lower left corner::Options: You can add a note name to the backup task here to find it later, or you can also set the backup compression level, whether to split the mirror, etc.
Scheduled backup: You can set a scheduled backup task here so that the backup task is automatically executed according to the time you set.
Backup strategy: You can set a full backup, incremental backup or differential backup strategy here (this is AOMEI Easy Backup VIP function, please upgrade if necessary) to help you automatically clear old backups regularly, saving you more disks space.
After successfully obtaining the system backup image, when you encounter some difficult system problems, you can use it to quickly restore the system to the normal running state at the time of backup. In addition, if you want to configure it on other computers If the system environment is the same as your own computer, you can also use the universal restore function to restore the system to another computer without resetting it, which is quite convenient and practical.