Table of contents
Configure cluster mirroring mode
Recently, there was a project that used message queues. I chose rabbitmq based on the actual situation. For specific reasons, there are a few reasons.
In terms of performance, rabbitmq is relatively balanced or comprehensive. I have been using rabbitmq before. The amount of data is not particularly large. rabbitmq also supports high concurrency. After all, the erlang language has high concurrency. In addition, for After the message is persisted, specific queues can be mirrored later. Overall, rabbitmq is more in line with the needs.
Preparation
Machine preparation and cluster deployment, so three are needed:
| CPU name |
ip |
| mq1 |
192.168.10.2 |
| mq2 |
192.168.10.3 |
| mq3 |
192.168.10.4 |
After confirming the version, you need to check the corresponding erlang version. Please refer to (https://rabbitmq.com/which-erlang.html)

Download the corresponding version of the package:
#OTP 22.3https://github.com/erlang/otp/releases/download/OTP-22.3.4.26/otp_src_22.3.4.26.tar.gz#rabbitmq rpm包https://packagecloud.io/rabbitmq/rabbitmq-server/packages/el/7/rabbitmq-server-3.8.4-1.el7.noarch.rpm#wxWidgetshttps://github.com/wxWidgets/wxWidgets/releases/tag/v3.1.5
Cluster deployment
Before deploying OTP, you need to install some pre-packages, otherwise there will be problems with compilation.
#都是教训,三台都执行下yum install mesa-libGL-devel mesa-libGLU-devel freeglut-devel gcc glibc-devel make ncurses-devel openssl-devel autoconf xmlto libtool automake gcc-c++ unixODBC unixODBC-devel gtk2-devel binutils-devel fop.noarch bzip2 -y
After the yum installation is completed, you also need to install wxWidgets
Otherwise, you will get this error when compiling.
wxWidgets not found, wx will NOT be usableCompile wxWidgets
#解压tar -xjf wxWidgets-3.1.5.tar.bz2cd /wxWidgets-3.15#编译./configure --with-regex=builtin --with-gtk --enable-unicode --disable-shared --prefix=/usr/local/wxWidgetsmake && make install#设置动态目录cd /etc/ld.so.conf.d/touch wxWidgets.confcat >>wxWidgets.conf<<EOF/usr/local/libEOF#重新加载动态库ldconfig#java环境也需要提前配置好,不然也会报错,因为我们是统一部署的jdk,这里就不再介绍了。#到这里就可以开始编译OTP了#OTP编译tar -xvf otp_src_22.3.4.26.tar.gz -C otpcd ./otp./otp_build autoconf./configure --prefix=/data460/erlang_22.3make && make install
#修改环境变量,验证是否成功vim /etc/profile#新增如下PATH=$PATH:/data460/erlang_22.3/bin/source /etc/pfofile
Check erl version
erlThere will be an error during compilation, which can be ignored.
Errors can be ignored
Can not link the wx driver, wx will NOT be useableAfter deployment, rabbitmq can be deployed
Three units are executed separately
rpm -ivh --nodeps rabbitmq-server-3.8.4-1.el7.noarch.rpmOne of them starts rabbitmq
systemctl start rabbitmq-serverThen synchronize this erlang file to two other computers
cat /var/lib/rabbitmq/.erlang.cookieNote that the file permissions of .erlang.cookie are 400
Then the other two are executed separately
systemctl start rabbitmq-server.servicesystemctl status rabbitmq-server.servicerabbitmqctl stop_apprabbitmqctl join_cluster rabbit@mq-01#内存节点#rabbitmqctl join_cluster --ram rabbit@mq-01rabbitmqctl start_apprabbitmqctl status
View cluster status
rabbitmqctl cluster_statusConfigure cluster mirroring mode
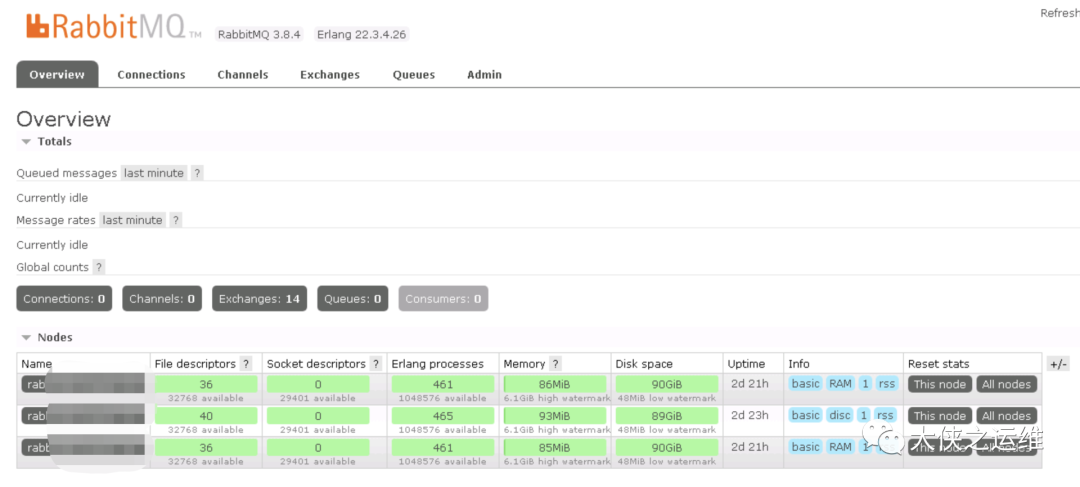
rabbitmqctl set_policy ha-all "^" '{"ha-mode":"exactly", "ha-params":2, "ha-sync-mode":"automatic","ha-sync-batch-size":300000}'#开启web页面rabbitmq-plugins enable rabbitmq_management#新建用户rabbitmqctl add_user admin fadsfj4as$rabbitmqctl set_user_tags admin administratorrabbitmqctl set_permissions -p / admin “.*” “.*” “.*”
Monitoring configuration
Using rabbitmq-exporter
Address: https://github.com/kbudde/rabbitmq_exporter/
Download package:
https://github.com/kbudde/rabbitmq_exporter/releases/download/v1.0.0-RC8/rabbitmq_exporter-1.0.0-RC8.linux-amd64.tar.gz
Unzip, configuration file, systemctl startup configuration
tar -xvf rabbitmq_exporter-1.0.0-RC8.linux-amd64.tar.gzThe following are the configuration files and directories involved
cat rabbitmq.conf{"rabbit_url": "http://192.168.10.2:15672","rabbit_user": "admin","rabbit_pass": "fadsfj4as$","publish_port": "9419","publish_addr": "","output_format": "TTY","ca_file": "ca.pem","cert_file": "client-cert.pem","key_file": "client-key.pem","insecure_skip_verify": false,"exlude_metrics": [],"include_queues": ".*","skip_queues": "^$","skip_vhost": "^$","include_vhost": ".*","rabbit_capabilities": "no_sort,bert","enabled_exporters": ["exchange","node","overview","queue"],"timeout": 30,"max_queues": 0}cat /usr/lib/systemd/system/rabbitmq_exporter.service[Unit]Description=rabbitmq_exporterAfter=network.target[Service]Type=simpleRestart=alwaysRestartSec=10WorkingDirectory=/data/rabbitmq_exporterExecStart=/data/rabbitmq_exporter/rabbitmq_exporter -config-file rabbitmq.conf[Install]WantedBy=multi-user.target#启动systemctl start rabbitmq_exporter.service && systemctl status rabbitmq_exporter.service
#View monitoring indicators
192.168.10.2:9419/metricsprometheus configuration
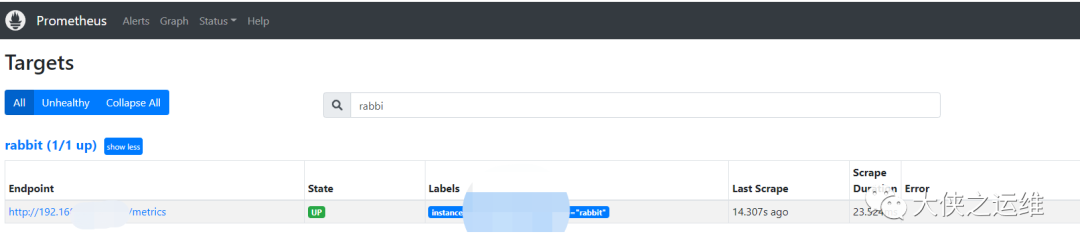
#新增- job_name: rabbitstatic_configs:- targets: ['192.168.10.7:9419'
Restart proemtheus
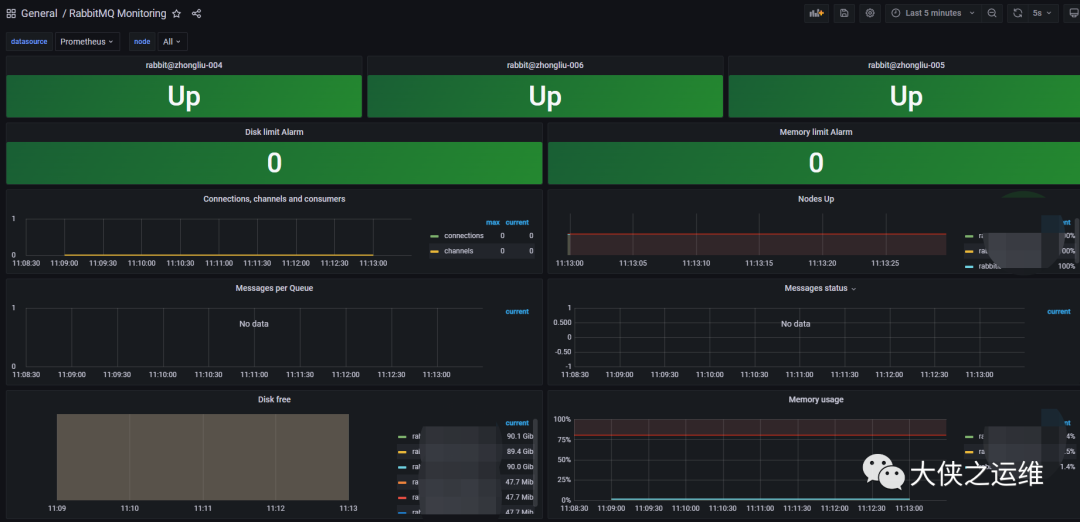
grafana display
import import 4279