Table of contents
- FastTester: Quickly generate test cases for testing
-
- 1. Obtaining the interface use case collection
- 2. Execute the test
- 3. Introduction to post-processor: http_collect
- 4. Introduction to the use of assertions: http_assert
- 5. Variable reference
- 6. Database config configuration instructions
- If you have any suggestions/questions, please contact me: https://blog.csdn.net/qq_42675140
FastTester: Quickly generate test cases for testing
Introduction
Utilize daily functional testing (actually calling the API) to obtain the request and response information of the API through the proxy, and conduct traffic playback/adjustment testing or quickly generate use cases on these request information. Parameter extraction, variable references, and assertions can be modified manually
. Wait for the formation of API automation test cases!
Project address: Watch the official~ Please remember to give a star ?
github
gitee
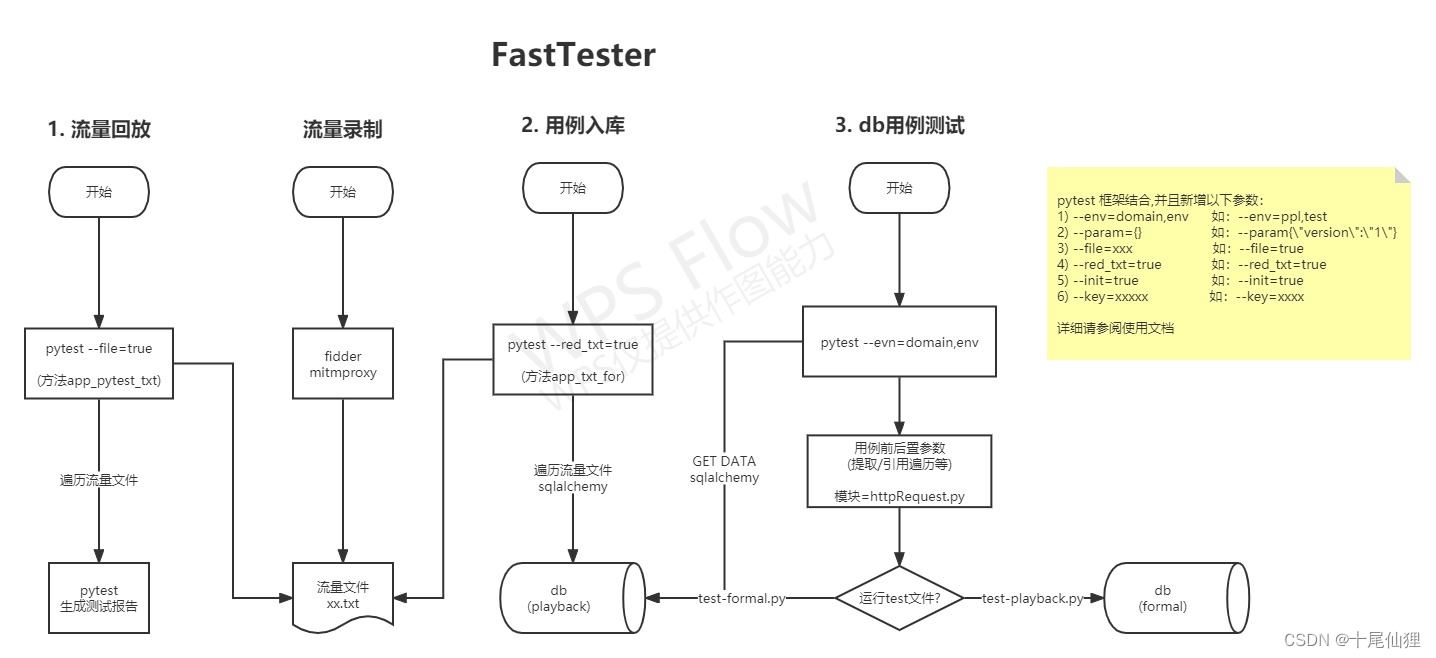
Flow chart (design idea)
~_~ 不会画太粗糙了
quick start
1.clone
github:git clone https://github.com/git-gsxl/FastTester.git
gitee:git clone https://gitee.com/qq772262624/FastTester.git
2.pip install:pip install -r requirements.txt -i https://pypi.douban.com/simple
3. Demo running test:
cd tests
pytest
# Windows 可直接运行:`startCollect.cmd`

1. Obtaining the interface use case collection
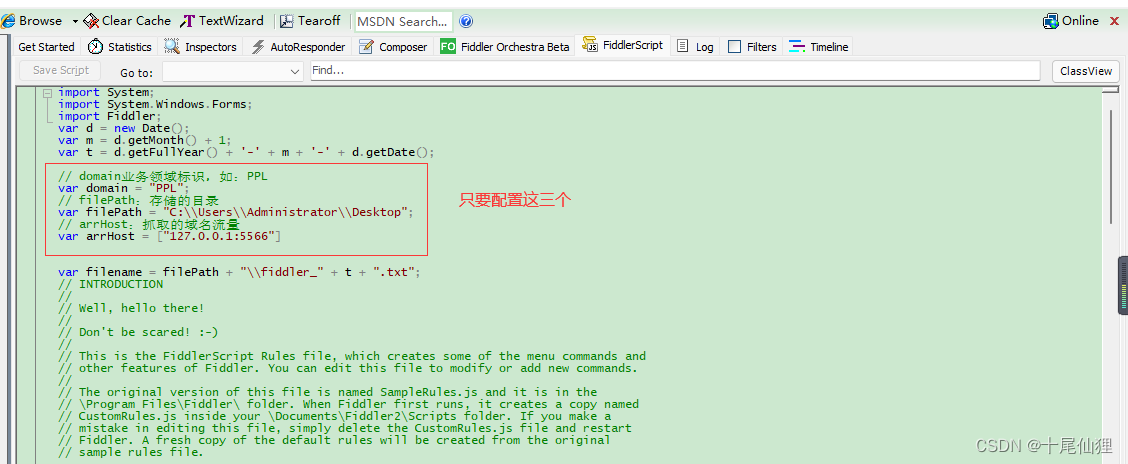
Method 1: Fiddler
1. utils/httpCat/fiddler.txtCopy and paste the text under the project, FiddlerScript
2. Change it to match the configuration of your own business field. It is the absolute path appdirectory of the project. Pay attention to using two handles.\\
Method 2: mitmproxy
1. Change utils/httpCat/config.inithe filtering domain name under the project to the domain name and business field you need to configure
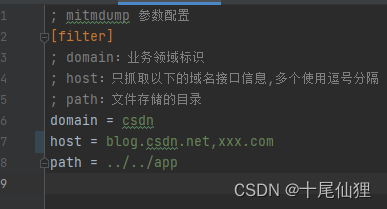
2. You need to configure the proxy certificate, etc. Please refer to the mitmproxy usage documentation for details.
3. Run the file: startCollect.cmd
如出现报错请检查 pip install -r requirements.txt 是否已安装?orpip install mitmproxy==5.0.0
Combining the above two methods
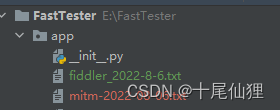
1. You will get: xxx.txt file
2. If you need to store the use case into the database, execute the command line:
cd test
pytest --red_txt=true
In addition, you may need to configure the database connection model/dbBase.py. The default issqlite
2. Execute the test
Command line parameter descriptions (some can be configured by default under pytest.ini) are consistent with the pytest framework, and the following parameters are added:
-
–env: Query the use cases of business domain=ppl and environment=test
如:--env=ppl,test -
–param: Append replace the version parameter with 1 or append
如:--param={\"version\":\"1\"} -
–file: Read all txt files in the app directory for traffic playback. See traffic playback for detailed usage.
如:--file=true -
–red_txt: Read txt files for use case storage
如:--red_txt=true -
–init: Initialization of db table structure, generally not needed
如:--init=true -
–key: key pushed by Qiwei or DingTalk group
如:--key=xxxx
Method 1: Traffic playback, only playback API response code is 200
  cd tests

  1)方式1:默认为app目录下全部txt文件(以下2-3不存在文件时亦是):pytest --file=1

  2)方式2:指定app目录下的文件:pytest --file=fiddler_2022-7-31.txt

  3)方式3:绝对路径指定文件(注意win下需要\\):pytest --file=E:\\fiddler_2022-7-31.txt

  4)方式4:相对路径指定文件:pytest --file=./fiddler_2022-7-31.txt
Method 2: After the use case is stored in the database, execute the db use case test
cd tests
pytest test_playback.py --env=domain,env --param={

    \"version\":\"1\"}
ps: Windows can run it directly with one click and generate a report with default ini parameters: testStart.cmd
(supports substitution variables, storage variables, reference variables, and response assertions)
3. Introduction to post-processor: http_collect
Parameter extractor, the default is to take the first value (supports extraction of return parameters of response and headers interface)
Please refer to Jsonpath syntax: https://goessner.net/articles/JsonPath
1.Jsonpath is case sensitive
1) Get the value of key:['key'] ----> {'key':'value'}
2) Get the value of key and rename it:[{'key':'name'}] ----> {'name':'value'}
3) Get the value of key and specify the nth one:['key':n] ----> {'key':values[n]}
4) Get the value of key and rename it and specify the nth one:['key':['name',n]] ----> {'name':values[n]}
5) Native Jsonpath syntax:['$.data.key'] ----> {'key':'value'}
6) Native Jsonpath syntax and rename:[{'$.data.key':'name'}] ----> {'name':'value'}
7) Native Jsonpath syntax and specify the nth one:[{'$.data.key':n}] ----> {'key':values[n]}
8) Native Jsonpath syntax and rename and specify the nth one:[{'$.data.key':['name',n]}] ----> {'name':values[n]}
2. Regular expressions
1) Get the value of the regular expression and name it env:[{'re':['env','http://(.+?)/']}] ----> {'env':'value'}
2) Get the value of the regular expression and name it env and take the nth value:[{'re':['env','http://(.+?)/', -1]}] ----> {'name':'value'}
4. Introduction to the use of assertions: http_assert
1.Jsonpath assertion
1. Characters inside: ["msgId"]
`实际为:assert "msgId" in response.text`
2. The variable is inside: ["${msgId}"]
`实际为:assert "${msgId}" in response.text`
2. Character equality: [{"msgId":"123456"}]
`实际为:assert 123456 == json_path(result.json(), 'msgId')`
3. Characters inside or other: [{"msgId":["123456","in"]}]注:in 可以是== != not in
assert 123456 in response.get('msgId')
4.长度:1 == len(response.get('msgId')):[{“msgId”:[1,“len”]}]
assert 1 == len(response.get('msgId'))
2. Regular expression assertion
1. Just write the regular expression directly, such as:[{'re':'http://(.+?)/'}]
5. Variable reference
Use this system and follow Faker syntax to quote directly: ${Faker syntax}
Starting with ppl_, it is a custom generated data method
For more information about Faker, please refer to the official documentation: https://faker.readthedocs.io/en/stable/locales/zh_CN.html#faker-providers-address
1. Number related:
1) Mobile phone number: ${phone_number}
18520149907
2) ID number: ${ssn}
410622198603154708
2. Time and date related
1) Current date and time: ${ppl_now_datetime}
2022-07-02 12:56:58
2) Current timestamp: ${ppl_time}
1656737818
3) Current date: ${ppl_now_date}
2022-07-02
4) Current time: ${ppl_now_time}
12:56:58
5) Date and time of the past 7 days: ${ppl_datetime(-7)}
2022-06-25 00:00:00
6) Date and time in the next 7 days: ${ppl_datetime(7)}
2022-07-09 23:59:59
7) Random year-month-day: ${date}
1996-03-20
8) Random (hour: minute: second): ${time}
04:52:23
9) Future date and time: ${future_datetime(end_date=+7d)}
2022-07-07 16:01:23
10) Past date and time: ${past_datetime(end_date=-7d)}
2022-06-29 13:29:20
3. Name related:
1) Name: ${name}
王凯
2) Name (female): ${name_female}
戴丽丽
3) Name (male): ${name_male}
刘荣
4)姓:${last_name}
宋
5) Name: ${first_name}
强
4. Address related
1) Address: ${address}
香港特别行政区大冶县上街钟街k座 664713
2) Province: ${province}
河北省
3) City: ${city}
长春县
4) Region: ${district}
白云
5) Street address: ${street_address}
武汉街D座
6. Database config configuration instructions
Used by default sqlite, generally you only need to connect sqliteto change 1、账号环境配置the information.

1. Account environment configuration
  1) gray:默认就好,一般会使用如:AB测试模型使用,定制化区分环境
  2) Tester:登录获取token或cookie初始化,可配置多个登录信息,如下有两种例子:
        collects:表示后置处理器 collect (使用详细查看第三点),用例提取token或cookie作为登录态
  {
      "gray":"gray",
      "Tester":[
          {
              "https://app-xxx.com":{
                  "url":"api/user/login",
                  "json":{
                      "mobile":18888888888,
                      "Password":"mVs6NwvIFRgN0aaUo4KZOiW9QZWbKZjqVX1eW9Gr2s4rgZ5atS3ppY39ZlyE37Tb2/zo6YWJV6VJV="
                  },
                  "method":"POST",
                  "collects":["clienttoken"]}
          },
          {
              "https://web-xxx.com":{
                  "url":"/api/index.php?r=data/login",
                  "data":"user=admin&password=4076f862096d1536b6cac6866e386655=",
                  "method":"POST",
                  "headers":{"content-Type":"application/x-www-form-urlencoded"},
                  "collects":["ppl_cookie"]
              }
          }
      ]
  }
2.Default configuration (domain=default)
  1) filter_path:过滤path为列表的,如登录/退出登录接口
  2) filter_code:根据返回retCode字段,判断是否=0或='0',是则数据符合,否则跳过该数据
  3) re_list:一般不需要使用,如AB测试模型时,则根据业务情况配置从response(uri/body/header)中正则匹配
  4) db_pop:获取用例过滤:数据库字段转dict,去除非必要的字段,默认就好
  5) filter_headers:过滤不必要的headers,默认就好
  6) split_url_handle:path不需要特殊处理可默认,一般php接口可能需要处理,如下
        例子:"split_url_handle":{".php":"path + '?r=' + query.pop('r')"}
        表示:如果'.php'在path中,则运行path=eval("path+'?r='+query.pop('r')"
   {
       "filter_path":[
           "/user/logout",
           "/user/login"
       ],
       "filter_code":{"retCode":[ 0, "0" ]},
       "re_list":[],
       "db_pop":[
           "id","curl","response",
           "_sa_instance_state",
           "create_time","update_time"
       ],
       "filter_headers":[
           "content-length","accept-encoding","host","user-agent","accept",
           "origin","referer","sec-ch-ua","connection","sec-fetch-dest",
           "sec-fetch-mode","sec-fetch-site","pragma","accept-language",
           "sec-ch-ua-mobile","sec-ch-ua-platform","postman-token",
           "cache-control","x-requested-with","accept-encoding"
       ],
       "split_url_handle":{}
   }