1. Install JDK
Download the latest version of JDK, the download address is as follows:
http://www.oracle.com/technetwork/java/javase/downloads/index.html
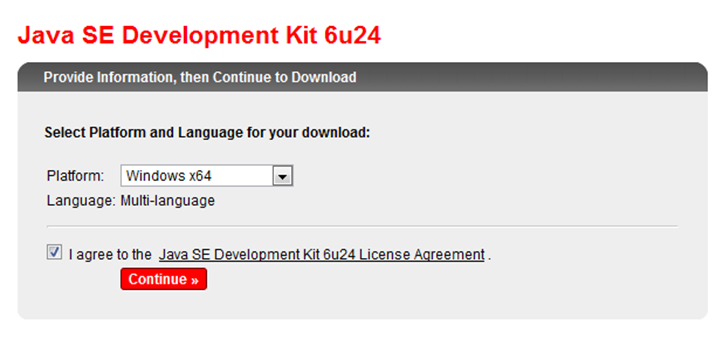
What I downloaded here is: Java SE Development Kit 6u24 for Windows x64, Multi-language, which is this file: jdk-6u24-windows-x64.exe
Download and install. After installation under Windows, three environment variables need to be set.
| JAVA_HOME | Specify the JDK installation path, which is the path C:/Program Files/Java/jdk1.6.0_24 just installed. This path includes lib, bin, jre and other folders (it is best to set this variable because tomcat, eclipse, etc. will be run later. ant, etc. need to use this variable) |
| PATH | Path allows the system to identify java commands in any path, set to: %JAVA_HOME%/bin;%JAVA_HOME%/jre/bin |
| CLASSPATH | CLASSPATH is the path for Java to load classes (class or lib). Only when the class is in the classpath can the java command recognize it. Set it to: .;%JAVA_HOME%/lib;%JAVA_HOME%/lib/tools.jar (Add . to indicate the current path) |
After the above environment variables are set, you can run cmd and run the following command in the command window. You can see information similar to the following:
Of course, you can also use java -fullversion on the command line to get detailed information about the current version. The return information at this time is similar to the following:
java full version "1.6.0_24-b07"
After that we can write a super simple java program: HelloWorld.java The content of the file is as follows:
public class HelloWorld
{
public static void main(String args[])
{
System.out.println("HelloWorld!");
}
}
In order: javac HelloWorld.java
java HelloWorld
to test whether it can run normally.
See:
Building a Java environment
http://blog.csdn.net/ghj1976/archive/2010/04/29/5543428.aspx
2. Download and install Eclipse
Download address: http://www.eclipse.org/downloads/
What I downloaded here is: 64-bit Eclipse Helios (3.6.2) Eclipse IDE for Java Developers
That is: eclipse-java-helios-SR2-win32-x86_64.zip this file
After downloading, unzip it and you can use it.
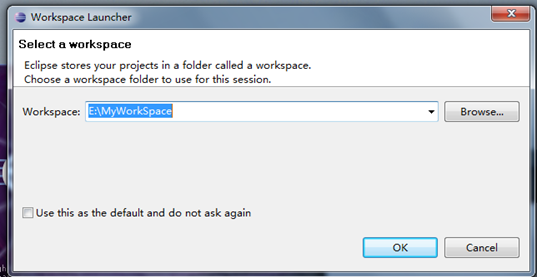
When using, select a Workspace and you can use it normally.
If we also need to use Eclipse to develop code for other programs, such as PHP, we can add software supported by Eclipse at this time, as follows:
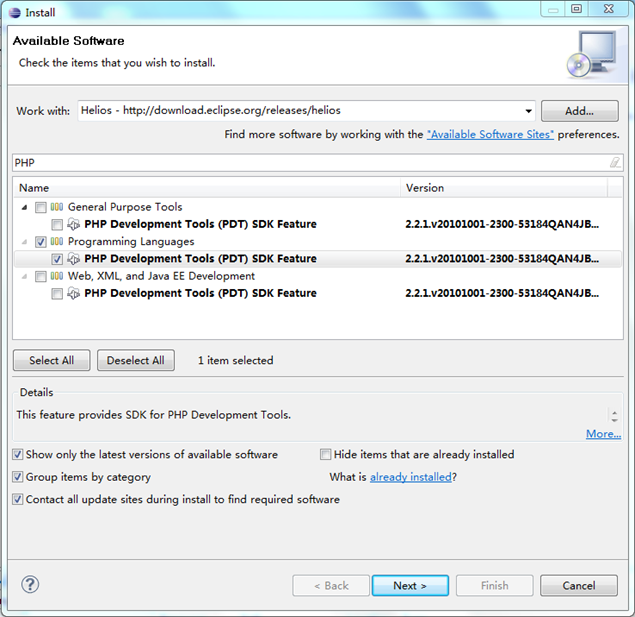
In the menu Help --> Install New Software in the Eclipse development environment, select the Helios - http://download.eclipse.org/releases/helios/ site (if you are using 3.6),
Then the list below will be refreshed (it may take a while...), then select PHP Development Tools (PDT) SDK Feature under the category Programming Languages, followed by NEXT and it will be OK.
In Eclipse we can also set the JDK version,
Right-click Properties –> Java Compiler on our project and set –> Compiler compliance level to the version we need.
It should be noted that Eclipse does not come with jdk, it only needs jre to run (no javac is required), because it comes with a compiler (there is a compile package in the plugin directory).
At runtime, because the java command has been added to the environment during JRE installation (whether Windows or Linux), eclipse uses it to start startup.jar. But if you only use jre, because there is no source code, eclipse can't generate the comment of type in the library according to the source code.
3. Set up Eclipse and install Android development tools
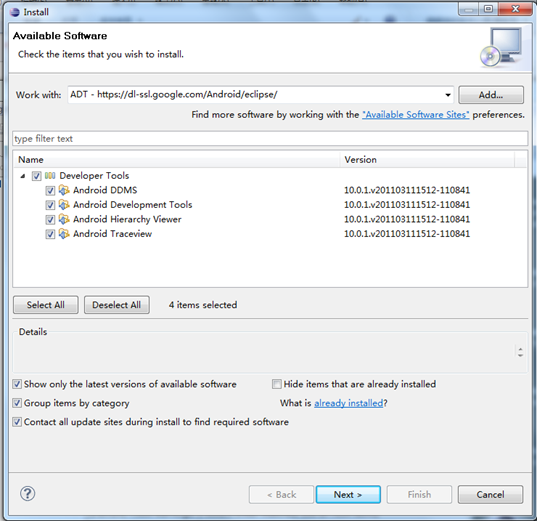
Open the Eclipse menu Help--->install new software,
select ADD
and enter Name: ADT
Location: https://dl-ssl.google.com/Android/eclipse/
Press OK
Then tick them all and install. Keep pressing Next to accept the agreement and it will be installed automatically.
4. Download Android SDK
Download Android SDK. Select android-sdk_r10-windows.zip.
You can download it from the following address in China:
http://code.google.com/p/androidforchinadeveloper/downloads/list
http://www.icewalkers.com/Linux/Software/536930 /Android-SDK.html
5. Set the Android SDK path
5.1. After Eclipse restarts, select [windows]-----[preference]---[Android],
click Browse, select the Android SDK path just downloaded (needs to be decompressed)
and click Apply
5.2. Then select the Android Package you want to install in Window > Android SDK and AVD Manager. To put it simply, select all.
> Available Packages:
> Android Repository:
+ Android SDK Tools, revision 9
+ Android SDK Platform-tools, revision 2
[Install Selected]
Select the development packages you want to install on Available Packages (install according to your own needs, no need to install them all )The online download speed is very slow.
In this way, the Android development environment is completed.
References:
Install android 2.2 development environment under ubuntu10.10
http://www.cnblogs.com/ghj1976/archive/2011/04/02/2003847.html


