Hadoop Single Node Cluster
- Hadoop Single Node Cluster only uses one machine to create a Hadoop environment, but you can still use Hadoop commands, but you cannot take advantage of the power of using multiple machines.
- Because there is only one server, all functions are concentrated in one server.
Install JDK
- Hadoop is developed based on Java, so the Java environment must be installed first.
- Click "Terminal" and enter the following code to view the Java version
java -version
-
JDK: Java Development Kit, a software development kit for the Java language

-
In Linux, you can use apt to manage software packages, and you can also use apt-get to download and install software packages (or suites). Here we will use apt-get to install jdk.
-
However, before installation, you must run apt-get update in order to obtain the latest package version. This command will connect to the APT Server and update the latest software package information.
-
To run apt-get, you must have superuser (superuser) permissions, but superuser permissions are very large. For security reasons, we generally do not log in to the system as superuser during operation. We can add the sudo command before the command, and the system will ask for the superuser password (the password entered during installation), so that we can obtain superuser permissions.
-
Enter the following command in "Terminal"
sudo apt-get update
- Then enter the password

- mission completed

- Install JDK using apt-get
- Enter the following command in "Terminal"
sudo apt-get install default-jdk

- Enter "Y" first and then press Enter.
- mission completed

- Check the Java version again using the following command
java -version
- When the system responds with the installed Java version, it means that the JDK has been successfully installed.

- Query the Java installation path
update-alternatives --display java
Set up SSH passwordless login
- Hadoop is composed of many servers. When we start the Hadoop system, the NameNode must connect to the DataNode and manage these nodes (DataNode). At this point the system will ask the user to enter a password. In order for the system to run smoothly without manually entering a password, SSH needs to be set to passwordless login.
- Note that passwordless login does not require a password, but uses the SSH Key (key) exchanged in advance for authentication.
- Hadoop uses SSH (Secure Shell) connection, which is currently a relatively reliable security protocol specially provided for remote login to other servers. All transmitted data is encrypted over SSH. Using the SSH protocol can prevent information leakage when remotely managing the system.
Install SSH
- Enter the following command in "Terminal"
sudo apt-get install ssh


Install rsync
- Enter the following command in "Terminal"
sudo apt-get install rsync

- Enter the following command in "Terminal"
ssh-keygen -t dsa -P '' -f ~/.ssh/id_dsa

View the generated key
- The SSH Key will be generated in the user's root directory, which is /home/hduser
- Enter the following command in "Terminal"
ll ~/.ssh

Put the generated Key into the license file
- In order to be able to log in to the machine without a password, we must add the generated public key to the license file.
- Enter the following command in "Terminal"
cat ~/.ssh/id_dsa.pub >> ~/.ssh/authorized_keys
- The format of the output redirection additional function command of Linux is as follows
- Command>>File
- The redirection symbol ">>" will redirect the standard output (stdout) generated after the command is executed and append it to the file.
- If the file does not exist, a new file will be created first, and then the contents of standard output (stdout) will be stored in this file.
- If the file already exists, the standard output (stdout) data will be appended to the file content without overwriting the original file content.
Download and install Hadoop
- Log in to the Hadoop official website download page
https://archive.apache.org/dist/hadoop/common/

- DownloadHadoop


- Enter wget and the space bar in "Terminal", then paste the link you copied previously
wget https://archive.apache.org/dist/hadoop/common/hadoop-2.6.0/hadoop-2.6.0.tar.gz
- Unzip hadoop 2.6
- Enter the following command in "Terminal"
sudo tar -zxvf hadoop-2.6.0.tar.gz
- Move the hadoop2.6.0 directory to /usr/local/hadoop
sudo mv hadoop-2.6.0 /usr/local/hadoop
Download and install Hadoop (method 2)
- Solve the problem of long download time
- Log in to the Tsinghua University open source software mirror site:
https://mirrors.tuna.tsinghua.edu.cn/


- Enter wget and the space bar in "Terminal", then paste the link you copied previously
wget https://mirrors.tuna.tsinghua.edu.cn/apache/hadoop/common/stable2/hadoop-2.10.1.tar.gz --no-check-certificate

- Download completed

- unzip Hadoop 2.10.1
- Enter the following command in "Terminal"
sudo tar -zxvf hadoop-2.10.1.tar.gz

- Move the hadoop2.6.0 directory to /usr/local/hadoop
sudo mv hadoop-2.10.1 /usr/local/hadoop

Check the Hadoop installation directory /usr/local/hadoop
- Enter the following command in "Terminal"
ll /usr/local/hadoop


Set Hadoop environment variables
- Many environment variables must be set to run hadoop, but it will be troublesome if they must be reset every time you log in. Therefore, you can set the environment variable settings in the ~/.bashrc file to automatically run every time you log in.
- edit ~/.bashrc
- Enter the following command in "Terminal"
sudo gedit ~/.bashrc
- Add the following at the end of the opened file:
export JAVA_HOME=/usr/lib/jvm/java-7-openjdk-amd64
export HADOOP_HOME=/usr/local/hadoop
export PATH=$PATH:$HADOOP_HOME/bin
export PATH=$PATH:$HADOOP_HOME/sbin
export HADOOP_MAPRED_HOME=$HADOOP_HOME
export HADOOP_COMMON_HOME=$HADOOP_HOME
export HADOOP_HDFS_HOME=$HADOOP_HOME
export YARN_HOME=$HADOOP_HOME
export HADOOP_COMMON_LIB_NATIVE_DIR=$HADOOP_HOME/lib/native
export HADOOP_OPTS="-Djava.library.path=$HADOOP_HOME/lib"
export JAVA_LIBRARY_PATH=$HADOOP_HOME/lib/native:$JAVA_LIBRARY_PATH
- After editing is completed, save it first and then exit!

explanation for the above
- Set JDK installation path
export JAVA_HOME=/usr/lib/jvm/java-7-openjdk-amd64
- Set HADOOP_HOME to the Hadoop installation path/usr/local/Hadoop
export HADOOP_HOME=/usr/local/Hadoop
- Set PATH
export PATH= P A T H : PATH: PATH:HADOOP_HOME/bin export
PATH= P A T H : PATH: PATH:HADOOP_HOME/sbin
- Set other HADOOP environment variables
export HADOOP_MAPRED_HOME= H A D O O P H O M E e x p o r t H A D O O P C O M M O N H O M E = HADOOP_HOME export HADOOP_COMMON_HOME= HADOOPHOMEexportHADOOPCOMMONHOME=HADOOP_HOME export HADOOP_HDFS_HOME= H A D O O P H O M E e x p o r t Y A R N H O M E = HADOOP_HOME export YARN_HOME= HADOOPHOME e x p o r t Y A R NHOME=HADOOP_HOME
- Link library related settings
export HADOOP_COMMON_LIB_NATIVE_DIR= H A D O O P H O M E / l i b / n a t i v e e x p o r t H A D O O P O P T S = " − D j a v a . l i b r a r y . p a t h = HADOOP_HOME/lib/native export HADOOP_OPTS="-Djava.library.path= HADOOPHOME/lib/nativeexportHADOOPOPTS="−Djava.library.path=HADOOP_HOME/lib" export
JAVA_LIBRARY_PATH= H A D O O P H O M E / l i b / n a t i v e : HADOOP_HOME/lib/native: HADOOPHOME/lib/native:JAVA_LIBRARY_PATH
Let ~/.bashrc settings take effect
-
After modifying /.bashrc, first log out from the system and then log in to the system, so that the settings will take effect, or use the source command to make the /.bashrc settings take effect
-
Enter the following command in "Terminal"
source ~/.bashrc

Edit Hadoop-env.sh
- hadoop-env.sh is the configuration file of hadoop, where the installation path of Java must be set.
- Enter the following command in "Terminal"
sudo gedit /usr/local/hadoop/etc/hadoop/hadoop-env.sh
- The setting of JAVA_HOME in the original file is:
export JAVA_HOME=${JAVA_HOME} is changed to:
export JAVA_HOME=/usr/lib/jvm/java-7-openjdk-amd64
- Save and close the file after modification

Set core-site.xml
- Enter the following command in "Terminal"
sudo gedit /usr/local/hadoop/etc/hadoop/core-site.xml
- Set the default name for HDFS
<property>
   <name>fs.default.name</name>
   <value>hdfs://localhost:9000</value>
</property>
- Save and close the file after modification
- In core-site.xml, we must set the default name of HDFS. This name can be used when using commands or programs to access HDFS.

edit yarn-site.xml
- The yarn-site.xml file contains MapReduce2 (YARN) related configuration settings.
- Enter the following command in "Terminal"
sudo gedit /usr/local/hadoop/etc/hadoop/yarn-site.xml
- Edit the configuration of yarn-site
<property>
   <name>yarn.nodemanager.aux-services</name>
   <value>mapreduce_shuffle</value>
</property>
<property>
   <name>yarn.nodemanager.aux-services.mapreduce.shuffle.class</name>
   <value>org.apache.hadoop.mapred.ShuffleHandler</value>
</property>
- Save and close the file after modification

set mapred-site.xml
- mapred-site.xml is used to set up and monitor the JobTracker task allocation and TaskTracker task running status of Map and Reduce programs. Hadoop provides set template files, which can be copied and modified by yourself.
- Enter the following command in the "Terminal" to copy the template file: from mapred-site.xml.template to mapred-site.xml
sudo cp /usr/local/hadoop/etc/hadoop/mapred-site.xml.template /usr/local/hadoop/etc/hadoop/mapred-site.xml

Edit mapred-site.xml
- Enter the following command in "Terminal"
sudo gedit /usr/local/hadoop/etc/hadoop/mapred-site.xml
- Edit the configuration of mapred-site.xml
<property>
 <name>mapreduce.framework.name</name>
   <value>yarn</value>
</property>
- Save and close the file after modification

Edit hdfs-site.xml
- hdfs-site.xml is used to set up the HDFS distributed file system
- Enter the following command in "Terminal"
sudo gedit /usr/local/hadoop/etc/hadoop/hdfs-site.xml
- Enter the following
<property>
   <name>dfs.replication</name>
   <value>3</value>
</property>
<property>
   <name>dfs.namenode.name.dir</name>
   <value> file:/usr/local/hadoop/hadoop_data/hdfs/namenode</value>
</property>
<property>
   <name>dfs.datanode.data.dir</name>
   <value> file:/usr/local/hadoop/hadoop_data/hdfs/datanode</value>
</property>
- Save and close the file after modification

- Explanation of the above
- Set the number of blocks copy backups
<property>
   <name>dfs.replication</name>
   <value>3</value>
</property>
- Set NameNode data storage directory
<property>
   <name>dfs.namenode.name.dir</name>
   <value> file:/usr/local/hadoop/hadoop_data/hdfs/namenode</value>
</property>
- Set the DataNode data storage directory
<property>
   <name>dfs.datanode.data.dir</name>
   <value> file:/usr/local/hadoop/hadoop_data/hdfs/datanode</value>
</property>
Create and format HDFS directories
- Create NameNode data storage directory
sudo mkdir -p /usr/local/hadoop/hadoop_data/hdfs/namenode
- Create DataNode data storage directory
sudo mkdir -p /usr/local/hadoop/hadoop_data/hdfs/datanode
- Change the owner of Hadoop directory to hduser
sudo chown hduser:hduser -R /usr/local/hadoop
- Linux is a multi-person, multi-tasking operating system, and all directories or files have owners. Use chown to change the owner of a directory or file to hduser.

Format HDFS
- Enter the following command in "Terminal"
hadoop namenode -format
- Note: If your HDFS already has data, you can execute the above HDFS format command. This operation will delete all data.

Start Hadoop
- Method 1: Start HDFS and YARN respectively, use start-dfs.sh to start HDFS and start-yarn.sh to start YARN
- Method 2: Start HDFS and YARN at the same time, use start-all.sh
Start HDFS
start-dfs.sh

Start YARN
start-yarn.sh

Check whether the NameNode and DataNode processes are started
- Enter the following command in "Terminal"
jps

HDFS功能:NameNode、Secondary NameNode、DataNode
MapReduce2(YARN):ResourceManager、NodeManager
Hadoop Resource Manager Web Interface
- Enter the following URL in the browser inside the virtual machine
http://localhost:8088/
Because Single Node Cluster is installed, there is currently only one node.


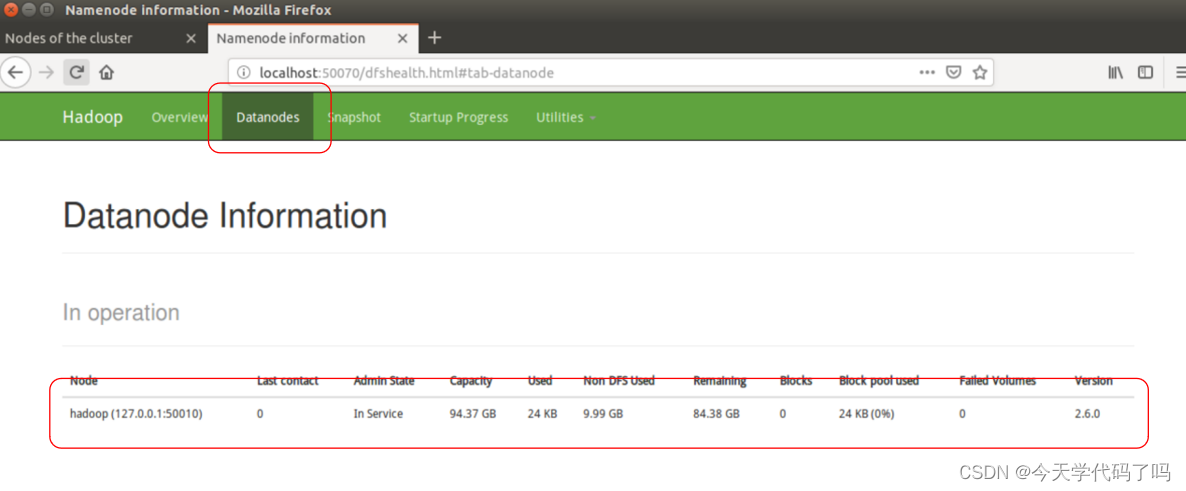
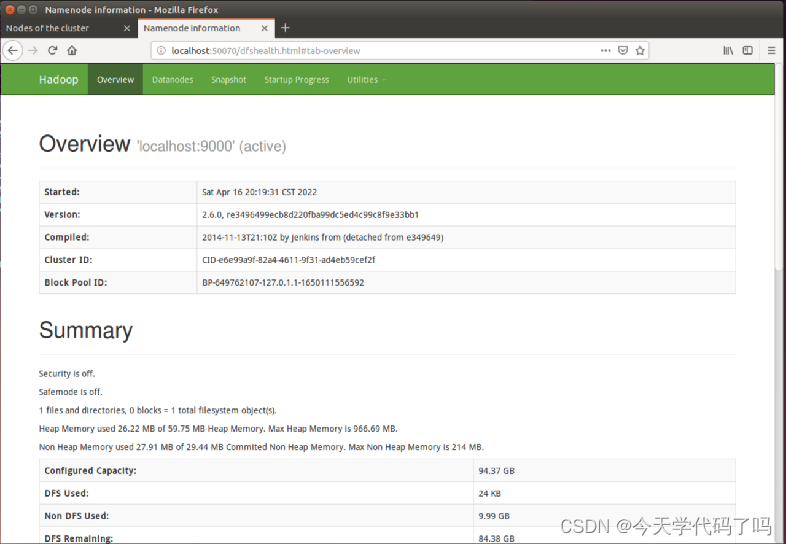
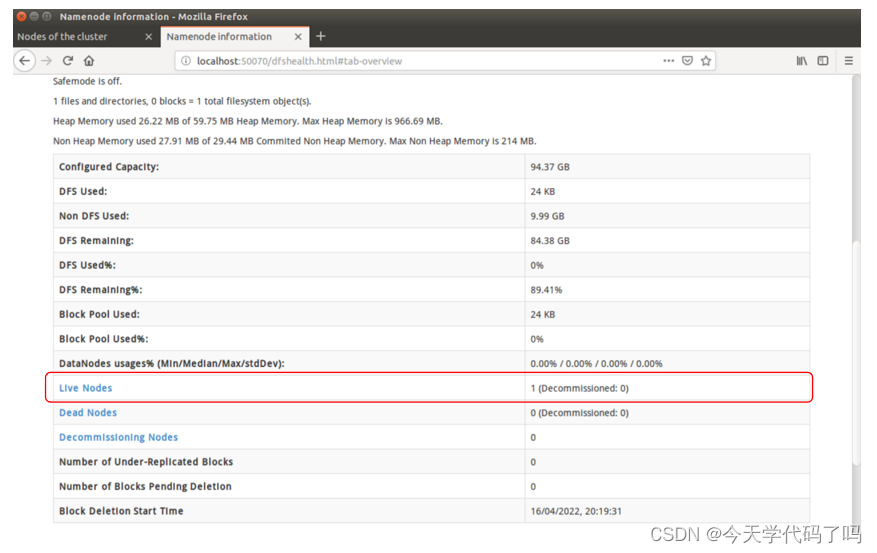
NameNode HDFS web interface
Enter the following URL http://localhost:50070/ in the browser within the virtual machine
View Live Nodes
View DataNodes