


CentOS update yum source
First look at the version of CentOS:
$ cat /etc/redhat-release
Download the yum of the 163 image according to the version. Back up before downloading:
mv /etc/yum.repos.d/CentOS-Base.repo /etc/yum.repos.d/CentOS-Base.repo.backup
Then download the yum source:
CentOS6.5:
wget http://mirrors.163.com/.help/CentOS6-Base-163.repo
CentOS7:
wget -O /etc/yum.repos.d/CentOS-Base.repo http://mirrors.aliyun.com/repo/Centos-7.repo
If the wget command does not take effect, it means that the wget tool has not been installed. Enter and press yum -y install wgetEnter to install. Or use
curl -O http://mirrors.aliyun.com/repo/Centos-7.repo
Certificate update:
Certificate check
You can first check the CA certificate through the rpm command, and you can find that it is the 2013 version.
$ rpm -qa |grep ca-certificates
ca-certificates-2013.1.94-65.0.el6.noarch
renew:
$ yum --disablerepo=epel -y update ca-certificates
yum update -y # 更新系统命令
Modify the yum configuration to install both 32-bit and 64-bit rpm by default
[root@OracleCentOS ~]# echo 'multilib_policy=all' >> /etc/yum.conf
Install the required rpm packages for Oracle 12c
[root@OracleCentOS ~]# yum -y install binutils compat-libcap1 compat-libstdc++-33 gcc gcc-c++ glibc glibc-devel ksh libgcc libstdc++ libstdc++-devel libaio libaio-devel libXext libXtst libX11 libXau libxcb libXi make sysstat unixODBC unixODBC-devel xterm
add group
[root@OracleCentOS ~]# groupadd oinstall
[root@OracleCentOS ~]# groupadd dba
[root@OracleCentOS ~]# groupadd oper
Add user oracle, the primary group is oinstall, and the secondary groups are dba and oper
[root@OracleCentOS ~]# useradd -g oinstall -G dba,oper oracle
View the group of user oracle
[root@localhost ~]# id oracle
uid=501(oracle) gid=501(oinstall) groups=501(oinstall),502(dba),503(oper)
set password
[root@OracleCentOS ~]# passwd oracle
-------------------------------Optional--------------
Add user osasm
[ root@OracleCentOS ~]# groupadd asmadmin
[root@OracleCentOS ~]# useradd osasm
[root@OracleCentOS ~]# usermod -g oinstall -G asmadmin,dba,operosasm
[root@OracleCentOS ~]# passwd osasm I set up find1way
Modify the configuration and add the following content to limits.conf
[root@OracleCentOS ~]# vi /etc/security/limits.conf
oracle soft nproc 2047
oracle hard nproc 16384
oracle soft nofile 1024
oracle hard nofile 65536
oracle stack nproc 16384
Edit the /etc/pam.d/login file
[root@OracleCentOS ~]# vi /etc/pam.d/login
# 添加以下内容
session required /lib/security/pam_limits.so
session required pam_limits.so
Edit the /etc/sysctl.conf file
[root@OracleCentOS ~]# vi /etc/sysctl.conf

#同时可以拥有的的异步IO请求数目
fs.aio-max-nr = 1048576
#表示一个进程可以打开的文件句柄的最大数量.
fs.file-max = 6815744
#定义了共享内存段的最大尺寸,可取的最大值为物理内存值-1byte,建议值为多于物理内存的一半,一般取值大于SGA_MAX_SIZE即可
kernel.shmmax = 8589934592
#系统任意时刻可以分配的所有共享内存段的总和的最大值
kernel.shmall =2097152
#设置系统范围内共享内存段的最大数量,也是系统中可以启动的Oracle实例的最大数量
kernel.shmmni = 4096
#表示设置的信号量
kernel.sem = 250 32000 100 128
#专用服务器模式下与用户进程通信时分配给用户的端口区间
net.ipv4.ip_local_port_range = 9000 65000
#默认接收缓冲区大小
net.core.rmem_default = 262144
#接收缓冲区最大值
net.core.rmem_max = 4194304
#默认的发送缓冲区大小
net.core.wmem_default = 262144
#发送缓冲区最大值
net.core.wmem_max = 1048586
Use the following command to make the kernel changes take effect
[root@OracleCentOS ~]# sysctl -p
if appears
- error: “net.bridge.bridge-nf-call-ip6tables” is an unknown key
- error: “net.bridge.bridge-nf-call-iptables” is an unknown key
- error: “net.bridge.bridge-nf-call-arptables” is an unknown key
先执行
# modprobe bridge -- 加载bridge模块
Modify large memory limit
View the ID of the oracle user group
[root@oraclecentOS ~]# id oracle
uid=501(oracle) gid=502(oinstall) groups=502(oinstall),503(dba),504(oper)
Add the dba group id (503 here) to the system kernel
[root@oraclecentOS ~]# echo 503 > /proc/sys/vm/hugetlb_shm_group

[root@OracleCentOS ~]#vi /etc/sysctl.conf
添加vm.hugetlb_shm_group=503
[root@OracleCentOS ~]# sysctl -p
Configure network
[root@oraclecentOS ~]# hostname
oraclecentos
[root@oraclecentOS ~]# vi /etc/hosts
添加 127.0.0.1 oraclecentos
Create a relevant directory and use the partition with the largest space for installation
[root@oraclecentOS ~]# mkdir -p /home/u01/app/
[root@oraclecentOS ~]# chown -R oracle:oinstall /home/u01/app/
[root@oraclecentOS ~]# chmod -R 775 /home/u01/app/
Configure environment variables
[root@oraclecentOS ~]# su - oracle
[oracle@oraclecentOS ~]$ echo $SHELL
/bin/bash
[oracle@oraclecentOS ~]$ cd ~
[oracle@oraclecentOS ~]$ vi .bash_profile
添加
umask=022
export TMP=/tmp
export TMPDIR=/tmp

[oracle@oraclecentOS ~]$ source .bash_profile
Install X-manger locally to read the Oracle installation interface of the remote host
After the installation is complete, create a new connection and log in as the oracle user to
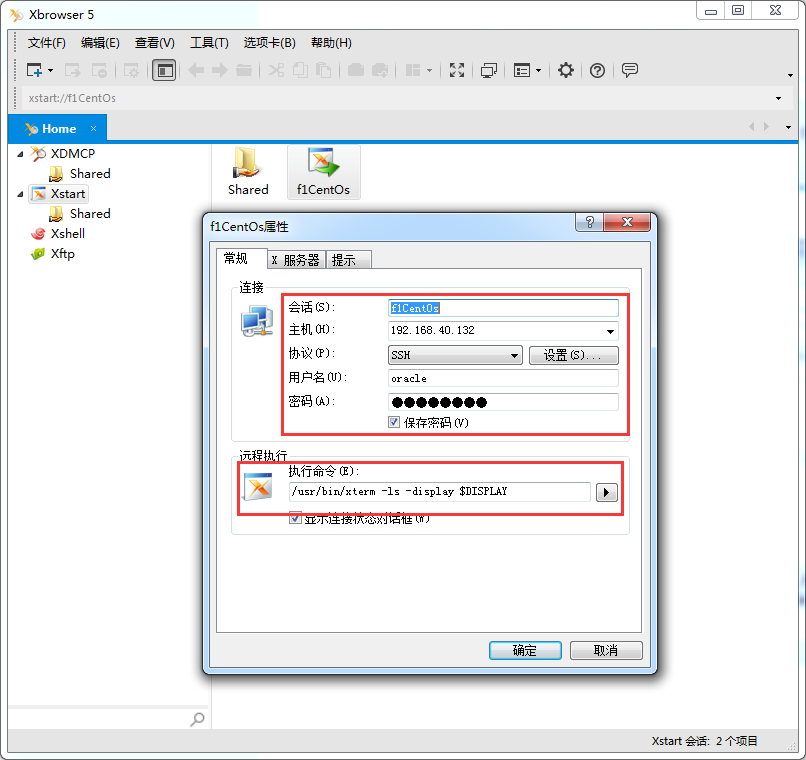
start the connection (if there is no xterm on the server, install it with yum -y install xterm).
If
X11 transfer application has been rejected!
To resolve this issue activate the X11 transfer feature of the remote SSH server
X11 forwarding relies on the "xorg-x11-xauth" software package, so the "xorg-x11-xauth" software package must be installed first
yum install xorg-x11-xauth
if appears
Could not execute auto check for display colors using command /usr/bin/xdpyinfo if the DISPLAY variable is set. Failed
yum install xdpyinfo
Check whether X11Forwarding in the /etc/ssh/sshd_config file on the server is yes
Modify to yes
Unzip the installation package file previously uploaded to the oracle user's home directory, enter the database directory, and then execute the installation script
/home/oracle/oraclelinuxx64_12201_database.zip
unzip oraclelinuxx64_12201_database.zip
cd database
./runInstaller


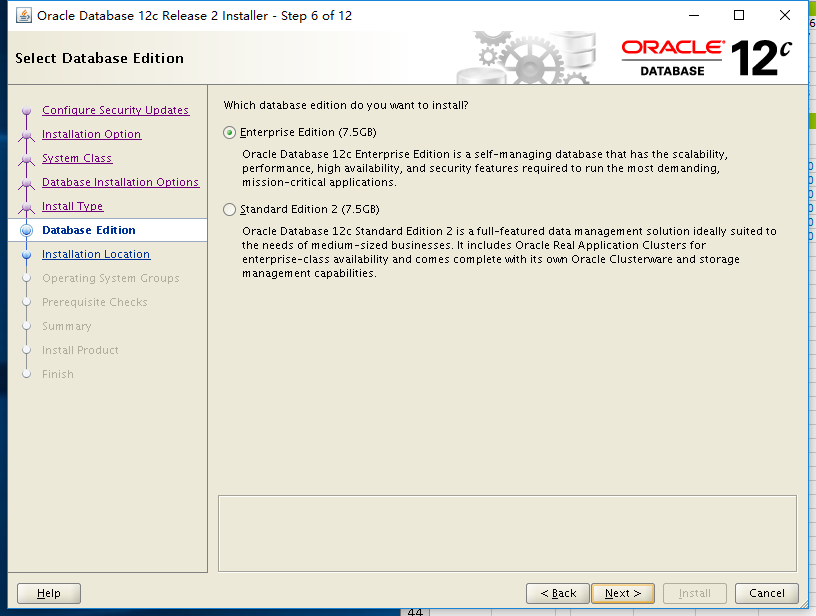


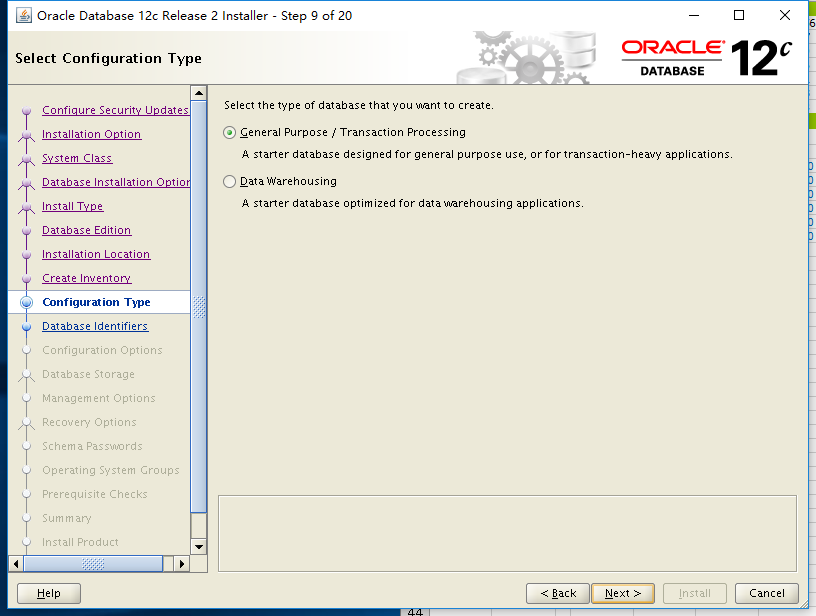
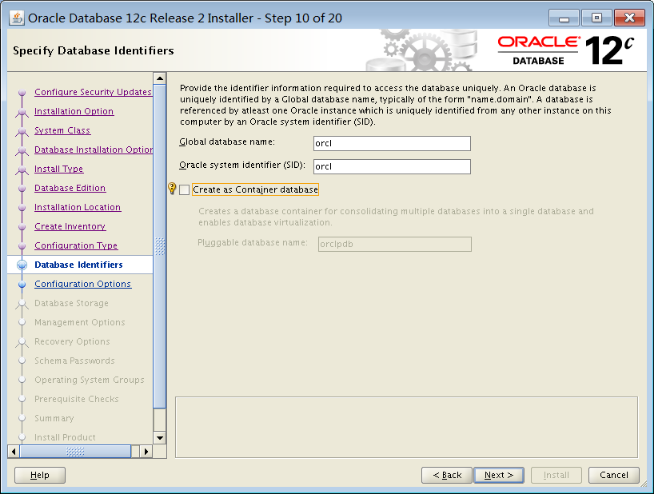
No container plugin is created, no pdb is used
The memory uses 60%-80% of the operating system memory. If an error INS-35172 is reported, the shared memory is not enough. Restart the machine after modification. See https://www.linuxidc.com/Linux/2015-07/120183.htm
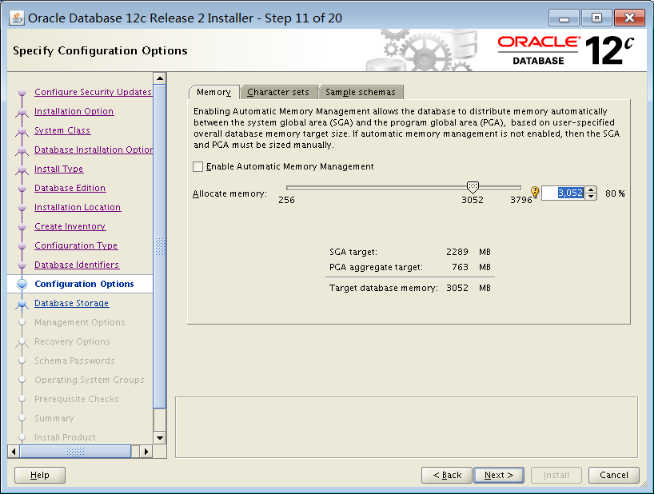
MEMORY_TARGET=Physical memory x 80%
MEMORY_MAX_SIZE=Physical memory x 80%
For OLTP systems:
SGA_TARGET=(physical memory x 80%) x 80%
SGA_MAX_SIZE=(physical memory x 80%) x 80%
PGA_AGGREGATE_TARGET=(physical memory x 80%) x 20%
For DSS systems:
SGA_TARGET=(physical memory x 80%) x 50%
SGA_MAX_SIZE=(physical memory x 80%) x 50%
PGA_AGGREGATE_TARGET=(physical memory x 80%) x 50%
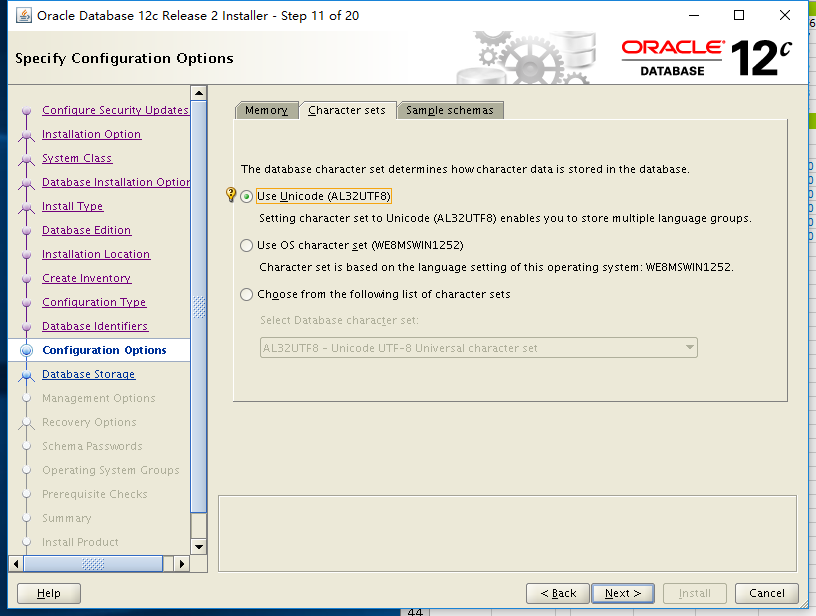

Automatic memory management is not used here


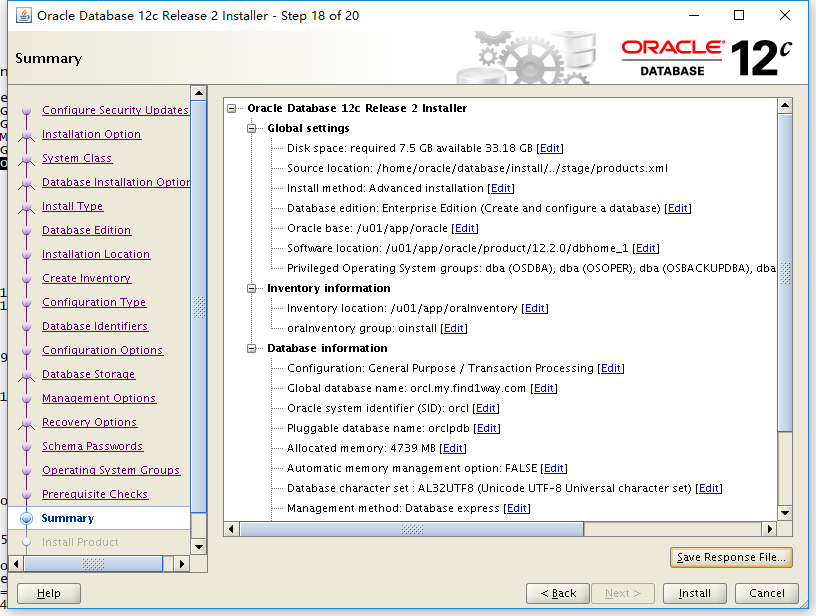
The password here is FIND1way12345
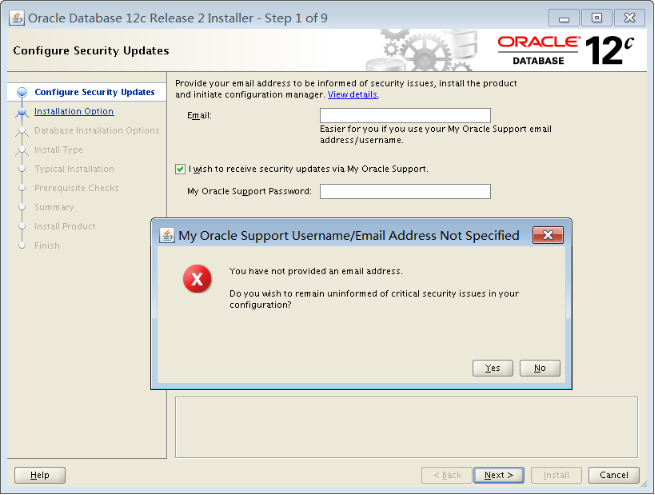
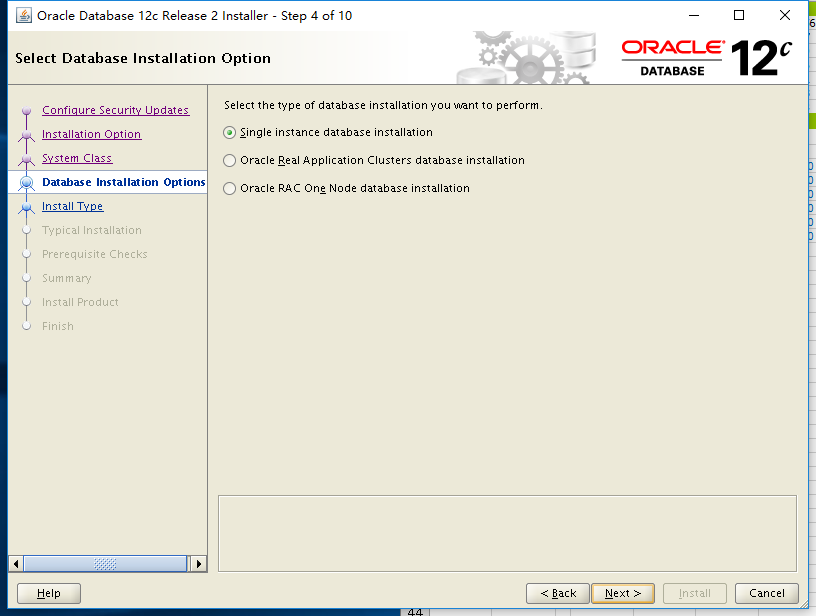
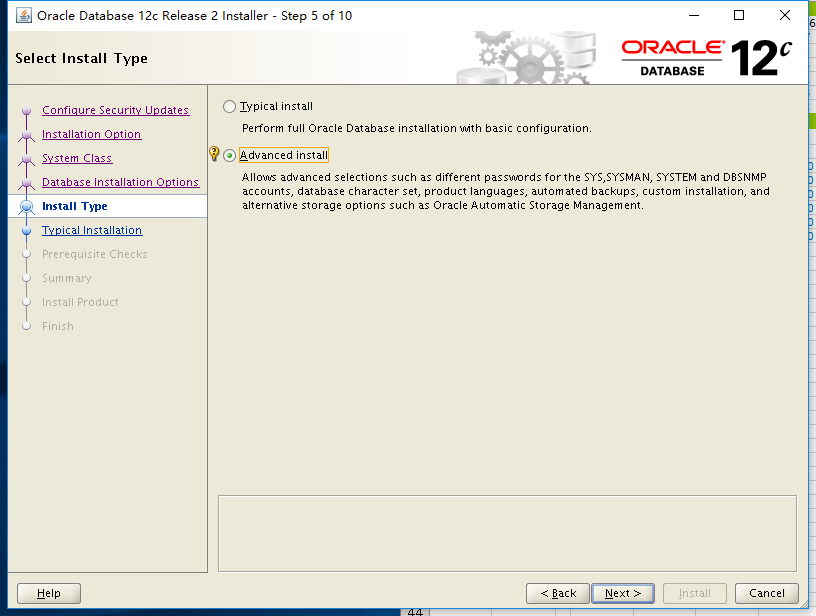
The next step here will be to check the environment required for installation. If there are no installed packages, install the following, and then check again. Make sure there are no warnings or errors before installing.
You need to turn off the server's iptables before installation
service iptables stop
After clicking install, one of the steps needs to be executed using root. Follow the prompts to enter the terminal, log in using root, and execute the two scripts given in the prompts. The options of the second script are executed by default. Press Enter all the way. No selection is required. There is a step to ask if you need to install TFA. The default is not to install it, just press Enter.
# chkconfig ntpd on 执行这个
If prompted, enter the terminal
su - oracle
Manually start the following monitoring
lsnrctl start
then retry
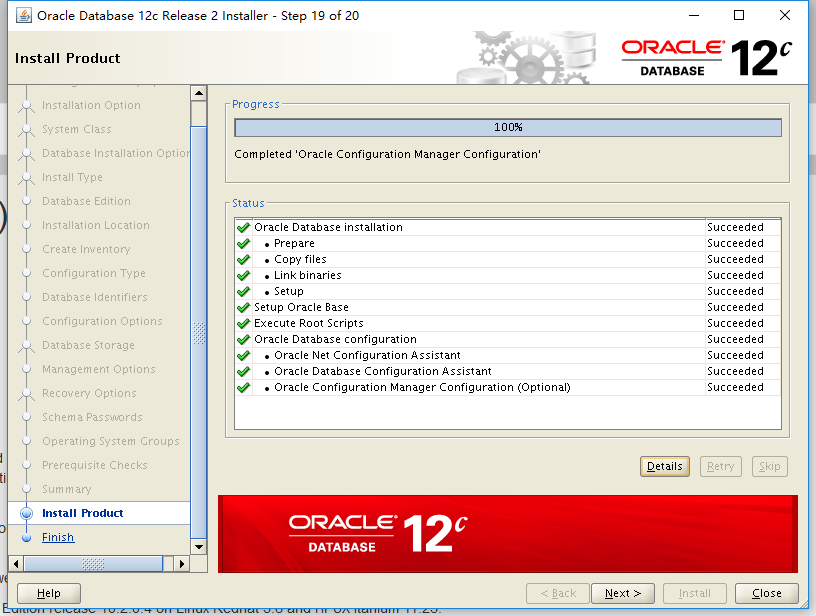
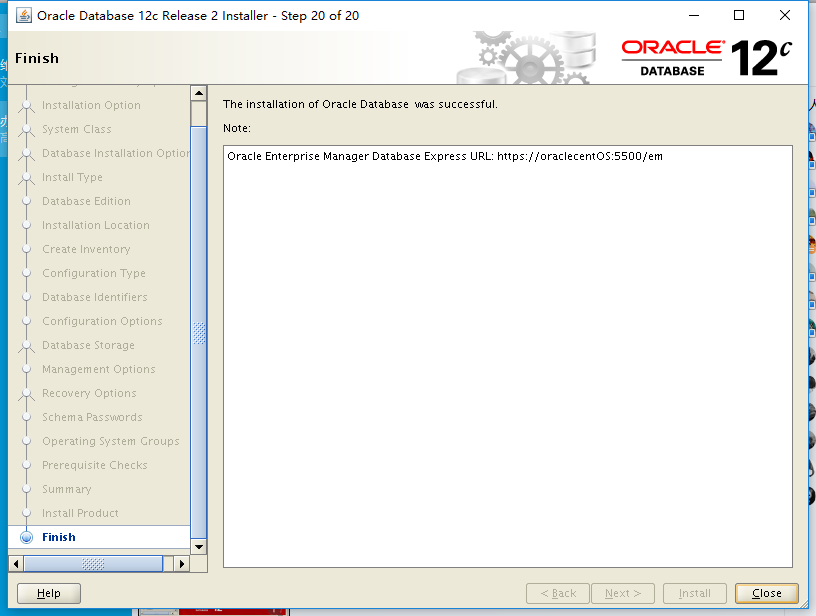

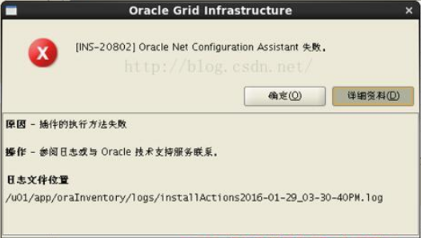
After the installation is complete, if there is an error, you can view the log
cd /home/u01/app/oraInventory/logs
Modify .bash_profile after installation is complete
[oracle@oraclecentOS ~]$ vi .bash_profile
添加以下内容
########## for Oracle ##########
ORACLE_BASE=/home/u01/app/oracle
export ORACLE_BASE
ORACLE_HOME=$ORACLE_BASE/product/12.2.0/dbhome_1
export ORACLE_HOME
ORACLE_SID=orcl
export ORACLE_SID
PATH=$PATH:.:$ORACLE_HOME/bin
export PATH
Listening file: /home/u01/app/oracle/product/12.2.0/dbhome_1/network/admin/listener.ora
Listening log: /home/u01/app/oracle/diag/tnslsnr/localhost/listener/alert/log .xml
Test start and stop
su - oracle
cd $ ORACLE_HOME/bin
start up
dbstart
lsnrctl start
stop
dbshut
lsnrctl stop
View listening status
lsnrctl stat
dbstart dbstop no prompt
Modify /etc/oratab
orcl:/home/oracle/app/oracle/product/12.2.0/dbhome_1:N

N改成Y
Startup error:
[oracle@oracle11g ~]$ dbstart
ORACLE_HOME_LISTNER is not SET, unable to auto-start Oracle Net Listener
Usage: /u01/app/oracle/oracle/product/10.2.0/db_1/bin/dbstart ORACLE_HOME
The cause of the error is that
there is a problem with the setting of ORACLE_HOME_LISTNER in the dbstart and dbshut script files.
Solution
: Open the two files respectively and find: ORACLE_HOME_LISTNER= 1, change it to ORACLEHOMELISTNER = 1, change it to ORACLE_HOME_LISTNER=1,Modify to OR A C L EHOMELI STNER= ORACLE_HOME, the command is as follows:
[oracle@oracle11g ~]$ vi $ORACLE_HOME/bin/dbstart
[oracle@oracle11g ~]$ vi $ORACLE_HOME/bin/dbshut
Save and exit after modification, problem solved
Run log file:
/home/u01/app/oracle/product/12.2.0/dbhome_1/rdbms/log
Startup, shutdown, database operation log
/home/u01/app/oracle/admin/orcl/adump
/home/u01/app/oracle/admin/orcl/dpdump
Monitoring logs
$ORACLE_HOME/ listener.log
/home/u01/app/oracle/product/12.2.0/dbhome_1/network/log/
Monitor the log to stop recording and start recording.
lsnrctl set log_status off
lsnrctl set log_status on