Install and configure
1. Upload and decompress
First upload the installation compressed package (taking apache-tomcat-7.0.70-windows-x64.zip as an example) to CentOS /work/tomcat
and then decompress the compressed package:
[root@localhost tomcat]$ unzip apache-tomcat-7.0.70-windows-x64.zip
[root@localhost tomcat]$ mv apache-tomcat-7.0.70 tomcat7
At this time, there should be a .zip compressed package and a tomcat7 folder under the tomcat folder.
The decompressed tomcat is placed under the tomcat7 folder.
2. Configuration
Next configure the environment variables:
1. Set the $TOMCAT_HOME environment variable
Note:
Generally, environment variables are/etc/profileconfigured inside. The following~/.bash_profilecan be replaced by/etc/profile
[root@localhost ~]$ vi ~/.bash_profile
#set tomcat environment
TOMCAT_HOME=/work/tomcat/tomcat7
export TOMCAT_HOME

#set tomcat environment
TOMCAT_HOME1=/work/tomcat/tomcat7_1
export TOMCAT_HOME1

TOMCAT_HOME2=/work/tomcat/tomcat7_2
export TOMCAT_HOME2

# 立即生效
[root@localhost ~]$ source ~/.bash_profile

# 测试
[root@localhost ~]$ echo $TOMCAT_HOME
2. Install the service daemon
Compile and install the tomcat daemon service waiter program
[root@localhost ~]$ cd $TOMCAT_HOME/bin/
[root@localhost ~]$ tar xvzf commons-daemon-native.tar.gz
[root@localhost ~]$ cd commons-daemon-1.0.15-native-src/unix
# 编译(注意:需要先安装好make,gcc等编译工具)
[root@localhost ~]$ ./configure
The following error message may appear during execution:
*** Java compilation tools ***
checking for JDK location… configure: error: Java Home not defined. Rerun with --with-java=… parameter
This is caused by not specifying the jdk directory, then specify the with-java parameter (pointing to the jdk directory) as prompted. as follows:
[root@localhost ~]$ ./configure --with-java=/usr/java/jdk1.7.0_71
After the operation is completed, the following message will be prompted to indicate that the operation was successful.
*** All done ***
Now you can issue “make”
Execute make:
[root@localhost ~]$ make
After executing make, a jsvcfile will be generated and copied to the bin directory of tomcat.
[root@localhost ~]$ cp jsvc $TOMCAT_HOME/bin
There is a file in tomcat/binthe directory daemon.shthat starts and shuts down the tomcat service daemon.
Note:
Some previous tomcat versions, such as tomcat 6.0.x, may not have this file. In fact, this file is placed commons-daemon-x.x.x-native-src/unix/samples/Tomcat7.shhere (there is another one in this directory Tomcat5.sh), but the new version of tomcat moves it to the bin directory and Named daemon.shit . So, if you are using tomcat 6, then Tomcat7.shcopy this file to binthe directory and name daemon.shit
Modify daemon.sh
[root@localhost ~]$ cd $TOMCAT_HOME/bin
[root@localhost ~]$ vi daemon.sh
Add service startup information at the beginning of the file, such as
# !/bin/sh
# chkconfig: 2345 90 10
# description: tomcat7
First add the following statement:
[root@localhost ~]$ vi $TOMCAT_HOME/bin/daemon.sh
# JAVA_OPTS=" -server -Xms1024m -Xmx1024m -XX:PermSize=512m -XX:MaxPermSize=512m "
Find a configuration section similar to the following:
test ".$TOMCAT_USER" = . && TOMCAT_USER=tomcat
# Set JAVA_HOME to working JDK or JRE
# JAVA_HOME=/opt/jdk-1.6.0.22
Modify TOMCAT_USER=tomcatthe user name of the account you want to specify to run as. For example, specify the user name here greenday
and remove JAVA_HOME=...the comment ( ) in front of 即“#”号it and set it to jdk的安装目录路径. Finally, the modified configuration section becomes as follows:
test ".$TOMCAT_USER" = . && TOMCAT_USER=greenday
JAVA_HOME=/us_r/java/jdk1.7.071
/usr/java/jdk1.7.0_71
Then save and exit
Modify owner and add execution permissions
[root@localhost ~]$ chown -R greenday:greenday /work/tomcat/tomcat7
There may be an error message here: chown: Invalid user: "greenday:greenday"
because there is no user greenday yet, so you need to add a user:
[root@localhost ~]$ useradd greenday
[root@localhost ~]$ chmod a+x /work/tomcat/tomcat7/bin/*.sh
Attachment:
Modify greenday user password:
[root@localhost ~]$ passwd greenday
3. Test
Test (after starting, you can go to the browser to access the local address to see if you can enter the Tomcat homepage)
[root@localhost ~]$ ./daemon.sh  start
[root@localhost ~]$ ./daemon.sh  stop
4. Add services
/etc/init.d/Just create a soft link to the directory:
[root@localhost ~]$ ln -s /work/tomcat/tomcat7/bin/daemon.sh /etc/init.d/tomcat7
This creates a tomcat7service named
Start the tomcat7 service and test it in the browser:
[root@localhost ~]$ /etc/init.d/tomcat7  start
[root@localhost ~]$ /etc/init.d/tomcat7  stop
test:
[root@localhost ~]$ service tomcat7 start
[root@localhost ~]$ service tomcat7 stop
5. Startup settings
# 设置tomcat服务开机启动
[root@localhost ~]$ chkconfig tomcat7 on
# 查看
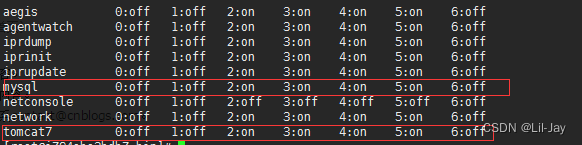
[root@cent01 conf]# chkconfig --list|grep tomcat7
tomcat7 0:off 1:off 2:on 3:on 4:on 5:on 6:off
# 关闭开机启动
[root@localhost ~]$ chkconfig tomcat7 off
6. Port related configuration
- Configure port 80:
First go to the Tomcat installation directory and modify the portserver.xmlin the file to port, and add encoding settings in the corresponding place:808080URIEncoding="UTF-8"
<Connector port="8080" protocol="HTTP/1.1"
                     connectionTimeout="20000"
                     redirectPort="8443" URIEncoding="UTF-8" />
<Connector port="8009" protocol="AJP/1.3" redirectPort="8443" URIEncoding="UTF-8" />

Change 8080 to port 80, and then check the CentOS port occupancy in the Terminal. For example, to check the 80 port occupancy, use the following command: (After the
company server, the Tomcat port sequence is changed to a naming method such as 8081, 8082, and then the nginx port is still 80 constant)
[root@localhost ~]$ lsof -i tcp:80
# 列出所有端口:
[root@localhost ~]$ netstat -ntlp
- Configure encoding:
In the web.xml file under tomcat's conf, the following code segments are commented by default. Remove the comments:

- Open the port:
Open the configuration file:
[root@localhost ~]$ vi /etc/sysconfig/iptables
# 加入如下语句:
-A INPUT -p tcp -m state --state NEW -m tcp --dport 80 -j ACCEPT
-A INPUT -p tcp -m state --state NEW -m tcp --dport 81 -j ACCEPT
-A INPUT -p tcp -m state --state NEW -m tcp --dport 82 -j ACCEPT
Save and exit, then restart the firewall:
Note: These configurations are just like configuring IP with commands. They will lose their effect after restarting. How to save:
[root@localhost ~]$ /etc/rc.d/init.d/iptables save
[root@localhost ~]$ service iptables restart
- In other configurations
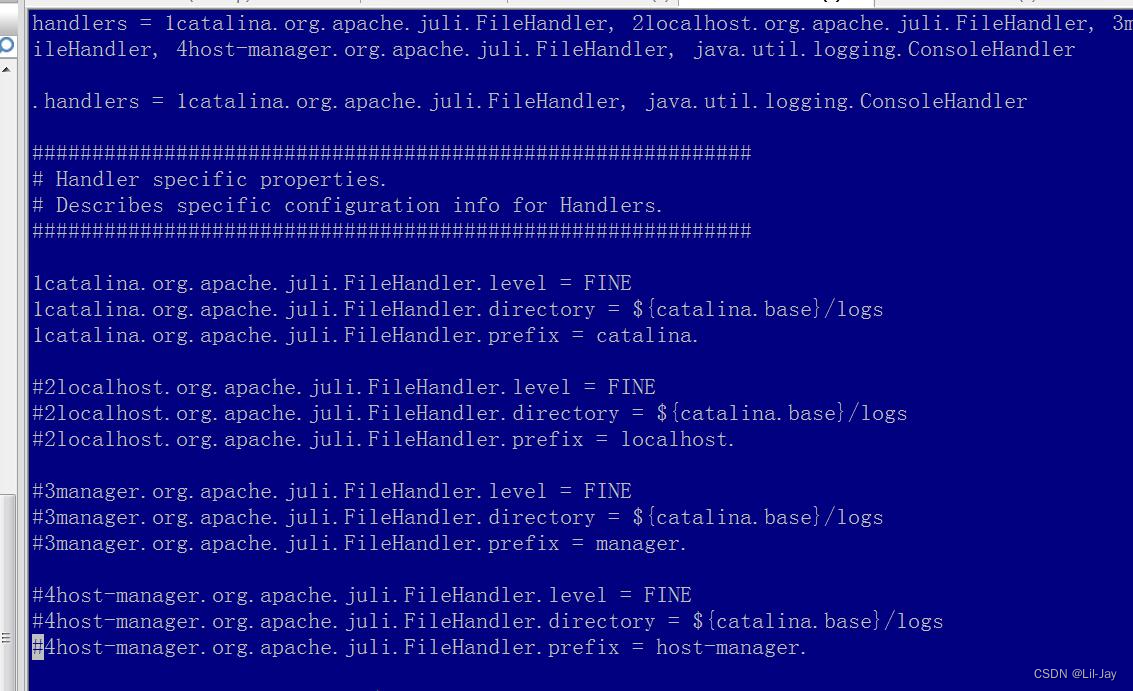
$TOMCAT_HOME/conf/logging.properties, comment out the logs as shown below:
Finally, delete everything in Tomcat's Webapps except ROOT (you can also keep it, this is optional)
Note:
If multiple Tomcats are installed on a Linux, and you want to set up simultaneous startup, you must modify one of the Tomcat ports under server.xml in Tomcat's conf folder as follows: Do not modify the configuration file in a tomcat
. For example, if we do not modify tomcat1, but only modify tomcat2, open its conf folder, you will see a server.xml file. What we need to modify are several places in this file: 1. Modify the connection
port
<Server port="8005" shutdown="SHUTDOWN">– Change 8005 to 9005
2. Change the access port number
<Connector port="8080" protocol="HTTP/1.1" connectionTimeout="20000" redirectPort="8443" />– Change port 8080 to port 8081
3. Change the AJP connection port
<Connector port="8009" protocol="AJP/1.3" redirectPort="8443" />– Change 8009 to 9009
3. Supplementary instructions for setting up startup
1. Switch to tomcat/binthe directory
sudo vi startup.shEdit the file with
and then startup.shadd the following content at the beginning of the file
#chkconfig: 2345 80 90
#description:tomcat auto start
#processname: tomcat

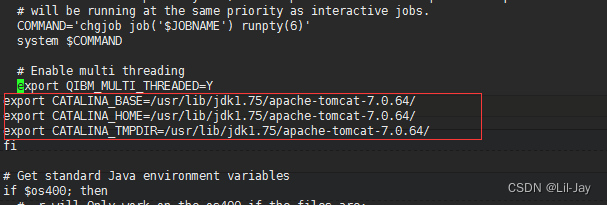
2. Edit the catalina.sh file.
[root@localhost ~]$ sudo vi catalina.sh
# 然后输入export按回车开始搜索export

# 然后fi之上添加环境变量
export CATALINA_BASE=/usr/lib/apache-tomcat-7.0.64
export CATALINA_HOME=/usr/lib/apache-tomcat-7.0.64
export CATALINA_TMPDIR=/usr/lib/apache-tomcat-7.0.64
3. Then add the connection
[root@localhost ~]$ ln -s /usr/apache-tomcat-7.0.64/bin/startup.sh /etc/rc.d/init.d/tomcat7
Use the above command to startup.shlink the file to init.dthe directory namedtomcat7
4. Then switch to /etc/rc.d/init.d/the directory
Use llto check whether tomcat has executable permissions.
If not, use chmod +x tomcat7to add execution permissions
, then use chkconfig --add tomcat7to add startup service,
and finally use chkconfig --listto confirm whether the addition is successful.