1. Description
pywinauto is a Python module for automation, suitable for Windows system software (GUI), you can traverse windows (dialog boxes) and controls in windows through Pywinauto, and you can also control mouse and keyboard input, so it can do more than what was introduced before pysimpleguiMore
2. Install
Generally use pip to install
pip install pywinauto
Official website documentation: https://pywinauto.readthedocs.io/en/latest/
3.Application
The first thing we want to control the software is to start a Windows software, each software (process) is an Application object
When instantiating the Application object, a backend parameter can be passed in, and the optional value is win32(默认)和 uia ,
Frameworks for win32 : MFC, VB6, VCL, simple WinForms controls and most old legacy applications Frameworks
for uia : WinForms, WPF, store apps, Qt5,
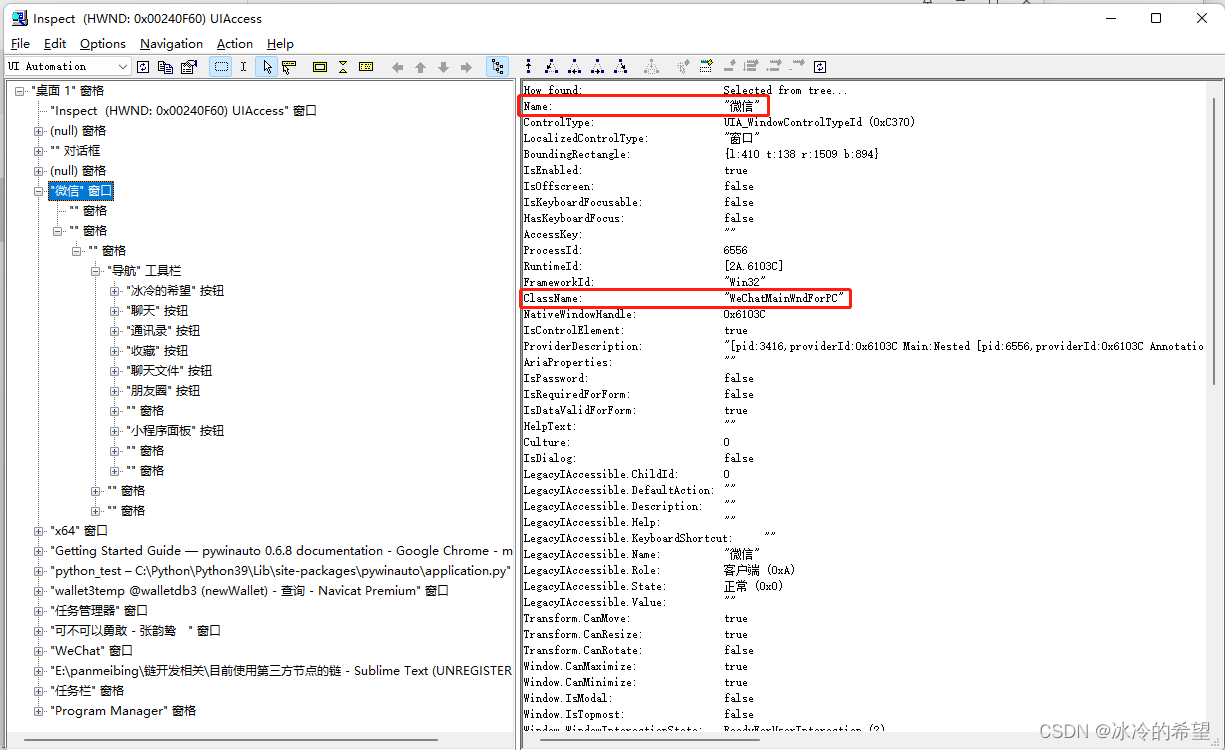
browsers There are two kinds of frameworks, you can use Inspect(对应uia)and Spy++(对应win32)to see, you can choose whichever one is more comprehensive. Inspect and Spy++ need to be installed by yourself
The following are the main methods of the Application object
| method | Common parameters | illustrate |
|---|---|---|
| start() | cmd_line、timeout、retry_interval | Start a software (process) through the cmd command |
| connect() | process、handle、path、timeout | To connect to a process, generally use the process number (task manager can see it) |
| top_window() | / | Get the top-level window of the application |
| window() | title、title_re、class_name、best_match | Get a single window (WindowSpecification) |
| windows() | title、title_re、class_name | Get multiple windows (UIAWrapper) |
| is64bit() | / | Whether it is a 64-bit application |
| cpu_usage | interval | CPU usage |
| wait_cpu_usage_lower() | threshold、timeout | Waiting for the CPU usage to be less than a certain threshold |
| active()() | / | Search returns an active window |
| kill() | soft | end process |
| wait_for_process_exit() | timeout、retry_interval | wait for the process to end |
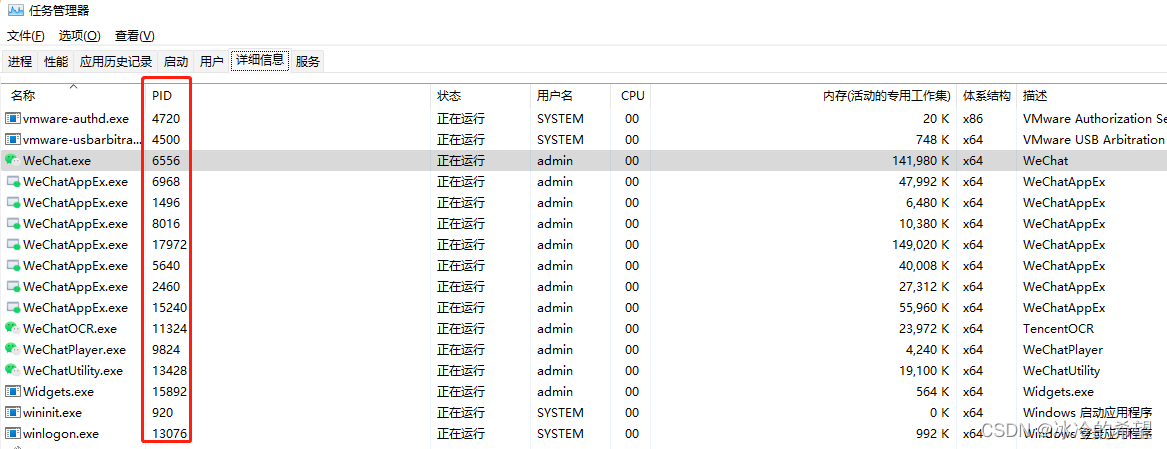
详细信息For example, start a WeChat application and connect through the process number, the process number is the PID seen in the task manager
from pywinauto import Application

app = Application(backend="uia")
# app.start(r"D:\Program Files (x86)\Tencent\WeChat\WeChat.exe")
app.connect(process=6556)
print("is64bit:", app.is64bit())
print("cpu_usage:", app.cpu_usage())
app.wait_cpu_usage_lower()
# app.active()  # 如果指定时间内不激活则报错
print("kill:", app.kill())
print("wait_for_process_exit:", app.wait_for_process_exit())
4.WindowSpecification
We want to get the window. A window is an WindowSpecificationobject, which can be obtained through the window() method of the Application object. The parameters can be title, classname or best_match, etc., which can be seen on inspect.exe, but it is important to note that inspect The Name you see actually corresponds to the title parameter of window()
The commonly used methods of the WindowSpecification object are as follows
| method | Common parameters | illustrate |
|---|---|---|
| maximize() | / | maximize window |
| minimize() | / | minimize window |
| restore() | / | recovery window |
| close() | / | close the window |
| get_show_state() | / | Get window status, 0 normal, 1 maximized, 2 minimized |
| was_maximized() | / | Is it currently maximized |
| draw_outline() | colour、thickness | Draw a frame around the window for positioning |
| print_control_identifiers() | / | Print all child windows and child elements (the corresponding control_type will be printed) |
| child_window() | title、control_type | get child window |
| exists() | timeout | Does the window exist |
| wait() | wait_for, timeout | Wait for the window to become a certain state (exists, visible, enabled, ready, active) |
| wait_not() | wait_for_not, timeout | Wait for the window not to be in a certain state (exists, visible, enabled, ready, active) |
give a chestnut
dlg = app.window(class_name="WeChatMainWndForPC")
# dlg = app.window(title="微信")
print("get_show_state:", dlg.get_show_state())
print("was_maximized:", dlg.was_maximized())
dlg.print_control_identifiers()
dlg.draw_outline()
dlg.maximize()
dlg.restore()
dlg.minimize()
dlg.close()
5. Element controls
There are generally various elements in a window, such as Button (Button), Edit Bar (Edit), Tree View (Tree View), Check Box (CheckBox), Dialog Box (Dialog), Toolbar ( Toolbar), status bar (StatusBar), list box (ListBox), pane (Pane), menu (Menu), menu bar (MenuItem), static content (Static), tool tip (ToolTips), list control (ListView), RadioButton, ComboBox, TabControl, GroupBox, PopupMenu, Header, etc.
Because there are too many control types to learn one by one, but they all have a element_infoproperty, which will return an inherited ElementInfoobject (UIAElementInfo or HwndElementInfo) after access. The more important properties or methods are as follows
| method or property | Common parameters | illustrate |
|---|---|---|
| name | / | The real name of the element (usually title) |
| visible | / | whether the element is visible |
| rich_text | / | the full name of the element |
| rectangle | / | Returns the position, width and height of the element |
| class_name | / | class name |
| enabled | / | Whether the element is available |
| parent | / | return parent element |
| children() | title、title_re、class_name、best_match | Returns the child elements (list) that meet the requirements |
| iter_children() | title、title_re、class_name、best_match | Iterate over eligible child elements (generator) |
In addition to element_infoobtaining the main information of some elements, these elements are also packaged into a Wrapper, so you can also learn the BaseWrappercommon methods and attributes. In fact BaseWrapper, the methods are basically for ElementInfofurther packaging, I only list some methods, as shown in the following table
| method or property | Common parameters | illustrate |
|---|---|---|
| element_info | / | 返回当前元素的ElementInfo对象 |
| from_point() | x、y | 通过坐标查找ElementInfo |
| class_name() | / | 类名,实际是调用element_info.class_name |
| friendly_class_name() | / | 友好的类名,同上 |
| window_text() | / | 元素的文本,实际是调用element_info.rich_text |
| is_visible() | / | 元素是否可见,实际是调用element_info.visible |
| is_enabled() | / | 元素是否可用,实际是调用element_info.enabled |
| rectangle() | / | 元素的位置和宽高,实际是调用element_info.rectangle |
| process_id() | / | 进程号,实际是调用element_info.process_id |
| draw_outline() | colour、thickness | 给当前元素画个框 |
| click_input() | button、coords、double | 鼠标操作,实际是调用mouse模块的_perform_click_input() |
| type_keys() | / | 键盘操作,实际是调用keyboard模块的send_keys() |
dlg = app.window(class_name="WeChatMainWndForPC")
list_data = dlg.child_window(title="会话", control_type="List")
for item in list_data:
    print(type(item))
    element_info = item.element_info
    print(type(element_info))
    print("window_text:", )
    print("rich_text:", element_info.rich_text)
    print("name:", element_info.name)
    print("visible:", element_info.visible)
    print("rectangle:", element_info.rectangle)
    print("class_name:", element_info.class_name)
    print("enabled:", element_info.enabled)
    print("parent:", element_info.parent)
    print("children:", element_info.children())
    print("iter_children:", element_info.iter_children())
    if item.window_text() == "文件传输助手":
        item.click_input()
        item.type_keys("冰冷的希望")
        item.type_keys("{VK_RETURN}")
    print()
说明一下,每个控件元素都有对应的Wrapper,所以上面的方法也不一定都用,需要根据实际情况进行测试区分。另外,比较有用的click_input()和type_keys()这两个方法分别用于操作鼠标和键盘(输入),下面我会单独拿出来说一下
6.鼠标操作
鼠标点击肯定离不开点击的位置,桌面就是一个坐标,左上角为坐标原点,往右是X轴正向,往下是Y轴正向。pywinauto提供了一个mouse模块用于鼠标操作,最核心的方法是_perform_click_input(),不过它是一个私有方法,我们调用的是基于它的封装方法,如下表
| 方法 | 参数 | |
|---|---|---|
| click() | button、coords | 单击鼠标某个键 |
| double_click() | button、coords | 双击鼠标某个键 |
| right_click() | coords | 单击鼠标右键 |
| move() | coords | 移动鼠标 |
| press() | button、coords | 按下鼠标 |
| release() | button、coords | 放开鼠标 |
| scroll() | coords、wheel_dist | 滚动鼠标滚轮 |
| wheel_click() | coords | 单击鼠标滚轮 |
参数说明:
参数button的默认值都是“left”,即鼠标左键,可选值有left、right、middle、move、wheel、x
参数coords 的默认值都是元组(0, 0),元组里的两个整数分别是X、Y轴的值
参数wheel_dist表示滚动的距离,大于0是向上滚动,小于0是向下滑动
举个栗子
from pywinauto import Application, mouse

app = Application(backend="uia")
app.connect(process=4352)
dlg = app.window(class_name="WeChatMainWndForPC")
list_data = dlg.child_window(title="会话", control_type="List")
for item in list_data:
    if item.window_text() == "文件传输助手":
        # item.click_input()
        rectangle = item.element_info.rectangle
        x = int((rectangle.left + rectangle.right) / 2)
        y = int((rectangle.top + rectangle.bottom) / 2)
        mouse.click(button='left', coords=(x, y))
        time.sleep(1)
        mouse.click("right", (x, y))
        time.sleep(1)
        mouse.move((x - 50, y))  # 往左边移动50个像素
        time.sleep(1)
        mouse.click(coords=(x, y))
        break
7.键盘操作
键盘操作主要是按下键盘上的按键,相关方法在keyboard模块,最最主要的是send_keys()方法,第一个参数keys就是我们需要按下的按键,其他参数比如说with_spaces、with_tabs、with_newlines、turn_off_numlock、set_foreground、vk_packet,一看就知道作用,而且都是布尔值,此处不进行举例
pywinauto支持的完整的按键可以在官方文档查看,https://pywinauto.readthedocs.io/en/latest/code/pywinauto.keyboard.html
下面我列举出的是一些比较常用的按键
| 按键 | 符号 | 说明 |
|---|---|---|
| Shift | VK_SHIFT | 上档键 |
| Ctrl | VK_CONTROL、VK_LCONTROL、VK_RCONTROL | Ctrl键、左右Ctrl键 |
| Alt | VK_MENU | Alt键 |
| Windows | VK_LWIN、VK_RWIN | 左右win键 |
| Space | VK_SPACE | 空格键 |
| backspace | BACKSPACE | 退格键 |
| enter | ENTER | 回车键 |
| esc | ESC | 退出键 |
| table | VK_TAB | 制表键 |
| left、right、up、down | VK_LEFT、VK_RIGHT、VK_UP、VK_DOWN | 上下左右方向键 |
| f1~f24 | VK_F1、VK_F2…VK_F24 | f1 to f24 |
| capslock | CAPSLOCK | caps key |
Instructions:
1. Braces are required when using buttons, for example, pressing the Enter key is '{ENTER}' (是字符串)
2. On the Windows platform, virtual buttons are sent by default, and VK_the buttons starting with are all virtual buttons. VK_Remove the prefix and change vk_packetthe parameter of send_keys() Falseto
It is not enough to press and lift a single button. A combination of keys is often required. At this time, a modifier is needed. It can be used in braces to downcontrol upwhen the button is pressed and lifted. If a number is added after it, it indicates how many times it is pressed.
list_data = dlg.child_window(title="会话", control_type="List")
for item in list_data:
    if item.window_text() == "文件传输助手":
        item.click_input()
        # item.type_keys("冰冷的希望")
        send_keys("   ")  # 随便输入字符串
        send_keys("{VK_CONTROL down} a {VK_CONTROL up}")  # 快捷键Ctrl+a(先按下Ctrl,再按下a,最后放开Ctrl)
        send_keys("{BACKSPACE}")  # 按下退格键删除文本
        send_keys("{. 6}")  # 按6次小数点
        send_keys("冰冷的希望{ENTER}")  # 输入文本,按下回车键
Of course, many times the use downand upmodification are not concise enough, so pywinauto also provides a simplified way of writing, use +instead {VK_SHIFT}, use ^instead {VK_CONTROL}, use %instead{VK_MENU}
send_keys('^a^c') # 按下Ctrl+a之后再按下Ctrl+c,即全选复制
send_keys('+{INS}') # 按下Shift+Ins键
send_keys('%{F4}') # 按下Alt+F4键
If you don't want to press the button, but just want to enter a plain string, you need to cancel the escape. Note that the modifier and the button are written differently
send_keys('{^}a{^}c{%}') # 输入字符串"^a^c%"而不是当成快捷键
send_keys('{

    {}ENTER{}}') # 输入字符串"{ENTER}"而不是按下回车键