After the front-end general static page is written, it is necessary to obtain data from the back-end, and it is necessary to interface. To put it bluntly, the connection interface is to send network requests, get data from the backend, and then render the data to the page.
Today, I will take a simple uniapp project as an example to introduce how to write the interface.
First of all, it is to encapsulate a request.js file (the name is self-selected, it is a file that encapsulates the request), and the encapsulation is to reduce repeated request codes.
This is the encapsulation of uniapp (because this uniapp is an app, so it does not need axios, and the web is generally encapsulated with axios).
In fact, request is a function, and it returns a promise object after calling it.
// 同时发送多个请求的次数
let ajaxTimes = 0;
//h5端才存在跨域,App端没有跨域
let baseUrl ='  ' ; //这个地址是后端给的,可以从后端的接口文档看
// #ifdef H5
baseUrl = '/api/'; //这个重写是因为h5端会存在跨域(跨域是什么自行查询)
// #endif
export const request = (params) => {
  // 避免覆盖传递过来的header
  let header = {
    ...params.header
  }
 //请求头要带token(为什么要带token自行查询)
  const token = uni.getStorageSync('token')
  if (token) {
    header['Authorization'] = 'Bearer '+token
  }
  ajaxTimes++;
  // 显示加载中 效果
  uni.showLoading({
    title: '加载中',
    mask: true
  });
  return new Promise((resolve, reject) => {
    uni.request({
      url: baseUrl + params.url,
      data: {
        ...params.data,
      },
      header: header,
      method: params.method,

      success: (response) => {
		//请求成功的处理
            },
      fail: (err) => {
       //请求失败的处理
      },
	   complete: () => {
       //请求完毕的处理
		    ajaxTimes--;
		   //请求处理完毕
		   if(ajaxTimes===0){
			   uni.hideLoading()
		   }
	   }
    })
  })
}
Then you can also look at the package of axios
import axios from "axios";
import router from "../router";


const Host = ;
const baseURL = ;
let fullURL = Host + baseURL
const headerTokenKey = ''
//创建一个axios实例
export const request = axios.create({
    baseURL: fullURL,
    timeout: 10 * 1000,
    headers: {
        'Content-Type': 'application/x-www-form-urlencoded;charset=utf-8'
    }
})
//请求拦截器,就是请求前做一些检查
request.interceptors.request.use(
    function (config) {
        if (!window.localStorage.getItem(headerTokenKey)) {
            console.log("没有token");
        } else {
            console.log(window.localStorage.getItem(headerTokenKey));
            config.headers[headerTokenKey] = window.localStorage.getItem(headerTokenKey);
        }
        return config;
    },
    function (error) {
        return Promise.reject(error);
    }
)
//响应拦截器,对响应结果做一些处理
request.interceptors.response.use(response => {
    console.log("response")
    console.log(response)
    console.log(response.data.code)
    if (response.data.code == 506) {
       console.log("没有操作权限");
        router.replace({
            path: '/login'
        })
        return response;
    }
    else
     return response;
})
Then the second step is that everyone can write the interface of the page they are responsible for (copy each interface, and then change the function name and parameters)
//刚才封装好的文件引入
import {request} from '@/api/request.js'

//导出这样的一个test函数就是一个接口
export function test(params){
    //可以看到这里的request函数调用了,所以它返回了一个promise
    //对象,所以调用test函数就会return一个promise对象,
	return request({
	  //传入的参数是对应后端给的接口的url,参数,还有请求方法
		url:'/ms/account/create',
		data:params,
	  method:'POST'
	})
}
After writing an interface, go to the corresponding page to apply it.
The third step is to trigger the request (there are many situations to trigger the request, button click, life cycle, this depends on the specific situation of the page)
template>
	<view>
    <text>请求篇</text>
	<button @click="send()">POST请求</button>
	</view>
</template>

<script>
//导入test接口,通过按钮点击事件触发请求
import {test} from '@/api/try.js'
export default{
	data(){
	  return {
	   listData: [],
	   data:'数据',
       params:{
        "message": "[{\"id\": \"序号1\",\"deviceName\": \"设备名称\",\"managerNumber\": \"管理编号\",\"brand\": \"品牌\",\"type\": \"型号\",\"factoryNumber\": \"出厂编号\",\"nominalAccuracy\": \"标称精度\",\"checkDate\": \"检定日期\",\"certificate\": \"证书编号\",\"ackCycle\": \"确认周期\",\"enpiryTime\": \"有效期至\",\"state\": \"仪器状态\",\"projectName\": \"所在项目\",\"keeper\": \"保管人\",\"note\": \"备注\"},{\"id\": \"序号2\",\"deviceName\": \"设备名称\",\"managerNumber\": \"管理编号\",\"brand\": \"品牌\",\"type\": \"型号\",\"factoryNumber\": \"出厂编号\",\"nominalAccuracy\": \"标称精度\",\"checkDate\": \"检定日期\",\"certificate\": \"证书编号\",\"ackCycle\": \"确认周期\",\"enpiryTime\": \"有效期至\",\"state\": \"仪器状态\",\"projectName\": \"所在项目\",\"keeper\": \"保管人\",\"note\": \"备注\"},{\"id\": \"序号31\",\"deviceName\": \"设备名称\",\"managerNumber\": \"管理编号\",\"brand\": \"品牌\",\"type\": \"型号\",\"factoryNumber\": \"出厂编号\",\"nominalAccuracy\": \"标称精度\",\"checkDate\": \"检定日期\",\"certificate\": \"证书编号\",\"ackCycle\": \"确认周期\",\"enpiryTime\": \"有效期至\",\"state\": \"仪器状态\",\"projectName\": \"所在项目\",\"keeper\": \"保管人\",\"note\": \"备注\"}]",
        "uploader": "张三",
        "accountTime": "2016-08-11",
        "accountName": "仪器设备台账",
         "accountYear": "2016"
              },

		  }
		},
	methods:{
		send(){
		   //在点击事件里触发请求,上一步说了test调用后是一个promise对象,所以这里就通过then,catch处理请求情况
			test(this.params).then(res=>{
				console.log('成功')
				console.log(res)
			}).catch(err=>{
			     console.log('错误')
				console.log(err)
			})

		},
		}
}
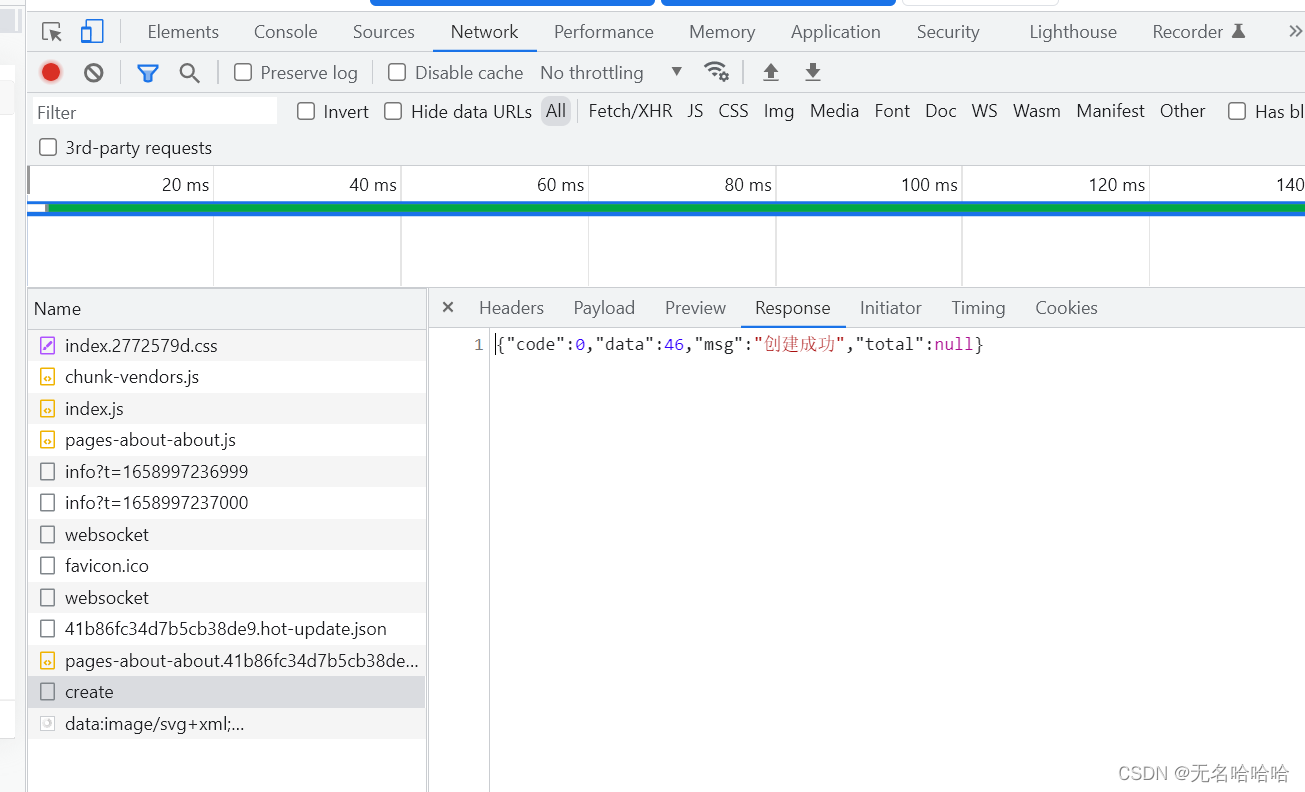
The fourth step, then we can request the status in the browser, open the network of Google Chrome developer tools to check the request status.
The picture below shows the request sent after clicking the button. Why is it called create because the interface url is called create, and the second line 200 is the request status code (200 means the request is successful, 40x, 40x is generally where the request on the front end is written wrong, Check it yourself, 50x, more than 50 is the problem of the backend)

If there is no create request in the network, it is not sent out. You have to check the reason yourself.
You can see a lot of things by clicking this request.
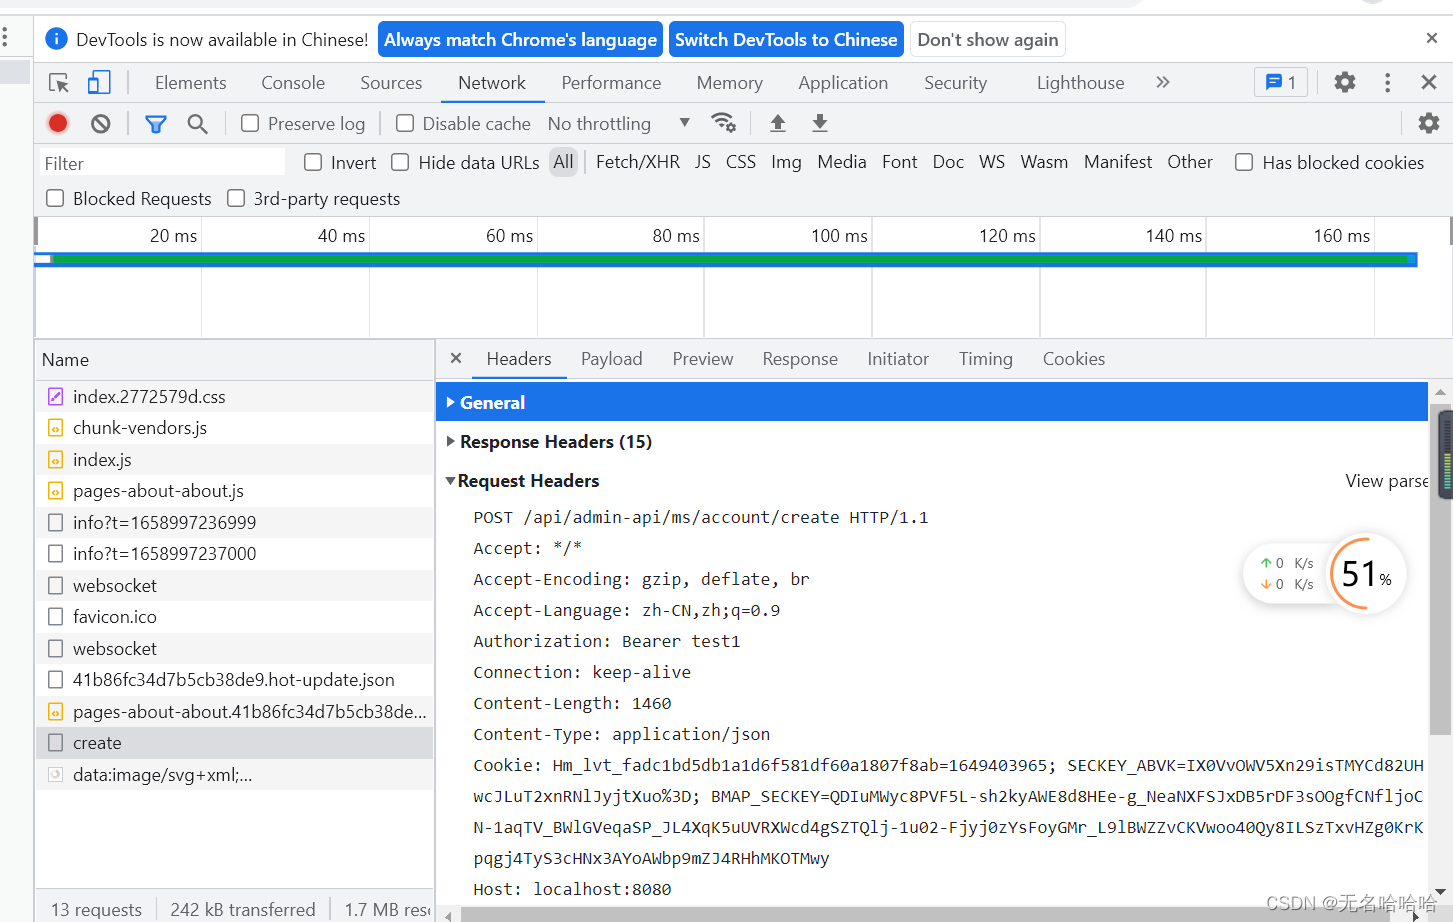
headers: Here you can see the request header and response header, and we can also see that there is an item Authorization: Bearer test1 in the request, which is the Payload encapsulated in request.js: it is the request parameter Response: it is the response data of
the
backend
Let me add that the commonly used front-end solution to cross-domain problems
is to create a vue.config.js file in the root directory of the project and write the following content
module.exports = {
	devServer:{
		port:'8080',//端口比如8080等等
		disableHostCheck:true,
		proxy:{
			'/api':{
				target:'',//后端给的地址
				changeOrigin:true,//确定跨域
				pathRewrite:{
					'^/api': ''//这个就是以在写请求的时候加上这个api,然后这里重写去掉api
				}
			}
		}
	}
}
Basically that’s all. If you are the project leader, you will usually encapsulate the request and handle the cross-domain. The project members generally write their own interfaces. It’s probably like this. If you like it, give it a star.
—————————————————
Copyright statement: This article is an original article of CSDN blogger "No Name Hahaha", following the CC 4.0 BY-SA copyright agreement, please attach the original source link and this statement.
Original link: https://blog.csdn.net/m0_52536354/article/details/126036858