Table of contents
1. Introduction to this article:
1.1 Disadvantages of java serialization
---> 1.1.1 cannot cross languages
---> 1.1.3 The serialized stream is too large
---> 1.1.4 Serialization performance is too poor
2.2 Connection retry configuration
2.4 Confirmation mode (this article is automatic)
---> 2.4.1 As shown in the figure
2.5 Send confirmation settings
---> 2.5.2 Write a callbackConfig, rewrite the method
---> Method 1: Pass and receive with application/json
---> Method 2: Pass and receive with application/json
3.1 Complete application.properties configuration
3.2 Complete application.yml configuration
1. Introduction to this article:
Rabbitmq connection configuration, and recycling mechanism configuration, modify the default java serialization method
1.1 Disadvantages of java serialization
---> 1.1.1 cannot cross languages
The serialVersionUID version number must be the same, and the version number of the same class name is different. Deserialization fails
--->1.1.2 Vulnerable
Apache Commons Collections allows chained arbitrary class function reflective calls. The attacker uploads the attack code to the server through the port "implementing the Java serialization protocol", and then it is executed by TransformedMap in Apache Commons Collections.
---> 1.1.3 The serialized stream is too large
The size of the binary array completed by binary encoding implemented by Java serialization is several times larger than the size of the binary array completed by binary encoding implemented by ByteBuffer.
---> 1.1.4 Serialization performance is too poor
ObjectOutputStream serialization is very inefficient
2. Configuration overview
2.1 Basic configuration
#基础配置
spring.rabbitmq.host=*
spring.rabbitmq.port=5672
spring.rabbitmq.username=pzy
spring.rabbitmq.password=*
spring.rabbitmq.virtual-host=develop
2.2 Connection retry configuration
# 开启rabbit初始化重试机制
spring.rabbitmq.template.retry.enabled=true
## 最大重试间隔时间
spring.rabbitmq.template.retry.max-interval=1000ms
## 最大重试次数
spring.rabbitmq.template.retry.max-attempts=3
# 间隔乘数
spring.rabbitmq.template.retry.multiplier=1
# 初始化的时间间隔
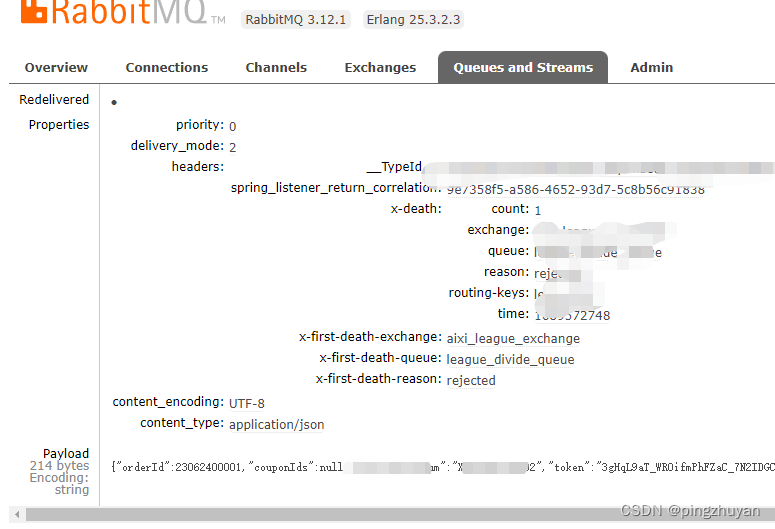
spring.rabbitmq.template.retry.initial-interval=1000ms2.3 Exception retry mechanism
#异常重试机制设置[未加死信队列 五次异常后 直接抛弃了]
#设置是否重回队列 true即出现异常会将消息重新发送到队列中
spring.rabbitmq.listener.simple.default-requeue-rejected=true
#设置是否启用消息重试机制,默认为false。
spring.rabbitmq.listener.simple.retry.enabled=true
#设置消息重试的最大次数,默认为3。
spring.rabbitmq.listener.simple.retry.max-attempts=5
#设置消息重试的初始间隔时间,默认为1000ms。
spring.rabbitmq.listener.simple.retry.initial-interval=2000ms
#设置消息重试的时间间隔倍数,默认为1(重试时间越来越长)
spring.rabbitmq.listener.simple.retry.multiplier=1.2
##设置消息重试的最大时间间隔,默认为10000ms。
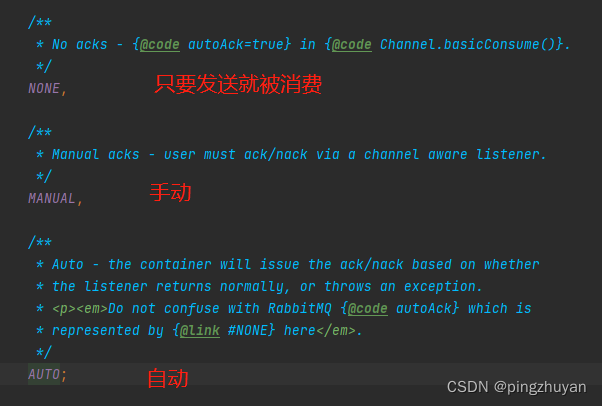
spring.rabbitmq.listener.simple.retry.max-interval=3000ms2.4 Confirmation mode (this article is automatic)
#spring.rabbitmq.listener.simple.acknowledge-mode=none
spring.rabbitmq.listener.simple.acknowledge-mode=auto
#spring.rabbitmq.listener.simple.acknowledge-mode=manual
#spring.rabbitmq.listener.direct.acknowledge-mode=manual
---> 2.4.1 As shown in the figure
2.5 Send confirmation settings
#发布消息成功到交换器后会触发回调方法(默认禁用none)
spring.rabbitmq.publisher-confirm-type=correlated
#消息发布不可达目的地的时候 才进行回退
spring.rabbitmq.publisher-returns=true
---> 2.5.1 Parameter explanation: (The function of the old version is directly a Boolean value, false is not enabled, true is enabled)
None disables the release confirmation mode, which is the default value.
CORRELATED will trigger the callback method after the successful release of the message to the switch.
SIMPLE has two effects:One: The effect will trigger the callback method like the CORRELATED value
Second: Use the rabbitTemplate to call the waitForConfirms or waitForConfirmsOrDie method to wait for the broker node to return the sending result after successfully publishing the message, and determine the logic of the next step according to the returned result. The point to note is that if the waitForConfirmsOrDie method returns false, the channel will be closed and the message cannot be sent to broker
---> 2.5.2 Write a callbackConfig, rewrite the method
package com.aisce.axmall.order.config.rabbitmq;

import lombok.NonNull;
import lombok.extern.slf4j.Slf4j;
import org.springframework.amqp.core.Message;
import org.springframework.amqp.rabbit.connection.CorrelationData;
import org.springframework.amqp.rabbit.core.RabbitTemplate;
import org.springframework.context.annotation.Configuration;

/**
 * rabbitmq的成功与失败
 * 消息回调
 * @author pzy
 * @description: TODO
 * @version 1.0.1 beta版
 */
@Slf4j
@Configuration
public class RabbitCallbackConfig implements RabbitTemplate.ConfirmCallback, RabbitTemplate.ReturnCallback {

    /**
     * 消息正常发送 或者发送到broker后出现问题
     * @param correlationData
     * @param ack
     * @param cause
     */
    @Override
    public void confirm(CorrelationData correlationData, boolean ack, String cause) {
        if (!ack) {

            log.error("confirm==>发送到broker失败\r\n" + "correlationData={}\r\n" + "ack={}\r\n" + "cause={}",
                    correlationData, ack, cause);
        } else {

            log.info("confirm==>发送到broker成功\r\n" + "correlationData={}\r\n" + "ack={}\r\n" + "cause={}",
                    correlationData, ack, cause);
        }
    }

    /**
     * 压根没到目的地 执行
     * @param message
     * @param replyCode
     * @param replyText
     * @param exchange
     * @param routingKey
     */
    @Override
    public void returnedMessage(@NonNull Message message, int replyCode,
                                @NonNull String replyText, @NonNull String exchange, @NonNull String routingKey) {


        log.error("error returnedMessage==> \r\n" + "message={}\r\n" + "replyCode={}\r\n" +
                        "replyText={}\r\n" + "exchange={}\r\n" + "routingKey={}",
                message, replyCode, replyText, exchange, routingKey);
    }


    //可进行后续操作

}
2.6 Reconfigure serialization
There are two ways (similar principle)
---> Method 1: Pass and receive with application/json
@Configuration
public class RabbitConfig {
@Bean
public MessageConverter messageConverter(){
    return new Jackson2JsonMessageConverter();
}
---> Method 2: Pass and receive with application/json
/**
 * rabbitmq配置类
 *
 * @author pzy
 * @version 0.1.0
 * @description: TODO
 */
@Configuration
public class RabbitConfig {

    @Autowired
    private SimpleRabbitListenerContainerFactory rabbitListenerContainerFactory;

    @Autowired
    private RabbitCallbackConfig rabbitCallbackConfig;

    @Bean
    RabbitTemplate rabbitTemplate(ConnectionFactory connectionFactory) {
        RabbitTemplate rabbitTemplate = new RabbitTemplate(connectionFactory);
        //消息到不到队列 自动重新返回到生产者
        rabbitTemplate.setMandatory(true);//其实前面配置加了
        rabbitTemplate.setConfirmCallback(rabbitCallbackConfig);
        rabbitTemplate.setReturnCallback(rabbitCallbackConfig);
        // 使用 JSON 序列化与反序列化
        rabbitTemplate.setMessageConverter(new Jackson2JsonMessageConverter());
        rabbitListenerContainerFactory.setMessageConverter(new Jackson2JsonMessageConverter());

        return rabbitTemplate;
    }
}
---> Display effect:
3. Configuration summary
3.1 Complete application.properties configuration
#beta版 rabbitmq V3.0.1 版本启动测试  pzy===============================================>
#基础配置
spring.rabbitmq.host=*
spring.rabbitmq.port=5672
spring.rabbitmq.username=pzy
spring.rabbitmq.password=*
spring.rabbitmq.virtual-host=develop
#发送确认机制设置
#发布消息成功到交换器后会触发回调方法(默认禁用none)
spring.rabbitmq.publisher-confirm-type=correlated
#消息发布不可达目的地的时候 才进行回退
spring.rabbitmq.publisher-returns=true

# 队列设置
#设置每次预抓取的数量是3,处理完之前不收下一条 默认250
spring.rabbitmq.listener.simple.prefetch=3
# 手动确认模式
#spring.rabbitmq.listener.simple.acknowledge-mode=manual
spring.rabbitmq.listener.simple.acknowledge-mode=auto
#spring.rabbitmq.listener.direct.acknowledge-mode=manual

# 开启rabbit初始化重试机制
spring.rabbitmq.template.retry.enabled=true
## 最大重试间隔时间
spring.rabbitmq.template.retry.max-interval=1000ms
## 最大重试次数
spring.rabbitmq.template.retry.max-attempts=3
# 间隔乘数
spring.rabbitmq.template.retry.multiplier=1
# 初始化的时间间隔
spring.rabbitmq.template.retry.initial-interval=1000ms

#异常重试机制设置[未加死信队列 五次异常后 直接抛弃了]
#设置是否重回队列 true即出现异常会将消息重新发送到队列中
spring.rabbitmq.listener.simple.default-requeue-rejected=true
#设置是否启用消息重试机制,默认为false。
spring.rabbitmq.listener.simple.retry.enabled=true
#设置消息重试的最大次数,默认为3。
spring.rabbitmq.listener.simple.retry.max-attempts=5
#设置消息重试的初始间隔时间,默认为1000ms。
spring.rabbitmq.listener.simple.retry.initial-interval=2000ms
#设置消息重试的时间间隔倍数,默认为1(重试时间越来越长)
spring.rabbitmq.listener.simple.retry.multiplier=1.2
##设置消息重试的最大时间间隔,默认为10000ms。
spring.rabbitmq.listener.simple.retry.max-interval=3000ms

# beta版 ============================================================================>
3.2 Complete application.yml configuration
After the properties are converted to yml, the comments are gone. See the above for details.
#只有服务的消费者 决定怎么消费确认 生产者决定不了
spring:
  rabbitmq:
    listener:
      simple:
        acknowledge-mode: manual
        default-requeue-rejected: true
        retry:
          enabled: true
          initial-interval: 2000ms
          max-attempts: 5
          max-interval: 3000ms
          multiplier: 1.2
    host: *
    port: 5672
    username: pzy
    password: *
    virtual-host: develop
    # 新版的就是publisher-confirm-type=correlated
    publisher-confirms: true
    publisher-returns: true
    template:
      retry:
        enabled: true
        initial-interval: 1000ms
        max-attempts: 3
        max-interval: 1000ms
        multiplier: 1
4. Article Portal
Microservices: 01-rabbitmq application scenarios and installation (docker)
Microservices: How to use 03-rabbitmq in springboot (Part 2)
5. The following notice
Microservice: 05-rabbitmq sets the number of retries and sets the dead letter queue