article title
1. Vue implements login interception
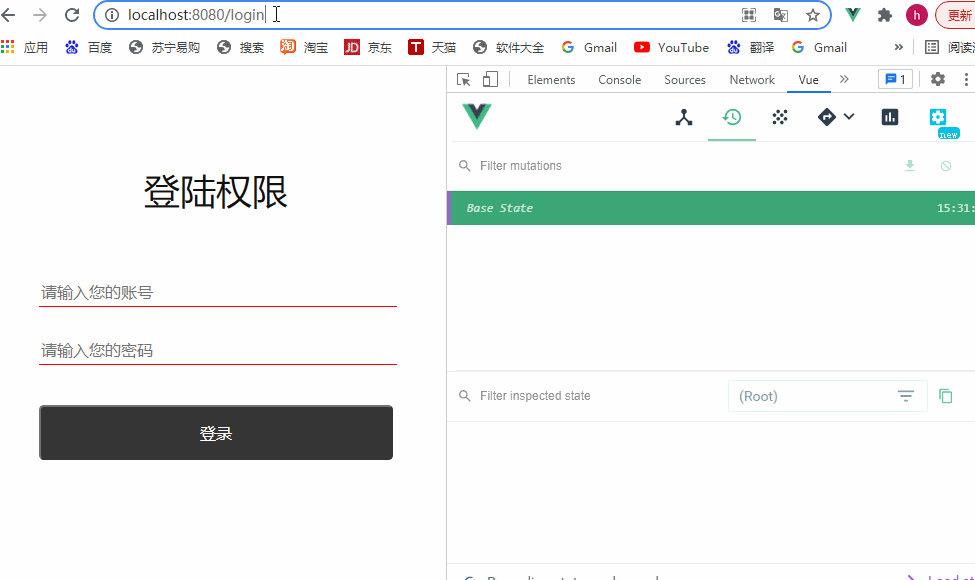
1-1. Effect display
The password account has not been added with strong authentication, the address bar cannot directly jump to the page by modifying the path, and must be successfully logged in
1-2 Code display
1-2-1 router.js
import Vue from "vue"
import VueRouter from "vue-router"

Vue.use(VueRouter)

const router = new VueRouter({


    mode: "history",
    base: "/",
    routes: [
        {


            path: "/login",
            name: "login",
            component: () => import("./pages/login.vue")
        },
        {


            path: "/",
            name: "index",
            component: () => import("./pages/index.vue")
        }
    ]
})

export default router
1-2-2 under the store folder
1-2-2-1 state.js
state ---- data warehouse
- state is a relatively powerful json, used to store data
export default {


    userInfo: "",
}
1-2-2-2 index.js
import Vue from "vue"
import Vuex from "vuex"
import state from "./state"
import mutations from "./mutations"
import getters from "./getters"
import actions from "./actions"

Vue.use(Vuex)

const store = new Vuex.Store({


    state,
    getters,
    actions,
    mutations
})

export default store
1-2-2-3 mutation.js
mutation ---- used to modify data
- Why can't the state be instantiated directly, and then directly modify the data of the state
- Commit a mutation, then pass the state through the mutation and then modify the state
- Synchronous
export default {


	login(state, v) {


		state.userTnfo = v
	}
}
1-2-3 main.js【The key to login interception—global routing guard】
1. Introduce store
import store from "./store";
2. Control cannot access other pages before logging in
router.beforeEach((to,from, next) => {


	if(store.state.userInfo || to.path === "/login"){


		next()
	} else {


		next({


			path: "/login"
		})
	}
)
login.vue under 1-2-4 pages
<template>
    <div class="login">
        <p class="login-title">
            登陆权限
        </p>
        <div class="section">
            <input
                class="section-input"
                v-model="form.account"
                placeholder-class="input-holder"
                placeholder="请输入您的账号"
            />
        </div>
        <div class="section">
            <input
                class="section-input"
                type="password"
                v-model="form.password"
                placeholder-class="input-holder"
                placeholder="请输入您的密码"
            />
        </div>
        <button class="btn" @click="login">登录</button>


    </div>
</template>
<script>
import store from "../store";

export default {


    data() {


        return {


            isHidden: false,
            isPassword: true,
            logs: [],
            form: {


                account: "",
                password: ""
            }
        };
    },
    created() {

      },
    mounted() {

      },
    methods: {


        login() {


            if (!this.form.account || !this.form.password) {


                alert("请填写账号密码");
                return false;
            }
            const that = this;
            setTimeout(() => {


                store.commit("login", {


                    account: that.form.account,
                    password: that.form.password
                });
                that.$router.push("./");
            }, 500);
        }
    }
};
</script>

<style lang="less">
.login {


    position: relative;
    top: 0;
    left: 0;
    padding: 0 45px;
    p {


        text-align: center;
    }
    &-title {


        color: #111111;
        font-size: 36px;
        padding: 40px 0 30px;

    }
    .section {


        &-input {


            width: 100%;
            height: auto;
            border: none;
            margin-bottom: 30px;
            outline: none;
            font-size: 16px;
            line-height: 1.6;
            border-bottom: 1px solid red;
        }
        .input-holder {


            color: #777777;
            font-size: 16px;
        }
    }
    .btn {


        width: 100%;
        height: auto;
        color: #fff;
        background: #373737;
        margin: 10px 0 20px;
        padding: 15px;
        box-sizing: border-box;
        border-radius: 5px;
        font-size: 16px;
    }
    .btn-primary {


        color: #373737;
        background: #fff;
    }
    .login-text {


        position: fixed;
        left: 0;
        bottom: 60px;
        width: 100%;
        height: auto;
        font-size: 12px;
        color: #777777;
        text-align: center;
    }
}

</style>
1-3 Summary
- Create a store folder and initialize it
- Get this instance in the global navigation guard created in main.js.
$store.state.userInfoGuarding Navigation Through Judgmentnext()- or
next({path: '/login'})
- In the login component by
store.commitsubmitting userInfo data
2. Introduction to Vue project functions
Project address: placed on github, click here
2-1 Function
-
Configure global routing guards in main.js to control user login routing permissions
- When there is no login, the route cannot jump
-
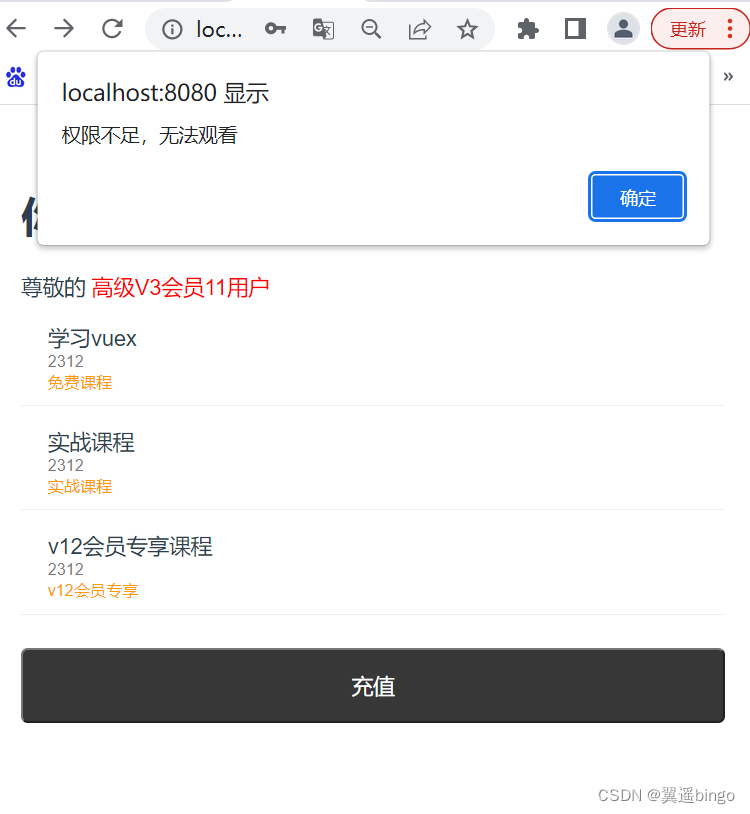
Index and userCenter interface share
$state.userStatusand$state.vipLevelstatus value -
Recharge different amounts, become
$state.vipLevela member of the level, and watch the corresponding courses
2-2 View items

3. React routing login and user identity authentication
3-1 Brief introduction of the project
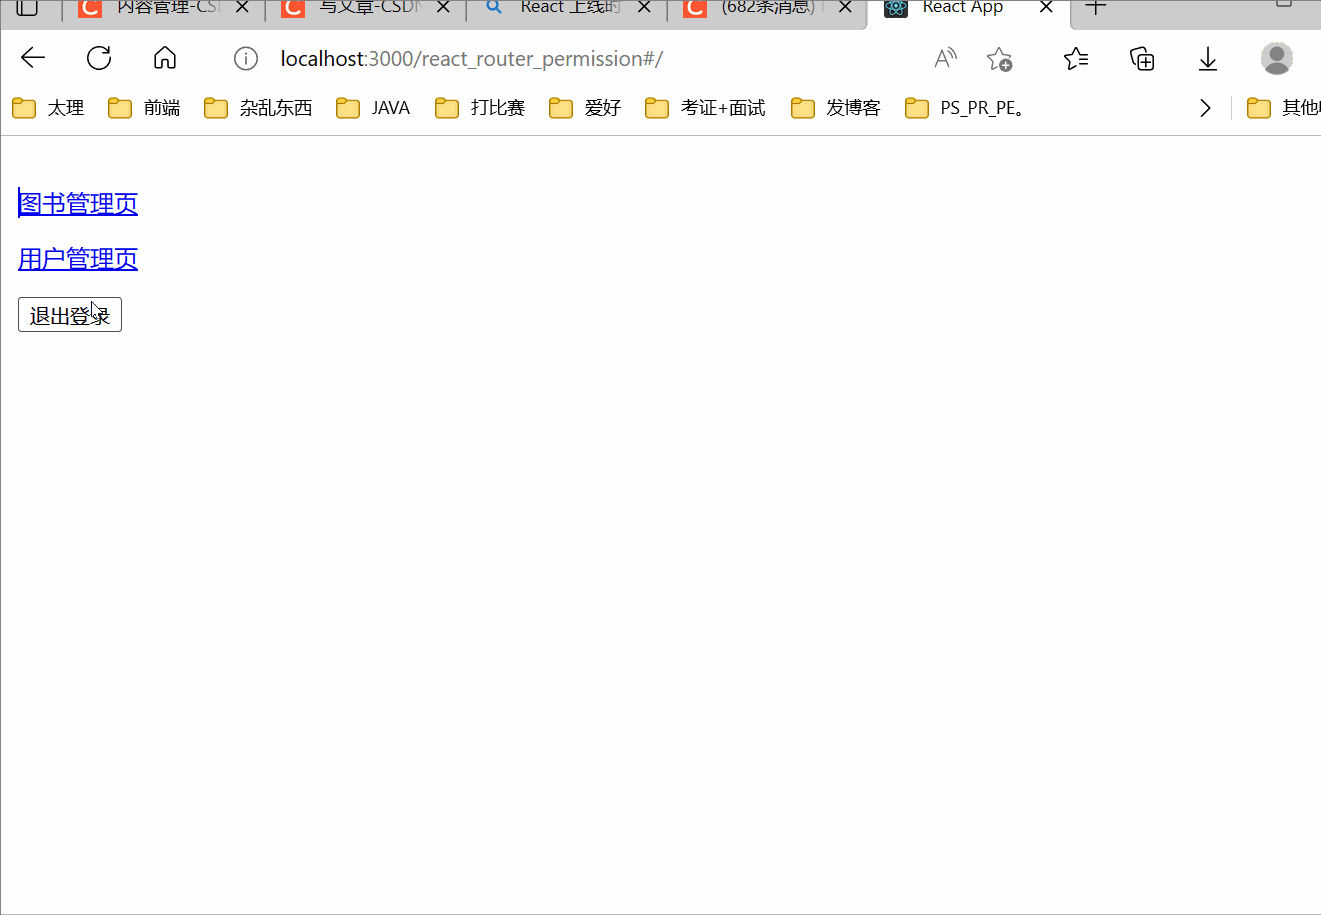
3-1-1 Display
- Renderings:
3-1-2 Code structure + idea display
3-1-2-1 Project directory:
-
Installation dependencies:
yarn add react-router-dom -
Add routing to React
import React from "react";
import ReactDOM from "react-dom/client";
import "./index.css";
import MainRouter from "./page/router";

const root = ReactDOM.createRoot(document.getElementById("root"));
root.render(<MainRouter />);

=============================================================================
import {

     HashRouter, Redirect, Route, Switch } from "react-router-dom";
import routerConfig from "./config";
import {

     getToken } from "../../utils/token";

const PrivateRoute = (props) => {


	const {

     routerConfig, location } = props;
	const {

     pathname } = location;
	const isLogin = JSON.parse(getToken()); // 判断是否登录
	const currentRoute = routerConfig.find((item) => item.path === pathname); // 找到路由对应的组件

	/* 这些if eles 部分可以省略,只是为了直观一点 */
	if (isLogin) {


		/* 已经登录,再次进登录页面,就让它跳转到首页 */
		if (pathname === "/login") {


			return <Redirect to={

    "/"} />;
		} else {


			if (currentRoute) {


				/* 登录成功后,访问非登录页面,路由匹配的上 */
				if (currentRoute.super && isLogin.level <= 0) {


					// 权限不够
					return <Redirect to={

    "/noPermission"} />;
				}
				return <Route path={

    pathname} component={

    currentRoute.component} />;
			} else {


				/* 路由匹配不上 */
				return <Redirect to={

    "/404"} />;
			}
		}
	} else {


		/* 非登录状态 */
		if (currentRoute) {


			if (currentRoute.auth) {


				/* 可以匹配到路由,但是访问这个页面需要登录 */
				return <Redirect to={

    "/login"} />;
			} else {


				/* 可以匹配到路由, 但是不需要登录, 就可以直接访问了 */
				return <Route path={

    pathname} component={

    currentRoute.component} />;
			}
		} else {


			/* 匹配不到路由, 直接跳转到404 */
			return <Redirect to={

    "/404"} />;
		}
	}
};
3-1-2-2 Login logic
import React from "react";
import {

     setToken } from "../../utils/token";

function LoginComponent(props) {


	const {

     history } = props;
	return (
		<div>
			<h1>Login Page</h1>
			<button
				onClick={

    () => {


					const LoginInfo = {


						value: "chenjiang",
						level: 0, // 标志普通管理员
					};
					setToken(JSON.stringify(LoginInfo));
					history.push("/");
				}}
			>
				管理员登录
			</button>
			<button
				onClick={

    () => {


					const LoginInfo = {


						value: "chenjiang",
						level: 1, // 标志超级管理员
					};
					setToken(JSON.stringify(LoginInfo));
					history.push("/");
				}}
			>
				超级管理员登录
			</button>
		</div>
	);
}
export default LoginComponent;
4. Fork and star the project on github
View cases more conveniently and understand more clearly!
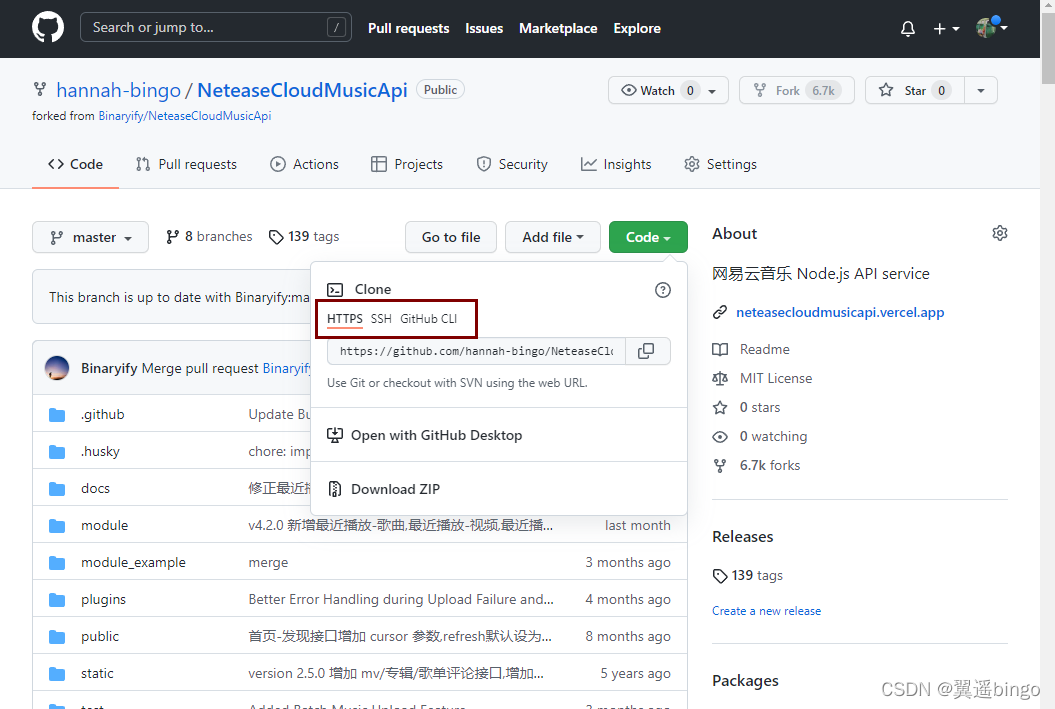
Open the source code and click Fork
- fork this project
- Fork in GitHub is a code warehouse clone on the server side (that is, the newly cloned code warehouse is on the remote server side), which contains all the contents of the original warehouse (ie upstream repository, upstream warehouse), such as branches, tags, and submissions.
- Code hosting services (such as Github, BitBucket) provide a convenient function to complete the Fork operation (click the Fork button on the warehouse page). In this way, you have a remote warehouse that you can submit freely, and then you can contribute your submission back to the original warehouse through the Pull Request.
- As for the owner of the original warehouse, encouraging others to fork his warehouse and contribute to his warehouse through Pull Request also enhances the popularity of the original warehouse.
- Copy your warehouse address
4-2 Local warehouse installation
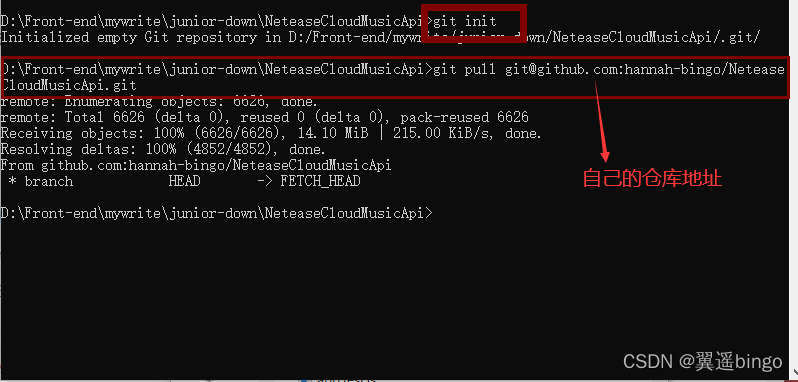
- Create a new folder locally
logInToIntercept, cmd enters the command line - Initialize the repository:
git init - Pull the source code of the project from the remote warehouse:
git pull 上文复制的仓库地址
4-3 Local running project [with node environment]
1. The installation package depends on: yarn add
2. Run the project according to the specific configuration of the package: yarn run serveor yarn start
3. Just open it in the browser: http://localhost:3000
Question about git: error: src refspec main does not match any