Detailed nginx configuration file
Article directory
Ubuntu nginx directory structure
- default directory structure
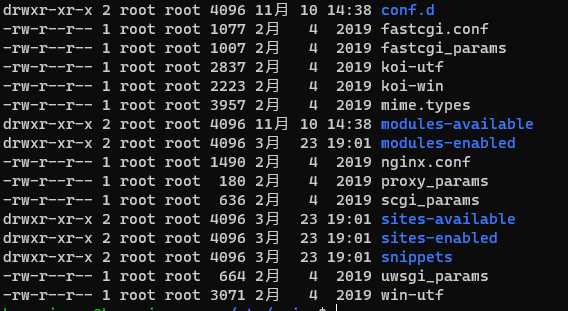
All configurations of the old version of nginx are placed in one nginx.conf file, and the new version of the nginx configuration file is divided into three parts nginx.cong, and sites-available, in which is a reference to the file.site-enabledsites-enabledsite-avaliable
nginx configuration file structure
...              #全局块
#配置影响nginx全局的指令。一般有运行nginx服务器的用户组,nginx进程
#pid存放路径,日志存放路径,配置文件引入,允许生成worker process数等

events {         #events块
   ...
   #配置影响nginx服务器或与用户的网络连接。有每个进程的最大连接数,选取哪种事件
   #驱动模型处理连接请求,是否允许同时接受多个网路连接,开启多个网络连接序列等。
}

http      #http块

{
    ...   #http全局块
    #可以嵌套多个server,配置代理,缓存,日志定义等绝大多数功能和第三方模块的配置。如文件引入,mime-
    #type定义,日志自定义,是否使用sendfile传输文件,连接超时时间,单连接请求数等。
    server        #server块。
    {
        ...       #server全局块,配置虚拟主机的相关参数,一个http中可以有多个server
        location [PATTERN]   #location块,配置请求的路由,以及各种页面的处理情况。
        {
            ...
        }

    }
    ...     #http全局块
}
Default nginx.conf ((1.18.0 version)
user www-data; #配置用户或者组
worker_processes auto;# 允许生成的进程数
pid /run/nginx.pid; #指定nginx进程运行文件存放地址
include /etc/nginx/modules-enabled/*.conf;# 加载模块配置文件(该目录下为软连接)

events {


        worker_connections 768; #单个进程最大连接数
        # multi_accept on;
}

http {


        ##
        # Basic Settings
        ##

        sendfile on;# 开启高效文件传输模式,sendfile指令指定nginx是否调用sendfile函数来输出文件,对于普通应用设为 on,如果用来进行下载等应用磁盘IO重负载应用,可设置为off,以平衡磁盘与网络I/O处理速度,降低系统的负载.注意:如果图片显示不正常把这个改成off.
        tcp_nopush on;# 防止网络阻塞
        tcp_nodelay on;# 防止网路阻塞
        keepalive_timeout 65;#连接超时时间
        types_hash_max_size 2048;
        # server_tokens off;

        # server_names_hash_bucket_size 64;
        # server_name_in_redirect off;

        include /etc/nginx/mime.types; #文件拓展名与文件类型映射表
        default_type application/octet-stream;#默认文件类型,默认为text-plain

        ##
        # SSL Settings
        ##

        ssl_protocols TLSv1 TLSv1.1 TLSv1.2 TLSv1.3; # Dropping SSLv3, ref: POODLE
        ssl_prefer_server_ciphers on;

        ##
        # Logging Settings
        ##

        access_log /var/log/nginx/access.log;
        error_log /var/log/nginx/error.log;

        ##
        # Gzip Settings
        ##

        gzip on;

        # gzip_vary on;
        # gzip_proxied any;
        # gzip_comp_level 6;
        # gzip_buffers 16 8k;
        # gzip_http_version 1.1;
        # gzip_types text/plain text/css application/json application/javascript text/xml application/xml application/xml+rss text/javascript;

        ##
        # Virtual Host Configs
        ##

        include /etc/nginx/conf.d/*.conf;
        include /etc/nginx/sites-enabled/*;
}


#mail {


#       # See sample authentication script at:
#       # http://wiki.nginx.org/ImapAuthenticateWithApachePhpScript
#
#       # auth_http localhost/auth.php;
#       # pop3_capabilities "TOP" "USER";
#       # imap_capabilities "IMAP4rev1" "UIDPLUS";
#
#       server {


#               listen     localhost:110;
#               protocol   pop3;
#               proxy      on;
#       }
#
#       server {


#               listen     localhost:143;
#               protocol   imap;
#               proxy      on;
#       }
#}
Detailed explanation of location, detailed explanation of proxy_pass
 location [PATTERN]   #location块,配置请求的路由,以及各种页面的处理情况。
       {


 #         ...
     }
-
root
The root specified in location is only a relative path, which needs to be combined with the path to map the address, such as
location ^~/static/ { ## 这里的root需要和路径结合使用,即是映射的文件位置为 /usr/test/static root /usr/test/; index index.html } -
alias
The alias specifies an absolute path, which will not be used in combination with the path in location, but directly uses the address to map to the file, such as
  location ^~/static/ {

      	## 不会路径结合映射地址,那么这里就会直接映射到/usr/test/文件夹下的文件
    alias /usr/test/;
    index index.html
}
Once the configuration request location is mapped to the specified location, all the following folders and files can be mapped to it, no need to configure the mapping to it, but if the file name is remapped to the address, then this path will no longer be use
-
path matching
- = at the beginning means an exact match. For example, A only matches the request at the end of the root directory, and cannot be followed by any string;
- The beginning of ^~ indicates that the uri starts with a regular string, not a regular match;
- The beginning of ~ indicates a case-sensitive regular match;
- The beginning of ~* indicates a case-insensitive regular match;
- / Universal match, any request will match if there is no other match.
**A location definition can be a prefix string or a regular expression. When using a regular expression, use the " " modifier (for case-insensitive matching) or the " *" modifier (for case-sensitive matching) in front of it. To find a location that matches the request, nginx first checks the location definitions, prefixed with strings (these locations become prefixed locations). Among them, the location with the longest matching prefix will be selected and remembered. Then, the regular expressions are checked, in the order they appear in the configuration file. The search for the regular expression terminates at the first match, and the corresponding configuration is used. If no match to the regex is found, the previously remembered configuration for the prefix position is used**
Use regular expressions first, if no matching regular expressions are found, use the longest matching prefix string location
priority
- The equal sign type (=) has the highest precedence. Once a match is successful, no matches for other locations will be found
- ^~ and generic match. Using prefix matching, regular expressions are not supported. If multiple locations match successfully, the matching process will not be terminated, and the one with the longest expression will be matched (example below)
- If the longest location obtained in the previous step is of type ^~, it means that the regular expression is blocked and no longer matches the regular expression
- If the longest location obtained in the previous step is not of the ^~ type, continue to match regular expressions. As long as one of the regular expressions succeeds, use this regular location, return the result immediately, and end the parsing process
location  = / {


  # 精确匹配 / ,主机名后面不能带任何字符串
  [ configuration A ]
}
location  / {


  # 因为所有的地址都以 / 开头,所以这条规则将匹配到所有请求
  # 但是正则和最长字符串会优先匹配
  [ configuration B ]
}
location /documents/ {

      # 匹配任何以 /documents/ 开头的地址,匹配符合以后,还要继续往下搜索
  # 只有后面的正则表达式没有匹配到时,这一条才会采用这一条
  [ configuration C ]
}
location ~ /documents/Abc {

      # 匹配任何以 /documents/Abc 开头的地址,匹配符合以后,还要继续往下搜索
  # 只有后面的正则表达式没有匹配到时,这一条才会采用这一条
  [ configuration CC ]
}
location ^~ /images/ {

      # 匹配任何以 /images/ 开头的地址,匹配符合以后,停止往下搜索正则,采用这一条。
  [ configuration D ]
}
location ~* \.(gif|jpg|jpeg)$ {

      # 匹配所有以 gif,jpg或jpeg 结尾的请求
  # 然而,所有请求 /images/ 下的图片会被 config D 处理,因为 ^~ 到达不了这一条正则
  [ configuration E ]
}
location /images/ {

      # 字符匹配到 /images/,继续往下,会发现 ^~ 存在
  [ configuration F ]
}
location /images/abc {

      # 最长字符匹配到 /images/abc,继续往下,会发现 ^~ 存在
  # F与G的放置顺序是没有关系的
  [ configuration G ]
}
location ~ /images/abc/ {

      # 只有去掉 config D 才有效:先最长匹配 config G 开头的地址,继续往下搜索,匹配到这一条正则,采用
  # 因为都是正则匹配,优先级一样,选择最上面的
    [ configuration H ]
}
-
reverse proxy proxy_pass
When configuring proxy_pass proxy forwarding in nginx, if the url behind proxy_pass adds / to indicate the absolute root path; if there is no /, it indicates a relative path, and the matching path part is also given to the proxy
Visit http://192.168.0.1/proxy/test.htmll in the following four situations
#第一种:末尾加斜杠,proxy_pass中不包含路径
location /proxy/ {


    proxy_pass http://127.0.0.1/;
}
#代理到URL:http://127.0.0.1/test.html,proxy_pass+请求url匹配的location路径后的内容

#第二种(相对于第一种,最后少一个 / ),末尾不加斜杠,proxy_pass中不包含路径
location /proxy/ {


    proxy_pass http://127.0.0.1;
}
#代理到URL:http://127.0.0.1/proxy/test.html,proxy_pass替换请求url的ip和端口

#第三种:末尾加斜杠,proxy_pass中包含路径
location /proxy/ {


    proxy_pass http://127.0.0.1/aaa/;
}
#代理到URL:http://127.0.0.1/aaa/test.html,proxy_pass+请求url匹配的location路径后的内容

#第四种(相对于第三种,最后少一个 /,末尾不加斜杠,url中包含路径 )proxy_pass+请求url匹配的location路径后的内容
location /proxy/ {


    proxy_pass http://127.0.0.1/aaa;
}
#代理到URL:http://127.0.0.1/aaatest.html
Summarize
- If there is a slash after proxy_pass, the forwarded url is the content after the location path matched by proxy_pass+original url. Example: Original request http://192.168.10.1/proxy/test.html, location is /proxy/ proxy_pass is http://127.0.0.1:81/abc/ forwarding path: (proxy_pass) http://127.0.0.1 :81/abc/ plus the original request part path test.html, the final path http://127.0.0.1:81/abc/test.html
- If there is no slash after proxy_pass
- proxy_pass only has ip plus port and no path. The matching rule is that proxy_pass replaces the ip and port of the original request url, while retaining the location path. An example is the second case above.
- When the port in proxy_pass contains a path, the matching rule is the same as 1 (there is a slash after it)
https configuration, https forwarding http configuration
Configure first
server {


        listen 443 ssl;#新版本通过在端口后添加ssl 开启ssl
        server_name www.****.com; #域名或ip地址
        #ssl on; #旧版本通过ssl on 开启ssl
        ssl_certificate /xxx.crt;#证书地址
        ssl_certificate_key /xxx.key;#生成证书申请文件对应的私钥
        ssl_session_timeout 5m;
        ssl_protocols TLSv1 TLSv1.1 TLSv1.2; #按照这个协议配置
        ssl_ciphers ECDHE-RSA-AES128-GCM-SHA256:HIGH:!aNULL:!MD5:!RC4:!DHE;#按照这个套件配置
        ssl_prefer_server_ciphers on;
        location / {


            root   html; #站点目录,此时通过/ 访问到的路径是html/index.html 或 html/index.htm
            index  index.html index.htm;
            #try_files $uri $uri/ /index.html #指向入口文件,vue中常用
        }
    }
- The certificate address of the configuration file must be specified correctly, it is best to use an absolute path
- 443 is the default port of https, similar to port 80 of http
Through the above configuration, you can access through https, but many users may still access through http. At this time, you need to forward http to https. You only need to configure it under your http server. The following configuration will rewrite ^ https://$http_host$request_uri? permanent;http Port 80 is forwarded to https port 444
server {


        listen       80;
        server_name  www.***.com;
        rewrite ^ https://$http_host$request_uri? permanent;    # force redirect http to https
    }
server {


        listen 443;
        server_name www.****.com; #填写绑定证书的域名
        ssl on;
        ssl_certificate /xxx.crt;
        ssl_certificate_key /xxx.key;
        ssl_session_timeout 5m;
        ssl_protocols TLSv1 TLSv1.1 TLSv1.2; #按照这个协议配置
        ssl_ciphers ECDHE-RSA-AES128-GCM-SHA256:HIGH:!aNULL:!MD5:!RC4:!DHE;#按照这个套件配置
        ssl_prefer_server_ciphers on;
        location / {


            root   html; #站点目录
            index  index.html index.htm;
        }
        location /proxy {


            proxy_pass http://xx.xx.xx.xx:port/xx.xx; #https 转发至http 具体转发规则可以参考上面反向代理部分
        }
    }
load balancing configuration
Old rules, configure first
http {


 # ... 省略其它配置
 upstream tomcats {

     # 定义一个负载集群 tomcats
 	server 192.168.0.100:8080;
 	server 192.168.0.101:8080;
 	server 192.168.0.102:8080;
 }
 server {


 	listen 80;
 	location / {


 		proxy_pass http://tomcats; #将80端口的请求代理到负载均衡集群中
 	}
 }
 # ... 省略其它配置
}
Through the above configuration, the request to access 80 can be handed over to the three servers 100, 101, and 102 in turn to sort out, and the allocation strategy can be changed by configuring different parameters
upstream tomcats {


 server 192.168.0.100:8080 weight=2 max_fails=3 fail_timeout=15 max_conns=1000;
 server 192.168.0.101:8080 down;
 server 192.168.0.102:8080 backup;
}
- weight weight, the default is 1, the distribution with higher weight is more frequent, and the proportion of weight is distributed
- max_fails defaults to 1, the number of times a server allows requests to fail. After exceeding the maximum number of times, new requests will not be allocated to this machine within the fail_timeout time. If it is set to 0, Nginx will permanently invalidate the node and then send the request Send to the defined proxy_next_upstream, fastcgi_next_upstream, uwsgi_next_upstream, scgi_next_upstream, and memcached_next_upstream instructions to handle this wrong request
- fail_timeout defaults to 10 seconds. After a server reaches max_fails failed requests, within the fail_timeout period, nginx will consider this server temporarily unavailable and will not assign requests to it
- max_conns The maximum number of connections, which limits the maximum number of connections allocated to a certain server. If it exceeds this number, no new connections will be allocated to him. The default is 0, which means no limit.
- backup Backup machine, it will take effect after all nodes are down
- down identifies a machine as unavailable
Nginx load balancing is implemented through the upstream module. There are three built-in load balancing strategies in nginx.
7. Round robin (default), Nginx distributes each request to each server evenly according to the number of requests.
8. The least link, assigning requests to For the server with the least number of connections, Nginx will count which servers have the least number of connections.
9. IP Hash, bind the server requested by the processor. When requesting for the first time, a hash value is calculated according to the client’s IP address, and the request is allocated to a certain server in the cluster. All subsequent requests of the client, Through the hash algorithm, the server that previously processed the client's request will be found, and then the request will be handed over to it for processing.
Completely uninstall nginx
1.1 删除nginx,–purge包括配置文件
sudo apt-get --purge remove nginx

1.2 自动移除全部不使用的软件包
sudo apt-get autoremove

1.3 罗列出与nginx相关的软件
dpkg --get-selections|grep nginx


执行1.3的结果:
stephen@stephen-OptiPlex-390:~$ dpkg --get-selections|grep nginx
nginx                       install
nginx-common                    install
nginx-core                  install

1.4 删除1.3查询出与nginx有关的软件
sudo apt-get --purge remove nginx
sudo apt-get --purge remove nginx-common
sudo apt-get --purge remove nginx-core
  这样就可以完全卸载掉nginx包括配置文件
p nginx
nginx                       install
nginx-common                    install
nginx-core                  install

1.4 删除1.3查询出与nginx有关的软件
sudo apt-get --purge remove nginx
sudo apt-get --purge remove nginx-common
sudo apt-get --purge remove nginx-core
  这样就可以完全卸载掉nginx包括配置文件