SpringBoot integrated security (3) | (Security's front-end and back-end separation login and response processing)
Chapter
Chapter 1 link: SpringBoot integrated security (1) | (Security entry)
Chapter 2 link: SpringBoot integrated security (2) | (security custom configuration)
Chapter 3 link: SpringBoot integrated security (3) | (security Front-end and back-end separation login and response processing)
Chapter 4 link: SpringBoot integrated security (4) | (Security is based on JWT to achieve front-end separation and custom login)
foreword
In the previous chapter, we introduced springboot's security-based user configuration, permission configuration, and resource configuration. But in practice, it is found that the authentication uses the default login form to log in, and the error reporting of authentication and authorization exceptions is relatively rough and directly returns a string of JSON, which is very unfriendly. Since most projects are now separated from the front and back ends, we will discuss in this chapter Realize login based on front-end and back-end separation, and prompt management
This article is an expansion on the basis of the previous one. If you are not very clear about the project foundation, please check the previous article
1. Project dependencies
It mainly includes security dependencies and some tool dependencies
    <parent>
        <groupId>org.springframework.boot</groupId>
        <artifactId>spring-boot-starter-parent</artifactId>
        <version>2.5.7</version>
        <relativePath/>
    </parent>
   <dependencies>
       <!--    springboot   start-->
       <dependency>
           <groupId>org.springframework.boot</groupId>
           <artifactId>spring-boot-starter</artifactId>
       </dependency>
       <dependency>
           <groupId>org.springframework.boot</groupId>
           <artifactId>spring-boot-starter-test</artifactId>
           <scope>test</scope>
       </dependency>
       <dependency>
           <groupId>org.springframework.boot</groupId>
           <artifactId>spring-boot-starter-web</artifactId>
       </dependency>
       <!--    springboot依赖    end-->

       <!--wagger2依赖start-->
       <dependency>
           <groupId>com.github.xiaoymin</groupId>
           <artifactId>knife4j-spring-ui</artifactId>
           <version>3.0.3</version>
       </dependency>
       <dependency>
           <groupId>io.springfox</groupId>
           <artifactId>springfox-swagger2</artifactId>
           <version>3.0.0</version>
       </dependency>

       <!--常用工具依赖start-->
       <dependency>
           <groupId>org.apache.commons</groupId>
           <artifactId>commons-lang3</artifactId>
           <version>3.12.0</version>
       </dependency>

       <dependency>
           <groupId>org.apache.commons</groupId>
           <artifactId>commons-collections4</artifactId>
           <version>4.1</version>
       </dependency>

       <dependency>
           <groupId>com.google.guava</groupId>
           <artifactId>guava</artifactId>
           <version>30.1.1-jre</version>
       </dependency>

       <!--fastjson引入-->
       <dependency>
           <groupId>com.alibaba</groupId>
           <artifactId>fastjson</artifactId>
           <version>1.2.49</version>
       </dependency>
       <dependency>
           <groupId>org.projectlombok</groupId>
           <artifactId>lombok</artifactId>
           <optional>true</optional>
       </dependency>
       <dependency>
           <groupId>commons-codec</groupId>
           <artifactId>commons-codec</artifactId>
           <version>1.15</version>
       </dependency>

       <!--security引入-->
       <dependency>
           <groupId>org.springframework.boot</groupId>
           <artifactId>spring-boot-starter-security</artifactId>
       </dependency>

       <!--数据库引入引入-->
       <dependency>
           <groupId>org.springframework.boot</groupId>
           <artifactId>spring-boot-starter-data-jpa</artifactId>
       </dependency>
       <dependency>
           <groupId>mysql</groupId>
           <artifactId>mysql-connector-java</artifactId>
           <scope>runtime</scope>
       </dependency>
   </dependencies>
2. Custom response processing
Custom response processing is mainly to define the response format, which is convenient for front-end and back-end coordination
1. Define the response body ResponseHandle
@Data
public class ResponseHandle<T> {


    private String status;
    private String desc;
    private T data;

    // 成功 无参构成函数
    public static ResponseHandle SUCCESS(){


        ResponseHandle result = new ResponseHandle();
        result.setDesc("成功");
        result.setResultCode(HttpCode.SUCCESS);
        return result;
    }
    //成功 有返回数据构造函数
    public static ResponseHandle SUCCESS(Object data){


        ResponseHandle result = new ResponseHandle();
        result.setData(data);
        result.setResultCode(HttpCode.SUCCESS);
        return result;
    }

    /**
     * 失败,指定status、desc
     */
    public static ResponseHandle FAIL(String status, String desc) {


        ResponseHandle result = new ResponseHandle();
        result.setStatus(status);
        result.setDesc(desc);
        return result;
    }

    /**
     * 失败,指定ResultCode枚举
     */
    public static ResponseHandle FAIL(HttpCode resultCode) {


        ResponseHandle result = new ResponseHandle();
        result.setResultCode(resultCode);
        return result;
    }
    /**
     * 把ResultCode枚举转换为ResResult
     */
    private void setResultCode(HttpCode code) {


        this.status = code.code();
        this.desc = code.message();
    }
}
2. Define the response enumeration HttpCode
public enum HttpCode {


    // 成功状态码
    SUCCESS("00000", "成功"),
    UNKNOWN_ERROR("99999", "服务未知异常"),
    // 系统500错误
    SYSTEM_ERROR("10000", "系统异常,请稍后重试"),


    // 认证错误:20001-29999
    USER_NOAUTH("20000", "用户未登录"),
    TOKEN_ERROR("20001", "生成token失败"),
    LOGIN_ERROR("20002", "登录失败"),
    USER_LOCKED("20004", "账户已锁定"),
    USER_PASS_OUT("20005", "用户名或密码错误次数过多"),
    USER_NOTFIND_ERROR("20006", "没有找到用户"),
    USER_ERROR("20007", "用户名或密码不正确"),

    ;


    private String code;

    private String message;

    HttpCode(String code, String message) {


        this.code = code;
        this.message = message;
    }

    public String code() {


        return this.code;
    }

    public String message() {


        return this.message;
    }
}
3. Custom login response class
Mainly the information format returned to the front end in scenarios such as successful login, failed login, no login, and logout
1. Login failure processing
@Component
public class LoginFailureHandler implements AuthenticationFailureHandler {


    @Override
    public void onAuthenticationFailure(HttpServletRequest request, HttpServletResponse response, AuthenticationException exception) throws IOException, ServletException {


        response.setCharacterEncoding("UTF-8");
        response.setContentType("application/json; charset=utf-8");
        response.setStatus(HttpServletResponse.SC_OK);
        ResponseHandle fail = ResponseHandle.FAIL(HttpCode.USER_ERROR);
        response.getWriter().write(JSONObject.toJSONString(fail));
    }
}
2. Successful login processing
public class LoginSuccessHandler implements AuthenticationSuccessHandler {


    @Override
    public void onAuthenticationSuccess(HttpServletRequest request, HttpServletResponse response, FilterChain chain, Authentication authentication) throws IOException, ServletException {


    }

    @Override
    public void onAuthenticationSuccess(HttpServletRequest request, HttpServletResponse response, Authentication authentication) throws IOException, ServletException {


        response.setCharacterEncoding("UTF-8");
        response.setContentType("application/json; charset=utf-8");
        response.setStatus(HttpServletResponse.SC_OK);
        ResponseHandle success = ResponseHandle.SUCCESS(authentication);
        response.getWriter().write(JSONObject.toJSONString(success));
    }
}
3. Successful logout processing
public class LogoutMySuccessHandler implements LogoutSuccessHandler {


    @Override
    public void onLogoutSuccess(HttpServletRequest request, HttpServletResponse response, Authentication authentication) throws IOException, ServletException {


        response.setCharacterEncoding("UTF-8");
        response.setContentType("application/json; charset=utf-8");
        response.setStatus(HttpServletResponse.SC_OK);
        ResponseHandle success = ResponseHandle.SUCCESS("登出成功");
        response.getWriter().write(JSONObject.toJSONString(success));
    }
}
4. No login processing
public class NoLoginHandler implements AuthenticationEntryPoint {


    @Override
    public void commence(HttpServletRequest request, HttpServletResponse response, AuthenticationException authException) throws IOException, ServletException {


        response.setCharacterEncoding("UTF-8");
        response.setContentType("application/json; charset=utf-8");
        response.setStatus(HttpServletResponse.SC_OK);
        ResponseHandle fail = ResponseHandle.FAIL(HttpCode.USER_NOAUTH);
        response.getWriter().write(JSONObject.toJSONString(fail));
    }
}
Fourth, custom login implementation
1. Introduction to UsernamePasswordAuthenticationFilter
UsernamePasswordAuthenticationFilter is the implementation class of security that implements username and password login by default. When we use the default login form and other routes, we will enter this class for user login processing. If we want to customize the login interface, then we have to rewrite this class.
2. Custom username and password login implementation
Here, users can customize their own implementation logic, such as user password encryption, return parameters, etc.
@Slf4j
public class MyUsernamePasswordAuthenticationFilter extends UsernamePasswordAuthenticationFilter {


    @Override
    public Authentication attemptAuthentication(HttpServletRequest request, HttpServletResponse response) throws AuthenticationException {


        if(!request.getMethod().equals("POST")){


            throw new AuthenticationServiceException("Authentication method not supported: " + request.getMethod());
        }
        if(request.getContentType().equals("application/json")){


            try {


                //参数转换为map
                Map map = new ObjectMapper().readValue(request.getInputStream(),Map.class);
                String username = (String) map.get("username");
                String password = (String) map.get("password");
                UsernamePasswordAuthenticationToken authRequest = new UsernamePasswordAuthenticationToken(username, password);
                setDetails(request, authRequest);
                return this.getAuthenticationManager().authenticate(authRequest);
            } catch (IOException e) {


                e.printStackTrace();
            }
        }
        return super.attemptAuthentication(request, response);
    }
}
3. Security configuration
Configure security user sources, authentication modes, filters, etc. Here we define our own /mylogin login interface
@Configuration
@EnableWebSecurity
public class SecurityConfig extends WebSecurityConfigurerAdapter {


    @Autowired
    private UserServiceImpl userService;


    /**
     * 常用的三种存储方式,项目找那个用的最多的为,自定义用户存储
     *
     * @param auth
     * @throws Exception
     */
    @Override
    protected void configure(AuthenticationManagerBuilder auth) throws Exception {


        //1、内存用户配置
//        auth.inMemoryAuthentication().passwordEncoder(bCryptPasswordEncoder())
//                .withUser("admin").password(bCryptPasswordEncoder().encode("123456")).authorities("ADMIN")
//                .and()
//                .withUser("test").password(bCryptPasswordEncoder().encode("123456")).authorities("TEST");
        //2、数据库用户配置
//        auth.jdbcAuthentication().dataSource(dataSource).passwordEncoder(passwordEncoder())
//                .usersByUsernameQuery(
//                        "select username, password, status from Users where username = ?")
//                .authoritiesByUsernameQuery(
//                        "select username, authority from Authority where username = ?");
        //3、自定义用户存储
        auth.userDetailsService(userService)
                .passwordEncoder(bCryptPasswordEncoder());
    }

    /**
     * configure(WebSecurity)用于影响全局安全性(配置资源,设置调试模式,通过实现自定义防火墙定义拒绝请求)的配置设置。
     * 一般用于配置全局的某些通用事物,例如静态资源等
     *
     * @param web
     */
    @Override
    public void configure(WebSecurity web) {


        web.ignoring()
                .antMatchers(HttpMethod.OPTIONS, "/**")  ///跨域请求预处理
                .antMatchers("/favicon.ico")
                .antMatchers("/swagger**")   // 以下swagger静态资源、接口不拦截
                .antMatchers("/doc.html")
                .antMatchers("/swagger-resources/**")
                .antMatchers("/v2/api-docs")
                .antMatchers("/webjars/**")
                .antMatchers("/test/**")
                .antMatchers("/js/**", "/css/**", "/images/**");  // 排除html静态资源
    }

    /**
     * 配置接口拦截
     * configure(HttpSecurity)允许基于选择匹配在资源级配置基于网络的安全性,
     * 也就是对角色所能访问的接口做出限制
     *
     * @param httpSecurity 请求属性
     * @throws Exception
     */
    @Override
    protected void configure(HttpSecurity httpSecurity) throws Exception {


        httpSecurity.authorizeRequests()
                .antMatchers(HttpMethod.GET, "/demo/get").permitAll()
                //指定权限为ROLE_ADMIN才能访问,这里和方法注解配置效果一样,但是会覆盖注解
                .antMatchers("/demo/delete").hasRole("ADMIN")
                // 所有请求都需要验证
                .anyRequest().authenticated()
                .and()
                //.httpBasic() Basic认证,和表单认证只能选一个
                // 使用表单认证页面
                .formLogin()
                .and().addFilterAt(loginFilter(), UsernamePasswordAuthenticationFilter.class)
                .exceptionHandling()
                .authenticationEntryPoint(new NoLoginHandler())
                .and()
                .logout()
                .logoutSuccessHandler(new LogoutMySuccessHandler())
                .and()
                .csrf().disable();
    }


    /**
     * 配置用户认证方式
     *
     * @return
     * @throws Exception
     */
    @Override
    @Bean
    public AuthenticationManager authenticationManagerBean() throws Exception {


        return super.authenticationManagerBean();
    }


    /**
     * 自定义过滤器,用来替换security的默认过滤器(UsernamePasswordAuthenticationFilter),
     * 实现自定义的login接口,接口路径为了区别默认的/login我们定义为/mylogin
     *
     * @return
     * @throws Exception
     */
    @Bean
    public MyUsernamePasswordAuthenticationFilter loginFilter() throws Exception {


        MyUsernamePasswordAuthenticationFilter loginFilter = new MyUsernamePasswordAuthenticationFilter();
        loginFilter.setFilterProcessesUrl("/mylogin");
        loginFilter.setAuthenticationSuccessHandler(new LoginSuccessHandler());
        loginFilter.setAuthenticationFailureHandler(new LoginFailureHandler());
        loginFilter.setAuthenticationManager(authenticationManagerBean());
        return loginFilter;
    }

    /**
     * 使用security 提供的加密规则(还有其他加密方式)
     *
     * @return
     */
    @Bean
    public BCryptPasswordEncoder bCryptPasswordEncoder() {


        return new BCryptPasswordEncoder();
    }

}
4. Verify login
1. Write the test interface
@Api(tags = {

    "演示相关接口"})
@RestController
@RequestMapping("/demo")
public class DemoCtrl {


    @Autowired
    private UserRepository userRepository;

    @Autowired
        private BCryptPasswordEncoder bCryptPasswordEncoder;


    @ApiOperation(value = "获取接口", notes = "获取接口")
    @GetMapping(value = "/get")
    public ResponseHandle get() {


        return ResponseHandle.SUCCESS("获取数据成功");
    }
    @ApiOperation(value = "获取接口", notes = "获取接口")
    @GetMapping(value = "/find")
    public ResponseHandle find() {


        return ResponseHandle.SUCCESS("查询数据成功");
    }

    @ApiOperation(value = "注册用户", notes = "注册")
    @PostMapping("/register")
    public String registerUser(@RequestBody Map<String, String> registerUser) {


        User user = new User();
        user.setUsername(registerUser.get("username"));
        user.setPassword(bCryptPasswordEncoder.encode(registerUser.get("password")));
        user.setRole("ROLE_USER");
        User save = userRepository.save(user);
        return save.toString();
    }

    @ApiOperation(value = "修改用户", notes = "修改")
    @GetMapping("/update")
//    @PreAuthorize("hasRole('ROLE_ADMIN')")
    public ResponseHandle updateUser() {


        return ResponseHandle.SUCCESS("数据修改成功");
    }
    @ApiOperation(value = "删除用户", notes = "删除")
    @GetMapping("/delete")
    public ResponseHandle deleteUser() {


        return ResponseHandle.SUCCESS("数据删除成功");
    }
}
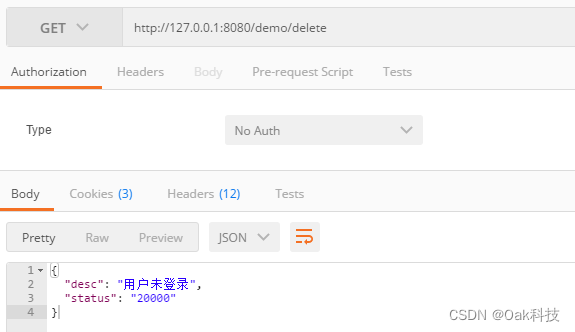
2. Call interface prompt
1. There is no login call interface
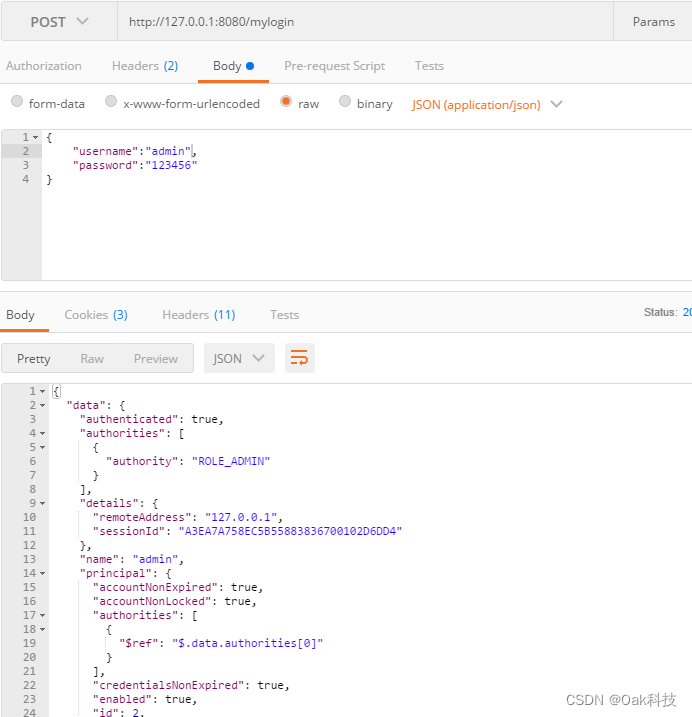
2. Call the login interface
Summarize
At this point, springboot integrates security to complete the user's database configuration and custom login, and improves the login-related responses, which facilitates the unified processing of the front and back ends. This kind of login can meet the needs of a single project, but considering the login authentication between multiple projects, there are still many problems in this solution. Next, we will continue to complete the token-based authentication method
Links to Chapter 1: SpringBoot Integrated Security (1) | (Introduction to Security)
Links to Chapter 2: SpringBoot Integrated Security (2) | (Security Custom Configuration)
Links to Chapter 3: SpringBoot Integrated Security (3) | (Before and After Security End-separated login and response processing)
Chapter 4 link: SpringBoot integrated security (4) | (Security is based on JWT to achieve front-end separation and custom login)