Article Directory
-
- SSM integration
-
- 1. Build the environment
- Two, build the Spring environment
- 3. Build the SpringMVC environment
- 4. Integrate Spring and SpringMVC
- Five, build Mybatis framework environment
- 6. Integrate Spring and Mybaits
- Seven, Spring's transaction control
- 8. Overall test
SSM integration

1. Build the environment
1.1 Create database and table structure
create database ssm;
create table account(
id int primary key auto_increment,
name varchar(100),
money double(7,2),
);
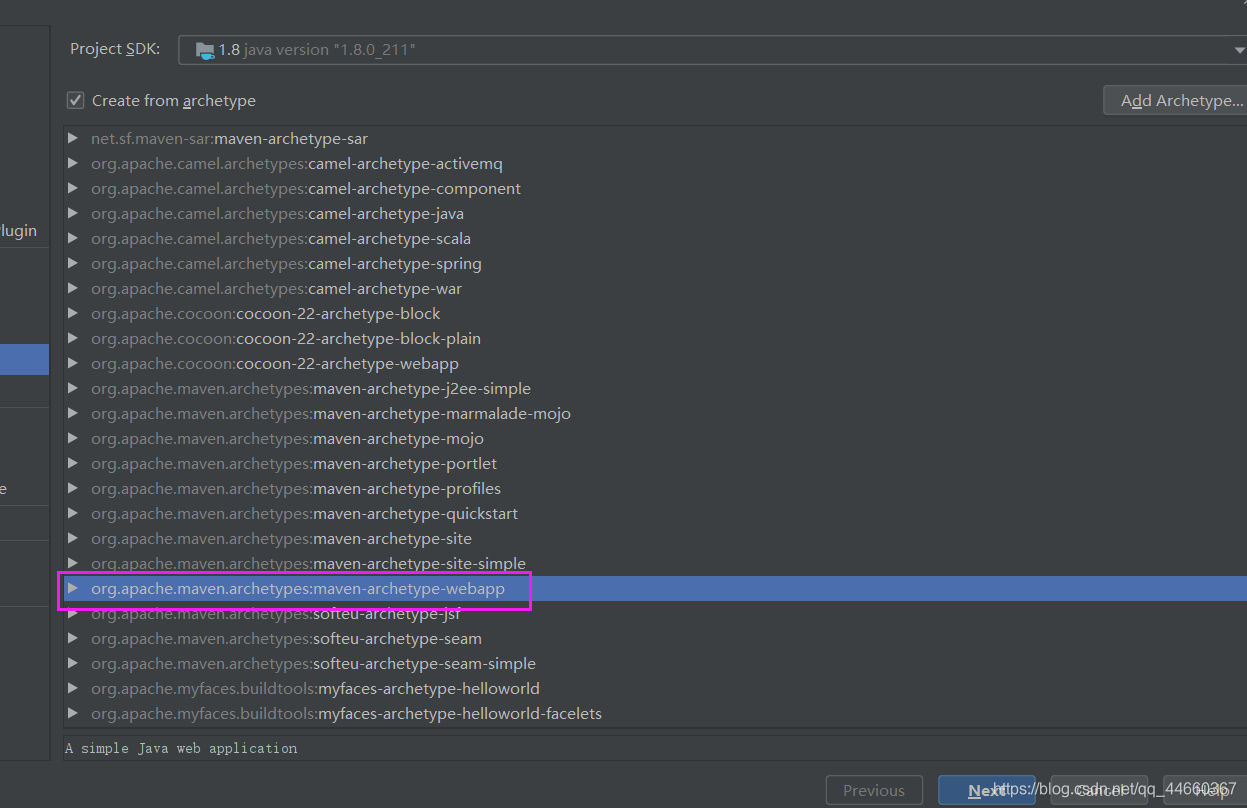
1.2 Create a Maven project
Select jdk, check Apache – webapp module
1.3 Create a submodule and import coordinates
Import all Maven coordinates to be used
<?xml version="1.0" encoding="UTF-8"?>

<project xmlns="http://maven.apache.org/POM/4.0.0" xmlns:xsi="http://www.w3.org/2001/XMLSchema-instance"
  xsi:schemaLocation="http://maven.apache.org/POM/4.0.0 http://maven.apache.org/xsd/maven-4.0.0.xsd">
  <modelVersion>4.0.0</modelVersion>

  <groupId>org.example</groupId>
  <artifactId>springmvc_day03_01ssm</artifactId>
  <version>1.0-SNAPSHOT</version>
  <packaging>war</packaging>

  <name>springmvc_day03_01ssm Maven Webapp</name>
  <!-- FIXME change it to the project's website -->
  <url>http://www.example.com</url>

  <properties>
    <project.build.sourceEncoding>UTF-8</project.build.sourceEncoding>
    <maven.compiler.source>1.7</maven.compiler.source>
    <maven.compiler.target>1.7</maven.compiler.target>
  </properties>

  <dependencies>
    <dependency>
      <groupId>org.aspectj</groupId>
      <artifactId>aspectjweaver</artifactId>
      <version>1.9.6</version>
    </dependency>
    <dependency>
      <groupId>org.springframework</groupId>
      <artifactId>spring-aop</artifactId>
      <version>5.2.9.RELEASE</version>
    </dependency>
    <dependency>
      <groupId>org.springframework</groupId>
      <artifactId>spring-context</artifactId>
      <version>5.2.9.RELEASE</version>
    </dependency>
    <dependency>
      <groupId>org.springframework</groupId>
      <artifactId>spring-web</artifactId>
      <version>5.2.9.RELEASE</version>
    </dependency>
    <dependency>
      <groupId>org.springframework</groupId>
      <artifactId>spring-webmvc</artifactId>
      <version>5.2.9.RELEASE</version>
    </dependency>
    <dependency>
      <groupId>org.springframework</groupId>
      <artifactId>spring-test</artifactId>
      <version>5.2.9.RELEASE</version>
    </dependency>
    <dependency>
      <groupId>org.springframework</groupId>
      <artifactId>spring-tx</artifactId>
      <version>5.2.8.RELEASE</version>
    </dependency>
    <dependency>
      <groupId>org.springframework</groupId>
      <artifactId>spring-jdbc</artifactId>
      <version>5.2.8.RELEASE</version>
    </dependency>
    <!-- 注意:这里要将Junit中的Scope属性改为compile,来实现在非测试区自定义测试支持junit -->
    <dependency>
      <groupId>junit</groupId>
      <artifactId>junit</artifactId>
      <version>4.12</version>
      <scope>compile</scope>
    </dependency>
    <dependency>
      <groupId>mysql</groupId>
      <artifactId>mysql-connector-java</artifactId>
      <version>8.0.21</version>
    </dependency>
    <dependency>
      <groupId>javax.servlet</groupId>
      <artifactId>servlet-api</artifactId>
      <version>2.5</version>
    </dependency>
    <dependency>
      <groupId>javax.servlet.jsp</groupId>
      <artifactId>jsp-api</artifactId>
      <version>2.0</version>
    </dependency>
    <dependency>
      <groupId>jstl</groupId>
      <artifactId>jstl</artifactId>
      <version>1.2</version>
    </dependency>
    <dependency>
      <groupId>log4j</groupId>
      <artifactId>log4j</artifactId>
      <version>1.2.17</version>
    </dependency>
    <dependency>
      <groupId>org.slf4j</groupId>
      <artifactId>slf4j-api</artifactId>
      <version>1.7.30</version>
    </dependency>
    <dependency>
      <groupId>org.mybatis</groupId>
      <artifactId>mybatis</artifactId>
      <version>3.5.5</version>
    </dependency>
    <dependency>
      <groupId>org.mybatis</groupId>
      <artifactId>mybatis-spring</artifactId>
      <version>2.0.5</version>
    </dependency>
    <dependency>
      <groupId>c3p0</groupId>
      <artifactId>c3p0</artifactId>
      <version>0.9.1.2</version>
    </dependency>
  </dependencies>

  <build>
    <finalName>springmvc_day03_01ssm</finalName>
    <pluginManagement><!-- lock down plugins versions to avoid using Maven defaults (may be moved to parent pom) -->
      <plugins>
        <plugin>
          <artifactId>maven-clean-plugin</artifactId>
          <version>3.1.0</version>
        </plugin>
        <!-- see http://maven.apache.org/ref/current/maven-core/default-bindings.html#Plugin_bindings_for_war_packaging -->
        <plugin>
          <artifactId>maven-resources-plugin</artifactId>
          <version>3.0.2</version>
        </plugin>
        <plugin>
          <artifactId>maven-compiler-plugin</artifactId>
          <version>3.8.0</version>
        </plugin>
        <plugin>
          <artifactId>maven-surefire-plugin</artifactId>
          <version>2.22.1</version>
        </plugin>
        <plugin>
          <artifactId>maven-war-plugin</artifactId>
          <version>3.2.2</version>
        </plugin>
        <plugin>
          <artifactId>maven-install-plugin</artifactId>
          <version>2.5.2</version>
        </plugin>
        <plugin>
          <artifactId>maven-deploy-plugin</artifactId>
          <version>2.8.2</version>
        </plugin>
      </plugins>
    </pluginManagement>
  </build>
</project>
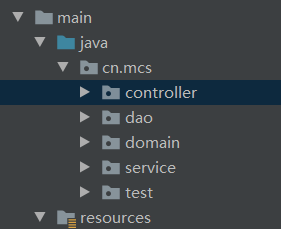
1.4 Create a three-tier framework
1.4.1 Writing Entity Classes
package cn.mcs.domain;

import java.io.Serializable;

public class Account implements Serializable {


    private int id;
    private String name;
    private double money;

    public int getId() {


        return id;
    }

    public void setId(int id) {


        this.id = id;
    }

    public String getName() {


        return name;
    }

    public void setName(String name) {


        this.name = name;
    }

    public double getMoney() {


        return money;
    }

    public void setMoney(double money) {


        this.money = money;
    }

    public Account(int id, String name, double money) {


        this.id = id;
        this.name = name;
        this.money = money;
    }

    public Account() {


    }

    @Override
    public String toString() {


        return "Account{" +
                "id=" + id +
                ", name='" + name + '\'' +
                ", money=" + money +
                '}';
    }
}
1.4.2 Writing Persistence Layer Interface
package cn.mcs.dao;

import cn.mcs.domain.Account;

import java.util.List;

public interface AccountDao {


    // 保存用户
    public void saveAccount(Account account);

    //查找所有
    public List<Account> findAll();
}
1.4.3 Write business layer interface
package cn.mcs.service;

import cn.mcs.domain.Account;

import java.util.List;

public interface AccountService {


    // 保存用户
    public void saveAccount(Account account);

    //查找所有
    public List<Account> findAll();
}
1.4.4 Write business layer implementation class
package cn.mcs.service.impl;
import cn.mcs.domain.Account;
import cn.mcs.service.AccountService;
import java.util.List;
public class AccountServiceImpl implements AccountService {
@Override
public void saveAccount(Account account) {
}
@Override
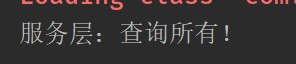
public List<Account> findAll() {
System.out.println("业务层:查询所有!");
return null;
}
}
Two, build the Spring environment
2.1 Create a spring configuration file
applicationContext.xml
<?xml version="1.0" encoding="UTF-8"?>
<beans xmlns="http://www.springframework.org/schema/beans"
       xmlns:xsi="http://www.w3.org/2001/XMLSchema-instance"
       xmlns:context="http://www.springframework.org/schema/context"
       xmlns:aop="http://www.springframework.org/schema/aop"
       xmlns:tx="http://www.springframework.org/schema/tx"
       xsi:schemaLocation="http://www.springframework.org/schema/beans
        http://www.springframework.org/schema/beans/spring-beans.xsd
        http://www.springframework.org/schema/context
        http://www.springframework.org/schema/context/spring-context.xsd
        http://www.springframework.org/schema/aop
        http://www.springframework.org/schema/aop/spring-aop.xsd
        http://www.springframework.org/schema/tx
        http://www.springframework.org/schema/tx/spring-tx.xsd">

    <!-- 开启注解支持,配置扫描的包 -->
    <context:component-scan base-package="cn.mcs">
        <!-- spring只需要扫描dao,domain,service,永久层以及服务层的包,controller的包交给springmvc来处理-->
        <!-- 这里是取消对有@Controller注解的文件进行扫描 -->
        <context:exclude-filter type="annotation" expression="org.springframework.stereotype.Controller"/>
    </context:component-scan>
</beans>
2.2 Use annotations to configure the business layer implementation class and persistence layer
// 持久层
@Repository
public interface AccountDao {


// 业务层实现类
@Service("accountService")
public class AccountServiceImpl implements AccountService {
2.3 Test whether spring can run independently
test.java
package cn.mcs.test;

import cn.mcs.service.AccountService;
import org.junit.Test;
import org.springframework.context.ApplicationContext;
import org.springframework.context.support.ClassPathXmlApplicationContext;

public class test {


    @Test
    public void test01() {


        // 获取容器
        ApplicationContext ac = new ClassPathXmlApplicationContext("classpath:applicationContext.xml");
        // 获取对象
        AccountService accountService = (AccountService) ac.getBean("accountService");
        // 执行操作
        accountService.findAll();
    }
}
Note that if the @Test annotation is used to report an error, because you did not set the Scope property to compile when importing the package
Output the sentence we printed, proving that spring can run independently
3. Build the SpringMVC environment
3.1 Configure the core controller
web.xml
<!DOCTYPE web-app PUBLIC
 "-//Sun Microsystems, Inc.//DTD Web Application 2.3//EN"
 "http://java.sun.com/dtd/web-app_2_3.dtd" >

<web-app>
  <display-name>Archetype Created Web Application</display-name>
  <servlet>
    <servlet-name>dispatcherServlet</servlet-name>
    <servlet-class>org.springframework.web.servlet.DispatcherServlet</servlet-class>
    <init-param>
      <param-name>contextConfigLocation</param-name>
      <param-value>classpath:springmvc.xml</param-value>
    </init-param>
    <load-on-startup>1</load-on-startup>
  </servlet>
  <servlet-mapping>
    <servlet-name>dispatcherServlet</servlet-name>
    <url-pattern>/</url-pattern>
  </servlet-mapping>
  <!-- 配置字符接编码 -->
  <filter>
    <filter-name>characterEncodingFilter</filter-name>
    <filter-class>org.springframework.web.filter.CharacterEncodingFilter</filter-class>
    <init-param>
      <param-name>encoding</param-name>
      <param-value>UTF-8</param-value>
    </init-param>
  </filter>
  <filter-mapping>
    <filter-name>characterEncodingFilter</filter-name>
    <url-pattern>/*</url-pattern>
  </filter-mapping>
</web-app>
3.2 Write springmvc configuration file
springmvc.xml
<?xml version="1.0" encoding="UTF-8"?>
<beans xmlns="http://www.springframework.org/schema/beans"
       xmlns:xsi="http://www.w3.org/2001/XMLSchema-instance"
       xmlns:mvc="http://www.springframework.org/schema/mvc"
       xmlns:context="http://www.springframework.org/schema/context"
       xsi:schemaLocation="http://www.springframework.org/schema/beans
        http://www.springframework.org/schema/beans/spring-beans.xsd
        http://www.springframework.org/schema/mvc
        http://www.springframework.org/schema/mvc/spring-mvc.xsd
        http://www.springframework.org/schema/context
        http://www.springframework.org/schema/context/spring-context.xsd">
    <!-- 配置要扫描的包,只扫描表现层的包 -->
    <context:component-scan base-package="cn.mcs">
        <context:include-filter type="annotation" expression="org.springframework.stereotype.Controller"/>
    </context:component-scan>

    <!-- 配置视图解析器 -->
    <bean id="internalResourceViewResolver" class="org.springframework.web.servlet.view.InternalResourceViewResolver">
        <property name="prefix" value="/WEB-INF/pages/"></property>
        <property name="suffix" value=".jsp"></property>
    </bean>

    <!-- 开启mvc注解支持 -->
    <mvc:annotation-driven></mvc:annotation-driven>
</beans>
3.3 Writing controller and jsp pages
package cn.mcs.controller;

import org.springframework.stereotype.Controller;
import org.springframework.web.bind.annotation.RequestMapping;
import org.springframework.web.bind.annotation.RequestParam;

@Controller
@RequestMapping("/account")
public class accountController {


    @RequestMapping("/findAll")
    public String findAll() {


        System.out.println("表现层:查询所有");
        return "list";
    }
}
index.jsp
<%@ page contentType="text/html;charset=UTF-8" language="java" %>
<html>
<head>
    <title>Title</title>
</head>
<body>
    <a href="account/findAll">查询所有</a>
</body>
</html>
Create pages file under WEB-INF path and create list.jsp at the same time
<%@ page contentType="text/html;charset=UTF-8" language="java" %>
<html>
<head>
    <title>Title</title>
</head>
<body>
    <h1>表现层:查询所有</h1>
</body>
</html>
3.4 Configure tomcat server and test

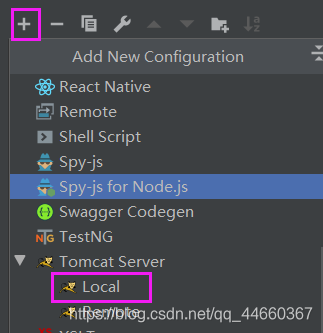
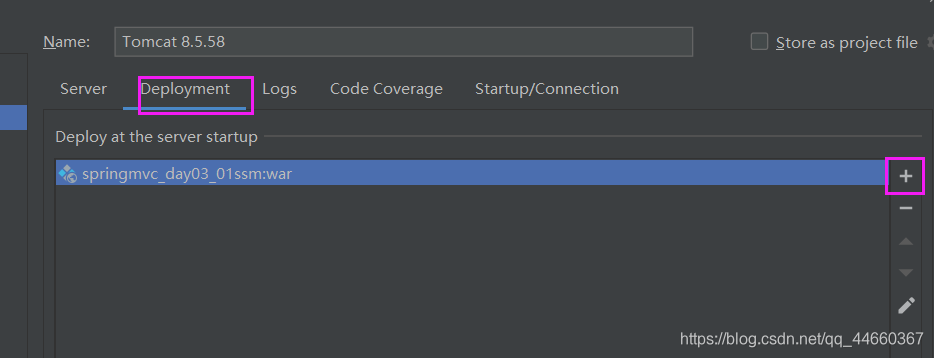
Run the test

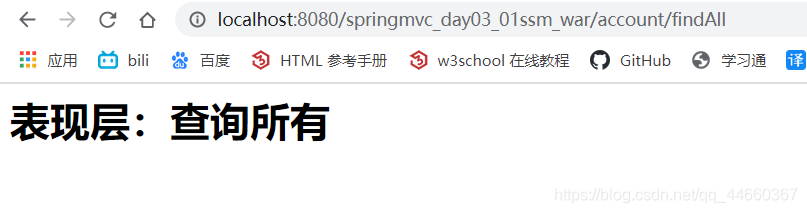

console to print, and switch to the specified page, the springmvc environment is successfully built!
4. Integrate Spring and SpringMVC
Integration principle
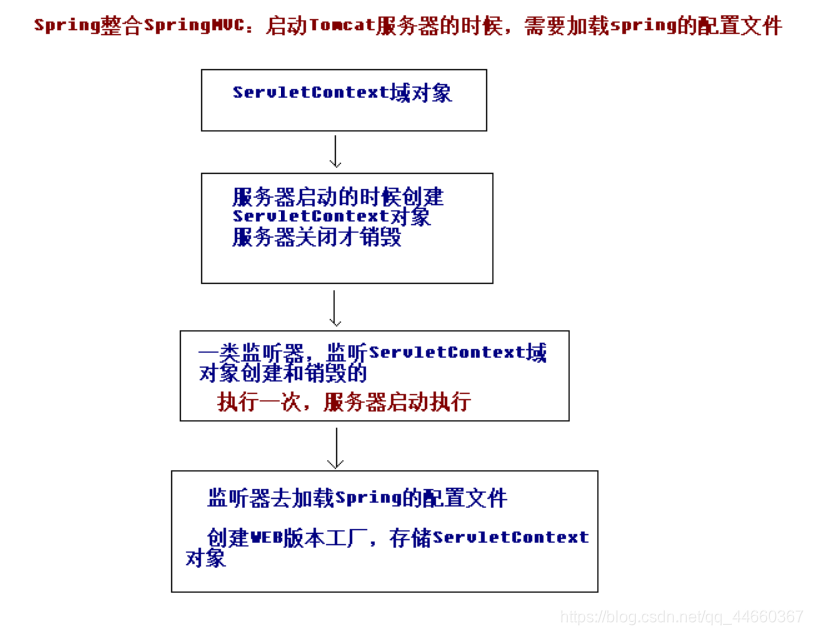
Modify web.xml, load spring configuration as a file
<!-- 配置spring的监听器,监听器默认去加载/WEB路径下的applicationContext.xml-->
  <listener>
    <listener-class>org.springframework.web.context.ContextLoaderListener</listener-class>
  </listener>
  <!-- 修改加载类路径的位置 -->
  <context-param>
    <param-name>contextConfigLocation</param-name>
    <param-value>classpath:applicationContext.xml</param-value>
  </context-param>
Use the query method of the business layer in the controller
    @Autowired
    private AccountService accountService;
	@RequestMapping("/findAll")
    public String findAll() {


        System.out.println("表现层:查询所有");
        accountService.findAll();
        return "list";
    }
Running tomcat again

uses the business layer query method, and jumps to the page at the same time, the integration is successful!
Five, build Mybatis framework environment
It is a bit cumbersome for mybatis to query the pure xml configuration. We use annotations combined with configuration files. The mapping files of the permanent layer are not used, and annotations are used instead, and the main configuration file is written.
5.1 Write the main configuration file
SqlMapConfig.xml
<?xml version="1.0" encoding="UTF-8"?>
<!DOCTYPE configuration
PUBLIC "-//mybatis.org//DTD Config 3.0//EN"
"http://mybatis.org/dtd/mybatis-3-config.dtd">
<configuration>
<!-- 配置环境 -->
<environments default="mysql">
<!-- 配置mysql的环境 -->
<environment id="mysql">
<!-- 配置事务类型 -->
<transactionManager type="JDBC"></transactionManager>
<!-- 配置数据源(连接池) -->
<dataSource type="POOLED">
<!-- 配置数据库的基本信息 -->
<property name="driver" value="com.mysql.jdbc.Driver"/>
<property name="url" value="jdbc:mysql://localhost:3306/ssm?useUnicode=true&characterEncoding=UTF-8"/>
<property name="username" value="root"/>
<property name="password" value="123456"/>
</dataSource>
</environment>
</environments>
<!-- 扫描dao包(注解版)或者映射文件(配置文件) -->
<mappers>
<!-- 一个一个dao包扫 -->
<!-- <mapper class="cn.mcs.dao.AccountDao"/>-->
<!-- 该包下所有的dao接口都可被扫描 -->
<package name="cn.mcs.dao"/>
</mappers>
</configuration>
5.2 Add CRUD annotations to the permanent layer interface
package cn.mcs.dao;

import cn.mcs.domain.Account;
import org.apache.ibatis.annotations.Insert;
import org.apache.ibatis.annotations.Select;
import org.springframework.stereotype.Repository;
import org.springframework.stereotype.Service;

import java.util.List;

@Repository
public interface AccountDao {


    // 保存用户
    @Insert("insert into account (name,money) values (#{name},#{money})")
    public void saveAccount(Account account);

    //查找所有
    @Select("select *from account")
    public List<Account> findAll();
}
5.3 Use the permanent layer query method in the business layer
package cn.mcs.service.impl;

import cn.mcs.dao.AccountDao;
import cn.mcs.domain.Account;
import cn.mcs.service.AccountService;
import org.springframework.beans.factory.annotation.Autowired;
import org.springframework.stereotype.Service;

import java.util.List;

@Service("accountService")
public class AccountServiceImpl implements AccountService {


    @Autowired
    private AccountDao accountDao;


    @Override
    public void saveAccount(Account account) {


        accountDao.saveAccount(account);
    }

    @Override
    public List<Account> findAll() {


        System.out.println("业务层:查询所有!");
        List<Account> accounts = accountDao.findAll();
        return accounts;
    }
}
5.4 Testing
package cn.mcs.test;

import cn.mcs.dao.AccountDao;
import cn.mcs.domain.Account;
import org.apache.ibatis.io.Resources;
import org.apache.ibatis.session.SqlSession;
import org.apache.ibatis.session.SqlSessionFactory;
import org.apache.ibatis.session.SqlSessionFactoryBuilder;
import org.junit.Test;

import java.io.InputStream;
import java.util.List;

public class Demo01 {


    @Test
    public void run1() throws Exception{


        // 加载配置文件
        InputStream inputStream = Resources.getResourceAsStream("SqlMapConfig.xml");
        // 创建工厂
        SqlSessionFactory factory = new SqlSessionFactoryBuilder().build(inputStream);
        // 创建sqlSession对象
        SqlSession session = factory.openSession();
        // 获取代理对象
        AccountDao dao = session.getMapper(AccountDao.class);
        // 调用查询的方法
        List<Account> list = dao.findAll();
        for (Account account : list) {


            System.out.println(account);
        }
        // 释放资源
        session.close();
        inputStream.close();
    }

    @Test
    public void run2() throws Exception{


        // 加载配置文件
        InputStream inputStream = Resources.getResourceAsStream("SqlMapConfig.xml");
        // 创建工厂
        SqlSessionFactory factory = new SqlSessionFactoryBuilder().build(inputStream);
        // 创建sqlSession对象
        SqlSession session = factory.openSession();
        // 获取代理对象
        AccountDao dao = session.getMapper(AccountDao.class);
        // 调用查询的方法
        Account account = new Account();
        account.setName("康康");
        account.setMoney(1000);
        dao.saveAccount(account);
        // 提交数据
        session.commit();
        // 释放资源
        session.close();
        inputStream.close();
    }
}

At the same time, check the database content, and the Mybaits environment is successfully built!
6. Integrate Spring and Mybaits
Spring integrates mybaits, that is, puts the configuration in mybaits in the spring container.
Spring configuration file after integrating mybatisapplicationContext.xml
<?xml version="1.0" encoding="UTF-8"?>
<beans xmlns="http://www.springframework.org/schema/beans"
xmlns:xsi="http://www.w3.org/2001/XMLSchema-instance"
xmlns:context="http://www.springframework.org/schema/context"
xmlns:aop="http://www.springframework.org/schema/aop"
xmlns:tx="http://www.springframework.org/schema/tx"
xsi:schemaLocation="http://www.springframework.org/schema/beans
http://www.springframework.org/schema/beans/spring-beans.xsd
http://www.springframework.org/schema/context
http://www.springframework.org/schema/context/spring-context.xsd
http://www.springframework.org/schema/aop
http://www.springframework.org/schema/aop/spring-aop.xsd
http://www.springframework.org/schema/tx
http://www.springframework.org/schema/tx/spring-tx.xsd">
<!-- 开启注解支持,配置扫描的包 -->
<context:component-scan base-package="cn.mcs">
<!-- spring只需要扫描dao,domain,service,永久层以及服务层的包,controller的包交给springmvc来处理-->
<!-- 这里是取消对有@Controller注解的文件进行扫描 -->
<context:exclude-filter type="annotation" expression="org.springframework.stereotype.Controller"/>
</context:component-scan>
<!-- 配置c3p0连接池对象 -->
<bean id="managerDataSource" class="org.springframework.jdbc.datasource.DriverManagerDataSource">
<property name="driverClassName" value="com.mysql.jdbc.Driver"></property>
<property name="url" value="jdbc:mysql://121.41.229.122:3306/ssm?useUnicode=true&characterEncoding=UTF-8"></property>
<property name="username" value="root"></property>
<property name="password" value="123456"></property>
</bean>
<!-- 配置session工厂 -->
<bean id="factoryBean" class="org.mybatis.spring.SqlSessionFactoryBean">
<property name="dataSource" ref="managerDataSource"></property>
</bean>
<!-- 配置要扫描的包 -->
<bean id="mapperScannerConfigurer" class="org.mybatis.spring.mapper.MapperScannerConfigurer">
<property name="basePackage" value="cn.mcs.dao"></property>
</bean>
</beans>
OK, the integration of mybatis and spring is completed. At this time, the ssm is basically built, but there is still one thing that is transaction control. The current integration cannot save data, and if there is an error in the middle of the transaction, it cannot be rolled back. Next, Configure the transaction control of spring.
Seven, Spring's transaction control
Add the following configuration to the spring configuration file
    <!-- spring基于声明式的事务控制 -->
    <!-- 配置事务管理器 -->
    <bean id="transactionManager" class="org.springframework.jdbc.datasource.DataSourceTransactionManager">
        <!-- 配置数据源 -->
        <property name="dataSource" ref="managerDataSource"></property>
    </bean>

    <!-- 配置事务通知 -->
    <tx:advice id="txAdvice" transaction-manager="transactionManager">
        <tx:attributes>
            <tx:method name="*" read-only="false" propagation="REQUIRED"/>
            <tx:method name="select*" read-only="true" propagation="SUPPORTS"></tx:method>
        </tx:attributes>
    </tx:advice>

    <!-- 配置AOP -->
    <aop:config>
        <!-- 配置切入点表达式 -->
        <aop:pointcut id="pt1" expression="execution(* cn.mcs.service.impl.*.*(..))"/>
        <!-- 建立切入点表达式和事务通知的关系 -->
        <aop:advisor advice-ref="txAdvice" pointcut-ref="pt1"/>
    </aop:config>
After configuring the transaction control, the SSM integration is complete. Next, let's test whether saving users and querying users can be implemented normally.
8. Overall test
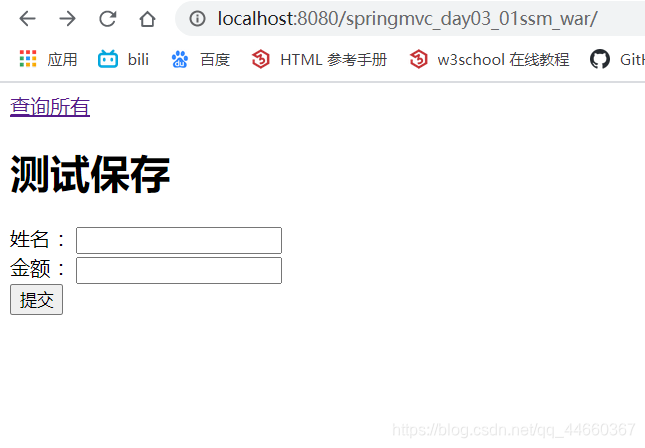
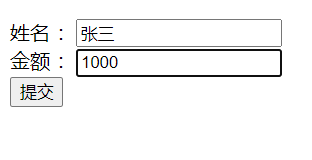
Write a form in index.jspto implement user upload data, the user id is self-incrementing and does not need to be entered.
<%@ page contentType="text/html;charset=UTF-8" language="java" %>
<html>
<head>
    <title>Title</title>
</head>
<body>
    <a href="account/findAll">查询所有</a>
<h1>测试保存</h1>
<form action="account/save" method="post">
    姓名 :<input type="text" name="name"><br>
    金额 :<input type="text" name="money"><br>
    <input type="submit" value="提交">
</form>
</body>
</html>
Jump to the query interface after saving the user
    @RequestMapping("/save")
    public void save(Account account, HttpServletRequest request, HttpServletResponse response) throws IOException {


        accountService.saveAccount(account);
        response.sendRedirect(request.getContextPath()+"/account/findAll");
        return;
    }
Run Tomcat!
Successfully jump to list.jsp

to view console query data
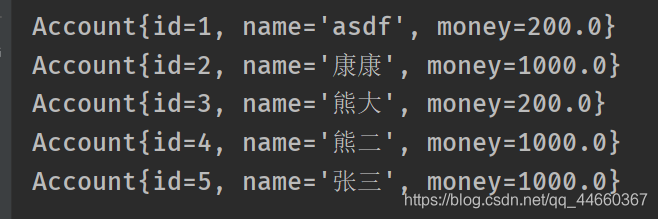
Check the data data

OK, at this position, the overall SSM integration is successful, and you will do it again!