Table of contents
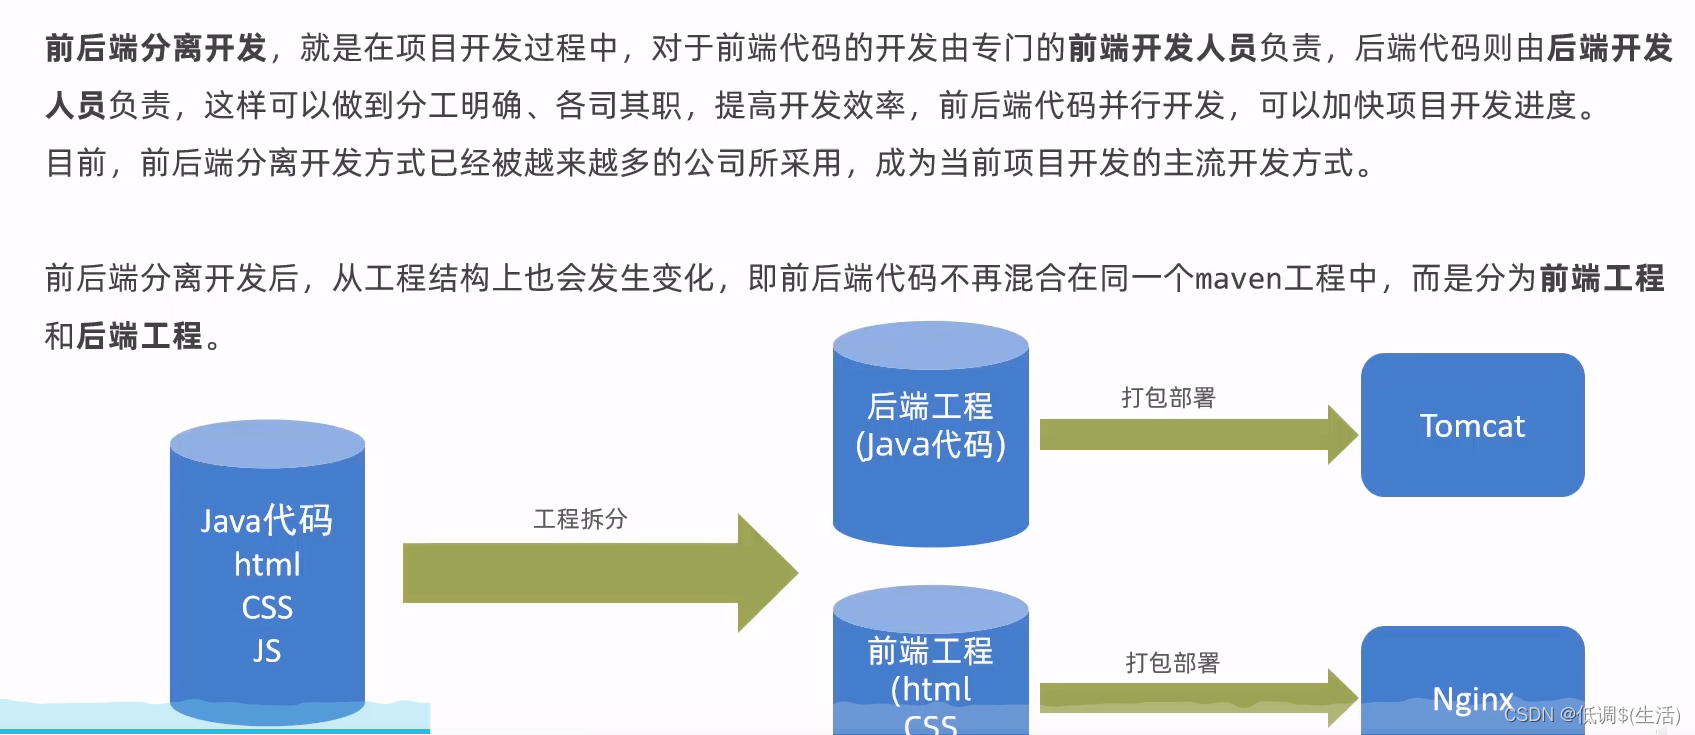
Separation of front and rear ends
Example diagram of development process
Deploy front-end (back-end maven packaging, front-end webpack packaging)
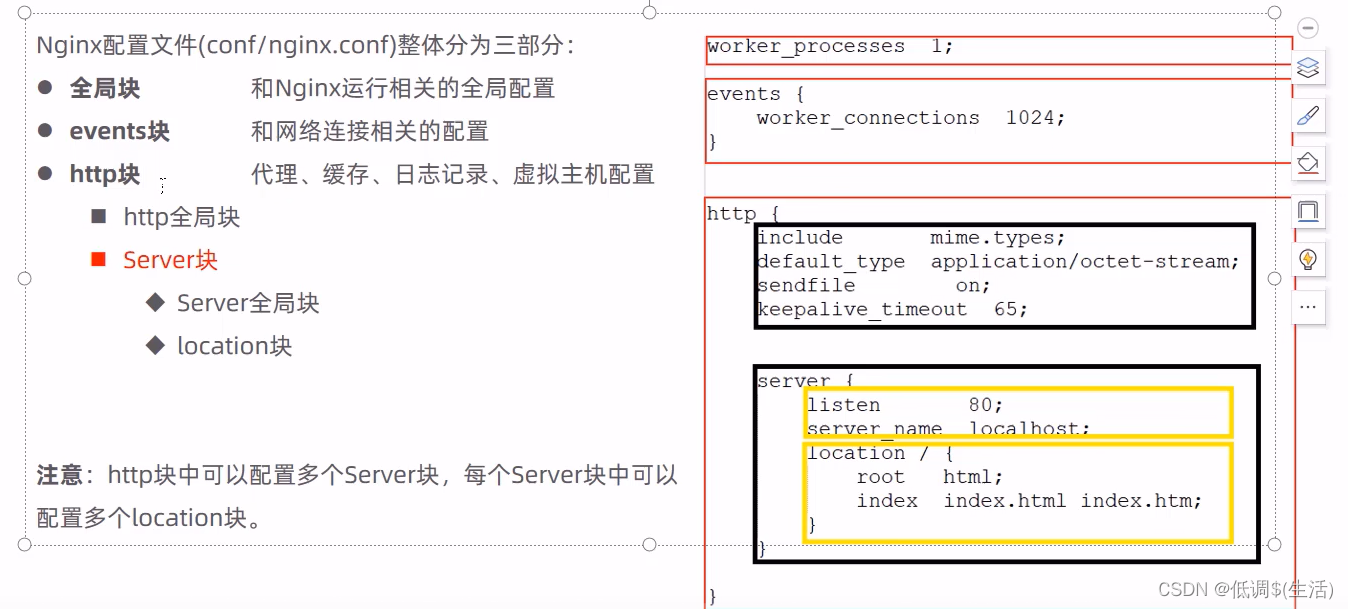
Nginx overview

Installation process
Nginx——centos7 quickly installs Nginx through yum and tests whether the installation is successful (graphic version)
The following is the key directory structure of nginx installation.

nginx basic commands
查看版本

nginx -v
检查配置文件是否有错

nginx -t

我的html目录在
/usr/share/nginx/html;
我的配置文件在
/etc/nginx/conf.d/default.conf


如果出现xftp传输文件失败
我们点击传输失败的文件右键点击状态
如果是permission is not allowed
我们需要给要传输到的文件赋予777权限。
sudo chmod 777 文件夹名
然后再试一遍就成功了。
启动

 nginx

停止

nginx -s stop

重新加载

nginx -s reload

查看进程状态

ps -ef | grep nginx

设置开机自启
systemctl enable nginx.service
Process status:

Next, we can use ip to visit directly in the LAN, and this page will appear. (Example: 192.168.131.125)

configuration file
Deploy static resources

Report 403 permission to open html, chomd 777 hello.html
acting
forward proxy

reverse proxy

Unlike the forward proxy, the reverse proxy is equivalent to working for the target server. When you visit a certain website, you think you are visiting the target server, but it is not the case. When you visit, it is actually a proxy server. Accept your request.

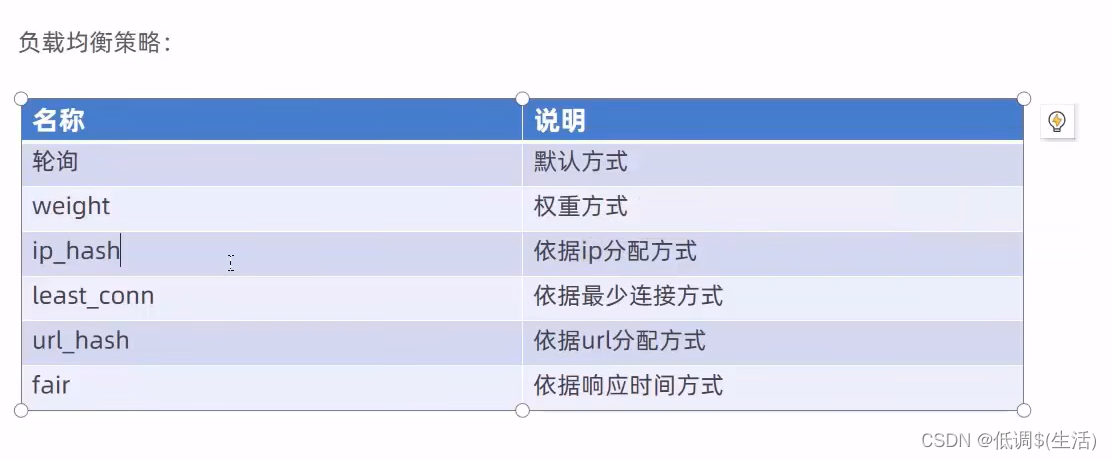
load balancing

Example of distribution by weight (default algorithm is round robin)

Distribution Algorithm Strategy
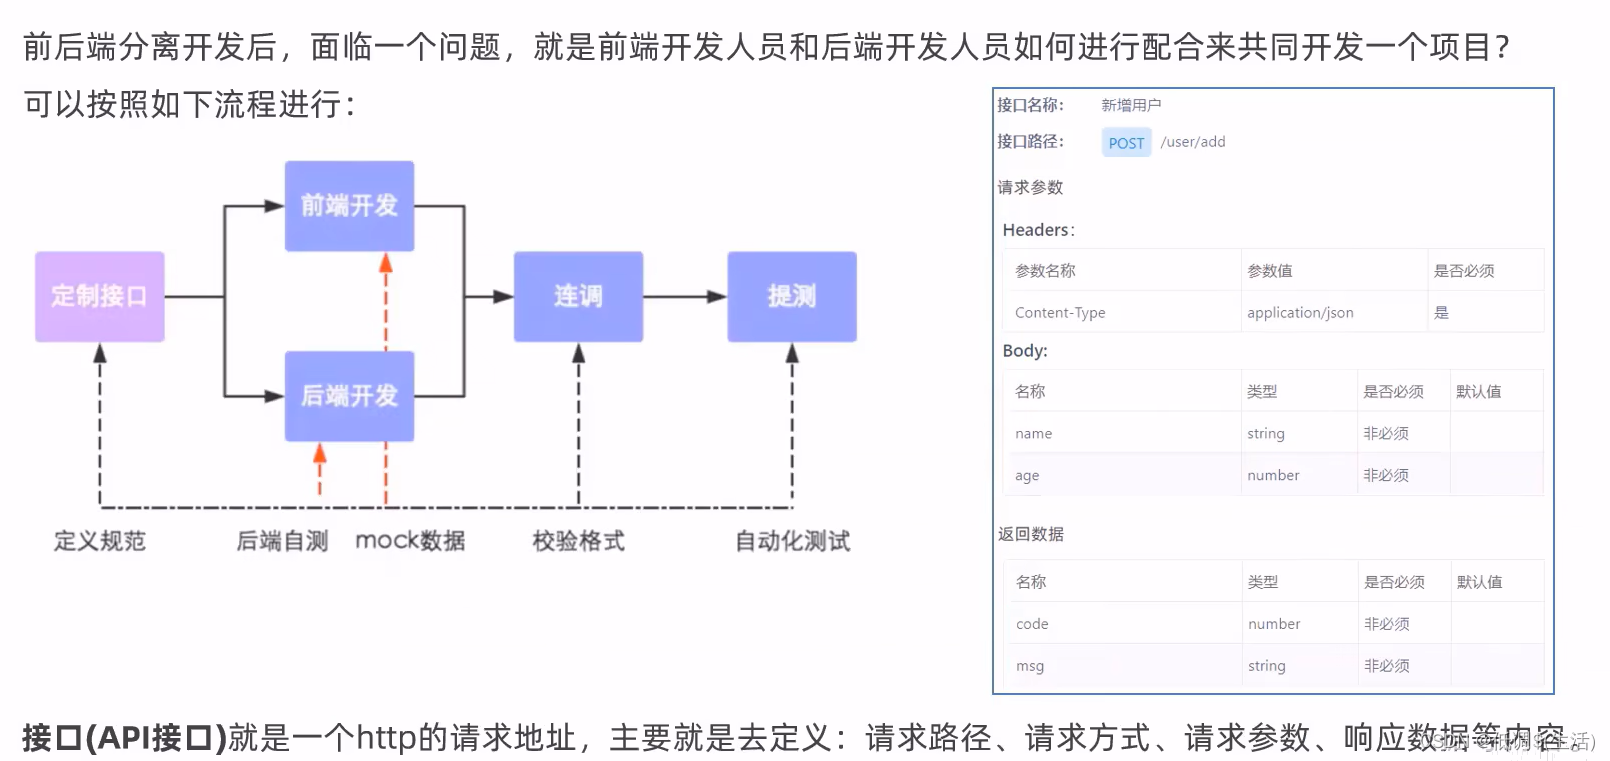
Separation of front and rear ends
Introduction
Example diagram of development process
Front-end technology stack
development tools
Visual Studio Code
hbuilder
technical framework
nodejs: Simply put, Node.js is JavaScript running on the server side.
VUE:
- VUE is a set of front-end framework , which eliminates the DOM operation in native JavaScript and simplifies writing
- Based on the idea of MVVM (Model-View_ViewModel), VUE realizes two-way data binding
ElementUI:
It is a Vue-encapsulated UI component library launched by the front-end team of Ele.me. It provides PC-side components, simplifies the packaging of commonly used components, and reduces the difficulty of development.
mock: a front-end testing tool
webpack:
webpack is a code compilation tool with entry, exit, loader and plugins. webpack is a static module bundler for modern JavaScript applications.
YAPI (custom interface)
Introduction

Below is the visualization page of this tool.

There is also a tool APIFOX seems to be good. This deployment seems to be a bit troublesome.
Baidu can search directly.

Swagger
Development Process

1. Import maven coordinates.
<!--        swagger-->
        <dependency>
            <groupId>com.github.xiaoymin</groupId>
            <artifactId>knife4j-spring-boot-starter</artifactId>
            <version>3.0.2</version>
        </dependency>
2. Import related configuration classes and set static resource mapping
@Slf4j
@Configuration
@EnableSwagger2//swagger配置
@EnableKnife4j//swagger配置
public class WebMvcConfig extends WebMvcConfigurationSupport {

    /**
     * 设置静态资源映射
     * @param registry
     */
    @Override
    protected void addResourceHandlers(ResourceHandlerRegistry registry) {
        log.info("开始进行静态资源映射...");
        registry.addResourceHandler("doc.html").addResourceLocations("classpath:/META-INF/resources/");
        registry.addResourceHandler("/webjars/**").addResourceLocations("classpath:/META-INF/resources/webjars/");
        registry.addResourceHandler("/backend/**").addResourceLocations("classpath:/backend/");
        registry.addResourceHandler("/front/**").addResourceLocations("classpath:/front/");
    }

    /**
     * 扩展mvc框架的消息转换器
     * @param converters
     */
    @Override
    protected void extendMessageConverters(List<HttpMessageConverter<?>> converters) {
        log.info("扩展消息转换器...");
        //创建消息转换器对象
        MappingJackson2HttpMessageConverter messageConverter = new MappingJackson2HttpMessageConverter();
        //设置对象转换器,底层使用Jackson将Java对象转为json
        messageConverter.setObjectMapper(new JacksonObjectMapper());
        //将上面的消息转换器对象追加到mvc框架的转换器集合中
        converters.add(0,messageConverter);
    }

    //swagger配置
    @Bean
    public Docket createRestApi() {
        // 文档类型
        return new Docket(DocumentationType.SWAGGER_2)
                .apiInfo(apiInfo())
                .select()
                .apis(RequestHandlerSelectors.basePackage("com.ys.reggie.controller"))
                .paths(PathSelectors.any())
                .build();
    }

    private ApiInfo apiInfo() {
        return new ApiInfoBuilder()
                .title("瑞吉外卖")
                .version("1.0")
                .description("瑞吉外卖接口文档")
                .build();
    }
}
4. Open the access path in the filter.
       "/doc.html",
       "/webjars/**",
       "/swagger-resources",
       "/v2/api-docs"
Then start the project, visit loaclhost:8080/doc.html, we can see the following interface.

Common Notes

project deployment
project structure

server

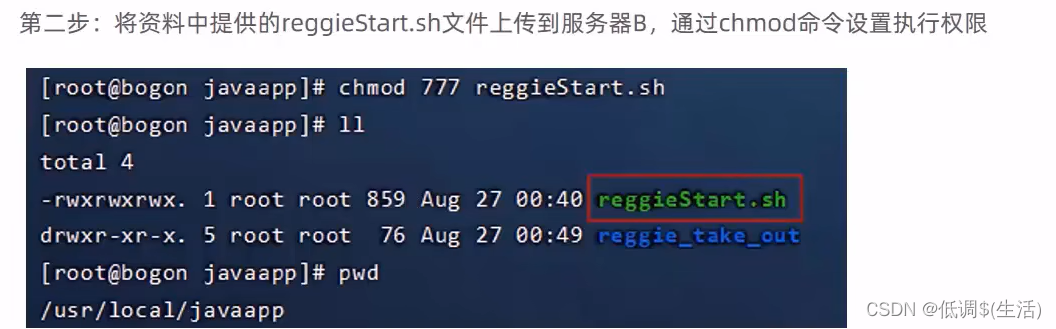
Deploy front-end (back-end maven packaging, front-end webpack packaging)

我的html目录在
/usr/share/nginx/html;
我的配置文件在
/etc/nginx/conf.d/default.conf


如果出现xftp传输文件失败
我们点击传输失败的文件右键点击状态
如果是permission is not allowed
我们需要给要传输到的文件赋予777权限。
sudo chmod 777 文件夹名
然后再试一遍就成功了。
Then modify the reverse proxy configuration file

Add api to allow ngxin to distinguish requests for reverse generation.
The original access path is http:192.168.138.100/api/employee/login
rewrite rewrites the access path, and the reverse proxy sends to the backend http://192.168.138.101:8080/employee/login
backend deployment
First install the following things.

要用xshell的话,先检查一下是否安装了ssh,没有安装的话运行这个
sudo apt-get install ssh 就可以了,推荐这个博主。
Ubuntu不能连接xshell的原因_爱吃苹果的梨叔的博客-CSDN博客_ubuntu xshell连接不上
jdk安装方法:Ubuntu系统安装JDK教程_XiaoHongyong的博客-CSDN博客_ubuntu安装jdk
maven 安装:sudo apt-get install maven
检测Maven版本:mvn -v
更多详情:Ubuntu安装maven_普通网友的博客-CSDN博客_ubuntu安装maven
git 安装:sudo apt-get install git
检测版本:git --version
克隆仓库到本地
git clone 云端仓库地址
Here is an automated deployment script.
run script

Remember to change the image path in the original project.