外卖项目优化-01
课程内容
- 环境搭建
- 缓存短信验证码
- 缓存菜品信息
- SpringCache
- 缓存套餐数据
前言
1). 当前系统存在的问题
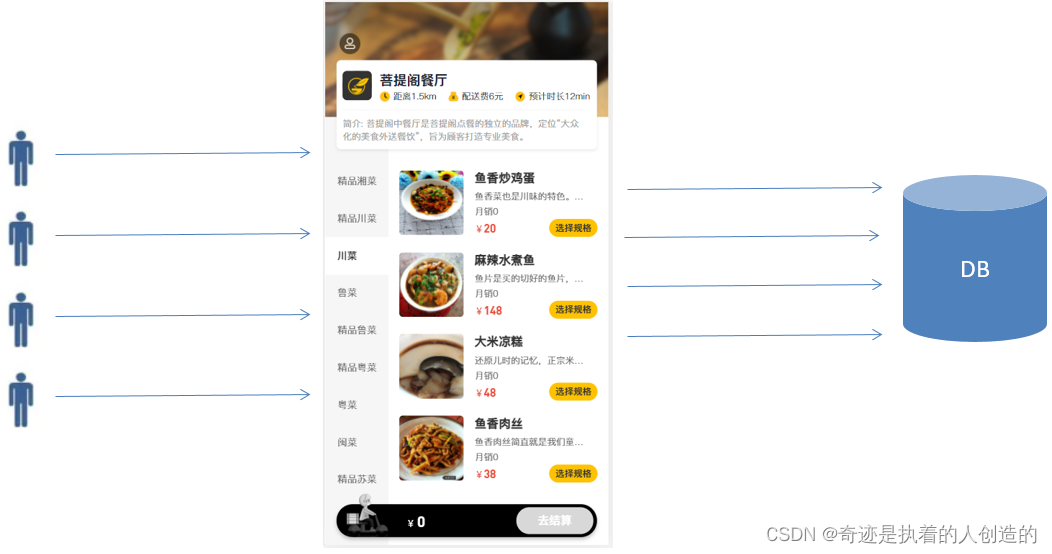
之前我们已经实现了移动端菜品展示、点餐、购物车、下单等功能,但是由于移动端是面向所有的消费者的,请求压力相对比较大,而我们当前所有的数据查询都是从数据库MySQL中直接查询的,那么可能就存在如下问题: 频繁访问数据库,数据库访问压力大,系统性能下降,用户体验较差。
2). 解决该问题的方法
要解决我们上述提到的问题,就可以使用我们前面学习的一个技术:Redis,通过Redis来做缓存,从而降低数据库的访问压力,提高系统的访问性能,从而提升用户体验。加入Redis做缓存之后,我们在进行数据查询时,就需要先查询缓存,如果缓存中有数据,直接返回,如果缓存中没有数据,则需要查询数据库,再将数据库查询的结果,缓存在redis中。
1. 环境搭建
1.1 版本控制
Next, we need to optimize our functions, but it needs to be explained that we not only need to optimize the cache mentioned above, but also need to optimize all aspects of our program. Our chapter is mainly aimed at optimizing the cache. In order to facilitate the management of our optimized versions of the code, we use Git to control the code version. Then at this time we need to submit the code we have developed before to Git and push it to the remote warehouse of Code Cloud Gitee. The steps are as follows:
In fact, I have already done some operations when I finished learning git before, and some operations here can be ignored
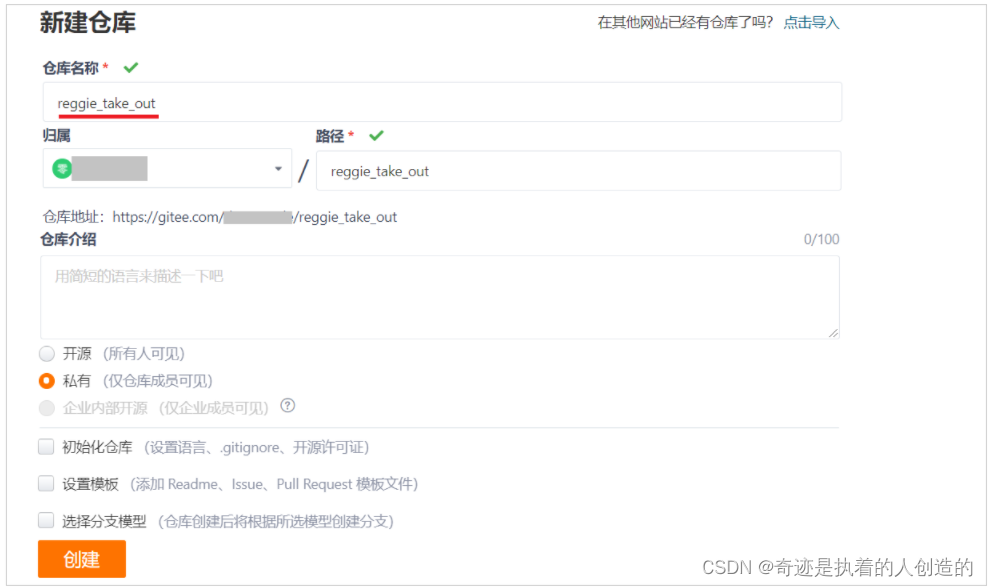
1). Create a Gitee remote warehouse
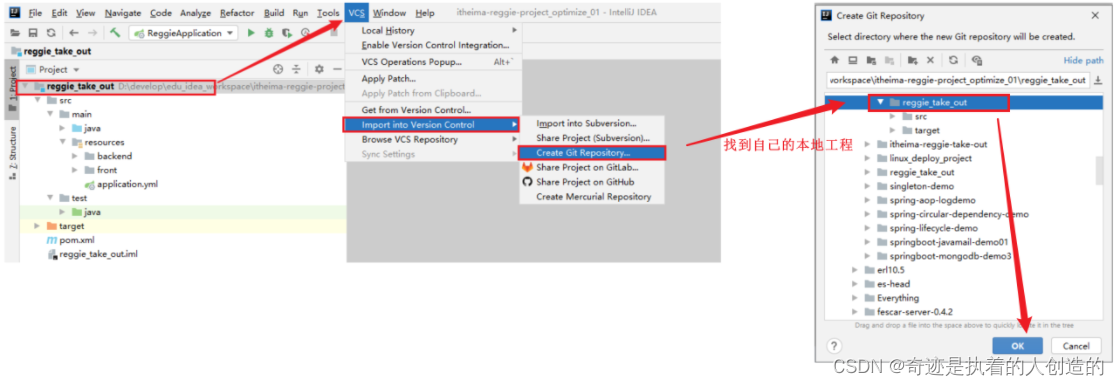
2). idea-create a local warehouse
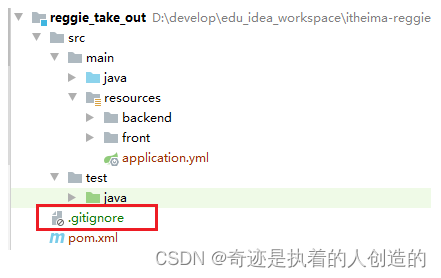
3). Prepare to ignore the file.gitignore
In our project, there are some files that do not need to be submitted to git, such as: .idea, target/, *.iml, etc. We can directly import the .gitignore file provided in today's course material into our project.
My previous ignore file feels that it is not as rich as the tutorial, so I will replace the content with the tutorial
4). idea-submit and push local code
A. Add project files into the staging area
It is the add operation
B. Submit code
It is the commit operation
C. Push the code to the remote warehouse
It is the push operation
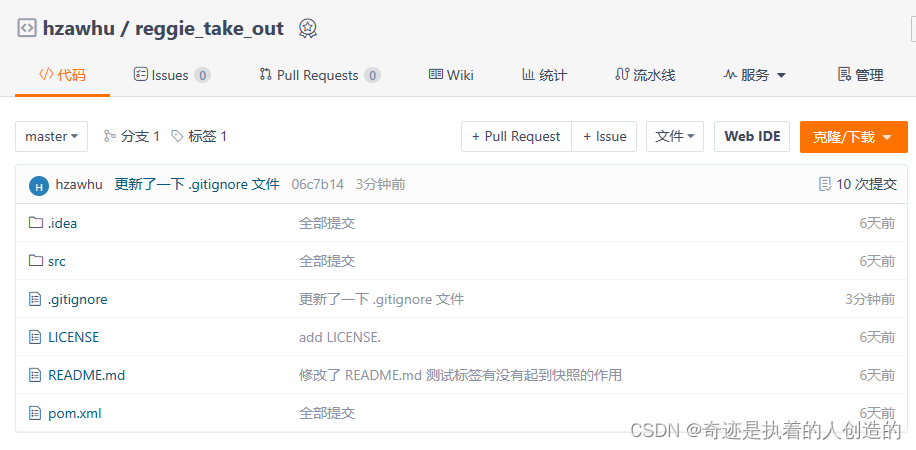
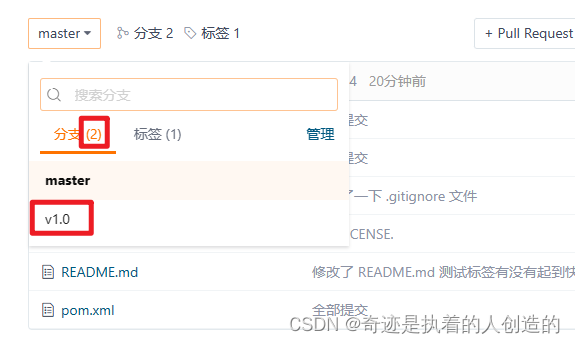
5). View gitee remote warehouse
take a look at my latest
I have already made a label.
I didn’t expect that the standard practice of the tutorial is to directly create a new branch. It is indeed true. When the time comes, I want to go back to the newly developed state and switch directly to the main branch. I want to see the optimized version. project, just switch directly to the new branch to be created soon. how convenient
6). Create a branch
At present, there is only one main branch master in git by default. We will optimize the cache next, and we will not operate on the master branch. We need to create a separate branch v1.0 on git. For cache optimization, we will be on this branch to operate.
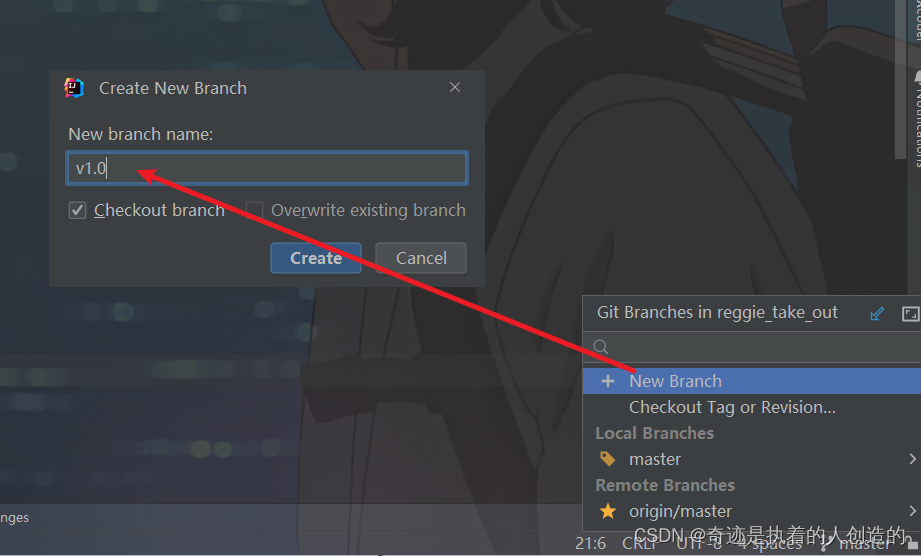
After the creation is completed, it will automatically switch to the v1.0 branch. The current code status is exactly the same as the master,
but all subsequent operations are done under this branch, which will not affect the master branch.
First develop on the v1.0 branch , after passing the test, it is found that there is no problem, and then merge it into the master main branch
The currently created v1.0 branch is created based on the master branch, so the code of the current master branch is exactly the same as the code of the v1.0 branch, and then the code of v1.0 is also pushed to the remote warehouse.
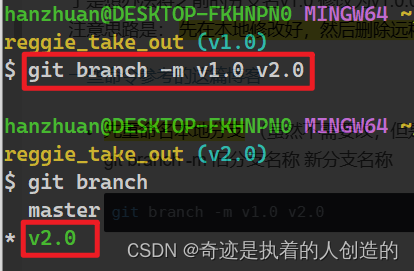
Resolve branch and tag naming conflicts
Do pay attention to the fact that branch and tag cannot have the same name, otherwise an error will be
reported when pushing. I plan to use the form of tag in the future v1.0.xand v1.0the form of branch
. So I tried to change the previous branch name v1.0 to v1.0.0.
Note that the idea is:Modify it locally first, then delete the remote v1.0 tag and v1.0 branch, and then re-push
This blog for some command reference
-
Rename the local branch first(Although there is no need to change it, it is very important, otherwise the following operations cannot be done)
git branch -m old branch name new branch namegit branch -m v1.0 v2.0can
git branchcheck
-
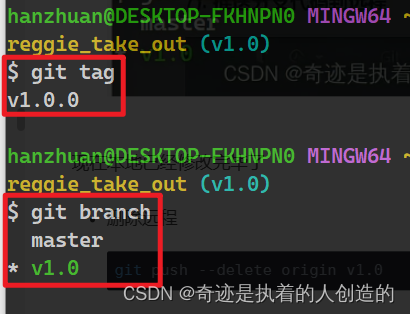
Rename the local tag again
git tag new tag name old tag name
git tag v1.0.0 v1.0You can
git tagview local tags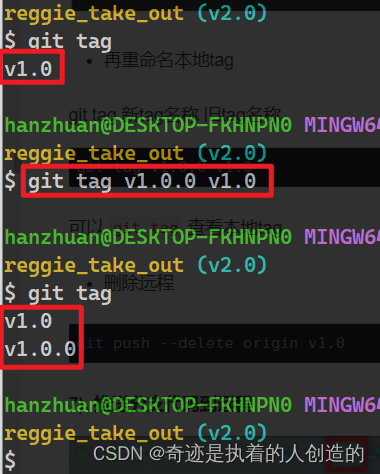
It seems that it is not renamed, but copied
, so it is just right, delete the original v1.0 tag directly -
delete old tags
git tag -d tag name
git tag -d v1.0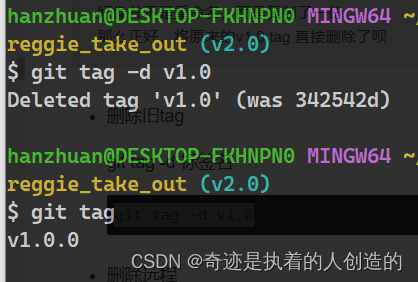
-
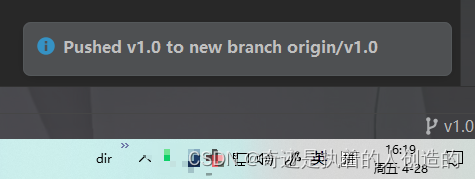
Push the locally renamed tag v1.0.0 to the remote
git push origin v1.0.0
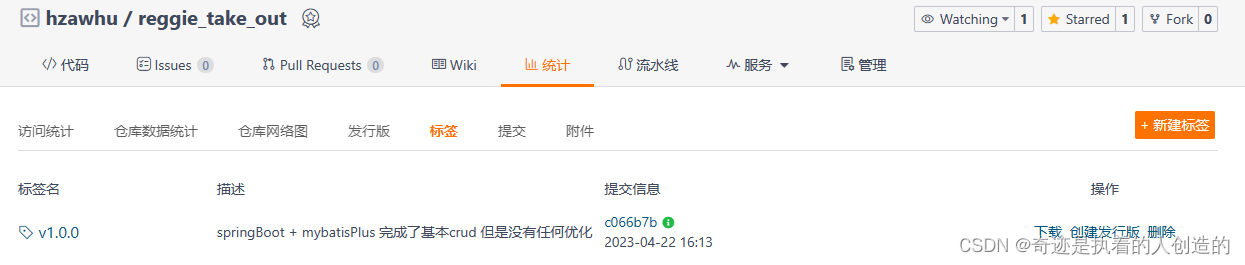
There are two tags in the remote view, the content is exactly the same, delete the old v1.0
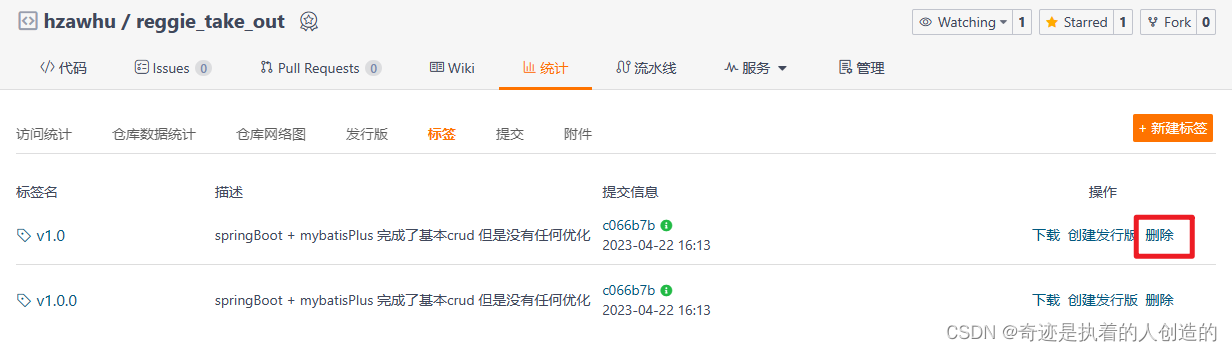
After deletion is as follows:
-
Then change the name of the local branch
git branch -m old branch name new branch name
git branch -m v2.0 v1.0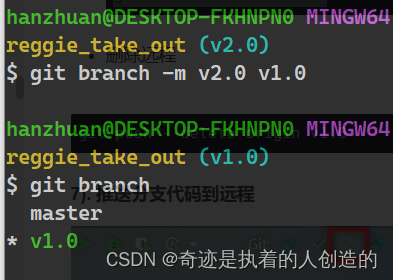
Now that the local has been modified,
just modify a local file, then commit and push, and no error will be reported
Remote viewing: pay attention to switching to the v1.0 branch to view

7). Push branch code to remote

1.2 Environment preparation
Note that they are all developed under the v1.0 branch
1). Import the maven coordinates of spring data redis in the pom.xml file of the project
<dependency>
    <groupId>org.springframework.boot</groupId>
    <artifactId>spring-boot-starter-data-redis</artifactId>
</dependency>
2). Add redis related configuration in the application.yml of the project
  redis:
    host: 192.168.141.100
    port: 6379
    #password: root@123456
    password: 123456
    database: 0
Note: When introducing the above dependencies, you need to pay attention to the indentation in front of the yml file. The above configuration should be configured under the spring level.
Replace the ip address with your own, here I choose to connect to the redis of the remote virtual machine
3). Write Redis configuration class RedisConfig, define RedisTemplate
Create a RedisTemplate object by yourself and put it in the IOC container, or in the bean, so that the boot automatic assembly finds that there is already a bean of this type in the IOC, and it will not help you create it again, and inject it directly. The benefits of creating it yourself can
be
set Serializer, the default serializer mismatch is a bit troublesome
cn.whu.reggie.config.RedisConfig
package cn.whu.reggie.config;

import org.springframework.cache.annotation.CachingConfigurerSupport;
import org.springframework.context.annotation.Bean;
import org.springframework.context.annotation.Configuration;
import org.springframework.data.redis.connection.RedisConnectionFactory;
import org.springframework.data.redis.core.RedisTemplate;
import org.springframework.data.redis.serializer.StringRedisSerializer;

@Configuration
public class RedisConfig extends CachingConfigurerSupport {


    @Bean
    public RedisTemplate<Object, Object> redisTemplate(RedisConnectionFactory connectionFactory) {


        RedisTemplate<Object, Object> redisTemplate = new RedisTemplate<>();
        //默认的Key序列化器为:JdkSerializationRedisSerializer
        redisTemplate.setKeySerializer(new StringRedisSerializer());
        redisTemplate.setConnectionFactory(connectionFactory);
        return redisTemplate;
    }
}
explain:
1). When the SpringBoot project starts, an automatic configuration class RedisAutoConfiguration will be loaded, in which the bean RedisTemplate has been declared
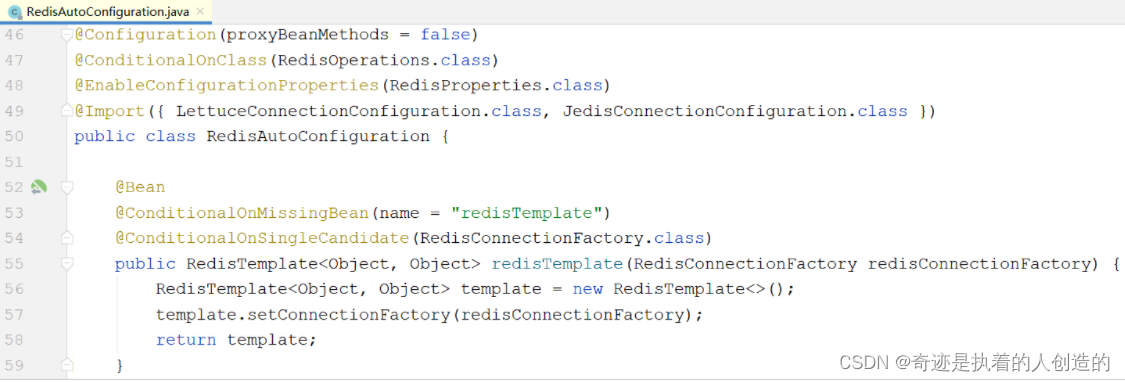
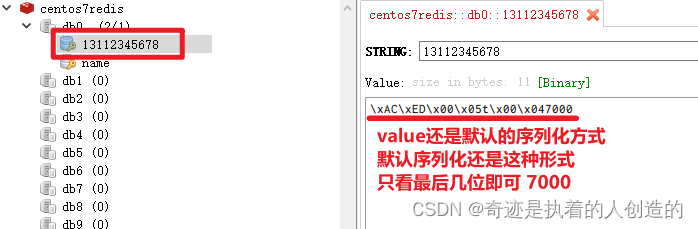
The serialization method of the key and value used by the RedisTemplate declared by the above framework is the default JdkSerializationRedisSerializer. If the key is serialized in this way, it is not very convenient for us to query through the graphical interface of redis during the test, as follows:

2). If we use our custom RedisTemplate, the key serialization method uses StringRedisSerializer, which is in the form of a string, and the final effect is as follows:

3). Will there be conflicts if two beans are defined? The answer is no, because the source code is as follows:

4). Submit to the remote warehouse once

2. Cache SMS verification code
2.1 Thought analysis
We have implemented the verification code login on the mobile terminal before, and we store the randomly generated verification code in the HttpSession. But in our actual business scenario, the general verification code needs to set the expiration time. If it exists in the HttpSession, the expiration time cannot be set. At this time, we need to optimize the function of this piece.
Now it needs to be modified to cache the verification code in Redis. The specific implementation idea is as follows:
1). Inject the RedisTemplate object into the server-side UserController for operating Redis;
2). In the sendMsg method of the server-side UserController, cache the randomly generated verification code in Redis, and set the validity period to 5 minutes;
3). In the login method of the server-side UserController, obtain the cached verification code from Redis, and delete the verification code in Redis if the login is successful;
2.2 Code modification
1). Inject RedisTemplate object in UserController to operate Redis
@Autowired
private RedisTemplate redisTemplate;
2). In the sendMsg method of UserController, save the generated verification code to Redis
// 改用 redis 4、5两步合为一步了  【redis确实可以看成一种更快的session,这么理解舒服多了啊】
// 将生成的验证码缓存到Redis中,并且设置有效期5分钟
// key还是手机号  value还是code
redisTemplate.opsForValue().set(phone,code,5, TimeUnit.MINUTES);
4, 5 steps are commented out
// 4. 将生成的验证码保存到Session
session.setAttribute(phone,code); // 直接手机号phone作为key, 验证码code作为值

// 5. 设置session失效时间为5min 注意单位为秒
SMSUtils.deadTime(5*60,phone,session);
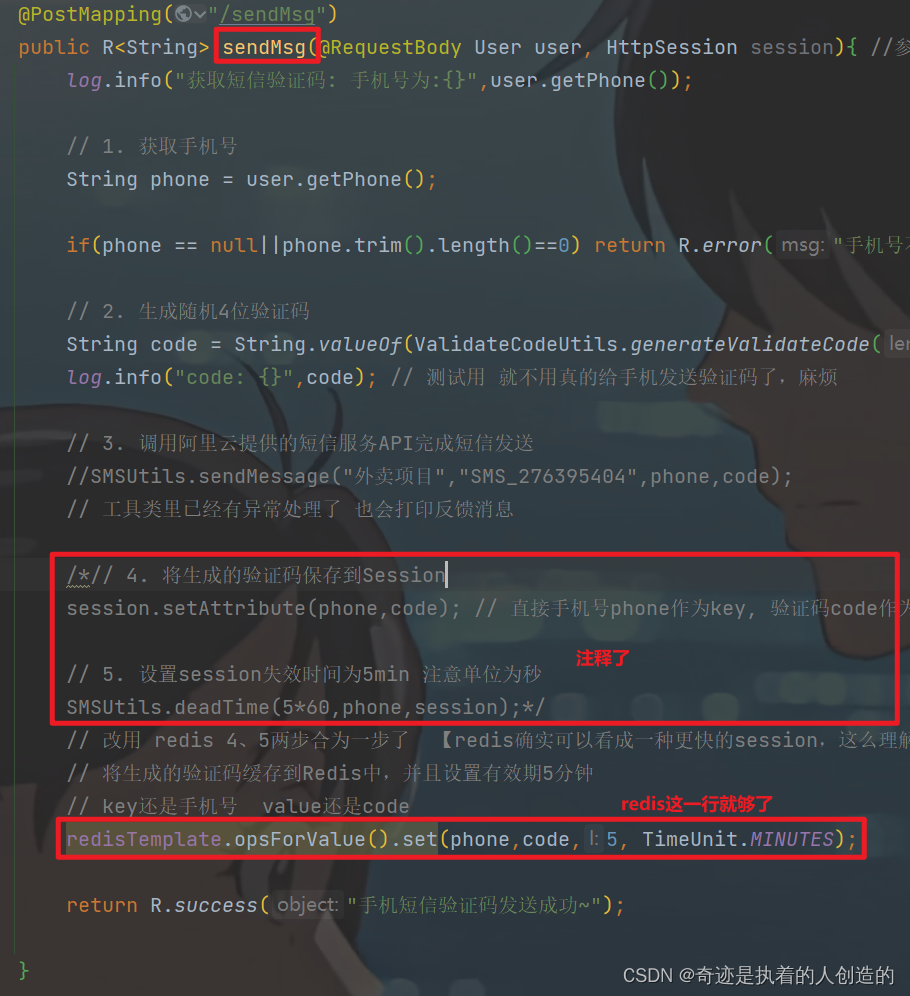
It turns out that the tool class implements a 5-minute expiration, and a new thread is opened to destroy the verification code. Now it is no longer needed. It is much faster to use redis
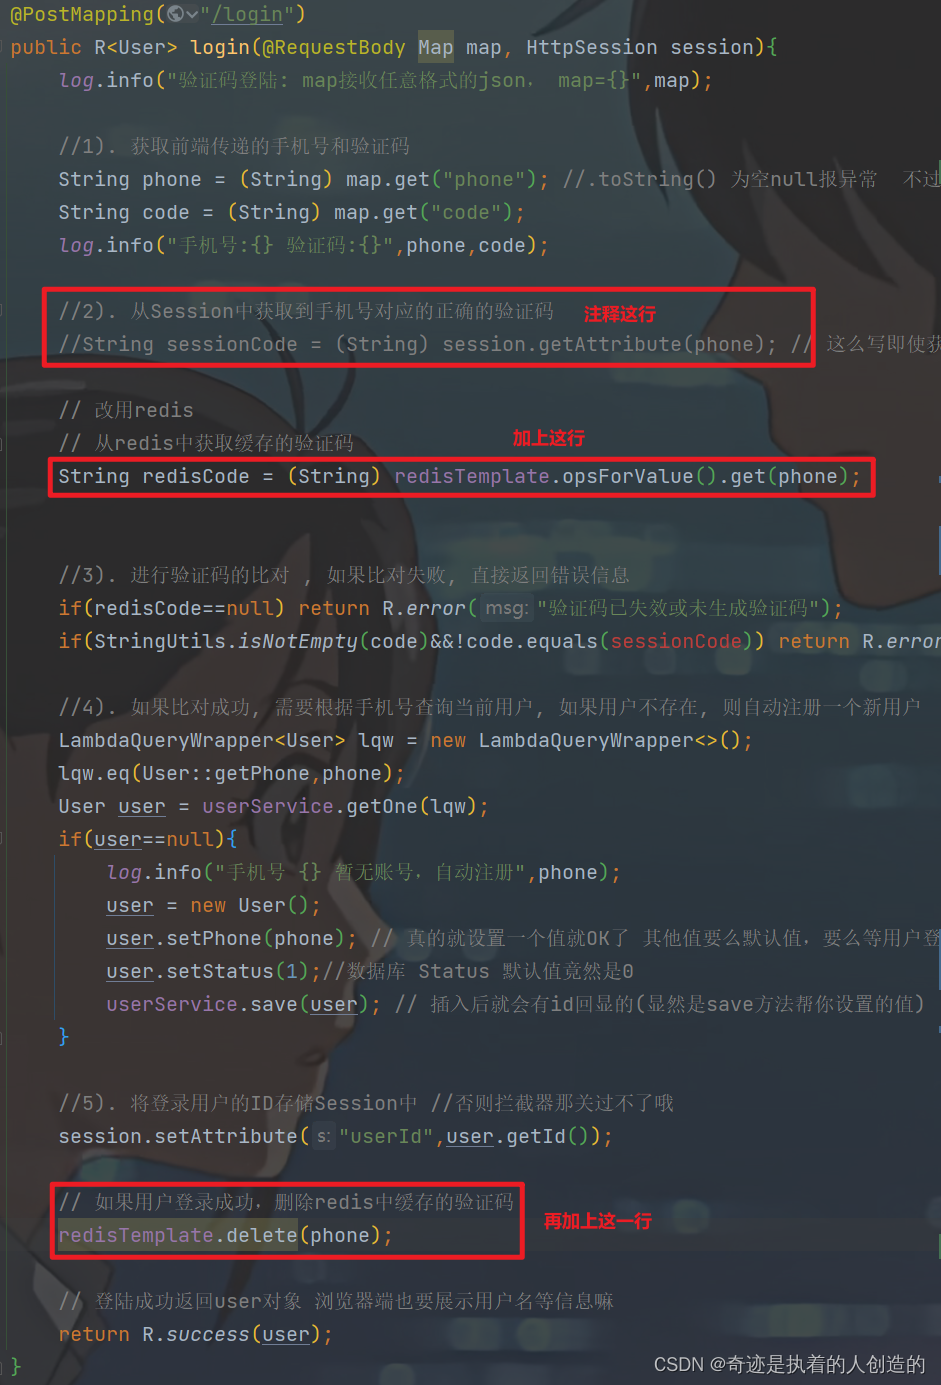
3). In the login method of UserController, obtain the generated verification code from Redis, and delete the verification code cached in Redis if the login is successful
// 改用redis
// 从redis中获取缓存的验证码
String redisCode = (String) redisTemplate.opsForValue().get(phone);
// 如果用户登录成功,删除redis中缓存的验证码
redisTemplate.delete(phone);
2.3 Function test
After the code is written, restart the service.
1). Access the front-end project and get the verification code
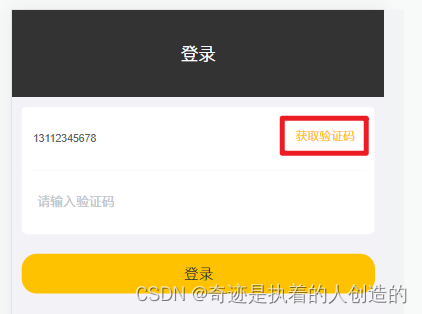
Don't rush to log in, you can go to the RedisDesktopManager visualization tool to see the value
Through the log of the console, we can see the generated verification code:

2). View the data in Redis through the graphical interface tool of Redis
Don't click login first, the login is successful, the verification code will be deleted, and it will not be visible in the visualization tool
3). After filling in the verification code on the login interface and logging in, check whether the data in Redis is deleted
First confirm that the login is successful:
then refresh redis to check,
and sure enough, the phone number is gone
3. Cache menu information
3.1 Implementation ideas
前面我们已经实现了移动端菜品查看功能,对应的服务端方法为DishController的list方法,此方法会根据前端提交的查询条件(categoryId)进行数据库查询操作。在高并发的情况下,频繁查询数据库会导致系统性能下降,服务端响应时间增长。现在需要对此方法进行缓存优化,提高系统的性能。
那么,我们又需要思考一个问题, 具体缓存几份数据呢, 所有的菜品缓存一份 , 还是说需要缓存多份呢? 我们可以看一下我们之前做的移动端效果:
我们点击哪一个分类,展示的就是该分类下的菜品, 其他菜品无需展示。所以,这里面我们在缓存时,可以根据菜品的分类,缓存多份数据,页面在查询时,点击的是哪个分类,我们就查询该分类下的菜品缓存数据。
具体的实现思路如下:
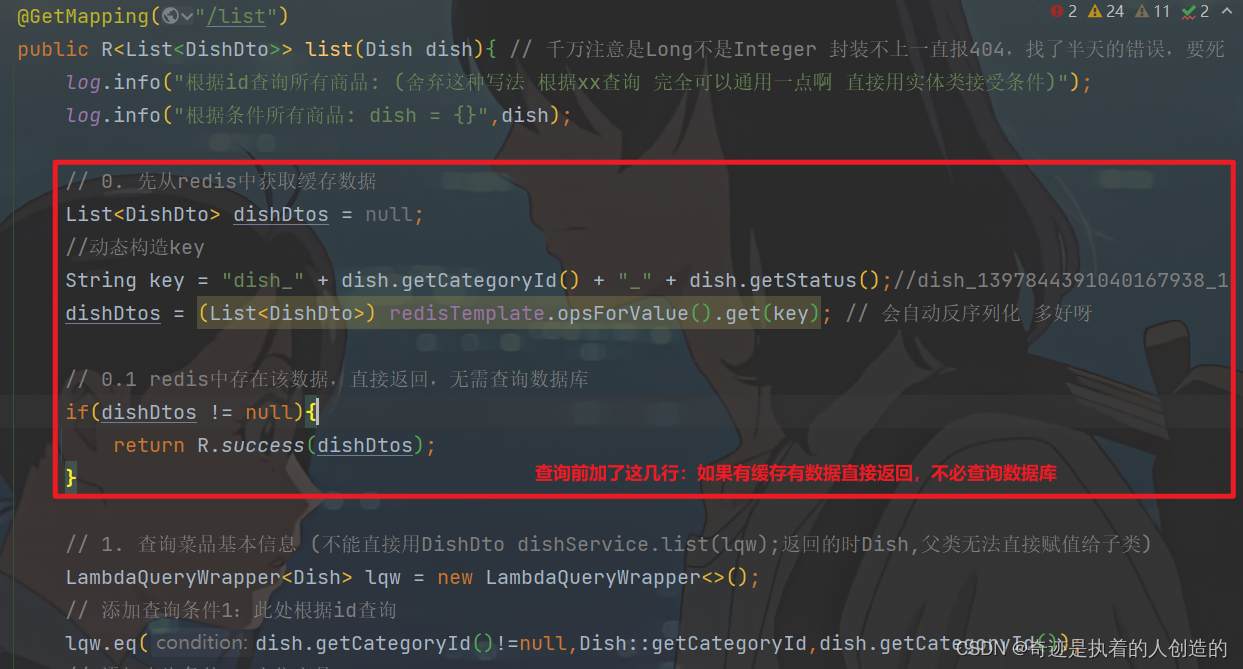
1). 改造DishController的list方法,先从Redis中获取分类对应的菜品数据,如果有则直接返回,无需查询数据库;如果没有则查询数据库,并将查询到的菜品数据存入Redis。
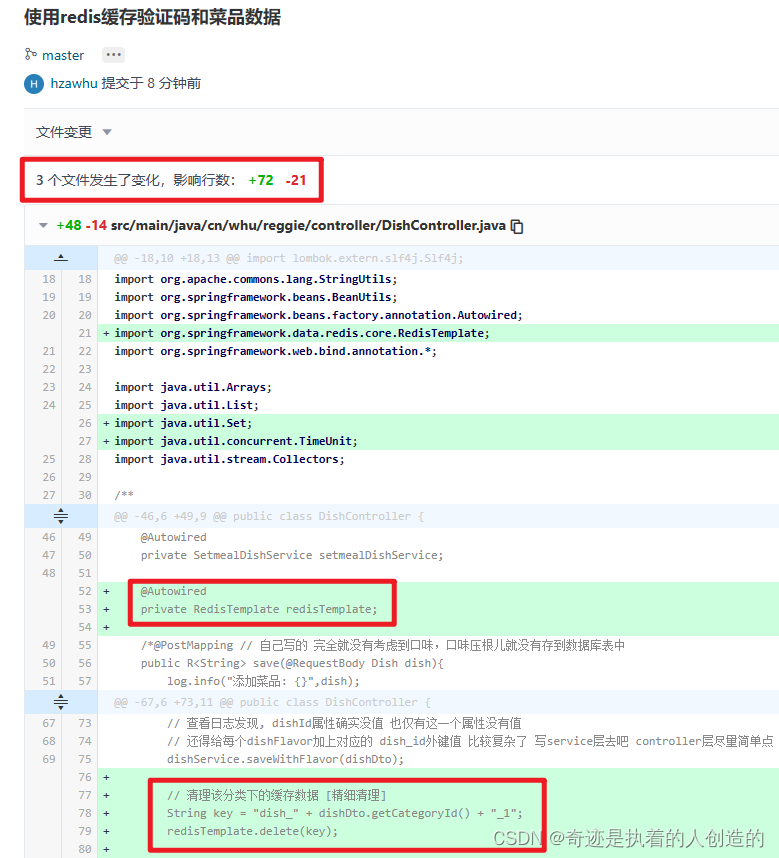
2). 改造DishController的save和update方法,加入清理缓存的逻辑。(有更新就清理下对应的缓存,下次再请求就会去数据库查喽,然后再给他放入缓存)
注意:
在使用缓存过程中,要注意保证数据库中的数据和缓存中的数据一致,如果数据库中的数据发生变化,需要及时清理缓存数据。否则就会造成缓存数据与数据库数据不一致的情况。
3.2 代码改造
需要改造的代码为: DishController
3.2.1 查询菜品缓存
| 改造的方法 | redis的数据类型 | redis缓存的key | redis缓存的value |
|---|---|---|---|
| list | string | dish_分类Id_状态 , 比如: dish_12323232323_1 | List |
1). 在DishController中注入RedisTemplate
@Autowired
private RedisTemplate redisTemplate;
2). 在list方法中,查询数据库之前,先查询缓存, 缓存中有数据, 直接返回
// 0. 先从redis中获取缓存数据
List<DishDto> dishDtos = null;
//动态构造key
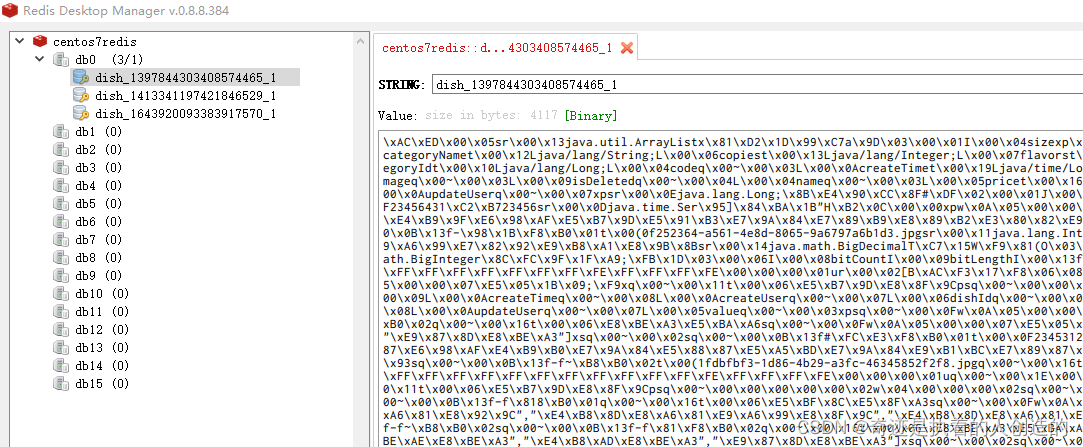
String key = "dish_" + dish.getCategoryId() + "_" + dish.getStatus();//dish_1397844391040167938_1
dishDtos = (List<DishDto>) redisTemplate.opsForValue().get(key); // 会自动反序列化 多好呀
// 0.1 redis中存在该数据,直接返回,无需查询数据库
if(dishDtos != null){
return R.success(dishDtos);
}
3). 如果redis不存在,查询数据库,并将数据库查询结果,缓存在redis,并设置过期时间
// 0.2 如果不存在,才需要查询数据库,并将查询到的菜品数据缓存到redis中
redisTemplate.opsForValue().set(key,dishDtos,60, TimeUnit.MINUTES);
// 1) value直接就是对象 会自动帮你序列化和反序列化(也是为啥pojo一定得实现Serializable接口)
// 2) 缓存也设置过期时间,60min也就是1h, 万一一直没人访问释放很正常,节省内存嘛 (个人觉得每次有查询就延长一点时间最好)

3.2.2 清理菜品缓存
为了保证数据库中的数据和缓存中的数据一致,如果数据库中的数据发生变化,需要及时清理缓存数据。所以,我们需要在添加菜品、更新菜品时清空缓存数据。
1). 修改菜品,清空缓存
在修改菜品的方法updateById中,当菜品数据更新完毕之后,需要清空菜品的缓存。那么这里清理菜品缓存的方式存在两种:
A. 清理所有分类下的菜品缓存
// 方法一:简单粗暴 清理所有菜品缓存 【同时也感受到了redis命令设计得好 spring封装得也好】
Set<String> keys = redisTemplate.keys("dish_*");// 直接可以匹配
redisTemplate.delete(keys);// 直接可以批量删除
B. 清理当前添加菜品分类下的缓存
// 方法二:清理某个分类下的缓存数据 [精细清理]
String key = "dish_" + dishDto.getCategoryId() + "_1";
redisTemplate.delete(key);
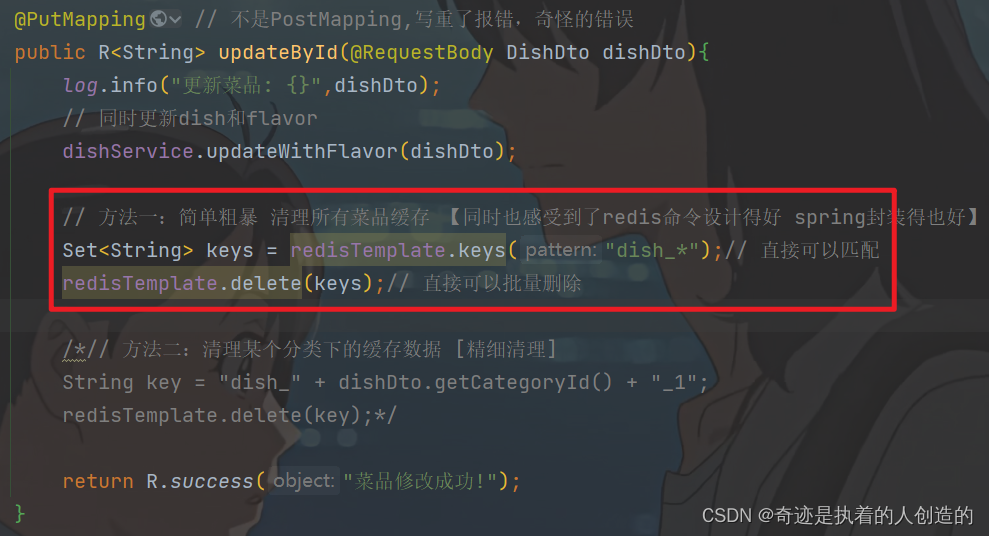
注意: 在这里我们推荐使用第一种方式进行清理,这样逻辑更加严谨。 因为对于修改操作,用户是可以修改菜品的分类的,如果用户修改了菜品的分类,那么原来分类下将少一个菜品,新的分类下将多一个菜品,这样的话,两个分类下的菜品列表数据都发生了变化。
2). 保存菜品,修改菜品,删除菜品,清空缓存
具体使用哪种方式呢?视情况而定,eg:
保存菜品:推荐使用第二种清理的方式, 只清理当前菜品关联的分类下的菜品数据。
修改菜品:推荐使用第一种清理的方式, 因为一次修改可能涉及多个分类,只清理一个不够 (突然想念存储过程了,唉,可惜人家不是redis)
还有就是该请求也是修改,但是没有上传categoryId信息,如果临时去查,会不会反而降低了效率呢?不如直接就清空了。
修改菜品:updateById
// 方法一:简单粗暴 清理所有菜品缓存 【同时也感受到了redis命令设计得好 spring封装得也好】
Set<String> keys = redisTemplate.keys("dish_*");// 直接可以匹配
redisTemplate.delete(keys);
保存菜品: save
// 方法二:清理某个分类下的缓存数据 [精细清理]
String key = "dish_" + dishDto.getCategoryId() + "_1";
redisTemplate.delete(key);
(批量)起售/停售: updateByIds
// 根本就不知道 categoryId 去数据库一个个查 那么redis的意义就小了 直接清空菜品缓存吧
Set<String> keys = redisTemplate.keys("dish_*");// 直接可以匹配
redisTemplate.delete(keys);
(批量)删除商品:deleteByIds
// 根本就不知道 categoryId 去数据库一个个查 那么redis的意义就小了 直接清空菜品缓存吧
Set<String> keys = redisTemplate.keys("dish_*");// 直接可以匹配
redisTemplate.delete(keys);
3.3 功能测试
代码编写完毕之后,重新启动服务。
1). 访问移动端,根据分类查询菜品列表,然后再检查Redis的缓存数据,是否可以正常缓存;
我们也可以在服务端,通过debug断点的形式一步一步的跟踪代码的执行。
2). 当我们在进行新增及修改菜品时, 查询Redis中的缓存数据, 是否被清除;
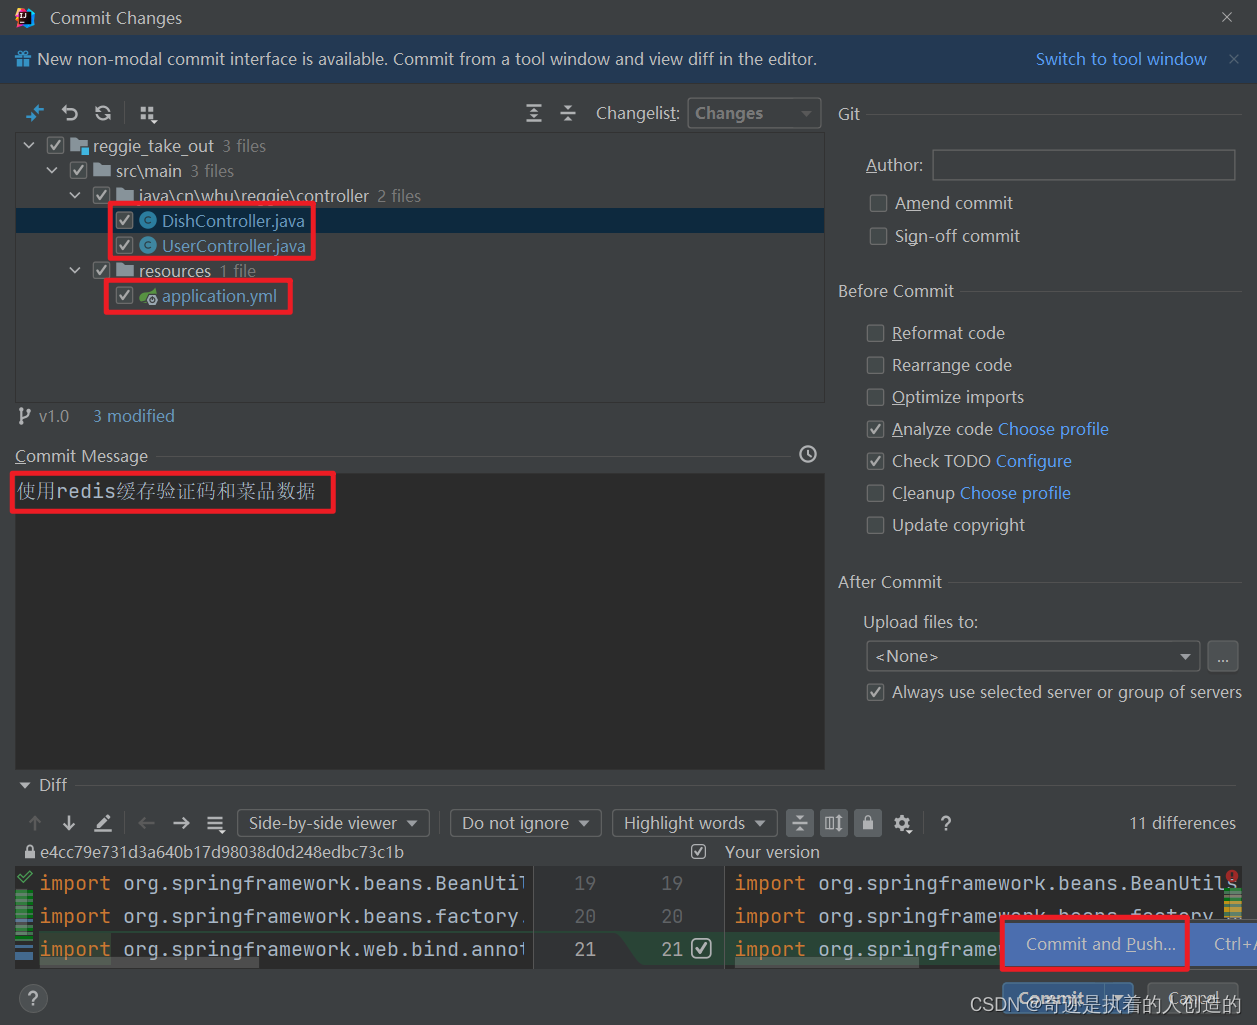
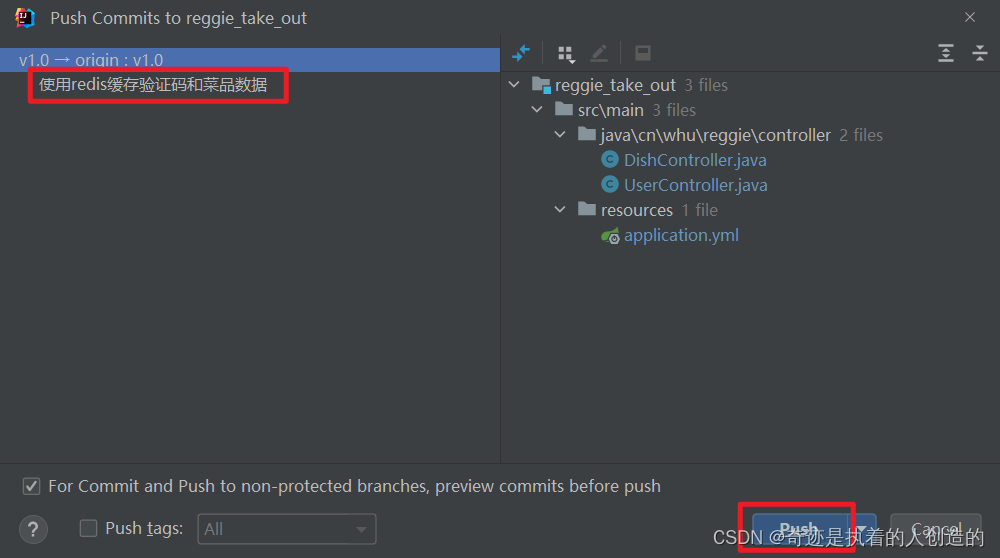
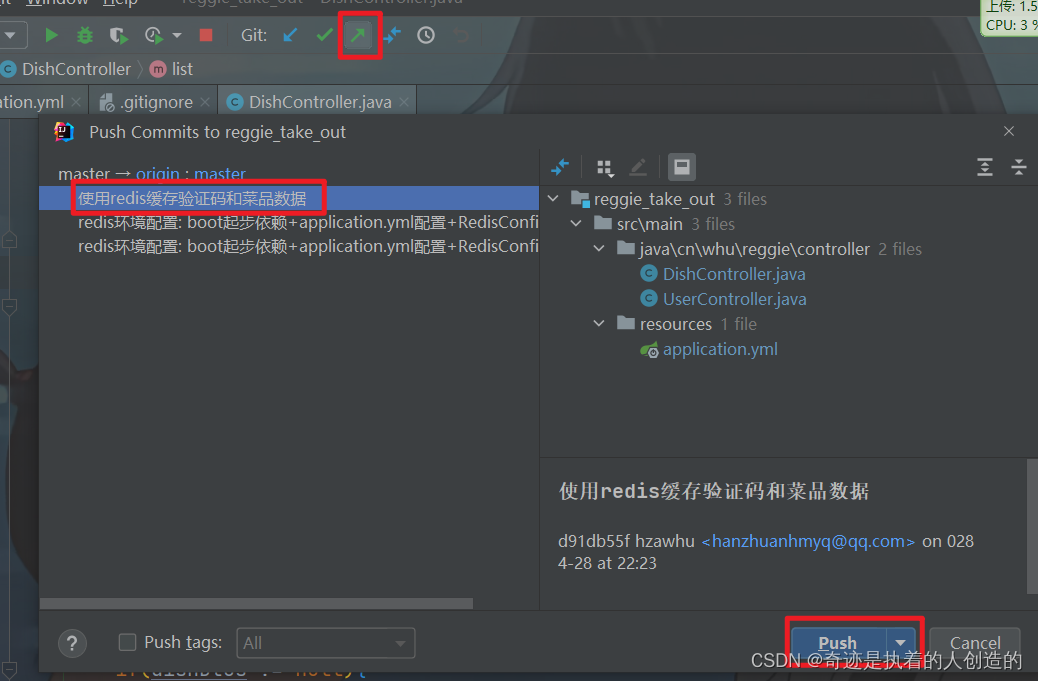
3.4 提交并推送代码
1). 提交并推送代码
在v1.0分支中, 将我们已经实现并且测试通过的使用redis缓存验证码和菜品信息的代码,提交并推送至Gitee
2). 合并代码到master分支
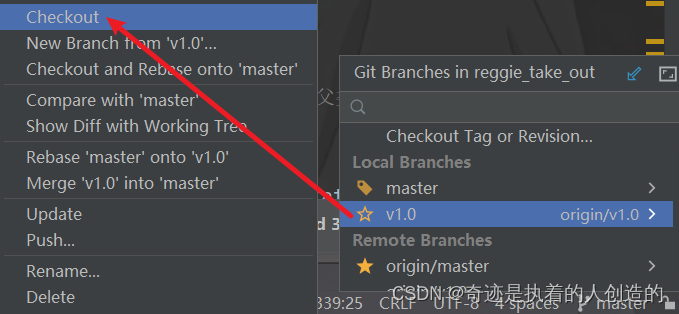
A. 将代码切换到master分支
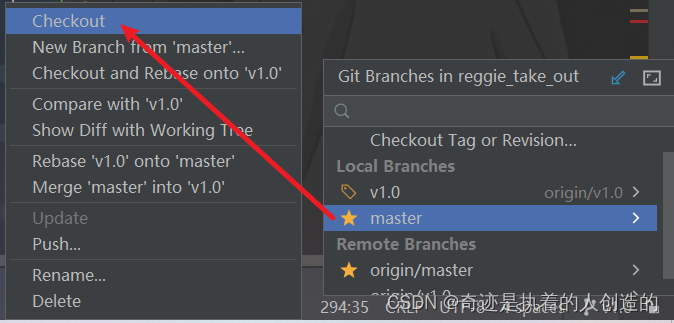
切换完成之后,可以偷偷看看DishController,看看代码什么样的,发现确实是修改之前的,前面的修改都没有
B. 将v1.0分支的代码合并到当前master分支
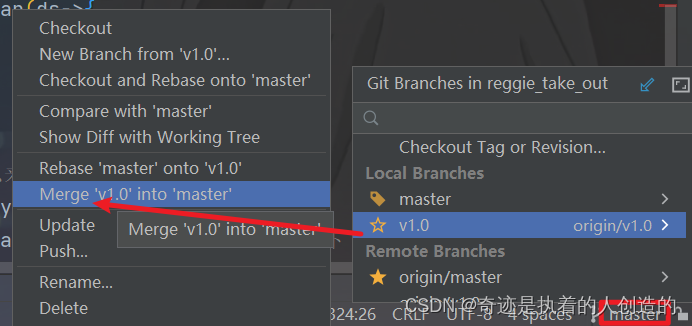
merge完毕,这个时候又可以偷偷看看代码,发现修改的那些缓存代码全部同步过来了
C. 将master分支合并后代码推送到Gitee
修改了哪些地方都给给你列出来了,真好
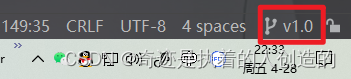
D. 切换回v1.0分支,继续开发优化功能
4. SpringCache
4.1 介绍
Spring Cache是一个框架,实现了基于注解的缓存功能,只需要简单地加一个注解,就能实现缓存功能,大大简化我们在业务中操作缓存的代码。
Spring Cache只是提供了一层抽象,底层可以切换不同的cache实现。具体就是通过CacheManager接口来统一不同的缓存技术。CacheManager是Spring提供的各种缓存技术抽象接口。
针对不同的缓存技术需要实现不同的CacheManager:
| CacheManager | 描述 |
|---|---|
| EhCacheCacheManager | 使用EhCache作为缓存技术 |
| GuavaCacheManager | 使用Google的GuavaCache作为缓存技术 |
| RedisCacheManager | 使用Redis作为缓存技术 |
4.2 注解
在SpringCache中提供了很多缓存操作的注解,常见的是以下的几个:
| 注解 | 说明 |
|---|---|
| @EnableCaching | 开启缓存注解功能 |
| @Cacheable | 在方法执行前spring先查看缓存中是否有数据,如果有数据,则直接返回缓存数据;若没有数据,调用方法并将方法返回值放到缓存中 |
| @CachePut | 将方法的返回值放到缓存中 |
| @CacheEvict | 将一条或多条数据从缓存中删除 |
在spring boot项目中,使用缓存技术只需在项目中导入相关缓存技术的依赖包,并在启动类上使用@EnableCaching开启缓存支持即可。
For example, to use Redis as a cache technology, you only need to import the maven coordinates of Spring data Redis.
4.3 Getting started procedure
Next, we will demonstrate the common usage of SpringCache through an introductory case. We mentioned above that SpringCache can integrate different caching technologies, such as Redis, Ehcache, and even we can use Map to cache data. Next, when we demonstrate, we will first use a Map to cache data, and finally we will replace it with Redis. cache.
4.3.1 Environment preparation
1). Database preparation
drop database if exists cache_demo;

create database cache_demo;

use cache_demo;

create table user(
	id bigint primary key,
	name varchar(255),
	age int,
	address varchar(255)
)

insert into user values(1,'张三',18,'北京');
insert into user values(2,'李四',19,'上海');
insert into user values(3,'王五',20,'广州');
insert into user values(4,'赵六',21,'武汉');
insert into user values(5,'田七',22,'南京');

select * from user;
2). Import basic project
The code of the basic environment has been prepared in our materials today, and you only need to import this project into it. The imported project structure is as follows:
Link: https://pan.baidu.com/s/174IEaLXYwzTJhEAl-RIj4Q
Extraction code: nli8
will not be created slowly by itself, just import it directly

Since the basic functions of SpringCache are provided in the Spring core (spring-context), we can perform a simple SpringCache test without introducing additional dependencies.
Note: Change the password in application.yml to your own
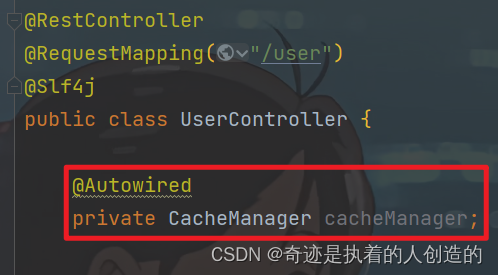
3). Inject CacheManager
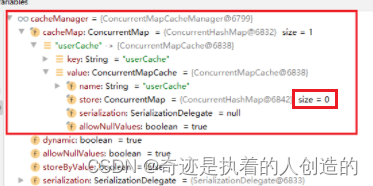
We can inject a CacheManager into UserController. When debugging, we can track the changes of data in the cache through CacheManager.
We can see that CacheManager is an interface, and the default implementations are as follows;
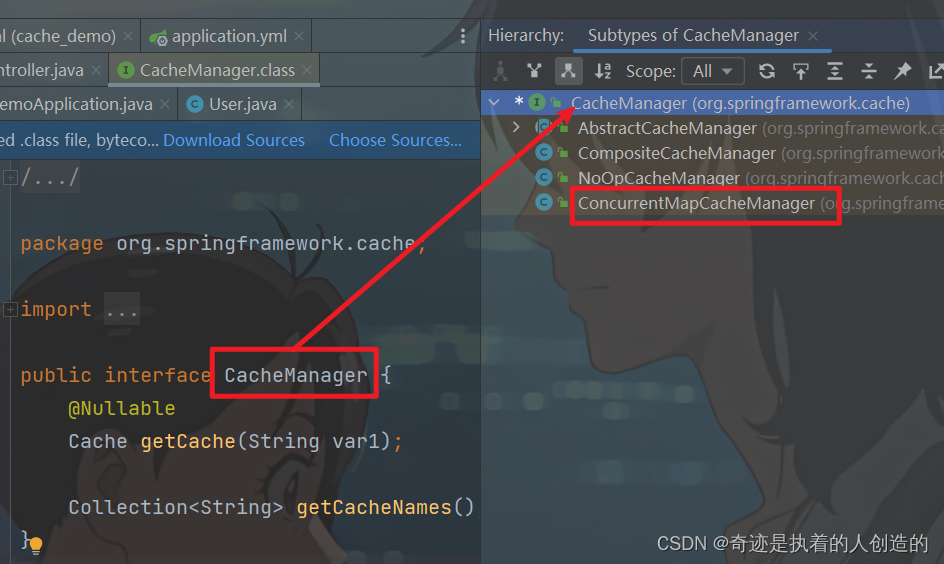
In the above implementations, ConcurrentMapCacheManager is used by default. Later we can track changes in cached data through breakpoints.
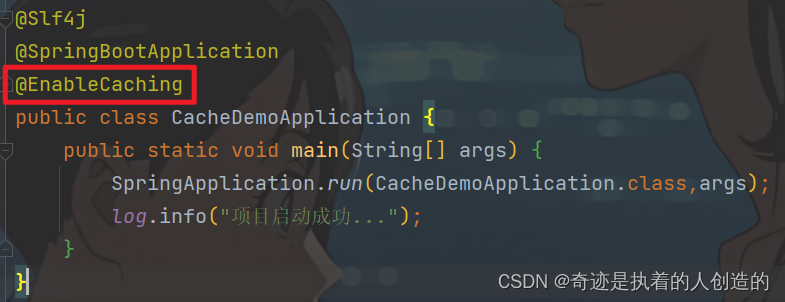
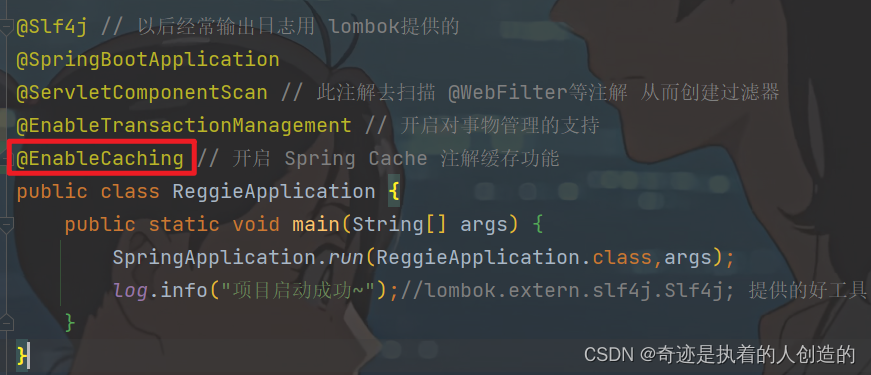
4). Add @EnableCaching to the boot class
Adding this annotation to the boot class means that the current project enables the caching annotation function.
4.3.2 @CachePut annotation
@CachePut Description:
Function: put the return value of the method into the cache
value: the name of the cache, there can be many keys under each cache name
key: 缓存的key ----------> 支持Spring的表达式语言SPEL语法
1). 在save方法上加注解@CachePut
当前UserController的save方法是用来保存用户信息的,我们希望在该用户信息保存到数据库的同时,也往缓存中缓存一份数据,我们可以在save方法上加上注解 @CachePut,用法如下:
/**
 * CachePut: 将方法返回值放入缓存
 * value: 缓存的名称,每个缓存名称下面可以有多个key (userCache表示user模块这一大类的缓存)
 * key: 缓存的key
 *
 * (可以通过spel(spring表达式语言)获取方法内的变量)
 * #result 就表示方法返回值    =》 #result.id
 * #user 就获取了参数 (user是参数名)  =》 #user.id
 */
@CachePut(value = "userCache",key = "#user.id")
@PostMapping
public User save(User user){


    userService.save(user);
    return user;
}
key的写法如下:
#user.id : #user指的是方法形参的名称, id指的是user的id属性 , 也就是使用user的id属性作为key ;
#user.name: #user指的是方法形参的名称, name指的是user的name属性 ,也就是使用user的name属性作为key ;
#result.id : #result代表方法返回值,该表达式 代表以返回对象的id属性作为key ;
#result.name : #result代表方法返回值,该表达式 代表以返回对象的name属性作为key ;
2). 测试
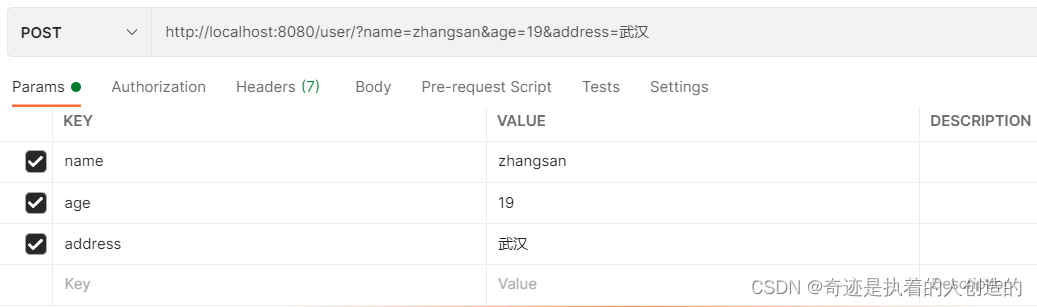
启动服务,通过postman请求访问UserController的方法, 然后通过断点的形式跟踪缓存数据。
第一次访问时,缓存中的数据是空的,因为save方法执行完毕后才会缓存数据。
第二次访问时,我们通过debug可以看到已经有一条数据了,就是上次保存的数据,已经缓存了,缓存的key就是用户的id。

注意: 上述的演示,最终的数据,实际上是缓存在ConcurrentHashMap中,那么当我们的服务器重启之后,缓存中的数据就会丢失。 我们后面使用了Redis来缓存就不存在这样的问题了。
4.3.3 @CacheEvict注解
@CacheEvict 说明:
作用: 清理指定缓存
value: 缓存的名称,每个缓存名称下面可以有多个key
key: 缓存的key ----------> 支持Spring的表达式语言SPEL语法
1). 在 delete 方法上加注解@CacheEvict
When we delete the data in the user table of the database, we need to delete the corresponding data in the cache. At this time, we can use the @CacheEvict annotation. The specific usage is as follows:
/**
* CacheEvict:清理指定缓存
* value:缓存的名称,每个缓存名称下面可以有多个key
* key:缓存的key
*/
@CacheEvict(value = "userCache",key = "#p0")  //#p0 代表第一个参数
//@CacheEvict(value = "userCache",key = "#root.args[0]") //#root.args[0] 代表第一个参数
//@CacheEvict(value = "userCache",key = "#id") //#id 代表变量名为id的参数
@DeleteMapping("/{id}")
public void delete(@PathVariable Long id){


    userService.removeById(id);
}
2). Test
To test the deletion of the cache, we first access the save method 4 times, save 4 pieces of data to the database, and also save them to the cache. Finally, we can see the data information in the cache through debug. Then we access the delete method through postman, as follows:
slightly
When deleting data, we can see 4 pieces of data that have been cached through debug:
slightly
After executing the delete operation, we save a piece of data again. When saving, debug to check whether the deleted ID value has been deleted.
slightly
It is found that Map is used here as a cache. Although it is also cached in memory, it cannot be called a database, because once the project is restarted, the map cache will be lost.
In fact, redis is separate from the project itself. Although it also exists in memory, when the project process is killed, redis is still running. Which redis memory caches will still exist, and the next time the project restarts, it can continue to be used without losing it. This is also the reason why redis stores data in memory and dares to claim data (it really uses memory as a hard disk).
3). Annotate @CacheEvict on the update method
After updating the data, the data in the database has changed. We need to delete the corresponding data in the cache to avoid inconsistencies between the database data and the cached data.
// 此处这4种写法都是等价的
//@CacheEvict(value = "userCache",key = "#p0.id") //第一个参数的id属性
//@CacheEvict(value = "userCache",key = "#root.args[0].id") //第一个参数的id属性
//@CacheEvict(value = "userCache",key = "#result.id") //返回值的id属性
@CacheEvict(value = "userCache",key = "#user.id") //参数名为user参数的id属性
@PutMapping
public User update(User user){


    userService.updateById(user);
    return user;
}
After adding the annotation, we can restart the service, and then test the method, which is basically the same as above, cache the data first, then update a certain piece of data, and query the status of the cached data in the form of debug.
4.3.4 @Cacheable annotation
@Cacheable Description:
Function: Before the method is executed, spring first checks whether there is data in the cache, and if there is data, it returns the cached data directly; if there is no data, calls the method and puts the method return value in the cache
value: the name of the cache, each cache name can have multiple keys
key: cached key ----------> Support Spring's expression language SPEL syntax
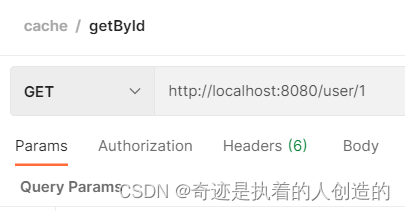
1). Annotate @Cacheable on getById
/**
 * Cacheable:在方法执行前spring先查看缓存中是否有数据,如果有数据,则直接返回缓存数据;若没有数据,调用方法并将方法返回值放到缓存中
 * value:缓存的名称,每个缓存名称下面可以有多个key
 * key:缓存的key
 */
@Cacheable(value = "userCache", key = "#id")
@GetMapping("/{id}")
public User getById(@PathVariable Long id){


    User user = userService.getById(id);
    return user;
}
2). Test
我们可以重启服务,然后通过debug断点跟踪程序执行。我们发现,第一次访问,会请求我们controller的方法,查询数据库。后面再查询相同的id,就直接获取到数据库,不用再查询数据库了,就说明缓存生效了。
图略
problem:
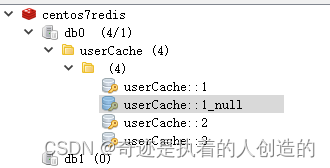
当我们在测试时,查询一个数据库不存在的id值,第一次查询缓存中没有,也会查询数据库。而第二次再查询时,会发现,不再查询数据库了,而是直接返回,那也就是说如果根据ID没有查询到数据,那么会自动缓存一个null值。 我们可以通过debug,验证一下:
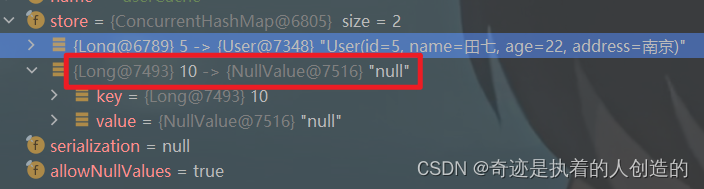
我们能不能做到,当查询到的值不为null时,再进行缓存,如果为null,则不缓存呢? 答案是可以的。
3). 缓存非null值
在@Cacheable注解中,提供了两个属性分别为: condition, unless 。
condition : 表示满足什么条件, 再进行缓存 ;
unless : 表示满足条件则不缓存 ; 与上述的condition是反向的 ;
具体实现方式如下:
/**
 * Cacheable:在方法执行前spring先查看缓存中是否有数据,如果有数据,则直接返回缓存数据;若没有数据,调用方法并将方法返回值放到缓存中
 * value:缓存的名称,每个缓存名称下面可以有多个key
 * key:缓存的key
 *
 * condition:条件,满足条件时才缓存数据 (无法获取result )
 * unless:满足条件则不缓存
 */
@Cacheable(value = "userCache", key = "#id", unless = "#result == null")
@GetMapping("/{id}")
public User getById(@PathVariable Long id){


    User user = userService.getById(id);
    return user;
}
注意: 此处,我们使用的时候只能够使用 unless, 因为在condition中,我们是无法获取到结果 #result的。
4). 在list方法上加注解@Cacheable
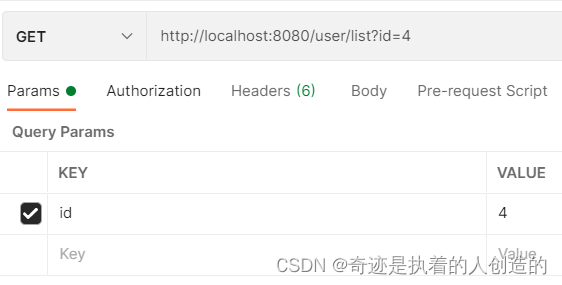
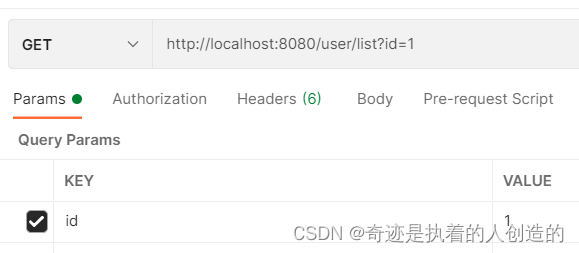
在list方法中进行查询时,有两个查询条件,如果传递了id,根据id查询; 如果传递了name, 根据name查询,那么我们缓存的key在设计的时候,就需要既包含id,又包含name。 具体的代码实现如下:
Cacheable注解不仅可以读缓存,还可以写缓存 全能啊
// 这个注解不仅可以读缓存,还可以自己写缓存 ★
// 查询条件有2个,所以key也关联2个
@Cacheable(value = "userCache",key = "#user.id +'_'+ #user.name")
@GetMapping("/list")
public List<User> list(User user){


    LambdaQueryWrapper<User> queryWrapper = new LambdaQueryWrapper<>();
    queryWrapper.eq(user.getId() != null,User::getId,user.getId());
    queryWrapper.eq(user.getName() != null,User::getName,user.getName());
    List<User> list = userService.list(queryWrapper);
    return list;
}
然后再次重启服务,进行测试。
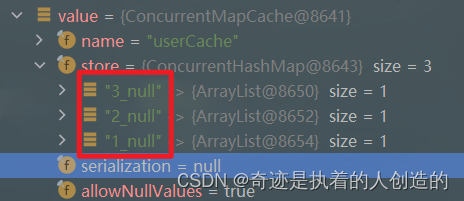
第一次查询时,需要查询数据库,在后续的查询中,就直接查询了缓存,不再查询数据库了。
4.4 集成Redis
在使用上述默认的ConcurrentHashMap做缓存时,服务重启之后,之前缓存的数据就全部丢失了,操作起来并不友好。在项目中使用,我们会选择使用redis来做缓存,主要需要操作以下几步:
1). pom.xml
<dependency>
    <groupId>org.springframework.boot</groupId>
    <artifactId>spring-boot-starter-cache</artifactId>
</dependency>

<dependency>
    <groupId>org.springframework.boot</groupId>
    <artifactId>spring-boot-starter-data-redis</artifactId>
</dependency>
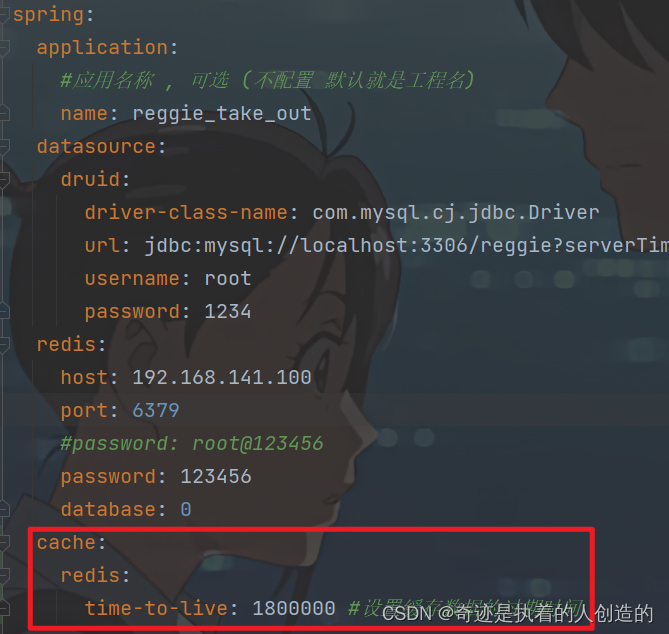
2). application.yml
spring:
  redis:
    host: 192.168.200.200
    port: 6379
    password: root@123456
    database: 0
  cache:
    redis:
      time-to-live: 1800000   #设置缓存过期时间,可选 (单位ms: 1800000ms=1800s=30min)
加上redis依赖,并且yml中配置上redis,顶层CacheManager接口就会自动使用redis的实现类,也就是底层使用redis缓存而非map缓存
3). 测试
重新启动项目,通过postman发送根据id查询数据的请求,然后通过redis的图形化界面工具,查看redis中是否可以正常的缓存数据。
确实就用到redis啦~
重启服务器,再次访问相同的链接,发现缓存还在~
5. 缓存套餐数据
5.1 实现思路
前面我们已经实现了移动端套餐查看功能,对应的服务端方法为SetmealController的list方法,此方法会根据前端提交的查询条件进行数据库查询操作。在高并发的情况下,频繁查询数据库会导致系统性能下降,服务端响应时间增长。现在需要对此方法进行缓存优化,提高系统的性能。
具体的实现思路如下:
1). 导入Spring Cache和Redis相关maven坐标
2). 在application.yml中配置缓存数据的过期时间
3). 在启动类上加入@EnableCaching注解,开启缓存注解功能
4). 在SetmealController的list方法上加入@Cacheable注解 (写缓存+读缓存)
5). 在SetmealController的save和delete方法上加入CacheEvict注解
5.2 缓存套餐数据
5.2.1 代码实现
1). pom.xml中引入依赖
<dependency>
    <groupId>org.springframework.boot</groupId>
    <artifactId>spring-boot-starter-cache</artifactId>
</dependency>
备注: spring-boot-starter-data-redis 这个依赖前面已经引入了, 无需再次引入。
2). application.yml中设置缓存过期时间
spring:
  cache:
    redis:
      time-to-live: 1800000 #设置缓存数据的过期时间
3). 启动类上加入@EnableCaching注解
4). SetmealController的list方法上加入@Cacheable注解
在进行套餐数据查询时,我们需要根据分类ID和套餐的状态进行查询,所以我们在缓存数据时,可以将套餐分类ID和套餐状态组合起来作为key,如: 1627182182_1 (1627182182为分类ID,1为状态)。
/**
* 根据条件查询套餐数据
* @param setmeal
* @return
*/
@GetMapping("/list")
@Cacheable(value = "setmealCache",key = "#setmeal.categoryId + '_' + #setmeal.status")
public R<List<Setmeal>> list(Setmeal setmeal){


    LambdaQueryWrapper<Setmeal> queryWrapper = new LambdaQueryWrapper<>();
    queryWrapper.eq(setmeal.getCategoryId() != null,Setmeal::getCategoryId,setmeal.getCategoryId());
    queryWrapper.eq(setmeal.getStatus() != null,Setmeal::getStatus,setmeal.getStatus());
    queryWrapper.orderByDesc(Setmeal::getUpdateTime);

    List<Setmeal> list = setmealService.list(queryWrapper);

    return R.success(list);
}
5.2.2 测试
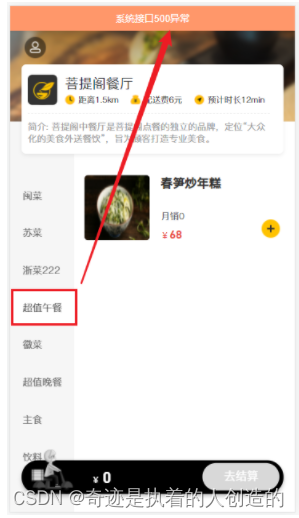
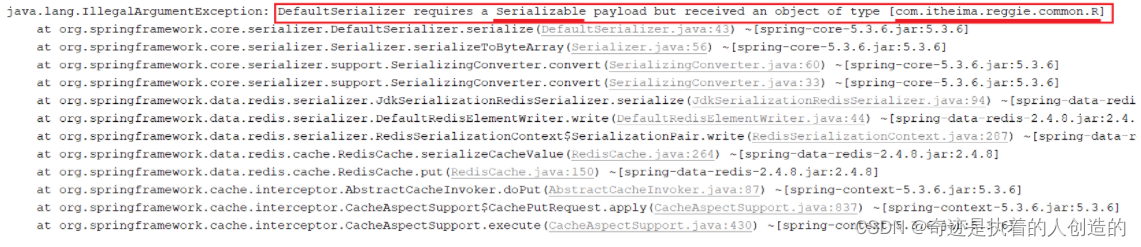
缓存数据的代码编写完毕之后,重新启动服务,访问移动端进行测试,我们登陆之后在点餐界面,点击某一个套餐分类,查询套餐列表数据时,服务端报错了,错误信息如下:
为什么会报出这个错误呢?
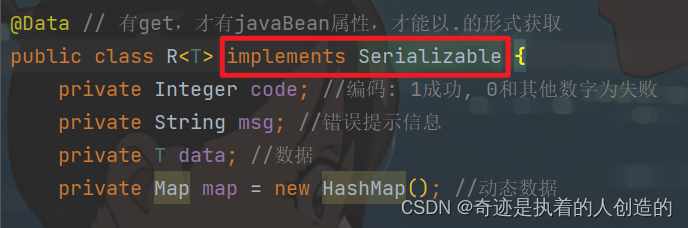
因为 @Cacheable 会将方法的返回值R缓存在Redis中,而在Redis中存储对象,该对象是需要被序列化的,而对象要想被成功的序列化,就必须得实现 Serializable 接口。而当前我们定义的R,并未实现 Serializable 接口。所以,要解决该异常,只需要让R实现 Serializable 接口即可。如下:
修复完毕之后,再次重新测试,访问套餐分类下对应的套餐列表数据后,我们会看到Redis中确实可以缓存对应的套餐列表数据。
5.3 清理套餐数据
5.3.1 代码实现
为了保证数据库中数据与缓存数据的一致性,在我们添加套餐或者删除套餐数据之后,需要清空当前套餐缓存的全部数据。那么@CacheEvict注解如何清除某一份缓存下所有的数据呢,这里我们可以指定@CacheEvict中的一个属性 allEnties,将其设置为true即可。
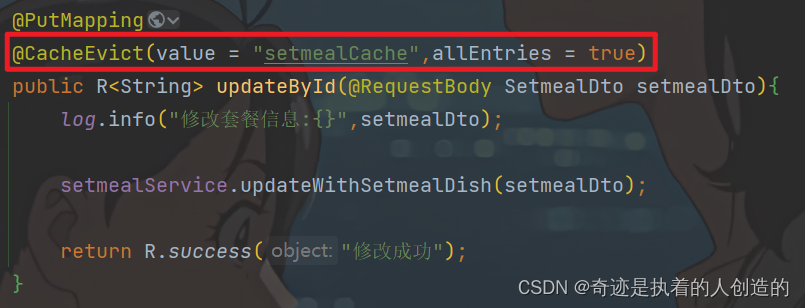
1). 在delete方法上加注解@CacheEvict
@DeleteMapping
@CacheEvict(value = "setmealCache",allEntries = true) // allEntries = true 表示清理所有缓存
public R<String> delete(@RequestParam List<Long> ids){


    log.info("根据id批量删除(单个id就是单删): ids={}",ids);
    setmealService.removeWithDish(ids);//删除套餐,还要删除中间表setmeal_dish的"套餐-菜品"关联记录
    return R.success("删除成功!");
}
2). 在save方法上加注解@CacheEvict
@PostMapping
@CacheEvict(value = "setmealCache",allEntries = true) // allEntries = true 表示清理所有缓存
public R<String> save(@RequestBody SetmealDto setmealDto){


    log.info("套餐信息:{}",setmealDto);
    setmealService.saveWithDish(setmealDto);
    return R.success("新增套餐成功");
}
5.3.2 测试
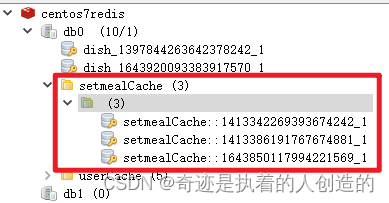
代码编写完成之后,重启工程,然后访问后台管理系统,对套餐数据进行新增 以及 删除, 然后通过Redis的图形化界面工具,查看Redis中的套餐缓存是否已经被删除。
果然被删除了
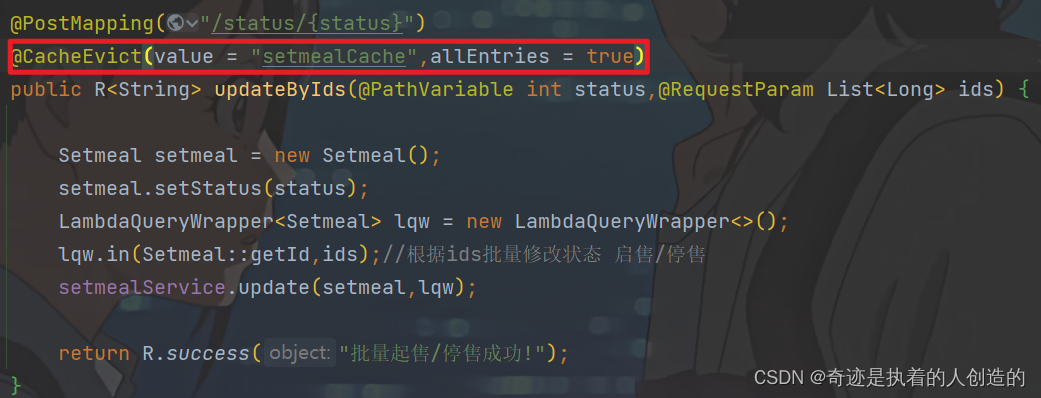
5.3.3 其他功能缓存处理
In fact, only foreground queries need to be cached, because the amount of foreground visits is huge, and the background visits are very small, so there is no need for caching.
But for some update operations, there must be a clear cache operation, otherwise, the business logic is wrong.
Therefore, the operation of clearing the cache must be added to the method of modifying the package information and batch start/stop sale of the controller
@CacheEvict(value = "setmealCache",allEntries = true)
(Also clear, in case the package type is modified)
5.4 Submit push code
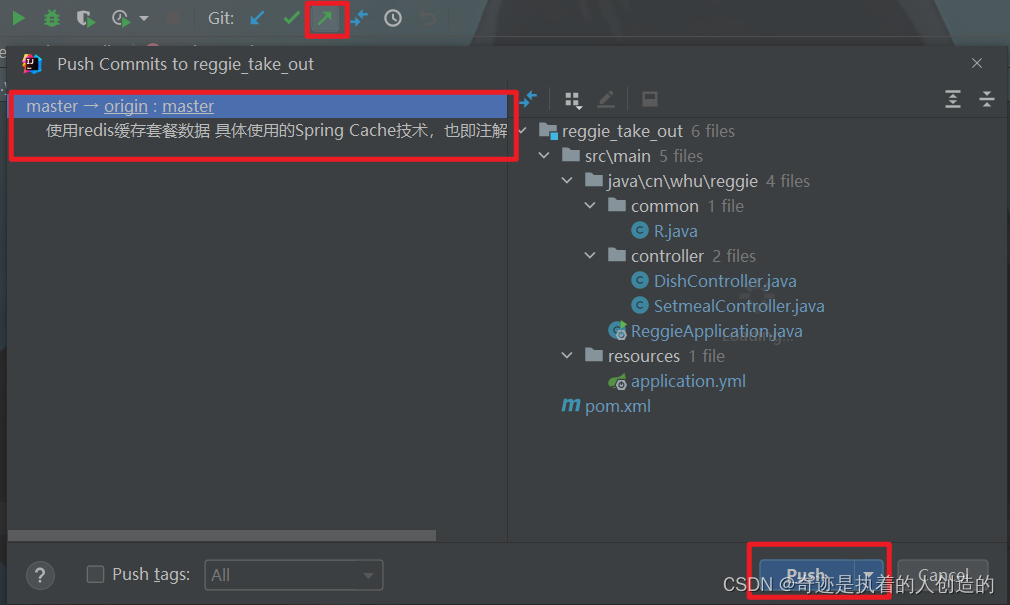
So far, we have completed the caching of package data in the v1.0 branch, and then we need to submit and push the code to the remote warehouse.
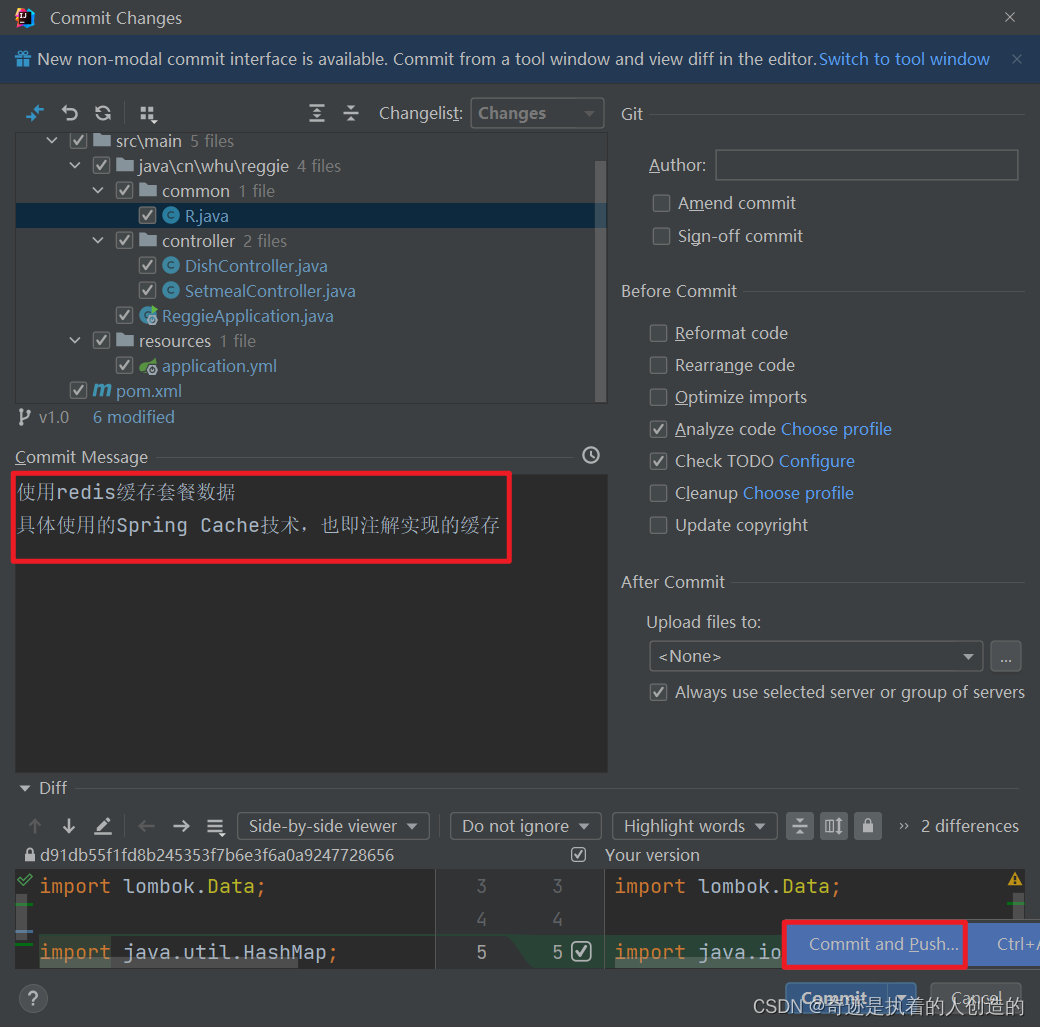
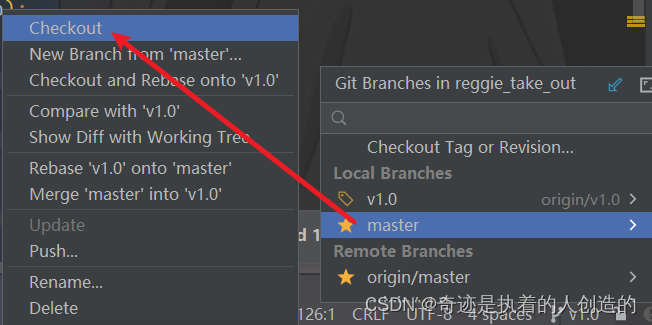
Then, switch to the master branch in idea, and then merge the code of the v1.0 branch into master.

Then push the code of the merged master branch to the remote warehouse.
Check whether the remote warehouse is really pushed to:

