Article directory
- Docker Practical Articles
- 0. Learning Objectives
- 1. Getting to know Docker first
- 2. Basic operation of Docker
- 3.Dockerfile custom image
- 4.Docker-Compose
- TODO Pause to modify the project suddenly can't run, do not rule out the possibility of breaking it before
- 5.Docker mirror warehouse
Docker Practical Articles
0. Learning Objectives
1. Getting to know Docker first
1.1. What is Docker
Although microservices have various advantages, the splitting and generalization of services has brought a lot of trouble to deployment.
- In a distributed system, there are many dependent components, and some conflicts often occur when deploying between different components.
- Repeated deployment in hundreds or thousands of services, the environment is not necessarily consistent, and various problems will be encountered
1.1.1. Environmental issues of application deployment
There are many components in large-scale projects, and the operating environment is also relatively complex. Some problems will be encountered during deployment:
-
Dependencies are complex and prone to compatibility issues
-
Development, testing, and production environments are different
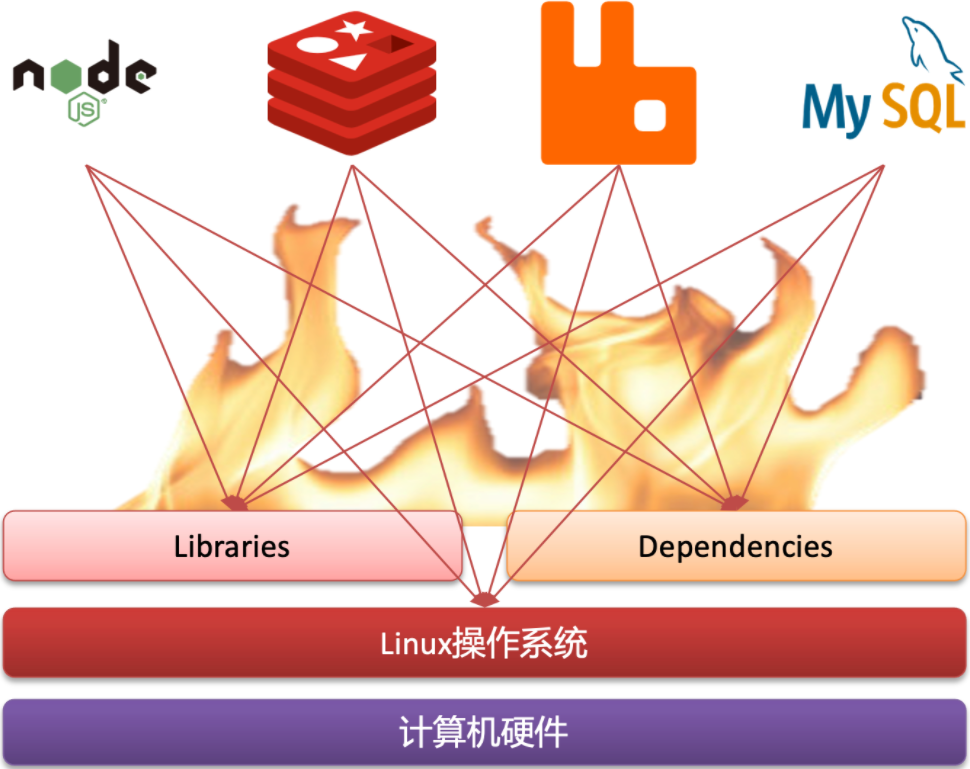
For example, in a project, the deployment needs to depend on node.js, Redis, RabbitMQ, MySQL, etc. The function libraries and dependencies required for the deployment of these services are different, and there may even be conflicts. It brings great difficulties to deployment.
1.1.2.Docker solves dependency compatibility issues
And Docker has solved these problems ingeniously, how did Docker achieve it?
In order to solve the dependency compatibility problem, Docker adopts two methods:
-
Package the application's Libs (function library), Deps (dependency), configuration and application together
-
Run each application in an isolated container to avoid mutual interference
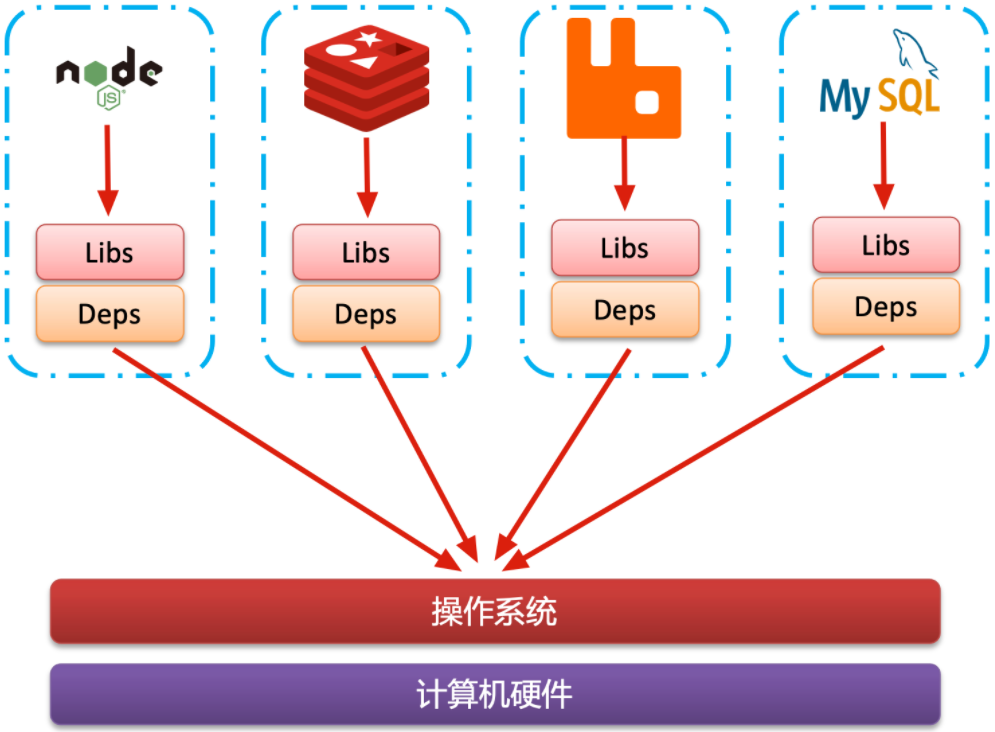
Such a packaged application package not only contains the application itself, but also protects the Libs and Deps required by the application. There is no need to install these on the operating system, and naturally there will be no compatibility issues between different applications.
Although the compatibility problem of different applications has been solved, there will be differences in development, testing and other environments, as well as differences in operating system versions. How to solve these problems?
1.1.3.Docker resolves operating system environment differences
To solve the problem of differences in different operating system environments, one must first understand the operating system structure. Taking an Ubuntu operating system as an example, the structure is as follows:

Structures include:
- Computer hardware: such as CPU, memory, disk, etc.
- System kernel: The kernel of all Linux distributions is Linux , such as CentOS, Ubuntu, Fedora, etc. The kernel can interact with computer hardware and provide kernel instructions to operate computer hardware. (No matter what release version, the linux kernel is the same, but the function library is different)
- System applications: applications and function libraries provided by the operating system itself. These function libraries are packages of kernel instructions, which are more convenient to use.
The OS can be divided into three layers: system function library-"system kernel-"hardware
called step by step, no matter what release version, the system kernel is the same, so docker also packs the system function library and it is OK
The process applied to computer interaction is as follows:
1) The application calls the operating system application ( function library ) to realize various functions
2) The system function library is the encapsulation of the kernel instruction set, which will call the kernel instruction
3) Kernel instructions operate computer hardware
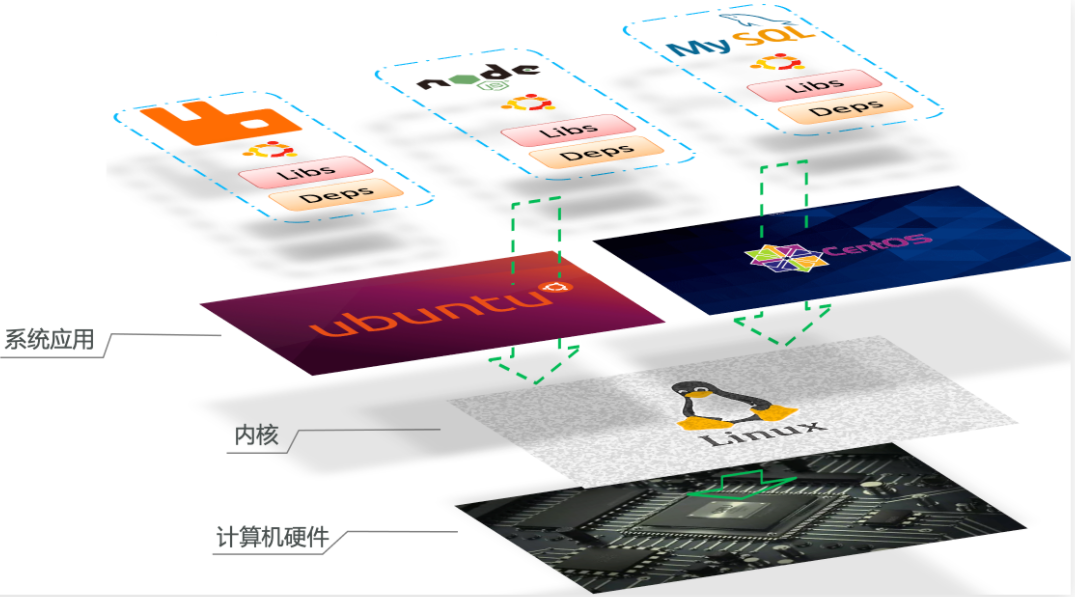
Both Ubuntu and CentOSpringBoot are based on the Linux kernel, but the system applications are different, and the function libraries provided are different:

At this point, if you install an Ubuntu version of the MySQL application to the CentOS system, when MySQL calls the Ubuntu function library, it will find that it cannot find or does not match, and it will report an error:

How does Docker solve the problems of different system environments?
- Docker packages the user program with the system (such as Ubuntu) function library that needs to be called
- When Docker runs to different operating systems, it is directly based on the packaged function library and runs with the help of the Linux kernel of the operating system
As shown in the picture:
1.1.4. Summary
How does Docker solve the compatibility problems of complex dependencies and dependencies of different components in large-scale projects?
- Docker allows applications, dependencies, function libraries, and configurations to be packaged together during development to form a portable image
- Docker applications run in containers and use the sandbox mechanism to isolate them from each other
How does Docker solve the problem of differences in development, testing, and production environments?
- The Docker image contains a complete operating environment, including system function libraries, and only depends on the Linux kernel of the system, so it can run on any Linux operating system
Docker is a technology for quickly delivering and running applications, with the following advantages:
- The program, its dependencies, and the operating environment can be packaged together into a mirror image, which can be migrated to any Linux operating system
- The sandbox mechanism is used to form an isolated container during runtime, and each application does not interfere with each other
- Both startup and removal can be completed with one line of commands, which is convenient and quick
1.2. Difference between Docker and virtual machine
Docker makes it easy for an application to run on any operating system. And the virtual machines we used to touch can also run another operating system in one operating system to protect any application in the system.
What is the difference between the two?
A virtual machine (virtual machine) simulates a hardware device in an operating system , and then runs another operating system, such as running an Ubuntu system in a Windows system, so that any Ubuntu application can be run. (created a new operating system new os called local os)
Docker only encapsulates the function library, and does not simulate a complete operating system, as shown in the figure: (directly call the local OS)

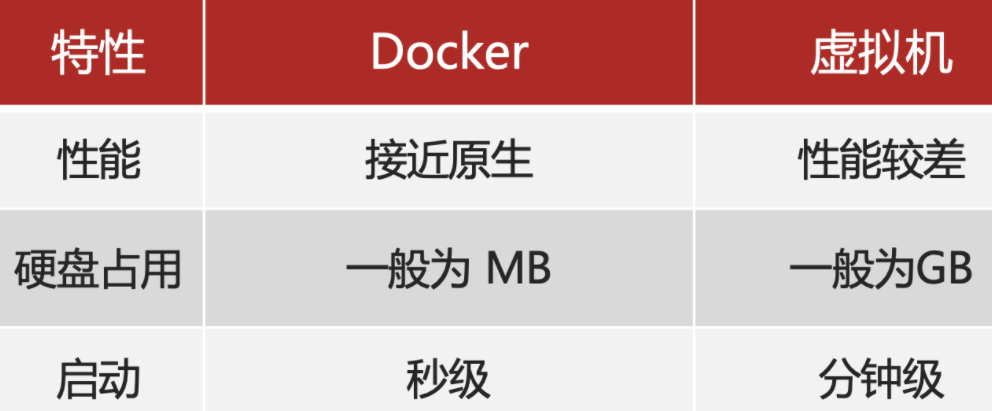
For comparison:
summary:
Differences between Docker and virtual machines:
-
docker is a system process; a virtual machine is an operating system within an operating system
-
docker is small in size, fast in startup speed and good in performance; the virtual machine is large in size, slow in startup speed and average in performance
1.3.Docker Architecture
1.3.1. Images and containers
There are several important concepts in Docker:
Image : Docker packages applications and their required dependencies, function libraries, environments, configurations, and other files together, called images.
Container : The process formed after the application in the image runs is a container , but Docker will isolate the container process, which is invisible to the outside world.
All applications are ultimately composed of codes, which are files formed by bytes in the hard disk . Only when running, will it be loaded into memory to form a process.
The mirror image is a file package formed by packaging an application file on the hard disk, its operating environment, and some system function library files together. This package is read-only. (A mirror image is a read-only file)
As for the container , it is to load the programs and functions written in these files into the memory to allow it to form a process, but it must be isolated. Therefore, an image can be started multiple times to form multiple container processes. (The container is the process that the image actually runs (isolated process))
The container can read the image but cannot write the image. When it needs to write, it copies the file to its own container, and then writes its own copy. That is, isolation is achieved
.
The container has its own isolation environment, its own CPU memory, and even its own file system, so it will not interact with other processes of the OS, or other processes cannot perceive the existence of the container (isolated process) , the container does not feel the existence of other os processes, and will think that its isolation environment is an os
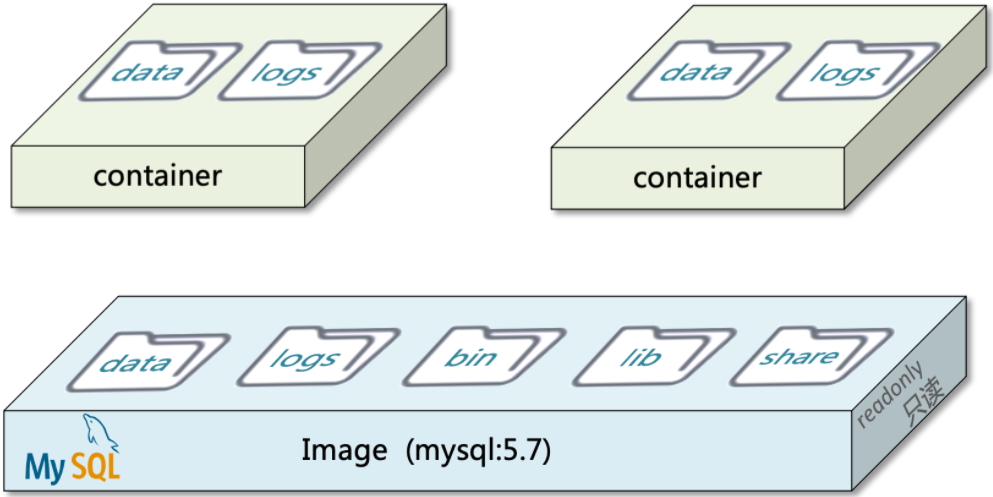
For example, if you download a QQ, if we package the running files of QQ on the disk and its operating system dependencies, a QQ image will be formed. Then you can start multiple times, double open, or even open QQ three times, and chat with multiple girls.
1.3.2.DockerHub
There are so many open source applications that packaging them is often a duplication of effort. In order to avoid these duplication of efforts, people will put their own packaged application images, such as Redis and MySQL images, on the network for shared use, just like GitHub's code sharing.
-
DockerHub: DockerHub is an official Docker image hosting platform . Such a platform is called a Docker Registry.
-
There are also public services similar to DockerHub in China, such as NetEase Cloud Mirror Service , Alibaba Cloud Mirror Library , etc.
On the one hand, we can share our image to DockerHub, and on the other hand, we can also pull the image from DockerHub:
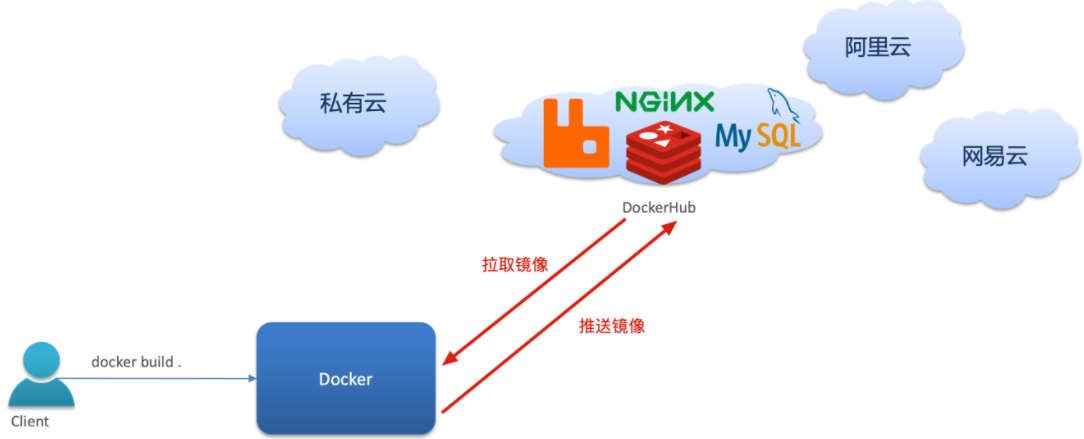
Therefore, in general, images like redis, MySQL, and Nginx do not need to be created by themselves, and the official created ones are directly pulled (all are excellent).
Only your own microservices or mirrors that require deep customization need to be created by yourself
( Images that are not willing to be disclosed can build their own private cloud and put them in the private cloud)
1.3.3.Docker architecture
If we want to use Docker to operate images and containers, we must install Docker.
Docker is a program of CS architecture, which consists of two parts:
-
Server (server): Docker daemon process, responsible for processing Docker instructions, managing images, containers, etc.
-
Client (client): Send instructions to the Docker server through commands or RestAPI. Commands can be sent to the server locally or remotely.
As shown in the picture:

1.3.4. Summary
mirror image:
- Package the application together with its dependencies, environment, and configuration
container:
- The image runs like a container, and one image can run multiple containers
Docker structure:
-
Server: receive commands or remote requests, operate images or containers
-
Client: Send commands or requests to the Docker server
DockerHub:
- A mirror hosting server, similar to the Alibaba Cloud mirror service, collectively referred to as DockerRegistry
1.4. Install Docker
Enterprise deployments generally use the Linux operating system, and among them, the CentOS distribution accounts for the largest proportion, so we install Docker under CentOS. Refer to this blog: Install Docker on Centos7
2. Basic operation of Docker
2.1. Mirror operation
2.1.1. Image name
First look at the name composition of the image:
- The image name generally consists of two parts: [repository]:[tag].
- When no tag is specified, the default is latest, representing the latest version of the image
As shown in the picture:
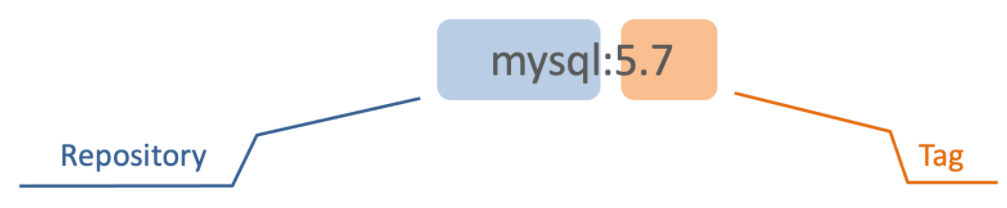
Here mysql is the repository, 5.7 is the tag, and together they are the image name, representing the MySQL image of version 5.7.
So
mysql:5.7andmysql:5.6are two different images.
If no tag is specified, the default is the latest image.
2.1.2. Mirror command
Common mirroring operation commands are shown in the figure:
The images in the figure above mean mirror image
- command warm up
# 查看docker的所有命令
docker --help

# 查看images命令的帮助文档
docker images --help

# 根据提示信息 使用images命令
docker images
Next, learn these commands through a case
2.1.3. Case 1 - Pulling and Viewing Mirror Images
Requirement: Pull an nginx image from DockerHub and view it
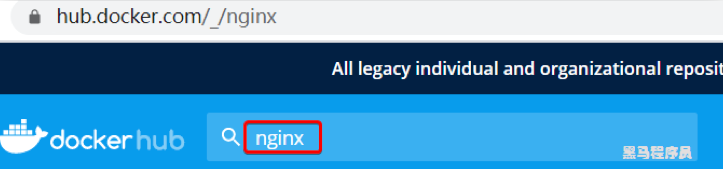
1) First go to the mirror warehouse to search for nginx images, such as DockerHub :
No need to log in, just search for the mirror name, eg: nginx

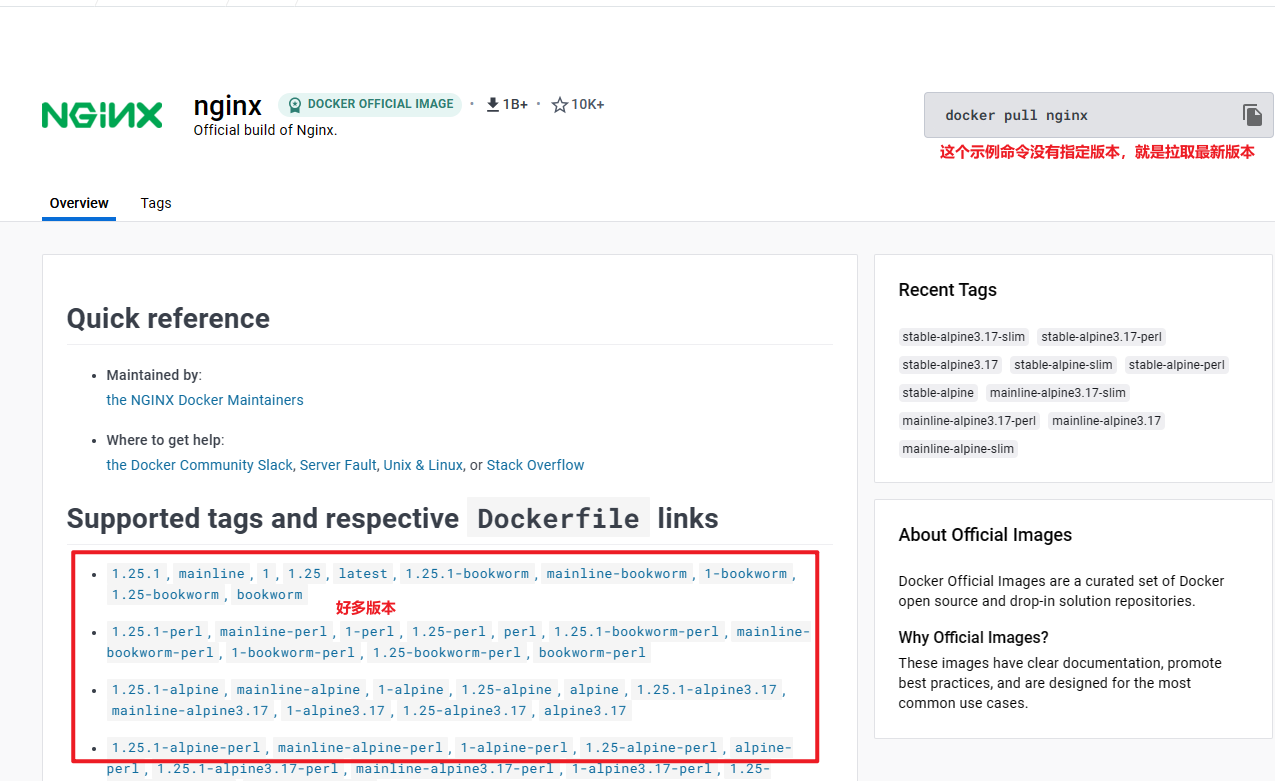
2) According to the viewed image name, pull the image you need, and use the command:docker pull nginx
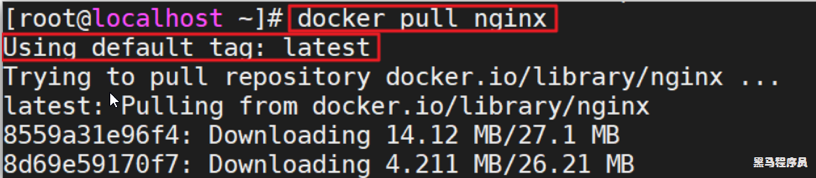
3) Through the command: docker imagesview the image pulled

2.1.4. Case 2 - saving and importing images
Requirement: Use docker save to export the nginx image to the disk, and then load it back through load
1) Use the docker xx --help command to view the syntax of docker save and docker load
For example, to view the save command usage, you can enter the command:
docker save --help
result:
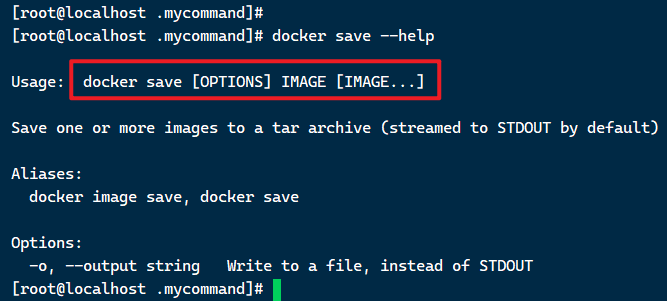
Command format:
docker save -o [保存的目标文件名称] [镜像名称]
2) Use docker save to export the image to disk
Run the command:
docker save -o nginx.tar nginx:latest
The result is shown in the figure:
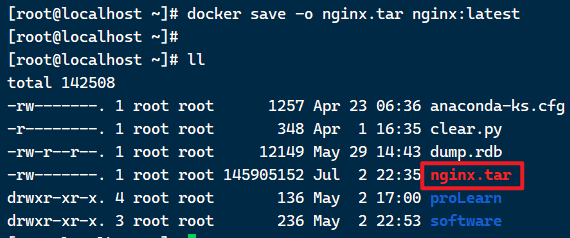

The latest version is just pulled, so only the latest version can be saved.
The image name consists of two parts: [repository]:[tag] eg:mysql:5.6nginx:latest

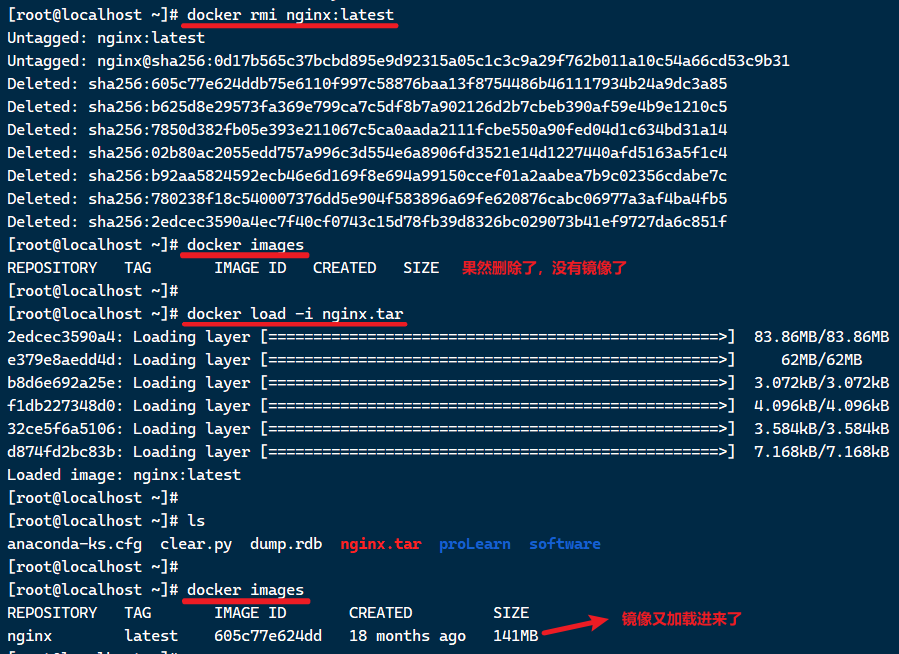
3) Use docker load to load the image
First delete the local nginx mirror:
docker rmi nginx:latest
Then run the command to load the local file:
docker load -i nginx.tar
result:
2.1.5. Practice
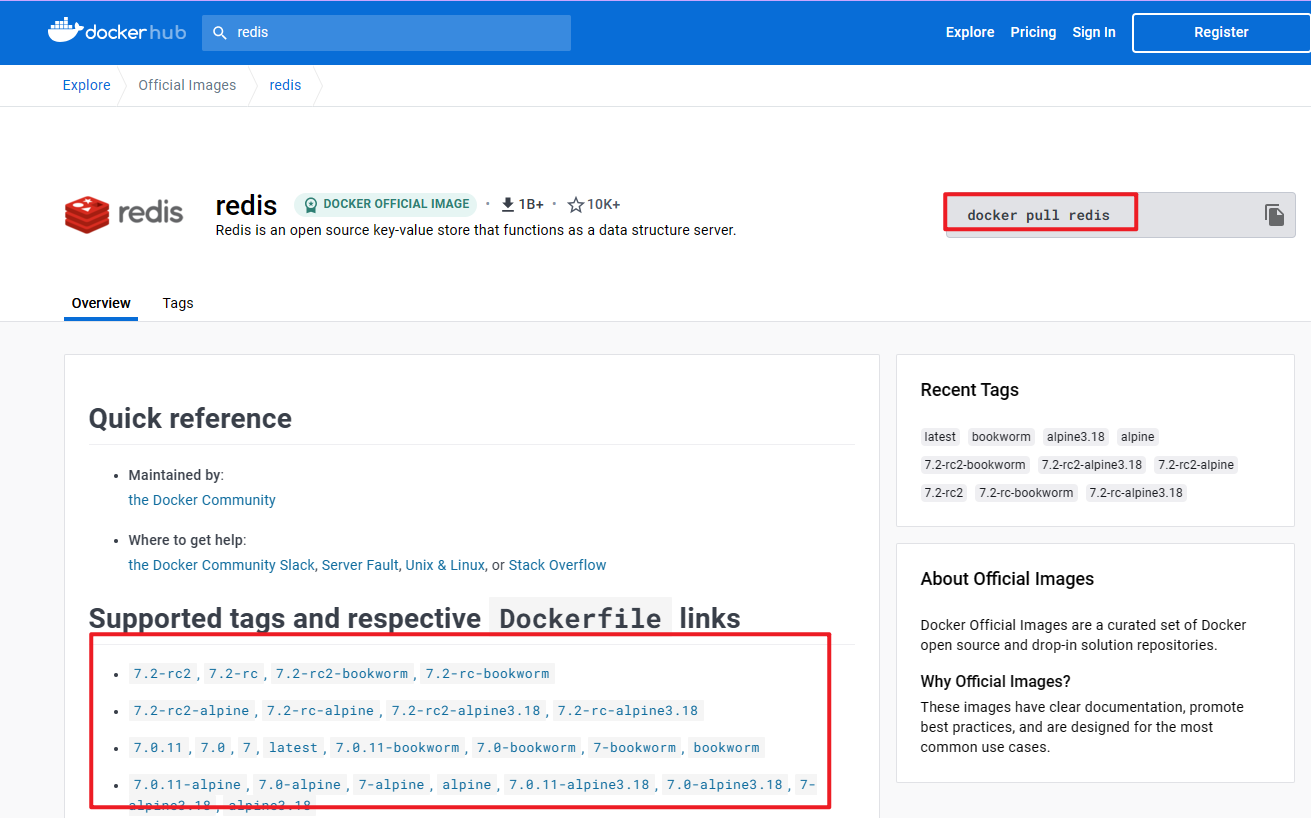
Requirement: Go to DockerHub to search and pull a Redis image
Target:
1) Go to DockerHub to search for the Redis image
2) View the name and version of the Redis image
3) Use the docker pull command to pull the image
4) Use the docker save command to package redis:latest into a redis.tar package
5) Use docker rmi to delete the local redis:latest
6) Use docker load to reload the redis.tar file
LX:
1) Go to DockerHub to search for the Redis image

2) View the name and version of the Redis image
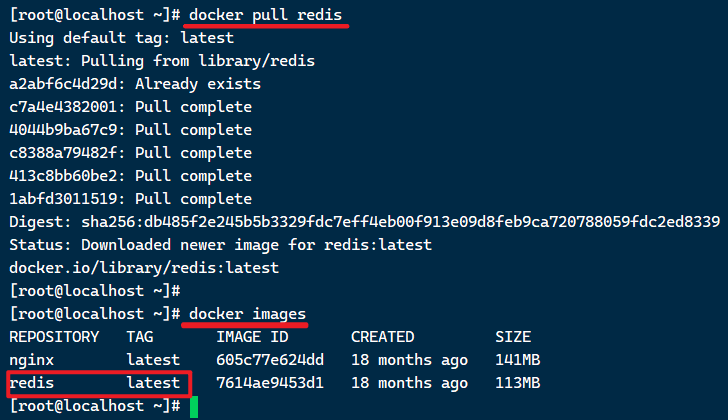
3) Use the docker pull command to pull the image
docker pull redis
4) Use the docker save command to package redis:latest into a redis.tar package
docker save -o redis.tar redis:latest

5) Use docker rmi to delete the local redis:latest
docker rmi redis:latest
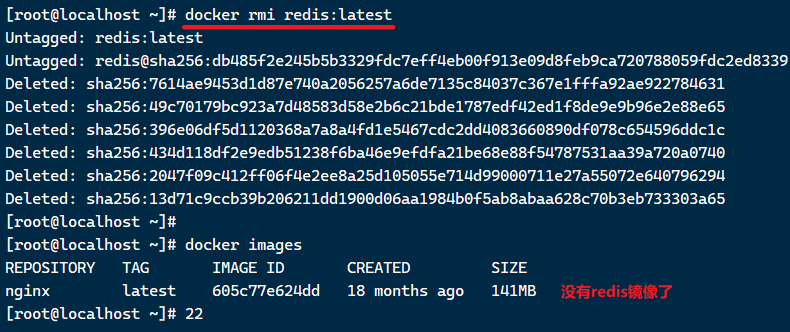
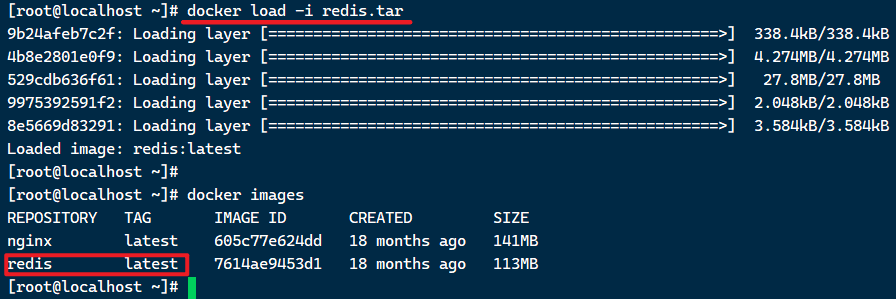
6) Use docker load to reload the redis.tar file
docker load -i redis.tar
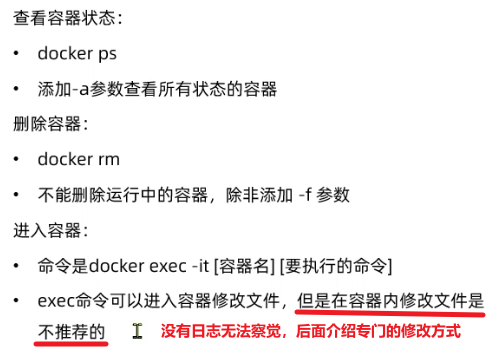
2.2. Container Operations
2.2.1. Container related commands
The command of the container operation is as follows:
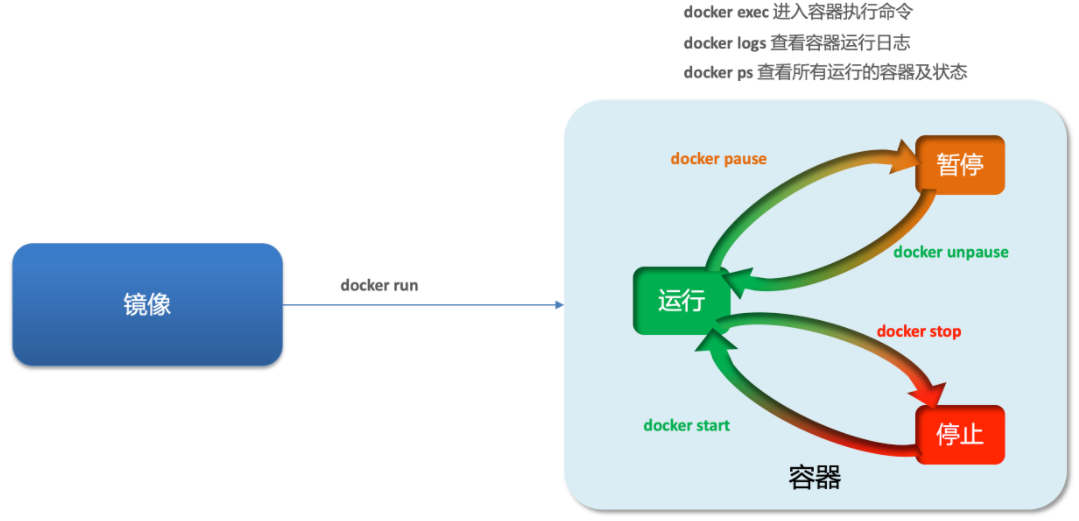
Containers protect three states:
- running: the process is running normally
- Suspended: The process is suspended, the CPU is no longer running, and memory is not released (suspended process)
- Stop: the process terminates, reclaiming the memory, CPU and other resources occupied by the process (killing the process)
in:
-
docker run: create and run a container, in running state
-
docker pause: pause a running container
-
docker unpause: Resume a container from a paused state
-
docker stop: stop a running container
-
docker start: make a stopped container run again
-
docker rm: Delete a container (the container process includes some files generated by the container on the disk, all of which are completely deleted. But the image will not be deleted)
-
docker ps: View all containers and their status (running, pausing, stopping in the above figure)
2.2.2. Case - create and run a container
The command to create and run the nginx container:
docker run --name containerName -p 80:80 -d nginx
docker run --name mn -p 80:80 -d nginx
Command interpretation:
- docker run : create and run a container
- –name : Give the container a name, such as mn
- -p : Map the host port to the container port, the left side of the colon is the host port, and the right side is the container port (requests sent to the port number of the host are forwarded to the corresponding port of the container for execution, and the container cannot be directly accessed because it is blocked quarantined)
- -d: Run the container in the background (running silently in the background without occupying the terminal)
- nginx: mirror name, such as nginx (no tag is the latest version by default)
The parameter here -pis to map the container port to the host port.
By default, the container is an isolated environment. If we directly access port 80 of the host, we will definitely not be able to access nginx in the container.
Now, associate 80 of the container with 80 of the host. When we access port 80 of the host, it will be mapped to 80 of the container, so that we can access nginx:
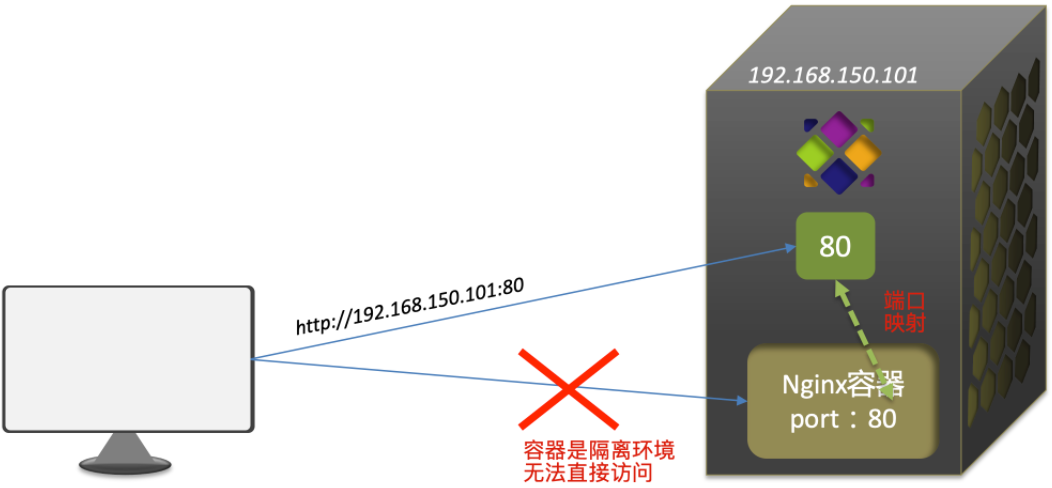

The command is executed successfully, and the unique id of the container is printed (every container is created, it will have a unique id)
docker ps

Can see running containers
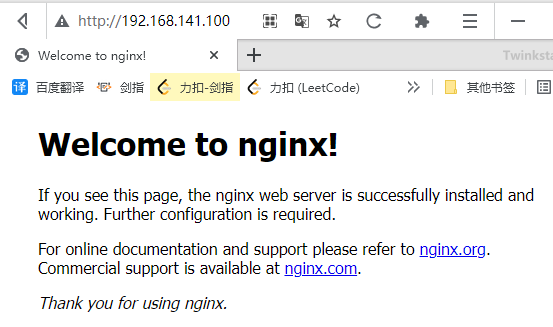
At this time, visit the server port 80 (can be omitted), and you can see the Nginx home page
http://192.168.141.100/
Check the log again:
docker logs mn
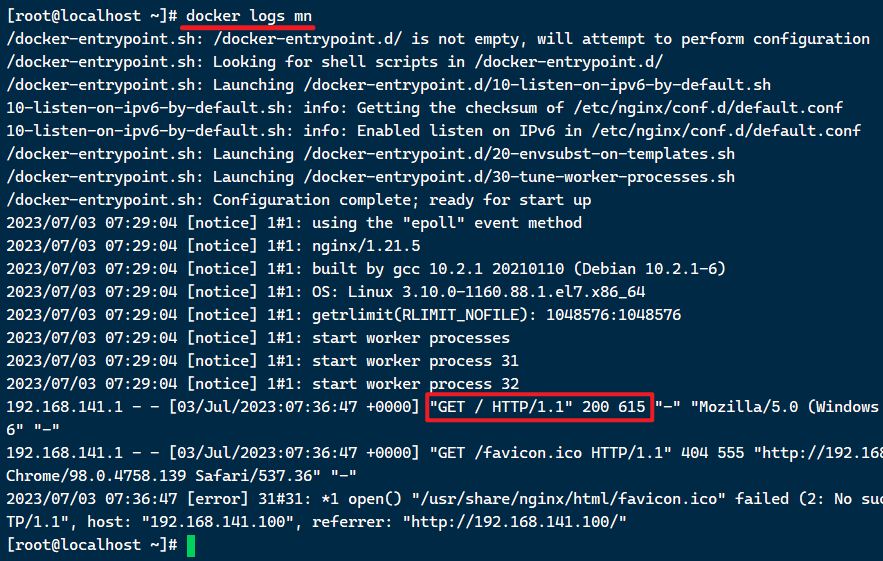
Access records are in the log
docker logs -f mn
Debug mode access log
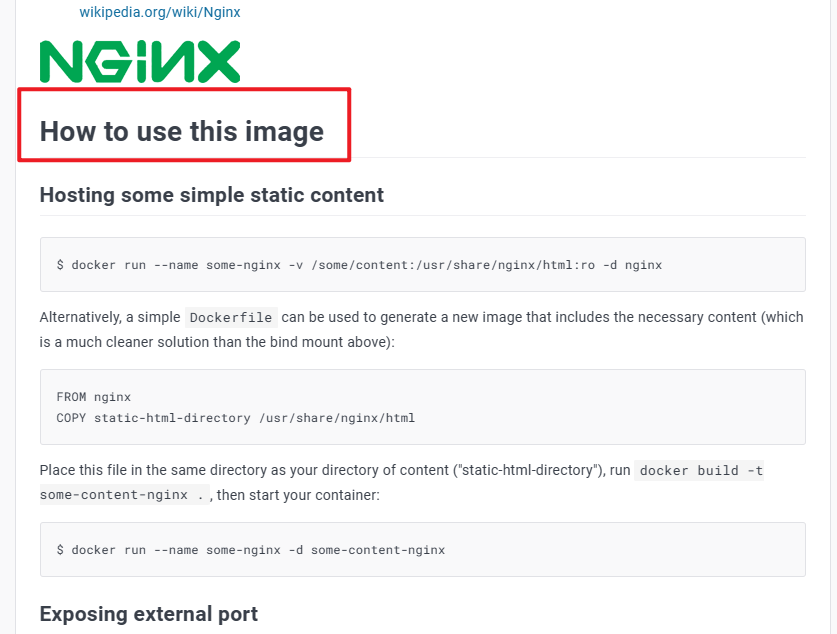
Search Nginx on the official website, enter the official image, pull down, and you can see the usage guide (below the version number)
2.2.3. Case - enter the container and modify the file
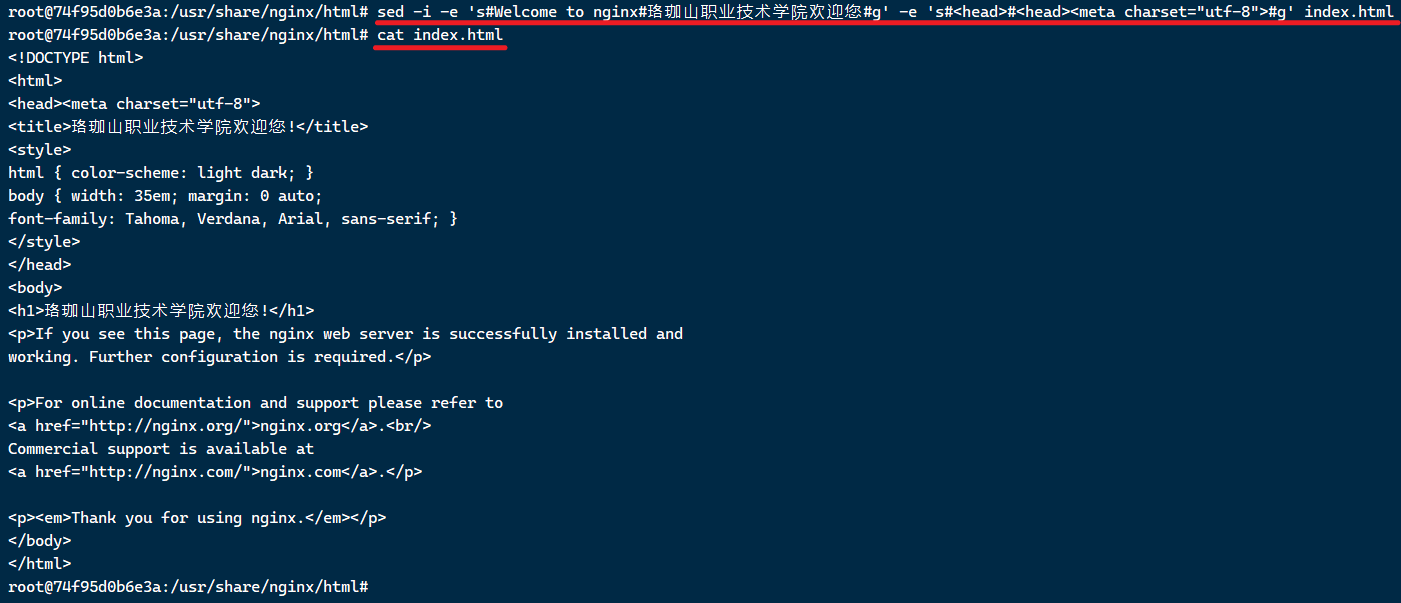
Requirements : Enter the Nginx container, modify the content of the HTML file, and add "Welcome to Luojiashan Vocational and Technical College"
Tip : To enter the container, you need to use the docker exec command.
steps :
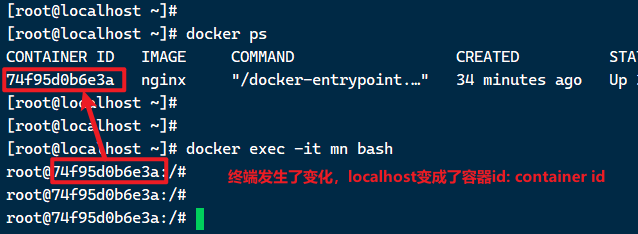
1) into the container. The command to enter the nginx container we just created is:
docker exec -it mn bash
Command interpretation:
-
docker exec: enter the container and execute a command
-
-it : Create a standard input and output terminal for the currently entered container , allowing us to interact with the container
-
mn : the name of the container to enter
-
bash: the command executed after entering the container, bash is a linux terminal interactive command
2) Enter the directory where the HTML of nginx is located /usr/share/nginx/html
Inside the container, an independent Linux file system will be simulated, which looks like a linux server: (but it is actually a castrated version of the file system)

The environment, configuration, and running files of nginx are all in this file system, including the html file we want to modify.
View the nginx page on the DockerHub website, you can know that the html directory of nginx is located in/usr/share/nginx/html
We execute the command to enter the directory:
cd /usr/share/nginx/html
View the files in the directory:

3) Modify the content of index.html
There is no vi command in the container (proving castration), and it cannot be modified directly. We use the following command to modify:
sed -i -e 's#Welcome to nginx#珞珈山职业技术学院欢迎您#g' -e 's#<head>#<head><meta charset="utf-8">#g' index.html
Or change two lines to execute
sed -i 's#Welcome to nginx#珞珈山职业技术学院欢迎您#g' index.html
sed -i 's#<head>#<head><meta charset="utf-8">#g' index.html
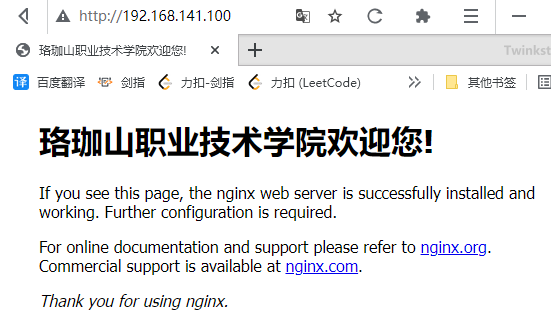
Visit your own virtual machine address in the browser, for example mine is: http://192.168.141.100/ , you can see the result:
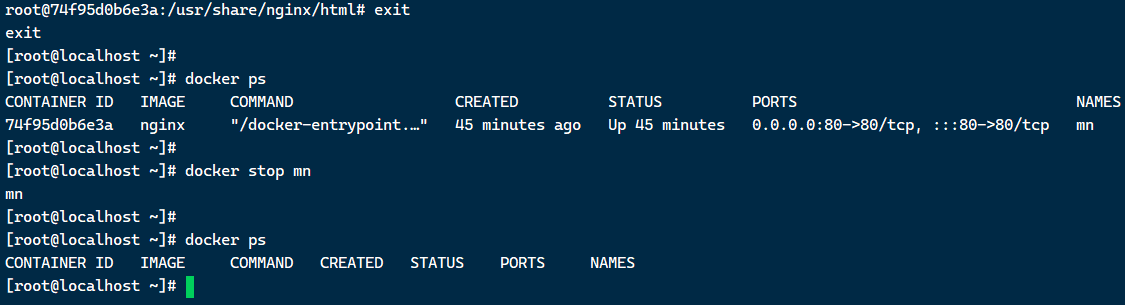
- Finally stop the container
# 先退出容器
exit
# 再查看运行的容器
docker ps
# 再停掉Nginx容器 (mn是容器名称)
docker stop mn
# 再查看运行的容器,就没有mn了
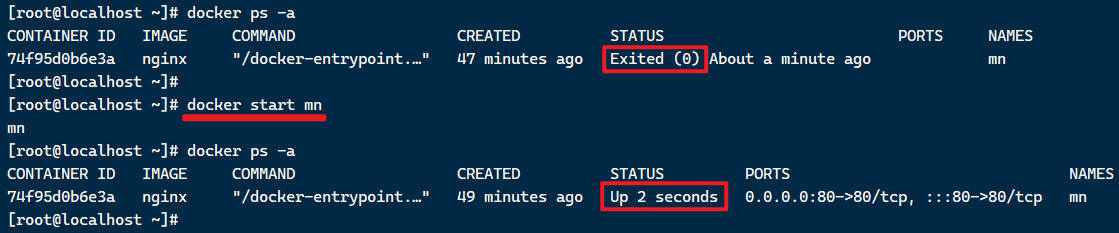
docker ps
# 查看所有容器 包括未运行的
docker ps -a
# 重新启动容器 (并没有docker rm mn 删除容器吗,静态容器文件系统还在)
docker start mn
# 删除容器 (只能删除当前未运行的容器)
docker rm mn
# 强制删除容器 (包括正在运行的容器)
docker rm -f mn
2.2.4. Summary
What are the common parameters of the docker run command?
- –name: specify the container name
- -p: specify port mapping
- -d: Let the container run in the background
Command to view container logs:
- docker logs
- Add the -f parameter to continuously view the log
View container status:
- docker ps
- docker ps -a View all containers, including stopped ones
2.2.LX ★

# 拉取镜像之前做过了
#docker pull redis
# 创建容器并运行 (相当于本地创建了一个实例,以后只要未删除实例,直接docker start mr 启动即可 不需要重复创建)
docker run --name mr -p 6379:6379 -d redis redis-server --appendonly yes
# 查看是否在运行
docker ps
# 可以windows端用可视化工具连接,能看到下拉列表说明连上了

# 进入容器
docker exec -it mr bash
# 然后进入redis
redis-cli
# 或者一步到位,直接进入容器的redis-cli  (一步抵上面2步)
#docker exec -it mr redis-cli

# 然后可以借此回顾一下redis命令
set name zhangsan
get name
Redis-01-Basics-Data Types, Common Commands
2.3. Data volume (container data management)
In the previous nginx case, when modifying the html page of nginx, you need to enter the inside of nginx. And because there is no editor, it is very troublesome to modify the file.
This is the consequence of the coupling between the container and the data (files in the container).

To solve this problem, the data must be decoupled from the container, which requires the use of data volumes.
2.3.1. What is a data volume
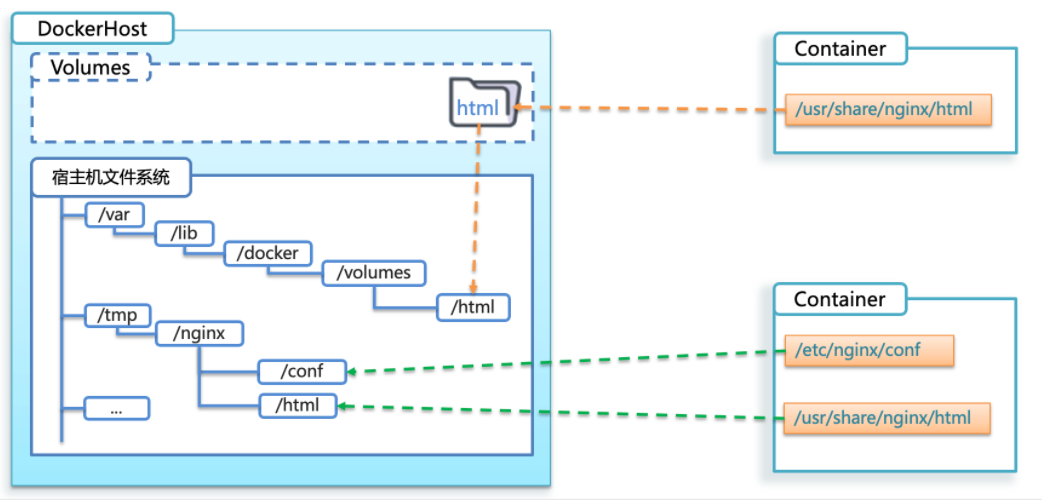
data volumeIs a virtual directory that points to a directory in the host's file system.
volumes: volume
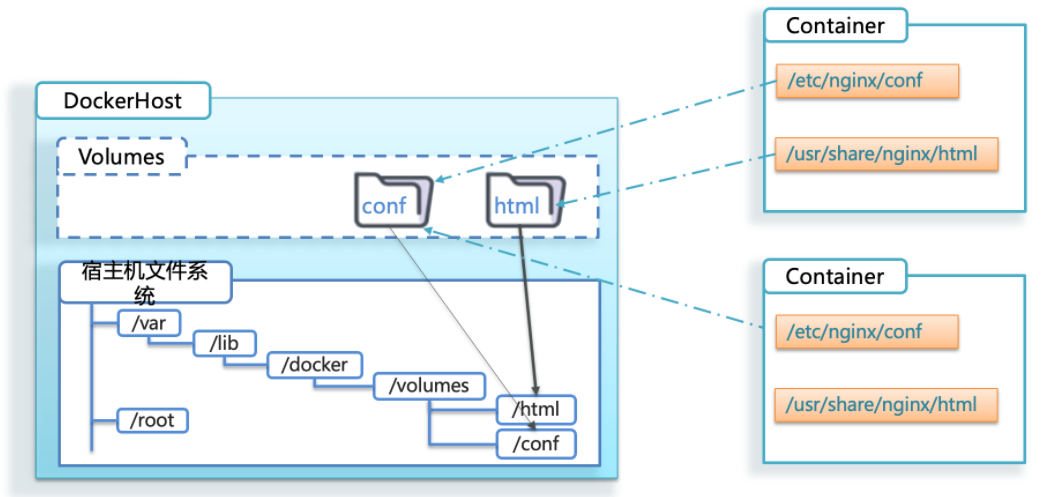
Once the data volume is mounted, all operations on the container will be applied to the host directory corresponding to the data volume.
In this way, we operate the /var/lib/docker/volumes/html directory of the host machine, which is equivalent to operating the /usr/share/nginx/html directory in the container
A docker host: There is a data volume under DockerHost : VolumesThere are a lot of data in the data volume, all of which correspond to a certain file on the host machine (the benefits of mounting associations) [It always feels like sacrificing a little isolation (the data is not completely isolated and can be perceived) The usability brought by it]
Associating the internal directory of the container with the data volume is actually establishing an association with the host file
Now: the host modifies the associated file, and the container can see it immediately, and the container modifies the associated file, the host can also see it immediately
With a new container, the configuration is exactly the same as the previous container, just let the new container also mount the same volume directory above , and sharing is realized,
that is, two containers can mount the same volume, and data is naturally realized comminicate
One day the container is deleted, but the data volume is still there. Now the data volume is no longer in the container, but just mounted on the container. (It seems that a U disk is inserted in the container, or a 'database' is connected to the container, which realizes the separation of the container and the data)
2.3.2. Dataset operation commands
The basic syntax for data volume operations is as follows:
docker volume [COMMAND]
The docker volume command is a data volume operation (understood as a fixed prefix) , and the next step is determined according to the command following the command:
- create create a volume
- inspect displays information about one or more volumes
- ls lists all volumes
- prune removes unused volumes
- rm deletes one or more specified volumes
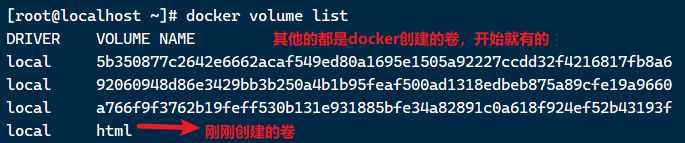
2.3.3. Create and view data volumes
Requirement : Create a data volume and view the directory location of the data volume on the host
① Create a data volume
docker volume create html
② View all data volumes
docker volume ls
result:
③ View the detailed information volume of the data volume (folder description information)
docker volume inspect html
result:
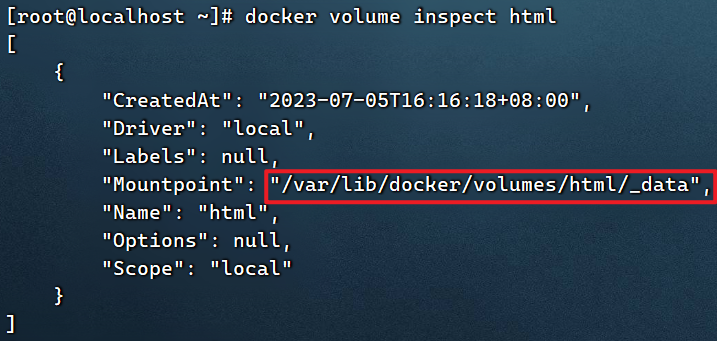
As you can see, the host directory associated with the html data volume we created is /var/lib/docker/volumes/html/_dataa directory. (Mount point: Mountpoint)
- Other command demonstration
# 删除所有未使用的卷(目前只有html一个 按y确定)
docker volume prune

# 重新创建卷html
docker volume create html
docker volume ls
# 删除指定卷
docker volume rm html
Summary :
The role of the data volume:
- Separate and decouple the container from the data, facilitate the operation of the data in the container, and ensure data security
Data volume operations:
- docker volume create: Create a data volume
- docker volume ls: view all data volumes
- docker volume inspect: View the details of the data volume, including the location of the associated host directory
- docker volume rm: delete the specified data volume
- docker volume prune: delete all unused data volumes
2.3.4. Mount data volume
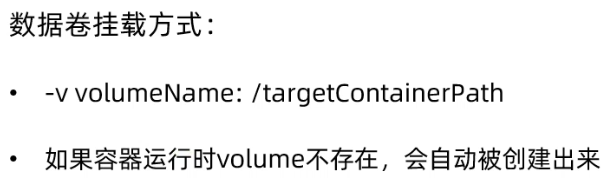
When we create a container, we can use the -v parameter to mount a data volume to a directory in a container. The command format is as follows:
docker run \
  --name mn \
  -v html:/root/html \
  -p 8080:80
  nginx \
The -v here is the command to mount the data volume:
-v html:/root/htm: Mount the html data volume to the /root/html directory in the container
2.3.5. Case - mount data volume to nginx
Requirement : Create an nginx container and modify the index.html content in the html directory in the container
Analysis : In the previous case, we entered the inside of the nginx container and already knew the location of the nginx html directory /usr/share/nginx/html. We need to mount this directory to the html data volume to facilitate the operation of its contents.
Tip : Use the -v parameter to mount the data volume when running the container
step:
① Create a container and mount the data volume to the HTML directory in the container
docker run --name mn -v html:/usr/share/nginx/html -p 80:80 -d nginx
Notice:
- The mn container cannot already exist, if it already exists, please delete it in advance
docker rm -f mn- html is a docker volume created before, and the mount point is at
/var/lib/docker/volumes/html/_data- The volume html that needs to be mounted can be created successfully if it did not exist before (the volume will be created first, and then the container will be created)
Recap creating volumes (and viewing volumes)
docker volume create html
docker volume ls
docker volume inspect html
# docker inspect html # 这个命令可以简写为这个形式 也就是省略volume
After deleting the volume html and then using the above command to create a container, it will still succeed. It will automatically create an html volume for you, which is the same as the effect created by yourself. So in most cases, you don’t need to create a volume yourself, docker will automatically create a volume for you. Just check the mount point (local directory) of the volume
docker volume rm html
docker volume ls # 发现没有html了
docker run --name mn -v html:/usr/share/nginx/html -p 80:80 -d nginx # html不存在时直接挂载
# 容器创建成功,卷挂载成功
docker volume ls # 可以看到自动创建的卷html
docker volume inspect html # 甚至挂载点等信息都没变,和自己手动创建卷时一模一样
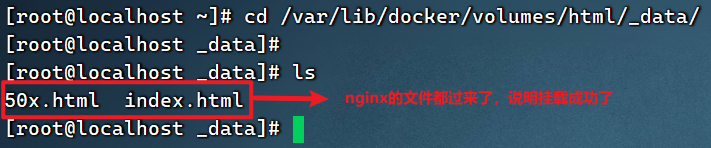
② Enter the location of the html data volume and modify the HTML content
# 查看html数据卷的位置
docker volume inspect html
# 进入该目录
cd /var/lib/docker/volumes/html/_data
# 修改文件
vi index.html
Mount: The two directories are each other
- Summarize
2.3.6. Case - mount local directory for MySQL
Containers can not only mount data volumes, but also directly mount to host directories. The relationship is as follows:
- With data volume mode: host directory --> data volume --> container directory
- Direct mount mode: host directory —> directory in the container (there is no need for data volumes to be transferred in the middle)
As shown in the picture:
Grammar :
The syntax of directory mount and data volume mount is similar:
- -v [host directory]:[container directory]
- -v [host file]:[file in container]
Requirement : Create and run a MySQL container, mount the host directory directly to the container
The implementation idea is as follows:
1) Upload the mysql.tar file in the pre-class materials to the virtual machine, and load it as a mirror image through the load command
2) Create directory /tmp/mysql/data
3) Create a directory /tmp/mysql/conf, and upload the hmy.cnf file provided by the pre-class materials to /tmp/mysql/conf
4) Go to DockerHub to check the information, create and run the MySQL container, and require:
① Mount /tmp/mysql/data to the data storage directory in the mysql container
② Mount /tmp/mysql/conf/hmy.cnf to the configuration file of the mysql container
③ Set MySQL password
# 0. 上传文件mysql.tar到~/software  (打开finalshell底部文件资源管理器 支持拖拽上传)
# 1. 加载文件为一个镜像
docker load -i mysql.tar
docker images # 查看所有镜像
# 2. 创建目录 /tmp/mysql/data or conf  (直接挂载目录麻烦的地方: 得自己创建目录和管理目录)
mkdir -p /tmp/mysql/data
mkdir -p /tmp/mysql/conf
# 3. 将课前资料提供的hmy.cnf文件上传到/tmp/mysql/conf   (mysql的配置文件)

# 4. 学习官网教程
docker run \
	--name mmysql \
	-e MYSQL_ROOT_PASSWORD=123 \
	-p 3306:3306 \
	-v /tmp/mysql/conf/hmy.cnf:/etc/mysql/conf.d/hmy.cnf \
	-v /tmp/mysql/data:/var/lib/mysql \
	-d \
	mysql:5.7.25
# 其中-e是直接设置mysql root用户的密码
# -v 挂载目录 /etc/mysql/conf.d是一个目录,mysql主配置文件会读这个目录(一共两个这种目录)里的配置文件合并为最终一个完整的配置文件
# 第一个-v挂载文件
# 第二个-v挂载目录
# --name配置容器名称, -p配置端口映射, -d配置后台运行,  mysql:5.7.25配置容器名称(name[:tag])

# 5. 验证mysql容器是否成功创建运行
docker ps
# 本地navicate创建新的mysql连接 如下图 可以成功连接上  (!!docker安装是真的简单!!)
# windows或者linux端都可以用ip连接上 (linux端也得用ip连接 因为被隔离了嘛,直接mysql -u -p连不上)
mysql -h192.168.141.100 -uroot -p123
Note:
If you have installed mysql before, port 3306 may be occupied here.
You need to close the mysql service of the host first.
ps -ef | grep mysql # 可以查看到mysql进程
systemctl stop mysqld
ps -ef | grep mysql # 看不到mysql进程了

# mysql开机启动
systemctl enable mysqld
# 关闭mysql开机启动 (永久关闭mysql 除非手动开启)
systemctl disable mysqld
On the windows side, navicat creates a mysql connection
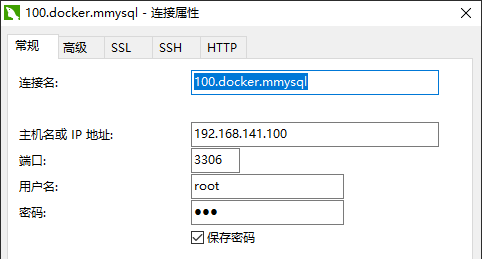
to the windows side command line remote connection
mysql -h192.168.141.100 -uroot -p123
Linux side command line connection
mysql -h192.168.141.100 -uroot -p123
2.3.7. Summary
- In the command of docker run, the file or directory is mounted into the container through the -v parameter:
- -v volume name: directory inside the container
- -v host file: file in the container
- -v host directory: container directory
- The difference between data volume mounting and direct directory mounting
- The coupling degree of data volume mounting is low, and the directory is managed by docker, but the directory is deep and hard to find
- The coupling degree of directory mounting is high, we need to manage the directory by ourselves (create it by ourselves, remember the path by ourselves) , but the directory is easy to find and view
3.Dockerfile custom image
Common images can be found on DockerHub, but for projects we write ourselves, we must build images ourselves.
To customize the image, you must first understand the structure of the image.
3.1. Mirror structure
Mirroring is a package of applications and their required system function libraries, environments, configurations, and dependencies.
Let's take MySQL as an example to see the composition structure of the image:

To put it simply, a mirror image is a file formed by adding a combination of application files, configuration files, and dependent files based on the system function library and operating environment, and then writing a startup script and packaging them together.
We want to build a mirror image, which is actually the process of realizing the above packaging.
3.2.Dockerfile syntax
When splitting and building a custom image, it is not necessary to copy and package each file.
We only need to tell Docker the composition of our image, which BaseImages are needed, what files need to be copied, what dependencies need to be installed, and what the startup script is. In the future, Docker will help us build images.
The file describing the above information is the Dockerfile file.
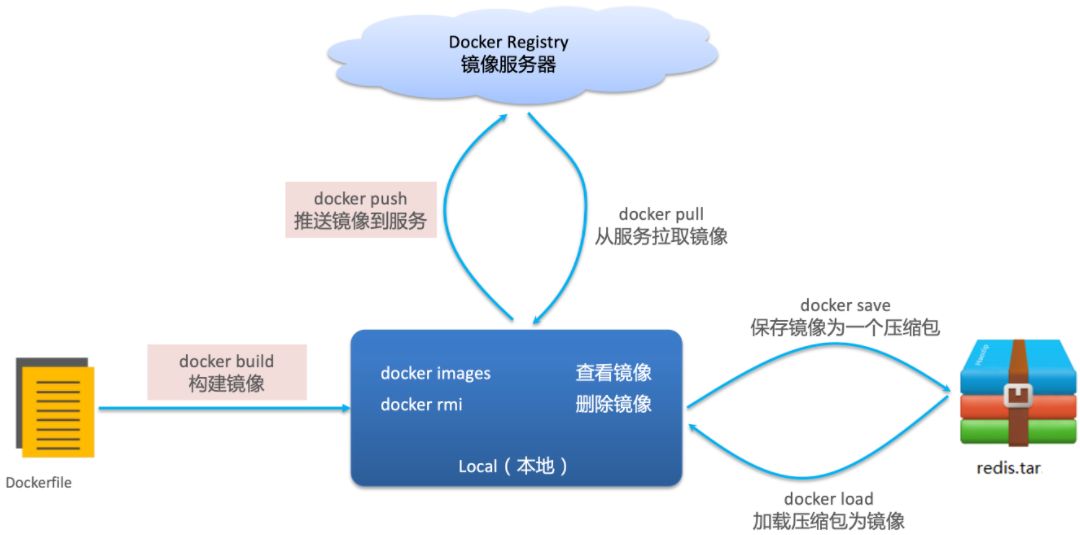
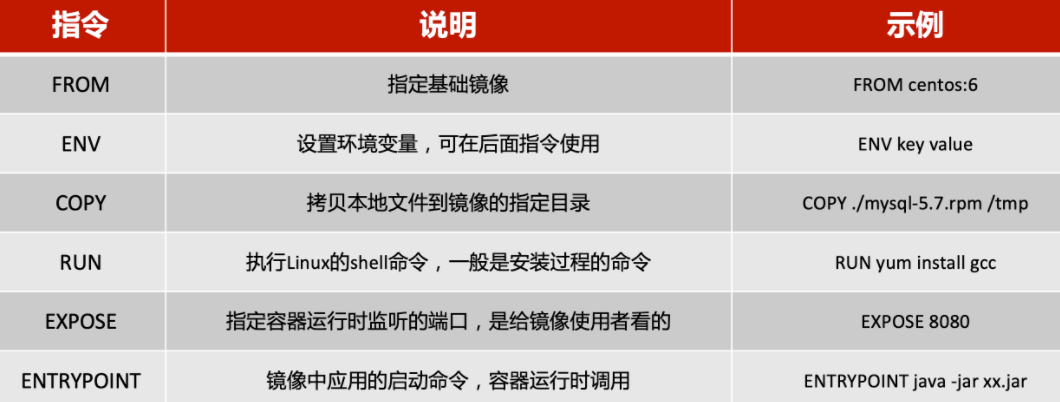
Dockerfile is a text file, which contains instructions (Instructions) one by one , using instructions to explain what operations to perform to build the image. Each instruction forms a Layer.
For updated detailed syntax description, please refer to the official website documentation: https://docs.docker.com/engine/reference/builder
3.3. Build Java project
3.3.1. Building Java projects based on Ubuntu
Requirements: Build a new image based on the Ubuntu image and run a java project
-
Step 1: Create a new empty folder docker-demo
cd /tmp/
mkdir docker-demo
cd docker-demo/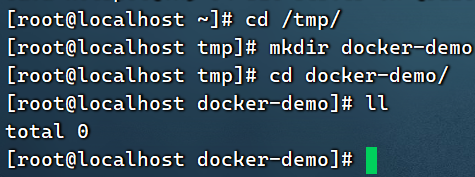
-
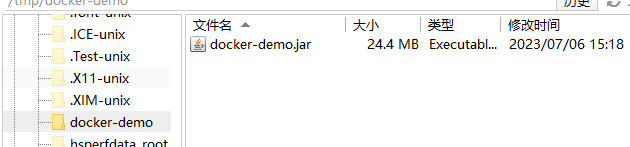
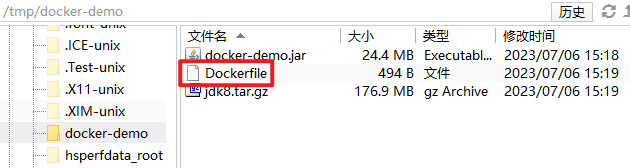
Step 2: Copy the docker-demo.jar file in the pre-class materials to the docker-demo directory
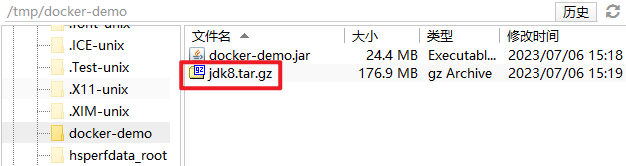
- Step 3: Copy the jdk8.tar.gz file in the pre-class materials to the docker-demo directory
-
Step 4: Copy the Dockerfile provided by the pre-class materials to the docker-demo directory
The content of which is as follows:
# 指定基础镜像 FROM ubuntu:16.04 # 配置环境变量,JDK的安装目录 ENV JAVA_DIR=/usr/local # 拷贝jdk和java项目的包 COPY ./jdk8.tar.gz $JAVA_DIR/ COPY ./docker-demo.jar /tmp/app.jar # 安装JDK RUN cd $JAVA_DIR \ && tar -xf ./jdk8.tar.gz \ && mv ./jdk1.8.0_144 ./java8 # 配置环境变量 ENV JAVA_HOME=$JAVA_DIR/java8 ENV PATH=$PATH:$JAVA_HOME/bin # 暴露端口 EXPOSE 8090 # 入口,java项目的启动命令 ENTRYPOINT java -jar /tmp/app.jar -
Step 5: Enter docker-demo
Upload the prepared docker-demo to any directory of the virtual machine, and then enter the docker-demo directory
-
Step 6: Run the command:
docker build -t javaweb:1.0 .-t : tag
name: repository:tag
. : the directory where the Dockerfile is located, here is the current directory
Wait for a while, the Dockerfile is equivalent to a script, which will run line by line according to the instructions in the Dockerfile. It
may take a long time to download the ubuntu environment (part of the environment)
. The following is built based on the existing image
Finally visit http://192.168.141.100:8090/hello/count , where the ip is changed to your virtual machine ip
It took a lot of steps to configure jdk above, which made the Dockerfile look complicated. Do you have to configure jdk every time you build a java project (microservice mirror)? Obviously not, can you build a java project mirror on the basis of a mirror with a jdk environment (this mirror dockerHub should have).
3.3.2. Building Java projects based on java8
Although we can add any installation packages we need to build an image based on the Ubuntu base image, it is cumbersome. So in most cases, we can modify some basic images with some software installed.
For example, the image for building a java project can be built on the basis of a base image that has been prepared with a JDK.
Requirements: Build a Java project as a mirror based on the java:8-alpine mirror (a small but fully functional java mirror)
The implementation idea is as follows:
-
① Create a new empty directory, and then create a new file in the directory, named Dockerfile
-
② Copy the docker-demo.jar provided by the pre-class materials to this directory
-
③ Write Dockerfile:
-
a) Based on java:8-alpine as the base image
-
b) Copy app.jar into the image
-
c) Expose the port
-
d) Write entry ENTRYPOINT
The content is as follows:
FROM java:8-alpine
COPY ./app.jar /tmp/app.jar
EXPOSE 8090
ENTRYPOINT java -jar /tmp/app.jar
There are so many complicated and time-consuming steps in front of you, all of which are done for you, and you can use them directly. How good it is (since the layered construction is established, why do we have to do the existing layers by ourselves, just take them and use them directly)

-
-
④ Use the docker build command to build a mirror image
-
⑤ Use docker run to create a container and run it
Rebuild and
change the dockerfile to
FROM java:8-alpine
COPY ./app.jar /tmp/app.jar
EXPOSE 8090
ENTRYPOINT java -jar /tmp/app.jar
Re-execute the command:
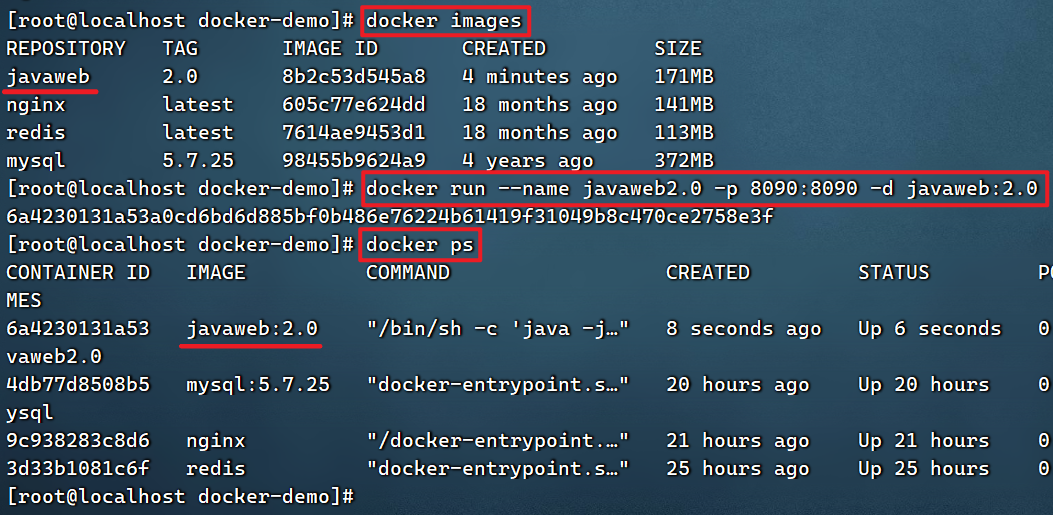
docker build -t javaweb:2.0 .
View build results
# 查看镜像是否构造成功
docker images
# 创建容器运行镜像
docker run --name javaweb2.0 -p 8090:8090 -d javaweb:2.0
# 查看容器运行
docker ps
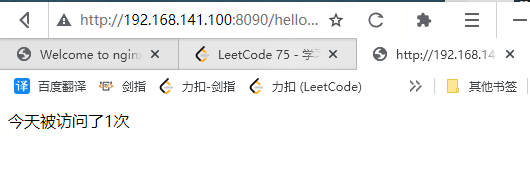
# 浏览器访问 注意ip换成自己的
http://192.168.141.100:8090/hello/count
3.4. Summary
summary:
-
The essence of Dockerfile is a file that describes the construction process of the image through instructions
-
The first line of the Dockerfile must be FROM to build from a base image
-
The base image can be a base operating system such as Ubuntu . It can also be an image made by others, for example: java:8-alpine
Each of the above microservices slowly uses commands to build and deploy, and creates mirrors and containers by themselves. Once there are more microservices, it will be too troublesome.
So: there must be a tool that can also quickly build a cluster and deploy it is Docker-Compose
4.Docker-Compose
Docker Compose can help us quickly deploy distributed applications based on Compose files without manually creating and running containers one by one!
4.1. Getting to know Docker Compose first
A Compose file is a text file that defines how each container in the cluster runs with instructions. The format is as follows:
this part can be understood as a collection of n docker run commands
version: "3.8"
 services:
  mysql:
    image: mysql:5.7.25
    environment:
     MYSQL_ROOT_PASSWORD: 123
    volumes:
     - "/tmp/mysql/data:/var/lib/mysql"
     - "/tmp/mysql/conf/hmy.cnf:/etc/mysql/conf.d/hmy.cnf"
  web:
    build: .
    ports:
     - "8090:8090"
The Compose file above describes a project that contains two containers:
- mysql: a
mysql:5.7.25container built based on the image, and two directories are mounted - web: a
docker buildmirror container based on ad-hoc build, port 8090 is mapped
The detailed syntax of DockerCompose refers to the official website: https://docs.docker.com/compose/compose-file/
In fact, the DockerCompose file can be regarded as writing multiple docker run commands to a file, but the syntax is slightly different.
4.2. Install Docker Compose
Reference: Install Docker&DockerCompose on Centos7—2. Install DockerCompose on CentOS7
4.3. Deploying microservice clusters
Requirement : Deploy the previously learned cloud-demo microservice cluster using Docker Compose
Implementation idea :
① Check the cloud-demo folder provided by the pre-class materials, and the docker-compose file has been written in it
② Modify your own cloud-demo project, and name the database and nacos address as the service name in docker-compose (when deploying with dockerCompose, all microservices can be accessed through the service name)
③ Use the maven packaging tool to package each microservice in the project as app.jar
④ Copy the packaged app.jar to each corresponding subdirectory in cloud-demo
⑤ Upload the cloud-demo to the virtual machine (drag and drop to upload the folder directly) , and use docker-compose up -d to deploy
We have written the ip address of the deployed microservices as localhost before. If these microservices are on the same machine in the future, it will be no problem, but it is impossible for the real cluster deployment to be on the same machine, so what should we do? The bottom layer of DockerCompose has done some configuration for us, and we can access it directly by using the service name (let’s map the service name to the complete url)
4.3.1.compose file
Link: https://pan.baidu.com/s/11t4AOqR2St6yCV2Yh1uPKQ
Extraction code: xqyo
Check the cloud-demo folder provided by the pre-class materials. The docker-compose file has been written in it , and each microservice has prepared an independent directory:
The content of docker-compose.yml is as follows:
version: "3.2"

services:
  nacos:
    image: nacos/nacos-server
    environment:
      MODE: standalone
    ports:
      - "8848:8848"
  mysql:
    image: mysql:5.7.25
    environment:
      MYSQL_ROOT_PASSWORD: 123
    volumes:
      - "$PWD/mysql/data:/var/lib/mysql"
      - "$PWD/mysql/conf:/etc/mysql/conf.d/"
  userservice:
    build: ./user-service
  orderservice:
    build: ./order-service
  gateway:
    build: ./gateway
    ports:
      - "10010:10010"
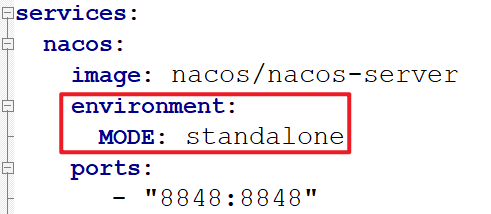
As you can see, it contains 5 service services:
nacos: As a registration center and configuration centerimage: nacos/nacos-server: Build based on nacos/nacos-server imageenvironment:environment variableMODE: standalone: single point mode start
ports: Port mapping, where port 8848 is exposed
mysql:databaseimage: mysql:5.7.25: The image version is mysql:5.7.25environment:environment variableMYSQL_ROOT_PASSWORD: 123: Set the password of the database root account to 123
volumes: The data volume is mounted, the data and conf directories of mysql are mounted here, and there are data I prepared in advance
userservice,orderservice,gateway: are all temporarily built based on Dockerfile
Check the mysql directory, and you can see that the cloud_order and cloud_user tables have been prepared:
Check the microservice directory, you can see that all contain Dockerfile files:
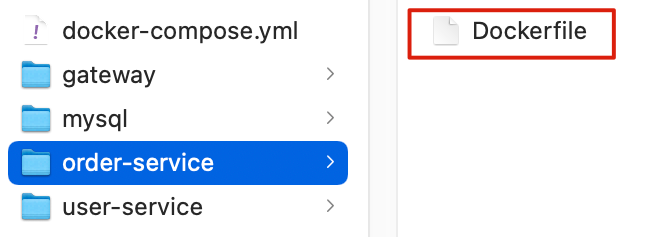
The content is as follows:
FROM java:8-alpine
COPY ./app.jar /tmp/app.jar
ENTRYPOINT java -jar /tmp/app.jar
4.3.2. Modify microservice configuration
Because microservices will be deployed as docker containers in the future, and the interconnection between containers is not through IP addresses, but through container names. Here we change the mysql and nacos addresses of order-service, user-service and gateway services to access based on container names.
As follows:
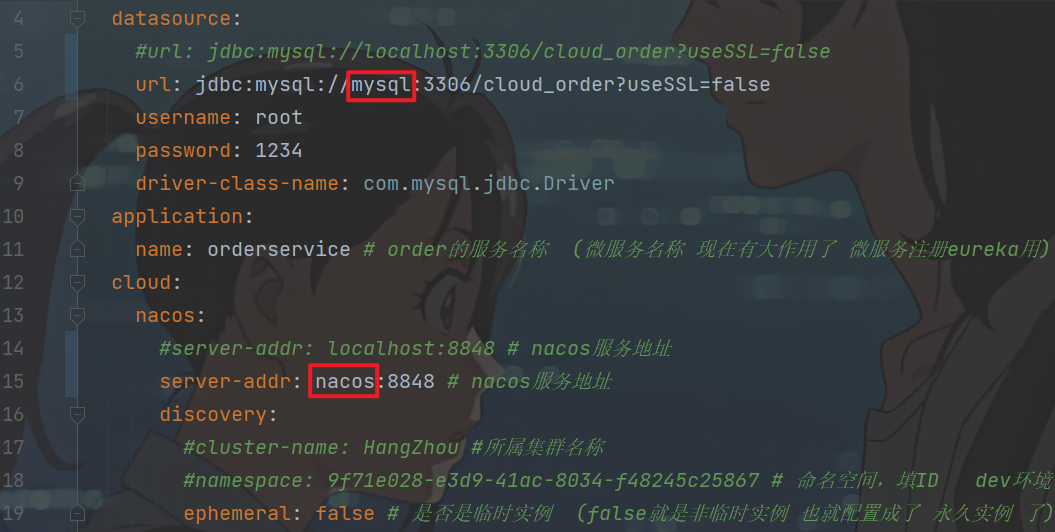
spring:
datasource:
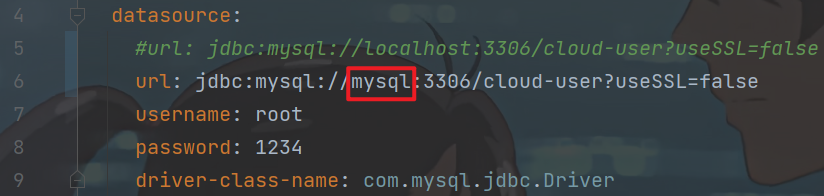
url: jdbc:mysql://mysql:3306/cloud_order?useSSL=false
username: root
password: 1234
driver-class-name: com.mysql.jdbc.Driver
application:
name: orderservice
cloud:
nacos:
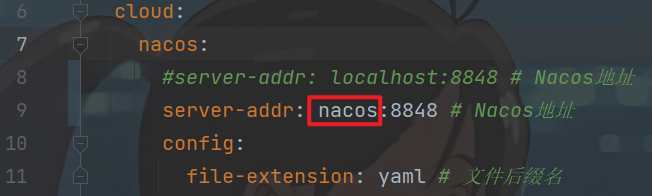
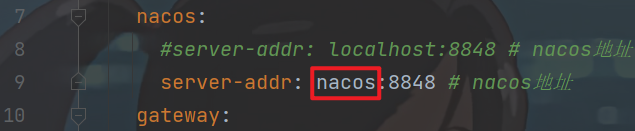
server-addr: nacos:8848 # nacos服务地址
Note that the password is changed to your own
ip and also changed to 8848 in IDEA's nacos microservice
-
Modify the server-addr of each microservice:
that is, change localhost to nacos, mysql, userservice,- user-service
- bootstrap.yml
- application.yml
- bootstrap.yml
- order-service
- application.yml
- application.yml
- gateway
- application.yml
- application.yml
- user-service
4.3.3. Packaging
Next we need to package each of our microservices. Because the name of the jar package in the Dockerfile is app.jar, each of our microservices needs to use this name.
It can be achieved by modifying the package name in pom.xml, which needs to be modified for each microservice:
<build>
  <!-- 服务打包的最终名称 -->
  <finalName>app</finalName>
  <plugins>
    <plugin>
      <groupId>org.springframework.boot</groupId>
      <artifactId>spring-boot-maven-plugin</artifactId>
    </plugin>
  </plugins>
</build>
-
Modify the packaging name of each microservice (modify pom.xml)

Modify all pom.xml, build tags are configured, and configure finalName
(user-service, order-service, gateway these three pom.xml)<finalName>app</finalName><build> <finalName>app</finalName> <plugins> <plugin> <groupId>org.springframework.boot</groupId> <artifactId>spring-boot-maven-plugin</artifactId> </plugin> </plugins> </build>
Next, clean first, and then package.
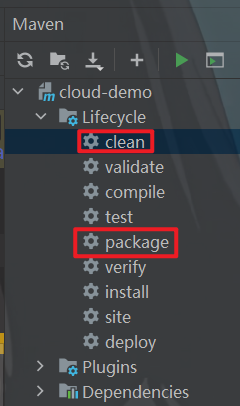
The final result is as follows:
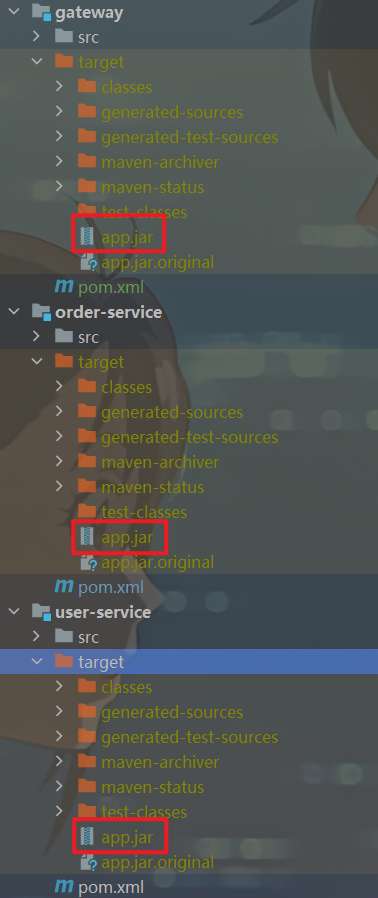
4.3.4. Copy the jar package to the deployment directory
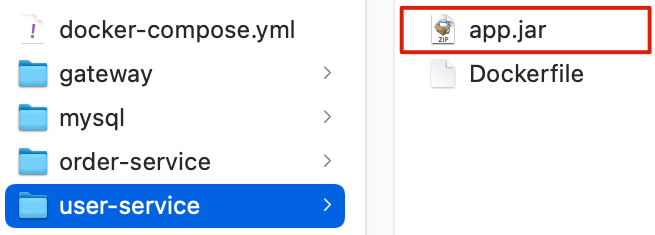
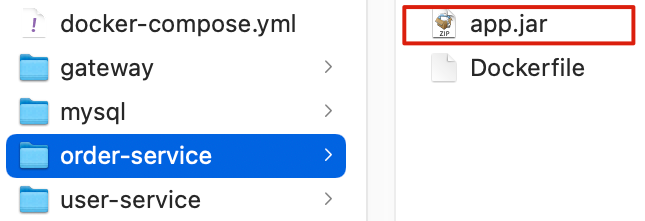
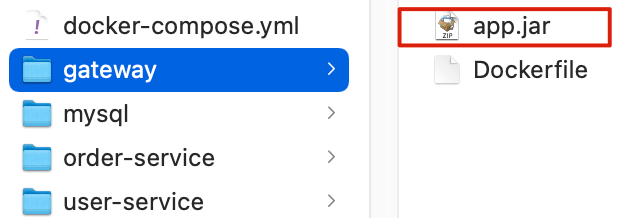
The compiled and packaged app.jar file needs to be placed in the same directory as the Dockerfile. Note: The app.jar of each microservice is placed in the directory corresponding to the service name, don't make a mistake.
user-service:
order-service:
gateway:
4.3.5. Deployment
Finally, we need to upload the entire cloud-demo folder to the virtual machine for DockerCompose deployment.
Drag and drop the upload folder directly and upload it to /tmpthe directory (any directory is fine)
cd /tmp/cloud-demo/
ll
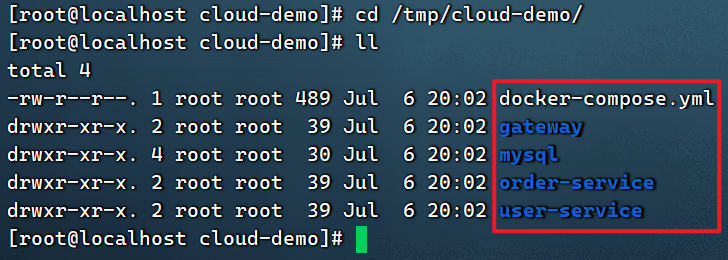
deploy:
Enter the cloud-demo directory, and run the following command:
docker-compose up -d
It may be a bit slow for the first time, wait patiently and
slowly pull the image according to docker-compose.yml (configuration file containing all files in the same directory), create a container environment, then start the container to run, and create microservices one by one in run in container
# 可以查看新创建的镜像
docker images
# 可以查看新创建运行的容器(镜像实例)
docker ps
# 查看日志
docker-compose logs -f
# 会发现报错,那是因为nacos微服务启动可能会慢于其他微服务,其他微服务启动时注册不了就卡死了。算是一个bug吧
# 解决很简单,重启一下(除nacos注册中心外的)其他微服务即可
docker-compose restart gateway userservice orderservice


Pay attention to whether the mysql password in the project is
written as 1234 before 1234. You may need to change it.
Change the docker database password for convenience.
TODO Pause to modify the project suddenly can't run, do not rule out the possibility of breaking it before
First modify the previous localhost back, and then
Windows starts the nacos server locally:
it cannot be started by double-clicking, because the default of double-clicking to start is the cluster mode!!!
startup.cmd -m standalone
This also explains why the above nacos configuration is special
Then start these 4 services in turn
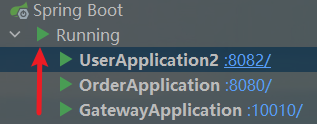
(nacos registration center, no eureka-server is needed)
http://localhost:10010/order/102?authorization=admin
http://localhost:10010/user/2?authorization=admin
Make sure the local can be accessed normally
Then I recalled it, and went back to the virtual machine server:
first visit the nacos registration center: http://192.168.141.100:8848/nacos/index.html
can be accessed, no problem, and can see that 3 microservices have been registered
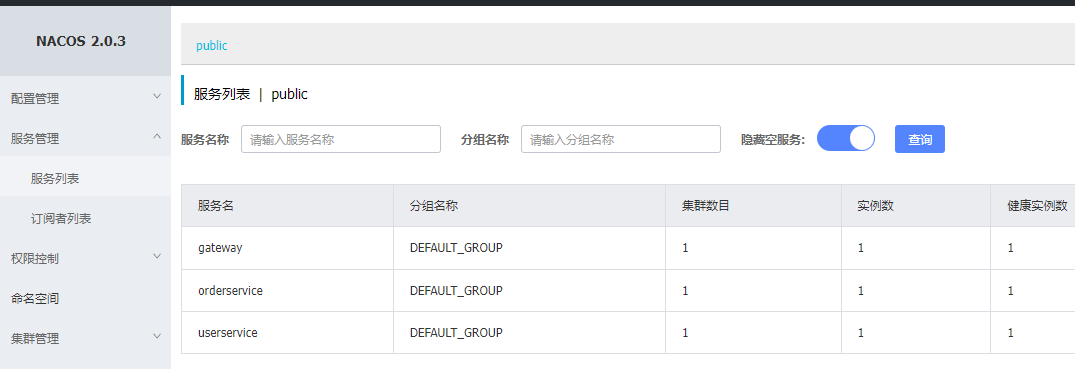
Then visit:
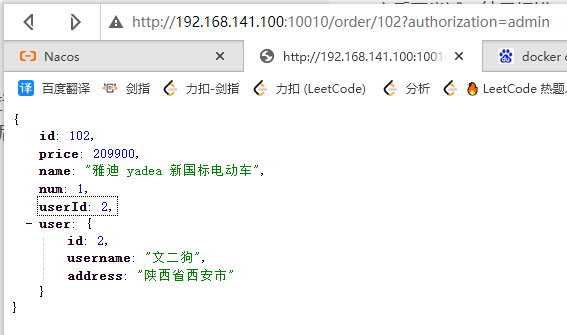
http://192.168.141.100:10010/order/102?authorization=admin
http://192.168.141.100:10010/user/2?authorization=admin
Checking the log still reports an error in the mysql password, indicating that the command cannot be executed directly after changing the password.
# 先删除所有正在运行的容器
docker rm -f 容器名称
# 再删除compose创建的所有镜像
docker rmi 镜像id
# 再重新执行
docker-compose up -d
docker-compose restart gateway userservice orderservice
docker-compose logs -f
Enter the mysql container and find that the password is still 123
docker exec -it cloud-demo_mysql_1 bash
mysql -uroot -p1234 # Can't log in to
mysql -uroot -p123 # Can log in but I don't know what's going on
But changing the password to 1234 will not work
(note that it is normal that remote login cannot be accessed, because the image and container do not develop port 3306 at all)
This is the second problem found, which requires authorization: https://blog.csdn.net/z19855139137/article/details/129769901
Try again later, the result is an error: Unknown database 'cloud-user'
Enter the container to view: I found that the database name in the original idea is written as cloud-user, the database name should be cloud_user The database name is
not easy to change, it can only be deleted and rebuilt, there is no way, modify it idea, repackage, upload, then delete the user-service image and container, and recreate the image and container
Try again, finally able to visit
Final reason:
- Question 1: Inconsistent passwords
- Modify the mysql password in the docker-compose.yml file, delete the original local container + mysql image, and execute again
docker-compose up -d
- Modify the mysql password in the docker-compose.yml file, delete the original local container + mysql image, and execute again
- Problem 2: Permission problem
- Enter the container, authorize
- https://blog.csdn.net/z19855139137/article/details/129769901
- 问题3:Unknown database ‘cloud-user’
- Enter the docker to view the database and find that the name is: cloud_user (note that port 3306 is not open, you can only view it when you enter the container)
- The database names are inconsistent, really. There is no way, modify the idea code, change the cloud-user in the configuration file url to cloud_user, repackage and upload, and then recreate the user-service image (note that each of the two configuration files needs to be modified)
5.Docker mirror warehouse
5.1. Build a private mirror warehouse
Reference: Install Docker&DockerCompose on Centos7—3.Docker Mirror Warehouse
After installation, you can graphically access the private Docker warehouse you built on the browser side. There are

currently 0 images, and then start to upload (push) images.
5.2. Push and pull images
To push an image to a private image service, you must first tag it. The steps are as follows:
① Re-tag the local mirror, and the name prefix is the address of the private warehouse: 192.168.150.101:8080/
docker tag nginx:latest 192.168.141.100:8080/nginx:1.0
Before pushing to the warehouse, first rename the local mirror -> to another mirror
tag to actually create a new mirror link (the name is different, but the id is exactly the same).
When renaming, the new name is prefixed with the warehouse address
② Push image
docker push 192.168.141.100:8080/nginx:1.0
③ Pull the image
docker pull 192.168.141.100:8080/nginx:1.0
First check the local mirror and find that there is indeed an nginx mirror, then
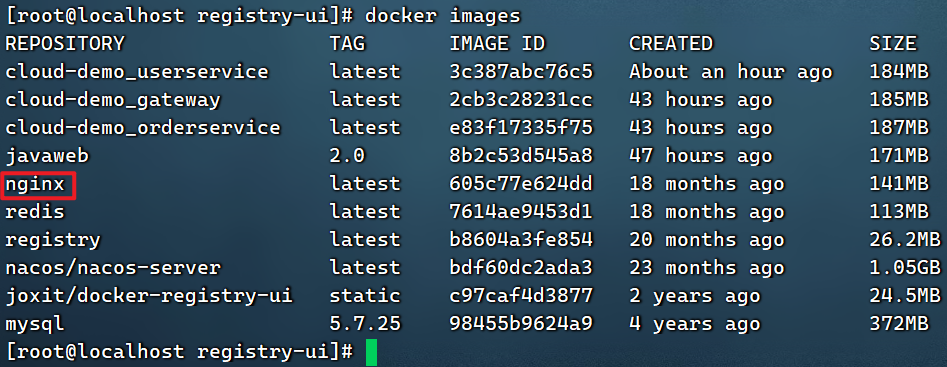
start tag packaging as a new mirror, specify the name yourself
docker tag nginx:latest 192.168.141.100:8080/nginx:1.0
Then check the image again,
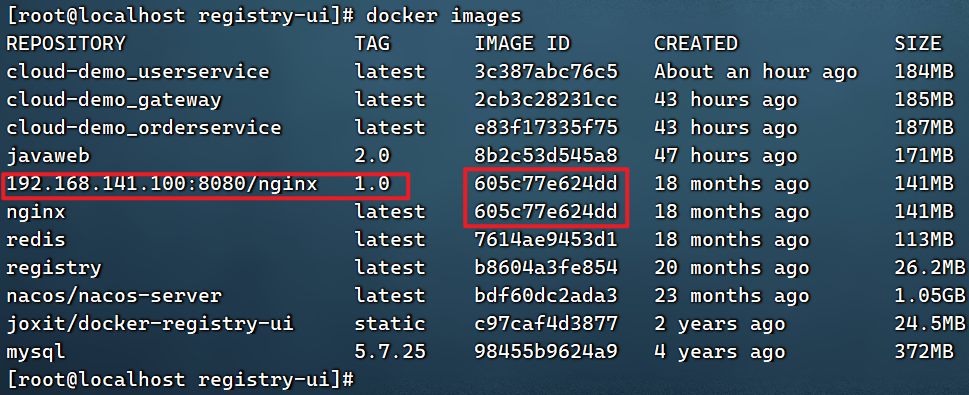
there is indeed a new image, and the id is exactly the same, indicating that it is just packaged with a new name.
Next, start uploading the image
docker push 192.168.141.100:8080/nginx:1.0
After the push is successful, go back to the browser to view:
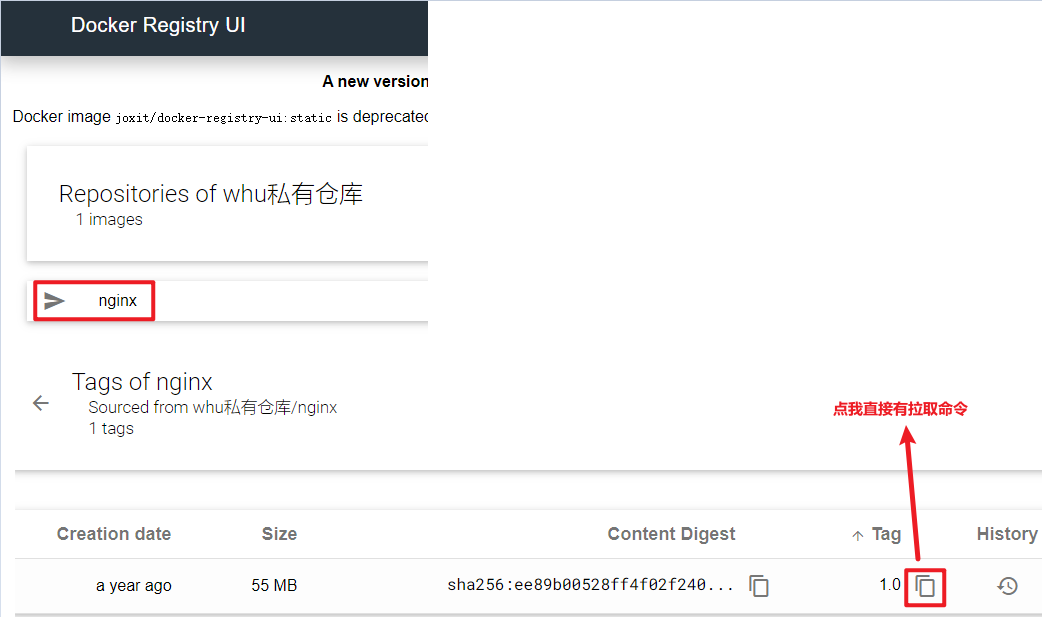
Delete the local mirror before pulling
docker rmi 192.168.141.100:8080/nginx:1.0
Now there is no nginx:1.0 locally, but there is nginx:1.0 in the warehouse
start pulling
docker pull 192.168.141.100:8080/nginx:1.0
Sure enough 192.168.141.100:8080/nginx, it came back again, and the id is still the same