This section mainly talks about the principle of graphics drawing, introduction and code demonstration.
-
Principle introduction
Let's talk about the graphics rendering of OpenGL first. In fact, all graphics are connected by many small graphics. You can understand it as the pixels of the picture. A color picture is composed of many pixels of different colors. To achieve colorful graphic design, you need to understand the principle that two points form a line, three points form a plane, and the principle of multi-surface forming. Here, we demonstrate the process of point-to-line, line-to-surface, and surface-to-shape through a simple program.
Here, let me introduce some commonly used functions and drawing principles.
1. Coordinate origin transformation: Translate(float x, float y, float z), you can also understand it as coordinate axis transformation. The angle of view and the world coordinates set by default are at the same origin. For example: we look at the phone, assuming that the phone is the origin, and our angle of view is also the origin by default, we have to drill our heads into the phone. Right, we don't look at the phone that way, we basically pull the phone away and operate it at a comfortable angle, which is the transformation of the item. Therefore, it is best to set the appropriate coordinate axis position before drawing the graph, and also need to consider the setting value of the viewpoint transformation. The coordinates of our input graphics are still input according to the origin, and will not be affected by Translate; it only affects the overall coordinate axis transformation, and its value does not need to be changed. Of course, you can also directly modify all the coordinate values of the graphics, but this is too troublesome and unnecessary; it is also possible to directly modify the initialized viewing angle transformation value.
2. The method of drawing points, lines, and planes: start with Begin (BeginMode mode) to start drawing mode type graphics, Vertex (float x, float y, float z) as the graphics vertices, connect each vertex in turn to form a graphics, and end with End ( ) to end drawing. Theoretically speaking, as long as you give all the vertices of the graph, ghosts and snakes will come out for you, and there is no problem at all (except for the possibility of getting stuck). Take drawing a line as an example:
gl.Begin(OpenGL.GL_LINES);
gl.Vertex(-1.0f, 0.0f, 0.0f);
gl.Vertex(1.0f, 0.0f, 0.0f);
gl.End();
3. Assign color: Color(float red, float green, float blue)
Add the set color before each graph vertex, and the drawing options of the graph will be more diverse; at the same time, using different colors between different vertices will produce a gradient color difference, which is very beautiful.
-
demo code
Let's add a coordinate system change first, then. Select to draw a line, followed by a triangle, and finally a pyramid. This is the process from point to line, line to surface, and surface to shape. All graphics are combined and connected in this way.
1. First, draw a line and set the color to white (the background is black)
#region 点到线
            gl.Begin(OpenGL.GL_LINES);
        gl.Color(1.0f, 1.0f, 1.0f);
            gl.Vertex(-2.0f, 0.0f, 0.0f);//左顶点
            gl.Vertex(2.0f, 2.0f, 0.0f);//右顶点
            gl.End();
            #endregion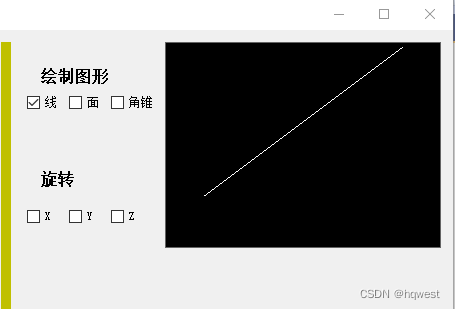
2. Next, let’s draw a surface, and then add a little bit of color change #region line into a surface (triangle)
  gl.Begin(OpenGL.GL_TRIANGLES);//第一个面
                gl.Color(1.0f, 0.0f, 0.0f);
                gl.Vertex(0.0f, 1f, 0.0f);//顶点
                gl.Color(0.0f, 1.0f, 0.0f);
                gl.Vertex(-1.0f, -1.0f, 0.0f);//左顶点
                gl.Color(0.0f, 0.0f, 1.0f);
                gl.Vertex(1.0f, -1.0f, 0.0f);//右顶点
                gl.End();
                #endregion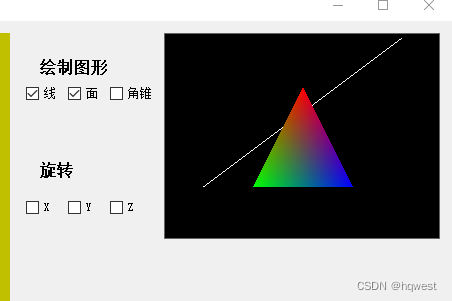
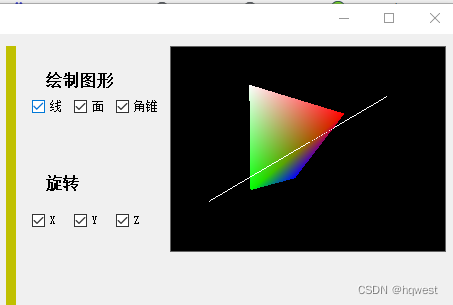
3. Next, draw a pyramid, and select white as the color of the fourth point to separate it. The pyramid is also composed of four faces, so we add three more faces (note that the coordinates and corresponding colors of each point must be the same)
#region 面组合成体
                gl.Begin(OpenGL.GL_TRIANGLES);//第二个面
                gl.Color(1.0f, 1.0f, 1.0f);
                gl.Vertex(0.0f, 0.0f, -2.0f);//第四个点
                gl.Color(0.0f, 1.0f, 0.0f);
                gl.Vertex(-1.0f, -1.0f, 0.0f);//左顶点
                gl.Color(0.0f, 0.0f, 1.0f);
                gl.Vertex(1.0f, -1.0f, 0.0f);//右顶点
                gl.End();
                gl.Begin(OpenGL.GL_TRIANGLES);//第三个面
                gl.Color(1.0f, 1.0f, 1.0f);
                gl.Vertex(0.0f, 0.0f, -2.0f);//第四个点
                gl.Color(0.0f, 1.0f, 0.0f);
                gl.Vertex(-1.0f, -1.0f, 0.0f);//左顶点
                gl.Color(1.0f, 0.0f, 0.0f);
                gl.Vertex(0.0f, 1f, 0.0f);//顶点
                gl.End();
                gl.Begin(OpenGL.GL_TRIANGLES);//第四个面
                gl.Color(1.0f, 1.0f, 1.0f);
                gl.Vertex(0.0f, 0.0f, -2.0f);//第四个点
                gl.Color(0.0f, 0.0f, 1.0f);
                gl.Vertex(1.0f, -1.0f, 0.0f);//右顶点
                gl.Color(1.0f, 0.0f, 0.0f);
                gl.Vertex(0.0f, 1f, 0.0f);//顶点
                gl.End();
                #endregion
We will find that the interface has not changed. Well guys look where our fourth vertex is. Coordinates (0, 0, -2), relative to the other four points, its position is inside. Because our perspective at this time is positive. Well, by the way, I have to talk about the viewing angle, which is set by the viewpoint transformation set by the initialization.
// Set the current matrix mode, apply subsequent matrix operations to the projection
matrix gl.MatrixMode(OpenGL.GL_PROJECTION);
// Create a perspective projection transformation
gl.Perspective(30.0f, (double)Width / (double)Height, 5, 100.0);
// viewpoint transformation
gl.LookAt(0, 5, 0, 0, 0, 0, 0, 1, 0);
// The angle of view at this time is here, which can be understood as the coordinate point (0, 5, 0) looking at the origin of the space
Translate(0.0f, 0.0f, -5.0f) is added to the front end of the program, which is equivalent to moving the drawn graphics to the screen. This will help us view the graph. (In the case of the Z axis, the normal is vertical to the outside of the screen)
Back to the topic, the fourth vertex is inside the already drawn triangle, so we can’t see it, so let’s rotate it a little to see the effect, as shown in the figure below.
Attach all the code, this code is added on the basis of " OpenGL drawing graphics under .Net platform (1) (VS2019,Winform,C#) "
using SharpGL;
using System;
using System.Collections.Generic;
using System.ComponentModel;
using System.Data;
using System.Drawing;
using System.Linq;
using System.Text;
using System.Threading.Tasks;
using System.Windows.Forms;

namespace SharpGLFormsApp1
{
    public partial class Form1 : Form
    {

        private bool drawLine = false;
        private bool drawArea = false;
        private bool drawVolume = false;
        private bool flagRotateX = false;
        private bool flagRotateY = false;
        private bool flagRotateZ = false;
        private float rotation_X = 0.0f;
        private float rotation_Y = 0.0f;
        private float rotation_Z = 0.0f;


        /// <summary>
        /// 默认绘画模式为线条
        /// </summary>
        private uint _model = OpenGL.GL_LINE_LOOP;

        /// <summary>
        /// X轴坐标
        /// </summary>
        private float _x = 0;

        /// <summary>
        /// Y轴坐标
        /// </summary>
        private float _y = 0;

        /// <summary>
        /// Z轴坐标
        /// </summary>
        private float _z = 0;


        public Form1()
        {
            InitializeComponent();

        }

        /// <summary>
        /// 复位事件
        /// </summary>
        /// <param name="sender"></param>
        /// <param name="e"></param>
        private void button1_Click(object sender, EventArgs e)
        {
            _x = _y = _z = 0;
            tbX.Value = tbY.Value = tbZ.Value = Convert.ToInt32(_x);
            label1.Text = "X轴" ;
            label2.Text = "Y轴";
            label3.Text = "Z轴";
        }

        /// <summary>
        /// 线条选择事件
        /// </summary>
        /// <param name="sender"></param>
        /// <param name="e"></param>
        private void rbline_CheckedChanged(object sender, EventArgs e)
        {
            _model = OpenGL.GL_LINE_LOOP;
        }

        /// <summary>
        /// 球面事件
        /// </summary>
        /// <param name="sender"></param>
        /// <param name="e"></param>
        private void rbfull_CheckedChanged(object sender, EventArgs e)
        {
            _model = OpenGL.GL_QUADS;
        }

        /// <summary>
        /// 控件绘图事件
        /// </summary>
        /// <param name="sender"></param>
        /// <param name="args"></param>
        private void openGLControl1_GDIDraw(object sender, RenderEventArgs args)
        {
            // 创建一个GL对象
            OpenGL gl = this.openGLControl1.OpenGL;

            gl.Clear(OpenGL.GL_COLOR_BUFFER_BIT | OpenGL.GL_DEPTH_BUFFER_BIT);	// 清空屏幕
            gl.LoadIdentity();					// 重置
            gl.Translate(0.0f, 0.0f, -6.0f);	// 设置坐标,距离屏幕距离为6

            gl.Rotate(_x, 1.0f, 0.0f, 0.0f);	// 绕X轴旋转
            gl.Rotate(_y, 0.0f, 1.0f, 0.0f);	// 绕Y轴旋转
            gl.Rotate(_z, 0.0f, 0.0f, 1.0f);	// 绕Z轴旋转

            gl.Begin(_model);				    // 绘制立方体
            gl.Color(0.0f, 1.0f, 0.0f);			// 设置颜色
            //绘制其中一个面
            gl.Vertex(1.0f, 1.0f, -1.0f);
            gl.Vertex(-1.0f, 1.0f, -1.0f);
            gl.Vertex(-1.0f, 1.0f, 1.0f);
            gl.Vertex(1.0f, 1.0f, 1.0f);

            //如下类同
            gl.Color(1.0f, 0.5f, 0.0f);
            gl.Vertex(1.0f, -1.0f, 1.0f);
            gl.Vertex(-1.0f, -1.0f, 1.0f);
            gl.Vertex(-1.0f, -1.0f, -1.0f);
            gl.Vertex(1.0f, -1.0f, -1.0f);

            gl.Color(1.0f, 0.0f, 0.0f);
            gl.Vertex(1.0f, 1.0f, 1.0f);
            gl.Vertex(-1.0f, 1.0f, 1.0f);
            gl.Vertex(-1.0f, -1.0f, 1.0f);
            gl.Vertex(1.0f, -1.0f, 1.0f);

            gl.Color(1.0f, 1.0f, 0.0f);
            gl.Vertex(1.0f, -1.0f, -1.0f);
            gl.Vertex(-1.0f, -1.0f, -1.0f);
            gl.Vertex(-1.0f, 1.0f, -1.0f);
            gl.Vertex(1.0f, 1.0f, -1.0f);

            gl.Color(0.0f, 0.0f, 1.0f);
            gl.Vertex(-1.0f, 1.0f, 1.0f);
            gl.Vertex(-1.0f, 1.0f, -1.0f);
            gl.Vertex(-1.0f, -1.0f, -1.0f);
            gl.Vertex(-1.0f, -1.0f, 1.0f);

            gl.Color(1.0f, 0.0f, 1.0f);
            gl.Vertex(1.0f, 1.0f, -1.0f);
            gl.Vertex(1.0f, 1.0f, 1.0f);
            gl.Vertex(1.0f, -1.0f, 1.0f);
            gl.Vertex(1.0f, -1.0f, -1.0f);
            gl.End();						// 结束绘制
        }

        /// <summary>
        /// X轴拖动事件
        /// </summary>
        /// <param name="sender"></param>
        /// <param name="e"></param>
        private void tbX_Scroll(object sender, EventArgs e)
        {
            int x = tbX.Value;
            _x = x;
            label1.Text = "X:" + x;
        }

        /// <summary>
        /// Y轴拖动事件
        /// </summary>
        /// <param name="sender"></param>
        /// <param name="e"></param>
        private void tbY_Scroll(object sender, EventArgs e)
        {
            int y = tbY.Value;
            _y = y;
            label2.Text = "Y:" + y;
        }
        /// <summary>
        ///Z轴拖动事件
        /// </summary>
        /// <param name="sender"></param>
        /// <param name="e"></param>
        private void tbZ_Scroll(object sender, EventArgs e)
        {
            int z = tbZ.Value;
            _z = z;
            label3.Text = "Z:" + z;
        }

        private void openGLControl2_GDIDraw(object sender, RenderEventArgs args)
        {
            SharpGL.OpenGL gl = this.openGLControl2.OpenGL;
            //清除深度缓存
            gl.Clear(OpenGL.GL_COLOR_BUFFER_BIT | OpenGL.GL_DEPTH_BUFFER_BIT);

            //重置当前指定的矩阵为单位矩阵,将当前的用户坐标系的原点移到了屏幕中心
            gl.LoadIdentity();

            //坐标轴变换位置到(0.0f, 0.0f, -5.0f),这样我们的坐标轴就相当于往屏幕内走5个单位
            gl.Translate(0.0f, 0.0f, -5.0f);

            if (flagRotateX)
            {
                rotation_X += 1f;
                gl.Rotate(rotation_X, 1.0f, 0.0f, 0.0f);//rotationX:角度
            }
            if (flagRotateY)
            {
                rotation_Y += 1f;
                gl.Rotate(rotation_Y, 0.0f, 1.0f, 0.0f);//rotationY:角度
            }
            if (flagRotateZ)
            {
                rotation_Z += 1f;
                gl.Rotate(rotation_Z, 0.0f, 0.0f, 1.0f);//rotationZ:角度
            }

            if (drawLine)
            {
                #region 点到线
                gl.Begin(OpenGL.GL_LINES);
                gl.Color(1.0f, 1.0f, 1.0f);
                gl.Vertex(-2.0f, -1.0f, 0.0f);//左顶点
                gl.Vertex(2.0f, 2.0f, 0.0f);//右顶点
                gl.End();
                #endregion
            }
            if (drawArea)
            {
                #region 线成面(三角形)
                gl.Begin(OpenGL.GL_TRIANGLES);//第一个面
                gl.Color(1.0f, 0.0f, 0.0f);
                gl.Vertex(0.0f, 1f, 0.0f);//顶点
                gl.Color(0.0f, 1.0f, 0.0f);
                gl.Vertex(-1.0f, -1.0f, 0.0f);//左顶点
                gl.Color(0.0f, 0.0f, 1.0f);
                gl.Vertex(1.0f, -1.0f, 0.0f);//右顶点
                gl.End();
                #endregion
            }
            if (drawVolume)
            {
                #region 面组合成体
                gl.Begin(OpenGL.GL_TRIANGLES);//第二个面
                gl.Color(1.0f, 1.0f, 1.0f);
                gl.Vertex(0.0f, 0.0f, -2.0f);//第四个点
                gl.Color(0.0f, 1.0f, 0.0f);
                gl.Vertex(-1.0f, -1.0f, 0.0f);//左顶点
                gl.Color(0.0f, 0.0f, 1.0f);
                gl.Vertex(1.0f, -1.0f, 0.0f);//右顶点
                gl.End();
                gl.Begin(OpenGL.GL_TRIANGLES);//第三个面
                gl.Color(1.0f, 1.0f, 1.0f);
                gl.Vertex(0.0f, 0.0f, -2.0f);//第四个点
                gl.Color(0.0f, 1.0f, 0.0f);
                gl.Vertex(-1.0f, -1.0f, 0.0f);//左顶点
                gl.Color(1.0f, 0.0f, 0.0f);
                gl.Vertex(0.0f, 1f, 0.0f);//顶点
                gl.End();
                gl.Begin(OpenGL.GL_TRIANGLES);//第四个面
                gl.Color(1.0f, 1.0f, 1.0f);
                gl.Vertex(0.0f, 0.0f, -2.0f);//第四个点
                gl.Color(0.0f, 0.0f, 1.0f);
                gl.Vertex(1.0f, -1.0f, 0.0f);//右顶点
                gl.Color(1.0f, 0.0f, 0.0f);
                gl.Vertex(0.0f, 1f, 0.0f);//顶点
                gl.End();
                #endregion
            }

            gl.Flush();   //强制刷新
        }

        private void Form1_Load(object sender, EventArgs e)
        {
            OpenGL g2 = openGLControl2.OpenGL;
            g2.ClearColor(0, 0, 0, 0);
        }

        private void openGLControl2_Resize(object sender, EventArgs e)
        {
            OpenGL gl = openGLControl2.OpenGL;

            // 设置当前矩阵模式,对投影矩阵应用随后的矩阵操作
            gl.MatrixMode(OpenGL.GL_PROJECTION);

            // 重置当前指定的矩阵为单位矩阵,将当前的用户坐标系的原点移到了屏幕中心
            gl.LoadIdentity();

            // 创建透视投影变换
            gl.Perspective(30.0f, (double)Width / (double)Height, 5, 100.0);

            // 视点变换
            gl.LookAt(0, 5, 0, 0, 0, 0, 0, 1, 0);

            // 设置当前矩阵为模型视图矩阵
            gl.MatrixMode(OpenGL.GL_MODELVIEW);
        }

        private void ckline_CheckedChanged(object sender, EventArgs e)
        {
            drawLine = this.ckline.Checked;
        }

        private void ckarea_CheckedChanged(object sender, EventArgs e)
        {
            drawArea = this.ckarea.Checked;
        }


        private void ckvol_CheckedChanged(object sender, EventArgs e)
        {
            drawVolume = this.ckvol.Checked;
        }

        private void ckx_CheckedChanged(object sender, EventArgs e)
        {
            flagRotateX = this.ckx.Checked;
        }

        private void cky_CheckedChanged(object sender, EventArgs e)
        {
            flagRotateY = this.cky.Checked;
        }

        private void ckz_CheckedChanged(object sender, EventArgs e)
        {
            flagRotateZ = this.ckz.Checked;
        }
    }
}
Effect: