foreword
This article introduces Android to implement global setting custom fonts and local setting custom fonts, that is, setting fonts for a single TextView. At the same time, it also provides some excellent tripartite font frameworks, which can basically meet all the requirements of developers for font settings.
Effects before and after using custom fonts
1. What are assets?
First of all, you need to understand the assets of Android . In short, your pictures and svg files are placed under res/drawabe of the project, and the font files used to set the font are located under assets. How to create an assets directory, click to enter
2. APP global font
2.1. Import library
The code is as follows (example):
//Used to set the App global font
implementation 'uk.co.chrisjenx:calligraphy:2.2.0'
2.2. Initialize calligraphy in Application
The code is as follows (example):
public class MyApplication extends Application {
@Override
public void onCreate() {
super.onCreate();
instance = this;
//app字体
CalligraphyConfig.initDefault(
new CalligraphyConfig.Builder()
.setDefaultFontPath("fonts/OpenSans-Regular.ttf")
.setFontAttrId(R.attr.fontPath)
.build()
);
}
public static LightMeterApplication getInstance() {
return instance;
}
}
Configure custom MyApplication in AndroidManifest.xml to replace the default Application
    <application
        android:name=".MyApplication"
        android:allowBackup="false"
        android:hardwareAccelerated="true"
        android:icon="@drawable/ic_launcher"
        android:label="@string/app_name"
        android:theme="@style/AppTheme">
Below is my font directory

Download the font, click to enter the extraction code: 2555 You can also import the font that comes with Windows, the font path: C:\Windows\Fonts My Win10 comes with 263 font files, the following is a screenshot of the font file

2.3. Let the specified Activity configure custom fonts
override attachBaseContext
2.3.1 Java Settings
    //The Activity that is not rewritten is still the Android default font
    @Override
    protected void attachBaseContext(Context newBase) {
        super.attachBaseContext(CalligraphyContextWrapper.wrap(newBase));
    }
2.3.2 kotlin settings
override fun attachBaseContext(newBase: Context) {
    super.attachBaseContext(CalligraphyContextWrapper.wrap(newBase))
}
2.4 Android Q and Android X development environment error
If your project upgrades the AndroidX environment and debugs on Android Q, the following error will be reported
E/AndroidRuntime: FATAL EXCEPTION: main
    Process: com.bigcat.edulearnaid, PID: 21204
    java.lang.RuntimeException: Unable to start activity ComponentInfo{com.bigcat.edulearnaid/com.bigcat.edulearnaid.ui.StartActivity}: android.view.InflateException: Binary XML file line #17 in com.bigcat.edulearnaid:layout/abc_screen_simple: Binary XML file line #17 in com.bigcat.edulearnaid:layout/abc_screen_simple: Error inflating class androidx.appcompat.widget.FitWindowsLinearLayout
        at android.app.ActivityThread.performLaunchActivity(ActivityThread.java:3895)
Solution :
Add the following dependencies in the project build.gradle to replace uk.co.chrisjenx:calligraphy:2.2.0
implementation 'io.github.inflationx:calligraphy3:3.1.1'
implementation 'io.github.inflationx:viewpump:2.0.3'
Initialize in Application's onCreate():
2.4.1 java settings
ViewPump.init(ViewPump.builder()
            .addInterceptor(new CalligraphyInterceptor(
                new CalligraphyConfig.Builder()
                    .setDefaultFontPath("你的字体")
                    .setFontAttrId(R.attr.fontPath)
                    .build()))
                .build());
2.4.2 Kotlin settings
ViewPump.init(
    ViewPump.builder()
        .addInterceptor(
            CalligraphyInterceptor(
                CalligraphyConfig.Builder()
                    .setDefaultFontPath("你的字体")
                    .setFontAttrId(R.attr.fontPath)
                    .build()
            )
        )
        .build()
)
@Override
protected void attachBaseContext(Context newBase) {
    super.attachBaseContext(ViewPumpContextWrapper.wrap(newBase));
}
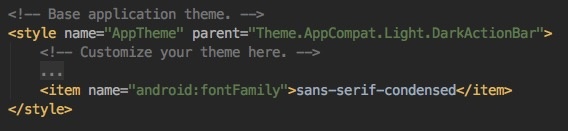
2.5 Use the theme to modify the global font
In application, android:themeconfigure an App theme through . Generally, newly created projects are @style/AppTheme. Add the properties about the font in it android:fontFamily, and it can complete the global setting of a system font.
3. Set the font of a single TextView
Unlike setting the global font, there is no need to configure the Application, no need to introduce the dependent library calligraphy, and the font path still needs to be configured. Use the following method to complete the font setting
3.1 Implementation using Typeface + .ttf
3.1.1 java
protected Typeface tfRegular;//Define font
{
    tfRegular = Typeface.createFromAsset(getActivity().getAssets(), "fonts/OpenSans-Regular.ttf");//Initialize font
    textView.setTypeface(tfRegular);
}
3.1.2 kotlin
protected var tfRegular: Typeface? = null // define font
    get() = field ?: Typeface.createFromAsset(requireActivity().assets, "fonts/OpenSans-Regular.ttf") // initialize font
textView.typeface
= tfRegular / / set font
3.2 Use the SDK's own fonts
noraml (common font, the font used by the system by default) sans (sans serif font) serif (serif font) monospace (monospaced font)
3.2.1 Implementation through xml
<TextView
    android:layout_width="match_parent"
    android:layout_height="wrap_content"
    android:text="580.6Ix"
    android:gravity="center"
    android:textStyle="bold"
    android:textSize="20sp"
    android:typeface=" serif"
    android:textColor="@color/white"/>
    <!-- android:textStyle="bold" font bold -->
    <!-- android:letterSpacing="0.2" font increase spacing -->
    <! -- android:typeface="serif" Set the SDK's own font -->
3.2.2 Implementation through Java logic code
    vSansText = (TextView) findViewById(R.id.sans);
    vSerifText = (TextView) findViewById(R.id.serif);
    vMonospaceText = (TextView) findViewById(R.id.monospace);

    //设置字体样式
    vSansText.setTypeface(Typeface.SANS_SERIF);
    vSerifText.setTypeface(Typeface.SERIF);
    vMonospaceText.setTypeface(Typeface.MONOSPACE);
3.2.3 Implementation through kotlin logic code
vSansText = findViewById(R.id.sans) vSerifText = findViewById(R.id.serif) vMonospaceText = findViewById(R.id.monospace) // 设置字体样式 vSansText.typeface = Typeface.SANS_SERIF vSerifText.typeface = Typeface.SERIF vMonospaceText.typeface = Typeface.MONOSPACE
3.3 Use RoBoto to set font in xml
The fonts that can be customized through xml also include Roboto. After Android 4.0, Roboto is used as the default font. If you want to know more about Robote, you can check it on Google's website . Here's how to use it:
3.3.1 Use android:fontFamily in xml
android:fontFamily="sans-serif" // roboto regular
android:fontFamily="sans-serif-light" // roboto light
android:fontFamily="sans-serif-condensed" // roboto condensed
android:fontFamily="sans-serif-thin" // roboto thin (android 4.2)
//in combination with
android:textStyle="normal|bold|italic"
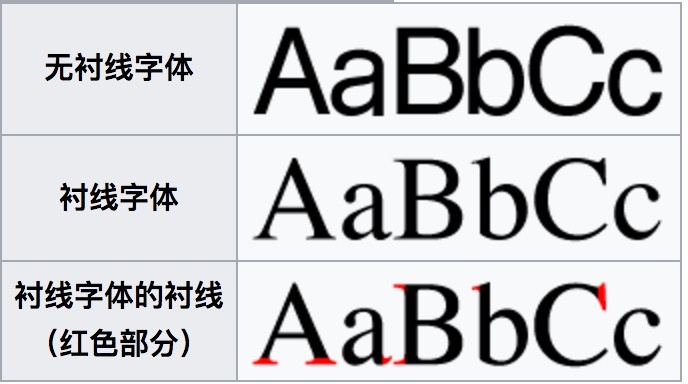
The normal and sans fonts are actually the same, serif is a serif font, and nonospace is a monospaced font.
serif adds serifs to the default font. And nonospace limits the width of each character, so that they achieve an equal width effect.
3.3.2 fontFamily parameter attribute
| font | attribute characteristics |
|---|---|
| Regular | standard font |
| Italic | font italic |
| Bold | bold font |
| Bold-italic | bold and italic |
| Light | sans serif font |
| Light-italic | sans serif italic |
| Thin | fine body |
| Thin-italic | thin italic |
| Condensed regular | Used for text decoration, information display, web design, seal cutting and mold making[cr] |
| Condensed italic | italic version cr |
| Condensed bold | bold cr |
| Condensed bold-italic | bold italic version cr |
3.3.3 fontFamily loads the fonts under the font resource package
1. Put the downloaded font into the following file
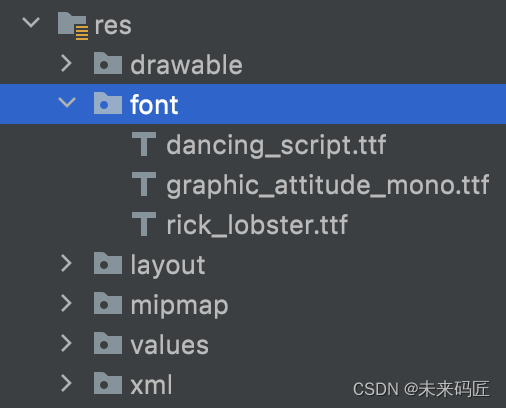
2. Reference in xml
<TextView
    android:layout_width="match_parent"
    android:layout_height="wrap_content"
    android:fontFamily="@font/anyeguihuapiaoxiang"
    android:text="Set the font of a single TextView - through the font resource file" />
It should be noted that if typefaceand is configured at the same time, the configured font fontFamilywill be used .fontFamily
3.4 textStyle
textStyleIt is mainly used to set the style of some fonts, and it is valid for all fonts. That is to say, even if you replace the font, you can still use textStyleto modify its style. There are optional options supported by textStyle itself normal|bold|italic, and they are also very easy to understand, that is 普通|粗体|斜体.
3.4.1 Use in xml
<TextView
    android:layout_width="match_parent"
    android:layout_height="wrap_content"
    android:text="Set the font-textStyle of a single TextView"
    android:textStyle="bold|italic" />
3.5 Andorid 8.0+ defines and uses fonts in resources
1. Right click on the res folder and go to New > Android Resource Directory. The New Resource Directory window appears.
2. In the Resource Type list, select a font, and click OK.
3. Add the font file to the font folder.
4. Double-click the font file to preview the font of the file in the editor.
These four steps are to create a font resource file and put the downloaded font into the file
3.5.1 Creating fonts
1. Right click on the font folder and go to "New" > "Font resource file". The New Resource File window is displayed.
2. Enter a file name and click OK. A new font resource XML will open in the editor.
3. Encapsulate each font file, style, and weight attribute in a <font> element. The following XML illustrates adding font-related attributes in the font resource XML:
<?xml version="1.0" encoding="utf-8"?>
<font-family xmlns:android="http://schemas.android.com/apk/res/android">
    <font
        android:fontStyle="normal"
        android:fontWeight="400"
        android:font="@font/lobster_regular" />
    <font
        android:fontStyle="italic"
        android:fontWeight="400"
        android:font="@font/lobster_italic" />
</font-family>
3.5.2 Use in TextView
In the layout XML file, set the fontFamily attribute to the font file you want to access.
    <TextView
        android:layout_width="wrap_content"
        android:layout_height="wrap_content"
        android:fontFamily="@font/lobster"/>
3.5.3 Dynamic call
Typeface typeface = ResourcesCompat.getFont(context, R.font.lobster);
4. Excellent personalized font function framework
4.1 Setting text styles through Spannables
★ 659-
4.2 Make keywords clickable underline TextView
UnderLineLinkTextView ★327 -
4.3 Zoom font size with gestures
PinchZoomTextView ★272 -
4.4 Color-code some phrases
ColorTextView ★214 -