This article summarizes the key points of interviews related to HDFS and MapReduce in Hadoop. The next article will introduce advanced knowledge such as tuning and data tilt.
HadoopSummary
- I. Overview
- 2. HDFS Distributed File System
-
- 1 Overview
- 2. HDFS storage data architecture diagram
- 3 Advantages of HDFS
- 4 Disadvantages of HDFS (scenes where HDFS is not applicable)
- 5 HDFS technical details
- 6 HDFS replica placement strategy
- 7 What is Rack Awareness
- 8 What files (edits, fsimage, seen_txid, VERSION) are generated after the namenode is formatted? What are their respective functions?
- 9 Functions of Secondary NameNode
- 10 HDFS execution process (important)
- 11 What is RPC, the calling process of RPC
- 12 What is safe mode
- 3. Basic introduction of MapReduce and Yarn
- 4. Supplementary knowledge of Hadoop
I. Overview
1. Hadoop characteristics
(1) High reliability
With redundant data storage , even if one copy fails, other copies can also guarantee normal external services.
(2) Efficiency
As a parallel distributed computing platform, Hadoop adopts two core technologies of distributed storage and distributed processing , which can efficiently process PB- level data.
(3) High fault tolerance
Adopt redundant data storage method, automatically save multiple copies of data, and automatically redistribute failed tasks.
(4) High scalability
The design goal of Hadoop is to run efficiently and stably on cheap computer clusters , and can be extended to thousands of computer nodes.
(5) Low cost
Hadoop uses cheap computer clusters , the cost is relatively low, and ordinary users can easily build Hadoop operating environment with their own PCs.
(6) Running on the Linux platform
Hadoop is developed based on the Java language and can run well on the Linux platform.
(7) Support multiple programming languages
Applications on Hadoop can also be written in other languages, such as C++.
2. HDFS structure
- Hadoop is mainly composed of HDFS architecture (distributed file system) and MapReduce architecture (parallel computing framework).
HDFS Architecture
(1) Master-slave structure
- There is only one master node: namenode
- From the node, there are many: datanodes
(2) namenode is responsible for:
- Receive user operation requests
- Maintain the directory structure of the file system
- Manage the relationship between files and blocks
(3) datanode is responsible for:
- To store files, the files are divided into blocks and stored on the disk (each block is 128M). To ensure data security, the files will have multiple copies
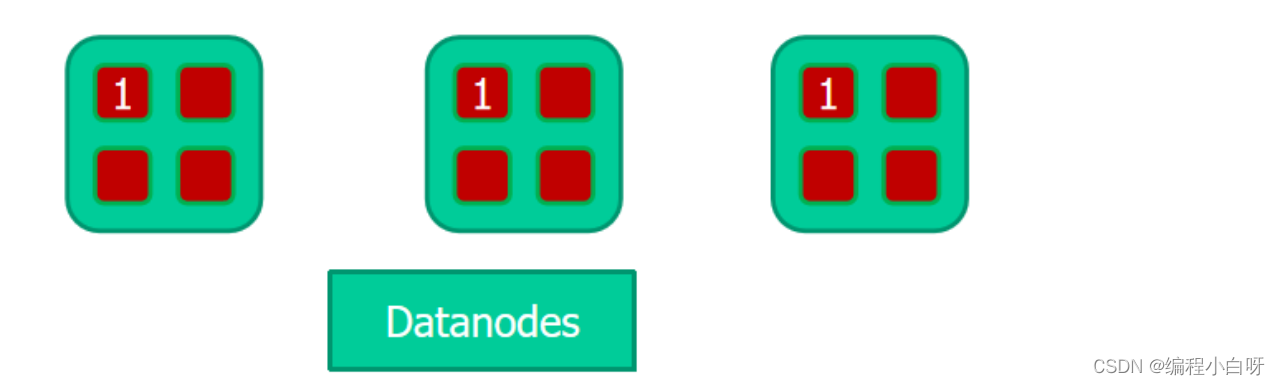
(4) In Hadoop, a file is divided into multiple file blocks of fixed size, which are distributed and stored in the nodes in the cluster. As shown in the figure below,
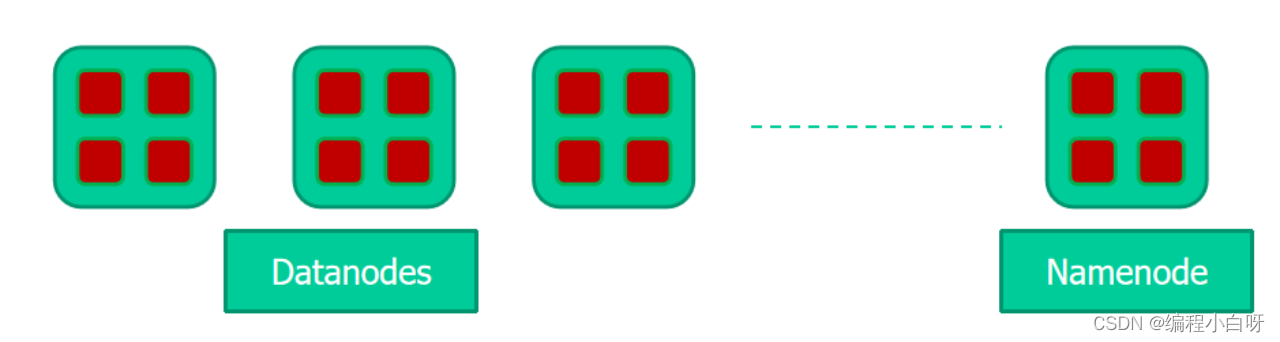
the same file block has multiple copies in different nodes. As shown below
We need a centralized place (Namenode) to save the block information of the file.
2. HDFS Distributed File System
1 Overview
- Hadoop Distributed File System - Hadoop distributed file storage system
- In order to ensure the reliability of data storage (copy) and read performance (slicing), HDFS replicates the data after slicing (guaranteed the number of copies) and stores them in multiple nodes of the cluster.
- There is a name node NameNode and multiple data nodes DataNode in HDFS
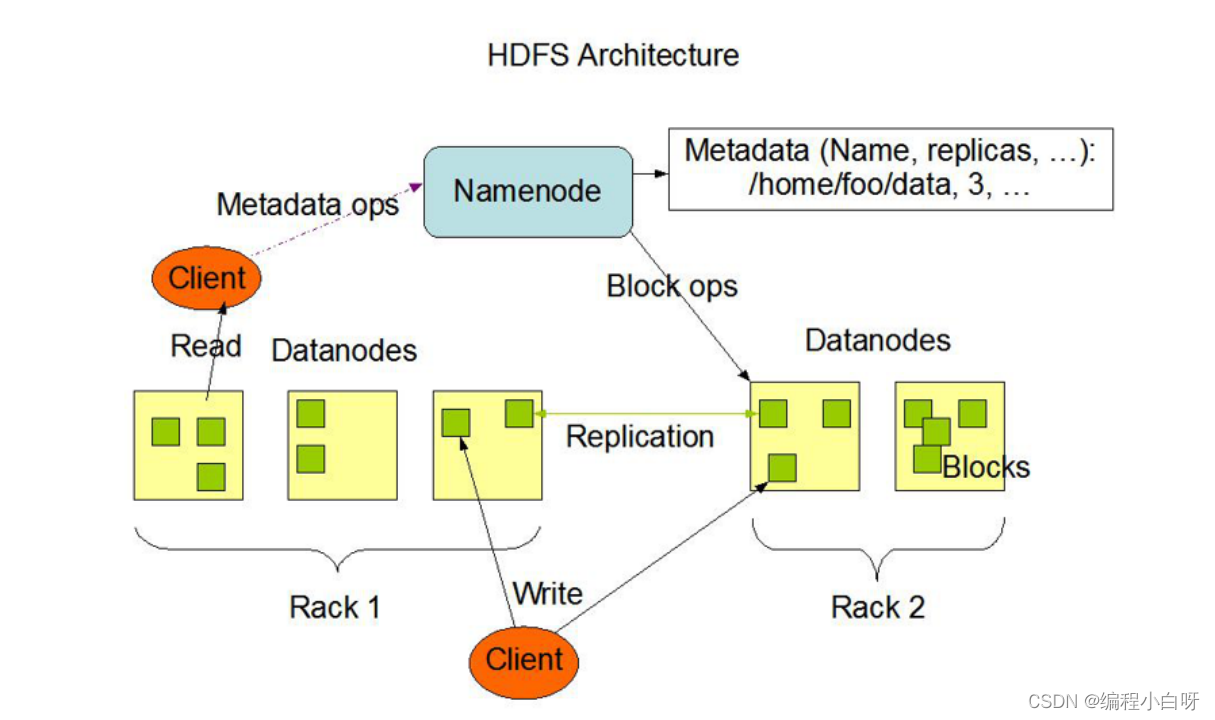
2. HDFS storage data architecture diagram
NameNode
1. Receive user operation requests
2. Store metadata information, metadata is stored in memory (to ensure read and write efficiency) and disk (for crash recovery)
3. Save the mapping relationship between files, blocks, and datanodes
DataNode
1. Store block content
2. Store in disk
3. Save the mapping relationship between block id and file
3 Advantages of HDFS
1. Suitable for big data processing
The processing data reaches GB, TB or even PB level, and can handle the number of files above one million scale, which is quite large.
2. Detect and quickly respond to hardware failures
Based on heartbeat mechanism
3. Streaming data access
The data processing scale of HDFS is relatively large, and applications need to access a large amount of data at a time. At the same time, these applications generally perform batch processing instead of user-interactive processing. Applications can access datasets as streams. The main thing is data throughput, not access speed.
4. Simplified Consistency Model
When most HDFS operates files, it needs to be written once and read many times . In HDFS, once a file is created, written, and closed, it generally does not need to be modified. Such a simple consistency model helps to improve throughput.
5. High fault tolerance
Data is automatically saved in multiple copies , and automatically restored after a copy is lost.
6. Can be built on cheap machines
Building on cheap machines can easily increase the storage capacity of the cluster almost linearly by expanding the number of machines.
4 Disadvantages of HDFS (scenes where HDFS is not applicable)
1. Not suitable for low-latency data access
Since Hadoop is optimized for the throughput of massive data and sacrifices the delay of obtaining data, it is not suitable for low latency to use Hadoop. For example, applications that interact with users require data to be responded within milliseconds or seconds.
2. Not suitable for small file storage
HDFS supports very large files through data distribution on DataNodes, and the metadata of the data is stored on NameNodes. The memory size of the NameNode determines the number of files that can be stored in the HDFS file system. Although the current system memory is relatively large, a large number of small files will still affect the performance of the NameNode. And the seek time of small file storage will exceed the read time, which violates the design goal of HDFS.
3. Multiple users write and modify files
HDFS files can only be written once, and do not support modification and additional writing (addition is supported after version 2.0).
4. Does not support super transaction
There is no strong support for transactions like relational databases.
5 HDFS technical details
( hdfs fsck pathView block information)
Block
-
Data block (Block) is the most basic storage unit for storing files in HDFS.
-
The very large data files stored in HDFS are divided into several blocks according to a standard and stored on different disks respectively. This standard is called block . The default size of the block is 64M (version 1.0) (version 2.0 is 128M ).
-
For the content of the file, the length of a file is size, then starting from the 0 offset of the file, the file is divided and numbered in order according to the fixed size, and each divided block is called a Block. The default block size of HDFS is 128MB. With a 256MB file, there are 256/128=2 blocks in total.
-
Different from ordinary file systems, in HDFS, if a file (30M) is smaller than the size of a data block (128M), it does not occupy the entire data block storage space (actually still 30M).
NameNode
- NameNode maintains metadata information
The NameNode maintains the metadata information in HDFS, including information about the relationship between files and Blocks, the number of Blocks, and the relationship between Blocks and DataNodes. The data format is as follows:
For example:/test/a.log,3,{b1,b2},[{b1:[h0,h1,h3]},{b2:[h0,h2,h4]}]
FileName (file name) replicas (number of copies) block-ids (block id) id-host (host where id is located)
- Files in the NameNode disk
The metadata information in the NameNode is stored in memory and files, real-time information in memory, and data mirroring in files as persistent storage. Documentation includes:
- fsimage: metadata image file. Storing a NameNode metadata information does not synchronize the data in memory in real time.
- edits: The operation log file, which records the operations to be performed by the NameNode.
- fstime: Save the time of the latest checkpoint. (last update time)
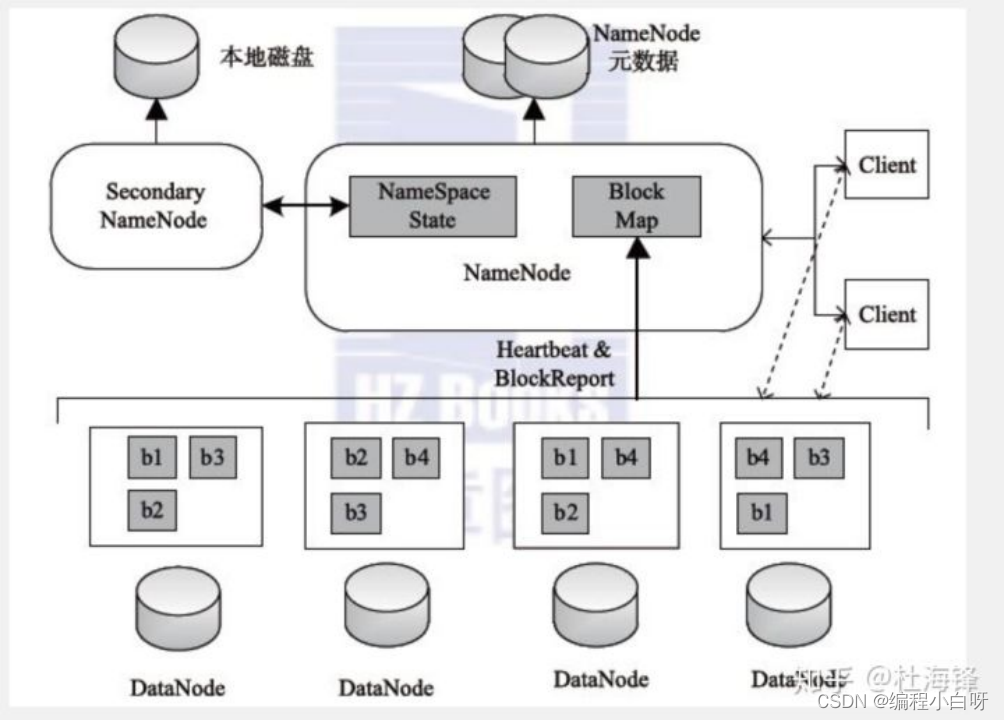
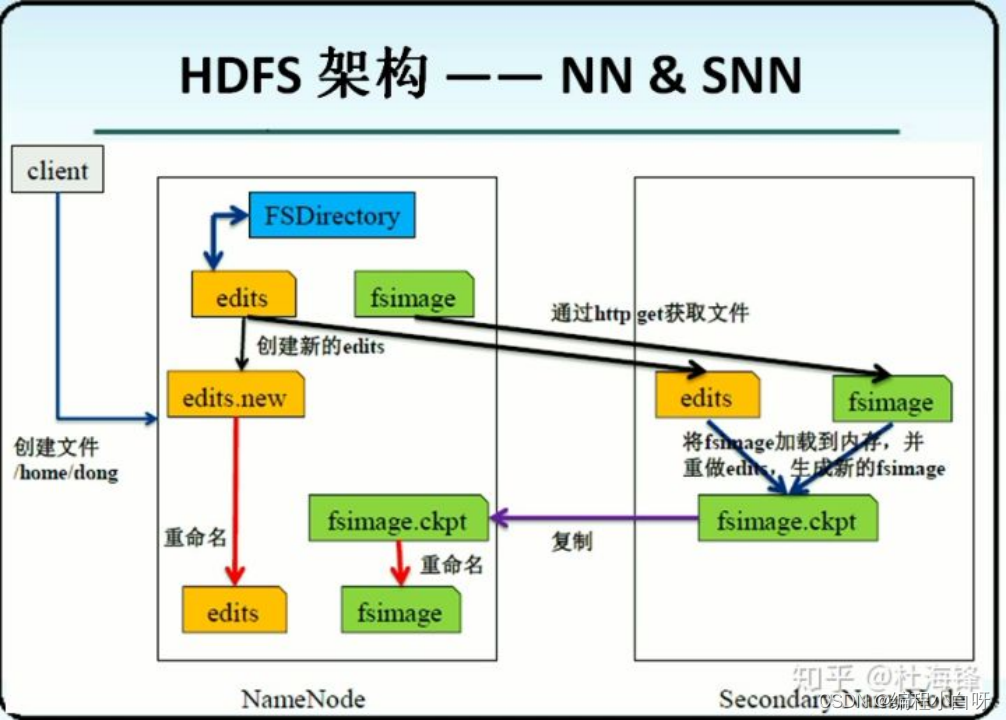
- NameNode update data details
The merge process is shown in the figure below:
- Every once in a while, the Secondary NameNode will communicate with the NameNode, requesting it to stop using the Editlog file, and temporarily add the newly arrived write operation to a new file edtis.new .
- The Secondary NameNode pulls the FsImage file and the EditLog file in the NameNode back to the local, loads them into the memory, performs a merge operation on the two, and merges them into a new fsimage , that is, executes the operations in the EditLog one by one in the memory to keep the FsImage up to date . After the merge, the Secondary NameNode will send the latest merged FsImage file to the NameNode. After the NameNode receives it, it will replace the old FsImage file with the latest FsImage file. At the same time, the NameNode will change edtis.new to edits and never reduce the size of the EditLog file.
DataNode
- In hadoop, data is stored on the DataNode and stored in the form of Block.
- The DataNode node will continuously send heartbeat reports to the NameNode node. (status information and data information)
6 HDFS replica placement strategy
- Default replica placement strategy:
By default, the number of replicas is 3, and all DNs are under the same rack. When writing a block, the selection of three DN machines is completely random.
- The replica placement strategy after rack awareness is configured:
After rack awareness is configured, when HDFS selects three DNs, the replica placement strategy is as follows:
(1) Put the first copy on the same node as the client. If the client is not in the cluster, a node will be randomly selected for storage.
(2) The second copy will be randomly selected on a different rack from the first copy.
(3) The third copy will randomly select a different node on the same rack as the second copy.
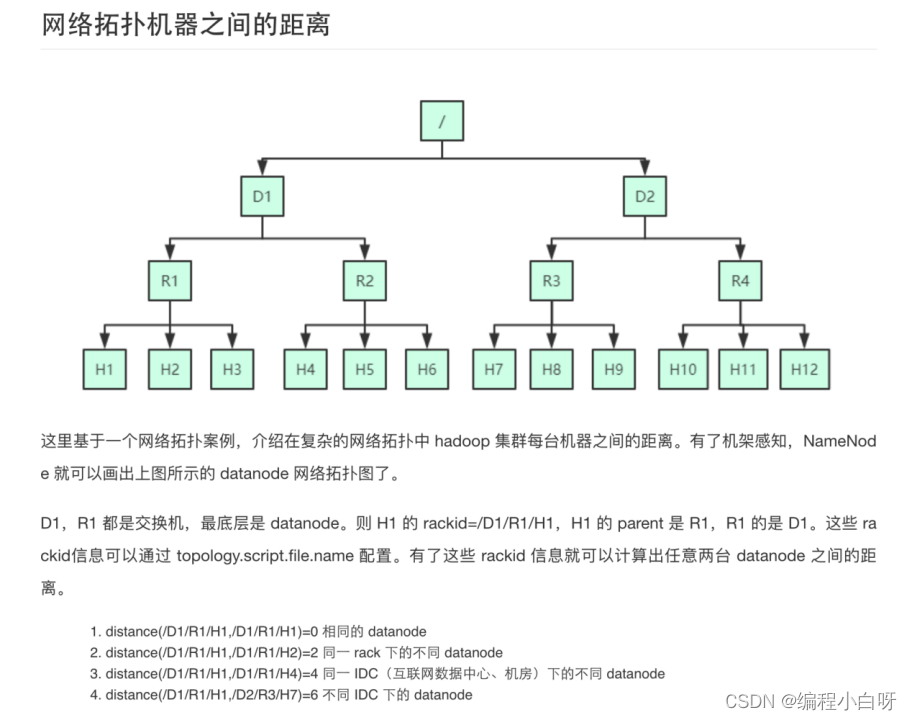
7 What is Rack Awareness
- Definition: In a distributed system, it is possible to identify different racks (rack) and the topological relationship between them, so as to manage data and resources more effectively.
- Hadoop can establish a topological map of the location of servers and racks within the system, and can identify the topological location of system nodes. Tells the Hadoop cluster which machine belongs to which rack.
- Why set up rack awareness:
(1) Turn on rack awareness, NN can know the network location of DN
(2) According to the network topology map, the rackid can be calculated, and the distance between any two DNs can be calculated through the rackid information
(3) When HDFS writes a block, the copy placement strategy will be adjusted according to the distance.
(4) The write strategy will write the copy to different racks to prevent a rack from hanging up and the copy from being lost. At the same time, it can reduce the network I/O when reading. But it will increase the cost of writing operations.
8 What files (edits, fsimage, seen_txid, VERSION) are generated after the namenode is formatted? What are their respective functions?
- Format file storage path:
/usr/local/hadoop2.7.1/data/hdfs/name/current - Format file:
edits 、fsimage、seen_txid、VERSION
(1) fsimage file: A permanent checkpoint of HDFS file system metadata, including serialization information of all directories and file idnodes of HDFS file system .
(2) edits file: the path to store all update operations of the HDFS file system, and all write operations of the file system client will first be recorded in the edits file.
(3) The seen_txid file saves a number, that is, the number of the last edits . Every time the NameNode starts, it will read the fsimage file into the memory, and start from 0001 to the number recorded in seen_txid, and execute the update operation in each edits in turn to ensure that the metadata information in the memory is up-to-date and synchronized, which can be regarded as When the namenode starts, merge the fsimage and edits files.
9 Functions of Secondary NameNode
(1) First, the merge operation of EditLog and FsImage can be completed, the size of EditLog file can be reduced, and the restart time of NameNode can be shortened.
- Every once in a while, the Secondary NameNode will communicate with the NameNode, requesting it to stop using the Editlog file, and temporarily add the newly arrived write operation to a new file edtis.new .
- The Secondary NameNode pulls the FsImage file and the EditLog file in the NameNode back to the local, loads them into the memory, performs a merge operation on the two, and merges them into a new fsimage , that is, executes the operations in the EditLog one by one in the memory to keep the FsImage up to date . After the merge, the Secondary NameNode will send the latest merged FsImage file to the NameNode. After the NameNode receives it, it will replace the old FsImage file with the latest FsImage file. At the same time, the NameNode will change edtis.new to edits and never reduce the size of the EditLog file.
(2) It can be used as a "checkpoint" of the NameNode to save the metadata information in the NameNode.
It can be seen from the above merging process that the Secondary NameNode will communicate with the NameNode regularly, obtain the FsImage file and the Edits file from the NameNode, and perform the merge operation to obtain the latest FsImage file. From this perspective, the Secondary NameNode is equivalent to setting a checkpoint for the NameNode to periodically back up the metadata information in the NameNode. When the NameNode fails, the metadata information recorded in the Secondary NameNode can be used for system recovery.
In the HDFS design, it is not supported to switch the system directly to the Secondary NameNode. Therefore, from this perspective, the Secondary NameNode only serves as a "checkpoint" for the NameNode, and does not serve as a hot backup .
10 HDFS execution process (important)
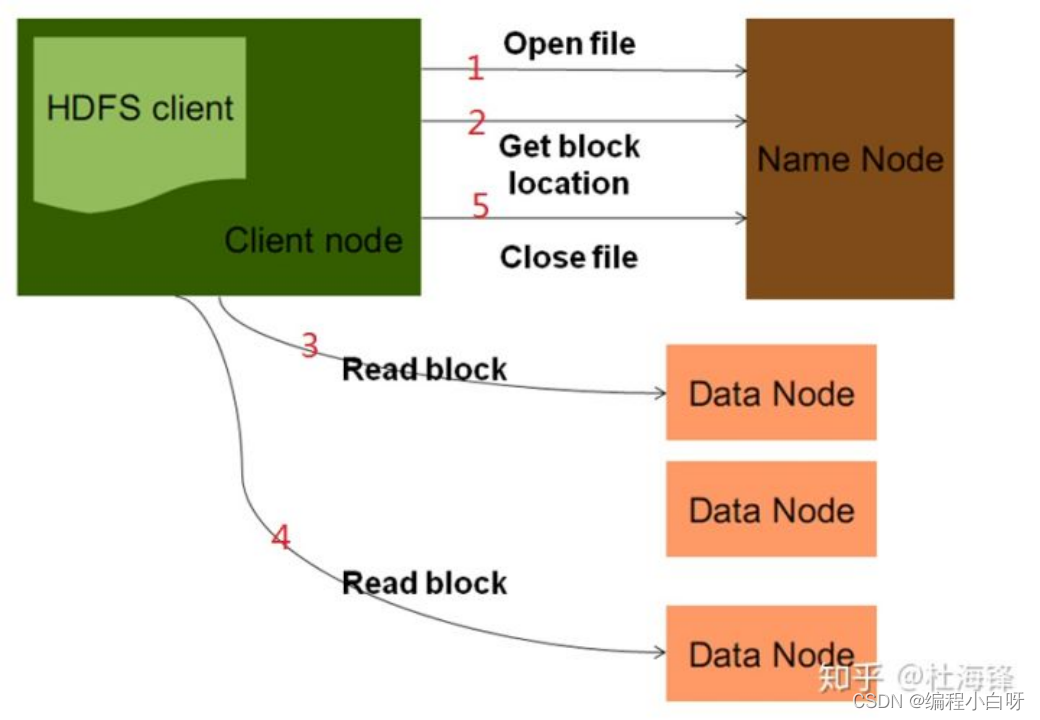
HDFS read process
(1) Client Client initiates an RPC read request to the remote NameNode;
(2) The NameNode returns the address of the DataNode that has the block; the client will select the DataNode closest to the client to read the block; if the client itself is a DataNode, it will directly obtain the data locally;
(3) The client calls the read function to start reading data. Data is read from the data node to the client, and when the data block is read, the connection to the data node is closed.
(4) The input stream searches for the next data block, finds the best position node of the data block, and reads the data.
(6) When the client finishes reading the data, close the input stream.
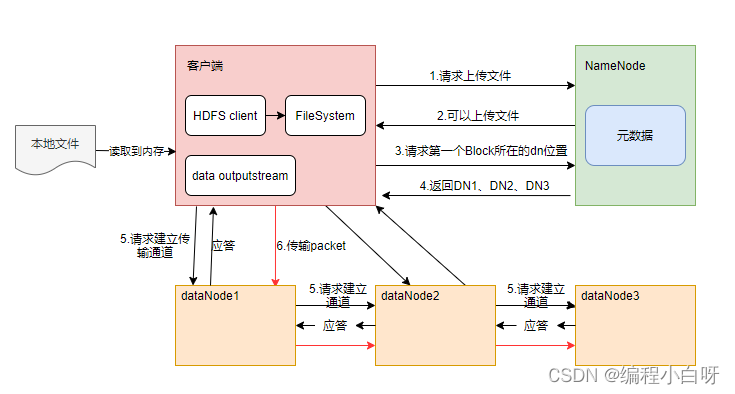
HDFS write process
1.
The client communicates with the namenode to request uploading files. The namenode checks whether the target file exists and whether the parent directory exists.
2. The namenode returns whether it can be uploaded.
3. The client requests which datanode servers the first block should be transferred to.
4. The namenode returns 3 datanode servers ABC
5. The client requests one of the 3 dns to upload data (essentially an RPC call to establish a pipeline). A will continue to call B after receiving the request, and then B will call C to complete the pipeline establishment. Return to the client level by level
6. The client starts to upload the first block to A (first read the data from the disk and put it in a local memory cache). In the unit of packet, A receives a packet and passes it to B, and B passes it to C; Each time A transmits a packet, it will be put into a response queue to wait for the response.
7. After a block transmission is completed, the client requests the namenode to upload the server of the second block again.
8. When all data blocks are successfully written, the client sends a request to complete the writing to the NameNode, and the NameNode updates the metadata information to mark the file as available.
HDFS deletion process
1) First delete the node name on the NameNode.
2) When the NameNode executes the delete method, it only marks the data blocks to be deleted involved in the operation, and does not actively contact the DataNode nodes where these data blocks are located.
3) When the DataNode node that saves these data blocks sends a heartbeat to the NameNode node, in the heartbeat response, the NameNode node will send an instruction to the DataNode to delete the data.
4) So after a period of time after the delete method is executed, the data block can be actually deleted.
- Note: In the process of reading and writing, NameNode is only responsible for address recording and querying. All data reading and writing are directly connected between the client and DataNode. The advantage of this form is that it can improve the response speed of NameNode and provide HDFS threads at the same time. Concurrent capabilities.
11 What is RPC, the calling process of RPC
(1) What is RPC
-
RPC - Remote Procedure Call Protocol
It is a protocol for requesting services from remote computer programs over a network without requiring knowledge of the underlying network technology. The RPC protocol assumes the existence of some transport protocol, such as TCP or UDP, to carry information data between communication programs. In the OSI network communication model, RPC spans the transport layer and the application layer. RPC makes it easier to develop applications including network distributed multiprogramming.
-
Hadoop's entire architecture is built on top of RPC (org.apache.hadoop.ipc)
(2) RPC call process
Start the server first, and then run the client, you can analyze and view the output information of the server and client.
- Define the RPC protocol (create an interface class)
The RPC protocol is the communication interface between the client and the server, and it defines the external service interface of the server. - Implementing the RPC protocol (creating service classes)
The Hadoop RPC protocol is usually a java interface that users need to implement. - Construct and start RPC Server (create server class)
After the RPC protocol is defined, you can create an RPC server through this protocol. You can directly use new RPC.Bulder(conf) to construct an RPC Server, and call the function start() to start the service. - Construct RPC Client and send RPC request (create client class)
use static method getProxy() to construct Client proxy object, and directly call the method of remote port through proxy object.
12 What is safe mode
When the distributed file system starts, there will be a safe mode at the beginning. When the distributed file system is in the safe mode, the content in the file system is not allowed to be modified or deleted until the safe mode ends. The security mode is mainly to check the validity of the data blocks on each DataNode when the system starts, and at the same time copy or delete some data blocks as necessary according to the policy . You can also enter safe mode through commands during runtime. In practice, if you modify or delete files when the system starts, there will be an error message that the safe mode does not allow modification, and you only need to wait for a while.
- Safe mode time period: The system has just started, and the data node location information of the datanode needs to be reported to the namenode. At this time, writing, renaming and deletion are not yet possible. This time period is in safe mode.
- When the NameNode starts, it first enters the safe mode. If the lost blocks of the datanode reach a certain ratio (1- dfs.safemode.threshold.pct), the system will always be in the safe mode state, that is, the read-only state.
3. Basic introduction of MapReduce and Yarn
1. Overview of MapReduce
MapReduce is designed and developed based on the MapReduce paper released by Google. Based on the idea of divide and conquer, it is used for parallel computing and offline computing of large-scale data sets (greater than 1TB), and has the following characteristics:
- Highly abstract programming ideas: programmers only need to describe what to do, and how to do it is handed over to the execution framework of the system.
- Good scalability: the cluster capacity can be expanded by adding nodes.
- High fault tolerance: Improve the availability and fault tolerance of the cluster through strategies such as computing migration or data migration.
2. Resource scheduling and allocation—the introduction of Yarn
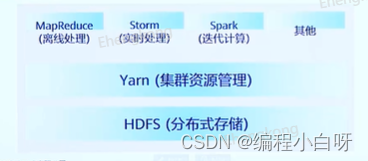
In Hadoop 1.0 version, there are only HDFS and MapReduce, and resource scheduling is carried out through MRv1. In 2.0, resource scheduling is in charge of Yarn, and MapReduce is in charge of parallel computing tasks .
Apache Hadoop YARN (Yet Another Resource Negotiator), the Chinese name is "Another Resource Coordinator". It is a new Hadoop resource manager. It is a general resource management system that can provide unified resource management and scheduling for upper-layer applications. Its introduction brings cluster utilization, resource unified management and data sharing. great benefit.
After the introduction of Yarn, it can support a variety of computing modes, such as offline computing, real-time computing, and iterative computing.
Therefore, we can understand that HDFS can be understood as a distributed hard disk- distributed file management system , and YANR can be understood as a distributed operating system- distributed resource (cpu, memory, disk, network) management and distributed process scheduling , MapReduce is an application running on the distributed operating system YARN.
3. Basic structure of Yarn
master-slave structure
- Master node, only one: ResourceManager
- From the node, there are many: NodeManager
YARN is still a master/slave structure overall. In the entire resource management framework, the resourcemanager is the master, and the nodemanager is the slave.
Resourcemanager is responsible for the unified management and scheduling of resources on each nademanger. When a user submits an application program, it is necessary to provide an ApplicationMaster to track and manage the program, which is responsible for applying for resources from the ResourceManager, and requires NodeManger to start tasks that can occupy certain resources. Since different ApplicationMasters are distributed to different nodes, they will not affect each other.
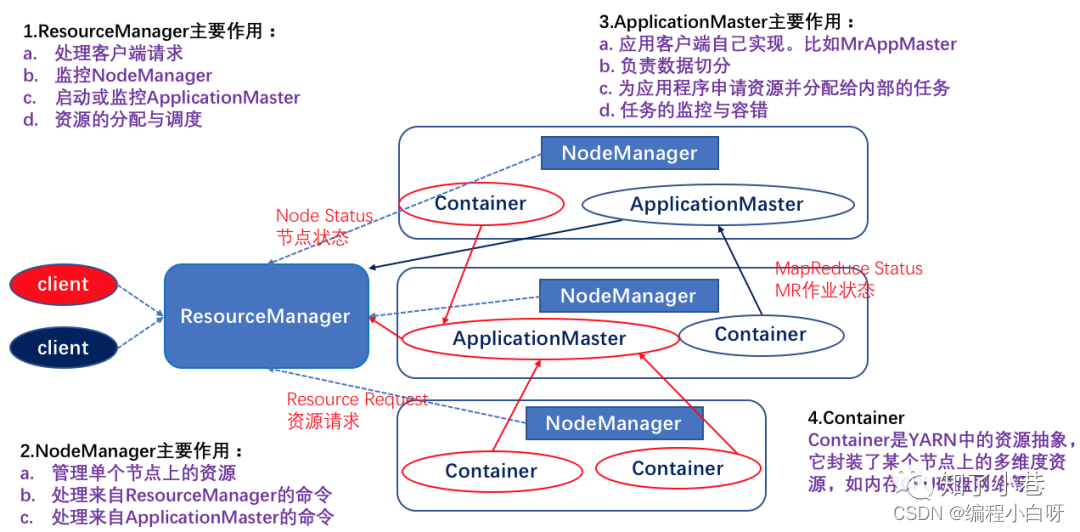
(1) ResourceManager
There is only one in the entire cluster, which is responsible for the unified management and scheduling of cluster resources
(2) NodeManager
There are multiple in the entire cluster, which are responsible for the management and use of single-node resources
(3) ApplicationMaster
One per application, responsible for the management of the application
(4) Container
The abstraction of the task running environment (the basic unit of resource allocation) describes a series of information
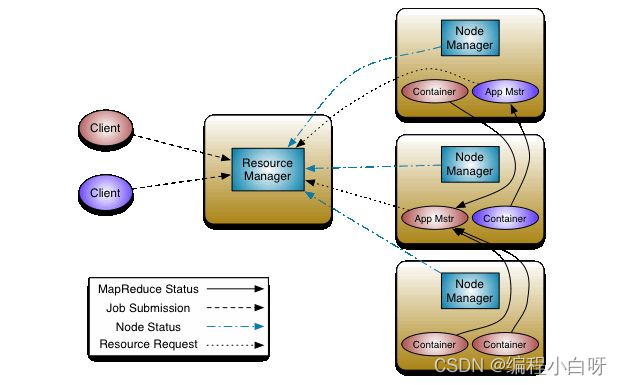
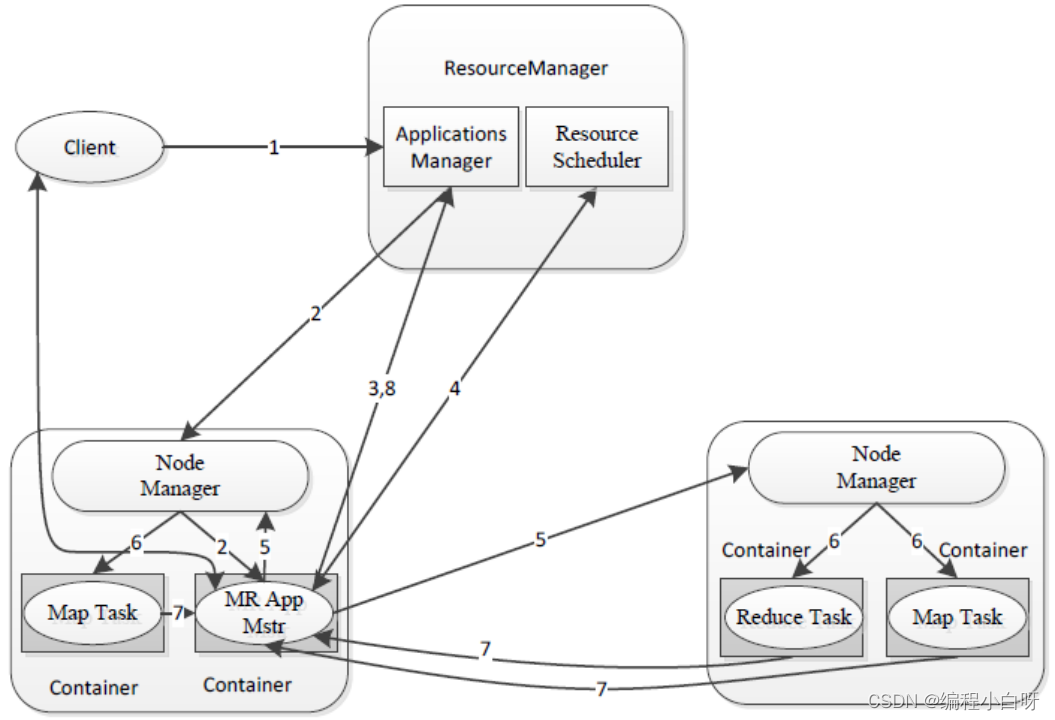
Working Mechanism of MapReduce on Yarn
MapReduce2.0 runs on YARN. YARN consists of two parts: ResourceManager (RM) and NodeManager (NM)
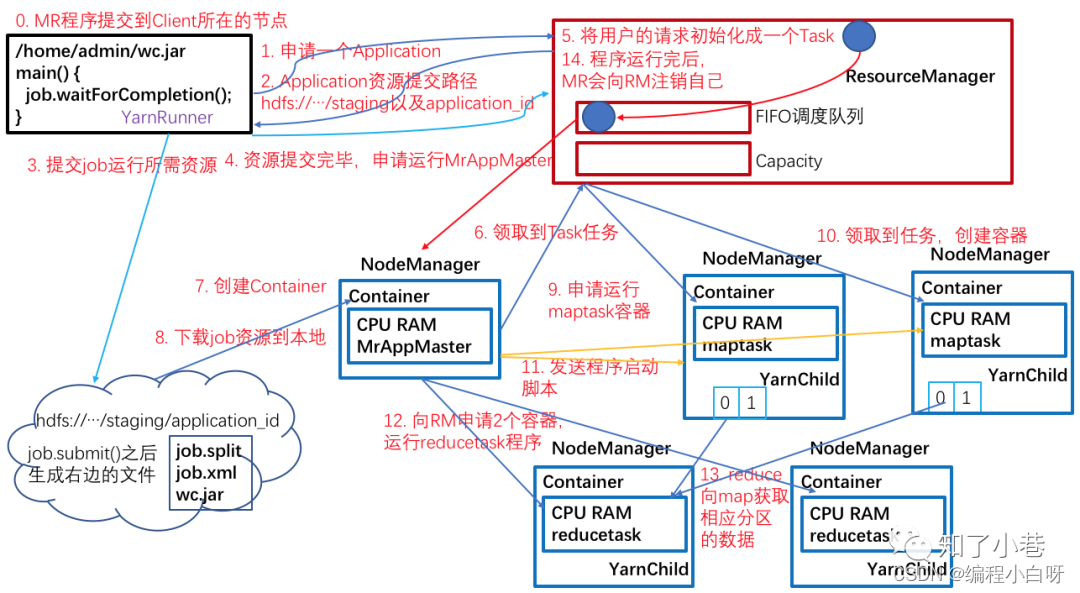
(1) Job (Application) submission
Step 0: The MR client calls the job.waitForCompletion method to submit the MapReduce job to the entire cluster.
Step 1: Client applies for an Application id from RM.
Step 2: RM returns the submission path and Application id of the job resource to the Client.
Step 3: The client submits the jar package, slice information and configuration files to the specified resource submission path (HDFS).
Step 4: After the client submits resources, it applies to RM to run MrAppMaster (ApplicationMaster adapted to YARN).
(2) Job (Application) initialization
Step 5: After RM receives the client's request, it adds the job to the capacity scheduler (task queue).
Step 6: A certain idle NM receives the job.
Step 7: The NM creates a Container (resource abstraction), and starts and runs MrAppMaster through the command.
Step 8: Download the resources submitted by the Client to the local.
(3) Resource allocation
Step 9: MrAppMaster applies to RM for running multiple maptask task resources.
Step 10: RM assigns the task of running maptask to the other two NodeManagers, and the other two NodeManagers receive tasks and create containers respectively.
(4) Resource Scheduling
Step 11: MR sends the program startup script to the two NodeManagers that received the task, and the two NodeManagers start maptask respectively, and maptask sorts the data partitions.
Step 12: After MrAppMaster waits for all maptasks to finish running, apply for a container from RM and run the reduce task.
Step 13: The reduce task obtains the data of the corresponding partition from the maptask.
Step 14: After the program finishes running, MR will apply to RM for deregistration.
(5) Progress and status updates
Tasks in YARN return their progress and status (including counter) to the application manager, and the client requests progress updates from the application manager every second (set by mapreduce.client.progressmonitor.pollinterval) and displays them to the user.
(6) Homework completed
In addition to requesting job progress from the application manager, the client checks for job completion by calling waitForCompletion() every 5 minutes. The time interval can be set by mapreduce.client.completion.pollinterval. After the job is completed, the application manager and Container will clean up the working state. Job information will be stored by the job history server for later user review.
4. Yarn workflow
Step 1 The user submits the application program to YARN, including the ApplicationMaster program, the command to start the ApplicationMaster, and the user program.
Step 2 ResourceManager allocates the first Container (here can be understood as a resource such as memory) for the application, and communicates with the corresponding Node-Manager, asking it to start the ApplicationMaster of the application in this Container.
Step 3 ApplicationMaster first registers with ResourceManager, so that users can directly check the running status of the application through ResourceManage, then it will apply for resources for each task, and monitor its running status until the running is completed, that is, repeat steps 4~7.
Step 4 The ApplicationMaster applies for and receives resources from the ResourceManager through the RPC protocol in a polling manner.
Step 5 Once the ApplicationMaster has applied for resources, it will communicate with the corresponding NodeManager and ask it to start the task.
Step 6 After the NodeManager has set the running environment for the task (including environment variables, JAR packages, binary programs, etc.), write the task start command into a script, and start the task by running the script.
Step 7 Each task reports its status and progress to the ApplicationMaster through an RPC protocol, so that the ApplicationMaster can keep track of the running status of each task, so that the task can be restarted when the task fails.
During the running of the application, the user can query the current running status of the application to the ApplicationMaster through RPC at any time.
Step 8 After the application program finishes running, ApplicationMaster logs out to ResourceManager and closes itself.
5. MapReduce detailed execution process
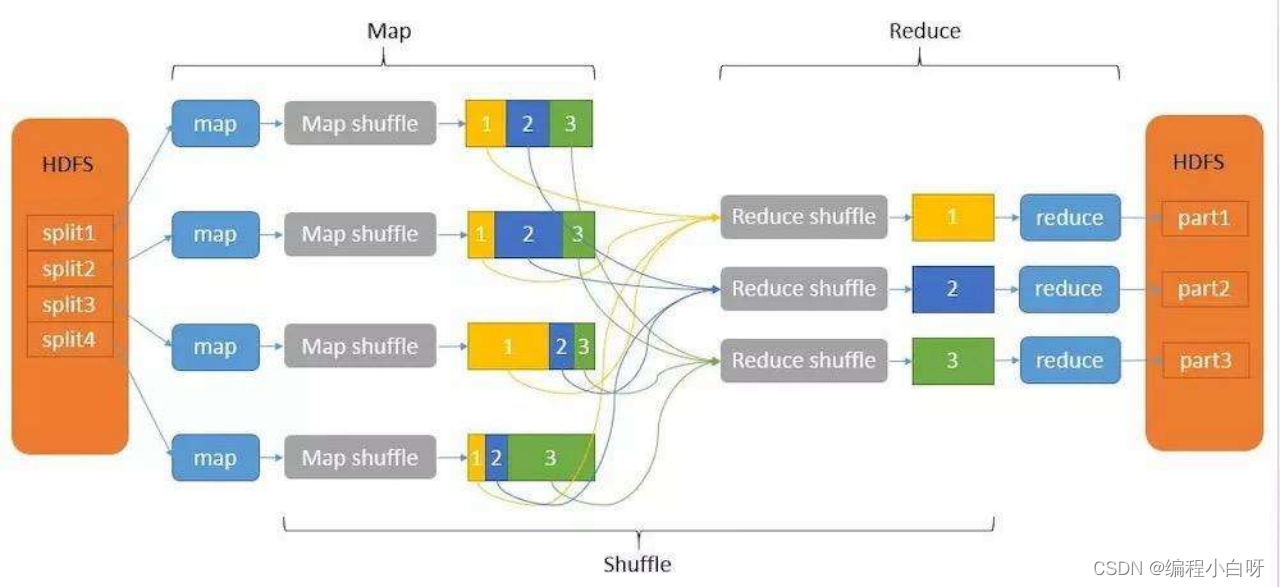
The mapreduce computing framework is generally divided into three stages: map, shuffle and reduce
- In the map stage, the input file is divided into splits. Generally, the number of map processes is the number of splits. Then map parses them into keys and values, performs its own logical processing conversion, and outputs new keys and values.
- After the output of the map result, write the key, value, and the calculated partition into the memory ring buffer. When a certain threshold is reached, it will be locked and the overflow writing thread will be started to make the partition orderly according to the quick sort before writing to the disk. , the internal keys of the partition are ordered, and if there is a combiner, they will be merged. If not, write the content to the local disk.
- When writing, it does not affect the map write cache. After writing, many overflow files will be generated. We need to merge these files, and use merge sort to merge multiple files into one file.
- At this point, the map shuffle ends, and the reduce shuffle is performed. A reduce pulls the data of the same partition from different maps, and then performs a merge operation on the reduce side. This is very similar to map merge. If the memory resources are sufficient, put the memory, and then merge, if not enough Just put the disk merge. It will also be sorted here, and the partitions with the same serial number will be merged and sorted.
- Input the result to the reduce terminal, input form: <key, {value list}>, write logic, output key, value.
- Save the reduce output to a file.
The role of the memory ring buffer: to collect map results in batches and reduce the impact of disk IO.
The following sorting algorithms are involved:
5.1 Quick Sort
When the amount of data is small (currently less than 13), use insertion sort, otherwise use quick sort; when quick sort recurses to a certain depth, use heap sort. This algorithm, also known as introsort, avoids the worst-case scenario of quicksort.
5.2 Merge sort
Basic idea: For a given set of sets, use recursion and divide-and-conquer techniques to divide the data sequence into smaller and smaller sub-sets, then sort the sub-sets, and finally merge the sorted sub-sets into Larger and larger ordered sequences.
After the first round of comparison, the smallest record is obtained, and then the position of the record is exchanged with the position of the first record; then, a second comparison is performed for other records not including the first record, and the smallest record is obtained and compared with the first record The two position records are swapped; the process is repeated until only one record remains for comparison.
5.3 Several sorts in the process of MapReduce
In the shuffle process of MapReduce, three sorts are usually performed, namely:
- Map's overflow phase: quick sorting according to partition and key
- Merge overflow files of Map: Merge and sort multiple overflow files of the same partition to synthesize a large overflow file
- Reduce input phase: Merge and sort data files from different Map tasks in the same partition
In addition, in the whole process of MapReduce, the output KV pairs are sorted by key by default, and quick sort is used.
The sorting of the Map output is actually the sorting in the overflow writing process above.
The sorting of Reduce output means that after Reduce processes the data, MapReduce will automatically sort the output KV according to the key.
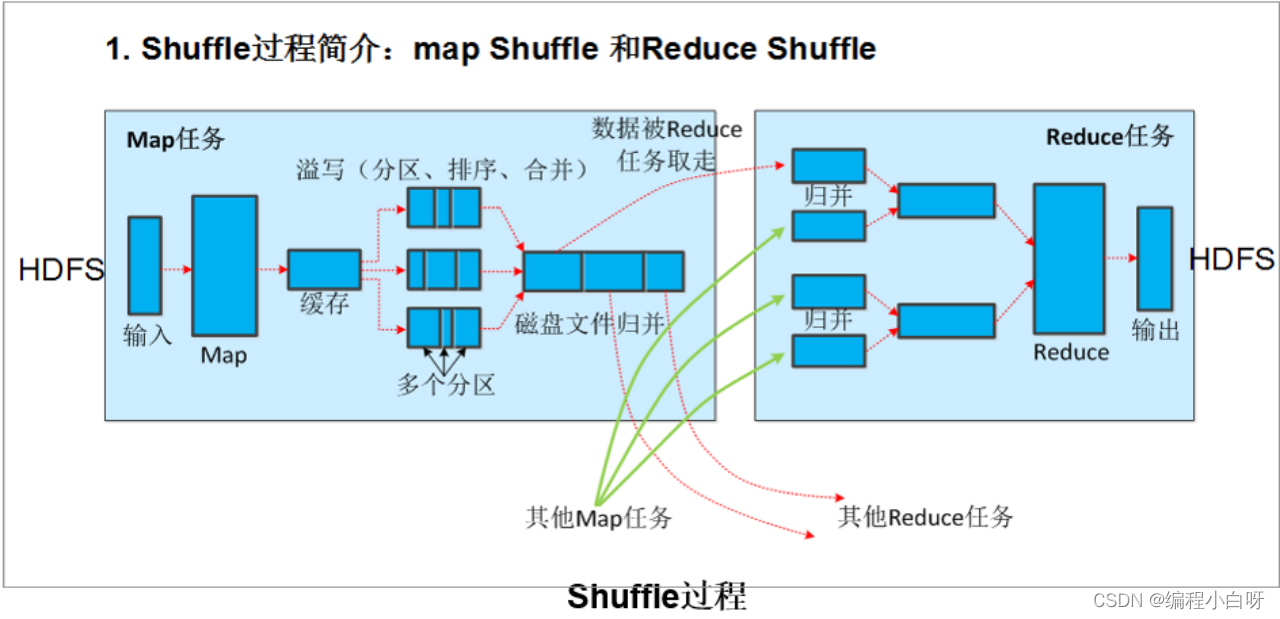
6 Detailed explanation of hadoop's shuffle process
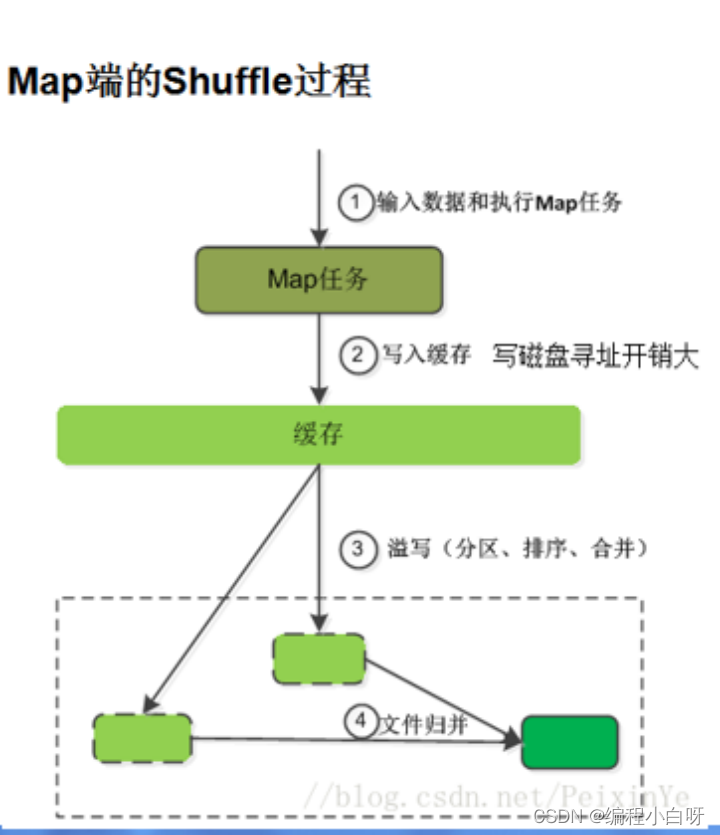
6.1 Shuffle on the Map side
The Map side will process the input data and generate intermediate results, which will be written to the local disk instead of HDFS. The output of each Map will first be written to the memory buffer. When the written data reaches the set threshold, the system will start a thread to write the data in the buffer to the disk. This process is called spill. Before the spill is written, a secondary sort is performed, first sorting according to the partition to which the data belongs, and then sorting the data in each partition according to the key. The purpose of the partition is to divide the records into different Reducers in order to achieve load balancing, and the Reducers in the future will read their corresponding data according to the partition. Then run the combiner (if it is set), the essence of the combiner is also a Reducer, and its purpose is to process the files to be written to the disk first, so that the amount of data written to the disk will be reduced. Finally, write the data to the local disk to generate a spill file (the spill file is saved in the directory specified by {mapred.local.dir}, and will be deleted after the Map task ends).
Finally, each Map task may generate multiple spill files. Before each Map task is completed, these spill files will be merged into one file through a multi-way merge algorithm. At this point, the shuffle process of Map is over.
6.2 Shuffle on the Reduce side
The shuffle on the reduce side mainly includes three stages, copy, sort (merge) and reduce . First, the output files generated by the Map side must be copied to the Reduce side, but how does each Reducer know which data it should process? Because when the Map side performs partition, it is actually equivalent to specifying the data to be processed by each Reducer (the partition corresponds to the Reducer ), so the Reducer only needs to copy the data in the corresponding partition when copying the data. . Each Reducer will process one or more partitions, but it needs to first copy the data in its corresponding partition from the output result of each Map. The next step is the sort stage, which is also called the merge stage, because the main work of this stage is to perform merge sorting. The data copied from the Map side to the Reduce side is in order, so it is very suitable for merge sorting. Finally, a larger file is generated on the Reduce side as the input of Reduce.
The last is the Reduce process, in which the final output is generated and written to HDFS.
6.3 shuffle summary
(1) Partitioner: Partition the data according to the key, so that it can be used by reduce in the future (this step is performed in the buffer). The partition can be customized. If not customized, all data will be in one partition by default.
(2) Sorting (sort): This step is transparent, sorting according to the key value, and this step is performed in the buffer.
(3) Combine: a preview of reduce to reduce the workload of reduce in the future (this step can be done or not, pay attention to special scenarios).
(4) copy: This step is transparent, data is pulled, and different reducers pull different data according to the partition.
(5) Merge: This step is transparent, because the files are pulled, and the data of different nodes needs to be merged and written into the file.
6.4 Little Knowledge Points
The default size of the Split fragment, the method to call the fragment?
1. What is the size of the split
切分成多少个Split,那么就有多少个Map任务执行,一个Map任务只处理一个Split(默认)。

一个数据分片就是一个块,默认大小:128M
2. The method of slice calling
FileInputFormat类:getsplits方法
4. Supplementary knowledge of Hadoop
1. Hadoop serialization function, the interface to be implemented, the interface that the key must implement
Serialization has two major functions in a distributed environment:
(1) Inter-process communication
(2) Permanent storage.
(3) In order to process data more efficiently. When dealing with large amounts of data, serialization can reduce the size of data transfers and allow for faster loading of data from disk into memory.
Interface to implement: Writable
The interface that Key must implement: WritableComparable
2. Why must the Key implement the WritableComparable interface? There are several reasons for this:
a. Serialization and deserialization : Hadoop needs to serialize and deserialize the Key so that it can be transferred and stored between MapReduce tasks. Therefore, Key must implement the Writable interface .
b. Sorting : In MapReduce, the keys generated in the Map stage need to be sorted in a certain way to ensure that the data obtained in the Reduce stage is grouped in the expected way. In order to achieve sorting, Key must implement the Comparable interface .
c. Grouping : In MapReduce, the data in the Reduce phase is grouped according to the Key generated in the Map phase. Therefore, if you need to customize the grouping method, Key must also implement the Comparable interface .
To sum up, in order to achieve efficient sorting and grouping in Hadoop, as well as transfer and storage between MapReduce tasks, Key must implement the WritableComparable interface.
3. Handwritten WordCount
/*
* LongWritable对应输入的key类型,默认是行的偏移量LongWritable
* Text,对应上输入的value类型,默认行数据Text
* Text:对应输出的key类型,不能使用默认值,需要根据需求更改
* Text:对应输出的value类型,根据需求修改
* @author lesie
* 要求输出的格式(key,1)
* 单词计数输出的key类型为Text
* 输出的value类型为IntWritable
*/
public class WordCountMapper extends Mapper<LongWritable, Text, Text, IntWritable>{


    /*
* KEYIN
* VALUEIN
* context--环境对象,输出结果
* @see org.apach.hadoop.mapreduce.Mapper#map(KEYIN,VALUEIN,...)
*/
    public void map(LongWritable ikey,Text ivalue,Context context) throws IOException, InterruptedException
    {


        //获取一行数据
        String line=ivalue.toString();

        //按空格切片
        String []arrs=line.split(" ");
        for(String arr:arrs)
            {


                context.write(new Text(arr),new IntWritable(1));
            }

    }
}


/*
 * reducer的数输入key用公式mapper输出的key类型
 * valuein:reducer的输入value应该是mapper输出的value类型
 * keyout:根据业务而定
 * valueout:根据业务而定
 * @author lesie
 * 工作机制:
 * 1.将key相同的value进行合并,形成一个Iterable,交给程序
 * eg:(hello,<1,1,1,1,1,1>)
 * 2.reduce方法执行的次数取决于mapper输出的key,有多个不同的key执行多少次
 * 3.默认的排序,对key进行排序,先按照数字进行排再按照字典顺序
 */

public class WordCountReducer extends Reducer<Text, IntWritable, Text, IntWritable> {


    public void reduce(Text _key, Iterable<IntWritable> values, Context context) throws IOException, InterruptedException {


        // process values
        //定义计数变量
        int sum=0;
        //进行累加操作
        for (IntWritable val : values) {


            //通过get方法取出其中的值
            sum+=val.get();
        }
        //输出数据,最终结果,key是单词Text,value是单词出现的总次数
        context.write(_key, new IntWritable(sum));
    }

}


public class WordCountDriver {


    public static void main(String[] args) throws Exception {


        // TODO Auto-generated method stub
        //获取当前配置
        Configuration conf=new Configuration();

        //获取一个表示当前Mapreduce作业的Job对象,向ahdoop申请一个job任务执行逻辑
        Job job=Job.getInstance();

        //指定程序入口
        job.setJarByClass(WordCountDriver.class);

        //设置需要执行的Mapper类
        job.setMapperClass(WordCountMapper.class);

        //设置Reducer类
        job.setReducerClass(WordCountReducer.class);

        //设置Mapper的输出类型
        job.setMapOutputKeyClass(Text.class);
        job.setMapOutputValueClass(IntWritable.class);

        //设置Reducer的输出结果类型
        job.setOutputKeyClass(Text.class);
        job.setOutputValueClass(IntWritable.class);

        //设置输入路径
        FileInputFormat.setInputPaths(job, new Path("hdfs://192.168.140.128:9000/wc/words.txt"));

        //设置输出路径
        FileOutputFormat.setOutputPath(job, new Path("hdfs://192.168.140.128:9000/wc/result6"));

        //任务的提交
        job.waitForCompletion(true);
    }

}
4. Handwritten Top-K
public class TopKMapper extends Mapper<LongWritable, Text, NullWritable, IntWritable> {


    private int k = 10; // TopK值
    private PriorityQueue<Integer> heap; // 堆

    @Override
    public void setup(Context context) {


        k = context.getConfiguration().getInt("k", 10); // 从Configuration中获取TopK值
        heap = new PriorityQueue<>(k, Collections.reverseOrder()); // 初始化堆
    }

    @Override
    public void map(LongWritable key, Text value, Context context) throws IOException, InterruptedException {


        int num = Integer.parseInt(value.toString()); // 获取输入数据
        if (heap.size() < k) {

     // 如果堆未满,则将数据加入堆中
            heap.offer(num);
        } else {


            int smallest = heap.peek(); // 获取当前堆中的最小值
            if (num > smallest) {

     // 如果输入数据大于最小值,则替换堆中最小值
                heap.poll();
                heap.offer(num);
            }
        }
    }

    @Override
    public void cleanup(Context context) throws IOException, InterruptedException {


        for (int num : heap) {

     // 将堆中的TopK数据输出
            context.write(NullWritable.get(), new IntWritable(num));
        }
    }
}


public class TopKReducer extends Reducer<NullWritable, IntWritable, NullWritable, IntWritable> {


    private int k = 10; // TopK值
    private PriorityQueue<Integer> heap; // 堆

    @Override
    public void setup(Context context) {


        k = context.getConfiguration().getInt("k", 10); // 从Configuration中获取TopK值
        heap = new PriorityQueue<>(k, Collections.reverseOrder()); // 初始化堆
    }

    @Override
    public void reduce(NullWritable key, Iterable<IntWritable> values, Context context) throws IOException, InterruptedException {


        for (IntWritable value : values) {

     // 遍历输入数据
            int num = value.get();
            if (heap.size() < k) {

     // 如果堆未满,则将数据加入堆中
                heap.offer(num);
            } else {


                int smallest = heap.peek(); // 获取当前堆中的最小值
                if (num > smallest) {

     // 如果输入数据大于最小值,则替换堆中最小值
                    heap.poll();
                    heap.offer(num);
                }
            }
        }
    }

    @Override
    public void cleanup(Context context) throws IOException, InterruptedException {


        for (int num : heap) {

     // 将堆中的TopK数据输出
            context.write(NullWritable.get(), new IntWritable(num));
        }
    }
}


import java.io.IOException;
import java.util.*;

import org.apache.hadoop.conf.Configuration;
import org.apache.hadoop.fs.FileSystem;
import org.apache.hadoop.fs.Path;
import org.apache.hadoop.io.LongWritable;
import org.apache.hadoop.io.NullWritable;
import org.apache.hadoop.io.Text;
import org.apache.hadoop.mapreduce.Job;
import org.apache.hadoop.mapreduce.Mapper;
import org.apache.hadoop.mapreduce.Reducer;
import org.apache.hadoop.mapreduce.lib.input.FileInputFormat;
import org.apache.hadoop.mapreduce.lib.output.FileOutputFormat;
import org.apache.hadoop.mapreduce.lib.output.TextOutputFormat;

public class TopKApp {


    // 定义输入路径和输出路径
    private static final String INPUT_PATH = "hdfs:/xxx/topk_input";
    private static final String OUTPUT_PATH = "hdfs://xxx/topk_output";

    public static void main(String[] args) throws Exception {


        Configuration conf = new Configuration();
        FileSystem fileSystem = FileSystem.get(conf);
        Path outputPath = new Path(OUTPUT_PATH);
        // 如果输出路径已经存在,则先删除
        if (fileSystem.exists(outputPath)) {


            fileSystem.delete(outputPath, true);
        }

        // 创建一个MapReduce任务,并设置相关的配置信息
        Job job = Job.getInstance(conf, "TopKApp");
        job.setJarByClass(TopKApp.class);
        // 设置Mapper和Reducer的类
        job.setMapperClass(TopKMapper.class);
        job.setReducerClass(TopKReducer.class);
        // 设置Mapper的输出类型
        job.setMapOutputKeyClass(NullWritable.class);
        job.setMapOutputValueClass(Text.class);
        // 设置Reducer的输出类型
        job.setOutputKeyClass(NullWritable.class);
        job.setOutputValueClass(Text.class);
        // 设置输出文件格式
        job.setOutputFormatClass(TextOutputFormat.class);
        // 设置输入和输出路径
        FileInputFormat.setInputPaths(job, new Path(INPUT_PATH));
        FileOutputFormat.setOutputPath(job, outputPath);

        // 等待任务完成
        boolean result = job.waitForCompletion(true);
        System.exit(result ? 0 : 1);
    }
}