
Be diligent and encourage the years to wait for no one
C/C++ game development
Hello, Mina-san, this is Jun Xi_, today we will talk about the leading two-way circular linked list following the single linked list last time. This kind of linked list is also one of the most commonly used linked lists in our practical applications. Learn this kind Linked list is very important, I will try my best to use easy-to-understand words and logic diagrams to help better understand.
Okay, let's not talk nonsense, let's start today's study! —
Take the lead in doubly linked list
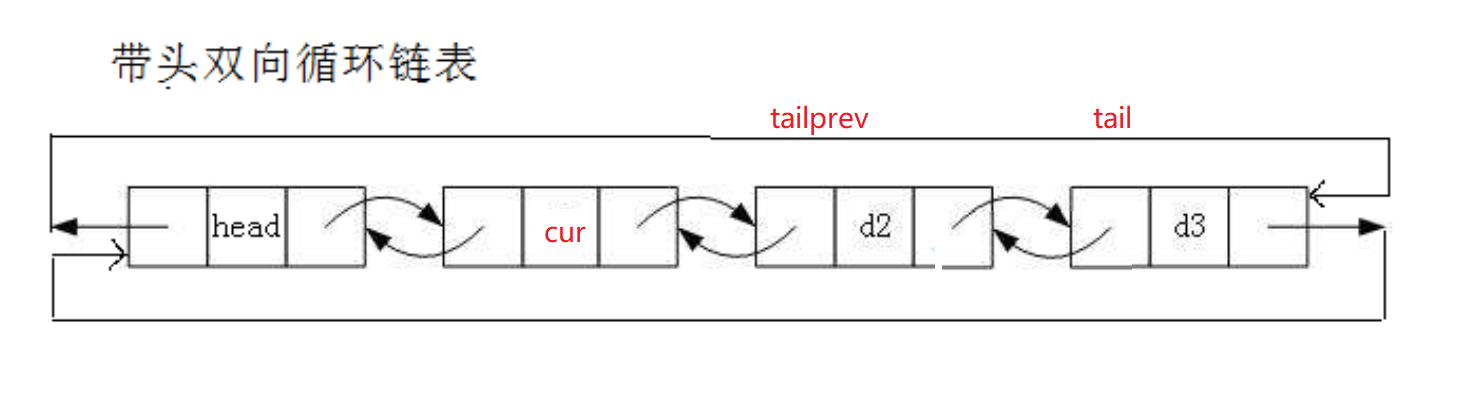
- The following is the logic diagram of the leading two-way circular linked list
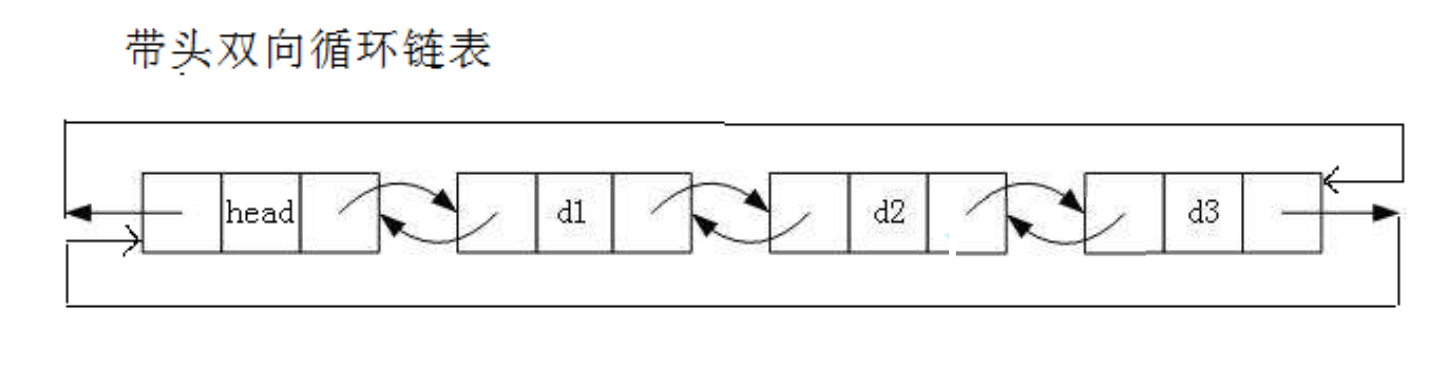
1. Different from the characteristics of singly linked list
- 1. Two-way: Two-way means that in the structure of the leading two-way circular linked list, there are two pointers to link the linked list, one of which points to the previous node, and the other pointer points to the next node.
- 2. Loop: The tail node of the singly linked list points to NULL, while the tail node of the bidirectional circular linked list points to the head node head, and the pointer to the previous node in the head points to the tail node (I don’t understand Combined with the picture to see)
- 3. Take the lead: take the lead means that there is a sentinel bit in the two-way circular linked list as the head of the linked list (don’t worry here, just know that there is this thing, and the explanation will be focused on below)
2. Elements stored in a node
typedef int LTDataType;
typedef struct ListNode
{


	LTDataType data;//链表中存的值
	struct ListNode* next;//指向下一个结点的指针
	struct ListNode* prev;//指向上一个结点的指针
}ListNode;
3. Initialize the linked list function BuyListNode
//初始化双链表,创建节点
ListNode* BuyListNode(LTDataType x)
{


    ListNode* newnode = (ListNode*)malloc(sizeof(ListNode));//malooc开辟一个结点的空间
    if (newnode == NULL)//判断一下是否开辟空间成功
    {


        perror("malloc failed\n");
        exit(-1);
    }
    //初始化时把两个指针都置空
    newnode->next = NULL;
    newnode->prev = NULL;
    newnode->data = x;
    return newnode;//返回创建好的链表节点
}
- This step is relatively simple. Look at the comments and believe that the code is very easy to understand, so I don’t need to explain too much.
4. Create the head node ListCreate of the linked list
// 创建返回链表的头结点.
ListNode* ListCreate()
{


    ListNode* phead = BuyListNode(0);//开辟结点所需动态空间
    phead->next = phead;
    phead->prev = phead;
    return phead;

}
- We just introduced that the head of the linked list has a sentinel bit. When the sentry bit has no nodes in the linked list, the head pointer and tail pointer in it both point to itself. So what is the significance of the sentinel bit?
What is a sentinel bit and the significance of the existence of a sentinel bit
- A sentinel bit is a special value or node used in a data structure to simplify the implementation of an algorithm and increase its efficiency. In the search operation, the sentinel position can be preset at an appropriate position to avoid the situation that the boundary is crossed and cannot be found. For example, in a linked list, the sentinel bit is used to locate the position of the linked list, even an empty linked list will have a sentinel bit. In insertion sort, the sentinel bit is used to assist the circular processing of moving data, it can store the data that needs to be moved, and will not be overwritten by subsequent operations. By using the sentinel bit, the implementation of the algorithm can be simplified, the number of boundary judgments can be reduced, and the execution efficiency of the program can be improved.
- Specifically speaking, what is the meaning in our linked list?
- When we use the linked list, if there is no sentinel bit, in order to prevent out-of-bounds access and empty linked list, we have to perform a null operation every time we use the linked list, which will greatly affect the efficiency of program operation. And when there is this sentinel bit, when this is an empty linked list, the phead at this time is a node pointing to itself, which will not cause errors, and when there is a node in the linked list, it is a node pointing to the head node , and it is also convenient for our loop, we can directly point the next of the tail node to this phead.
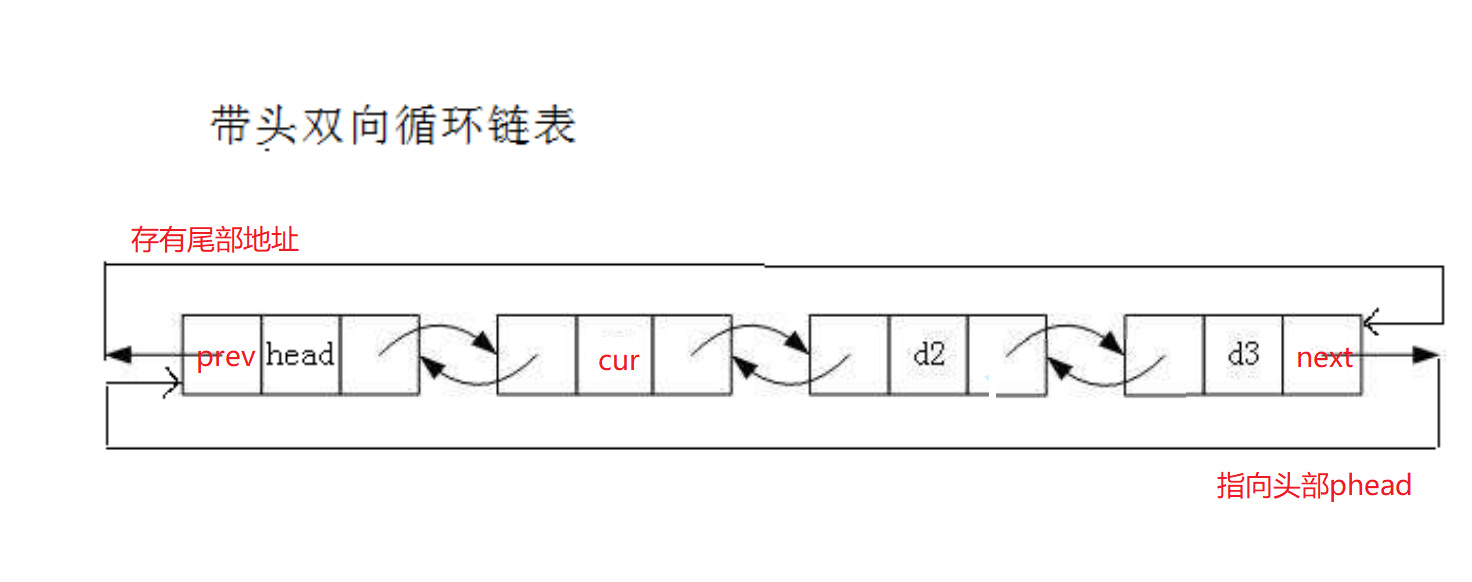
5. The function ListPrint that prints the linked list
// 双向链表打印
void ListPrint(ListNode* phead)
{


    assert(phead);//断言,判断是否有结点,
    printf("Phead");//没有其他结点,打印phead
    ListNode* cur = phead->next;
    while (cur!= phead)
    {


        printf(" <==> %d", cur->data);
        cur = cur->next;

    }
    printf("\n");
}
- It is basically the same as the printing of the previous single-linked list, but because we are a circular linked list, the tail of the linked list no longer points to NULL. We just said that the next of the tail of the linked list points to phead, so when we traverse the linked list, when the linked list is equal to phead again It means that the linked list has been traversed once, which is the condition for the loop to stop when we traverse
6. The function ListDestory that destroys the linked list
// 双向链表销毁
void ListDestory(ListNode* phead)
{


    assert(phead);

    ListNode* cur = phead->next;
    while (cur!=phead)
    {


        ListNode* next = cur->next;
        free(cur);
        cur = next;
    }
    free(phead);


}
- We traverse the entire linked list and release each node. The loop condition for traversing the linked list is the same as that for printing the linked list above.
- Well, after talking about the above basic interfaces, the next step is the highlight, how do we insert nodes into our linked list?
7. Head insertion and head deletion of linked list
- In fact, regarding the insertion and deletion, if you can understand the insertion and deletion of the previous singly linked list, the logic of this piece is actually very easy to understand.
plug
// 双向链表头插
void ListPushFront(ListNode* phead, LTDataType x)
{


    assert(phead);//断言,

    ListNode* frist = BuyListNode(x);//创建节点
    ListNode* cur = phead->next;
    frist->next = cur;
    frist->prev = phead;
    cur->prev = frist;
    phead->next = frist;

}
- Let's first look at the goal we want to achieve here through the picture
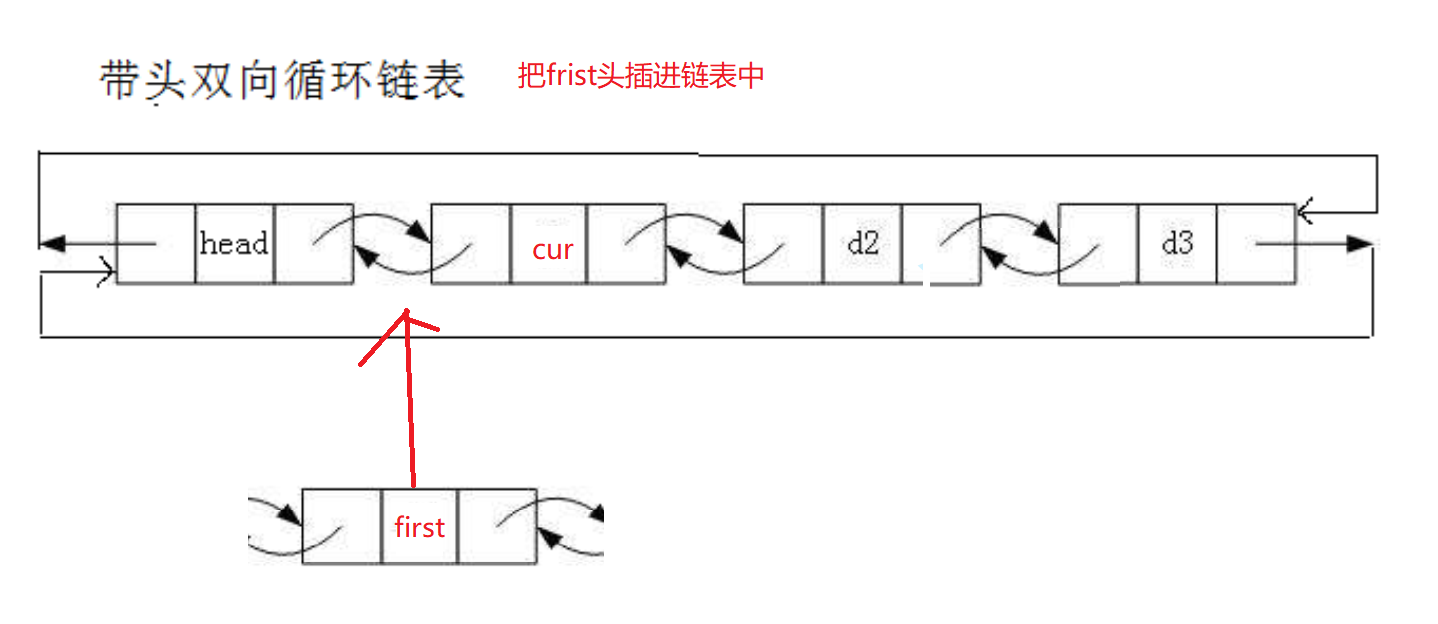
首先,我们需要保存一下第一个位置的地址,也就是图中的cur,然后我们让first的next指向此时的cur,first的prev指向头head,这样就建立起了结点间的联系

但是由于我们需要链表是一个双头链表,我们此时还需要让head的next指向插入的first,cur的prev也指向first这样才算真正完成我们的头插

head delete
// 双向链表头删
void ListPopFront(ListNode* phead)
{


    assert(phead);
    ListNode* frist = phead->next;

    phead->next = frist->next;
    frist->next->prev = phead;
    free(frist);
}
- Let the next of phead point to the next node of first, let the prev of the next node of first point to phead, release the free at this time, and delete the head
- Similar to the head plug, you can just look at the logic diagram above in reverse, so you don't waste space on drawing diagrams.
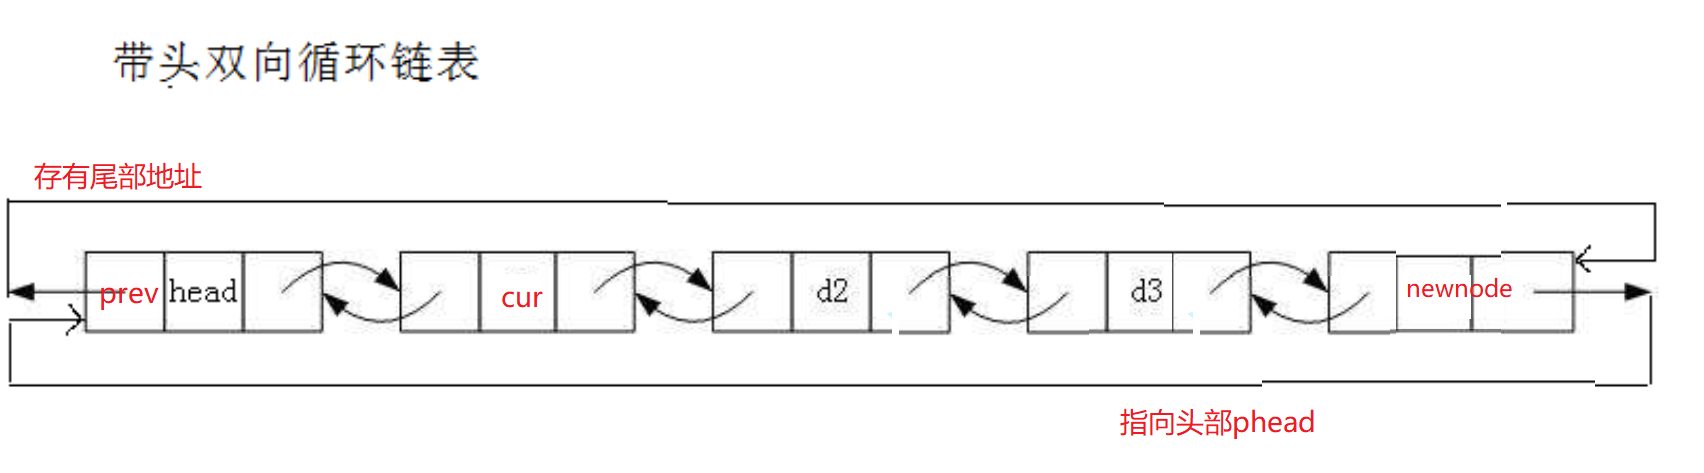
8. Tail insertion and deletion of linked list
tail plug
// 双向链表尾插
void ListPushBack(ListNode* phead, LTDataType x)
{


    assert(phead);
    assert(phead->prev);
    ListNode* newnode = BuyListNode(x);
    //ListInsert(phead, x);
    ListNode* tail = phead->prev;//起初的尾
    newnode->next = phead;//插入的结点指向头
    tail->next = newnode;//之前的尾指向现在的尾
    newnode->prev = tail;
    tail = newnode;

}
不同于单链表的是,由于我们的链表是循环链表,其实尾部的结点就保存在phead的prev中,因此不再需要遍历就能轻易的找到我们的尾部
此时,就比较简单啦,我们让现在的尾(d3)的next指向插入的newnode,让newnode的prev指向d3,next指向phead,再让phead的prev指向插入的newnode,即可完成尾插
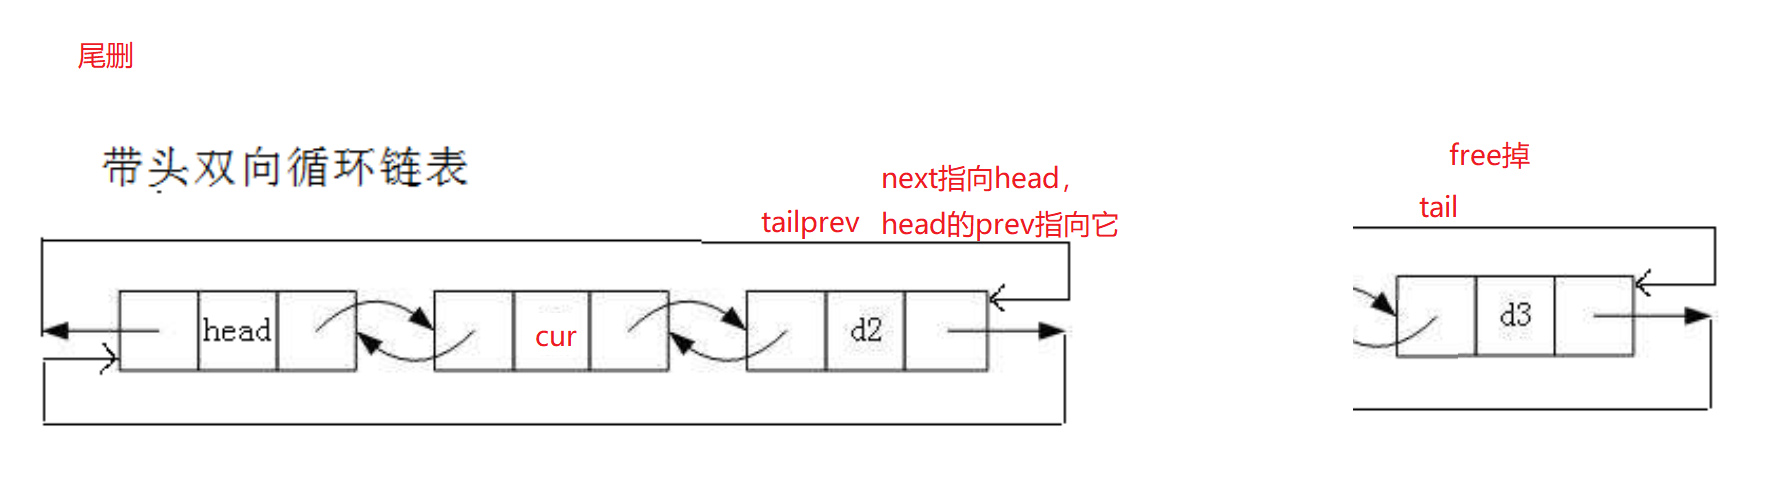
tail delete
// 双向链表尾删
void ListPopBack(ListNode* phead)
{


    assert(phead);
    assert(phead->prev);
    ListNode* tail = phead->prev;
    ListNode* tailprev = phead->prev->prev;
    tailprev->next = phead;
    tail = tailprev;
    free(phead->prev);
   // ListErase(phead->prev);

}
- Tail deletion requires us to find the previous node of the current tail, turn it into the current tail, and finally free the current tail.
9. The function ListFind to find out whether a value is in the linked list
// 双向链表查找
ListNode* ListFind(ListNode* phead, LTDataType x)
{


    assert(phead);

    ListNode* cur = phead;
    while (cur->next != phead)
    {


        if (cur->data == x)
        	return cur;

        else
         cur = cur->next;
    }

    return NULL;
}
- This is also very simple. We compare the value stored in the node with the value we need to find by traversing the linked list. If found, return the address of the current node position, and return NULL if not found.
10. The function ListInsert that modifies the value of the previous position of pos
- Here, let’s briefly mention the function of modifying the value of the pos position. It is very simple, so there is no need to waste space. After we find it through the above ListFind, we can directly modify the data at this position to the x we need.
cur->data=x;
- Into the title
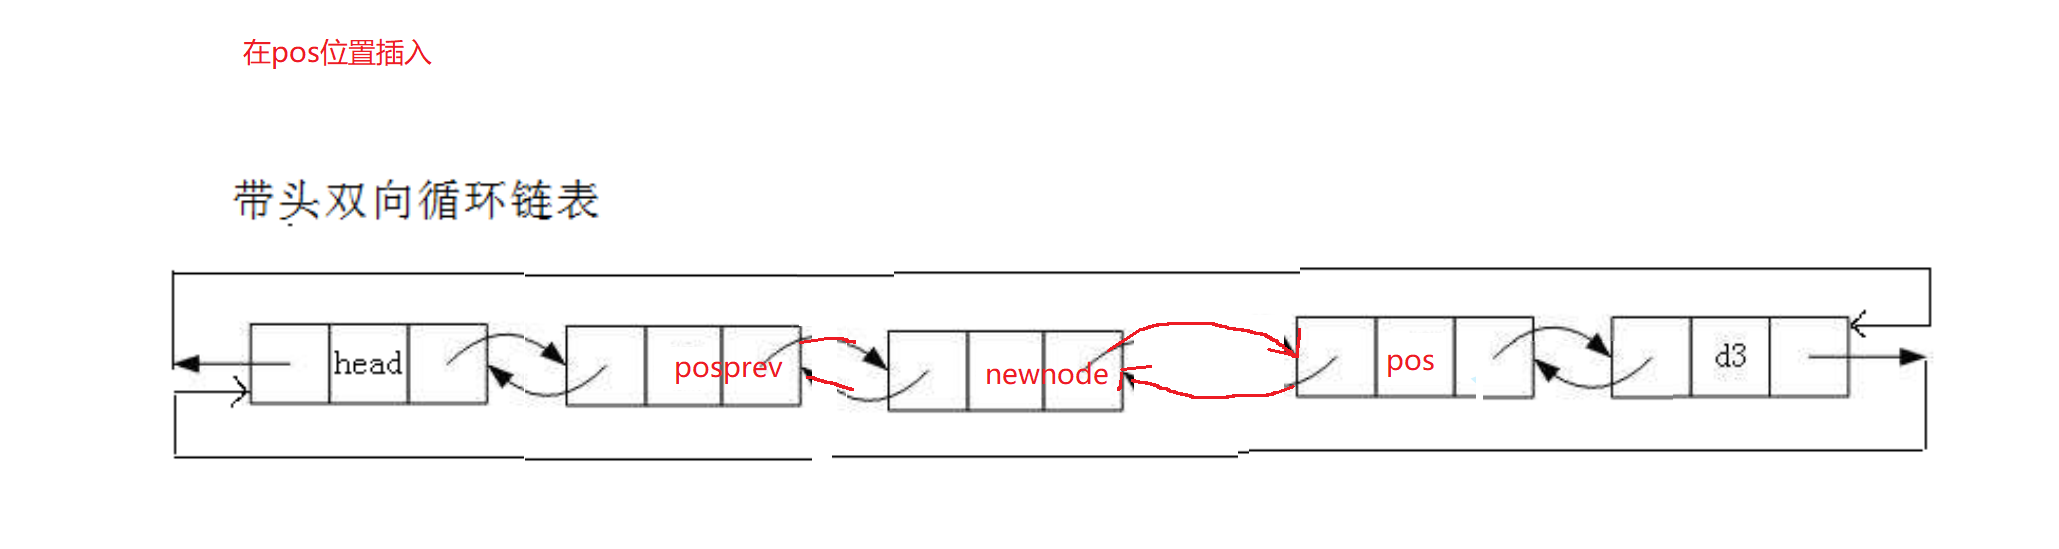
// 双向链表在pos的前面进行插入
void ListInsert(ListNode* pos, LTDataType x)
{


    ListNode* newnode = BuyListNode(x);//创建结点
    ListNode* posPrev = pos->prev;
    newnode->next = posPrev->next;
    posPrev->next = newnode;
    pos->prev = newnode;
    newnode->prev = posPrev;


}
- The pos position here is found by our lookup function above.
- After finding it, it is very simple. We point the next of the node posprev before the position of pos to newnode, let the prev of newnode point to posprev, then let the next of newnode point to pos, and finally the prev of pos points to the inserted newnode.

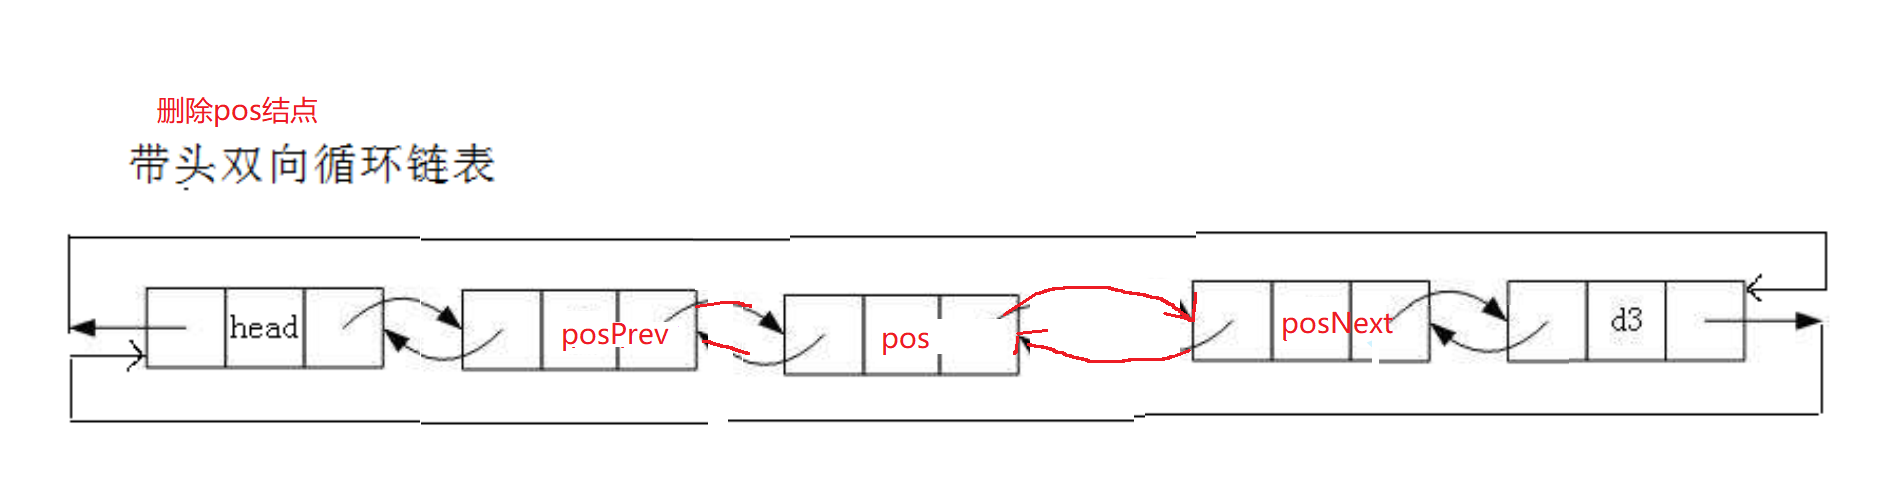
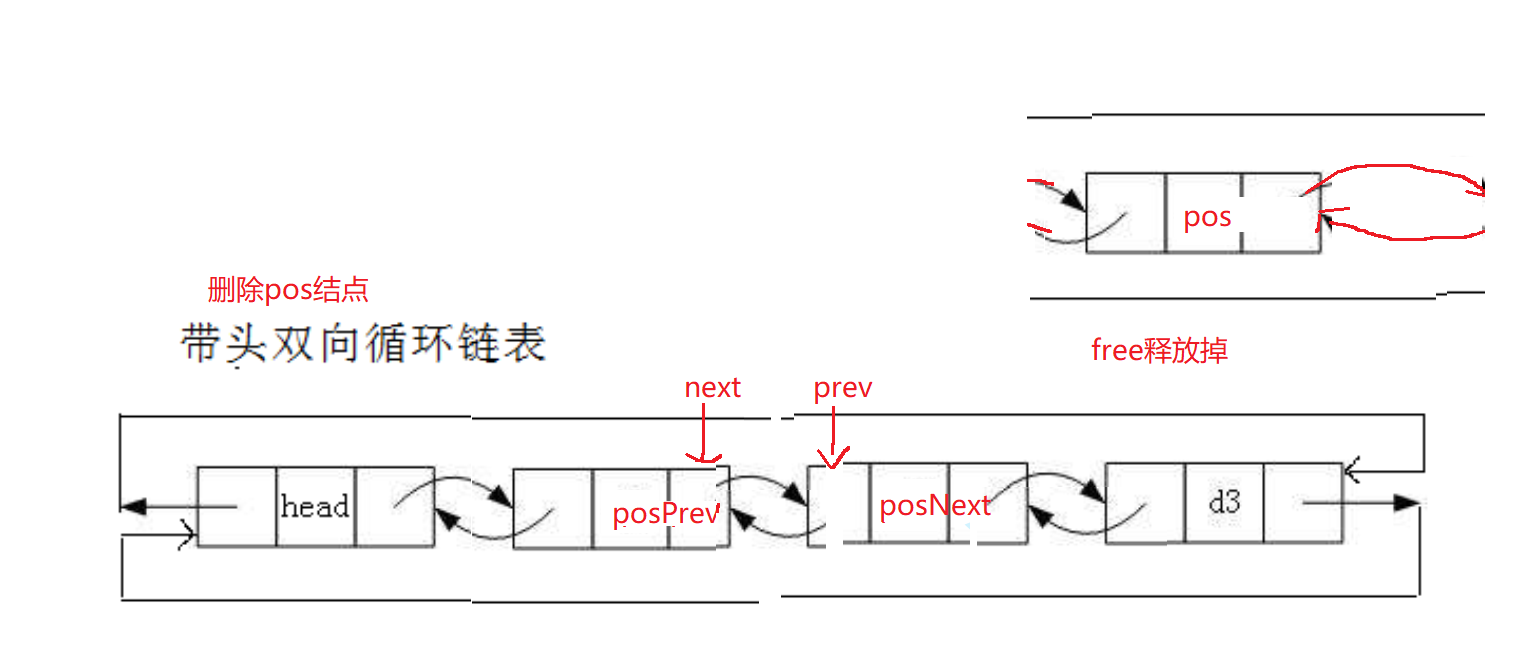
11. Delete the node ListErase at position pos
// 双向链表删除pos位置的节点
void ListErase(ListNode* pos)
{


    assert(pos);
    ListNode* posPrev = pos->prev;
    ListNode* posNext = pos->next;
    posPrev->next = posNext;
    posNext->prev = posPrev;

    free(pos);
    //pos = NULL;
}
- This is also very easy to understand, we just let the node posPrev at the previous position of pos point to the node posNext at the position after pos.
- The last small detail optimization, when you are in a limited time such as an interview or a written test, you are required to complete a leading two-way circular linked list. You can also write like this for the head plug deletion, tail plug tail deletion, just refer to the above These two functions can
//头插与头删
ListInsert(phead->next, x);
ListErase(phead->next);
//尾插与尾删
ListInsert(phead, x);
ListErase(phead->prev);
- think about why
- In fact, our head-plug deletion and tail-plug deletion are nothing more than operations on special pos positions, so we can naturally refer to the above two functions.
Summarize
- This is the end of today's content. Taking the lead in bidirectional circular linked list may not be so easy to understand. If you really want to understand it in depth, you must try to knock it out with the logic diagram. It is impossible to learn it without practicing. oh! !
- Well, if you have any questions, please ask me in the comment area or private message, see you next time!
It is not easy for a new blogger to create. If you feel that the content of the article is helpful to you, you may wish to click on this new blogger before leaving. Your support is my motivation to update! ! !
**(Ke Li asks you to support the blogger three times in a row!!! Click the comment below to like and collect to help Ke Li)**