Table of contents
1. Create CephFS file system MDS interface
1.1 Server operation
1) Create mds service on the management node
cd /etc/ceph
ceph-deploy mds create node01 node02 node03

2) View the mds service of each node
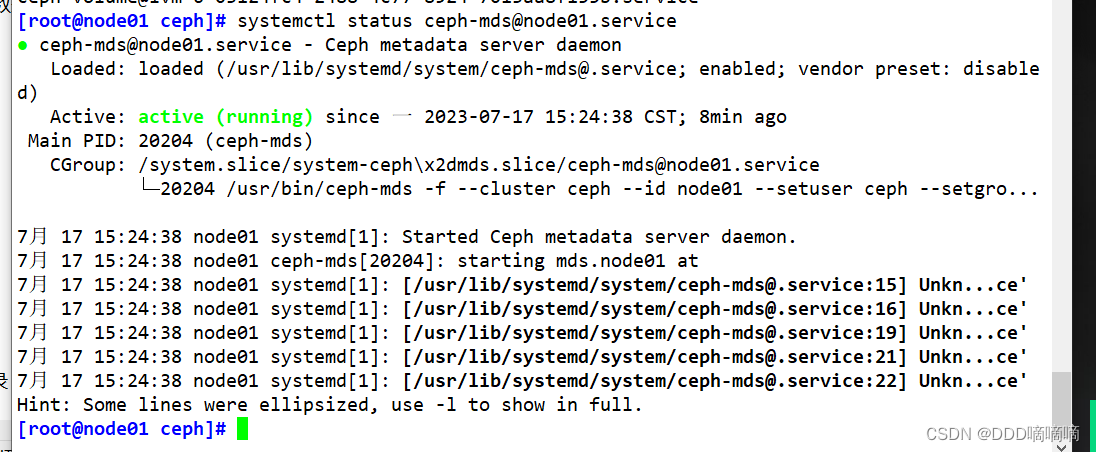
ssh root@node01 systemctl status ceph-mds@node01
ssh root@node02 systemctl status ceph-mds@node02
ssh root@node03 systemctl status ceph-mds@node03
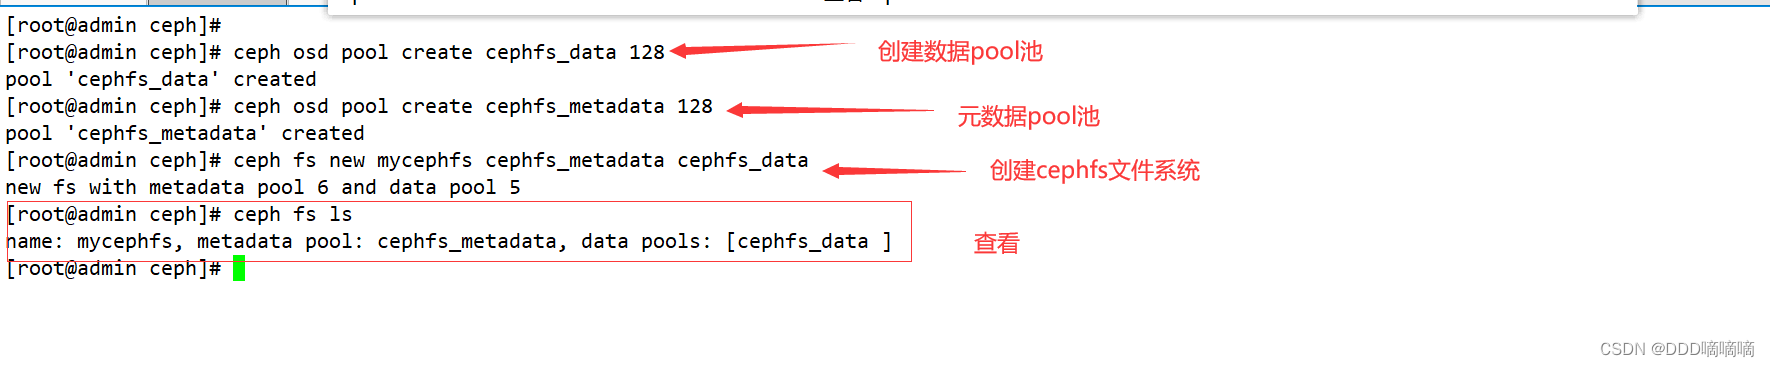
3) Create a storage pool and enable the ceph file system
- The ceph file system requires at least two rados pools, one for data and one for metadata. At this time, the data pool is similar to the shared directory of the file system.
ceph osd pool create cephfs_data 128					#创建数据Pool


ceph osd pool create cephfs_metadata 128				#创建元数据Pool

#创建 cephfs,命令格式:ceph fs new <FS_NAME> <CEPHFS_METADATA_NAME> <CEPHFS_DATA_NAME>
ceph fs new mycephfs cephfs_metadata cephfs_data		#启用ceph,元数据Pool在前,数据Pool在后

ceph fs ls					#查看cephfs
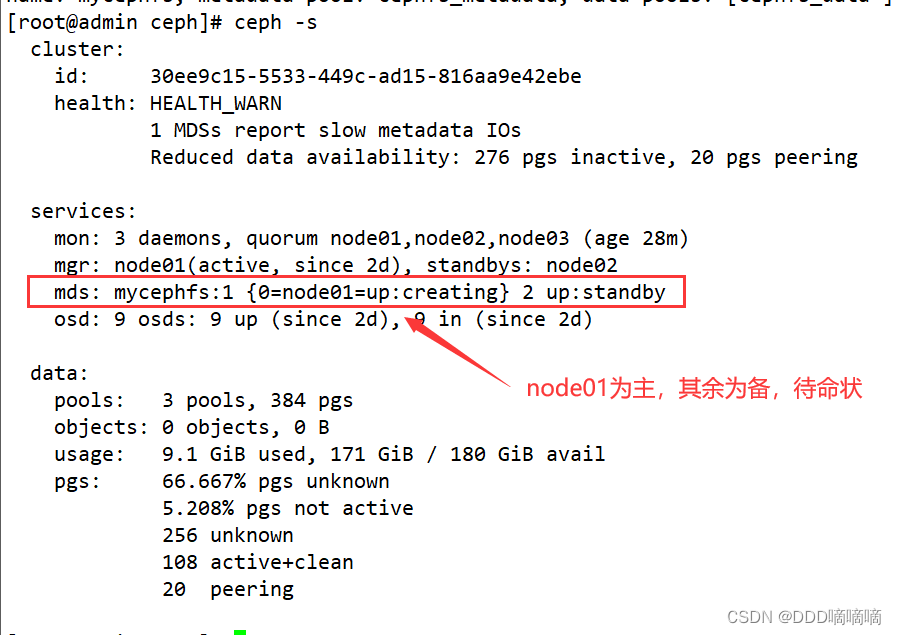
4) Check the mds status, one is up, and the other two are on standby. The current work is the mds service on node01
ceph -s
mds: mycephfs:1 {

    0=node01=up:active} 2 up:standby

ceph mds stat
mycephfs:1 {

    0=node01=up:active} 2 up:standby
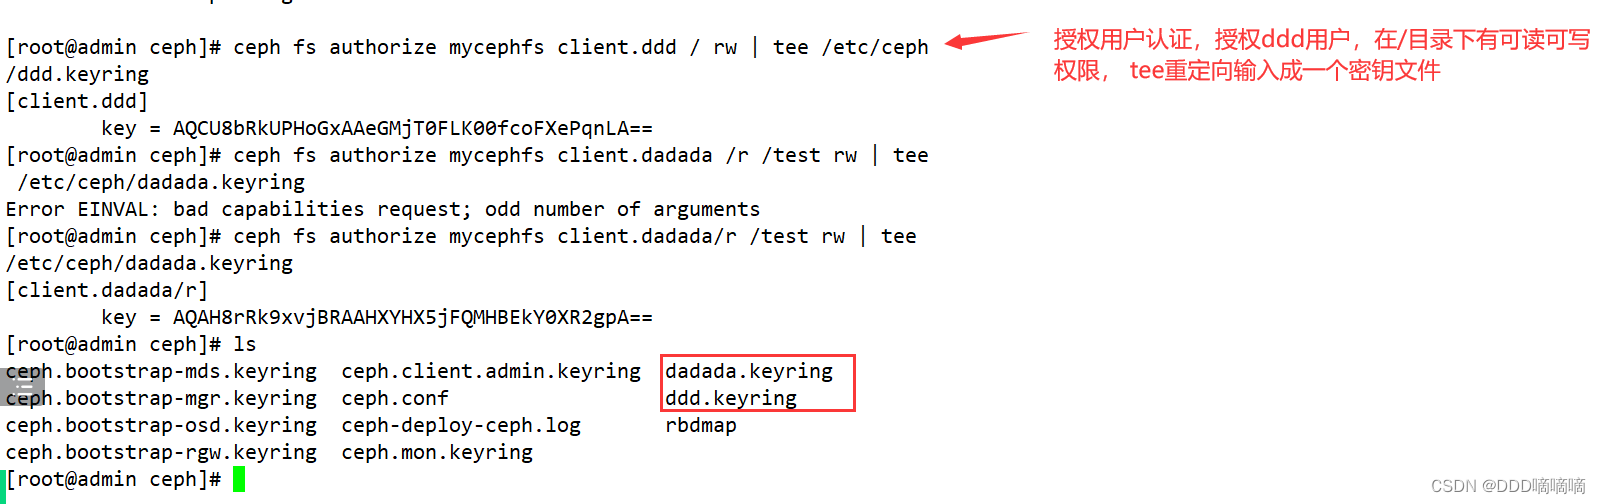
5) Create user
语法格式:ceph fs authorize  <fs_name>  client.<client_id>  <path-in-cephfs>  rw

#账户为 client.zhangsan,用户 name 为 zhangsan,zhangsan 对ceph文件系统的 / 根目录(注意不是操作系统的根目录)有读写权限
ceph fs authorize mycephfs client.zhangsan / rw | tee /etc/ceph/zhangsan.keyring


# 账户为 client.lisi,用户 name 为 lisi,lisi 对文件系统的 / 根目录只有读权限,对文件系统的根目录的子目录 /test 有读写权限
ceph fs authorize mycephfs client.lisi / r /test rw | tee /etc/ceph/lisi.keyring
1.2 Client operation
1) The client must be in the public network
2) Create a working directory on the client
mkdir /etc/ceph
3) Copy the ceph configuration file ceph.conf and the account keyring files zhangsan.keyring and lisi.keyring to the client on the ceph management node
scp ceph.conf zhangsan.keyring lisi.keyring root@client:/etc/ceph

4) Install the ceph package on the client
cd /opt
wget https://download.ceph.com/rpm-nautilus/el7/noarch/ceph-release-1-1.el7.noarch.rpm --no-check-certificate
rpm -ivh ceph-release-1-1.el7.noarch.rpm
yum install -y ceph
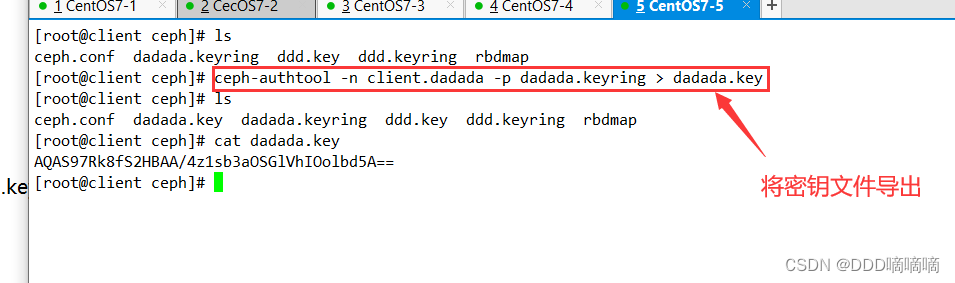
5) Create a key file on the client side
cd /etc/ceph
ceph-authtool -n client.zhangsan -p zhangsan.keyring > zhangsan.key			#把 zhangsan 用户的秘钥导出到 zhangsan.keyl
ceph-authtool -n client.lisi -p lisi.keyring > lisi.key						#把 lisi 用户的秘钥导出到 lisi.key
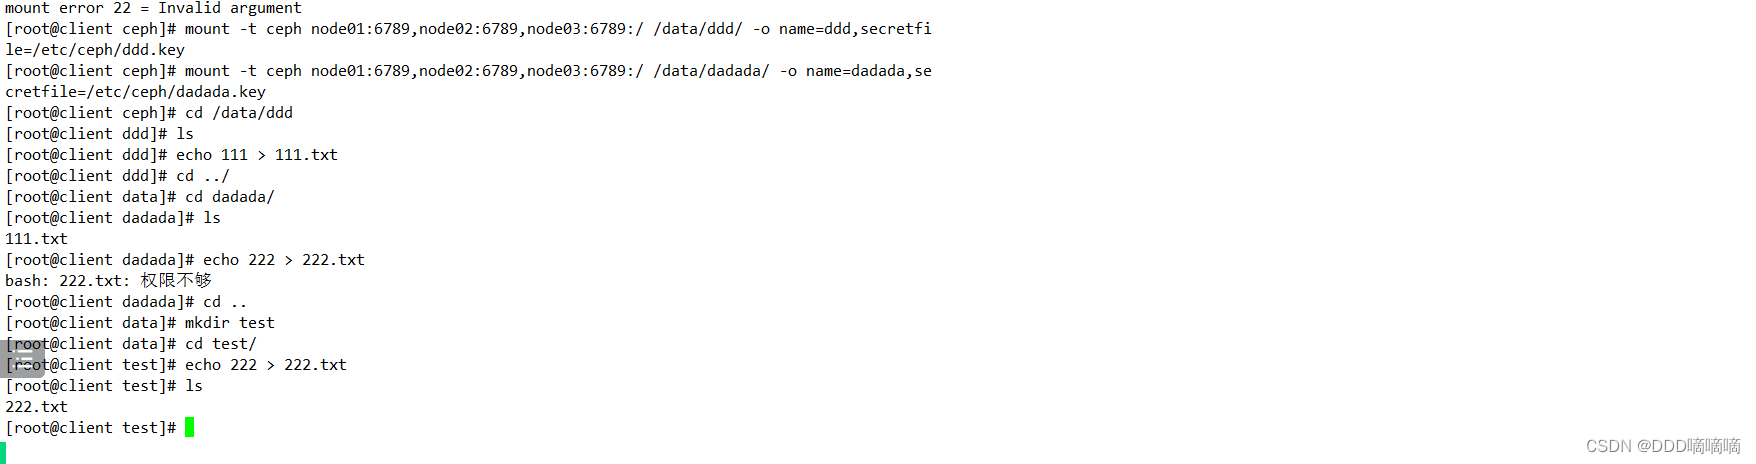
6) Client mount
Method 1: Based on the kernel
#语法格式:
mount -t ceph node01:6789,node02:6789,node03:6789:/  <本地挂载点目录>  -o name=<用户名>,secret=<秘钥>
mount -t ceph node01:6789,node02:6789,node03:6789:/  <本地挂载点目录>  -o name=<用户名>,secretfile=<秘钥文件>

#示例一:
mkdir -p /data/zhangsan
mount -t ceph node01:6789,node02:6789,node03:6789:/ /data/zhangsan -o name=zhangsan,secretfile=/etc/ceph/zhangsan.key

#示例二:
mkdir -p /data/lisi
mount -t ceph node01:6789,node02:6789,node03:6789:/ /data/lisi -o name=lisi,secretfile=/etc/ceph/lisi.key

#验证用户权限
cd /data/lisi
echo 123 > 2.txt
-bash:2.txt:权限不够

echo 123 > test/2.txt
cat test/2.txt
123

#示例三:
#停掉 node02 上的 mds 服务
ssh root@node02 "systemctl stop ceph-mds@node02"

ceph -s

#测试客户端的挂载点仍然是可以用的,如果停掉所有的 mds,客户端就不能用了
Method 2: Based on the fuse tool
#1)在 ceph 的管理节点给客户端拷贝 ceph 的配置文件 ceph.conf 和账号的秘钥环文件 zhangsan.keyring、lisi.keyring
scp ceph.client.admin.keyring root@client:/etc/ceph

#2)在客户端安装 ceph-fuse
yum install -y ceph-fuse

#3)客户端挂载
cd /data/aa
ceph-fuse -m node01:6789,node02:6789,node03:6789 /data/aa [-o nonempty]			#挂载时,如果挂载点不为空会挂载失败,指定 -o nonempty 可以忽略
2. Create Ceph block storage system RBD interface
2.1. Create a storage pool named rbd-demo dedicated to RBD
ceph osd pool create rbd-demo 64 64
2.2. Convert the storage pool to RBD mode
ceph osd pool application enable rbd-demo rbd
2.3. Initialize the storage pool
rbd pool init -p rbd-demo # -p 等同于 --pool
2.4. Create a mirror image
rbd create -p rbd-demo --image rbd-demo1.img --size 10G

可简写为:
rbd create rbd-demo/rbd-demo2.img --size 10G

2.5. Mirror image management
View which mirrors exist under the storage pool
rbd ls -l -p rbd-demo

View mirror details
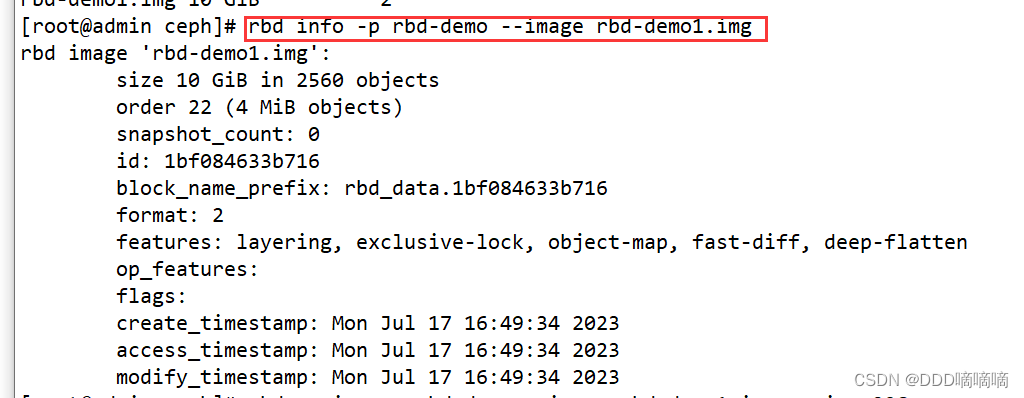
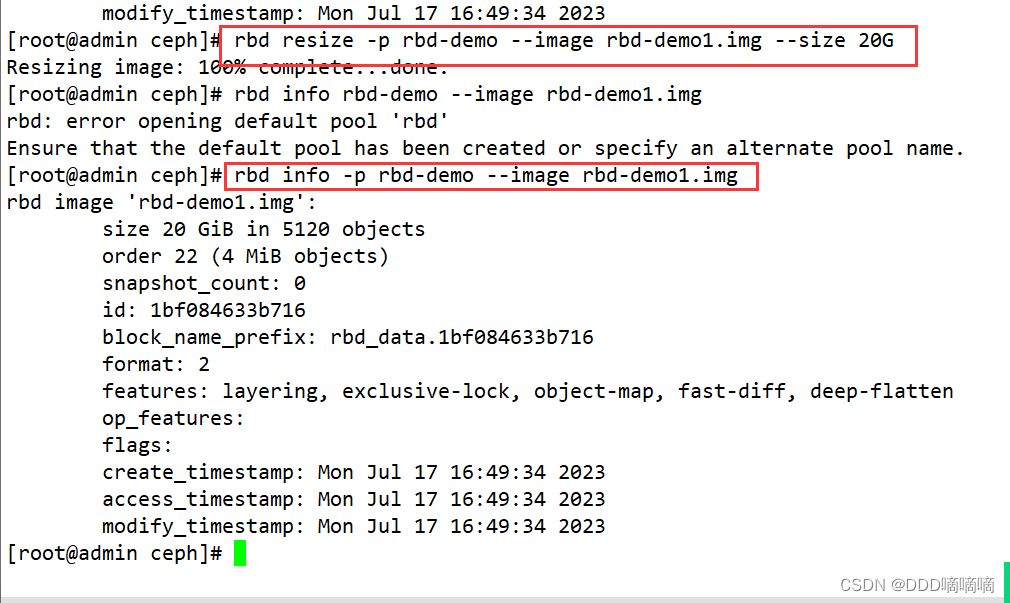
rbd info -p rbd-demo --image rbd-demo1.img
rbd image 'rbd-demo.img':
	size 10 GiB in 2560 objects							#镜像的大小与被分割成的条带数
	order 22 (4 MiB objects)							#条带的编号,有效范围是12到25,对应4K到32M,而22代表2的22次方,这样刚好是4M
	snapshot_count: 0
	id: 5fc98fe1f304									#镜像的ID标识
	block_name_prefix: rbd_data.5fc98fe1f304			#名称前缀
	format: 2											#使用的镜像格式,默认为2
	features: layering, exclusive-lock, object-map, fast-diff, deep-flatten			#当前镜像的功能特性
	op_features: 																	#可选的功能特性
	flags:
Modify image size
rbd resize -p rbd-demo --image rbd-demo1.img --size 20G

rbd info -p rbd-demo --image rbd-demo1.img

#使用 resize 调整镜像大小,一般建议只增不减,如果是减少的话需要加选项 --allow-shrink
rbd resize -p rbd-demo --image rbd-demo1.img --size 5G --allow-shrink
delete mirror
#直接删除镜像
rbd rm -p rbd-demo --image rbd-demo2.img
rbd remove rbd-demo/rbd-demo2.img

#推荐使用 trash 命令,这个命令删除是将镜像移动至回收站,如果想找回还可以恢复
rbd trash move rbd-demo/rbd-demo1.img

rbd ls -l -p rbd-demo

rbd trash list -p rbd-demo
5fc98fe1f304 rbd-demo1.img

#还原镜像
rbd trash restore rbd-demo/5fc98fe1f304

rbd ls -l -p rbd-demo


2.6, Linux client use
-
There are two ways for the client to use RBD:
● Map the image to the local block device of the system through the kernel module KRBD, usually the setting file is: /dev/rbd* ● The
other is through the librbd interface, usually the KVM virtual machine uses this kind of interface. -
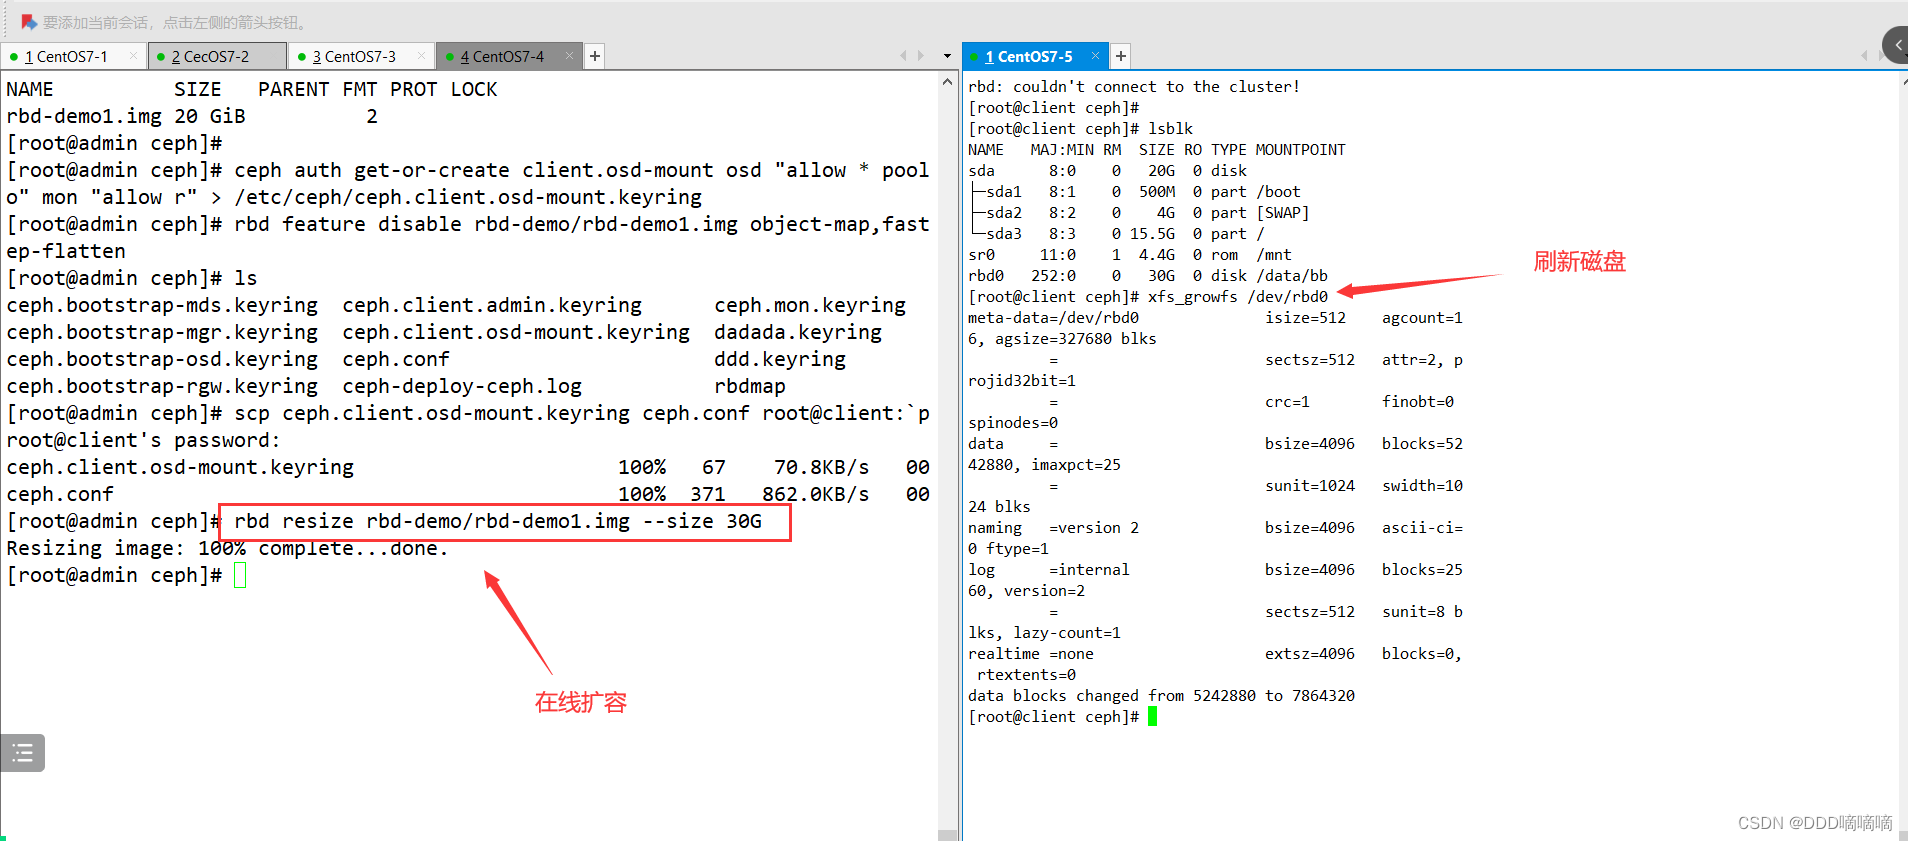
This example mainly uses the Linux client to mount the RBD image as a local disk. Before starting, you need to install the ceph-common package on the required client nodes, because the client needs to call the rbd command to map the RBD image to the local as a common hard disk. And also need to copy the ceph.conf configuration file and authorization keyring file to the corresponding node.
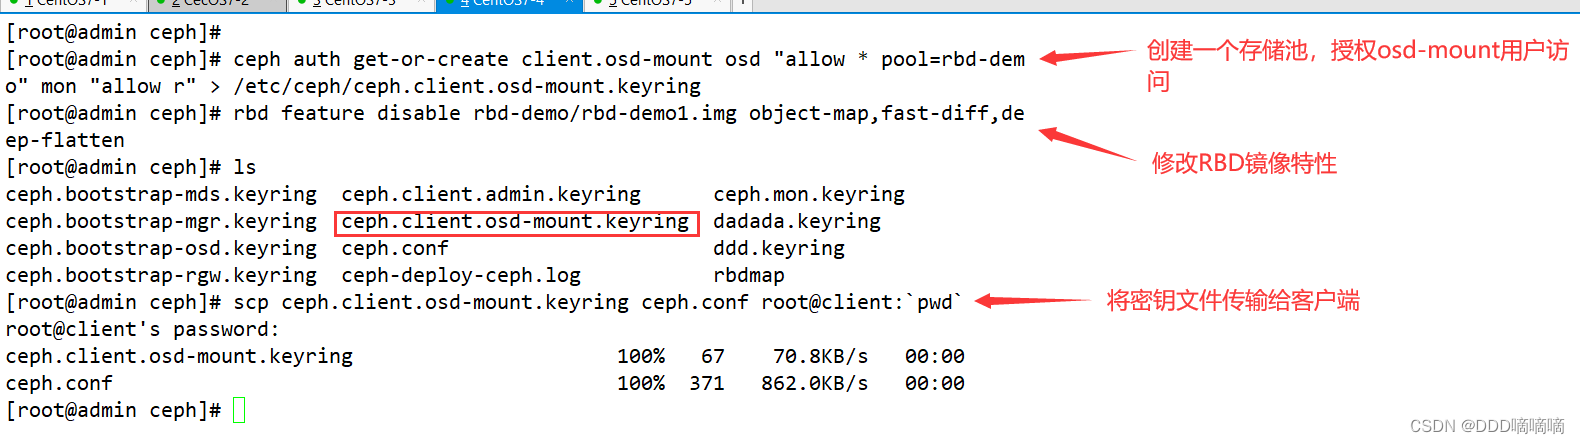
Create and authorize a user to access the specified RBD storage pool on the management node
#示例,指定用户标识为client.osd-mount,对另对OSD有所有的权限,对Mon有只读的权限
ceph auth get-or-create client.osd-mount osd "allow * pool=rbd-demo" mon "allow r" > /etc/ceph/ceph.client.osd-mount.keyring


#修改RBD镜像特性,CentOS7默认情况下只支持layering和striping特性,需要将其它的特性关闭
rbd feature disable rbd-demo/rbd-demo1.img object-map,fast-diff,deep-flatten

#将用户的keyring文件和ceph.conf文件发送到客户端的/etc/ceph目录下**
cd /etc/ceph
scp ceph.client.osd-mount.keyring ceph.conf root@client:/etc/ceph
Linux client operation
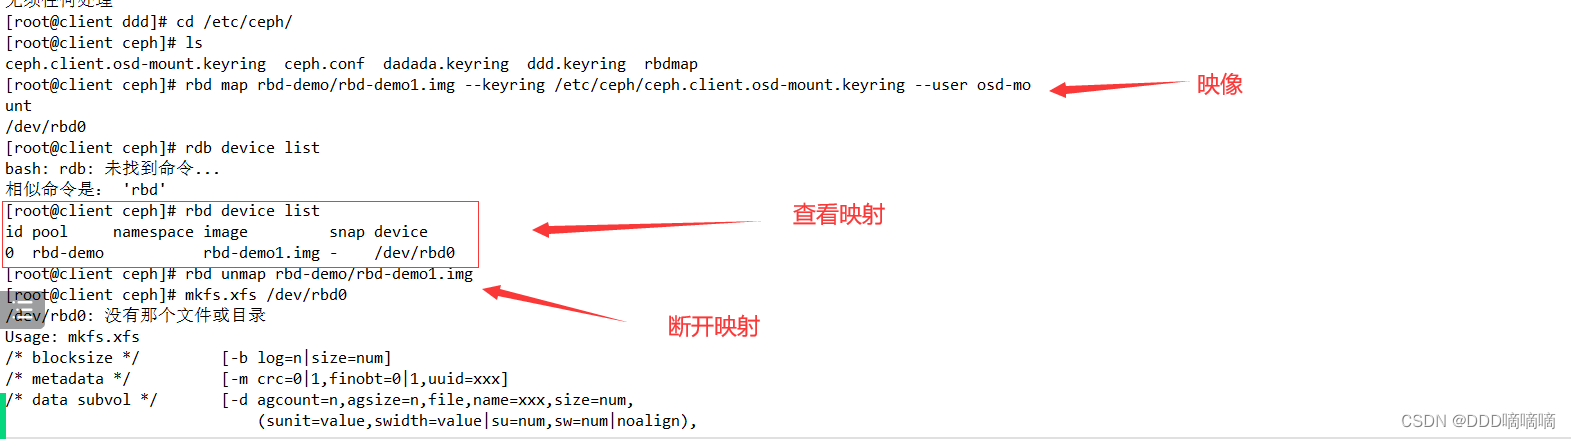
#安装 ceph-common 软件包
yum install -y ceph-common
#执行客户端映射
cd /etc/ceph
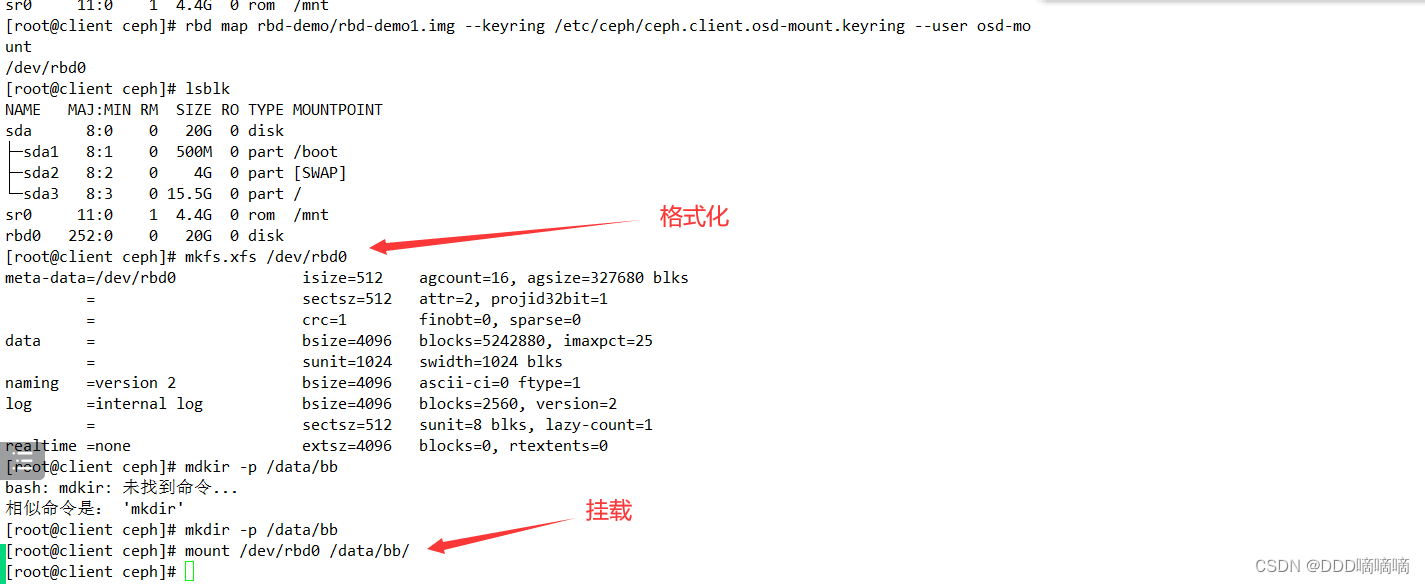
rbd map rbd-demo/rbd-demo1.img --keyring /etc/ceph/ceph.client.osd-mount.keyring --user osd-mount
#查看映射
rbd showmapped
rbd device list
#断开映射
rbd unmap rbd-demo/rbd-demo1.img
#格式化并挂载
mkfs.xfs /dev/rbd0
mkdir -p /data/bb
mount /dev/rbd0 /data/bb
#在线扩容
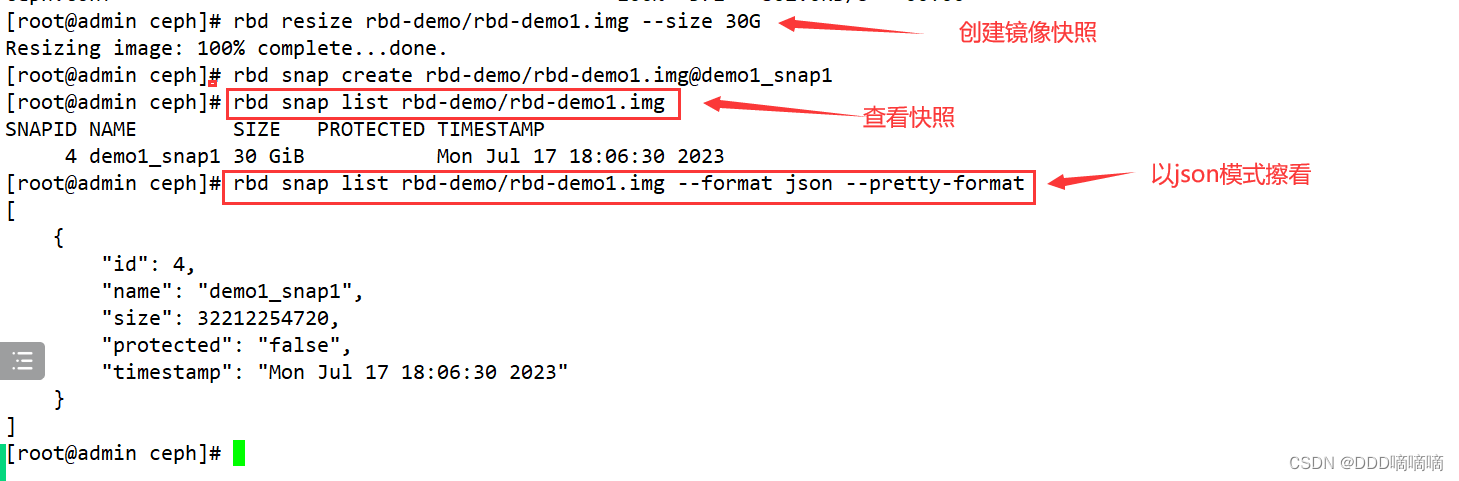
在管理节点调整镜像的大小
rbd resize rbd-demo/rbd-demo1.img --size 30G
在客户端刷新设备文件
xfs_growfs /dev/rbd0 #刷新xfs文件系统容量
resize2fs /dev/rbd0 #刷新ext4类型文件系统容量
2.7. Snapshot management
- Taking a snapshot of the rbd mirror can preserve the status history of the mirror, and can also use the layering technology of the snapshot to clone the snapshot into a new mirror.
write file on client side
echo 1111 > /data/bb/11.txt
echo 2222 > /data/bb/22.txt
echo 3333 > /data/bb/33.txt
Create a snapshot of the image on the management node
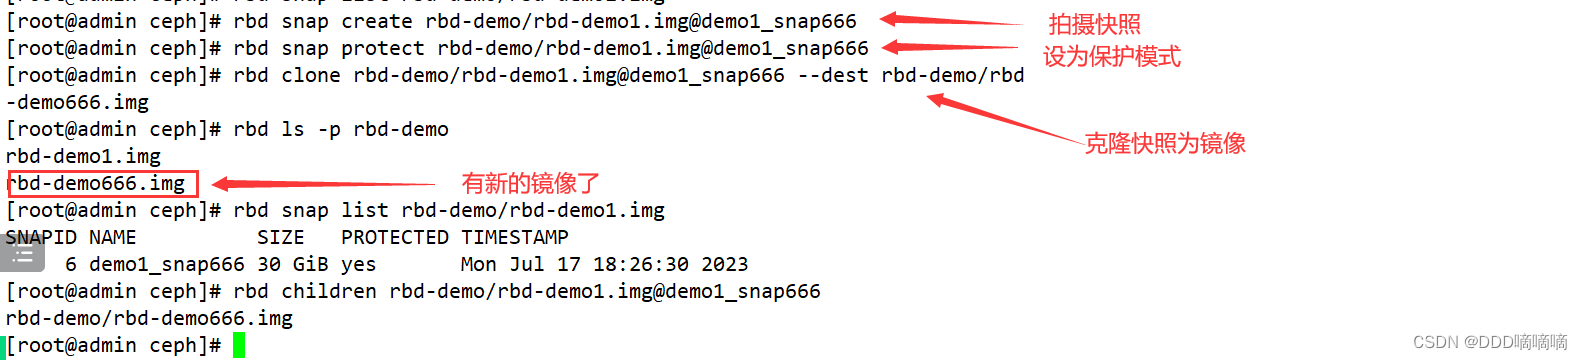
rbd snap create --pool rbd-demo --image rbd-demo1.img --snap demo1_snap1


#可简写为:
rbd snap create rbd-demo/rbd-demo1.img@demo1_snap1

#列出指定镜像所有快照
rbd snap list rbd-demo/rbd-demo1.img

#用json格式输出:
rbd snap list rbd-demo/rbd-demo1.img --format json --pretty-format
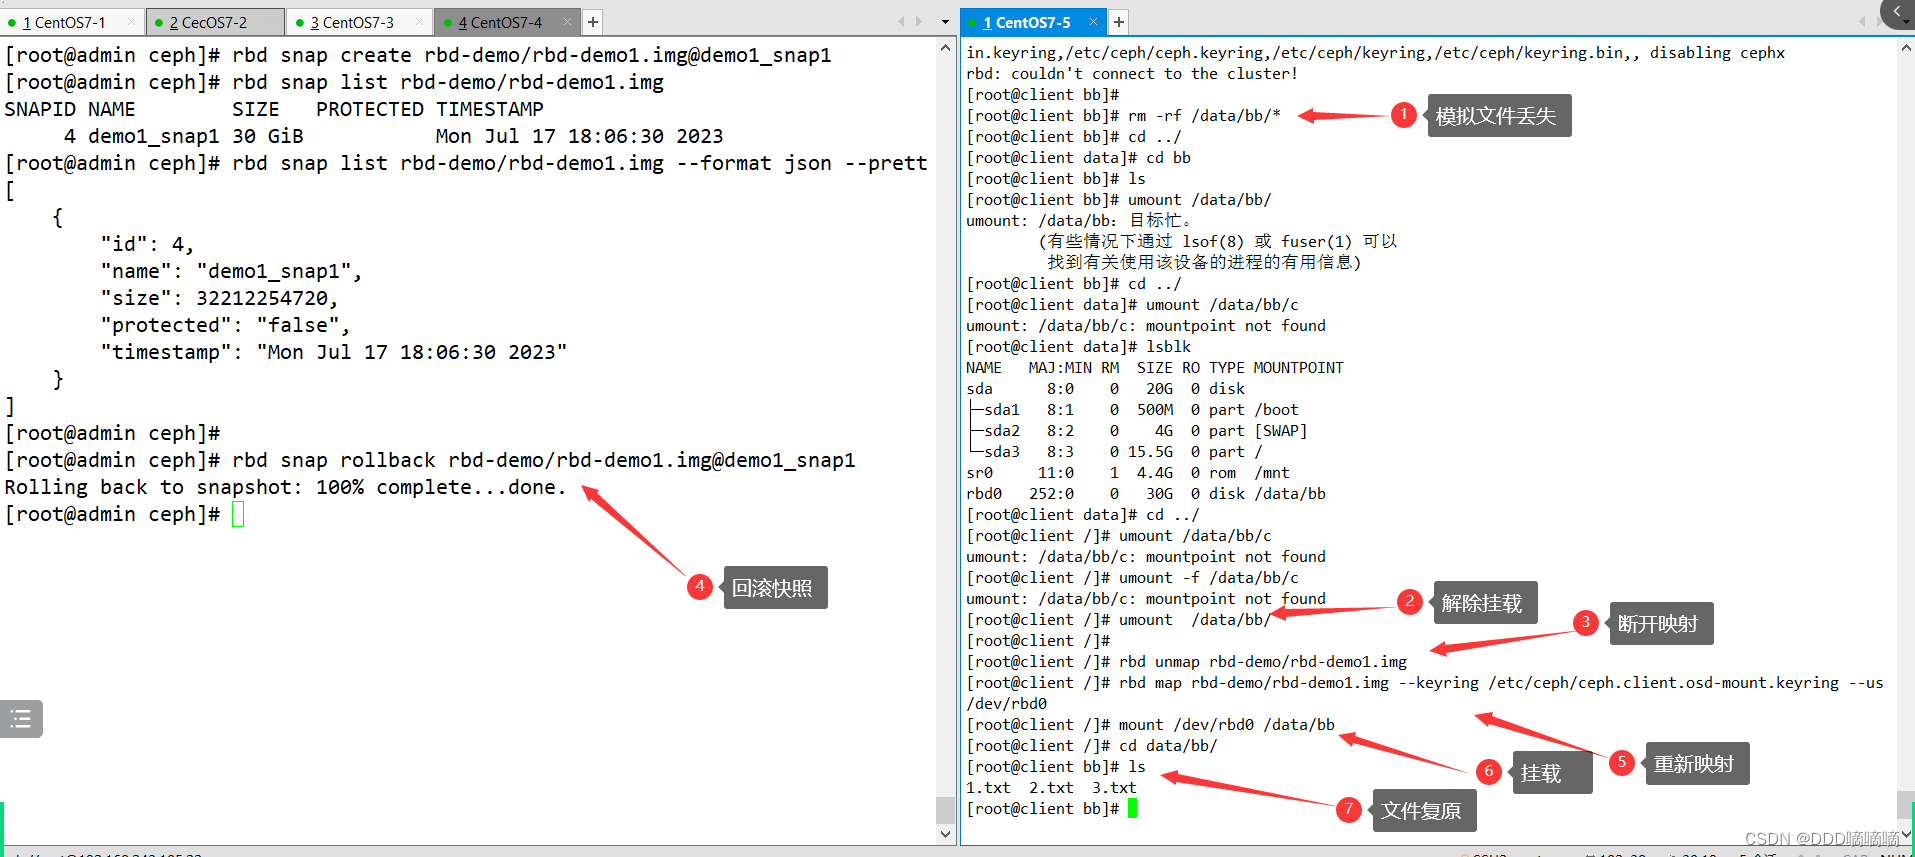
Roll back the mirror to the specified
在回滚快照之前,需要将镜像取消镜像的映射,然后再回滚。

#在客户端操作
rm -rf /data/bb/*
umount /data/bb
rbd unmap rbd-demo/rbd-demo1.img

#在管理节点操作
rbd snap rollback rbd-demo/rbd-demo1.img@demo1_snap1

#在客户端重新映射并挂载
rbd map rbd-demo/rbd-demo1.img --keyring /etc/ceph/ceph.client.osd-mount.keyring --user osd-mount
mount /dev/rbd0 /data/bb
ls /data/bb				#发现数据还原回来了
Limit the number of snapshots a mirror can create
rbd snap limit set rbd-demo/rbd-demo1.img --limit 3

#解除限制:
rbd snap limit clear rbd-demo/rbd-demo1.img
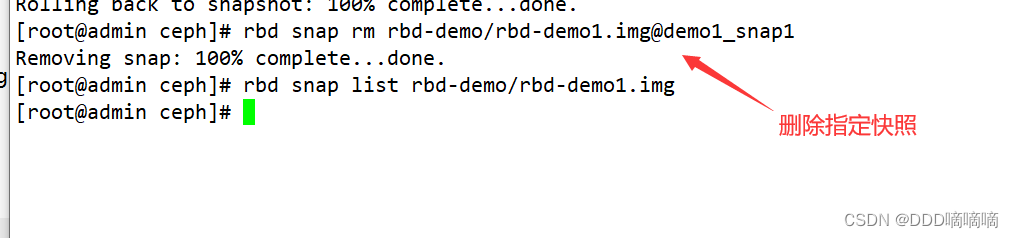
//delete snapshot
#删除指定快照:
rbd snap rm rbd-demo/rbd-demo1.img@demo1_snap1

#删除所有快照:
rbd snap purge rbd-demo/rbd-demo1.img
//snapshot layering
- Snapshot layering supports the use of snapshot clones to generate new images, which are almost identical to directly created images and support all operations of images. The only difference is that the clone image references a read-only upstream snapshot, and this snapshot must be protected.
#快照克隆
1)将上游快照设置为保护模式:
rbd snap create rbd-demo/rbd-demo1.img@demo1_snap666
rbd snap protect rbd-demo/rbd-demo1.img@demo1_snap666
2)克隆快照为新的镜像
rbd clone rbd-demo/rbd-demo1.img@demo1_snap666 --dest rbd-demo/rbd-demo666.img
rbd ls -p rbd-demo
3)命令查看克隆完成后快照的子镜像
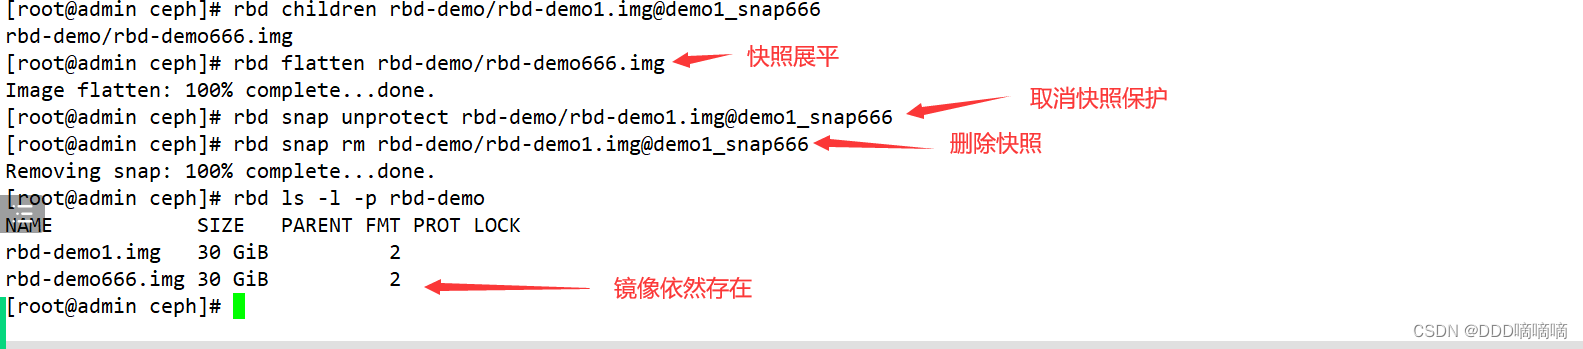
rbd children rbd-demo/rbd-demo1.img@demo1_snap666

//snapshot flatten
- Usually, the image obtained by snapshot cloning retains a reference to the parent snapshot. At this time, the parent snapshot cannot be deleted, otherwise it will be affected.
rbd snap rm rbd-demo/rbd-demo1.img@demo1_snap666
#报错 snapshot 'demo1_snap666' is protected from removal.

#如果要删除快照但想保留其子镜像,必须先展平其子镜像,展平的时间取决于镜像的大小
1) 展平子镜像
rbd flatten rbd-demo/rbd-demo666.img

2)取消快照保护
rbd snap unprotect rbd-demo/rbd-demo1.img@demo1_snap666

3)删除快照
rbd snap rm rbd-demo/rbd-demo1.img@demo1_snap666

rbd ls -l -p rbd-demo			#在删除掉快照后,查看子镜像依然存在
2.8. Export and import of images
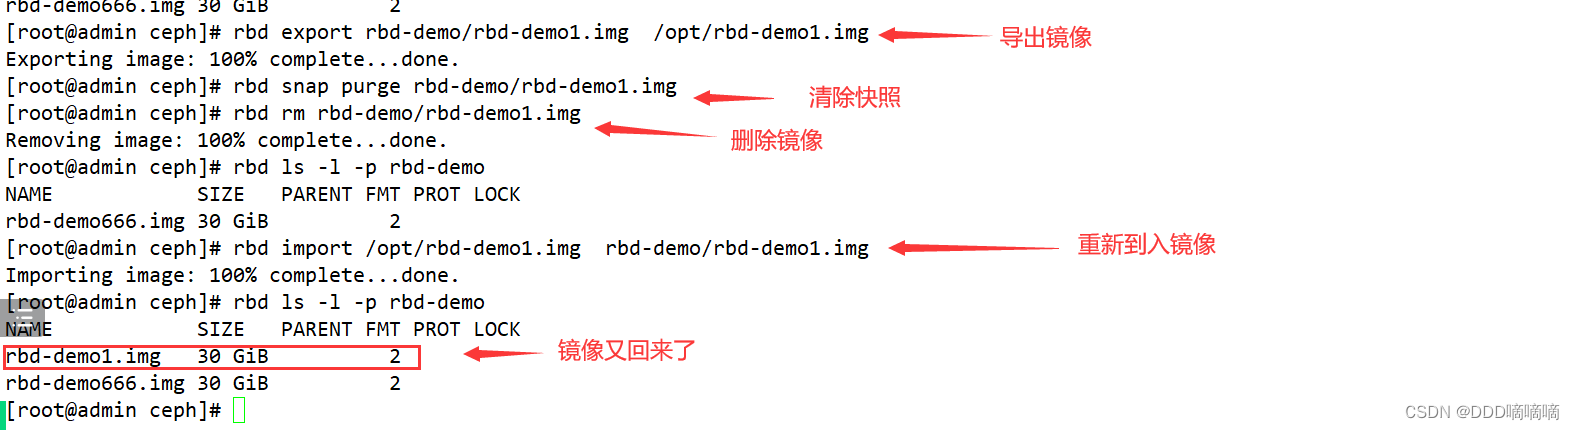
//export image
rbd export rbd-demo/rbd-demo1.img /opt/rbd-demo1.img
//Import image
#卸载客户端挂载,并取消映射
umount /data/bb
rbd unmap rbd-demo/rbd-demo1.img

#清除镜像下的所有快照,并删除镜像
rbd snap purge rbd-demo/rbd-demo1.img
rbd rm rbd-demo/rbd-demo1.img

rbd ls -l -p rbd-demo

#导入镜像
rbd import /opt/rbd-demo1.img  rbd-demo/rbd-demo1.img

rbd ls -l -p rbd-demo
3. OSD Fault Simulation and Recovery
3.1. Simulate OSD failure
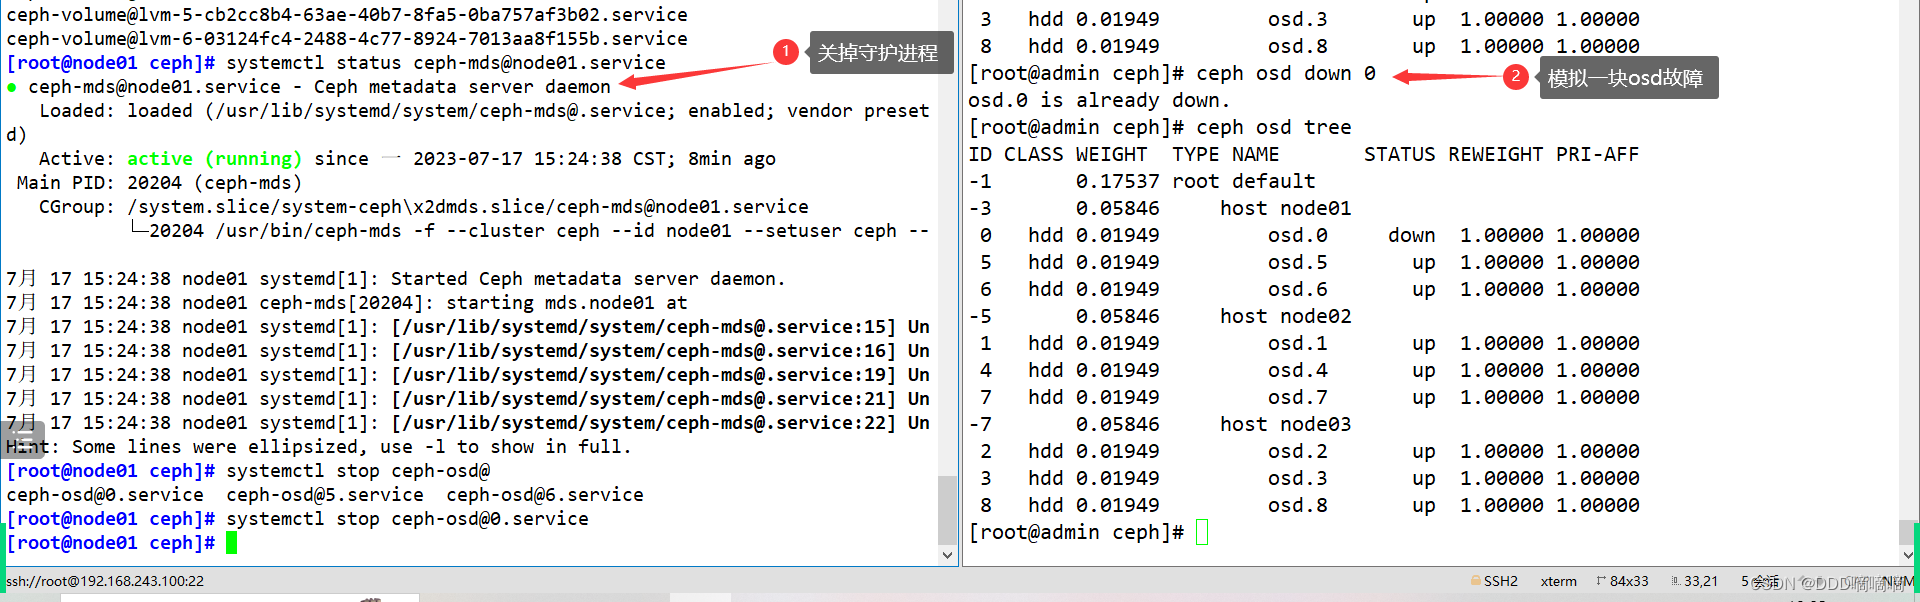
- If there are thousands of osds in the ceph cluster, it is normal for 2~3 to fail every day. We can simulate down one osd
#如果 osd 守护进程正常运行,down 的 osd 会很快自恢复正常,所以需要先关闭守护进程
ssh root@node01 systemctl stop ceph-osd@0

#down 掉 osd
ceph osd down 0

ceph osd tree
3.2. Kick the broken osd out of the cluster
//Method one :
#将 osd.0 移出集群,集群会开始自动同步数据
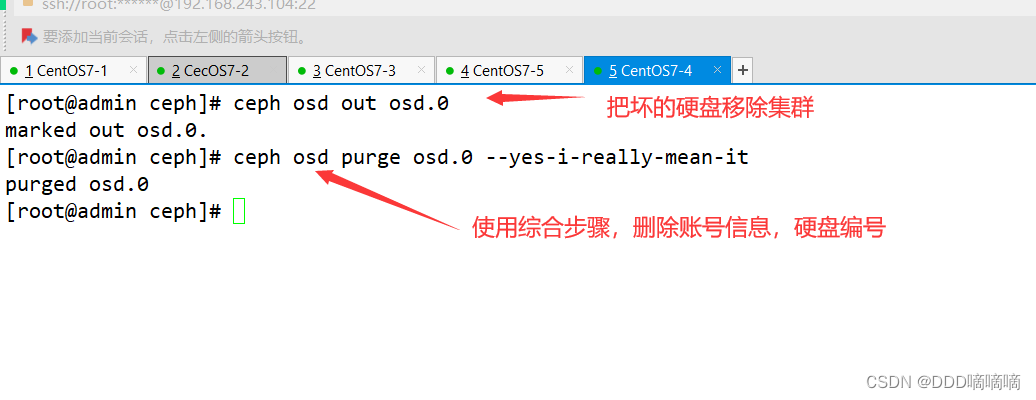
ceph osd out osd.0
#将 osd.0 移除 crushmap
ceph osd crush remove osd.0
#删除守护进程对应的账户信息
ceph auth rm osd.0
ceph auth list
#删掉 osd.0
ceph osd rm osd.0
ceph osd stat
ceph -s
#方法二:
ceph osd out osd.0
#使用综合步骤,删除配置文件中针对坏掉的 osd 的配置
ceph osd purge osd.0 --yes-i-really-mean-it
3.3. Rejoin the cluster after repairing the original broken osd
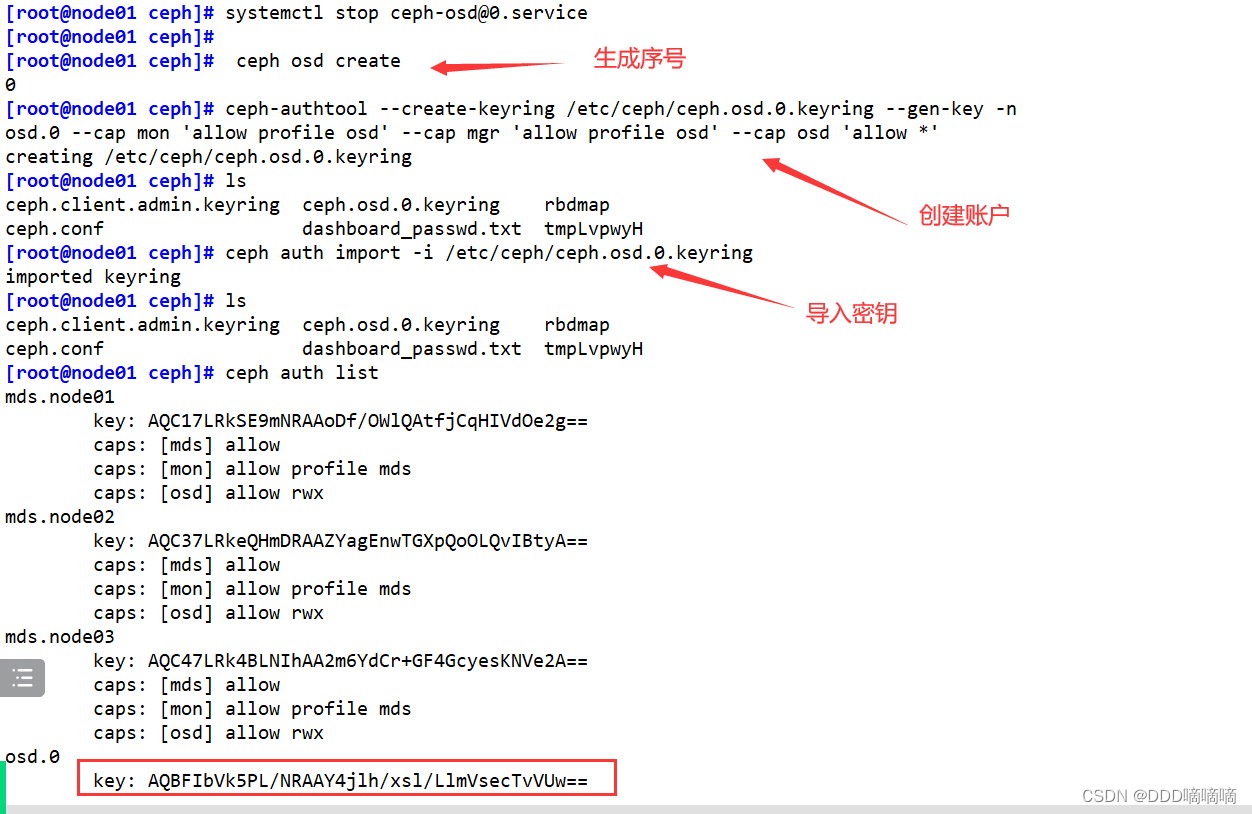
#在 osd 节点创建 osd,无需指定名,会按序号自动生成
cd /etc/ceph
ceph osd create
#创建账户
ceph-authtool --create-keyring /etc/ceph/ceph.osd.0.keyring --gen-key -n osd.0 --cap mon 'allow profile osd' --cap mgr 'allow profile osd' --cap osd 'allow *'
#导入新的账户秘钥
ceph auth import -i /etc/ceph/ceph.osd.0.keyring
ceph auth list
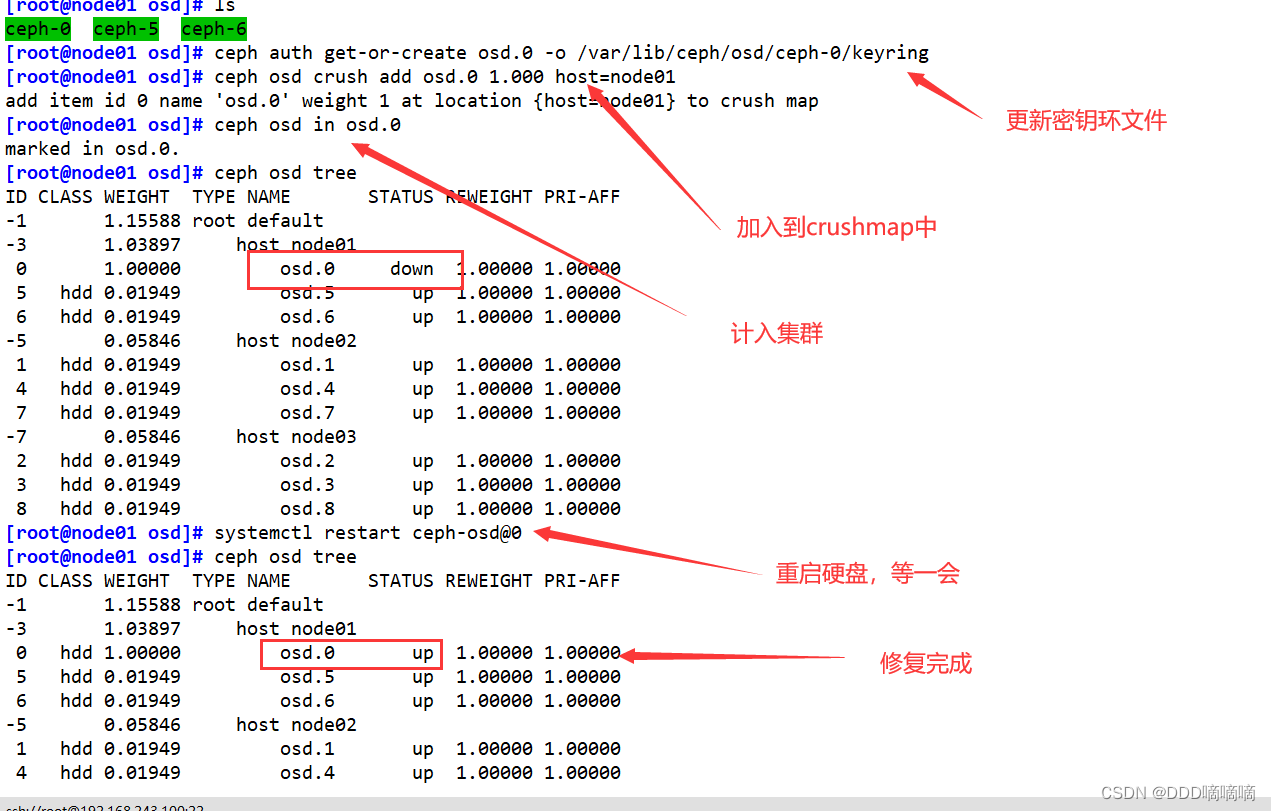
#更新对应的 osd 文件夹中的密钥环文件
ceph auth get-or-create osd.0 -o /var/lib/ceph/osd/ceph-0/keyring
#加入 crushmap
ceph osd crush add osd.0 1.000 host=node01 #1.000 代表权重
#加入集群
ceph osd in osd.0
ceph osd tree
#重启 osd 守护进程
systemctl restart ceph-osd@0
ceph osd tree #稍等片刻后 osd 状态为 up
//if restart fails
报错:
Job for [email protected] failed because start of the service was attempted too often. See "systemctl  status [email protected]" and "journalctl -xe" for details.
To force a start use "systemctl reset-failed [email protected]" followed by "systemctl start [email protected]" again.

#运行
systemctl reset-failed [email protected] && systemctl restart [email protected]
4. Create the RGW interface of the Ceph object storage system
4.1 Object Storage Concept
Object storage (object storage) is a storage method for unstructured data. Each piece of data in object storage is stored as a separate object and has a unique address to identify the data object. It is usually used in cloud computing environments.
Unlike other data storage methods, object-based storage does not use directory trees.
Although there are differences in design and implementation, most object storage systems present similar core resource types to the outside world. From the perspective of the client, it is divided into the following logical units:
-
Amazon S3
1. User (User)
2. Bucket (Bucket)
3. Object (Object) -
The relationship between the three is
1. User stores Objects in the Bucket on the system.
2. The bucket belongs to a user and can hold objects. One bucket is used to store multiple objects.
3. The same user can own multiple buckets. Different users are allowed to use buckets with the same name, so the user name can be used as the namespace of the bucket
OpenStack Swift:
- Provides user, container and object corresponding to users, buckets and objects respectively, but it also provides a parent component account for user, which is used to represent a project or user, so an account can contain one or more users, They can share the same set of containers and provide namespaces for containers
RadosGW:
- Provides user, subuser, bucket, and object, where user corresponds to S3 user, and subuser corresponds to Swift user, but neither user nor subuser supports namespaces for buckets, so buckets of different users are not allowed to have the same name ; However, since the jewel version, RadosGW has introduced a tenant (tenant) to provide namespaces for users and buckets, but he is an optional component
- It can be seen from the above that the core resource types of most object storage are similar, such as Amazon S3, OpenStack Swift and RadosGw. Among them, S3 and Swift are not compatible with each other. In order to be compatible with S3 and Swift, Ceph provides RGW (RadosGateway) data abstraction layer and management layer on the basis of RadosGW cluster, which can be natively compatible with S3 and Swift API.
- S3 and Swift can complete data exchange based on http or https, and the built-in Civetweb of RadosGW provides services. It can also support proxy servers including nginx, haproxy, etc. to receive user requests in the form of proxies, and then forward them to the RadosGW process.
- The function of RGW depends on the implementation of the object gateway daemon, which is responsible for providing the REST API interface to the client. For redundant load balancing requirements, there is usually more than one RadosGW daemon on a Ceph cluster.
4.2. Create RGW interface
- If you need to use an interface like S3 or Swift, you need to deploy/create the RadosGW interface. RadosGW is usually used as Object Storage, which is similar to Alibaba Cloud OSS.
Create an RGW daemon process on the management node (this process generally requires high availability in the production environment
cd /etc/ceph
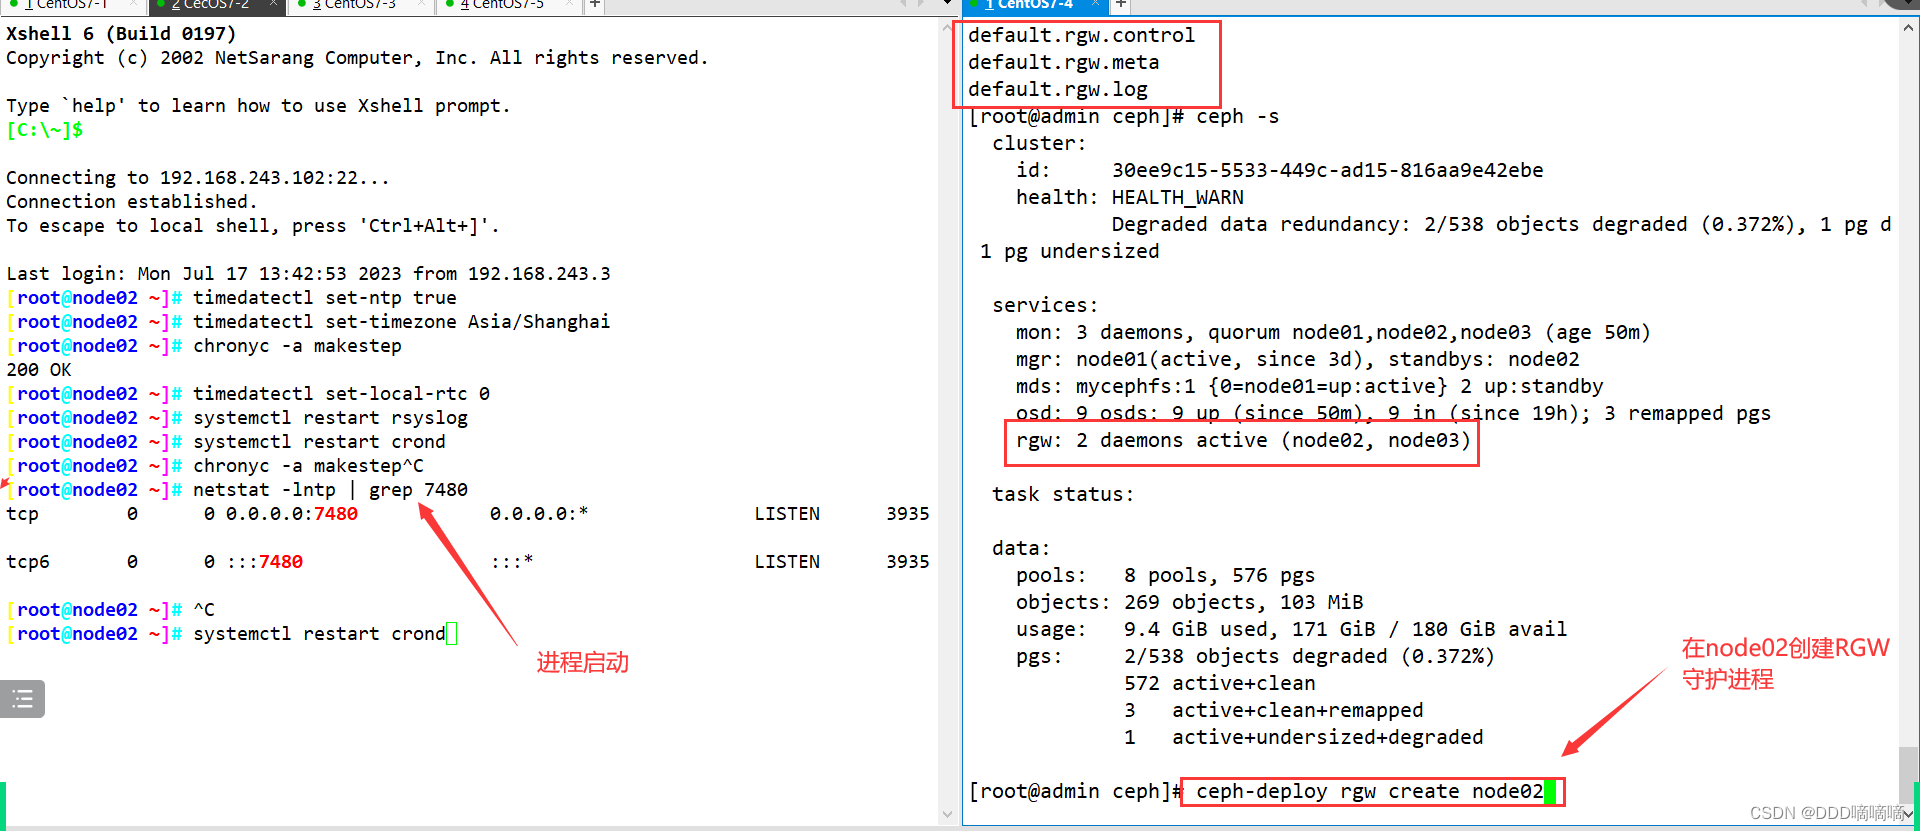
ceph-deploy rgw create node01
ceph -s
services:
mon: 3 daemons, quorum node01,node02,node03 (age 3h)
mgr: node01(active, since 12h), standbys: node02
mds: mycephfs:1 {
0=node02=up:active} 2 up:standby
osd: 6 osds: 6 up (since 12h), 6 in (since 25h)
rgw: 1 daemon active (node01)
#创建成功后默认情况下会自动创建一系列用于 RGW 的存储池
ceph osd pool ls
rgw.root
default.rgw.control #控制器信息
default.rgw.meta #记录元数据
default.rgw.log #日志信息
default.rgw.buckets.index #为 rgw 的 bucket 信息,写入数据后生成
default.rgw.buckets.data #是实际存储的数据信息,写入数据后生成
#默认情况下 RGW 监听 7480 号端口
ssh root@node01 netstat -lntp | grep 7480
curl node01:7480
<?xml version="1.0" encoding="UTF-8"?><ListAllMyBucketsResult xmlns="http://s3.amazonaws.com/doc/2006-03-01/">
<ListAllMyBucketsResult xmlns="http://s3.amazonaws.com/doc/2006-03-01/">
<Owner>
<ID>anonymous</ID>
<DisplayName/>
</Owner>
<Buckets/>
</ListAllMyBucketsResult>
Turn on http+https, change the listening port
- The RadosGW daemon process is internally implemented by Civetweb, and the basic management of RadosGW can be completed through the configuration of Civetweb.
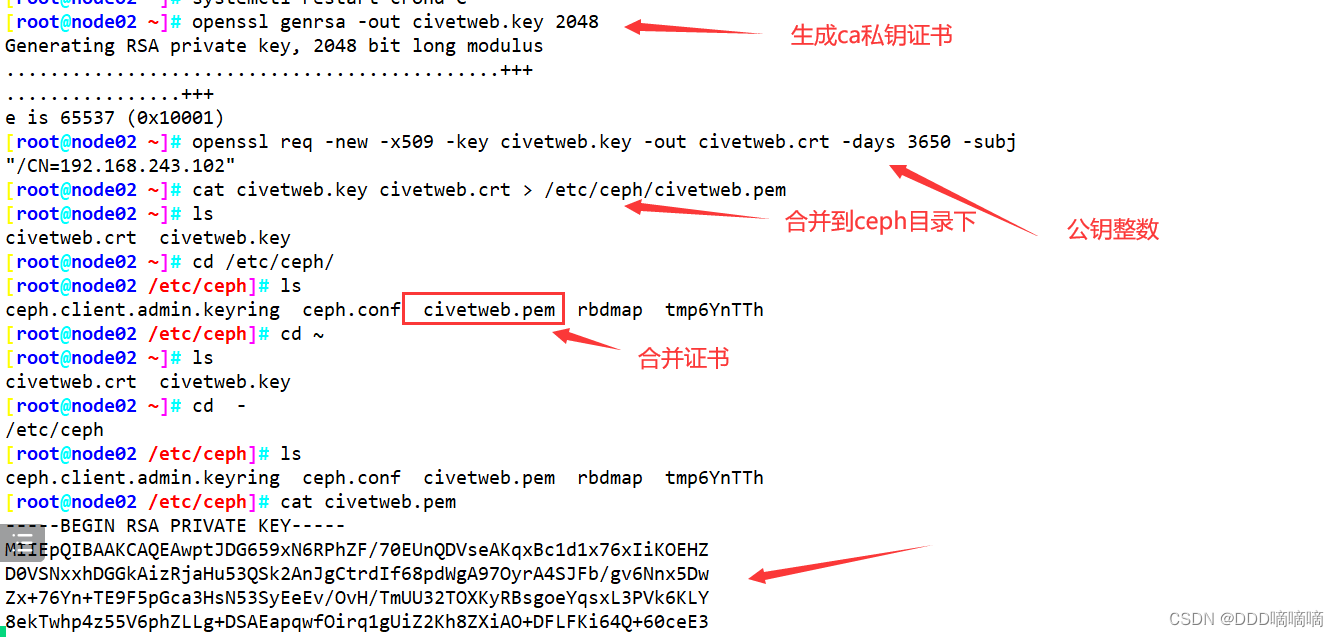
#要在 Civetweb 上启用SSL,首先需要一个证书,在 rgw 节点生成证书
1)生成CA证书私钥:
openssl genrsa -out civetweb.key 2048
2)生成CA证书公钥:
openssl req -new -x509 -key civetweb.key -out civetweb.crt -days 3650 -subj "/CN=192.168.80.11"
#3、将生成的证书合并为pem
cat civetweb.key civetweb.crt > /etc/ceph/civetweb.pem
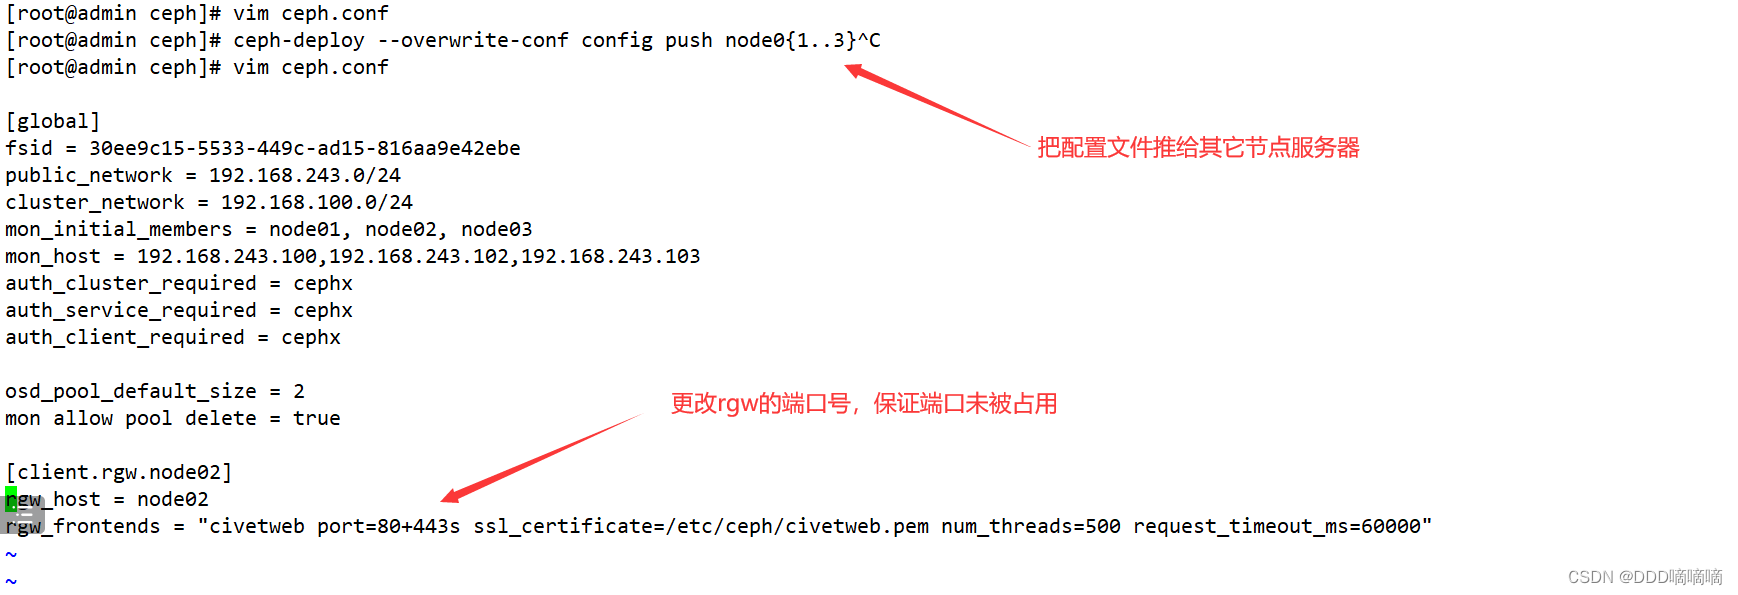
#更改监听端口
Civetweb 默认监听在 7480 端口并提供 http 协议,如果需要修改配置需要在管理节点编辑 ceph.conf 配置文件
cd /etc/ceph
vim ceph.conf
......
[client.rgw.node01]
rgw_host = node01
rgw_frontends = "civetweb port=80+443s ssl_certificate=/etc/ceph/civetweb.pem num_threads=500 request_timeout_ms=60000"
------------------------------------------------------------
●rgw_host:对应的RadosGW名称或者IP地址
●rgw_frontends:这里配置监听的端口,是否使用https,以及一些常用配置:
•port:如果是https端口,需要在端口后面加一个s。
•ssl_certificate:指定证书的路径。
•num_threads:最大并发连接数,默认为50,根据需求调整,通常在生产集群环境中此值应该更大
•request_timeout_ms:发送与接收超时时长,以ms为单位,默认为30000
•access_log_file:访问日志路径,默认为空
•error_log_file:错误日志路径,默认为空
------------------------------------------------------------
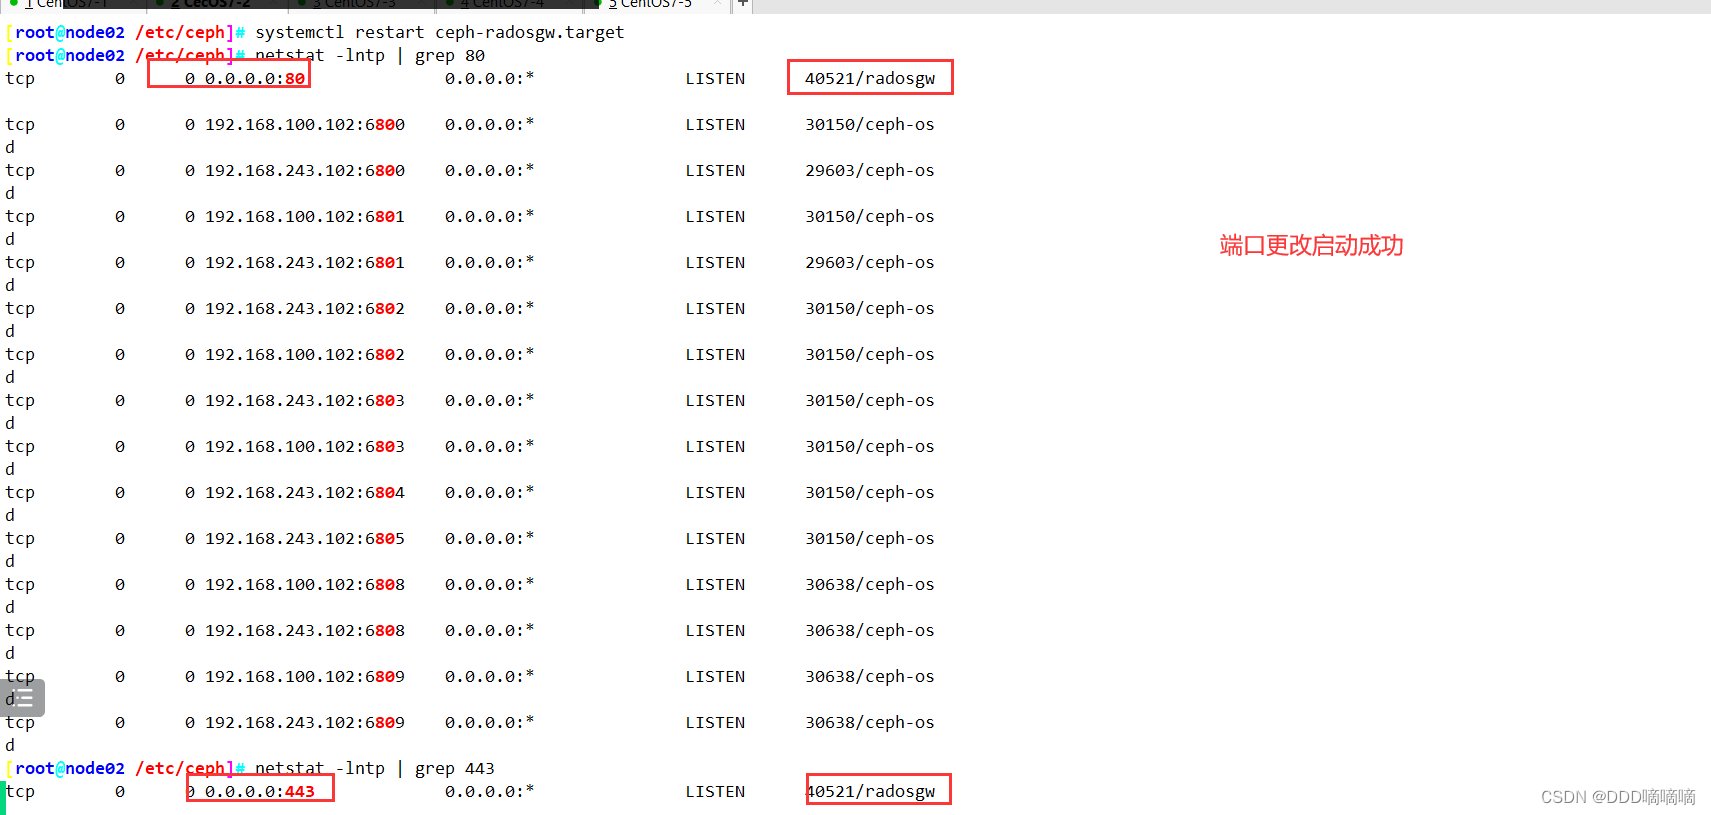
#修改完 ceph.conf 配置文件后需要重启对应的 RadosGW 服务,再推送配置文件
ceph-deploy --overwrite-conf config push node0{
1..3}
ssh root@node01 systemctl restart ceph-radosgw.target
#在 rgw 节点上查看端口
netstat -lntp | grep -w 80
netstat -lntp | grep 443
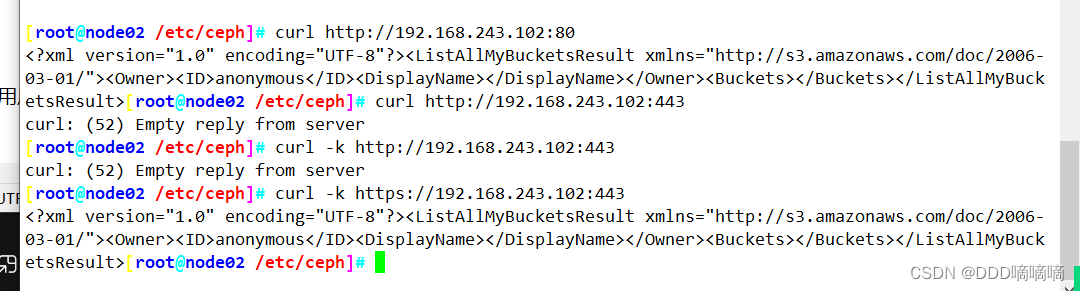
#在客户端访问验证
curl http://192.168.80.11:80
curl -k https://192.168.80.11:443
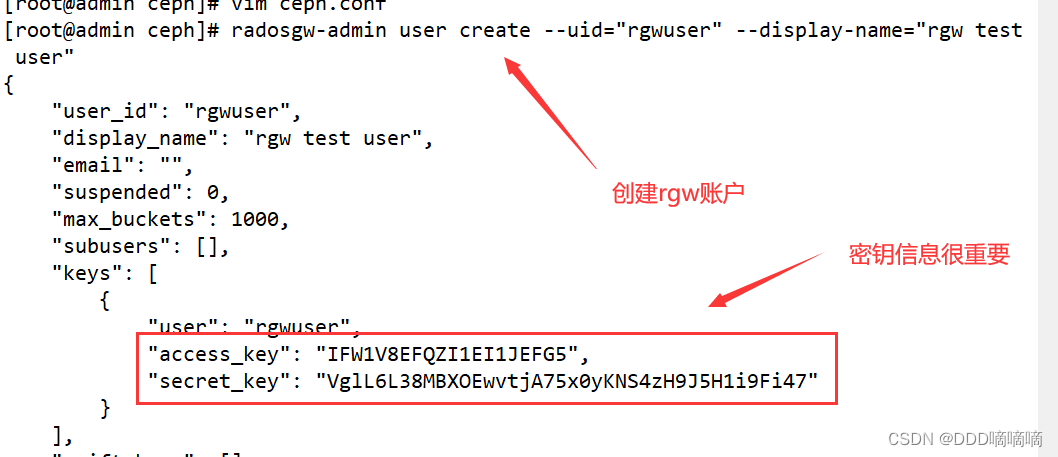
Create a RadosGW account
- Use the radosgw-admin command to create a RadosGW account on the management node
radosgw-admin user create --uid="rgwuser" --display-name="rgw test user"
......
    "keys": [
        {


            "user": "rgwuser",
            "access_key": "ER0SCVRJWNRIKFGQD31H",
            "secret_key": "YKYjk7L4FfAu8GHeQarIlXodjtj1BXVaxpKv2Nna"
        }
    ],


#创建成功后将输出用户的基本信息,其中最重要的两项信息为 access_key 和 secret_key 。用户创建成后功,如果忘记用户信息可以使用下面的命令查看
radosgw-admin user info --uid="rgwuser"
S3 interface access test
1)在客户端安装 python3、python3-pip
yum install -y python3 python3-pip
python3 -V
Python 3.6.8
pip3 -V
pip 9.0.3 from /usr/lib/python3.6/site-packages (python 3.6)
2)安装 boto 模块,用于测试连接 S3
pip3 install boto
3)测试访问 S3 接口
echo 123123 > /opt/123.txt
#coding:utf-8
#boto s3手册:http://boto.readthedocs.org/en/latest/ref/s3.html
#boto s3快速入门:http://boto.readthedocs.org/en/latest/s3_tut.html
#如果脚本长时间阻塞,请检查集群状态,开启的端口等
import ssl
import boto.s3.connection
from boto.s3.key import Key
#异常抛出
try:
_create_unverified_https_context = ssl._create_unverified_context
except AttributeError:
pass
else:
ssl._create_default_https_context = _create_unverified_https_context
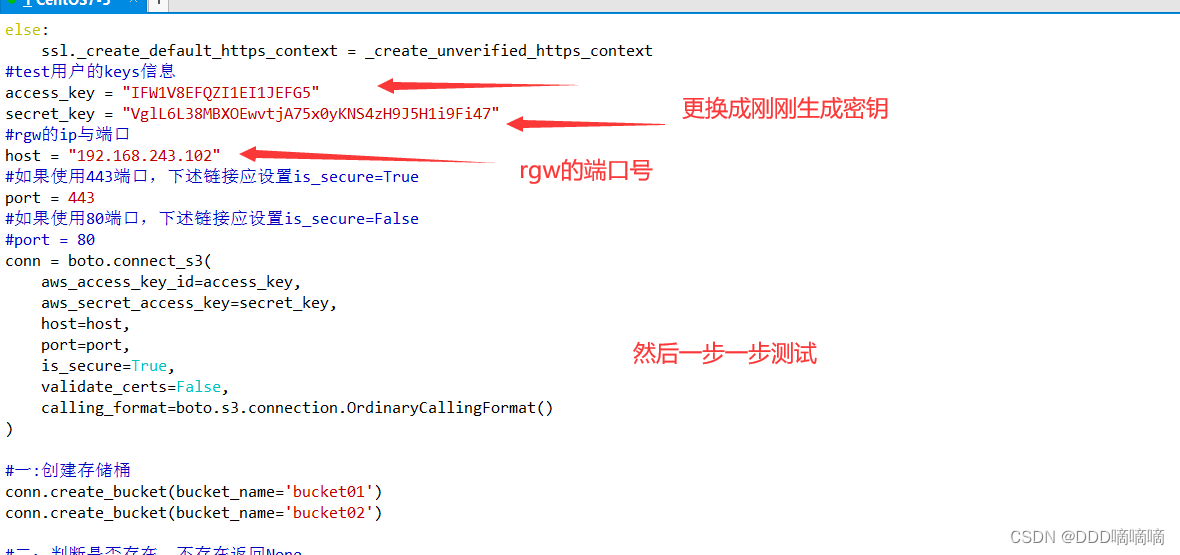
#test用户的keys信息
access_key = "ER0SCVRJWNRIKFGQD31H"
secret_key = "YKYjk7L4FfAu8GHeQarIlXodjtj1BXVaxpKv2Nna"
#rgw的ip与端口
host = "192.168.80.11"
#如果使用443端口,下述链接应设置is_secure=True
port = 443
#如果使用80端口,下述链接应设置is_secure=False
#port = 80
conn = boto.connect_s3(
aws_access_key_id=access_key,
aws_secret_access_key=secret_key,
host=host,
port=port,
is_secure=True,
validate_certs=False,
calling_format=boto.s3.connection.OrdinaryCallingFormat()
)
#一:创建存储桶
conn.create_bucket(bucket_name='bucket01')
conn.create_bucket(bucket_name='bucket02')
#二:判断是否存在,不存在返回None
exists = conn.lookup('bucket01')
print(exists)
exists = conn.lookup('bucket02')
print(exists)
#三:获得一个存储桶
bucket1 = conn.get_bucket('bucket01')
bucket2 = conn.get_bucket('bucket02')
#四:查看一个bucket下的内容
print(list(bucket1.list()))
print(list(bucket2.list()))
#五:向s3上存储数据,数据来源可以是file、stream、or string
#5.1、上传文件
bucket1 = conn.get_bucket('bucket01')
# name的值是数据的key
key = Key(bucket=bucket1, name='myfile')
key.set_contents_from_filename(r'D:\PycharmProjects\ceph\123.txt')
# 读取 s3 中文件的内容,返回 string 即文件 123.txt 的内容
print(key.get_contents_as_string())
#5.2、上传字符串
#如果之前已经获取过对象,此处不需要重复获取
bucket2 = conn.get_bucket('bucket02')
key = Key(bucket=bucket2, name='mystr')
key.set_contents_from_string('hello world')
print(key.get_contents_as_string())
#六:删除一个存储桶,在删除存储桶本身时必须删除该存储桶内的所有key
bucket1 = conn.get_bucket('bucket01')
for key in bucket1:
key.delete()
bucket1.delete()
#bucket1.get_all_keys()[0].delete() #删除某一个 key
#迭代遍历删除 buckets and keys
for bucket in conn:
for key in bucket:
print(key.name,key.get_contents_as_string())
#—个判断文件夹中是否有文件的方法
bucket1 = conn.get_bucket('bucket01')
res = bucket1.get_all_keys()
if len(res) > 0:
print('有文件')
else:
print('为空')