This article mainly introduces the simple process of connecting to IoTDA based on OpenHarmony 3.0, taking the BearPi-HM_Nano development board as an example, and using the huaweicloud_iot_link SDK to connect to the Huawei Cloud IoT platform. At the end of the article, we provide you with benefits, up to HUAWEI WATCH FIT watches, HUAWEI Band 7, HUAWEI FreeBuds SE wireless earphones, laptop stands and other heavy gifts;
prerequisite
· Have registered a HUAWEI CLOUD official account. If you have not registered, you can click the registration page to complete the registration.
· The real-name authentication has been completed. If not completed, you can click Real-Name Authentication on HUAWEI CLOUD to complete the authentication, otherwise the device access function cannot be used.
· The device access service has been activated. If you haven't opened it, you can visit it , and click "Management Console" to open the service.
hardware environment
BearPi-HM_Nano development board, Type-C data cable, PC.
Software Environment
Reference link click .
Figure 1 Software environment creation steps

illustrate:
(1) If you use DevEco Device Tool to participate in debugging, you need to install Windows environment.
(2) Obtain the source code: If you do not use the Docker method ( use the Docker method ), it is strongly recommended to use method 1 to obtain it.
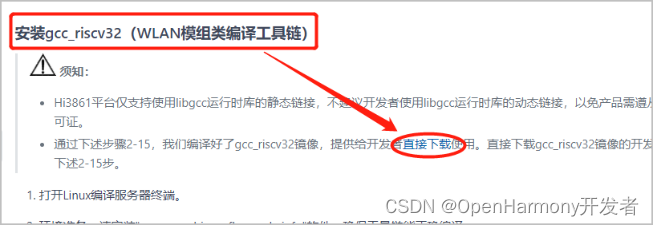
(3) When installing gcc_riscv32 in the environment on the development board, it is strongly recommended to download the gcc_riscv32 image directly, otherwise some plug-ins may fail to download or install. The specific operation is shown in Figure 2 below .
Notice:
The amount of open source code is large, and the download time may be long, so you need to reserve sufficient time.
Figure 2 Directly download the gcc_riscv32 image
create product
1. Log in to the management console , click "Products" in the left navigation bar, and click "Create Product" in the upper right corner of the page.
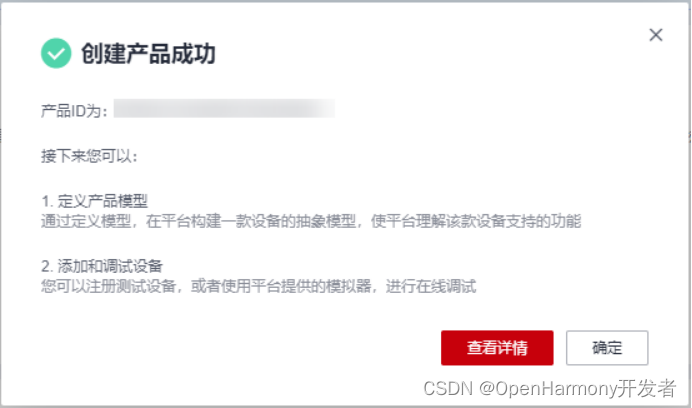
2. Fill in the parameters according to the prompts on the page, and then click "Confirm" to complete the creation of the product.
① The resource space to which it belongs: the default resource space;
② Product Name: Custom;
③ Protocol type: MQTT;
④ Data format: JSON;
⑤ Manufacturer Name: Custom;
⑥ Device type selection: Custom type;
⑦ Device Type: Custom;
Develop product models
1. Find the newly added product and click "View" to enter the product interface.
2. On the "Model Definition" page of product details, directly upload the model file .
register device
1. Access , click Management Console to enter the device access console.
2. In the left navigation bar, select Device > All Devices, click Register Device in the upper right corner, fill in the parameters according to the table below, and click OK.
① The resource space to which it belongs: the default resource space;
② Product: Select the product that has been created in [Create Product];
③ Device identification code: custom;
④ Device Name: Custom;
⑤ Device Authentication Type: Select "Key";
⑥ Key/confirmation key: fixed at 12345678;
Use Huaweiicloud_iotlink SDK
1. Download the source code: .
2. Copy the above source code directly to the third-party file directory of the OpenHarmony source code. It should be noted here that the three-party libraries shared by OpenHarmony and Huaweiicloud_iotlink SDK directly use OpenHarmony library files, such as CJSON and mbedtls.
3. Add the following code in the OpenHarmony 3.0 source code device\bearpi\bearpi_hm_nano\app\BUILD.gn, and choose to compile the demo according to whether # is commented.
# "//third_party/hwcloud_iotlink/demos/test_iotlink:test_iotlink", "//third_party/hwcloud_iotlink/demos/mqtt_tiny_v5_agriculture_demo:mqtt_tiny_v5_agriculture_demo",
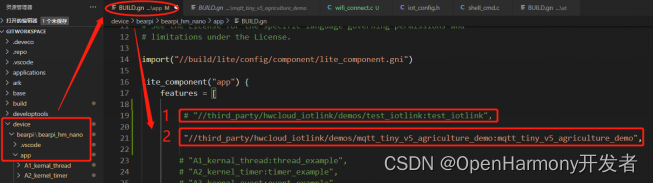
(Figure 6 demo selection)
illustrate:
1 in Figure 6 is the unit test code. You can execute different test cases by modifying the entry function in APP_FEATURE_INIT() in the last line of code in the test_main.c file, and test the adaptation of different components of the OSAL layer, including A series of verifications such as tasks, mutexes, semaphores, queues, and the SDK’s own queues. Part of the content can be compared with the official sample code of the BearPi-HM_Nano development board to verify the correctness of the program results, as shown in Figure 7.
2 in Figure 6 is a demo that uses MQTT to connect to Huawei Cloud. Take a look at the BUILD.gn file of the demo, as shown in Figure 8. Area A contains library files related to the development board hardware and wifi, and Area B includes MQTT to connect to Huawei. Some library files necessary for the cloud, such as cJson, mqtt-related, osal-related and configuration library files, the C area indicates that the hwcloud_iotlink library needs to be compiled when compiling the file, and the compilation will find the necessary libraries and C files for the file according to the specified path for compilation .

(Figure 7 unit test)
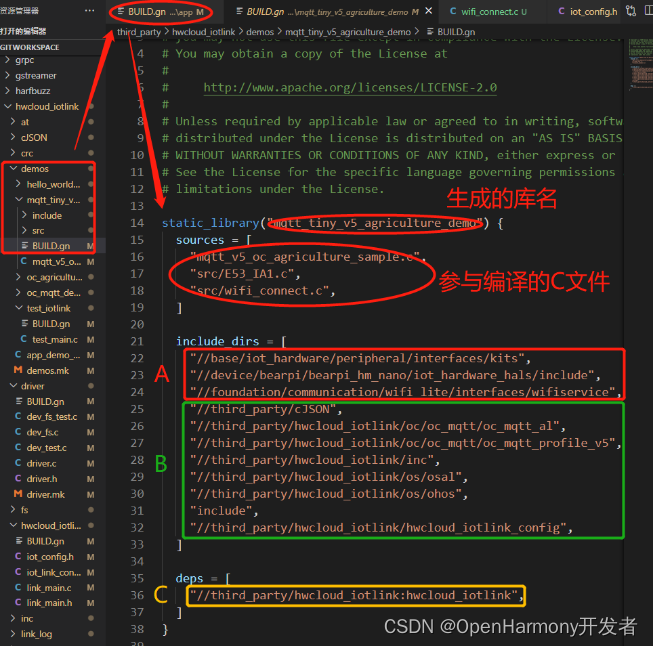
(Figure 8 code compilation file)
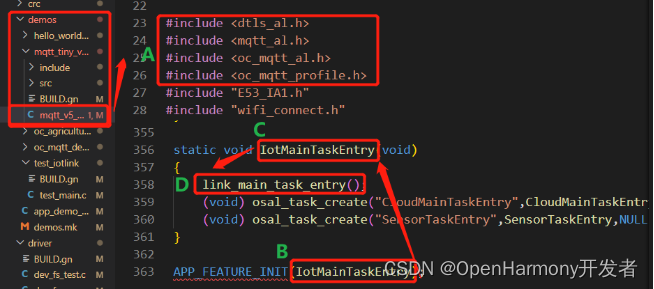
(Figure 9 demo's main function file)
illustrate:
Area A in Figure 9 shows some library files and dtls library files necessary for MQTT to connect to Huawei Cloud. The link_main_task_entry() function must be called first in the entry function IoTMainTaskEntry() to ensure the installation of osal and the initialization of other configurations.
1. Set parameters.

(Figure 10 parameter modification)
Notice:
If you need to connect to the cloud, you need to modify the network configuration information, wifi hotspot account and password, and your own device ID and device key registered in the cloud according to your device. The device only supports wifi in the 2.4G frequency band.
Device access platform
After the code is burned to the device, restart the device (it needs to be restarted twice for the first use, and you may need to configure internal information when burning for the first time), and after the second restart, the device can be connected to HUAWEI CLOUD normally.
After logging in to the platform, you can see the specific information reported by the data, and you can also issue commands and other operations to control the device, as shown in Figure 11-13 below.
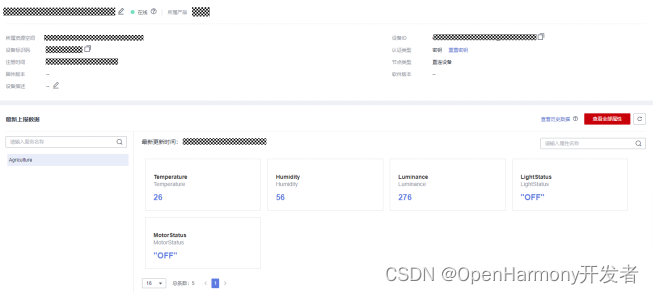
(Figure 11 Data reporting)
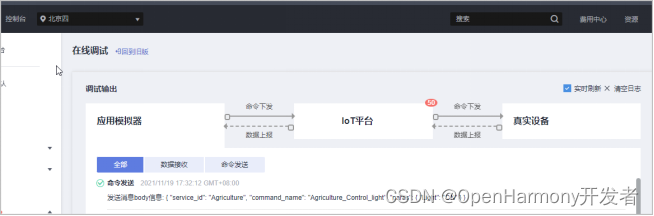
(Figure 12 command delivery)
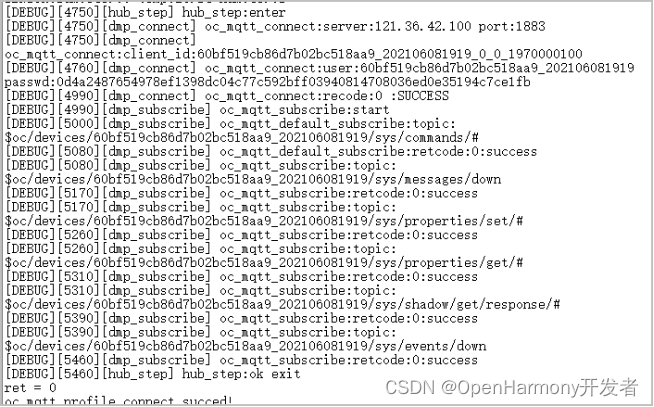
(Figure 13 log information)
The Internet of Things is called the third information technology revolution after computers and the Internet, and its applications are ubiquitous. With the emergence of Hongmeng, the hardware and software industries are facing a torrent of change and reconstruction, but there are also huge opportunities hidden in the torrent. The combination of IoT devices and Hongmeng has become an inevitable trend of social development.
This event invites everyone to experience HUAWEI CLOUD IoT+OpenHarmony and understand the whole process of connecting Hongmeng devices to HUAWEI CLOUD IoT. The above article is the basic version experience, and the event also has a high-end version experience, which is equipped with a complete experience manual and community expert guidance. Taking OpenHarmony 3.1.1 and rk3568 as examples, it explains how to use the SDK in a subsystem way.
At the same time, we have prepared generous gifts for everyone. Register for the event and receive free resources from HUAWEI CLOUD to participate in the lottery. The prizes in each link are endless, and the highest rewards are Huawei watches, Huawei bracelets, Huawei wireless earphones, laptop stands, etc. For more event rules, click the event link to view details ;
(list of event gifts)