Web effect preview:
Article directory
1. API Analysis
1.1 Quality Score Query
First go to the quality inquiry address: https://www.csdn.net/qc
Enter any article address to query, and check the page at the same time. Under the Network option, you can see the request address, request method, request header, request body, etc. of the called API:
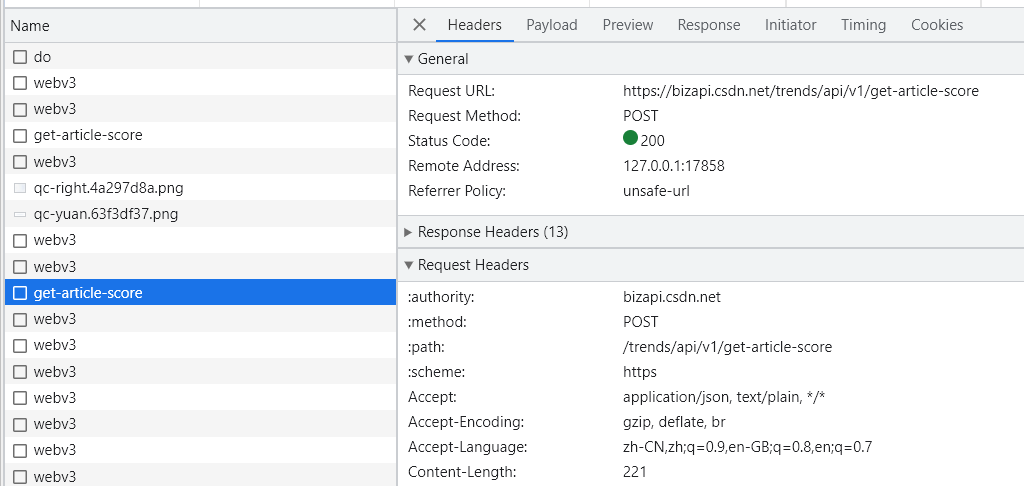
Many parameters in the request header are unnecessary, we use ApiPostthis software to test which are necessary parameters.
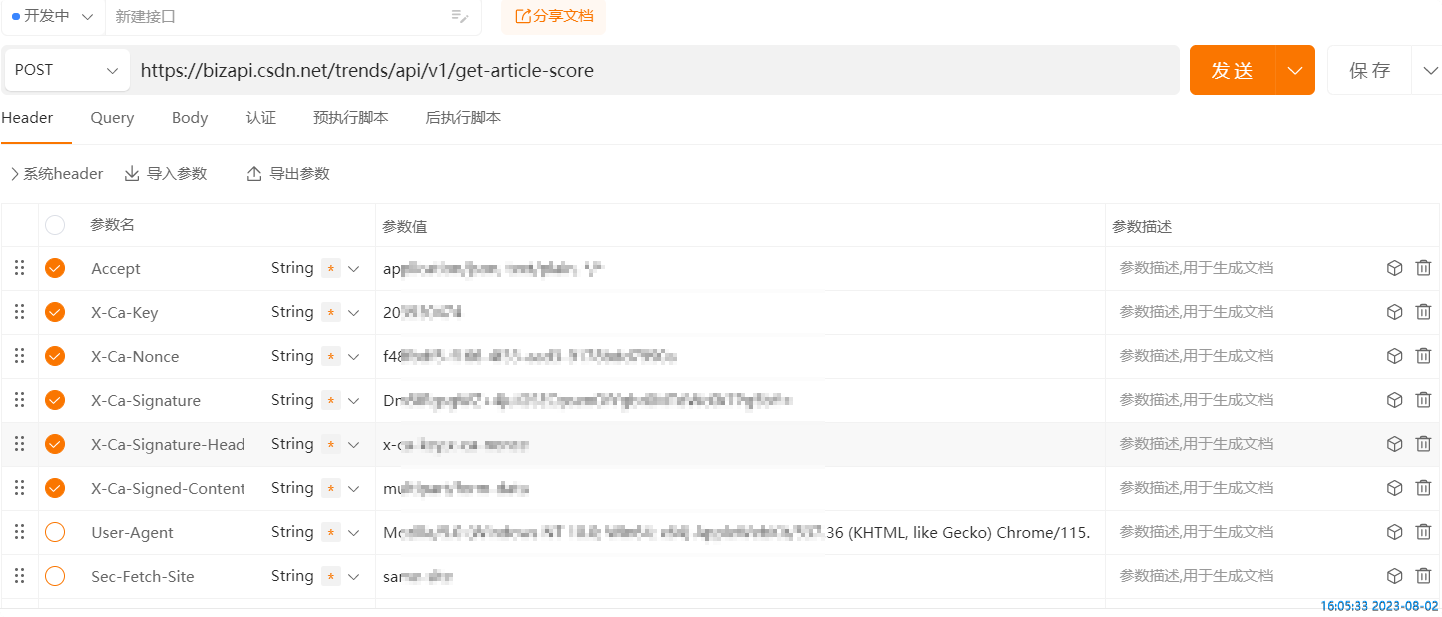
After testing, the request header only needs the following parameters.
The request body is:
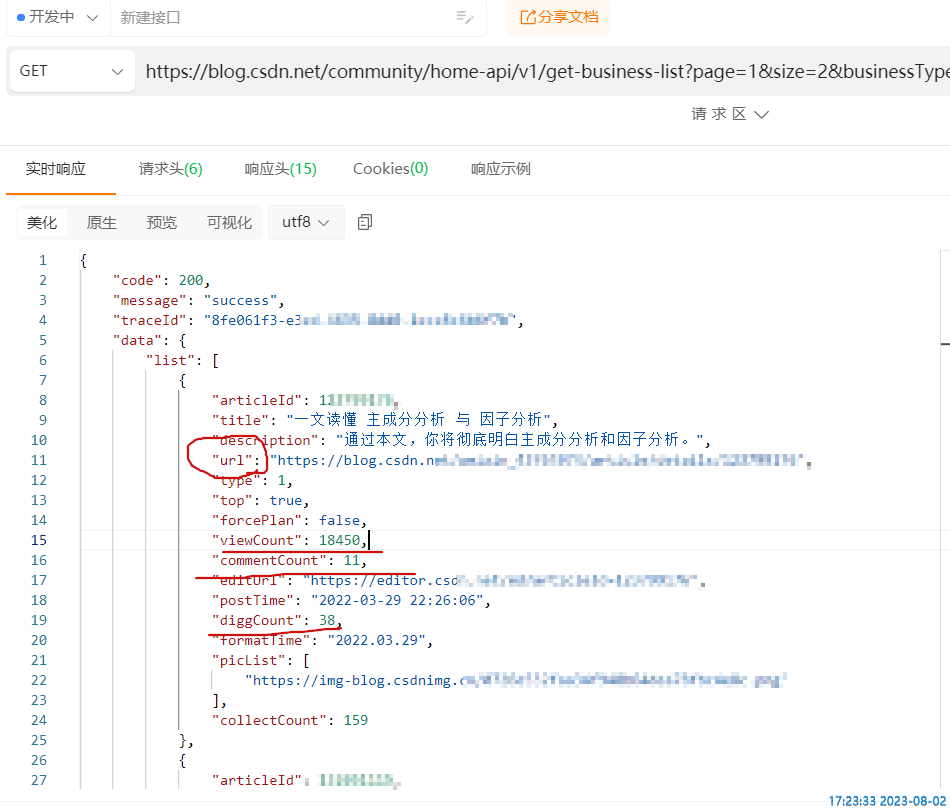
url:文章地址
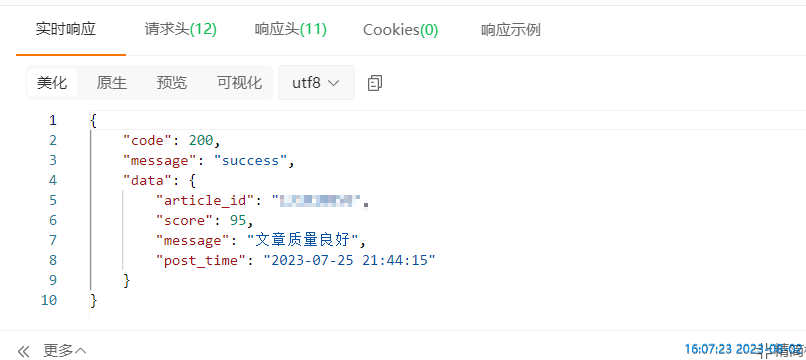
Test Results:
The problem of article quality sub-query has been solved. Let's get the URLs of articles in batches.
1.2 Get the article url
Click on your profile, turn on Inspect, and click on the Articles option for your profile.
Under this option, you can see the list of returned articles:
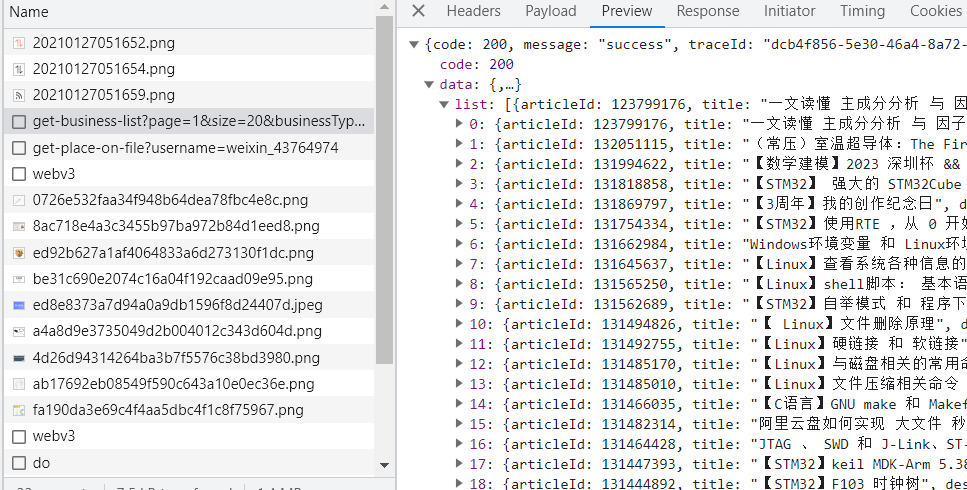
The method is: GET
Request URL:
https://blog.csdn.net/community/home-api/v1/get-business-list?page=1&size=20&businessType=blog&orderby=&noMore=false&year=&month=&username=id
Parameter Description:
- page: number of pages requested
- size: number per page
- username: your csdn
id
Test results: data such as the address, reading volume, and comment volume of each article can be returned.
2. Code implementation
2.1 Python
2.11 Step-by-step implementation
For ease of understanding, the program is divided into 2 parts:
- Obtain article information in batches and save them as excel files;
- Read the article url from excel, query the quality score, and then add the quality score to excel.
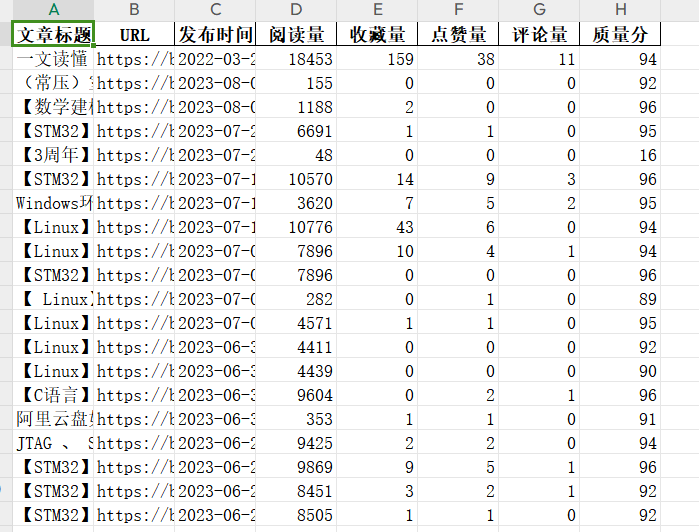
Get article information in batches:
Effect (obtain 20 articles):

code:
# 批量获取文章信息并保存到excel
class CSDNArticleExporter:
    def __init__(self, username, size, filename):
        self.username = username
        self.size = size
        self.filename = filename

    def get_articles(self):
        url = f"https://blog.csdn.net/community/home-api/v1/get-business-list?page=1&size={

      self.size}&businessType=blog&orderby=&noMore=false&year=&month=&username={

      self.username}"
        with urllib.request.urlopen(url) as response:
            data = json.loads(response.read().decode())
        return data['data']['list']

    def export_to_excel(self):
        df = pd.DataFrame(self.get_articles())
        df = df[['title', 'url', 'postTime', 'viewCount', 'collectCount', 'diggCount', 'commentCount']]
        df.columns = ['文章标题', 'URL', '发布时间', '阅读量', '收藏量', '点赞量', '评论量']
        # df.to_excel(self.filename)
        # 下面的代码会让excel每列都是合适的列宽,如达到最佳阅读效果
        # 你只用上面的保存也是可以的
        # Create a new workbook and select the active sheet
        wb = Workbook()
        sheet = wb.active
        # Write DataFrame to sheet
        for r in dataframe_to_rows(df, index=False, header=True):
            sheet.append(r)
        # Iterate over the columns and set column width to the max length in each column
        for column in sheet.columns:
            max_length = 0
            column = [cell for cell in column]
            for cell in column:
                try:
                    if len(str(cell.value)) > max_length:
                        max_length = len(cell.value)
                except:
                    pass
            adjusted_width = (max_length + 5)
            sheet.column_dimensions[column[0].column_letter].width = adjusted_width
        # Save the workbook
        wb.save(self.filename)
Batch query quality score:
Effect:
Code: The parameters of the request header are obtained by installing the previous method by yourself
# 批量查询质量分
class ArticleScores:
    def __init__(self, filepath):
        self.filepath = filepath

    @staticmethod
    def get_article_score(article_url):
        url = "https://bizapi.csdn.net/trends/api/v1/get-article-score"
        headers = {


            "Accept": "...",
            "X-Ca-Key": "...",
            "X-Ca-Nonce": "...",
            "X-Ca-Signature": "...",
            "X-Ca-Signature-Headers": "x-ca-key,x-ca-nonce",
            "X-Ca-Signed-Content-Type": "multipart/form-data",
        }
        data = urllib.parse.urlencode({

    "url": article_url}).encode()
        req = urllib.request.Request(url, data=data, headers=headers)
        with urllib.request.urlopen(req) as response:
            return json.loads(response.read().decode())['data']['score']

    def get_scores_from_excel(self):
        # Read the Excel file
        df = pd.read_excel(self.filepath)
        # Get the 'URL' column
        urls = df['URL']
        # Get the score for each URL
        scores = [self.get_article_score(url) for url in urls]
        return scores

    def write_scores_to_excel(self):
        df = pd.read_excel(self.filepath)
        df['质量分'] = self.get_scores_from_excel()
        df.to_excel(self.filepath,index=False)
2.12 Complete in one step
The previous code is still a bit bloated. You can query the quality score after obtaining the article information, and then write all the data into excel.
You can implement this part of the code yourself.
2.13 Complete code
import urllib.request
import json
import pandas as pd
from openpyxl import Workbook, load_workbook
from openpyxl.utils.dataframe import dataframe_to_rows


# 批量获取文章信息并保存到excel
class CSDNArticleExporter:
    def __init__(self, username, size, filename):
        self.username = username
        self.size = size
        self.filename = filename

    def get_articles(self):
        url = f"https://blog.csdn.net/community/home-api/v1/get-business-list?page=1&size={

      self.size}&businessType=blog&orderby=&noMore=false&year=&month=&username={

      self.username}"
        with urllib.request.urlopen(url) as response:
            data = json.loads(response.read().decode())
        return data['data']['list']

    def export_to_excel(self):
        df = pd.DataFrame(self.get_articles())
        df = df[['title', 'url', 'postTime', 'viewCount', 'collectCount', 'diggCount', 'commentCount']]
        df.columns = ['文章标题', 'URL', '发布时间', '阅读量', '收藏量', '点赞量', '评论量']
        # df.to_excel(self.filename)
        # 下面的代码会让excel每列都是合适的列宽,如达到最佳阅读效果
        # 你只用上面的保存也是可以的
        # Create a new workbook and select the active sheet
        wb = Workbook()
        sheet = wb.active
        # Write DataFrame to sheet
        for r in dataframe_to_rows(df, index=False, header=True):
            sheet.append(r)
        # Iterate over the columns and set column width to the max length in each column
        for column in sheet.columns:
            max_length = 0
            column = [cell for cell in column]
            for cell in column:
                try:
                    if len(str(cell.value)) > max_length:
                        max_length = len(cell.value)
                except:
                    pass
            adjusted_width = (max_length + 5)
            sheet.column_dimensions[column[0].column_letter].width = adjusted_width
        # Save the workbook
        wb.save(self.filename)


# 批量查询质量分
class ArticleScores:
    def __init__(self, filepath):
        self.filepath = filepath

    @staticmethod
    def get_article_score(article_url):
        url = "https://bizapi.csdn.net/trends/api/v1/get-article-score"
        headers = {


            "Accept": "...",
            "X-Ca-Key": "...",
            "X-Ca-Nonce": "...",
            "X-Ca-Signature": "...",
            "X-Ca-Signature-Headers": "x-ca-key,x-ca-nonce",
            "X-Ca-Signed-Content-Type": "multipart/form-data",
        }
        data = urllib.parse.urlencode({

    "url": article_url}).encode()
        req = urllib.request.Request(url, data=data, headers=headers)
        with urllib.request.urlopen(req) as response:
            return json.loads(response.read().decode())['data']['score']

    def get_scores_from_excel(self):
        # Read the Excel file
        df = pd.read_excel(self.filepath)
        # Get the 'URL' column
        urls = df['URL']
        # Get the score for each URL
        scores = [self.get_article_score(url) for url in urls]
        return scores

    def write_scores_to_excel(self):
        df = pd.read_excel(self.filepath)
        df['质量分'] = self.get_scores_from_excel()
        df.to_excel(self.filepath,index=False)


if __name__ == '__main__':
    # 获取文章信息
    exporter = CSDNArticleExporter(你的csdn id, 要查询的文章数量, 'score.xlsx')  # Replace with your username
    exporter.export_to_excel()
    # 批量获取质量分
    score = ArticleScores('score.xlsx')
    score.write_scores_to_excel()
2.2 python + html
Ideas:
-
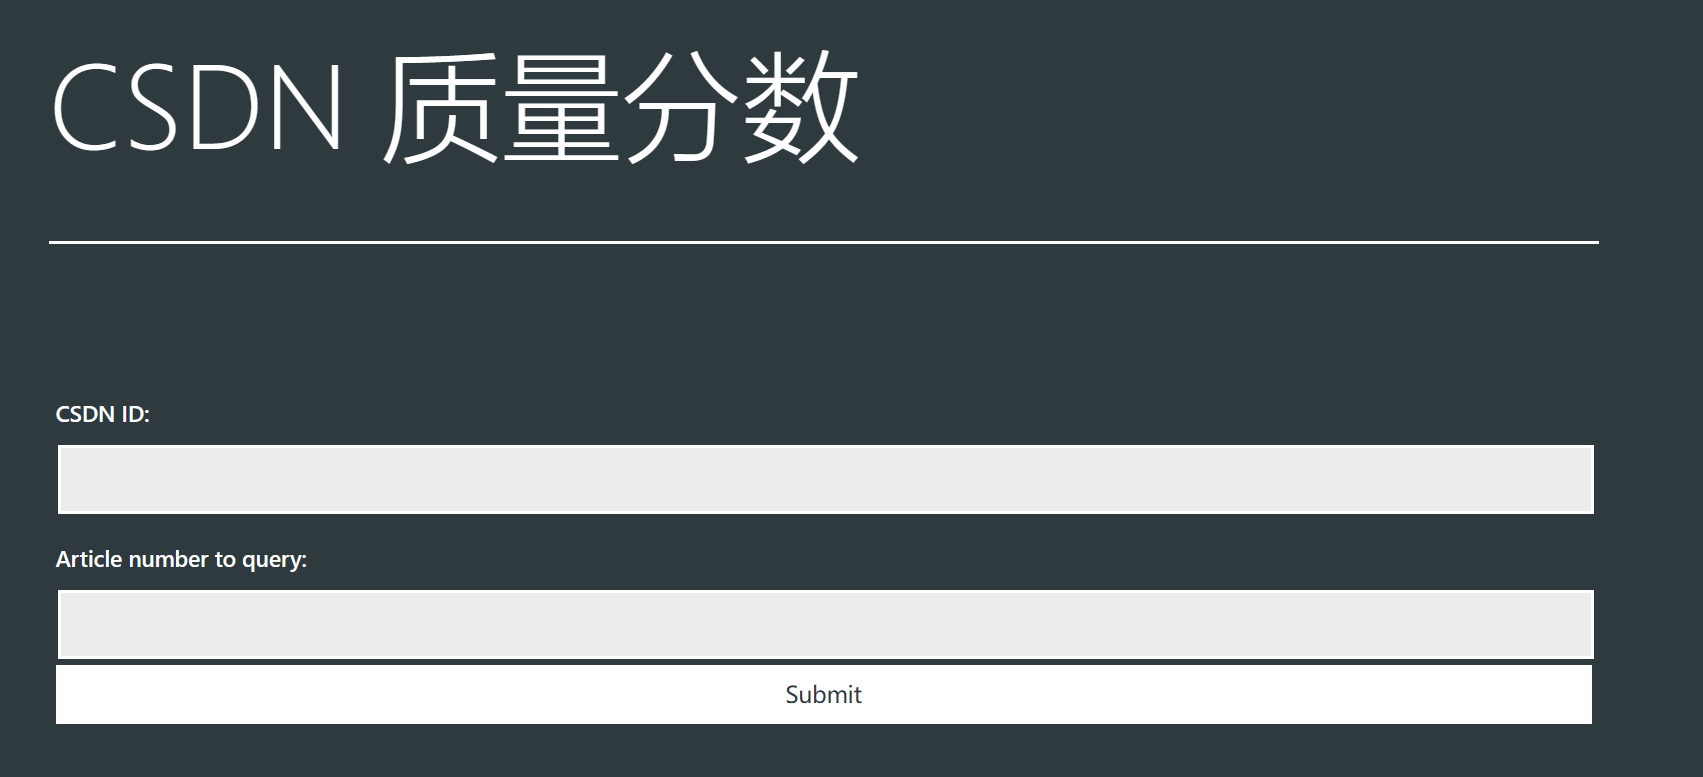
User Input : First, we need to get the user's input. In this project, users need to enter their CSDN username and the number of articles they want to get. We use HTML
<input>elements to create input boxes for users to enter this information. -
Get article information : When the user clicks the "Submit" button, we use jQuery's
$.getJSON()function to send a GET request to CSDN's API. This API returns a JSON object containing user article information. We extract the information we need from this object, including the article's title, URL, and score. -
Get Article Score : In order to get the score of each article, we need to send a POST request to our own server. Our server will receive this request, and then send a POST request to another API of CSDN to get the score of the article. This API returns a JSON object containing article scores. Our server returns this score to the front end.
-
Display the result : Finally, we display the obtained article information on the web page. We create an HTML table with information about one article per row. We use jQuery
$.when.apply()functions to ensure that all POST requests are completed before displaying the results. This is because POST requests are asynchronous, and if we don't wait for all requests to complete, we might display results for some articles before their scores are available.
2.21 Running locally
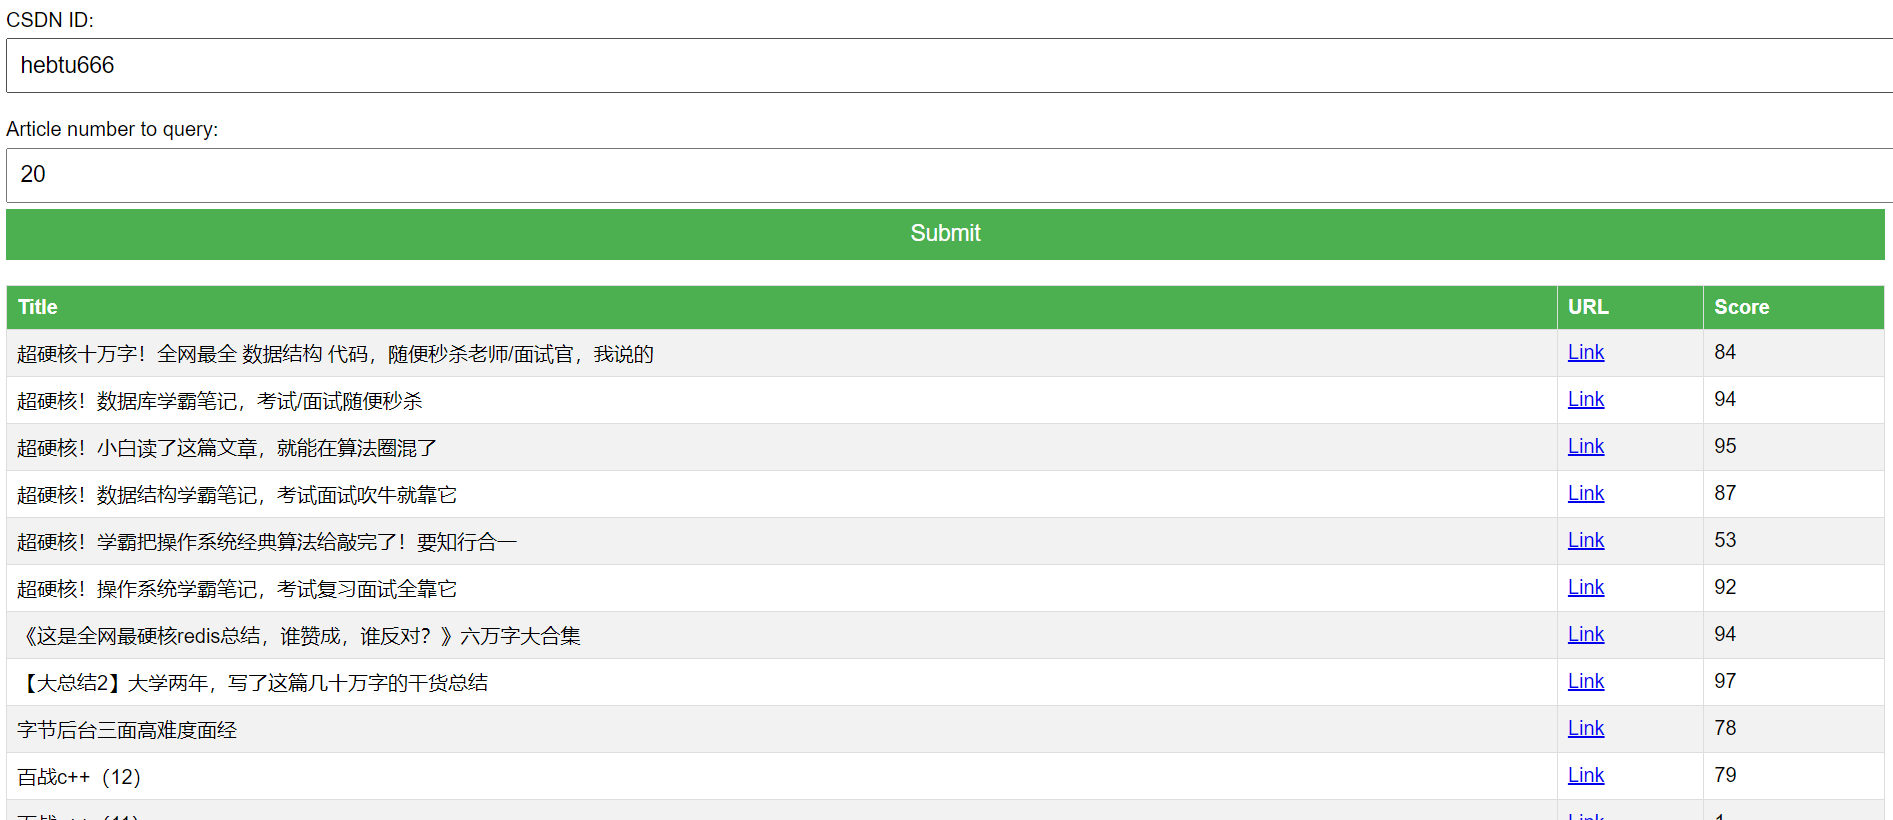
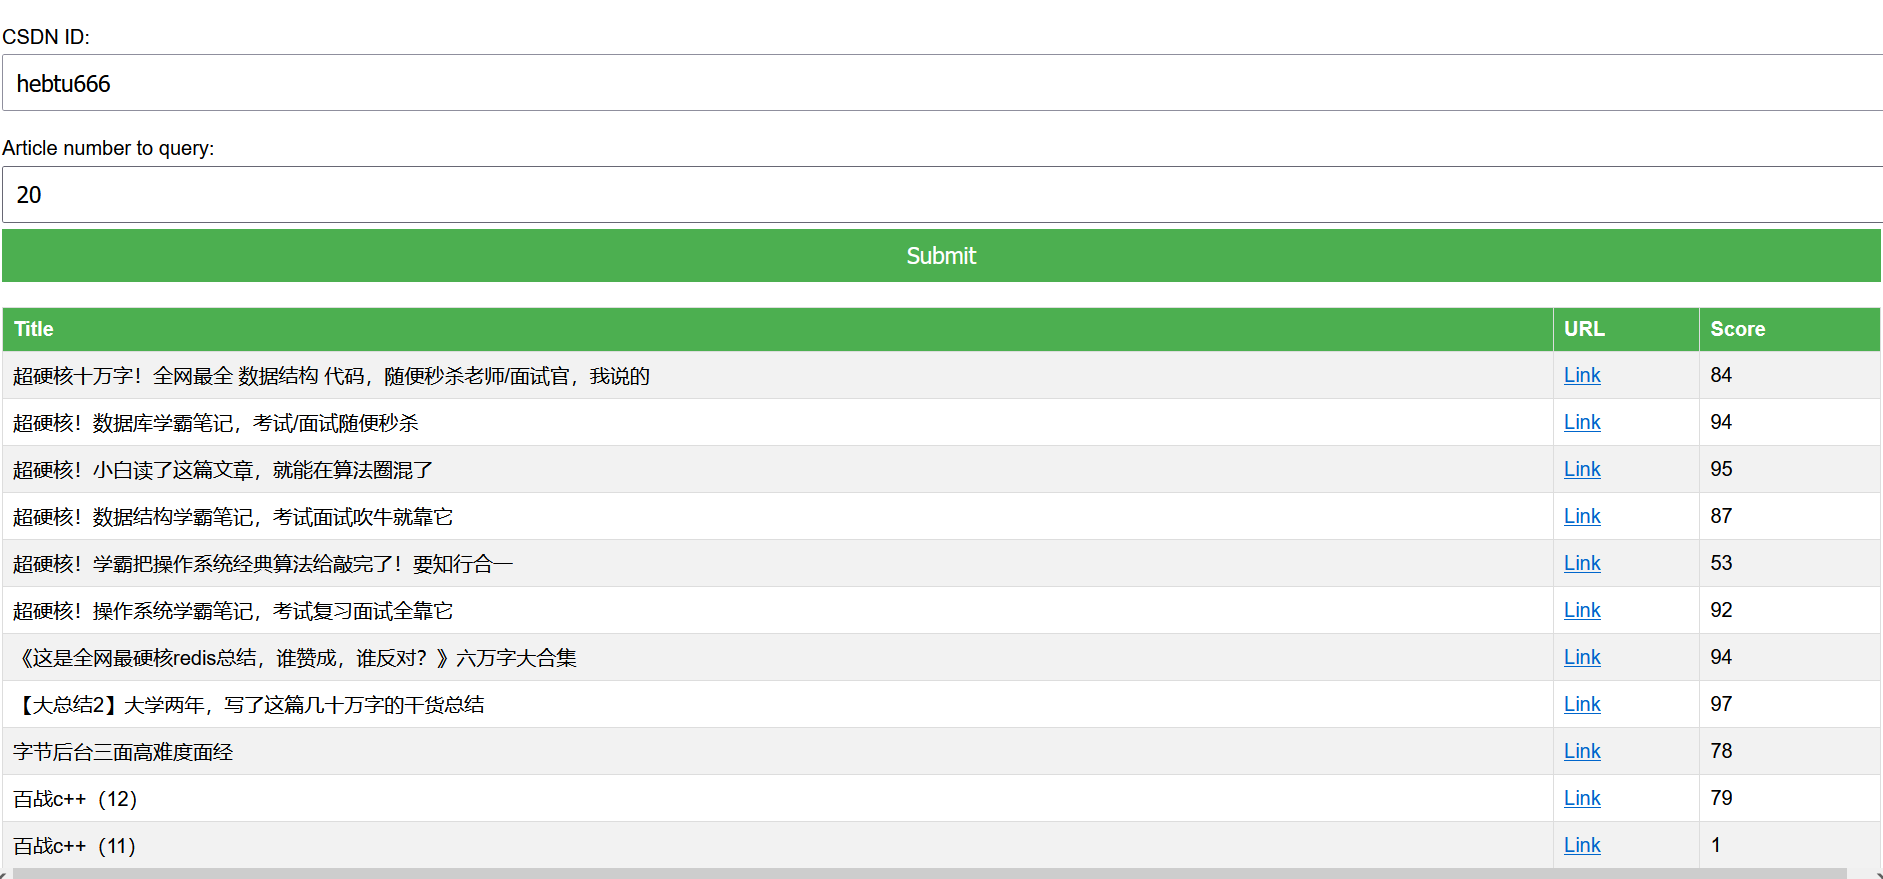
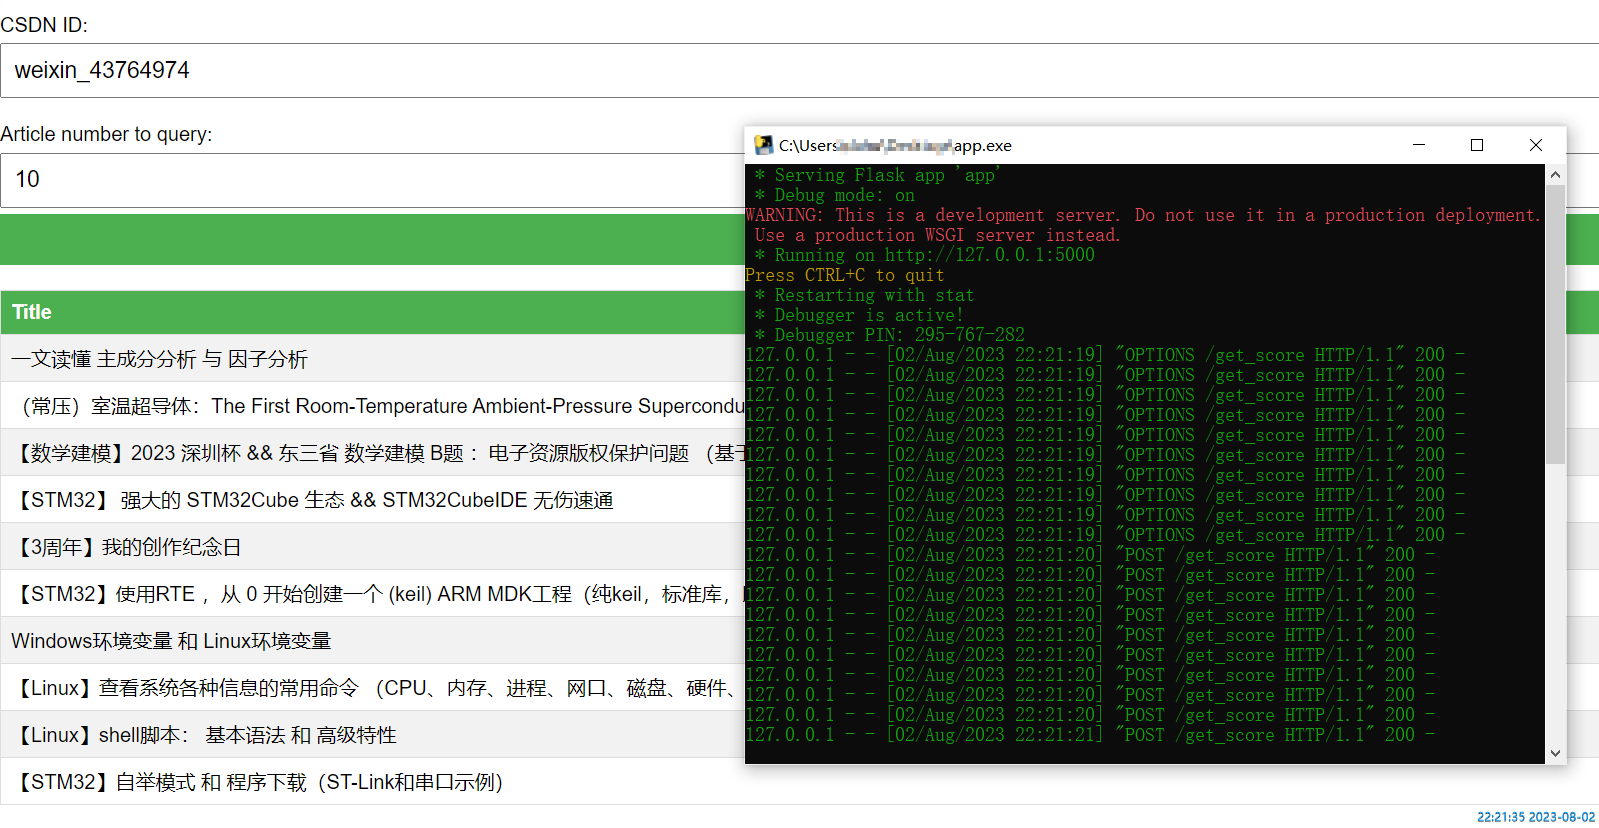
First look at the effect: this is the blog quality score of Rabbit Boss
Create an Flaskapplication and define a route '/' which responds to GET and POST requests. For GET requests, it returns an HTML form. For POST requests, it gets the username and size from the form, then gets the corresponding articles, and displays them on the screen.
app.py: The parameters of the request header are still obtained by yourself
from flask import Flask, request, jsonify
from flask_cors import CORS
import urllib.request
import json

app = Flask(__name__)
CORS(app)

@app.route('/get_score', methods=['POST'])
def get_score():
    article_url = request.json['url']
    url = "https://bizapi.csdn.net/trends/api/v1/get-article-score"
    headers = {


        "Accept": "application/json, text/plain, */*",
        "X-Ca-Key": "...",
        "X-Ca-Nonce": "....",
        "X-Ca-Signature": "....",
        "X-Ca-Signature-Headers": "x-ca-key,x-ca-nonce",
        "X-Ca-Signed-Content-Type": "multipart/form-data",
    }
    data = urllib.parse.urlencode({

    "url": article_url}).encode()
    req = urllib.request.Request(url, data=data, headers=headers)
    with urllib.request.urlopen(req) as response:
        score = json.loads(response.read().decode())['data']['score']
    return jsonify(score=score)

if __name__ == '__main__':
    app.run(debug=True)
htmlVisualization:
<!DOCTYPE html>
<html>
<head>
    <title>CSDN Article Info</title>
    <style>
        body {


            font-family: Arial, sans-serif;
        }
        form {


            margin-bottom: 20px;
        }
        label {


            display: block;
            margin-top: 20px;
        }
        input, button {


            width: 100%;
            padding: 10px;
            margin-top: 5px;
            font-size: 18px;
        }
        button {


            background-color: #4CAF50;
            color: white;
            border: none;
            cursor: pointer;
        }
        button:hover {


            background-color: #45a049;
        }
        table {


            width: 100%;
            border-collapse: collapse;
        }
        th, td {


            border: 1px solid #ddd;
            padding: 8px;
            text-align: left;
        }
        tr:nth-child(even) {


            background-color: #f2f2f2;
        }
        th {


            background-color: #4CAF50;
            color: white;
        }
    </style>
    <script src="https://ajax.googleapis.com/ajax/libs/jquery/3.5.1/jquery.min.js"></script>
    <script>
        $(document).ready(function(){


            $("#submit").click(function(event){


                event.preventDefault();
                var username = $("#username").val();
                var size = $("#size").val();
                var url = "https://blog.csdn.net/community/home-api/v1/get-business-list?page=1&size=" + size + "&businessType=blog&orderby=&noMore=false&year=&month=&username=" + username;
                $.getJSON(url, function(data) {


                    var articles = data.data.list;
                    var promises = [];
                    for (var i = 0; i < articles.length; i++) {


                        (function(article) {


                            var promise = $.ajax({


                                url: "http://localhost:5000/get_score",
                                type: "POST",
                                data: JSON.stringify({

      url: article.url}),
                                contentType: "application/json; charset=utf-8",
                                dataType: "json"
                            }).then(function(data){


                                return "<tr><td>" + article.title + "</td>" +
                                       "<td><a href='" + article.url + "'>Link</a></td>" +
                                       "<td>" + data.score + "</td></tr>";
                            });
                            promises.push(promise);
                        })(articles[i]);
                    }
                    $.when.apply($, promises).then(function() {


                        var html = "<table><tr><th>Title</th><th>URL</th><th>Score</th></tr>";
                        for (var i = 0; i < arguments.length; i++) {


                            html += arguments[i];
                        }
                        html += "</table>";
                        $("#result").html(html);
                    });
                });
            });
        });
    </script>
</head>
<body>
    <form>
        <label for="username">CSDN ID:</label>
        <input type="text" id="username" name="username">
        <label for="size">Article number to query:</label>
        <input type="text" id="size" name="size">
        <button id="submit">Submit</button>
    </form>
    <div id="result"></div>
</body>
</html>
Instructions:
Run app.py first, then open html.

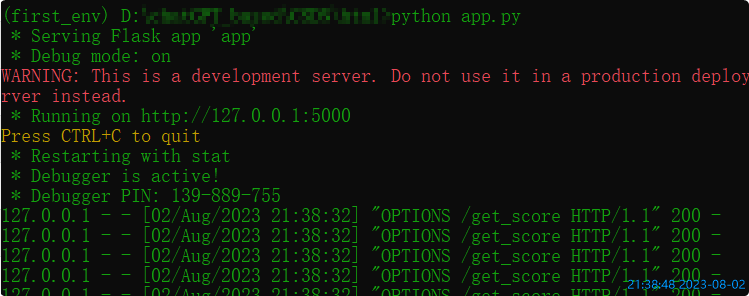
It can also be run on the command line. First enter the directory where app.py is located, enter cmd in the address bar (powershell is also available), and press Enter. My code uses the conda virtual environment, so enter the virtual environment first:
conda activate first_env
Then run app.py:
python app.py
Finally, open the html for query.
2.22 Pack into exe file
I use conda's virtual environment.
Enter the virtual environment:
conda activate first_env
First install in your current virtual environment:pyinstaller
(As long as you enter this virtual environment, you can use conda or pip)
Continue packaging on the command line:
pyinstaller --onefile --paths=E:\anaconda3\envs\first_env\Lib\site-packages app.py
Notice:
- The previous path is the virtual environment (first_env) where my python program runs, and I have installed related modules in it, such as flask;
- This command is run in the directory where app.py is located, and it has entered the virtual environment.
After the packaging is complete: the exe file can be found in the dist directory.
If you open it and it shows what modules are missing, then you need to solve it yourself.
If it can be run, then you can move this exe to any location to run. For example, I copy it to the desktop, and then double-click to open it to run.
Then the browser can open the Html to query.
2.23 Deploy to server
You can also deploy it to the server, and open the query page directly with the url in the future.
Deploy it yourself if you are interested.
Write love you forever into the end of the poem ~