
Hello everyone, today I will share a few little knowledge related to Vue, I hope it will be helpful to you
1. Get the value selected by the drop-down box in Vue.js

Sometimes, we want to get the selected option when the option changes in Vue.js. In this post, we will learn how to get selected options in Vue.js.
Get selected options in Vue.js We can get selected options in Vue.js by setting @change as a method. For example, we could write:
<template>
  <div id="app">
    <select name="fruit" @change="onChange($event)" v-model="key">
      <option value="1">apple</option>
      <option value="2">orange</option>
    </select>
  </div>
</template>
<script>
export default {
  name: "App",
  data() {
    return { key: "" };
  },
  methods: {
    onChange(event) {
      console.log(event.target.value, this.key);
    },
  },
};
</script>
We set v-model as a key responsive property, bind the property value of the selected value to that key property.
We then set @change to onChange($event) to call the onChange function with the change event object.
In the onChange function we get the event object and use event.target.value to get the property value of the selected value.
Since we use v-model to bind it to the property value of the selected value, we can get the same value via this.key.
Instead, we can remove ($event) and write, with the same result.
<template>
  <div id="app">
    <select name="fruit" @change="onChange" v-model="key">
      <option value="1">apple</option>
      <option value="2">orange</option>
    </select>
  </div>
</template>
<script>
export default {
  name: "App",
  data() {
    return { key: "" };
  },
  methods: {
    onChange(event) {
      console.log(event.target.value, this.key);
    },
  },
};
</script>
2. Use Vue.js to perform certain actions when the mouse hovers over an element
To perform some action when the mouse hovers over an element, we can listen to the mouseover (mouse over) and mouseleave (mouse leave) events.
For example, we can write the following code:
<template>
  <div id="app">
    <div @mouseover="hovered = true" @mouseleave="hovered = false">
      <p>hello world</p>
      <p v-show="hovered">hovered</p>
    </div>
  </div>
</template>
<script>
export default {
  name: "App",
  data() {
    return { hovered: false };
  },
};
</script>
We have a reactive property hovered with an initial value of false.
Then we add the @mouseover directive and set its value to hovered=true, when we move the mouse inside the div, we set the @mouseover directive to hovered=false to get the mouse inside and out of the div Toggle the hovered state.
We use the v-show directive to show the second p element when hovered is true.
Now, when our mouse is inside the div, we can see "hovered" being displayed.
When we move the mouse out of the div, the "hovered" disappears.
3. Get the elements in the component in Vue.js
Sometimes, we want to get elements inside a component in Vue.js. In this article, we will discuss how to get elements inside components in Vue.js.
To get an element inside a component in Vue.js, we can assign a reference (ref) to the element we want to get. We can then use the this.$refs property in any lifecycle or regular method to get that element.
For example, we can write the following code:
<template>
  <div id="app">
    <span ref="someName" class="foo bar">Child Span</span>
  </div>
</template>
<script>
export default {
  name: "App",
  mounted() {
    const childSpanClassAttr = this.$refs.someName.getAttribute("class");
    console.log(childSpanClassAttr);
  },
};
</script>
We set the ref attribute of the <span> to "someName".
We can then access the <span> element via this.$refs.someName in any lifecycle or regular method.
We can call any DOM element method, such as getAttribute, to operate on it.
We get the value of the 'class' attribute by passing 'class' as the parameter of getAttribute.
Therefore, the console log will print out 'foo bar'.
4. Use Vue.js to detect clicks outside elements
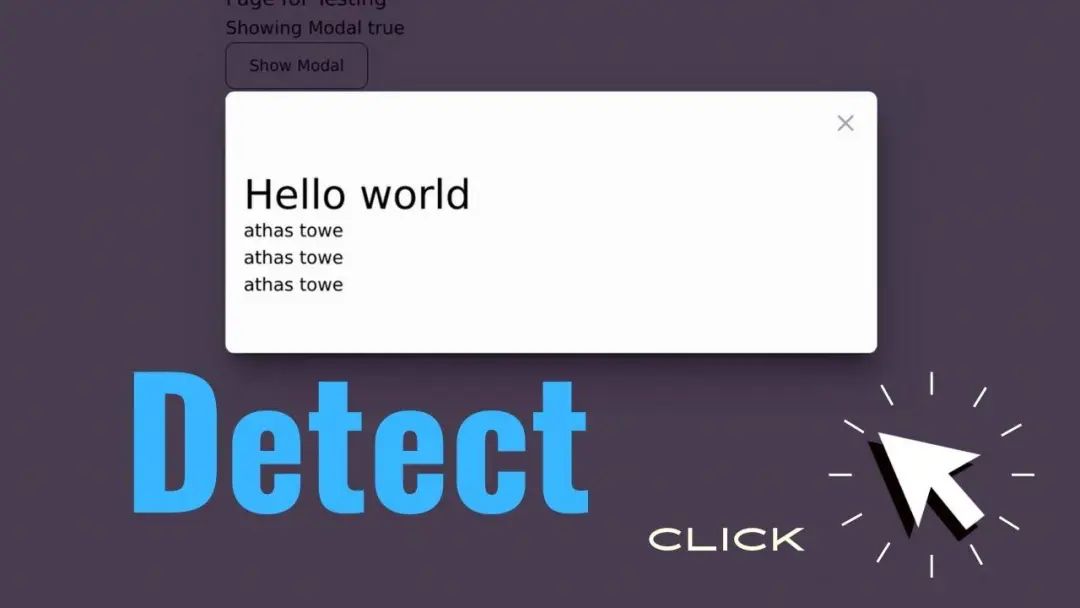
Sometimes, we want to detect clicks outside an element in Vue.js. In this article, we'll explore how to detect clicks outside an element with Vue.js.
We can detect clicks outside elements in Vue.js by creating a custom directive. For example, we could write:
<template>
  <!-- 创建一个宽度和高度为 500px 的 DIV,ID 为 "app" -->
  <div id="app" style="width: 500px; height: 500px">
    <!-- 该 DIV 使用了自定义指令 v-click-outside,用来监听点击元素外部的事件 -->
    <div v-click-outside="onClickOutside">hello world</div>
  </div>
</template>

<script>
  // 导入 Vue 库
  import Vue from "vue";

  // 创建一个自定义指令 "click-outside"
  Vue.directive("click-outside", {
    // 当指令绑定到元素时,会立即调用 bind 函数
    bind(el, binding, vnode) {
      // 创建一个函数来处理点击事件
      el.clickOutsideEvent = (event) => {
        // 如果点击的不是元素本身,也不是其内部的任何元素,那么就触发绑定的函数
        if (!(el === event.target || el.contains(event.target))) {
          // 在 Vue 实例上执行绑定的函数
          vnode.context[binding.expression](event);
        }
      };
      // 在 body 元素上添加 click 事件监听器
      document.body.addEventListener("click", el.clickOutsideEvent);
    },

    // 当指令与元素解除绑定时,会立即调用 unbind 函数
    unbind(el) {
      // 移除在 body 元素上的 click 事件监听器
      document.body.removeEventListener("click", el.clickOutsideEvent);
    },
  });

  // 导出 Vue 实例
  export default {
    name: "App", // 组件名
    methods: {
      // 自定义一个方法来处理点击元素外部的事件
      onClickOutside() {
        console.log("clicked outside"); // 控制台输出信息 "clicked outside"
      },
    },
  };
</script>
Use the Vue.directive method to add custom directives, which takes the directive name and an object as parameters that has bind and unbind methods to add the el method inside the bind method.
In the clickOutsideEvent method we check if el is not event.target and it does not contain event.target.
If both are true, add vnode.context[binding.expression](event); to run the method we set as the value of the v-click-outside directive.
Then, we call
document.body.addEventListener to add a click event listener to run clickOutsideEvent.
In the unbind method, we use removeEventListener to remove the event listener.
Then, in the template, we add v-click-outside and set its value to onClickOutside to run the method when outside is clicked.
When we click outside, we should see "clicked outside" logged.
We can detect clicks outside elements in Vue.js by creating a custom directive. The custom directive "v-click-outside" in this Vue.js code is mainly used to handle click events outside the element. This feature is very useful in many application scenarios, the following are some specific examples:
Dropdown menu (Dropdown) or modal window (Modal): When the user clicks on the outer area of the dropdown menu or modal window, we usually expect the dropdown menu or modal window to close. This would require detecting if the user has clicked outside the element, and if so, trigger a function to close the dropdown or modal window.
Context menu (Context Menu): In the context menu opened by the right button, when the user clicks other places outside the menu, it is usually necessary to close the menu. You can also use this custom directive to listen for click events and close the context menu when the click event occurs outside the menu.
Tooltip: Tooltips have similar requirements. When a tooltip is displayed, we usually want the tooltip to disappear if the user clicks somewhere other than the tooltip.
Form Validation: In some scenarios, you may want form validation to be performed when the user completes the input and clicks outside the input box. You can use this command to achieve this effect.
Search Autocomplete: When typing in the search box, an auto-complete drop-down menu will appear. When the user selects a search suggestion or clicks outside the search box, we usually need to close the auto-complete menu.
In all the above scenarios, through the "v-click-outside" custom directive, you can easily handle the click event outside the element, and then realize your interaction requirements.
5. How to call a filter in a method inside a Vue component instance?
We can get the filter function from the this.options.$filters property to call the filter in the Vue component instance.
For example, we can write:
<template>
  <div id="app">
    {

    { truncatedText }} <!-- 在页面上显示计算属性 truncatedText 的结果 -->
  </div>
</template>

<script>
import Vue from "vue"; // 导入 Vue 框架

// 在 Vue 框架中定义一个名为 "truncate" 的过滤器,该过滤器接收三个参数:text, stop, clamp
// text 为需要截断的文本
// stop 为截断的字符位置
// clamp 为当文本被截断时添加的字符,默认为 "..."
Vue.filter("truncate", (text, stop, clamp) => {
  return text.slice(0, stop) + (stop < text.length ? clamp || "..." : ""); // 如果 stop 小于文本长度,就在截断的地方添加 clamp 参数指定的内容,如果没有指定 clamp,就添加 "..."
});

export default {
  name: "App", // 组件的名称
  computed: {
    // 定义一个计算属性,使用上面定义的 "truncate" 过滤器,传入的文本为 "Lorem ipsum dolor sit amet, consectetur adipiscing elit",截断位置为 10,截断后添加的字符为 "..."
    truncatedText() {
      return this.$options.filters.truncate(
        "Lorem ipsum dolor sit amet, consectetur adipiscing elit",
        10,
        "..."
      );
    },
  },
};
</script>
We have a property called truncatedText which returns the truncated text.
Filters are defined via the Vue.filter method with their name as the first argument.
The second parameter is the filter function.
To call the truncate filter method, we use this.$options.filters.truncate and pass in the text to truncate, the number of characters to truncate the text, and the abbreviation after the truncate text.
Then we display this text in the template.
in conclusion
Due to the limited space of the article, today’s content will be shared here. At the end of the article, I would like to remind you that the creation of articles is not easy. If you like my sharing, please don’t forget to like and forward it, so that more people in need See. At the same time, if you want to gain more knowledge of front-end technology, welcome to follow me, your support will be the biggest motivation for me to share. I will continue to output more content, so stay tuned.