Use mybatis generator reverse engineering in idea to generate model, mapper and xml
Configure the pom file
Add plugins to the pom file to generate code
<plugin>
				<groupId>org.mybatis.generator</groupId>
				<artifactId>mybatis-generator-maven-plugin</artifactId>
				<version>1.3.5</version>
				<configuration>
					<verbose>true</verbose>
					<overwrite>true</overwrite>
				</configuration>
			</plugin>
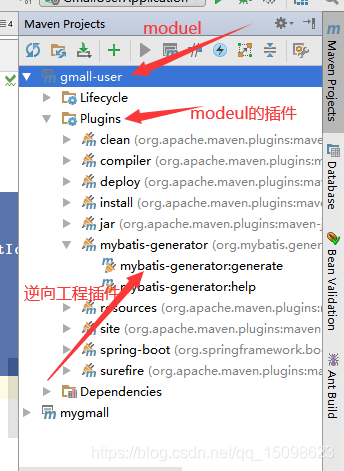
After the addition is complete, update the maven dependencies. When
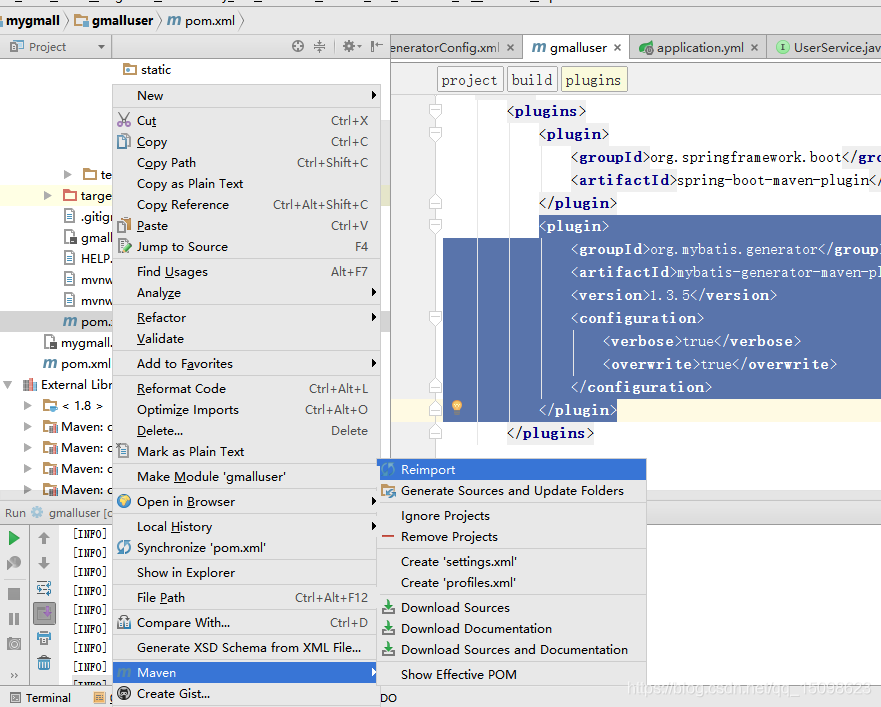
finished, click the maven projects on the right side of the idea, select the plugins option under the corresponding project or project, and the corresponding plugin will appear.
At this point, you can't click Use yet, because the connection configuration of the database has not been configured yet.
Configure database connection
Add the generatorConfig.xml file in the resources directory to configure the database connection.
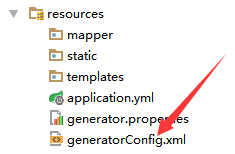
Some properties of generatorConfig.xml such as database url and user name can be directly written in the file, or extracted and placed in the generator.properties file, depending on personal preferences, but the habit of programmers is to extract the configuration as much as possible, do not Write the code to death.
generatorConfig.xml file
<?xml version="1.0" encoding="UTF-8"?>
<!DOCTYPE generatorConfiguration
        PUBLIC "-//mybatis.org//DTD MyBatis Generator Configuration 1.0//EN"
        "http://mybatis.org/dtd/mybatis-generator-config_1_0.dtd">

<generatorConfiguration>
    <!--导入属性配置,可以不用该文件,不用的话下面的某些属性就要硬编码到代码里-->
    <properties resource="generator.properties"></properties>

    <!--指定特定数据库的jdbc驱动jar包的位置,引用generator.properties
    里的变量,下同-->
    <classPathEntry location="${jdbc.driverLocation}"/>

    <context id="default" targetRuntime="MyBatis3">

        <!-- optional,旨在创建class时,对注释进行控制 -->
        <commentGenerator>
            <property name="suppressDate" value="true"/>
            <property name="suppressAllComments" value="true"/>
        </commentGenerator>

        <!--jdbc的数据库连接 -->
        <jdbcConnection
                driverClass="${jdbc.driverClass}"
                connectionURL="${jdbc.connectionURL}"
                userId="${jdbc.userId}"
                password="${jdbc.password}">
        </jdbcConnection>


        <!-- 非必需,类型处理器,在数据库类型和java类型之间的转换控制-->
        <javaTypeResolver>
            <property name="forceBigDecimals" value="false"/>
        </javaTypeResolver>


        <!-- Model模型生成器,用来生成含有主键key的类,记录类 以及查询Example类
            targetPackage     指定生成的model生成所在的包名
            targetProject     指定在该项目下所在的路径
            酌情根据自己的项目结构要修改
        -->
        <javaModelGenerator targetPackage="com.XXX"
                            targetProject="src/main/java">

            <!-- 是否允许子包,即targetPackage.schemaName.tableName -->
            <property name="enableSubPackages" value="false"/>
            <!-- 是否对model添加 构造函数 -->
            <property name="constructorBased" value="true"/>
            <!-- 是否对类CHAR类型的列的数据进行trim操作 -->
            <property name="trimStrings" value="true"/>
            <!-- 建立的Model对象是否 不可改变  即生成的Model对象不会有 setter方法,只有构造方法 -->
            <property name="immutable" value="false"/>
        </javaModelGenerator>

        <!--Mapper映射文件生成所在的目录 为每一个数据库的表生成对应的SqlMap文件
        酌情根据自己的项目结构要修改-->
        <sqlMapGenerator targetPackage="com.XXX"
                         targetProject="src/main/java">
            <property name="enableSubPackages" value="false"/>
        </sqlMapGenerator>

        <!-- 客户端代码,生成易于使用的针对Model对象和XML配置文件 的代码
                type="ANNOTATEDMAPPER",生成Java Model 和基于注解的Mapper对象
                type="MIXEDMAPPER",生成基于注解的Java Model 和相应的Mapper对象
                type="XMLMAPPER",生成SQLMap XML文件和独立的Mapper接口
                酌情根据自己的项目结构要修改
        -->
        <javaClientGenerator targetPackage="com.XXX"
                             targetProject="src/main/java" type="XMLMAPPER">
            <property name="enableSubPackages" value="true"/>
        </javaClientGenerator>

<!--需要生成代码的表配置,前面四个字段比较重要,后面五个字段默认false就行了,暂时也不清楚什么意思,以后遇到在研究-->
        <table  schema="数据库名,也可以不指定,因为前面配置的时候已经指定过了" tableName="数据表名" domainObjectName="代码中的表对应的实体类名" mapperName="XXDao"
               enableCountByExample="false" enableUpdateByExample="false"
               enableDeleteByExample="false" enableSelectByExample="false"
               selectByExampleQueryId="false">
        </table>


    </context>
</generatorConfiguration>
generator.properties file
jdbc.driverLocation=mysql-connector-java-5.1.46.jar 包的全路径,根据自己的实际情况配置
jdbc.driverClass=com.mysql.jdbc.Driver
jdbc.connectionURL=jdbc:mysql://IP地址:端口号/数据库名称?useSSL=false(useSSL字段在mysql5.5以后必须要加)
jdbc.userId=用户名
jdbc.password=密码
After that, you can use the plug-in to generate code with one click.