Zhuang Dong's TA Notes (15) <Special Effects: Flow + Disturbance>
Show results:
text:
Outline:

1. Augmentation:
1. Sorting problem:

The reason for this problem is that the villain's arm is not considered transparent before taking the background, so he is ignored and transparent during the compilation process.
Detach Attach Zwrite Off solves the transparent paste problem. (How to use it? I won’t talk about it here)
Determine whether the object in front is blocking the object in the rear. And judge whether the object in front is transparent, whether the Z depth pixel is closer to the front or not.
2. Alpha channel premultiplication problem:
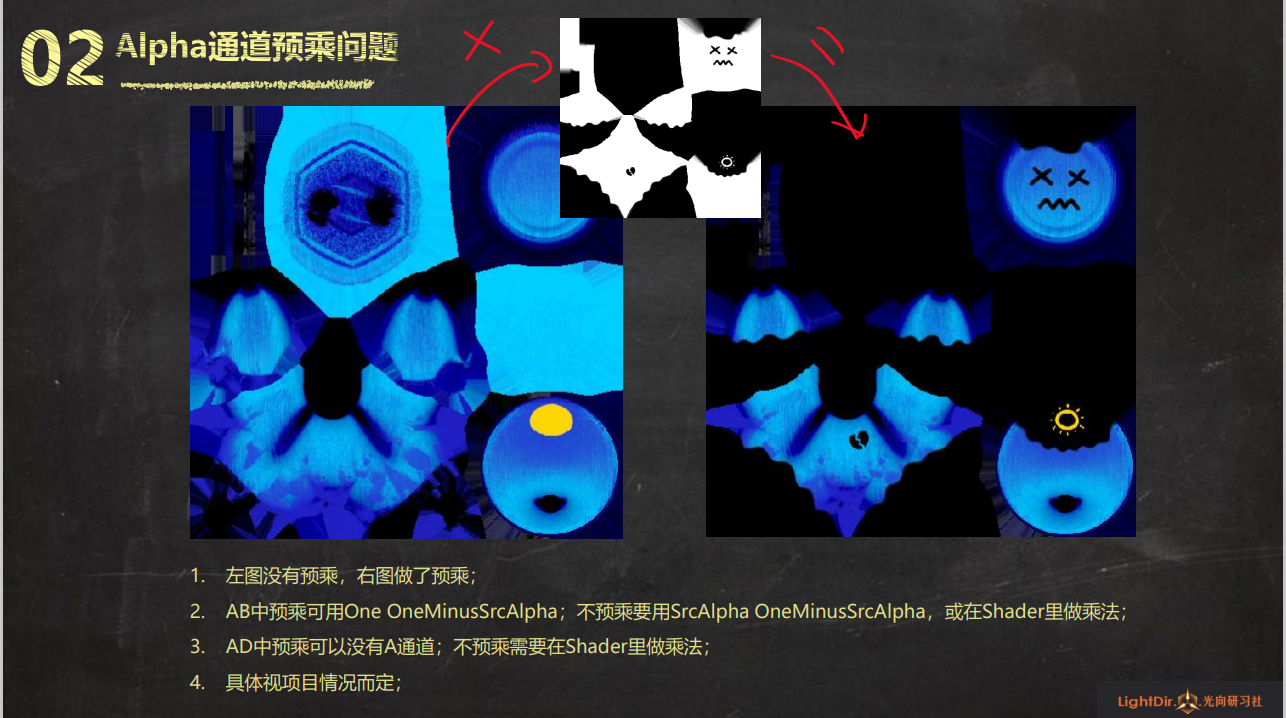
Two image types:
The picture on the left is without premultiplication.
The image on the right is a premultiplied texture.
What is premultiplication?
That is, multiply the color, RGB image and transparent sticker, and then put it in RGB.
What should I pay attention to?
When writing, AB (when premultiplied), you can use the mixed method of One OneMinusSrcAlpha.
When writing, AD (when not premultiplied), you can use SrcAlpha OneMinusSrcAlpha or a mixed method of multiplication in the shader.
3. AB AD code improvement:

Here, it is actually consistent with the notes recorded in the previous article, the difference between AB, and AD is:
Blend One One 和 Blend One OneMinusSrcAlpha .
2. Realization of UV flow effect:

1. Demonstration Ghost Flow

Control parameter design: (definition material panel)
1. Add noise texture_NoiseTex
2. Control noise intensity_NoiseInt
3. Control Flow speed_FlowSpeed
Knowledge points:
The overall performance is bright and dark (it not only brightens the background, but also darkens the background). If this is the intuitive feeling, it is generally considered to be AB.
If it is a brightening of all the background, half of it is AD.
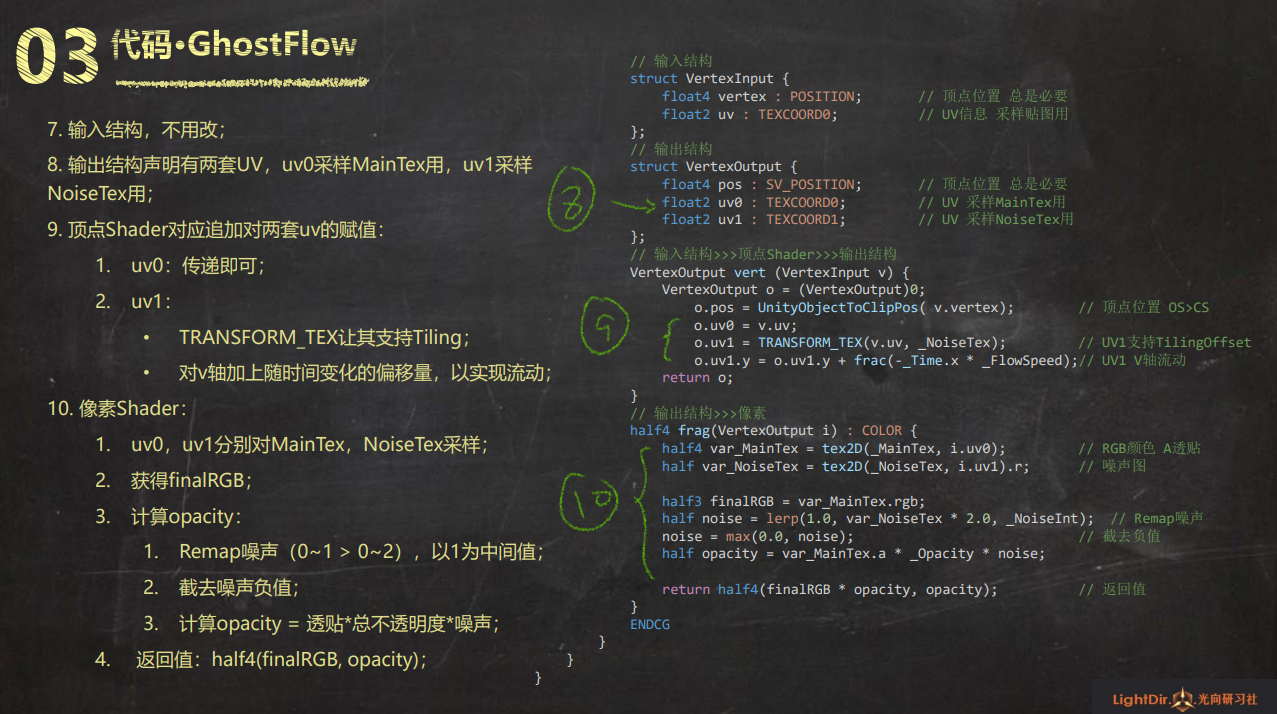
2. Code GhostFlow

3. Code GhostFlow;
frac (to take the remainder means to take the decimal point, otherwise there will be no change in the perception if only the integer is taken). The reason is that in the case of some low-end machines, if the remainder is not taken, it will be spent. In the depth, the reason for the spend is Time It is easy to overflow that has been growing infinitely since the opening of unity. After taking the remainder, it will not.
examples:
Vertex shader:
Let UV1 (noise UV) flow:
1. TRANSFORM_TEX supports texture scaling
2. Add an offset that changes with time to the V axis to achieve flow. _Time. (X, Y, Z) is divided into 3 levels, from slow to fast, increasing by 2 times.
Pixel shader:
1. Sampling noise map, only take a single channel, R.
2. Get FinalRGB.
3. Calculate the opacity transparent paste.
Remap noise map (mapped from 0~1 to 0~2), with 1 as the middle value. lerp(1,var_NoiseTex * 2 , _NoiseInt*2);
Cut Noise Negative Values
Calculation opacity = transparency * total opacity * noise map;
Return output: float4 (FinalRGB, opacity);
Code example:
Shader "Unlit/Sc014Flow01"
{
    Properties
    {
        _MainTex ("Texture", 2D) = "white" {}
        _NoiseTex ("_NoiseTex", 2D) = "gray" {}
        _NoiseInt ("噪波强度",Range(0,5))=1
        _FlowSpeed("流动速度",Range(-10,10))=5
        _Cutout("透贴",Range(0,1))=0.5
    }
    SubShader
    {
        Tags {
                "Queue"="Transparent"
                "RenderType"="Transparent"
                "ForceNoShadowCasting"="True"       // 关闭阴影投射
                "IgnoreProjector"="True"            // 不响应投射器

              }
        LOD 100
         Pass {
            Name "FORWARD"
            Tags {
                "LightMode"="ForwardBase"
            }

            Blend One OneMinusSrcAlpha

            CGPROGRAM
            #pragma vertex vert
            #pragma fragment frag
            #pragma multi_compile_instancing
            #include "UnityCG.cginc"
            #pragma multi_compile_fwdbase_fullshadows
            #pragma target 3.0
            UNITY_INSTANCING_BUFFER_START( Props )
               // UNITY_DEFINE_INSTANCED_PROP( float4, _Color)
            UNITY_INSTANCING_BUFFER_END( Props )

            uniform sampler2D _MainTex;//uniform float4 _MainTex_ST;
            uniform sampler2D _NoiseTex;uniform float4 _NoiseTex_ST;
            uniform float _Cutout;
            uniform float _NoiseInt;
            uniform float _FlowSpeed;

            //输入结构
            struct VertexInput
            {
                float4 vertex : POSITION;
                float2 uv0 : TEXCOORD0;

            };
            //顶点输出结构
            struct VertexOutput
            {
                float4 pos : SV_POSITION;
                float2 uv0 : TEXCOORD0;         //采样主贴图
                float2 uv1 : TEXCOORD1;         //采样噪波图
            };
            //输出结构>>>顶点shader>>>输出结构
            VertexOutput vert (VertexInput v)
            {
                VertexOutput o = (VertexOutput)0;
                o.pos = UnityObjectToClipPos(v.vertex);
                o.uv0 = v.uv0;
                o.uv1 = TRANSFORM_TEX(v.uv0,_NoiseTex);
                o.uv1.y = o.uv1.y + frac(_Time.x) * _FlowSpeed;
                return o ;
            }
            //色彩输出结构
            float4 frag(VertexOutput i) : COLOR
            {
                float4 var_mainTex = tex2D(_MainTex,i.uv0);
                float var_noiseTex = tex2D(_NoiseTex,i.uv1).r;
                float noise = lerp(1,var_noiseTex * 2,_NoiseInt);         // var_noiseTex * 2 == 将 noise 的值域 扩大到 0 - 2 .   并用lerp,加以控制。
                noise = max(0,noise); // 赋值截断,取消负值,就没有花花绿绿的东西了。
                float3 finalRGB = var_mainTex;
                float opacity = var_mainTex.a * _Cutout * noise;

                return float4(finalRGB*opacity,opacity);//这里注意,最后FinalRGB乘了一个 透贴,是因为开始没有预乘,这里做了预乘。(预乘:指 吧透贴和色彩都放在RGB中)
                //return noise;//输出噪波图
                //return opacity;//输出透明噪波图
            }
            ENDCG
        }
    }
}
3. Realization of UV disturbance effect:

1. Demonstration Ghost Warp:

1. Disturbance, a distortion map is added on the basis of the Flow code segment, the noise map is a single channel , and the distortion map is a three-channel .
2. What is distorted is UV. UV has several components, and there are two components. Different components must have different directions. Therefore, the distortion map has two channels to control the direction of the distortion. (Here, in order to reduce the calculation amount of texture sampling, the noise map is merged into the distortion map )
RG = warped graph
B = noise map
3. Additional distortion strength
2. Prepare Warp Tex: How to make a warp map

3. Code GhostWarp:

Here, I encountered a problem, that is, the perturbation effect is different under the two color spaces of Gamma and Liner, as shown in the figure.

There are 2 solutions
Method 1: Switch to Gamma color space.
Method 2: Keep the Liner color space, select the picture used, and uncheck sRGB.

Here I asked the group of friends why, why, under different color spaces of gamma and liner, there will be different UV offsets?
A group of friends provided an explanation link:
Gamma Calibration - LearnOpenGL CN
It probably means that in the engine, and in the display, due to the hardware algorithm, there will be a difference in color brightness of Pow2.2. This Pow2.2 is to make up for the linearity difference, so as to achieve a reasonable observation effect. (I haven't finished reading it, my understanding may be very different)
Reference example picture:

4. Code GhostWarp:

4. Task entrustment:

1. Homework:
