Project structure of Android Studio project
As a professional Android development tool, Android Studio has great advantages when building Android projects. First of all, it is very important to understand the project structure of Android. Directly above the picture: In fact, a complete Android Studio

project can be divided into 5 The parts selected in the figure are the parts that are frequently developed and paid attention to in daily life. They are:
- app module: it is the core module of the Android project. The core functions and main business of the project are developed under this module. The build folder stores the files generated by compilation. build.gradle is the construction script of this module
- Part 2 in the figure: the build script of the entire project (build.gradle), the basic configuration information of the project (settings.gradle), the execution script and some configuration files, focusing on build.gradle
- Part 3 in the figure: Gradle version and configuration information of the cache path
- Part 4 in the figure: the sub-module of the project, the structure is similar to app
Introduction to Gradle
Gradle is an open source tool for project automation building based on the concepts of Apache Ant and Apache Maven. It uses a Groovy -based domain-specific language ( DSL ) to declare project settings, and also adds a kotlin-based DSL based on the Kotlin language, abandoning various cumbersome configurations based on XML.
Gradle can use the Groovy or Kotlin language for script development. Currently, the Groovy language is mainly used. The Groovy syntax is not described here, just focus on closures and its dynamic characteristics.
Installation tutorials and other content can be scientifically surfed online~~
Gradle task - task
Task is the smallest task unit in Gardle, and complex operations can be performed between tasks (such as dynamically creating tasks, inter-dependence calls between multiple tasks, etc.). The execution of gradle is actually executed by a combination of various tasks to build the project.
Use the gradlew help command, any gradle project has this task, you can execute this command to observe whether the process of taks execution is as expected.
You can use tools to view, and you can also view runnable tasks through the gradlew tasks command.
Use the gradlew tasks --all command to view all tasks.
Use the gradlew AB command to execute tasks A and B, and support camel case abbreviation.
We create a simple Android project and try to write a simple task in the build.gradle under the app.
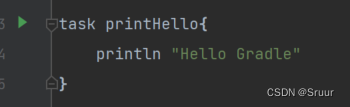
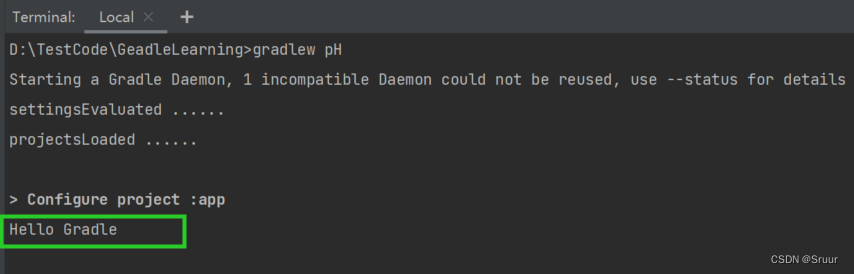
We can click the green triangle to execute the task, or use the command line to execute it. The command line execution is as follows: choose one, that is The output can be seen in the console
D:\TestCode\GeadleLearning>gradlew pH

D:\TestCode\GeadleLearning>gradlew printHello
Other features about task
task A {


    doLast {


        println "doLast A ..."
    }
}

task C {


    doLast {


        println "doLast C ..."
    }
}

task B {


    doLast {


        println "doLast B ..."
    }
}
// hello 任务依赖于A、B、C三个任务,按照Gradle任务列表中的顺序进行执行
task hello(dependsOn: [A, C, B]) {


    //任务执行的时候首先执行该闭包
    doFirst {


        println "doFirst hello start..."
    }

    //任务执行到最后执行该闭包
    doLast {


        println "doLast hello end..."
    }
}

//指定依赖关系,任务A依赖于任务C,再运行任务A之前先运行任务C
A.dependsOn C

//A必须运行再B运行之后
A.mustRunAfter B

task finalized {


    doLast {


        println "清理一些资源"
    }
}

//通过自定义任务类来实现任务
class MyTask extends DefaultTask {


    @Input
    String filePath

    @OutputFile
    File outFile

    //指定任务所在的分组
    MyTask() {


        group "自定义任务"
        description "我是一个自定义任务"
    }

    @TaskAction
    void runAction1() {


        println "MyTask runAction1"
    }

    @TaskAction
    void runAction2() {


        println "MyTask runAction2"
    }

    void sayHello(String str) {


        println str
    }
}

//创建名为myTask类型为MyTask的任务
tasks.create("myTask", MyTask)

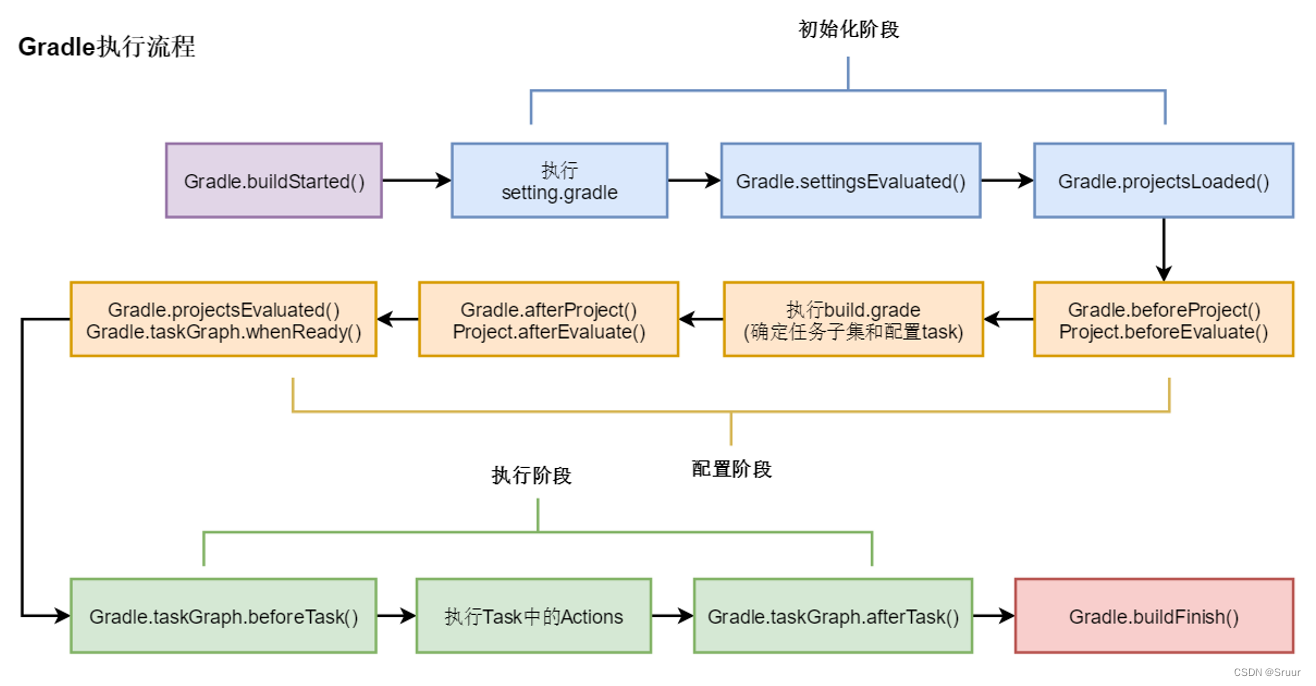
Geadle execution process
Gradle hook function
Gradle sets its own hook functions at each life cycle stage, and developers can use these functions for custom construction
Initialization phase : gradle.settingsEvaluated and gradle.projectsLoaded. (take effect in settings.gradle)
Configuration phase : project.beforeEvaluate and project.afterEvaluate; gradle.beforeProject, gradle.afterProject and gradle.taskGraph.taskGraph.whenReady.
Execution phase : gradle.taskGraph.beforeTask and gradle.taskGraph.afterTask.
/**
 * Gradle 钩子函数
 * 1、初始化阶段---->settings.gradle文件
 * 2、配置阶段,对于的其实就是build.gradle文件
 */
//gradle 针对所有项目的配置阶段
gradle.beforeProject {


    println "gradle.beforeProject"
}
gradle.afterProject {


    println "gradle.afterProject"
}
gradle.taskGraph.whenReady {


    println "gradle.taskGraph.whenReady"
}
//project只针对当前Module生效
project.beforeEvaluate {


    //在root中无效
    println "app.project.beforeEvaluate"
}
project.afterEvaluate {


    println "app.project.afterEvaluate"
}
In addition, we can also set the listener for the Geadle object
gradle.addProjectEvaluationListener(new ProjectEvaluationListener() {


    @Override
    void beforeEvaluate(Project project) {


        //如果是在Module的build.gradle中并不会执行该方法
        println "beforeEvaluate(Project project)"
    }

    @Override
    void afterEvaluate(Project project, ProjectState projectState) {


        println "afterEvaluate(Project project, ProjectState projectState)"
    }
})

gradle.addBuildListener(new BuildListener() {


    @Override
    void settingsEvaluated(Settings settings) {


        println "初始化阶段"
    }

    @Override
    void projectsLoaded(Gradle gradle) {


        println "加载阶段"
    }

    @Override
    void projectsEvaluated(Gradle gradle) {


        println "配置阶段"
    }

    @Override
    void buildFinished(BuildResult buildResult) {


        println "构建结束时调用"
    }
})
Gradle dependency management
In an Android project with complex functions, there are often a lot of third-party SDKs and modular management, and Gradle plays a vital role in these complex SDK dependencies and dependencies between modules, which will be introduced below Let's see how Geadle manages various dependencies.
build.gradle under the project
In the build.gradle under the whole project, the lower version of AndroidStudio will add some plug-ins about project construction to this script when building the project
//低版本AS创建的项目在build.gradle文件中添加插件的依赖
dependencies {


    classpath 'com.android.tools.build:gradle:7.1.2'
    classpath 'org.greenrobot:greendao-gradle-plugin:3.2.0'
    classpath 'com.neenbedankt.gradle.plugins:android-apt:1.8'
}
// Top-level build file where you can add configuration options common to all sub-projects/modules.
//顶级构建文件,您可以在其中添加所有子项目/模块通用的配置选项(AS版本:Electric Eel | 2022.1.1 Patch 1)
plugins {


    id 'com.android.application' version '7.1.2' apply false
    id 'com.android.library' version '7.1.2' apply false
    id 'org.jetbrains.kotlin.android' version '1.8.0' apply false
}
It can be seen that the new version does not specify the version of the plug-in, and does not explicitly add the plug-in. It may be integrated into AS. You need to consult the official documentation and Gradle documentation. This is not a big deal.
warehouse designation
Since Gradle is similar to Maven, it has a warehouse. It specifies the warehouse in the script in this way. In the new version of AS, the designated warehouse has been placed in the settings.gradle script
pluginManagement {


    repositories {


        google()
        mavenCentral()
        gradlePluginPortal()
    }
}
dependencyResolutionManagement {


    repositoriesMode.set(RepositoriesMode.FAIL_ON_PROJECT_REPOS)
    repositories {


        google()
        mavenCentral()
    }
}
rootProject.name = "GradleLearning3"
//老版本 对所有工程进行配置
allprojects {


    //为工程添加依赖仓库
    repositories {


        google()//Google的maven中央仓库
        mavenCentral()//maven中央仓库
        jcenter()//过时不维护
        maven {

    //从某个地址获取
        	url "xxxxxxx"
        }
    }
}
Dependency configuration
In the dependencies code block, we can choose different dependency configurations to declare the dependencies of the library. Each different dependency has different characteristics. For details, please refer to Google's documentation on dependency configuration. Here is a part of the
interception

Gradle dependency optimization
When we use Gradle to manage project dependencies, Gradle will optimize our dependencies when recompiling. For example, we rely on repeated libraries in app module dependencies, and check the dependencies after compilation:
dependencies {


    implementation 'androidx.core:core-ktx:1.7.0'

    //重复导入一个库的不同版本,是否会发生依赖冲突呢???
    implementation 'androidx.appcompat:appcompat:1.4.1'
    implementation 'androidx.appcompat:appcompat:1.4.0'
    implementation 'androidx.appcompat:appcompat:1.4.+'

    implementation 'com.google.android.material:material:1.5.0'
    implementation 'androidx.constraintlayout:constraintlayout:2.1.3'
    testImplementation 'junit:junit:4.13.2'
    androidTestImplementation 'androidx.test.ext:junit:1.1.3'
    androidTestImplementation 'androidx.test.espresso:espresso-core:3.4.0'
}
We use the command: gradlew :app:dependencies --configuration releaseRuntimeClassPath to view the compiled dependencies. The three common situations are explained in the figure:
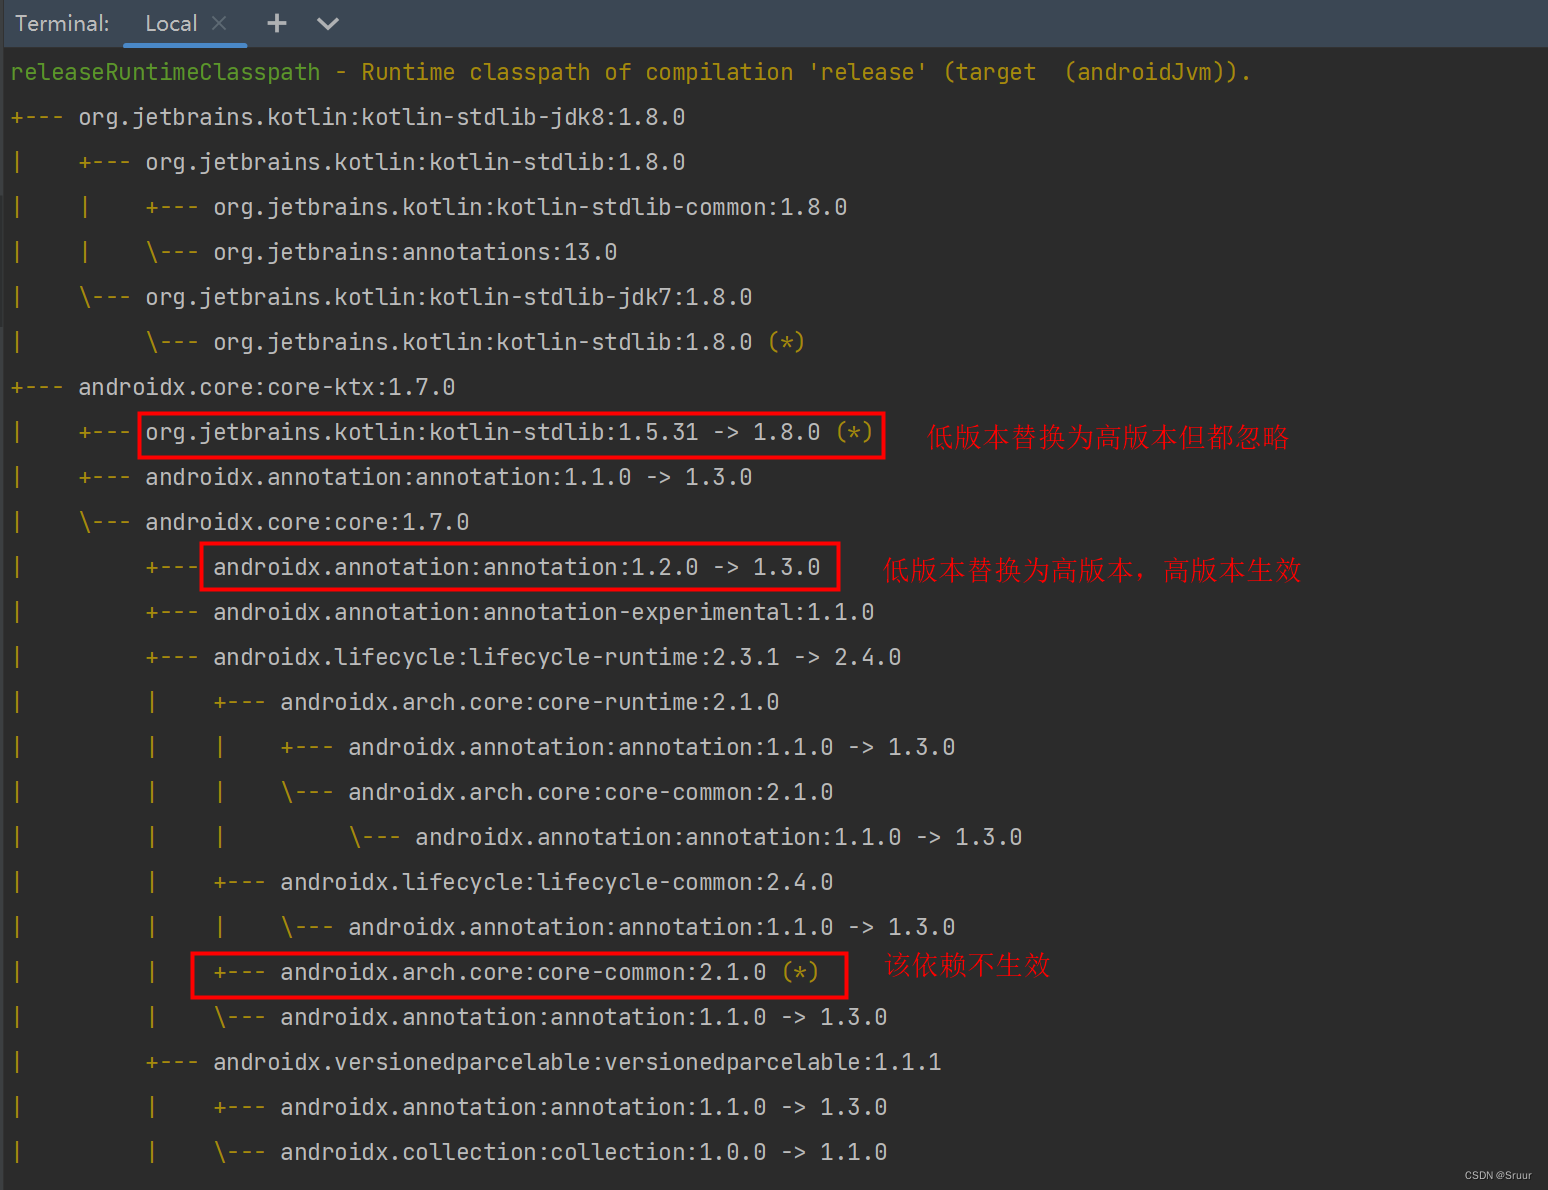
We are looking for the androidx.appcompat:appcompat that we repeatedly depend on from the output information, and see how Gradle handles it. The result is as follows: we can see that both the lower version and the latest version are replaced with the latest version, and this Both dependencies are ignored because the latest version of the library was added earlier.

Dependency conflict
The essence of dependency conflict is that there are two identical classes with the same package name and class name, which is not allowed in java, so a dependency conflict will arise.
For example, we have introduced a dependency package whose structure is as follows. If some classes in the red box below are included in another dependency, there will be a dependency conflict, so how do we solve it?
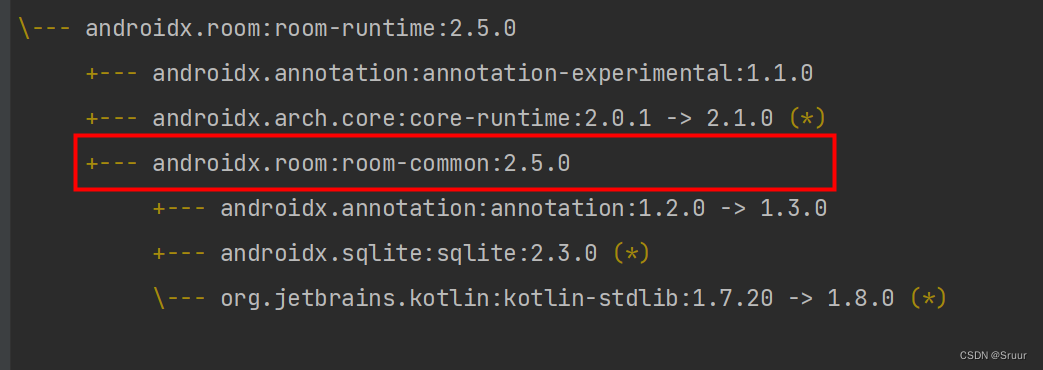
Suppose we need to exclude the dependent packages in the red box, we can choose the following ways to solve it:
    implementation('androidx.room:room-runtime:2.5.0') {


        exclude group: 'androidx.room', module: 'room-common'
    }
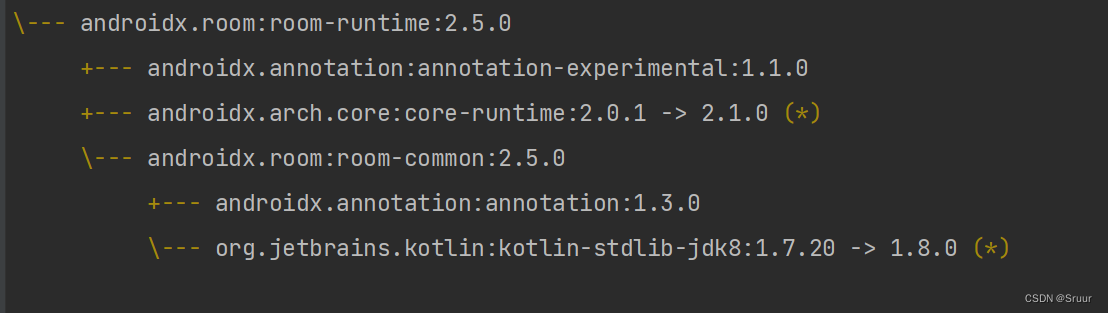
Use gradlew:app:dependencies --configuration releaseRuntimeClassPath to compile again: there is no previous sub-module dependency, so the dependency conflict can be resolved by the above method.
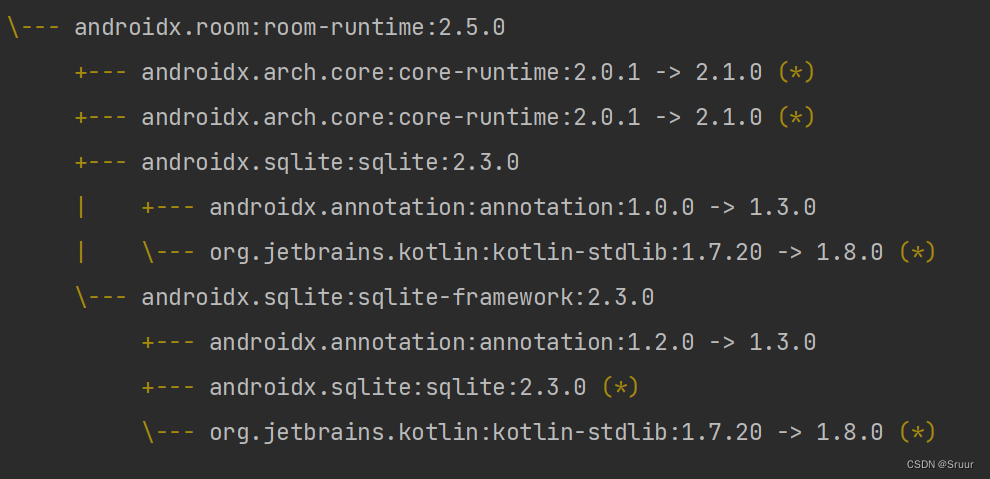
You can also kill a certain Group under the entire dependency, and you can find that all the Groups starting with androidx.sqlite have disappeared
    implementation('androidx.room:room-runtime:2.5.0') {


//        exclude group: 'androidx.room', module: 'room-common'
        exclude group:'androidx.sqlite'
    }
use exclude all
//在Build.gradle添加如下代码即可去掉所有依赖中模块为annotation的依赖包
configurations {


    configuration {


       all*.exclude module:"annotation"
    }
}
Mandatory specifying a version of a dependency
//(build.gradle的根节点)
configurations.all{


    resolutionStrategy {


        //强制指定版本
        force 'androidx.appcompat:appcompat:1.1.0'
    }
}

dependency transitive
Dependency transfer is used to control whether the package imported by a certain module can be directly used by other modules, mainly involving implementation and api. The
simplest explanation is as follows:
有A、B、C、D四个模块
A implementation  B,B implementation C 则A不能使用C
A implementation  B,B api C 则A可以使用C
A implementation  B,B implementation  C ,C api D 则B可以使用D,A不能使用D
A implementation  B,B api  C ,C api D 则A可以使用D