0 pre-operation
- Install python (the latest 3.10 is enough)
- Install pycharm (community version is enough)
- Install opencv-python (cmd input pip install opencv-python, you can also use domestic mirror if it is too slow)
- Follow-up also needs to install opencv-contrib-python
1 read pictures
# 导入cv2模块,别名为cv
import cv2 as cv

# 读取图片
img = cv.imread("face1.jpg")

# 显示窗口到窗口上,窗口名就是read_img
cv.imshow("read_img", img)

# 窗口等待 0为不自动关闭 其他数值为等待时间,单位为毫秒,返回为按键的ASCII
key = cv.waitKey(0)  # 此代码不写会闪现窗口

# 释放内存,销毁窗口
cv.destroyAllWindows()
The result is to display the picture directly in the window
2 grayscale conversion
# 导入cv模块
import cv2 as cv

# 读取图片
img = cv.imread("face1.jpg")
# 灰度转换
gray_img = cv.cvtColor(img, cv.COLOR_BGR2GRAY)
# 窗口显示灰度图
cv.imshow("gray", gray_img)
# 保存灰度图
cv.imwrite("face1_gray.jpg", gray_img)
# 显示原图
cv.imshow("img", img)
# 等待
cv.waitKey(0)
# 销毁
cv.destroyAllWindows()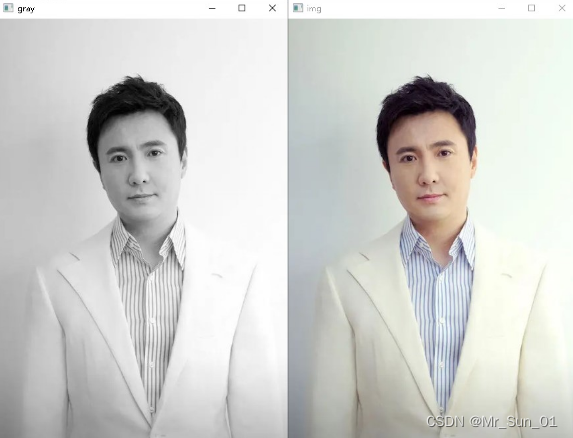
Comparison of grayscale image with original image
3 modify the size
import cv2 as cv

# 读取原图
img = cv.imread("face1.jpg")

# 修改尺寸
resize_img = cv.resize(img, dsize=(200, 200))
# 显示原图
cv.imshow("img", img)
# 显示修改图,最大化也是修改后的图
cv.imshow("resize_img", resize_img)

# 打印修改前后的图片尺寸信息
print("未修改", img.shape)
print("修改后", resize_img.shape)

# 按键为q时退出窗口等待
while True:
    if ord('q') == cv.waitKey(0):
        break

# 释放内存,销毁窗口
cv.destroyAllWindows()
4 Draw a rectangle or circle (involving the use of face frames)
import cv2 as cv

img = cv.imread("face1.jpg")

x, y, w, h = 100, 100, 100, 100
# 坐标轴以横向右为x轴正方向,以纵向下为y轴正方向
# 画矩形框(2个点可以确定一个边与x轴y轴垂直或平行的矩形) color(b,g,r)  thickness厚度
cv.rectangle(img, (x, y, x + w, y + h), color=(0, 0, 255), thickness=1)

# 画圆形(圆点+半径即可画一个圆)
cv.circle(img, center=(x + w, y + h), radius=100, color=(0, 255, 0), thickness=1)

# 显示
cv.imshow("img", img)

while True:
    if ord('q') == cv.waitKey(0):
        break

cv.destroyAllWindows()
5 face recognition
import cv2 as cv


# 检测函数 检索
def face_detect_demo():
    gray = cv.cvtColor(img, cv.COLOR_BGR2GRAY)  # 转为灰度图片
    #电脑本地路径为E:/2022soft/py310/Lib/site-packages/cv2/data
    face_detect = cv.CascadeClassifier("haarcascade/haarcascade_frontalface_alt2.xml")  # 级联分类器
    # gray表示传入的灰度图(快速查询) 1.1表示每次搜索窗口依次扩大10% 5表示构成检测目标的相邻矩形的最小个数(默认为3个) (100,100)表示最小人脸大小 (300,300)表示最大人脸大小
    face = face_detect.detectMultiScale(gray, 1.1, 5, cv.CASCADE_SCALE_IMAGE, (30, 30), (200, 200))
    # 遍历所有人脸的位置信息,包括人脸位置及大小
    for x, y, w, h in face:
        cv.rectangle(img, (x, y), (x + w, y + h), color=(0, 0, 255), thickness=1)  # 画出识别出来的人脸框
    cv.imshow("result", img)


# 读取图片
img = cv.imread("p4.jpg")
# 检测图片
face_detect_demo()

while True:
    if ord('q') == cv.waitKey(0):
        break

cv.destroyAllWindows()
The operation is as follows (the suspected tilted head Musk has not been recognized)
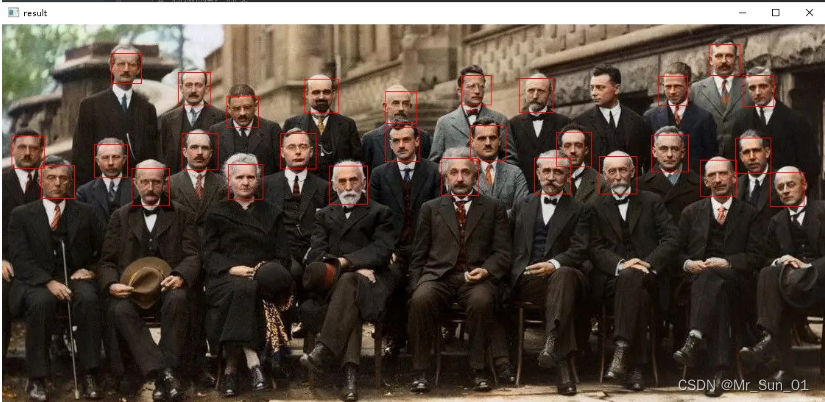
6 multiple face detection
import cv2 as cv


# 检测函数 检索
def face_detect_demo():
    gray = cv.cvtColor(img, cv.COLOR_BGR2GRAY)  # 转为灰度图片
    face_detect = cv.CascadeClassifier("haarcascade/haarcascade_frontalface_default.xml")  # 级联分类器
    face = face_detect.detectMultiScale(gray, minSize=(30, 30))  # 检索人脸
    # 遍历所有人脸的位置信息,包括人脸位置及大小
    for x, y, w, h in face:
        cv.rectangle(img, (x, y), (x + w, y + h), color=(0, 0, 255), thickness=1)  # 画出识别出来的人脸框
    cv.imshow("result", img)


# 读取图片
img = cv.imread("p3.jpg")
# 检测图片
face_detect_demo()

while True:
    if ord('q') == cv.waitKey(0):
        break

cv.destroyAllWindows()
7 Video detection
import cv2 as cv


# 检测函数 检索 画框
def face_detect_demo(img):
    gray = cv.cvtColor(img, cv.COLOR_BGR2GRAY)  # 转为灰度图片
    face_detect = cv.CascadeClassifier("haarcascade/haarcascade_frontalface_default.xml")  # 级联分类器
    face = face_detect.detectMultiScale(gray, minSize=(30, 30))  # 检索人脸
    # 遍历所有人脸的位置信息,包括人脸位置及大小
    for x, y, w, h in face:
        cv.rectangle(img, (x, y), (x + w, y + h), color=(0, 0, 255), thickness=1)  # 画出识别出来的人脸框
    cv.imshow("result", img)


# cap =cv.VideoCapture(0)#摄像头取数据
cap = cv.VideoCapture("2.mp4")

while True:
    flag, frame = cap.read()  # 得到状态和帧数据
    if not flag:
        break
    face_detect_demo(frame)  # 帧数据检索人数并画框
    cv.waitKey(1)

cv.destroyAllWindows()
cap.release()
The source of the detection data is replaced, and the camera or video file is imported from a single image. The essence remains the same. It still detects the face of each frame. Limited by the ability of the initial model, the false recognition rate is still relatively high.
8 Take pictures and save
import cv2 as cv

# 打开摄像头
cap = cv.VideoCapture(0)

count = 1

while (cap.isOpened()):  # 检测摄像头是否开启
    ret_flag, Vshow = cap.read()  # 得到每帧数据
    cv.imshow("Capture", Vshow)  # 显示预览

    k = cv.waitKey(1) & 0xFF  # 按键判断
    if (k == ord('s')):
        cv.imwrite(str(count) + "_camera.jpg", Vshow)  # 保存
        print("Success to save " + str(count) + "_camera.jpg\n")
        count += 1
    elif k == ord(" "):  # 退出
        break
# 释放摄像头
cap.release()
# 释放窗口内存
cv.destroyAllWindows()
9 Training faces (extracting face features)
import os
import cv2 as cv
from PIL import Image

import numpy as np


def getImageAndLabels(path):
    # 储存人脸数据
    facesSamples = []
    # 储存姓名数据
    ids = []
    # 储存图片信息
    imagePaths = [os.path.join(path, f) for f in os.listdir(path)]
    # 加载分类器
    face_detector = cv.CascadeClassifier("haarcascade/haarcascade_frontalface_alt2.xml");
    # 遍历列表中的图片
    for imagePath in imagePaths:
        # 打开图片,灰度化,PIL有9种模式:1,L,P,RGB,RGBA,CMYK,YCbCr,I,F
        PIL_img = Image.open(imagePath).convert('L')
        # 将图像转为数组,以黑白深浅
        img_numpy = np.array(PIL_img, 'uint8')
        # 获取图片人脸特征
        faces = face_detector.detectMultiScale(img_numpy)
        # 获取每张图片的id和姓名
        id = int(os.path.split(imagePath)[1].split('-')[0])
        # 预防无面容照片
        for x, y, w, h in faces:
            ids.append(id)
            facesSamples.append(img_numpy[y:y + h, x: x + w])

        print('id=', id)
    # 打印面部特征和id
    print('fs=', facesSamples)

    return facesSamples, ids


if __name__ == '__main__':
    # 图片路径
    path = "data/face/"
    # 获取图像数组和id标签数组和姓名
    faces, ids = getImageAndLabels(path)
    # 加载识别器 这里的face在opencv-contrib-python上,所以,你懂的
    recognizer = cv.face.LBPHFaceRecognizer_create()
    # 训练
    recognizer.train(faces, np.array(ids))
    # 保存文件
    recognizer.write("trainer/trainer.yml")
10 face recognition
import cv2 as cv
import os


def face_detect_demo(img):
    gray = cv.cvtColor(img, cv.COLOR_BGR2GRAY)
    face_detector = cv.CascadeClassifier(
        "haarcascade/haarcascade_frontalface_default.xml")  # 级联分类器
    # gray表示传入的灰度图(快速查询) 1.1表示每次搜索窗口依次扩大10% 5表示构成检测目标的相邻矩形的最小个数(默认为3个) (100,100)表示最小人脸大小 (300,300)表示最大人脸大小
    face = face_detector.detectMultiScale(gray, 1.1, 5, cv.CASCADE_SCALE_IMAGE, (100, 100), (300, 300))
    for x, y, w, h in face:
        cv.rectangle(img, (x, y), (x + w, y + h), color=(0, 0, 255), thickness=1)
        ids, confidence = recognizer.predict(gray[y:y + h, x:x + w])
        if confidence > 80:#差别较大,当做不认识
            cv.putText(img, "unknow" + str(confidence), (x + 10, y - 10), cv.FONT_HERSHEY_SIMPLEX, 0.75, (0, 255, 0), 1)
        else:
            cv.putText(img, str(names[ids - 1]) + str(confidence), (x + 10, y - 10), cv.FONT_HERSHEY_SIMPLEX, 0.75,
                       (0, 255, 0), 1)
    cv.imshow("result", img)


def getName():
    path = 'data/face/'
    imagePaths = [os.path.join(path, f) for f in os.listdir(path)]
    for imagePath in imagePaths:
        name = str(os.path.split(imagePath)[1].split('-', 2)[1])
        names.append(name)


names = []

getName()
recognizer = cv.face.LBPHFaceRecognizer_create()

recognizer.read('trainer/trainer.yml')#加载人脸特征值,之前训练出来的

warningtime = 0

img = cv.imread("p6.jpg")#识别图片
face_detect_demo(img)
cv.waitKey(0)

cap = cv.VideoCapture("2.mp4")
while True:
    flag, frame = cap.read()
    if not flag:
        break
    face_detect_demo(frame)#视频每一帧识别

    cv.waitKey(1)
11 Internet video playback
import cv2


class CaptureVideo(object):
    def net_video(self):
        # 获取网络视频流
        cam = cv2.VideoCapture("rtmp://media3.scctv.net/live/scctv_800")#好不容易找到一个可以播放的视频源
        while cam.isOpened():
            sucess, frame = cam.read()
            cv2.imshow("Network", frame)
            cv2.waitKey(1)


if __name__ == "__main__":
    capture_video = CaptureVideo()
    capture_video.net_video()
The whole process is over.
Thanks to the UP master of Bilibili-Harry Potter who knows AI for sharing the video-https://www.bilibili.com/video/BV1dT4y1z7it, please keep repeating.
The UP master has posted the code, but I manually typed it all by myself. For Xiaobai, it has benefited a lot.
Although there is a certain (very large) misrecognition rate during recognition, and even some funny (mentally retarded) effects, it is really super simple and very suitable for getting started with opencv+python.
Only this article starts the overall learning of opencv.
Aiming at the problems that pycharm cannot jump/automatically prompt after introducing opencv-python, the problem lies in the adaptation of high version opencv-python and pycharm, just use a low version, such as version = 4.5 .5 .64