Front
Morphology mainly extracts component information from images, which are usually the most essential shape features used in image understanding, and are of great significance for expressing and describing the shape of images.
In general, it is to make the key information in the image information more prominent through a series of operations. At the same time, the morphological operations are all based on the grayscale image.
The two main types of related operations are corrosion/expansion, followed by comprehensive operations - opening operation/closing operation/morphological gradient/top hat/black hat, etc.
corrosion
Erosion is one of the most basic morphological operations, which can remove the boundary points of the image, make the image shrink inward along the boundary, and remove the part smaller than the specified structural element.
Therefore, through corrosion, functions such as removing some external noise and element segmentation can be achieved.
Description of corrosion principle:
Structural element : It is a structure with a central position and a certain range. To put it bluntly, it is a two-dimensional array.
For each pixel in the scanned image, the structural element coincides with the scanned point, and the "AND" operation is performed with the structural element element and the covered binary image. If both are 1, the pixel value of the image remains unchanged, otherwise it is changed to 0.
The diagram is as follows:
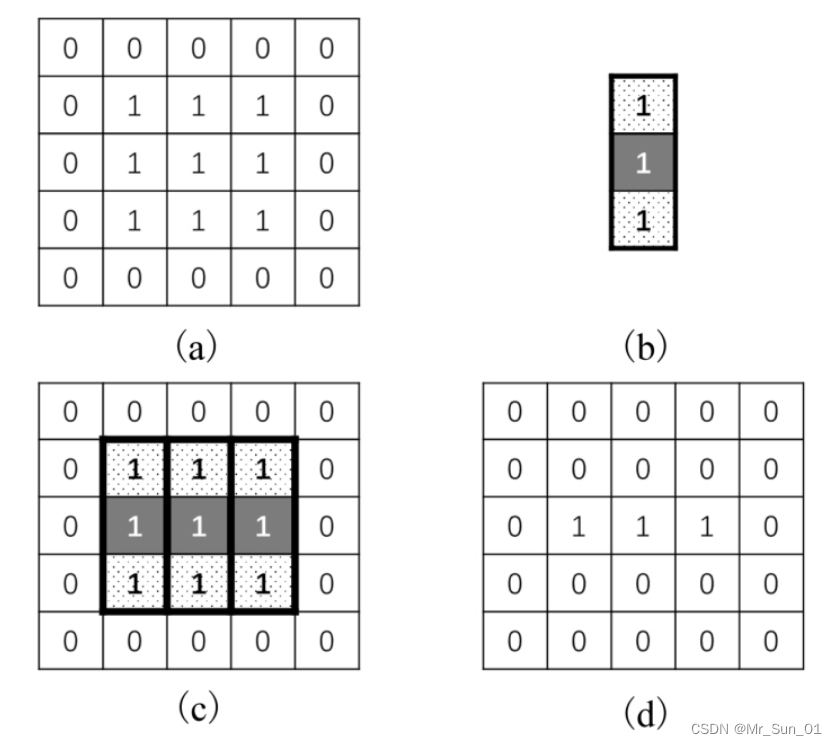
The picture a is the original picture, and the picture b is the structural element. When the second row is scanned, the data in the 2/3/4 columns of the first row is 0, so after corrosion, the 2/3/4 columns of the second row The 1s have all become 0, and the same is true for line 4.
When the 2/3/4 columns of the third row are scanned, since they are all 1, the 2/3/4 columns of the third row remain unchanged respectively, and the final result is shown in Figure d.
Function syntax description: dst = cv2.erode( src, kernel, anchor, iterations, borderType, borderValue)
- kernel : The structure used in corrosion can be generated by itself or through cv2.getStructuringElement(), which is a two-dimensional array space
- anchor : anchor position, the default is (-1,-1), at the center of the kernel
- iterations : The number of iterations of the corrosion operation, the default is 1, and only one corrosion operation is performed
- borderType : border processing method, generally adopts the default BORDER_CONSTANT
- borderValue : the border padding value, generally using the default value
So often simplified to dst = cv2.erode( src , kernel )
The program example is as follows:
import cv2 as cv
import numpy as np

origin = cv.imread("erode.bmp")
# 使用了一个3*3的结构元,结构元面积越大,腐蚀的越厉害,结果图就越小
kernel_3 = np.ones((3, 3), np.uint8)

# 不大明显,但有些触角已经变短了
erode_3 = cv.erode(origin, kernel_3)
# 反复刷了三次,图像进一步腐蚀减小,边角已经腐蚀掉了
erode_3_3 = cv.erode(origin, kernel_3, iterations=3)

cv.imshow("origin", origin)
cv.imshow("erode_3", erode_3)
cv.imshow("erode_3_3", erode_3_3)

cv.waitKey()
cv.destroyAllWindows()
The result of the operation is as follows: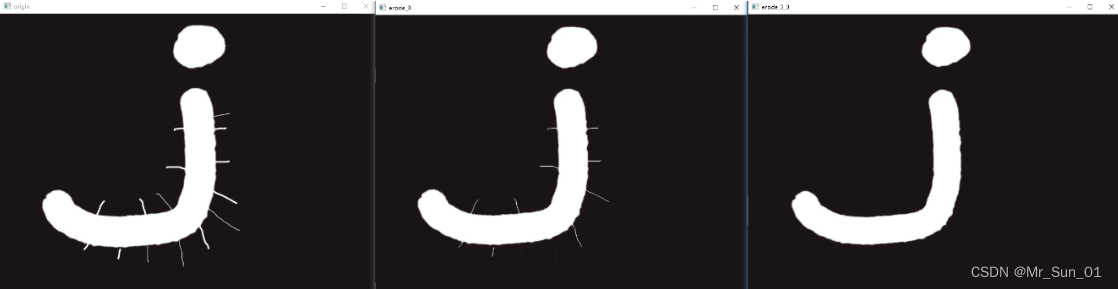
expand
Dilation operation is also a basic operation of morphology. The effects of dilation and erosion are opposite, and dilation operation can expand the boundary. The expansion operation can connect two close objects together, and is also conducive to filling
The blank space in the image after image segmentation.
Description of expansion principle:
Use the structural element to scan each pixel in the image, the structural element and the scanning point coincide, use the structural element element and the covered binary image to do "AND" operation, if both are 0, the pixel value of the image is 0, otherwise it is changed to 1 , so that the position of the edge of the picture will be expanded closely following the structure element.
Function syntax description: dst = cv2.dilate( src , kernel, anchor, iterations, borderType, borderValue)
The function parameters are exactly the same as the corrosion parameters, so there is no need to explain too much. The method can be simplified as dst = cv2.dilate(src, kernel)
The program example is as follows:
import cv2 as cv
import numpy as np
origin = cv.imread("dilation.png")
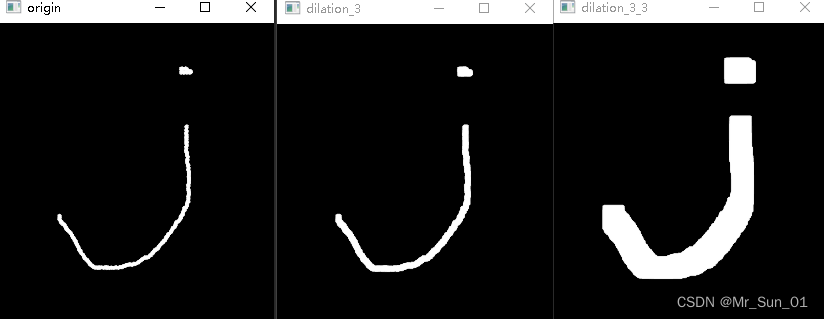
# 使用了一个3*3的结构元,结构元面积越大,膨胀的越厉害,结果图就越大
kernel = np.ones((3, 3), np.uint8)
erode_3 = cv.dilate(origin, kernel)
# 连续膨胀3次
erode_3_3 = cv.dilate(origin, kernel, iterations=9)
cv.imshow("origin", origin)
cv.imshow("dilation_3", erode_3)
cv.imshow("dilation_3_3", erode_3_3)
cv.waitKey()
cv.destroyAllWindows()Run as follows:
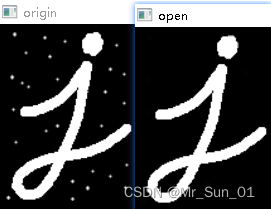
open operation
The opening operation is to perform the erosion operation first, and then the dilation operation. The erosion operation can remove the noise outside the target in the image, and then restore the size of the target after expansion.
Function syntax description: dst = cv2.morphologyEx( src, cv2.MORPH_OPEN, kernel)
src, dst are the original image and the processed result image respectively
cv2.MORPH_OPEN : flag for opening operation
kernel : the structural element used by the operation
The procedure is as follows:
import cv2 as cv
import numpy as np

origin = cv.imread("open_pic.png", 0)
kernel = np.ones((5, 5), np.uint8)
open_pic = cv.morphologyEx(origin, cv.MORPH_OPEN, kernel) # 开运算
cv.imshow("origin", origin)
cv.imshow("open", open_pic)

cv.waitKey()
cv.destroyAllWindows()
Run as follows:
Close operation
The closing operation is to perform the expansion operation first, and then the erosion operation. It is mainly aimed at scenarios where there are small holes in the key information in the image, and the dilation operation will fill the small holes.
Function syntax description: dst = cv2.morphologyEx( src, cv2.MORPH_CLOSE, kernel)
The closing operation and the opening operation use the same function, and only achieve different operations through different identifiers.
cv2.MORPH_OPEN : flag for closing operation
The procedure is as follows:
import cv2 as cv
import numpy as np

origin = cv.imread("close_pic.png", 0)
kernel = np.ones((5, 5), np.uint8)
open_pic = cv.morphologyEx(origin, cv.MORPH_CLOSE, kernel) # 闭运算
cv.imshow("origin", origin)
cv.imshow("open", open_pic)

cv.waitKey()
cv.destroyAllWindows()
The result of the operation is as follows:

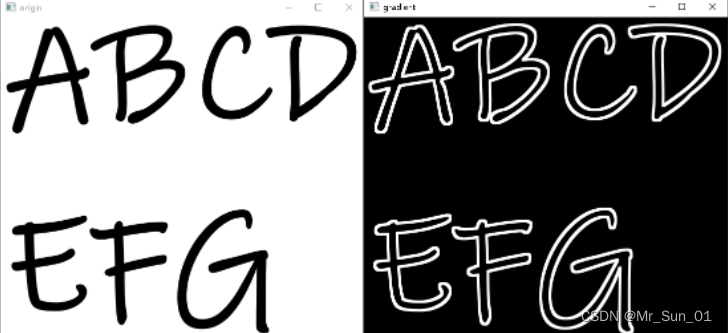
Morphological Gradient
In fact, it is the difference between the expansion and erosion of an image, which looks like the outline of the foreground object.
Function syntax description: dst = cv2.morphologyEx( src, cv2.MORPH_GRADIENT, kernel)
The function is the same as the opening and closing operation, only the style is different.
cv2.MORPH_GRADIENT : keyword for morphological gradient
The procedure is as follows:
import cv2 as cv
import numpy as np

origin = cv.imread("abcdefg.png")
kernel = np.ones((5, 5), np.uint8)
open_pic = cv.morphologyEx(origin, cv.MORPH_GRADIENT, kernel)  # 形态学梯度
cv.imshow("origin", origin)
cv.imshow("gradient", open_pic)

cv.waitKey()
cv.destroyAllWindows()
The renderings are as follows:
top hat
The opening operation is to corrode first and then expand, which will eliminate the noise in the image, and the top hat is the difference between the original image and the image obtained after the opening operation, that is, the eliminated noise.
Function syntax description: dst = cv2.morphologyEx( src, cv2.MORPH_TOPHAT, kernel)
import cv2 as cv
import numpy as np

origin = cv.imread("open_pic.png")
kernel = np.ones((5, 5), np.uint8)
open_pic = cv.morphologyEx(origin, cv.MORPH_TOPHAT, kernel)  # 礼帽
cv.imshow("origin", origin)
cv.imshow("tophat", open_pic)

cv.waitKey()
cv.destroyAllWindows()
Run as follows:

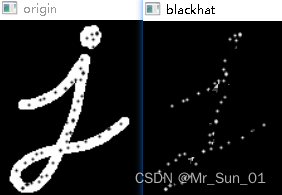
black hat
The closing operation is to expand first and then corrode, which has the function of filling the internal small holes, and the black hat is the difference between the image obtained by the closing operation and the original image, so the picture of the small hole filled before is displayed.
Function syntax description: dst = cv2.morphologyEx( src, cv2.MORPH_BLACKHAT, kernel)
The procedure is as follows:
import cv2 as cv
import numpy as np

origin = cv.imread("close_pic.png")
kernel = np.ones((5, 5), np.uint8)
open_pic = cv.morphologyEx(origin, cv.MORPH_BLACKHAT, kernel)  # 黑帽
cv.imshow("origin", origin)
cv.imshow("blackhat", open_pic)

cv.waitKey()
cv.destroyAllWindows()
Run as follows: