1. Kernel Description
You can query the installed kernel of Ubuntu 18.04 by the following command
grep menuentry /boot/grub/grub.cfg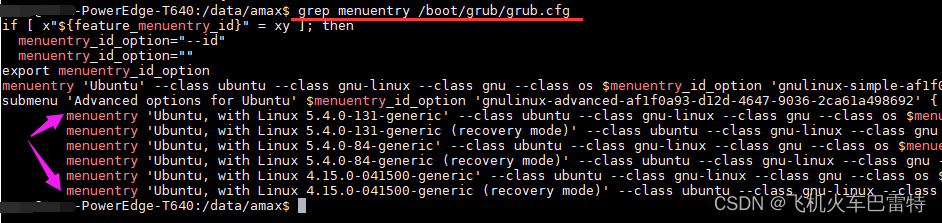
The figure above shows that the Ubuntu has a total of 6 linux kernels installed.
The Linux kernel currently in use can be queried by the following command
uname -aThe output shows that the kernel "GNU/Linux 4.15.0-041500-generic x86_64" is being used
Linux amax-PowerEdge-T640 4.15.0-041500-generic #201802011154 SMP Thu Feb 1 11:55:45 UTC 2018 x86_64 x86_64 x86_64 GNU/Linux
2. Install the graphics card driver
Background: Ubuntu 18.04.6 LTS + GNU/Linux 5.4.0-131-generic x86_64
I installed the Nvidia driver according to Ubuntu18.04 [the whole network is not pitted, super full steps] this blog to install. Then encountered a series of problems. initially through
sudo apt-get install build-essential There are big problems in installing build-essential. For example, build-essential needs to install xx dependency in advance. If you don’t have this dependency, you won’t be able to install build-essential successfully. As a result, I honestly listened to the prompts of the terminal to install gcc and cmake, but found that there was still a lack of xx dependency. Very annoyed.
Then I can’t install it, so I won’t install it, I plan to use it directly
sudo sh ./NVIDIA-Linux-x86_64-510.73.05.runInstalling the NVIDIA graphics card driver turned out to be naive. gcc and cmake are necessary procedures for installing NVIDIA graphics card drivers . If you don't have these two installed, it will report an error similar to the following:
ERROR: Unable to find the development tool `cc` in your path; please make sure that you have the package 'gcc' installed. If gcc is installed on your system, then please check that `cc` is in your PATH.
But installing gcc requires a lot of dependencies, and these dependencies cannot be installed through apt-get install. It was so annoying that I had to find another way. But finally I found a slightly better solution, which is to use
sudo aptitude install xxxxSuch commands to install gcc and cmake. If you can't use the aptitude command, I suggest you install the aptitude tool through apt-get install. The aptitude tool can install some packages or software for you in a more humanized way. It can always provide you with an installation solution, which is not as direct as apt-get install (unsuccessful installation means failure, Report a lot of Errors to you).
Then, I just used the aptitude tool to install gcc and cmake in a daze.
Then I happily installed the NVIDIA graphics card driver. But, do you think this is the end? No, I encountered the following error again
ERROR: You appear to be running an X server; please exit X before installing. For further details, please see the section INSTALLING THE NVIDIA DRIVER in the README available on the Linux driver download page at www.nvidia.com.
But fortunately, this error is relatively easy to solve, just add " -no-x-check " to the installation of NVIDIA graphics card driver , for example
sudo sh ./NVIDIA-Linux-x86_64-510.73.05.run -no-x-checkIn this way, you can almost enter the installation process of the NVIDIA graphics card driver. As a result, when the installation reached 47%, it reported another error, similar to the following
An error occurred while performing the step : ” Building kernel modules “. See /var/log/nvidia-installer.log for details.
Then, I researched a lot of ways to install NVIDIA graphics card drivers, for example, through the "Software/Driver" update that comes with the interface, or download and install online through the apt-get install command line, or change the installation package. However, the above work is in vain. The main reason is that the current "GNU/Linux 5.4.0-131-generic x86_64" Linux kernel does not support the latest NVIDIA graphics driver . In this case, you can't install the NVIDIA graphics card driver with a thousand installation methods.
Later, I want to change the kernel (this idea is correct), from 5.4 to 4.15 (because according to the search results on the Internet, the 4.15 Linux kernel supports the most NVIDIA graphics card drivers, that is to say, there are many Everyone's Linux kernel is 4.15). In addition, I also found that some people upgraded the Linux kernel, which caused the NVIDIA graphics card driver to be unusable. For example, the command "nvidia-smi" directly failed.
So, I installed the Linux 4.15 kernel on my Ubuntu 18.04 through the fact that the Linux kernel is too high so that the NVIDIA graphics card driver does not match this blog .
After installation, you need to update the kernel startup sequence . The steps are as follows:
The first step is to view the Linux kernel installed on this machine, using the command
grep menuentry /boot/grub/grub.cfgThe obtained kernel list is indexed, as follows
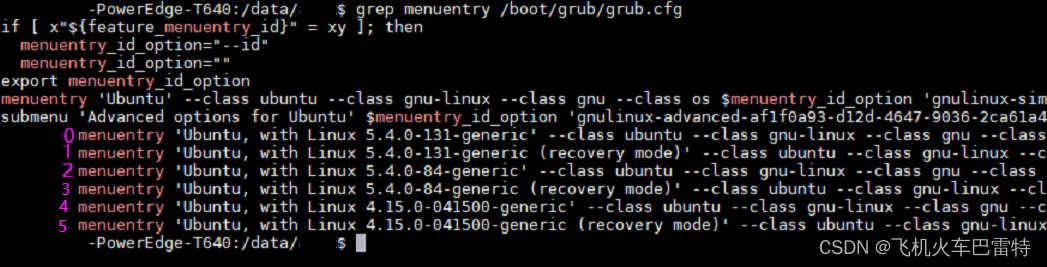
Then, the kernel with index "4" is what we want to use.
The second step is to modify the default kernel startup sequence through the following command.
sudo vim /etc/default/grubModify GRUB_DEFAULT=0 in the "grub" file to
GRUB_DEFAULT=“1>4"The "4" above is the kernel index "4", that is to say, set "Linux 4.15.0-041500-generic" as the kernel selected by default after the computer starts.
The third step is to update the kernel startup sequence and execute the command
update-grubThe fourth step, restart the machine
sudo rebootThen use the following command to query the restarted kernel
uname -aThe terminal will output
Linux amax-PowerEdge-T640 4.15.0-041500-generic #201802011154 SMP Thu Feb 1 11:55:45 UTC 2018 x86_64 x86_64 x86_64 GNU/Linux
3. Install CUDA
Refer to the blog Ubuntu to install cuda and cuDNN .
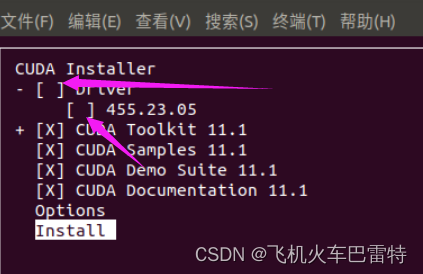
This is not difficult, just download the installation package and install it, but it is worth noting that during the installation process, do not reinstall the NVIDIA graphics card driver. That is, the [ ] Driver needs to be canceled by controlling the space bar.
Also, when updating the "~/.bashrc" file,
export PATH=$PATH:/usr/local/cuda/bin
export LD_LIBRARY_PATH=$LD_LIBRARY_PATH:/usr/local/cuda/lib64
export LIBRARY_PATH=$LIBRARY_PATH:/usr/local/cuda/lib64
The above path "/usr/local/cuda/" needs to be changed to the actual installation path of your cuda , for example, mine is
/usr/local/cuda-7.5/
Check whether cuda is installed successfully
nvcc --versionIf successful, it will output
nvcc: NVIDIA (R) Cuda compiler driver
Copyright (c) 2005-2022 NVIDIA Corporation
Built on Tue_May__3_18:49:52_PDT_2022
Cuda compilation tools, release 11.7, V11.7.64
Build cuda_11.7.r11.7/compiler.31294372_0
4. Install cuDNN
If you install cuDNN, you can also refer to this blog on installing CUDA and cuDNN on Ubuntu . Installation is not difficult.
It is worth noting that when I downloaded it, I needed to log in to NVIDIA's official website first, and then the downloaded installation package was only "cudnn-local-repo-ubuntu1804-8.4.1.50_1.0-1_amd64.deb". Therefore, I only need to execute a line
sudo dpkg -i cudnn-local-repo-ubuntu1804-8.4.1.50_1.0-1_amd64.debYou can install cuDNN.
After installation, you can use the following command to check whether the installation is successful
dpkg -l | grep cudnnIf successful, it will display
ii cudnn-local-repo-ubuntu1804-8.4.1.50 1.0-1 amd64 cudnn-local repository configuration files
Five, afterword
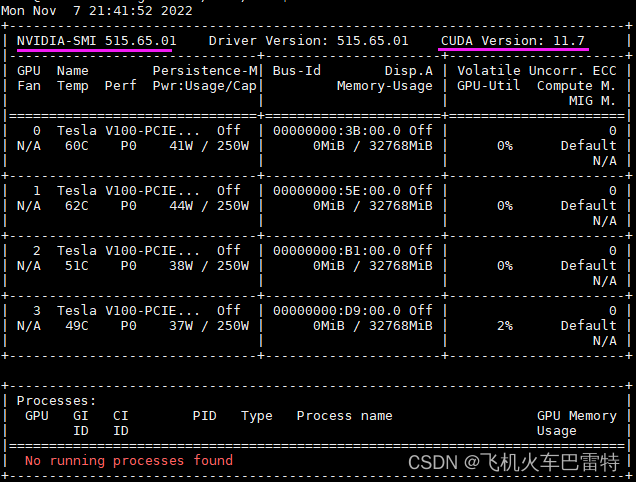
It is too difficult to install the NVIDIA graphics card driver. Upload a screenshot of the nvidia-smi command below to record the core elements of the NVIDIA graphics card driver (but there is no important information, simply indicating that the NVIDIA graphics card driver is installed successfully).
There are too many pitfalls in Linux server management. I hope that all friends will study hard. If you have any questions, please leave a message . You can exchange solutions to the problems together. The blogger is also very enthusiastic to help everyone~
The above blog only records the problems encountered by individuals. If you can’t solve the problems you encounter, please don’t blame me haha, thank you for understanding, love and respect! Welcome to the comment area to receive your questions~