How is the query executed?
`
Usually when we use the database, what we see is usually a whole. For example, if you have the simplest table with only one ID field, when executing the following query statement:
mysql> select * from T where ID=10;
What we see is to enter a statement and return a result, but we don't know the internal execution process of this statement in MySQL. So today I want to disassemble MySQL with you to see what "parts" are inside. I hope that through this dismantling process, you will have a deeper understanding of MySQL. In this way, when we encounter some abnormalities or problems of MySQL, we can directly dig into the essence and locate and solve the problems more quickly. Below I give a schematic diagram of the basic architecture of MySQL, from which you can clearly see the execution process of SQL statements in each functional module of MySQL.
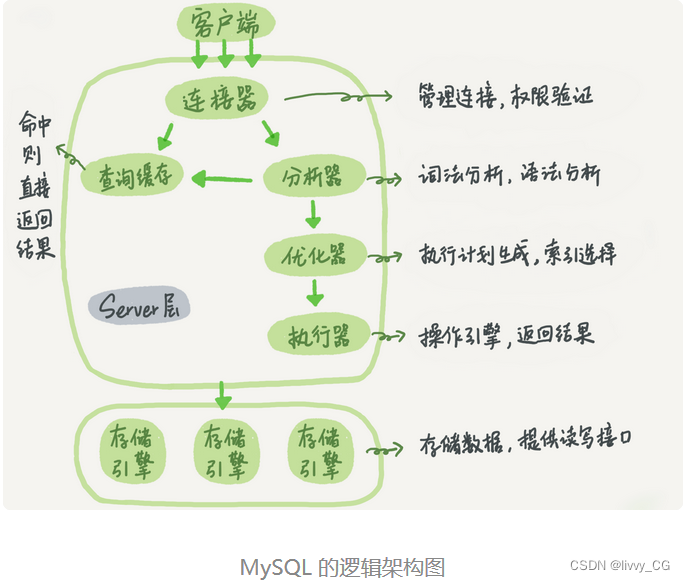
Generally speaking, MySQL can be divided into two parts: the server layer and the storage engine layer.
The Server layer includes connectors, query caches, analyzers, optimizers, executors, etc., covering most of MySQL's core service functions, as well as all built-in functions (such as date, time, math and encryption functions, etc.), all across storage engines All functions are implemented at this layer, such as stored procedures, triggers, views, etc.
The storage engine layer is responsible for data storage and retrieval. Its architecture mode is plug-in, and supports multiple storage engines such as InnoDB, MyISAM, and Memory. The most commonly used storage engine is InnoDB, which has become the default storage engine since MySQL 5.5.5.
That is to say, when you execute create table to build a table, if you do not specify the engine type, InnoDB is used by default. However, you can also select other engines by specifying the type of storage engine, such as using engine=memory in the create table statement to specify the use of memory engines to create tables. Different storage engines have different table data access methods and support different functions. In the following articles, we will discuss the choice of the engine.
It is not difficult to see from the figure that different storage engines share a Server layer, which is the part from the connector to the actuator. You can first have an impression of the name of each component, and then I will combine the SQL statement mentioned at the beginning to take you through the entire execution process and see the function of each component in turn.
Connector
In the first step, you will first connect to this database, and at this time, you will be greeted by the connector. The connector is responsible for establishing a connection with the client, obtaining permissions, maintaining and managing the connection. The connection command is generally written like this:
mysql -h ip − P ip -Pip−P port -u$user -p
After entering the command, you will need to enter the password in the interactive dialog. Although the password can also be written directly on the command line following -p, this may cause your password to be leaked. If you are connected to a production server, it is strongly recommended that you do not do this.
The mysql in the connection command is a client tool used to establish a connection with the server. After completing the classic TCP handshake, the connector will start to authenticate your identity, this time using the username and password you entered.
If the username or password is incorrect, you will receive an "Access denied for user" error, and the client program will terminate execution.
If the username and password authentication passes, the connector will check the permissions you have in the permissions table. After that, the permission judgment logic in this connection will depend on the permission read at this time.
This means that after a user successfully establishes a connection, even if you use the administrator account to modify the user's permissions, it will not affect the existing connection permissions. After the modification is completed, only new connections will use the new permission settings.
After the connection is completed, if you have no follow-up action, the connection is idle, you can see it in the show processlist command. The figure in the text is the result of show processlist, where the Command column shows the row of "Sleep", which means that there is an idle connection in the system.

If the client does not move for too long, the connector will automatically disconnect it. This time is controlled by the parameter wait_timeout, the default value is 8 hours.
If the client sends a request again after the connection is disconnected, it will receive an error reminder: Lost connection to MySQL server during query. At this time, if you want to continue, you need to reconnect and then execute the request.
In the database, a long connection means that after the connection is successful, if the client continues to request, the same connection will always be used. A short connection means that the connection is disconnected after a few queries are executed each time, and a new one is re-established for the next query.
The process of establishing a connection is usually more complicated, so I suggest that you minimize the action of establishing a connection during use, that is, use a long connection as much as possible.
But after all long connections are used, you may find that sometimes the memory occupied by MySQL increases very quickly. This is because the memory temporarily used by MySQL during execution is managed in the connection object. These resources will be released when the connection is disconnected. Therefore, if long connections accumulate, it may cause too much memory usage and be forcibly killed by the system (OOM). From the perspective of the phenomenon, MySQL restarts abnormally.
How to solve this problem? You can consider the following two options.
Regularly disconnect long connections. After using it for a period of time, or the program judges that a large query that takes up memory has been executed, the connection is disconnected, and then the query needs to be reconnected.
If you are using MySQL 5.7 or newer, you can reinitialize the connection resource by executing mysql_reset_connection after each large operation. This process does not require reconnection and re-authentication, but it will restore the connection to the state just created.
query cache
After the connection is established, you can execute the select statement. Execution logic will come to the second step: query cache.
After MySQL gets a query request, it will first go to the query cache to see if this statement has been executed before. Previously executed statements and their results may be directly cached in memory in the form of key-value pairs. The key is the query statement, and the value is the query result. If your query can find the key directly in this cache, then the value will be returned directly to the client.
If the statement is not in the query cache, it will continue to the subsequent execution phase. After the execution is completed, the execution result will be stored in the query cache. You can see that if the query hits the cache, MySQL can directly return the result without performing subsequent complex operations, which is very efficient.
But in most cases I would advise you not to use query caching, why? Because query caching often does more harm than good.
Query cache invalidation is very frequent. As long as there is an update to a table, all query caches on this table will be cleared. Therefore, it is very likely that you have worked hard to save the result, and it will be completely emptied by an update before you use it. For databases with high update pressure, the hit rate of the query cache will be very low. Unless your business is to have a static table, it will be updated once in a long time. For example, a system configuration table, then the queries on this table are suitable for query caching.
Fortunately, MySQL also provides this "on-demand use" approach. You can set the parameter query_cache_type to DEMAND, so that the query cache is not used for the default SQL statement. For the statement that you are sure to use query cache, you can use SQL_CACHE to specify it explicitly, like the following statement:
mysql> select SQL_CACHE * from T where ID=10;
Analyzer
If the query cache is not hit, it is time to actually execute the statement. First, MySQL needs to know what you want to do, so it needs to parse the SQL statement.
The analyzer will first do "lexical analysis". What you input is an SQL statement composed of multiple strings and spaces. MySQL needs to identify what the strings in it are and what they represent.
MySQL recognizes it from the keyword "select" you entered, which is a query statement. It also recognizes the string "T" as "table name T" and the string "ID" as "column ID".
After completing these identifications, it is necessary to do "syntax analysis". According to the result of lexical analysis, the syntax analyzer will judge whether the SQL statement you input satisfies the MySQL syntax according to the syntax rules.
If your statement is wrong, you will receive an error reminder of "You have an error in your SQL syntax". For example, the following statement select misses the initial letter "s".
mysql> select * from t where ID=1;
ERROR 1064 (42000): You have an error in your SQL syntax; check the manual that corresponds to your MySQL server version for the right syntax to use near ‘elect * from t where ID=1’ at line 1
General grammatical errors will prompt the first error location, so you should pay attention to the content immediately after "use near".
It should be noted that MySQL 8.0 directly deletes the whole function of query cache, that is to say, it does not have this function at all since 8.0.
optimizer
After passing the analyzer, MySQL knows what you are going to do. Before starting to execute, it must be processed by the optimizer.
The optimizer decides which index to use when there are multiple indexes in the table; or decides the connection order of each table when a statement has multiple table associations (join). For example, if you execute the following statement, this statement is to execute the join of two tables:
mysql> select * from t1 join t2 using(ID) where t1.c=10 and t2.d=20;
You can take out the ID value of the record c=10 from table t1 first, and then associate it with table t2 according to the ID value, and then judge whether the value of d in t2 is equal to 20.
You can also take out the ID value of the record with d=20 from table t2 first, and then associate it with t1 according to the ID value, and then judge whether the value of c in t1 is equal to 10.
The logical results of these two execution methods are the same, but the execution efficiency will be different, and the role of the optimizer is to decide which scheme to use.
After the optimizer phase is completed, the execution plan of this statement is determined, and then enters the executor phase.
Actuator
MySQL knows what you want to do through the analyzer, and knows what to do through the optimizer, so it enters the executor stage and starts to execute the statement.
When starting to execute, you must first judge whether you have the permission to execute queries on this table T. If not, an error without permission will be returned, as shown below (in engineering implementation, if the query cache is hit, it will be in the query cache When returning the result, do permission verification. The query will also call precheck to verify the permission before the optimizer).
mysql> select * from T where ID=10;
ERROR 1142 (42000): SELECT command denied to user ‘b’@‘localhost’ for table ‘T’
If you have permission, open the table and continue execution. When opening the table, the executor will use the interface provided by the engine according to the engine definition of the table.
For example, in the table T in our example, the ID field has no index, so the execution flow of the executor is as follows:
- Call the InnoDB engine interface to fetch the first row of this table, and judge whether the ID value is 10, if not, skip it, and if it is, store this row in the result set;
- Call the engine interface to fetch the "next row" and repeat the same judgment logic until the last row of the table is fetched.
- The executor returns the record set composed of all rows satisfying the conditions in the above traversal process as a result set to the client.
At this point, the execution of this statement is complete.
For tables with indexes, the execution logic is similar. The first call is the interface "get the first line that meets the condition", and then loop to get the interface "the next line that meets the condition". These interfaces are already defined in the engine.
You will see a rows_examined field in the slow query log of the database, indicating how many rows were scanned during the execution of the statement. This value is accumulated every time the executor calls the engine to fetch data rows.
In some scenarios, the executor is called once, and multiple rows are scanned inside the engine, so the number of rows scanned by the engine is not exactly the same as rows_examined.