I. Introduction
The goal of product development is to serve the business, solve specific business problems, and bring business value.
Therefore, the launch of any product function should adhere to the principle of "from practice to practice", find problems in actual combat, and solve this problem through new function design and function improvement. Such a function is the most practical value.
However, in actual combat, we will encounter a large number of endless problems, and resources are limited within a given time frame. This requires us to grasp the key contradictions, identify common problems, find out the problems that have the greatest business impact, and invest resources to ensure maximum ROI.
The above discussion is also applicable to Mendix component development. With the increase of domestic Mendix implementation projects, the demand for platform components is increasing day by day. On the one hand, Mendix encourages ecological partners, communities, and individual enthusiasts to actively participate in contributions (refer to previous activities 2021 | 2023 , and interested partners are welcome to sign up). On the other hand, the original factory focuses on investing resources in those basic, universal and most innovative or more difficult components.
Next, Mendix China will launch a series of articles to introduce the high-quality components of the Mendix platform and the practical problems they can solve to help the project be implemented efficiently. As the first article, this article will introduce the tree component, which has a wide range of application scenarios, but the application conditions and configuration are relatively complex.
2. Demand analysis
First, let’s take a look at the following three project requirements.
-
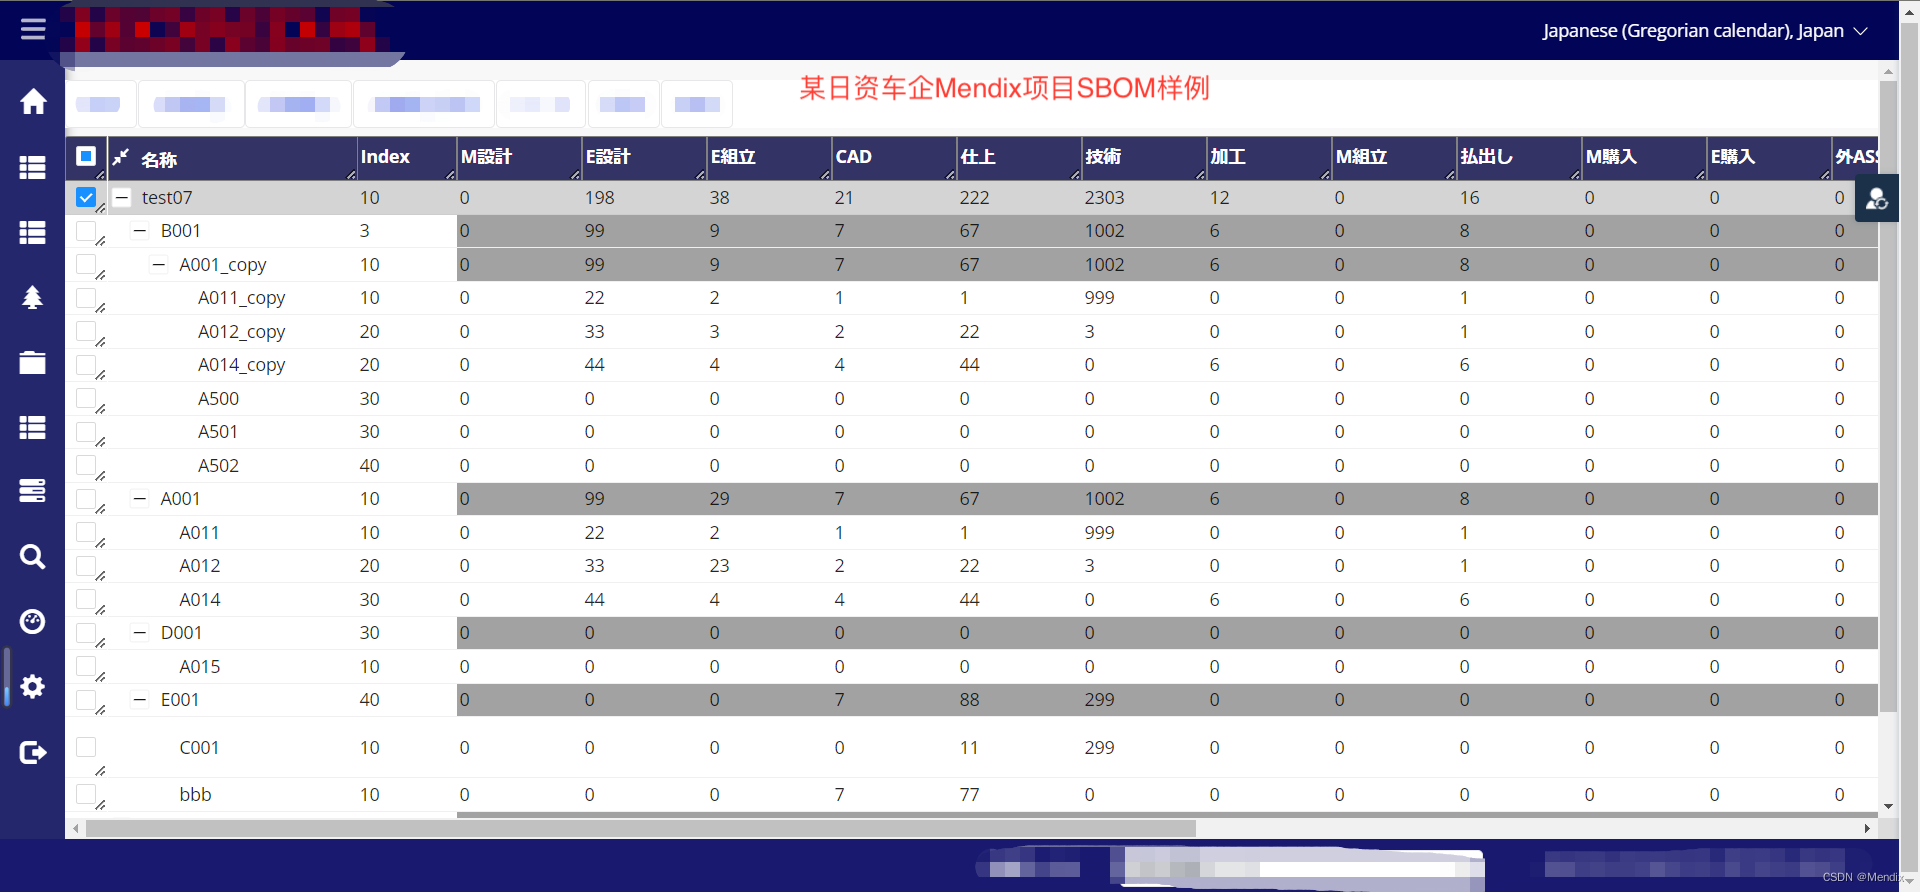
An automobile manufacturing company publicly selected low-code models, and valued low-code development platforms and manufacturing core systems, data integration capabilities, and practical experience in actual manufacturing scenarios. Mendix and Teamcener have ready-made connectors that can easily model business data in the R&D field on a low-code platform and obtain R&D data. At the same time, Mendix has a large number of manufacturing enterprise application scenario templates and domestic and foreign benchmark customers, and has rich project practical experience. Based on the above reasons, the company chose to introduce Mendix. In the initial stage of project development, the first specific technical problem faced was how to present the BOM data structure in the Mendix application.
-
A consumer electronics company, in order to maintain market competitiveness, has to conduct a large number of product pre-research and trial production, and the development and management processes of different products are quite different. How to efficiently manage a large number of research and development projects, the IT department decided to introduce a low-code development personalized product project management platform, which itself is positioned as an industry differentiation capability (system of differentiator). Mendix's full-stack low-code capabilities and support for cloud-native microservice architecture fit the company's Cloud First strategy, so the Mendix platform was chosen. In actual development, a common technical scenario requirement that needs to be met is how to display the project structure WBS in the application.
-
A leading furniture manufacturing company in a certain industry has a strong sense of digitalization. All major business areas have basically completed full coverage and stable operation of information systems through outsourced methods. In terms of enterprise architecture, they have many years of practical experience in data center. Facing the next decade, CIOs hope to conduct more independent research and development to meet personalized business demands, and explore the best practices of their business into digital products to promote to peers. One of the reasons for choosing the Mendix platform is that Mendix has good integration and scalability, and can be quickly integrated with its data center. At the beginning of the project, the first technical question that the development team asked us was how to manage and display the company's personnel organization structure in Mendix.
The requirements of the above three projects are very aggregated and similar. They all require the front-end to present a certain data structure, which is the requirement for the front-end components. Whether it is BOM structure, project WBS structure, or organizational structure, they all have the following commonalities in presentation and operability:
-
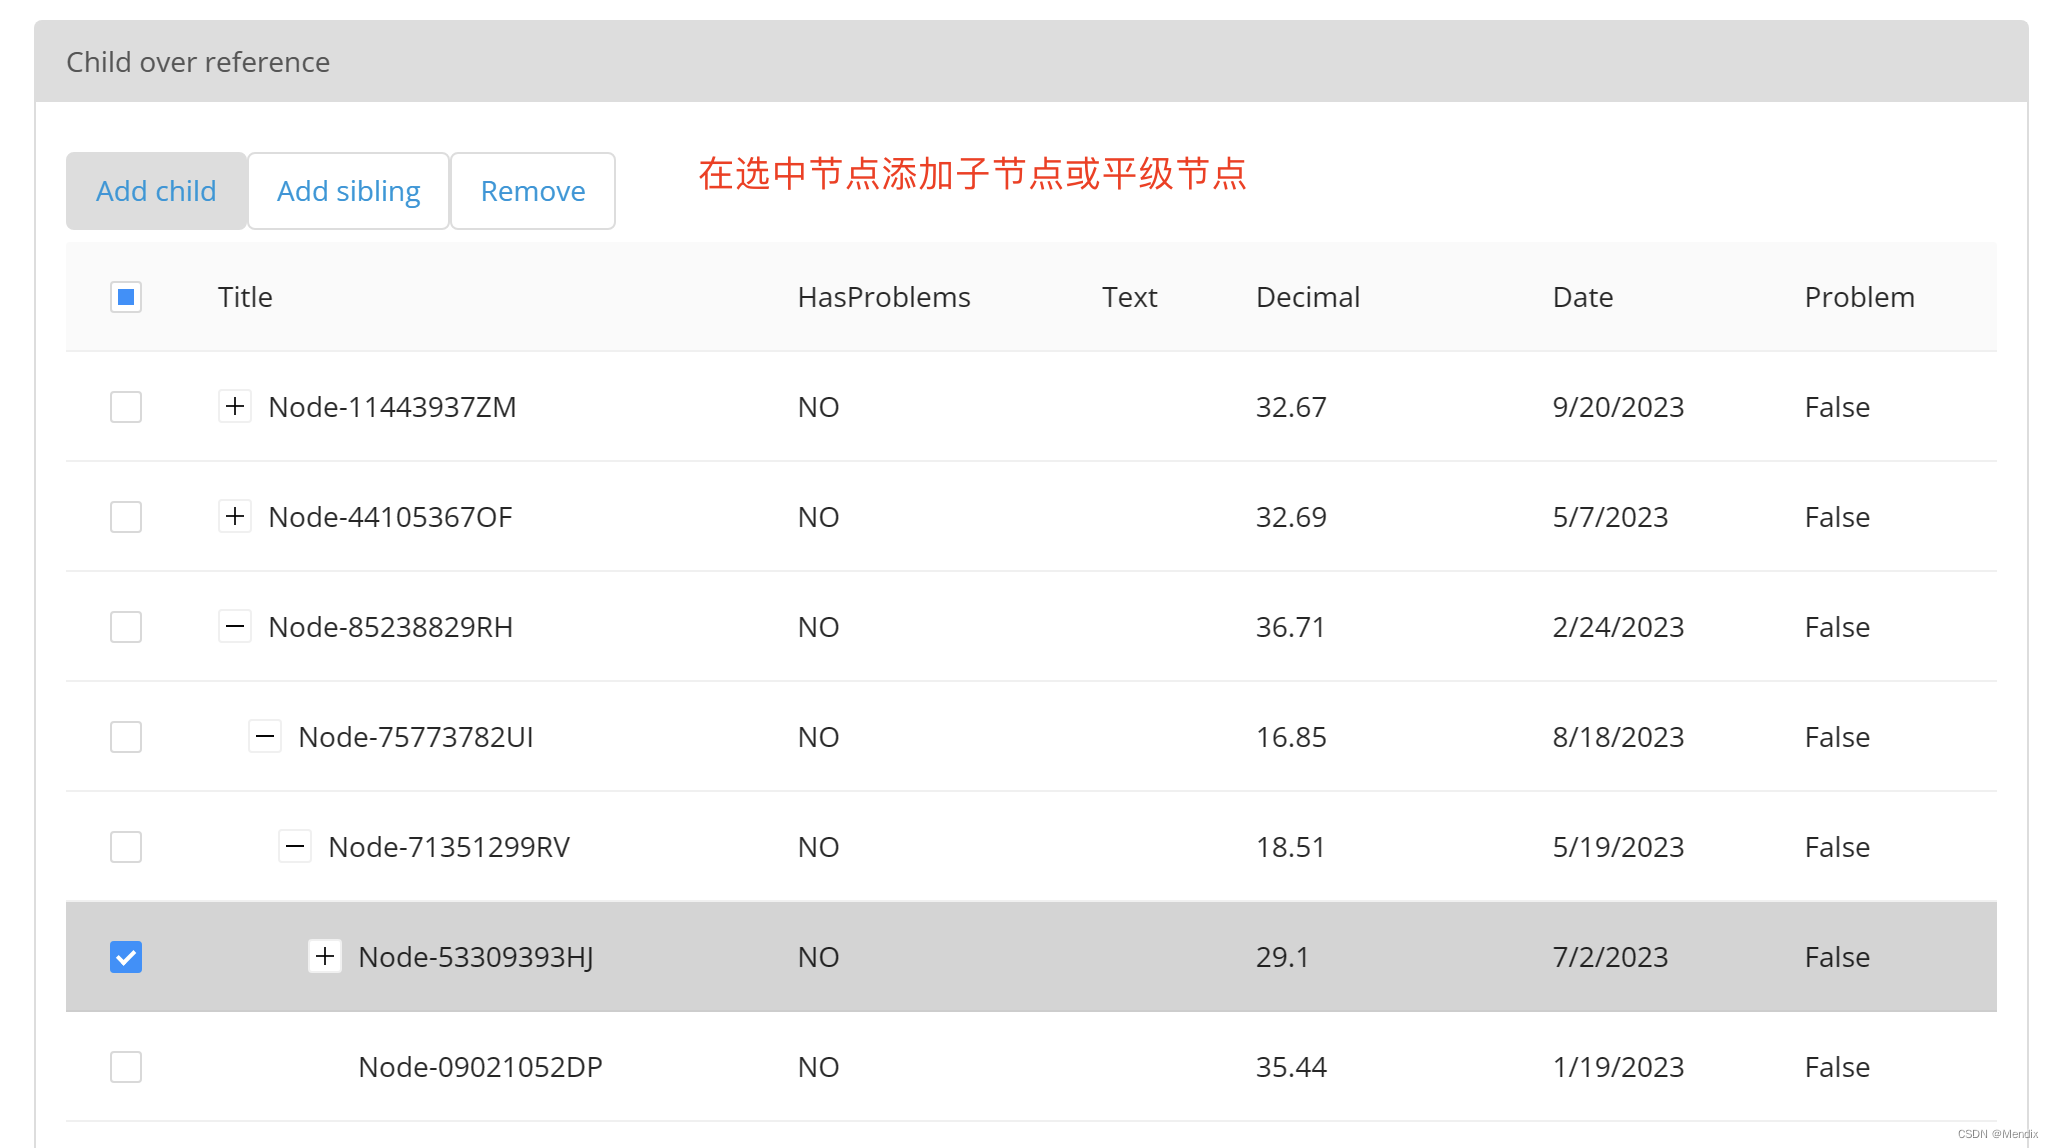
There are multiple levels of superior-subordinate relationships, and you can click to open or collapse subordinate nodes. For example, assembly A includes parts B and C
-
Each node will have a series of attribute fields, and specific attributes may have roll-up calculation logic for subordinate nodes, such as the number of preparations made by the purchasing department equals the sum of the data made by the purchasing teams in each region
-
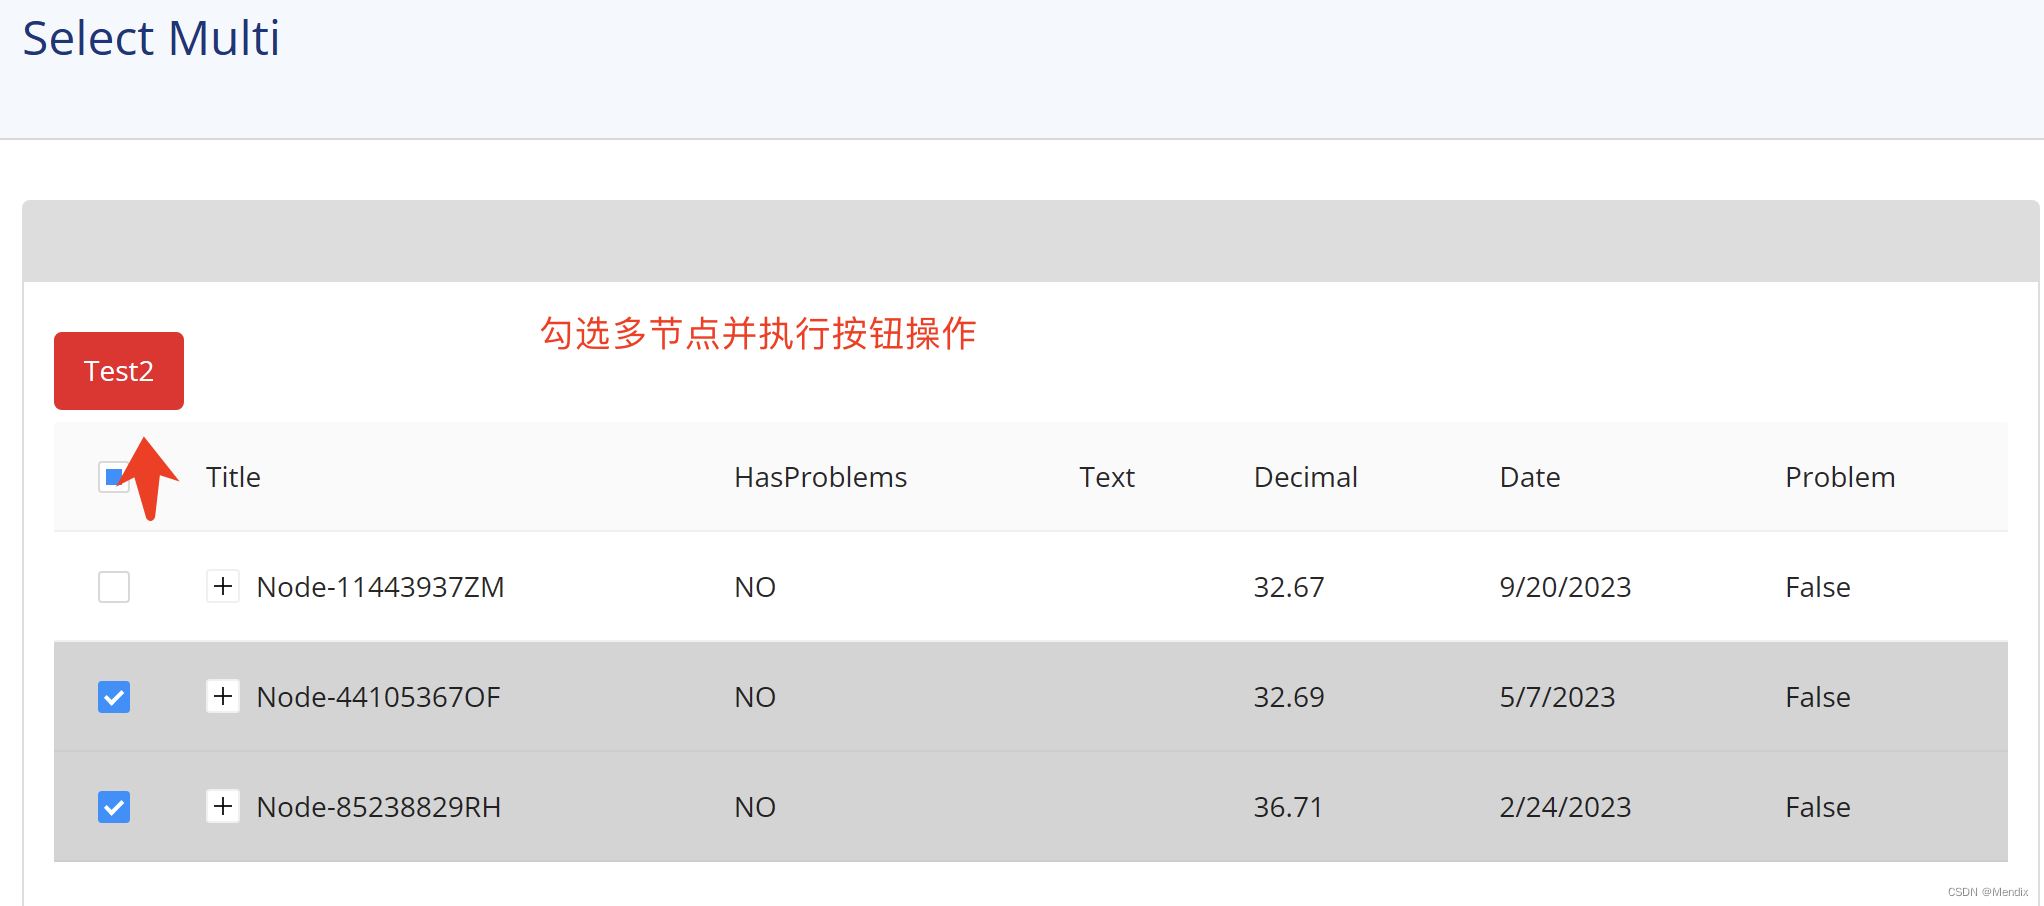
Select one or more nodes, you can display the details of this node or modify the attribute field, save the operation, or perform other operations on multiple nodes
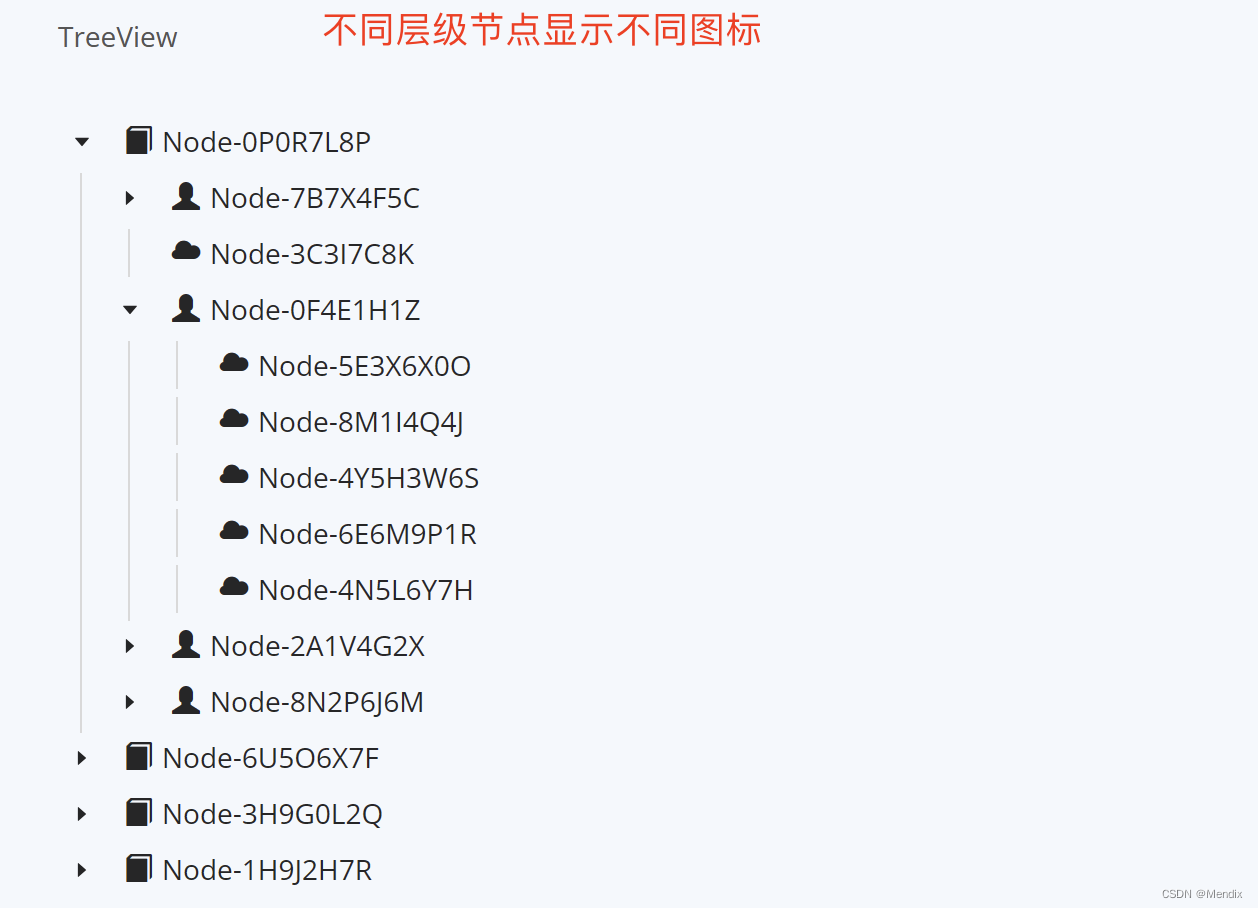
Other possible requirements, such as the ability to choose to display or hide certain fields when displaying nodes, the different styles of nodes at different levels for easy identification, and the selection of nodes can be checked for single or multiple selections, etc., and so on.
3. Tree components
component acquisition
In Mendix Studio Pro, open the Mendix Marketplace and search for the keyword Tree.
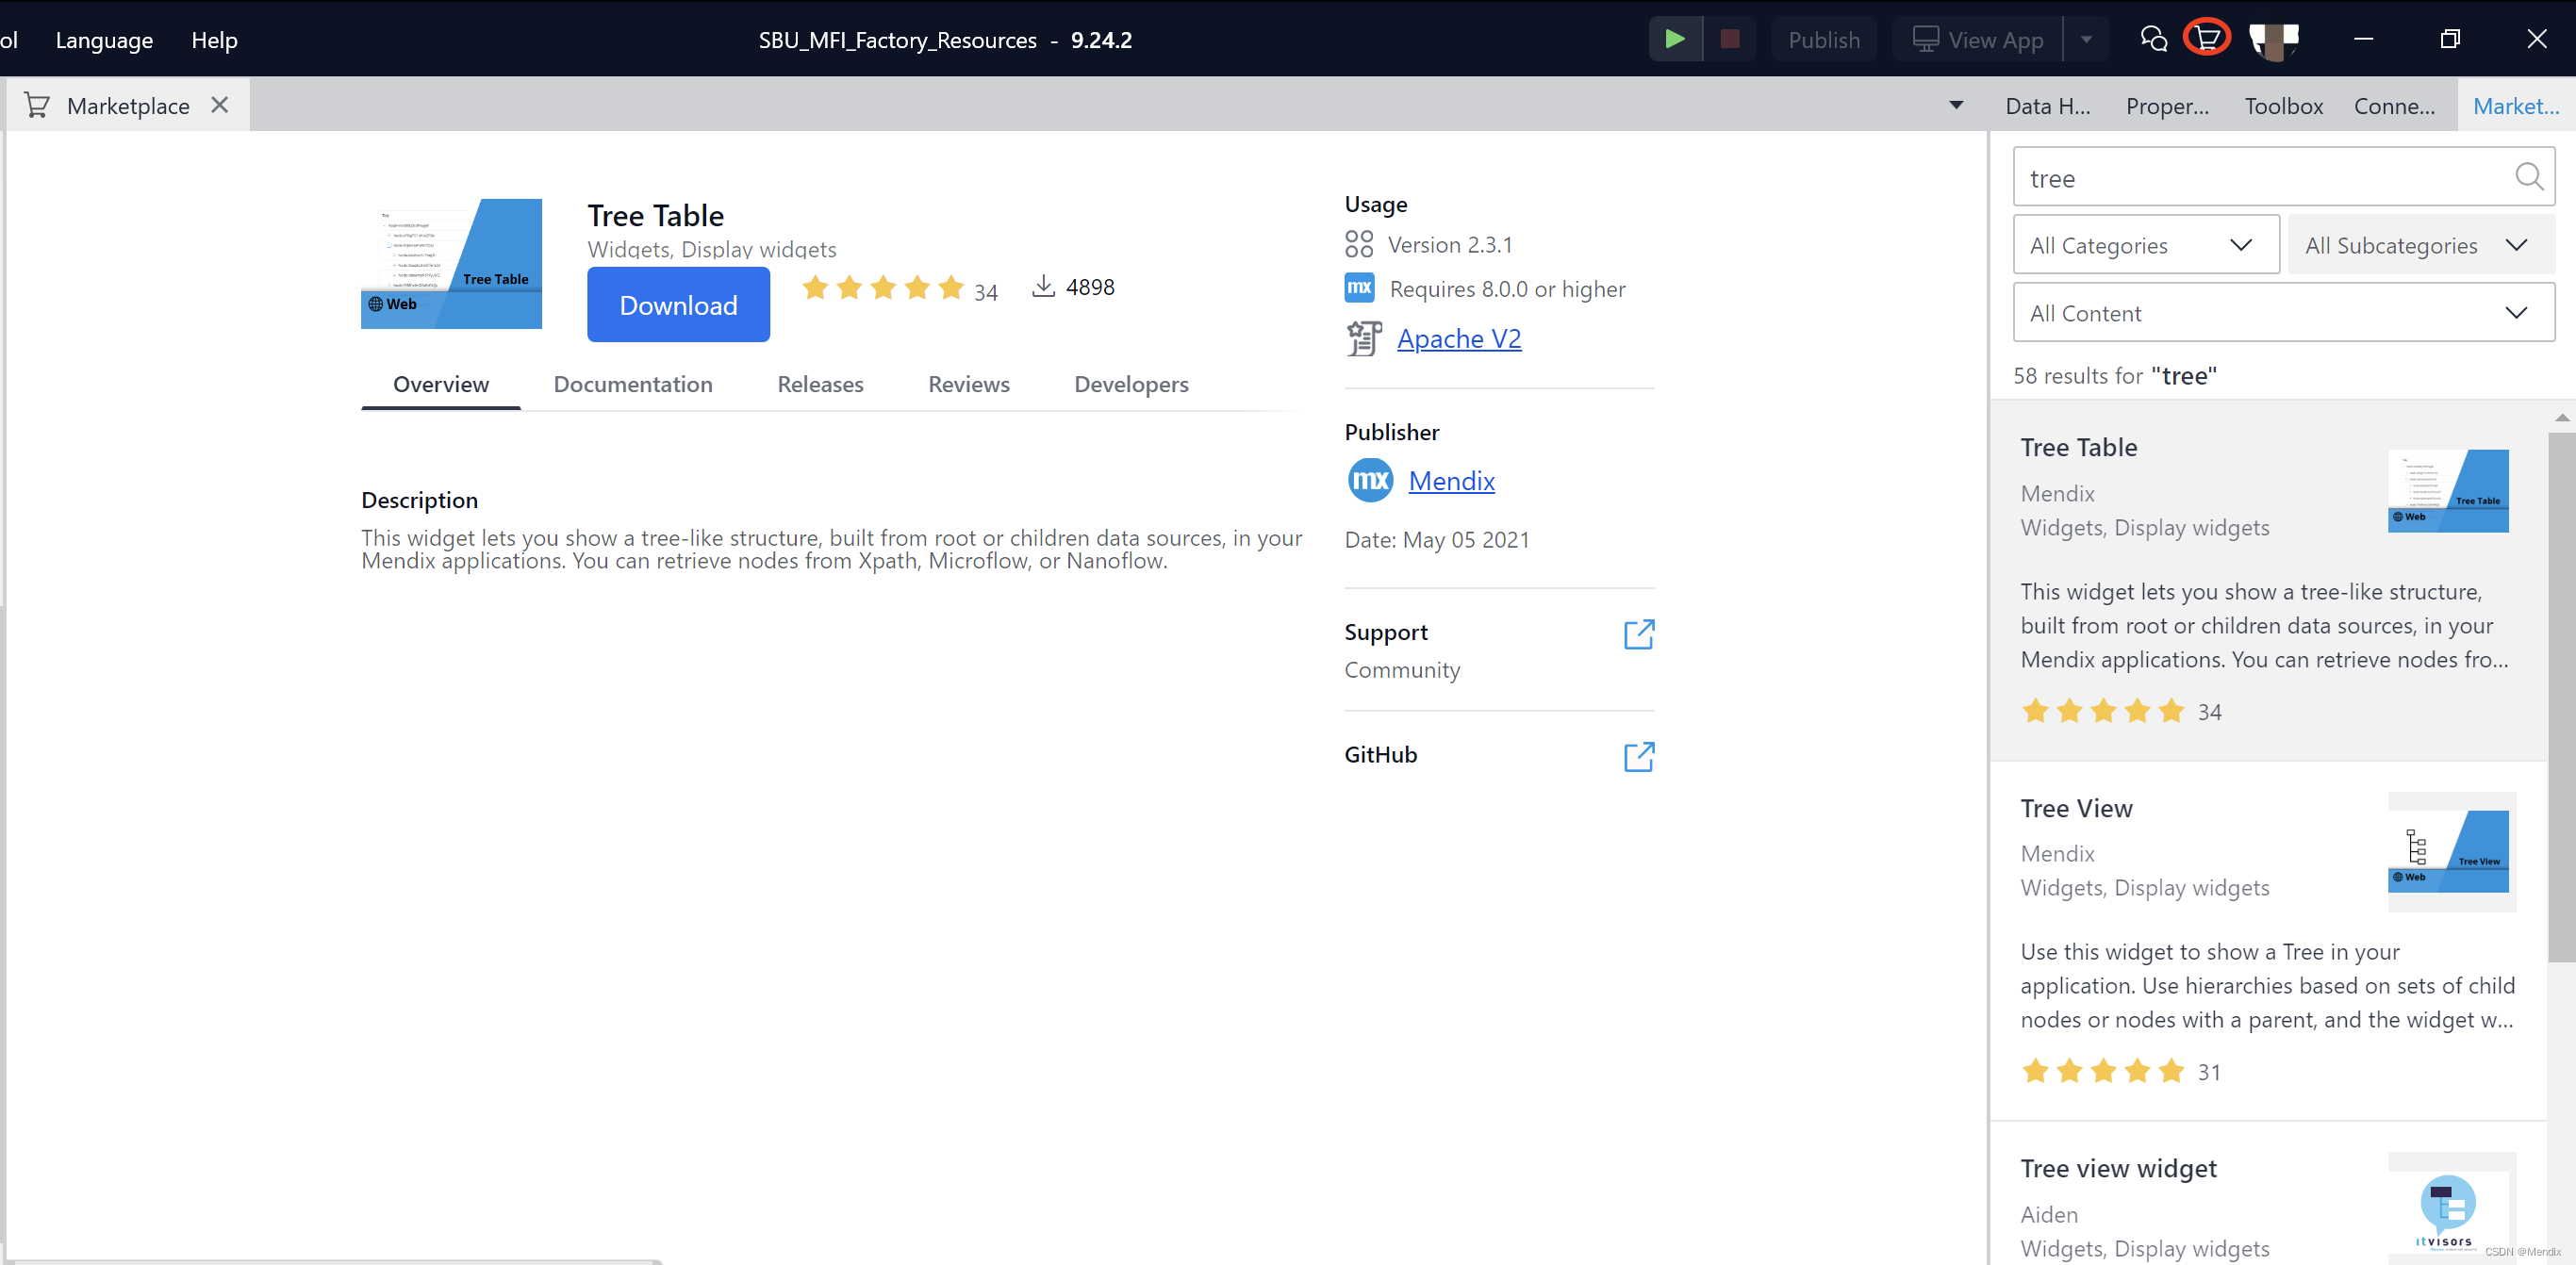
You can find the two components Tree View and Tree Table that are not in the IDE by default. (Tips: It is said that Mendix has a vast library of components. When looking for components, don’t just look at the ones installed by default in the IDE. Marketplace is an arsenal, and Chinese forums are treasures. Going to search will bring you more surprises)
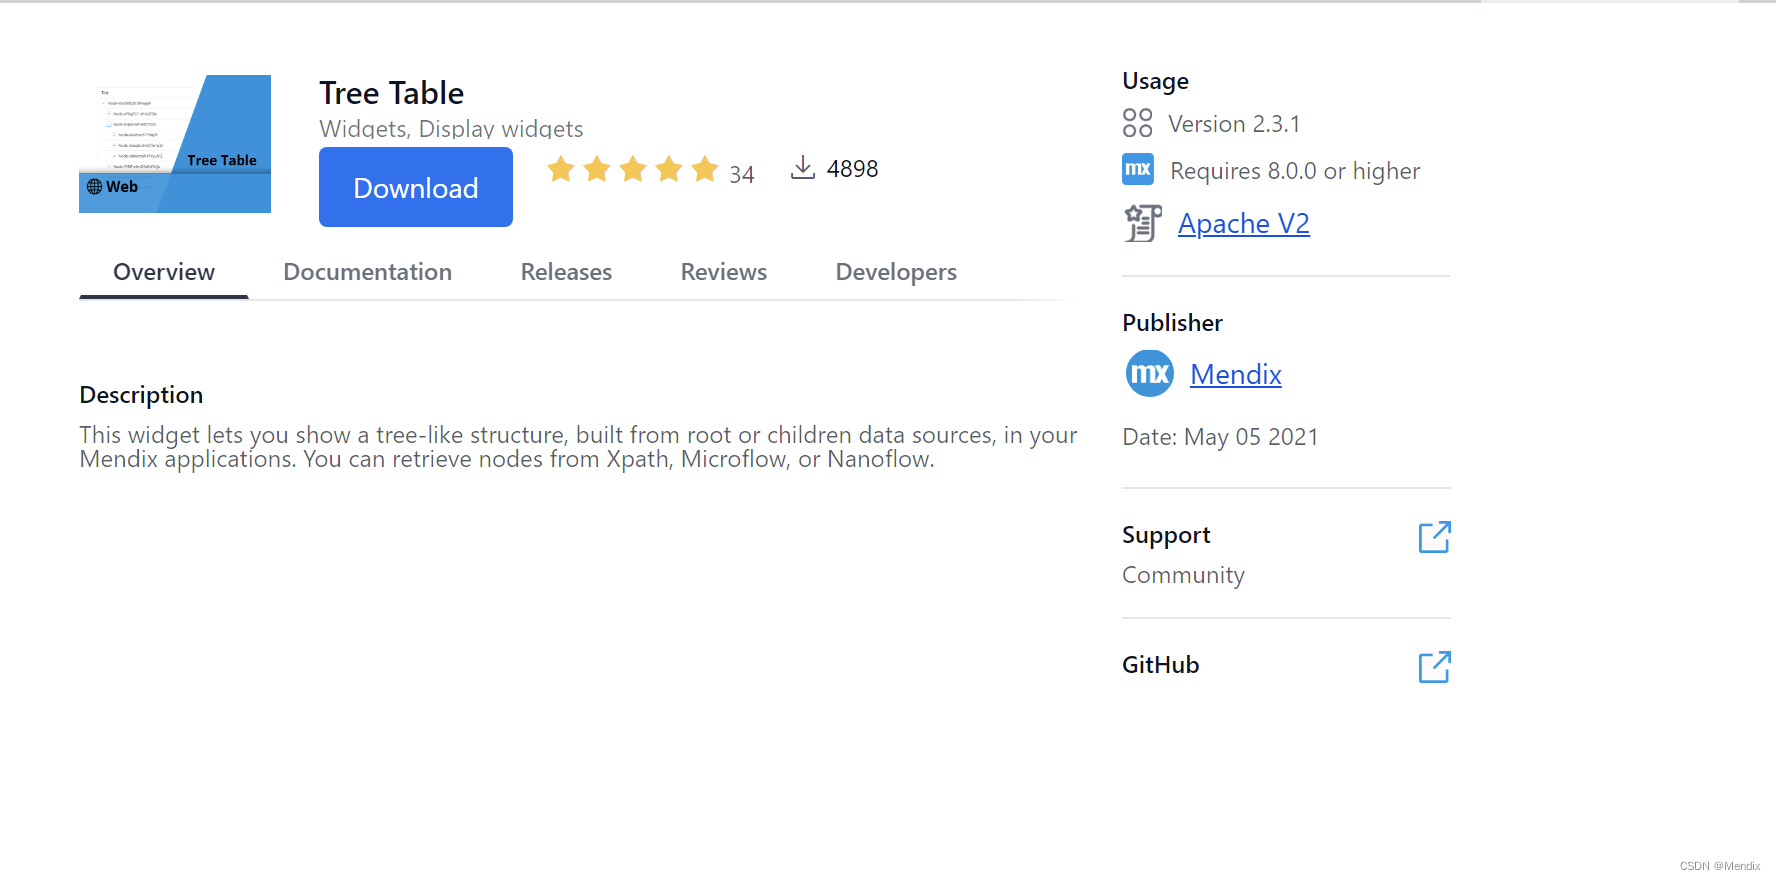 Click to download, and the installation will be completed in three seconds. At this point, you can find these two new components in Toolbox - Widgets - Add-ons!
Solid Model Adaptation
Before using the tree component, it is very important to establish a correct entity model based on the actual data structure!
We abstract the business data entity named Node (E1) from different business scenarios. This entity contains business fields such as Title (name), Text (description), Date (creation date), and functional fields of Boolean type such as _HasChildren (whether there are child nodes) and _Root (whether it is a root node). The so-called functional fields are fields that do not represent actual business significance but are useful for subsequent component configuration. We will describe the role of these two fields later.
In addition to field settings, it is also necessary to reflect the hierarchical relationship between nodes. One of the manifestations of Mendix's powerful modeling capabilities is that we can model this hierarchical relationship based on the self-association relationship of the same entity. Reflected in the above figure is the association relationship ChildSet (A1), which means that a node can correspond to multiple child nodes.
Another very key point in entity modeling is that in addition to establishing entities based on actual data structures, the tree component needs to introduce two additional auxiliary entities, namely TempView (E2) and SelectionHelper (E3) in the above figure, in order to play a role. And establish the necessary association relationship A2, A3, A4 among E1, E2, E3.
-
TempView (E2): An auxiliary entity of non-persistent storage, which will provide the outermost context (context) for the page displaying the tree component and act as a bridge.
-
SelectionHelper (E3): An auxiliary entity of non-persistent storage. This entity is required when the tree component enables the node selection function, and provides the function of recording the selected node. This entity will be the input parameter of the built-in event of the tree component by default, providing context information.
-
A2: Association relationship, which is associated with the currently selected node object. The instantiation of this relationship has been realized in the kernel of the tree component, and the user only needs to know and use it.
-
A3: Association relationship. Among them, Nodes is used to associate contextual environment entities with data objects that need to be presented, SelectedMulti and SelectedSingle are used to associate multiple or single node objects that are currently selected, this information is obtained from A2 of E3, and provided to other on the current page component usage.
-
A4: Association relationship, which needs to be used during configuration.
Based on your understanding of the above entity models and associated relationships, you can basically follow the example in actual use, and use these entities and relationships in component configuration and event definition. (Note: In order to facilitate the introduction of the realization of different functional requirements, the physical model in the given screenshot is not exactly the same as the above picture, but the 3 core entities and 4 core relationships involved are reflected. Please understand the numbers )
component configuration
Since the configuration logic of the Tree View component and the Tree Table component are very similar, we will focus on the configuration method of the Tree Table component next.
First, in the page designer of the IDE, a context view needs to be introduced, which is the Dataview corresponding to the E2 entity. As mentioned earlier, it acts as a bridge, passing the selected information of the tree component to other components on the current page, and at the same time initializes the tree structure data to be presented and the relationship A3 of the E2 entity when defining the Dataview, as shown in the figure below Show.

Then, place the Tree Table component in the above-mentioned Dataview, and you can start configuring the tree component. Due to the large number of configuration items, this article only focuses on the key and commonly used configuration items. (Don't blink please follow)
data
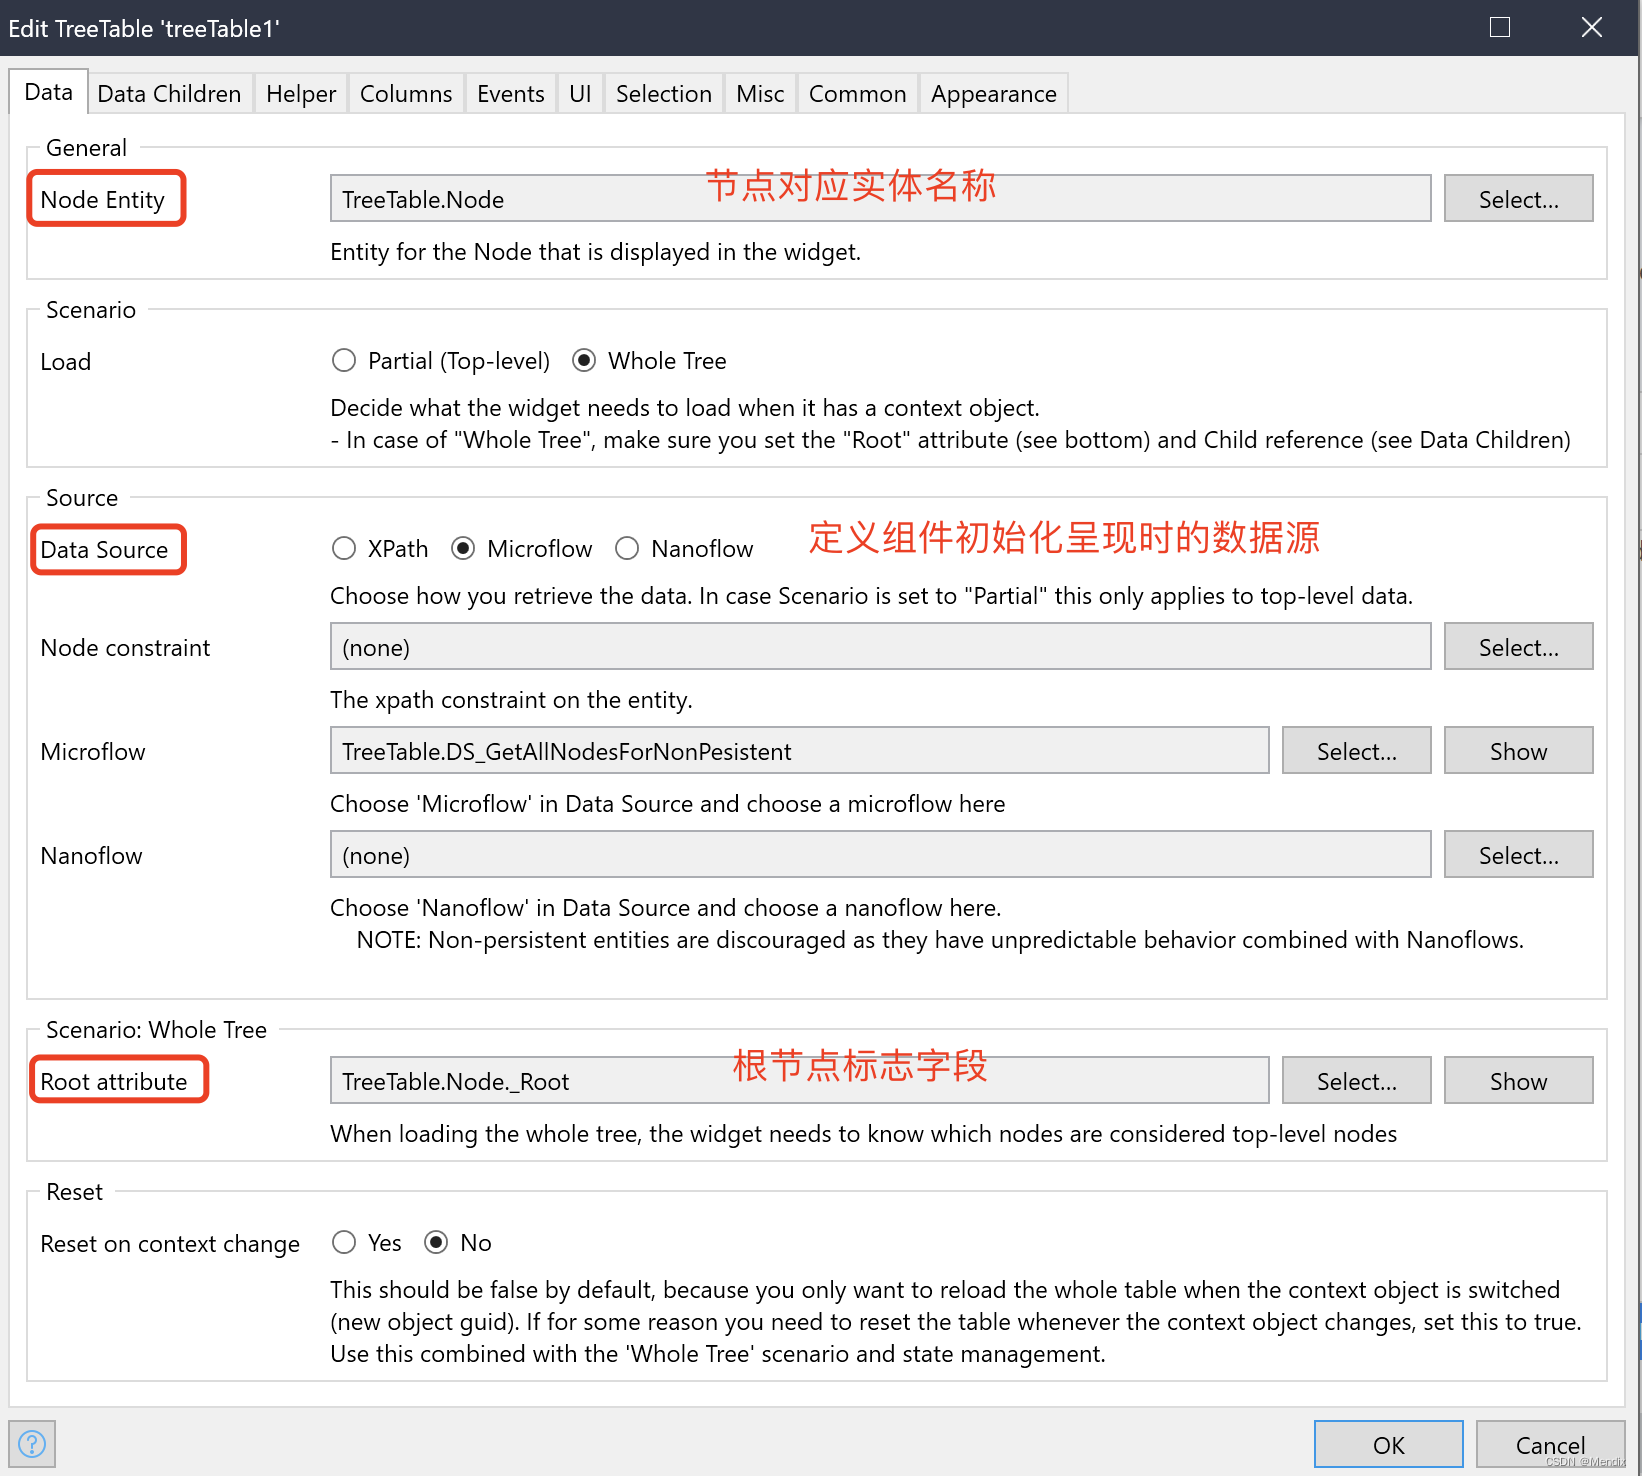
There are many ways to initialize the data source definition, which can be XPath or the most flexible microflow, and a List is obtained.
The root node flag is the functional field emphasized when introducing entity E1 above, and it is used here.
child node
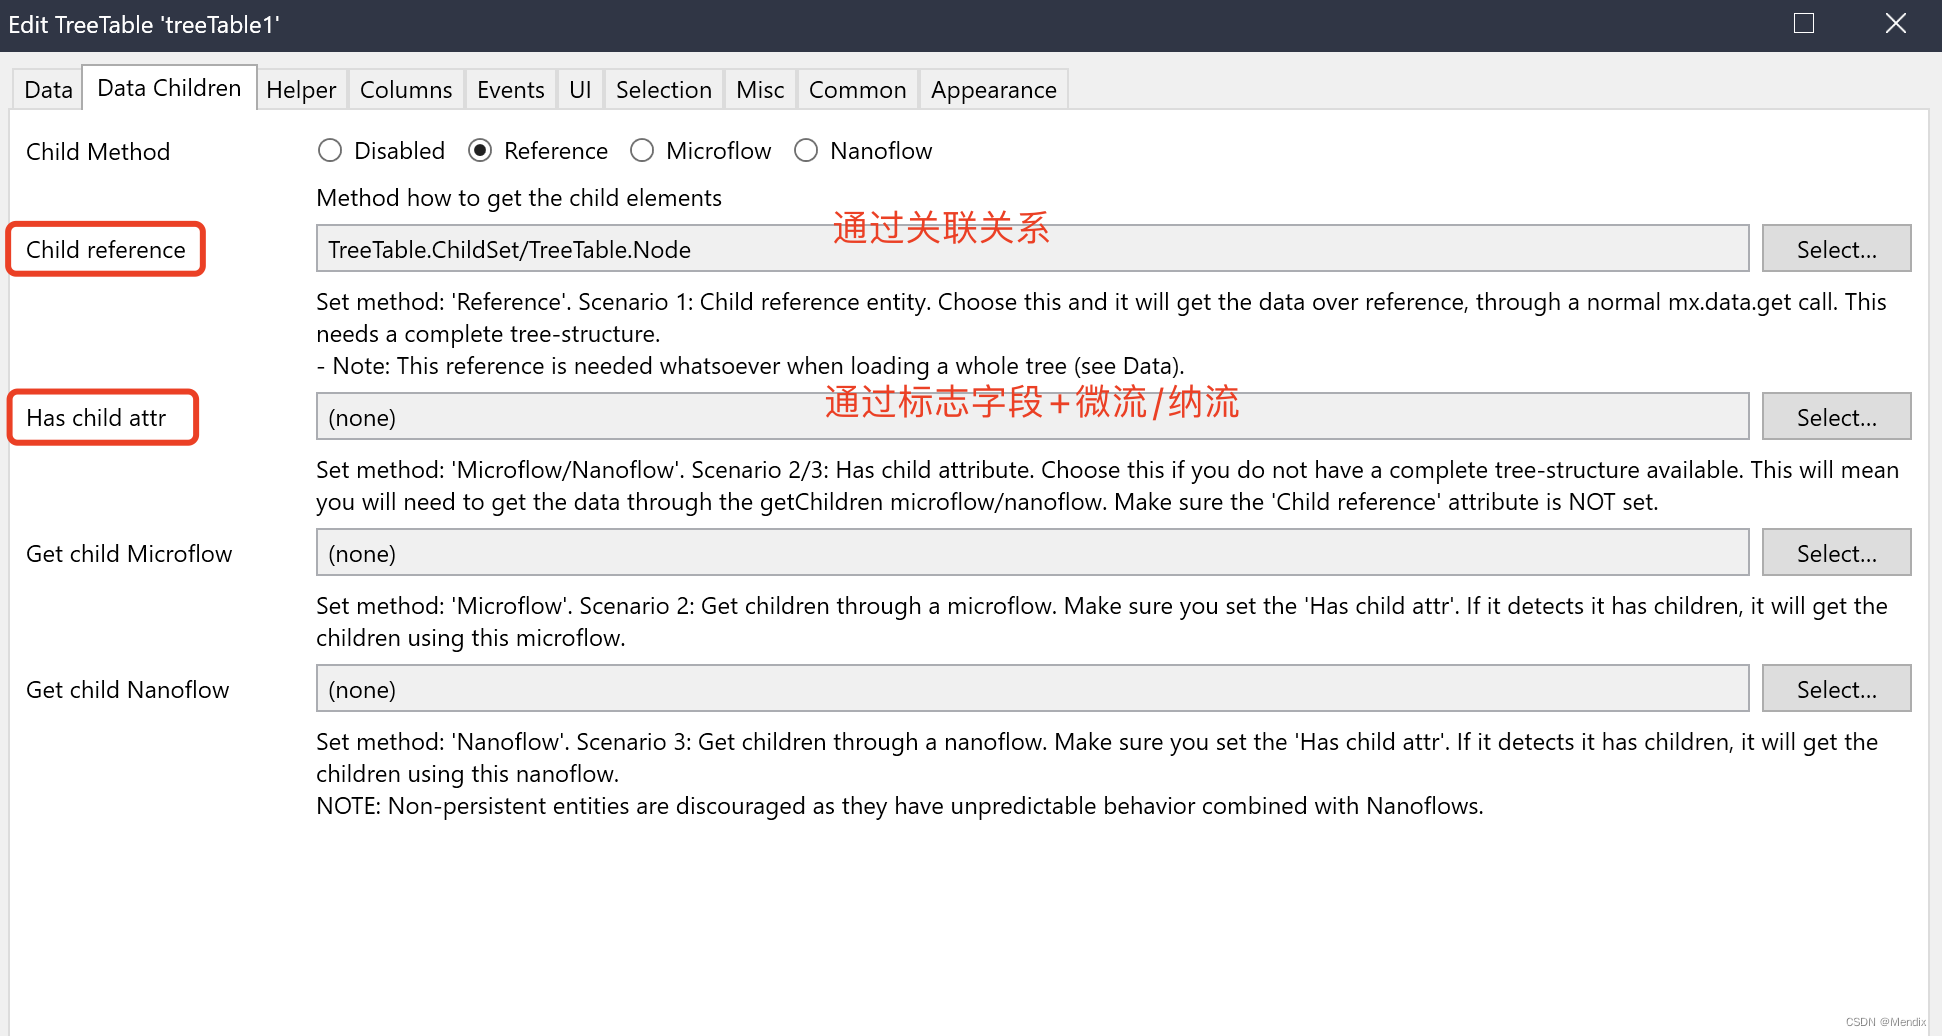
Indicates how to find child nodes, that is, when the parent node is clicked on the component, determine the way to expand the rendered child nodes. There are two ways.
If the entity modeling in the early stage refers to the previous mode in this article, you can choose to determine through the association relationship.
If a complete tree structure entity model is not established, the child nodes can also be obtained through the field flag whether there are child nodes, and the microflow returns List.
Although the latter method is more flexible, it is also more non-standardized and requires higher solid modeling capabilities. The former is recommended here.
help entity
It is of great significance and plays a key role in the processing of selected events. But configuration is a standard action, just specify E3, A2, and A3 in solid modeling.
column display
Optionally select which entity fields to render. The basic configuration is to directly select the relevant fields from the data entity E2, that is, the way of List. If there is a requirement for front-end dynamic configuration attributes, you can also choose the Dynamic method. This method involves additional auxiliary entities. Friends with this advanced requirement can study the Demo App in the reference materials at the end of the article by themselves.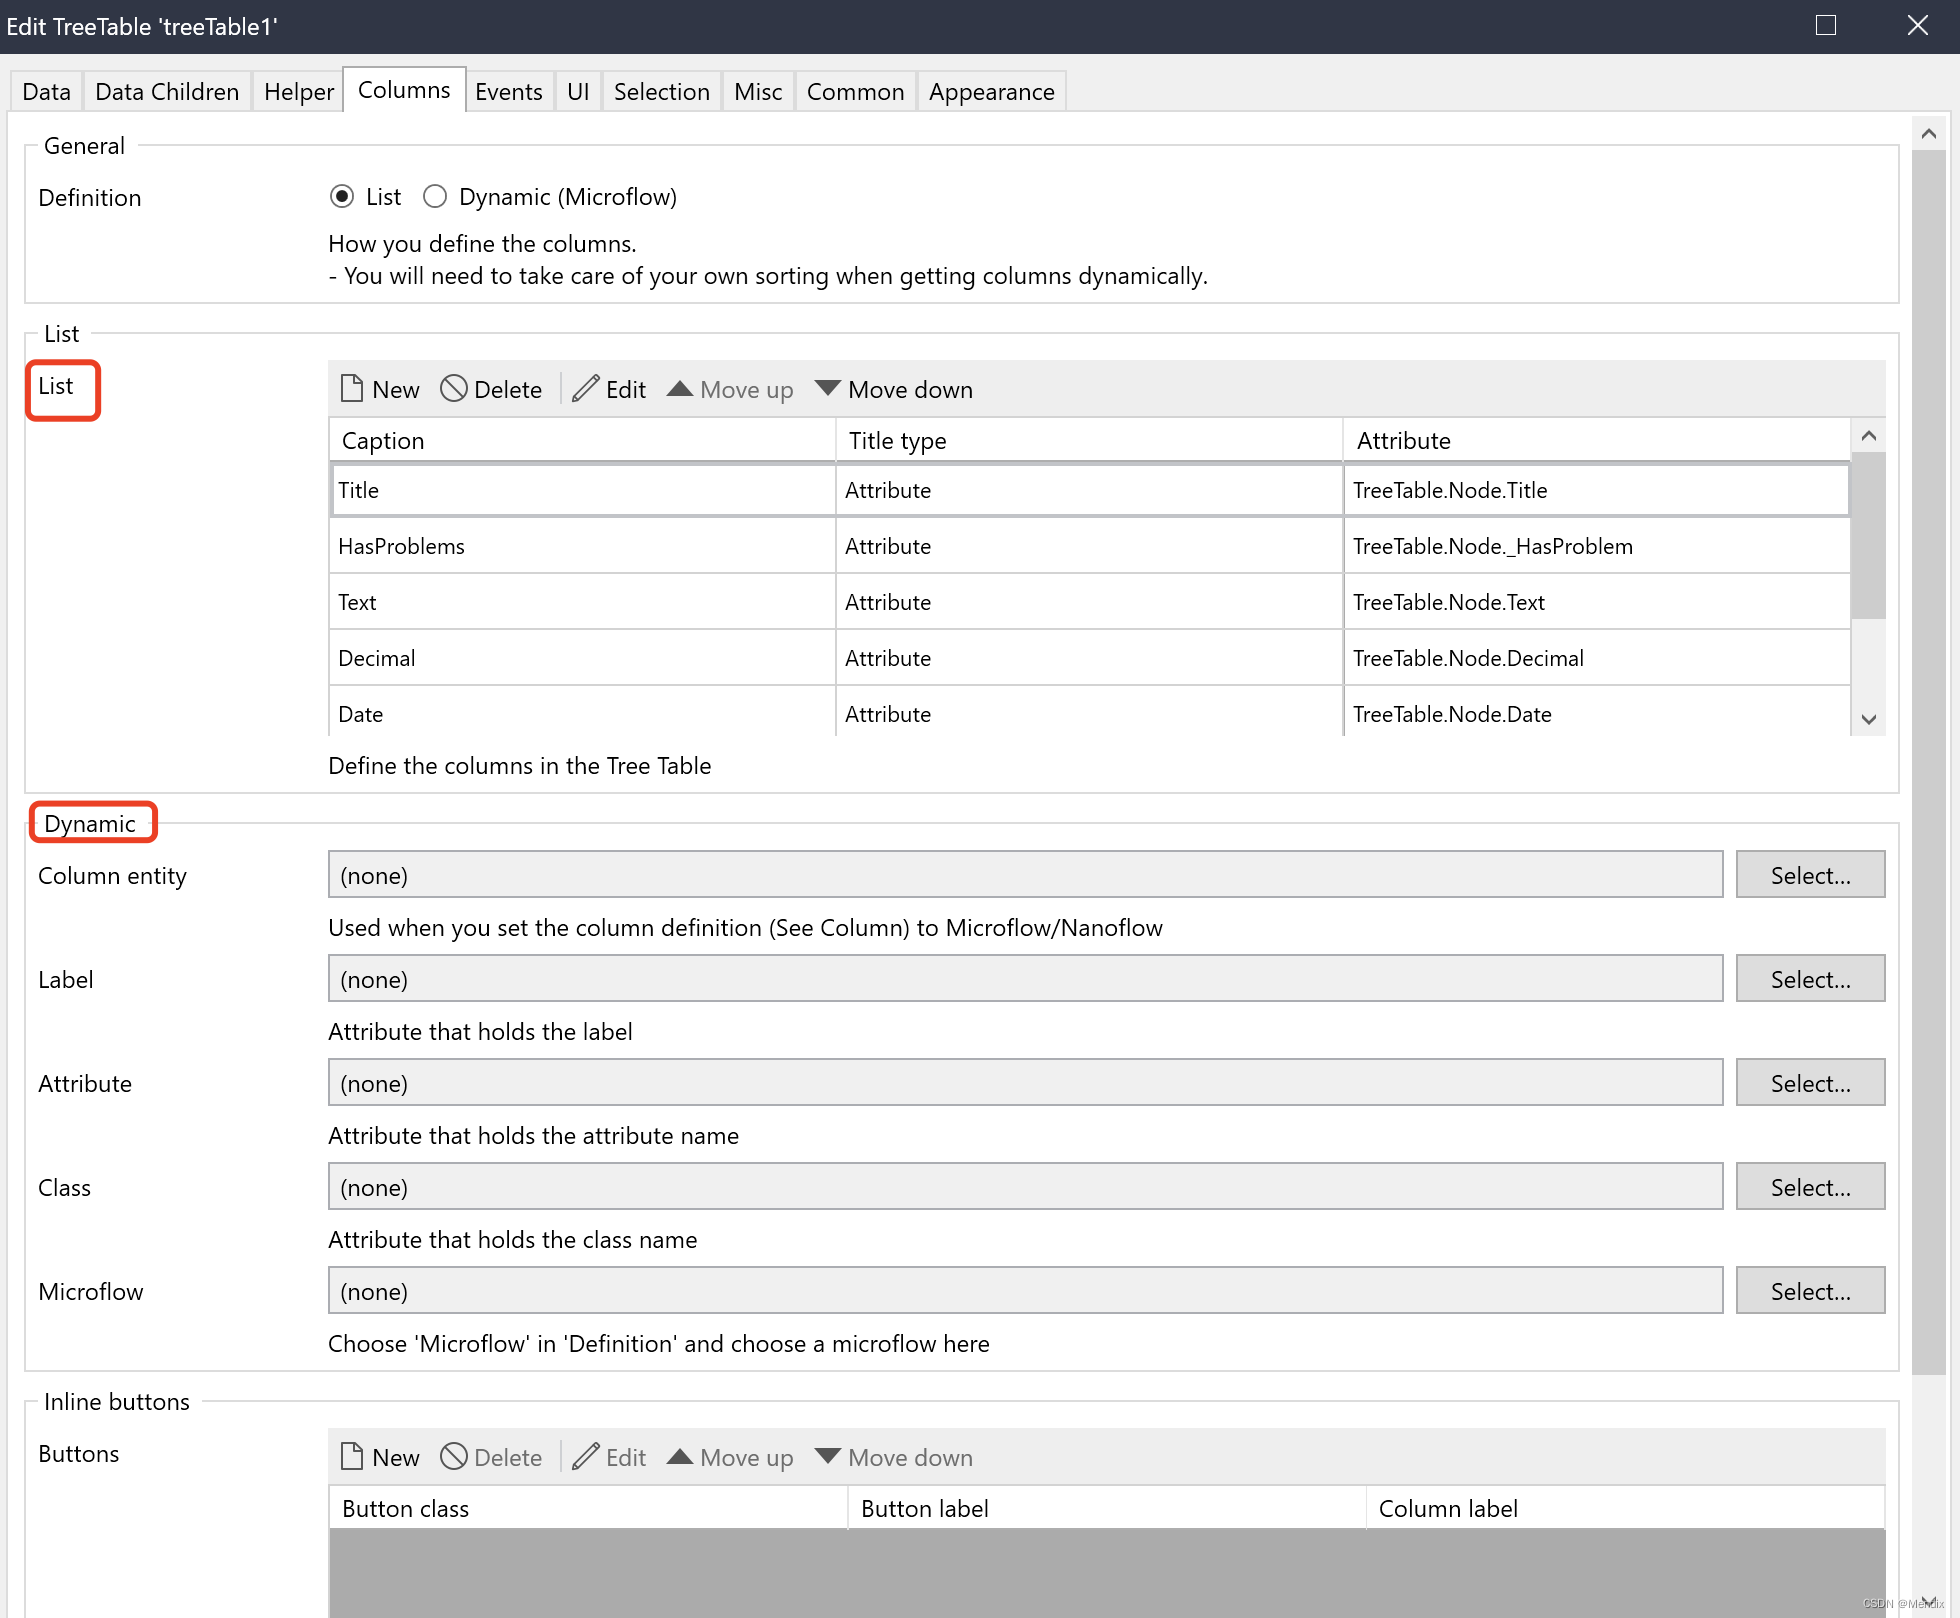
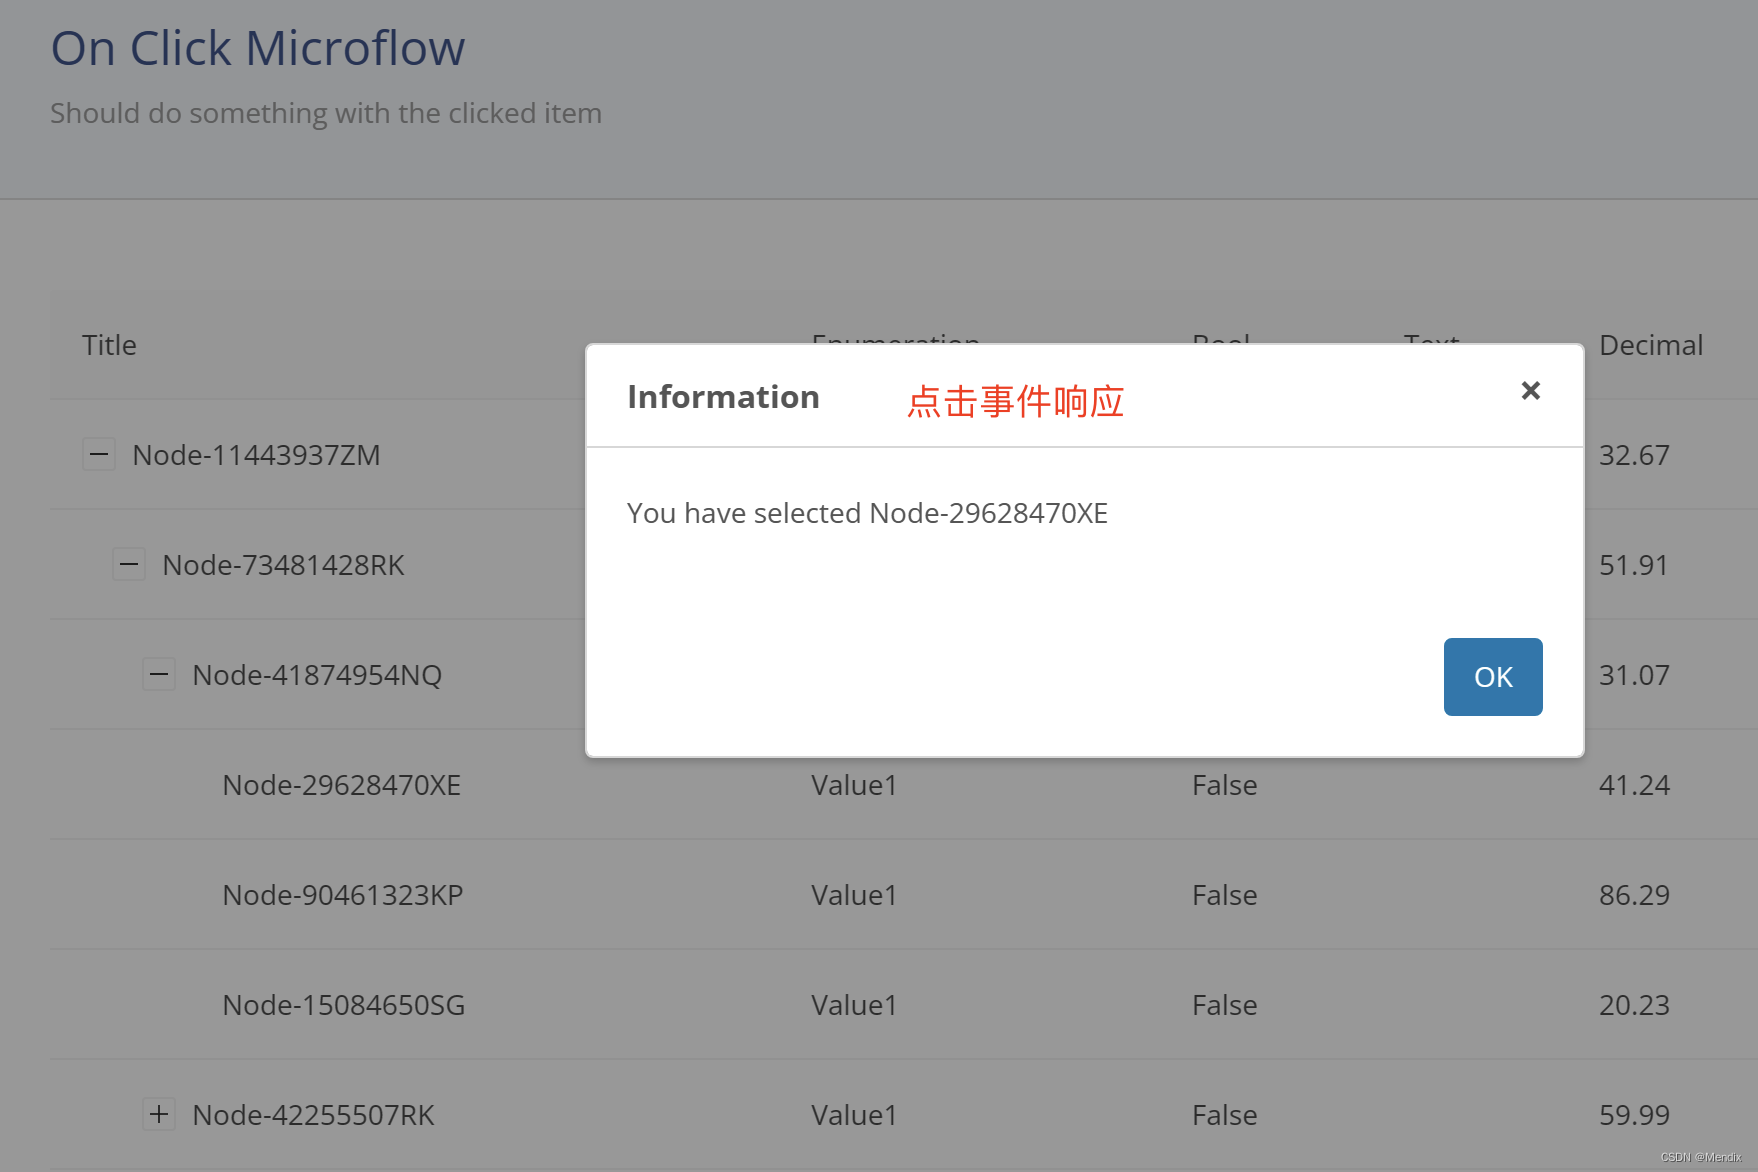
click event
In actual use, you often want to click a certain node in the tree component, and there will be related response events, such as opening to view details, prompt information, etc., and configure it here.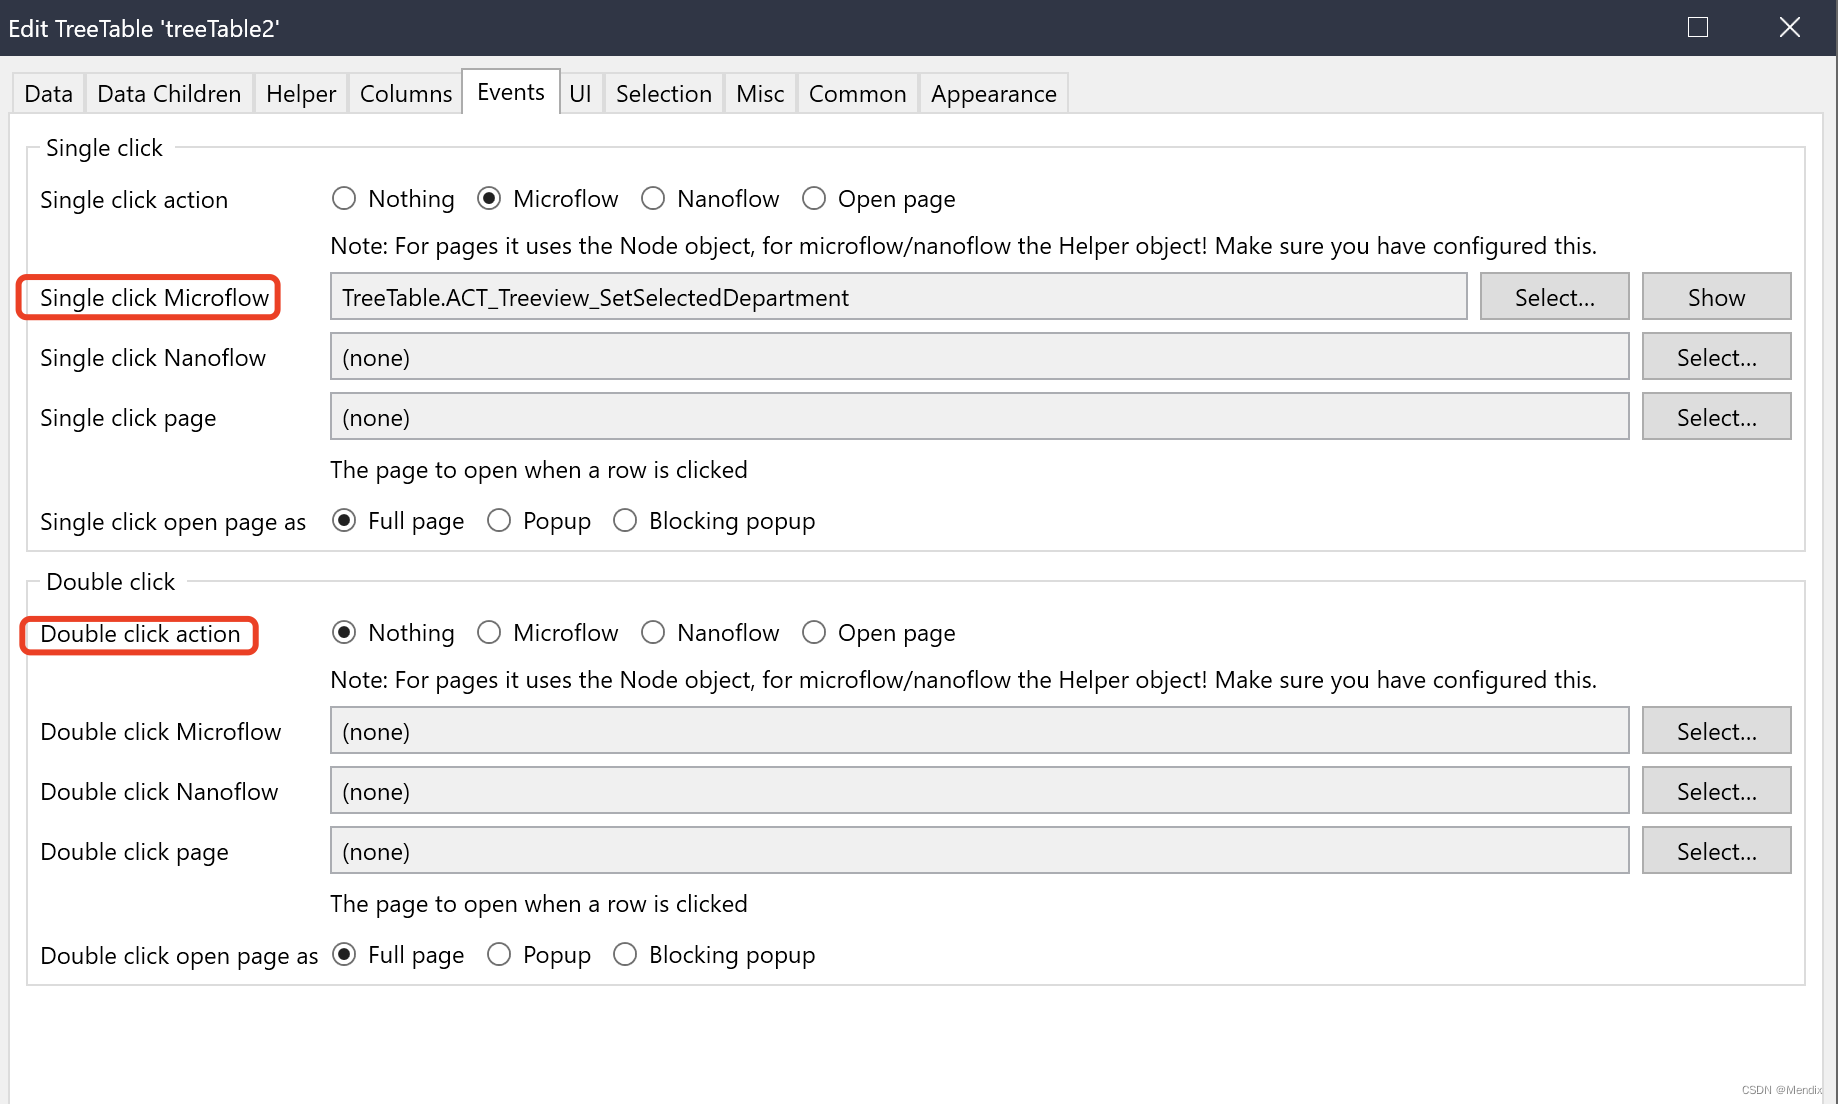
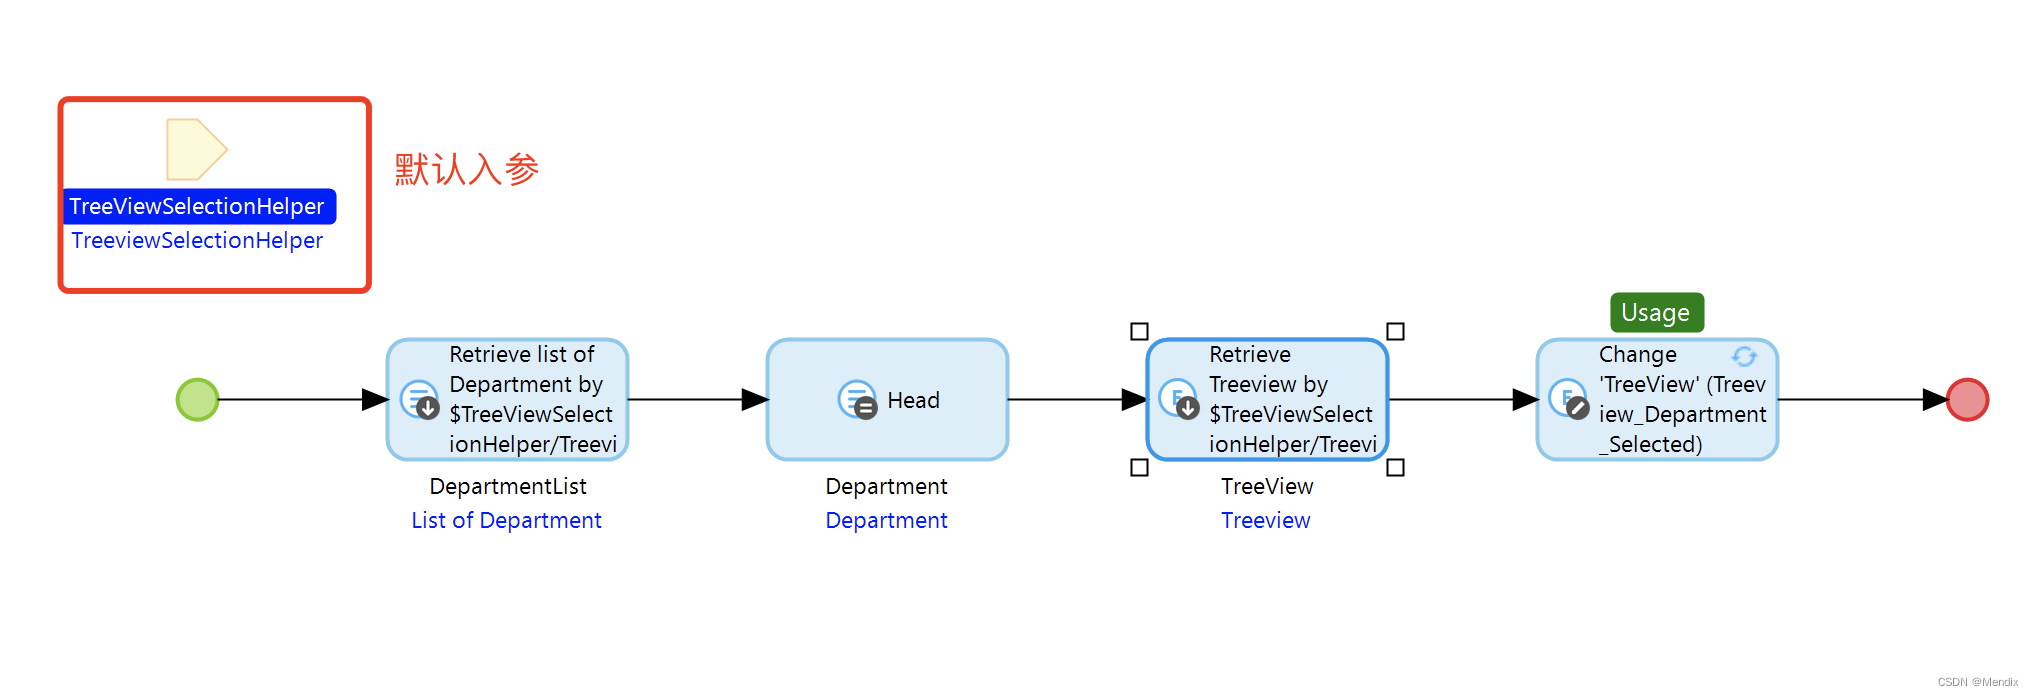
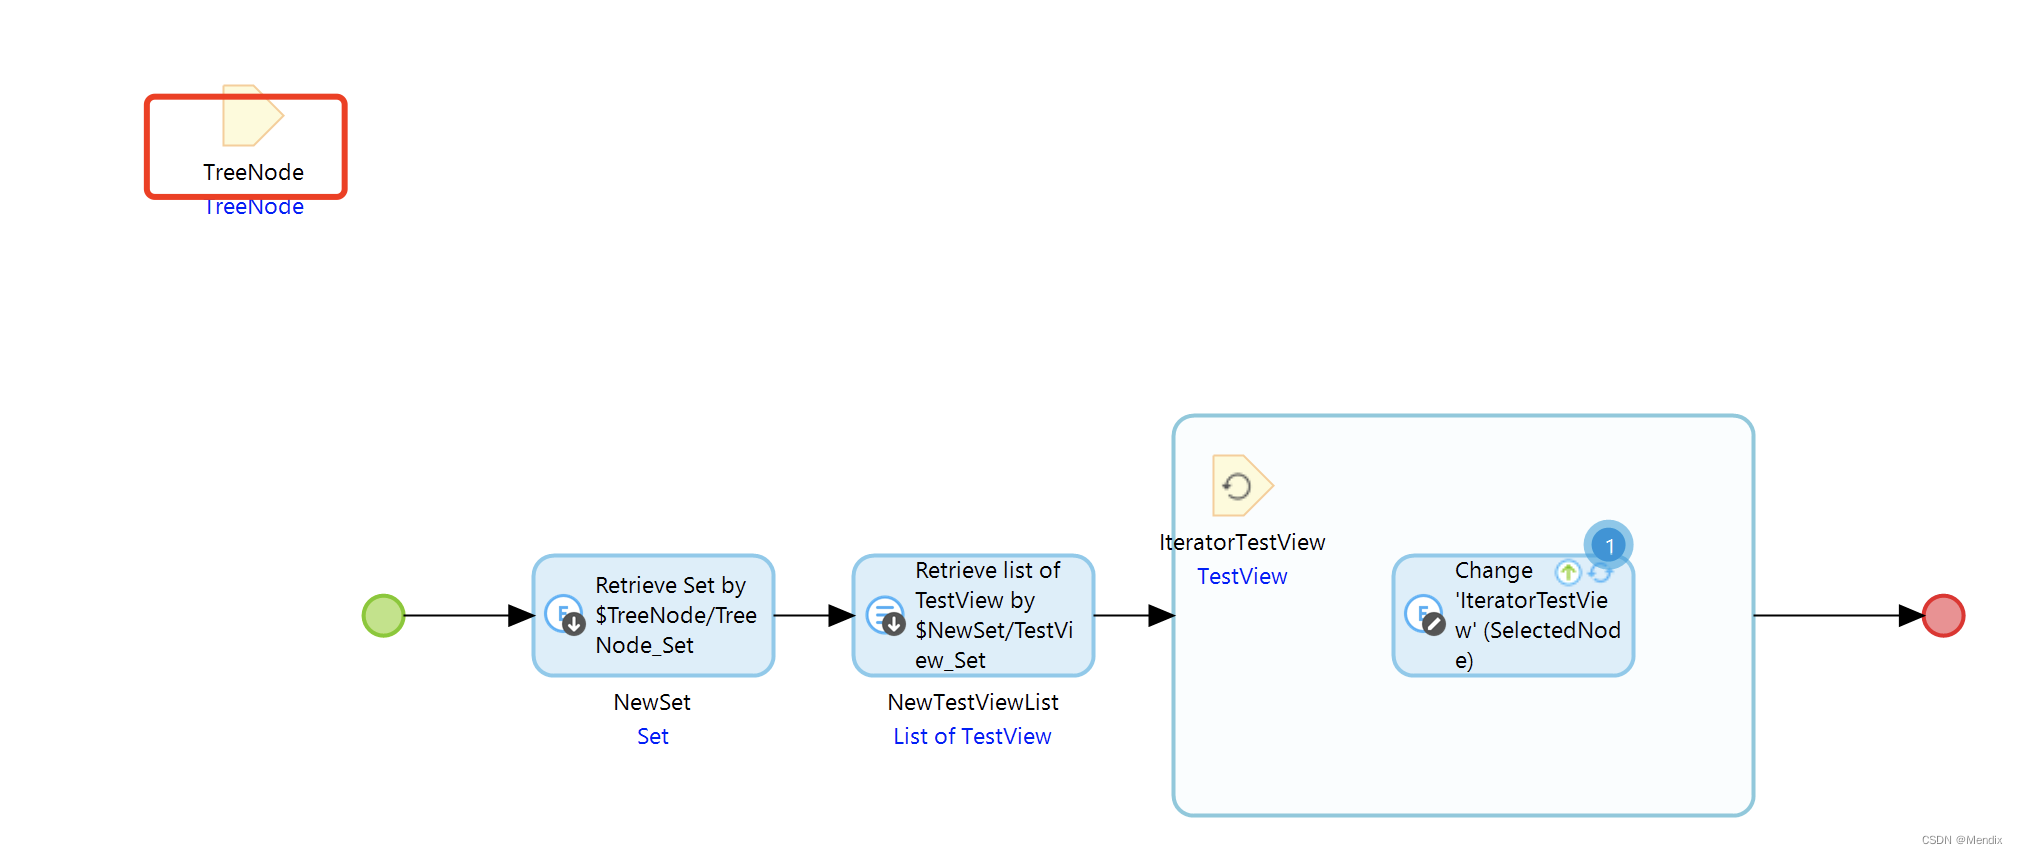
It is worth noting that the response event microflow here will automatically use the SelectionHelper (E3) entity as an input parameter, through which the clicked node object can be obtained and processed.
selected event
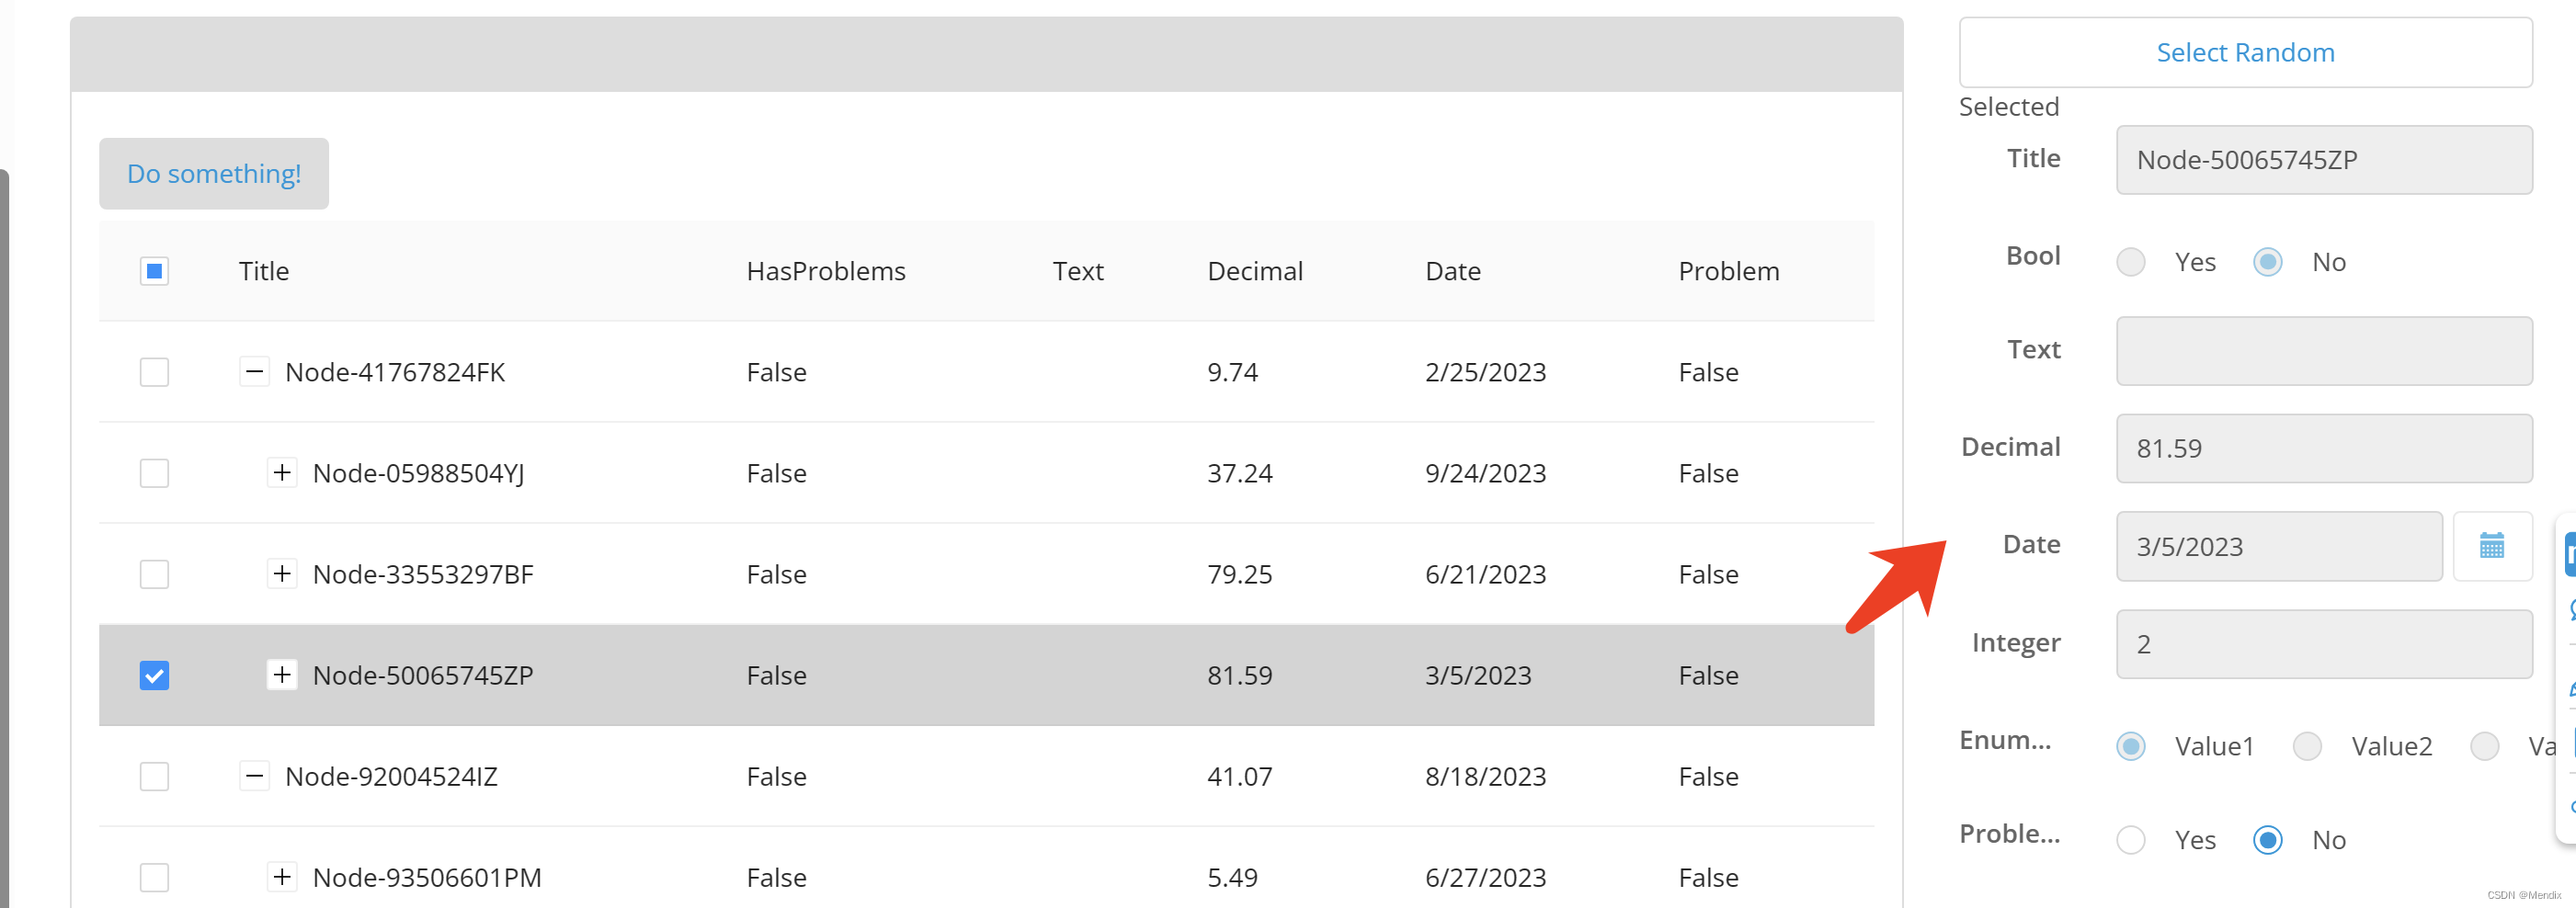
The tree component allows users to select single or multiple nodes, and set selected response events. The Checkboxes switch controls whether checkboxes are displayed.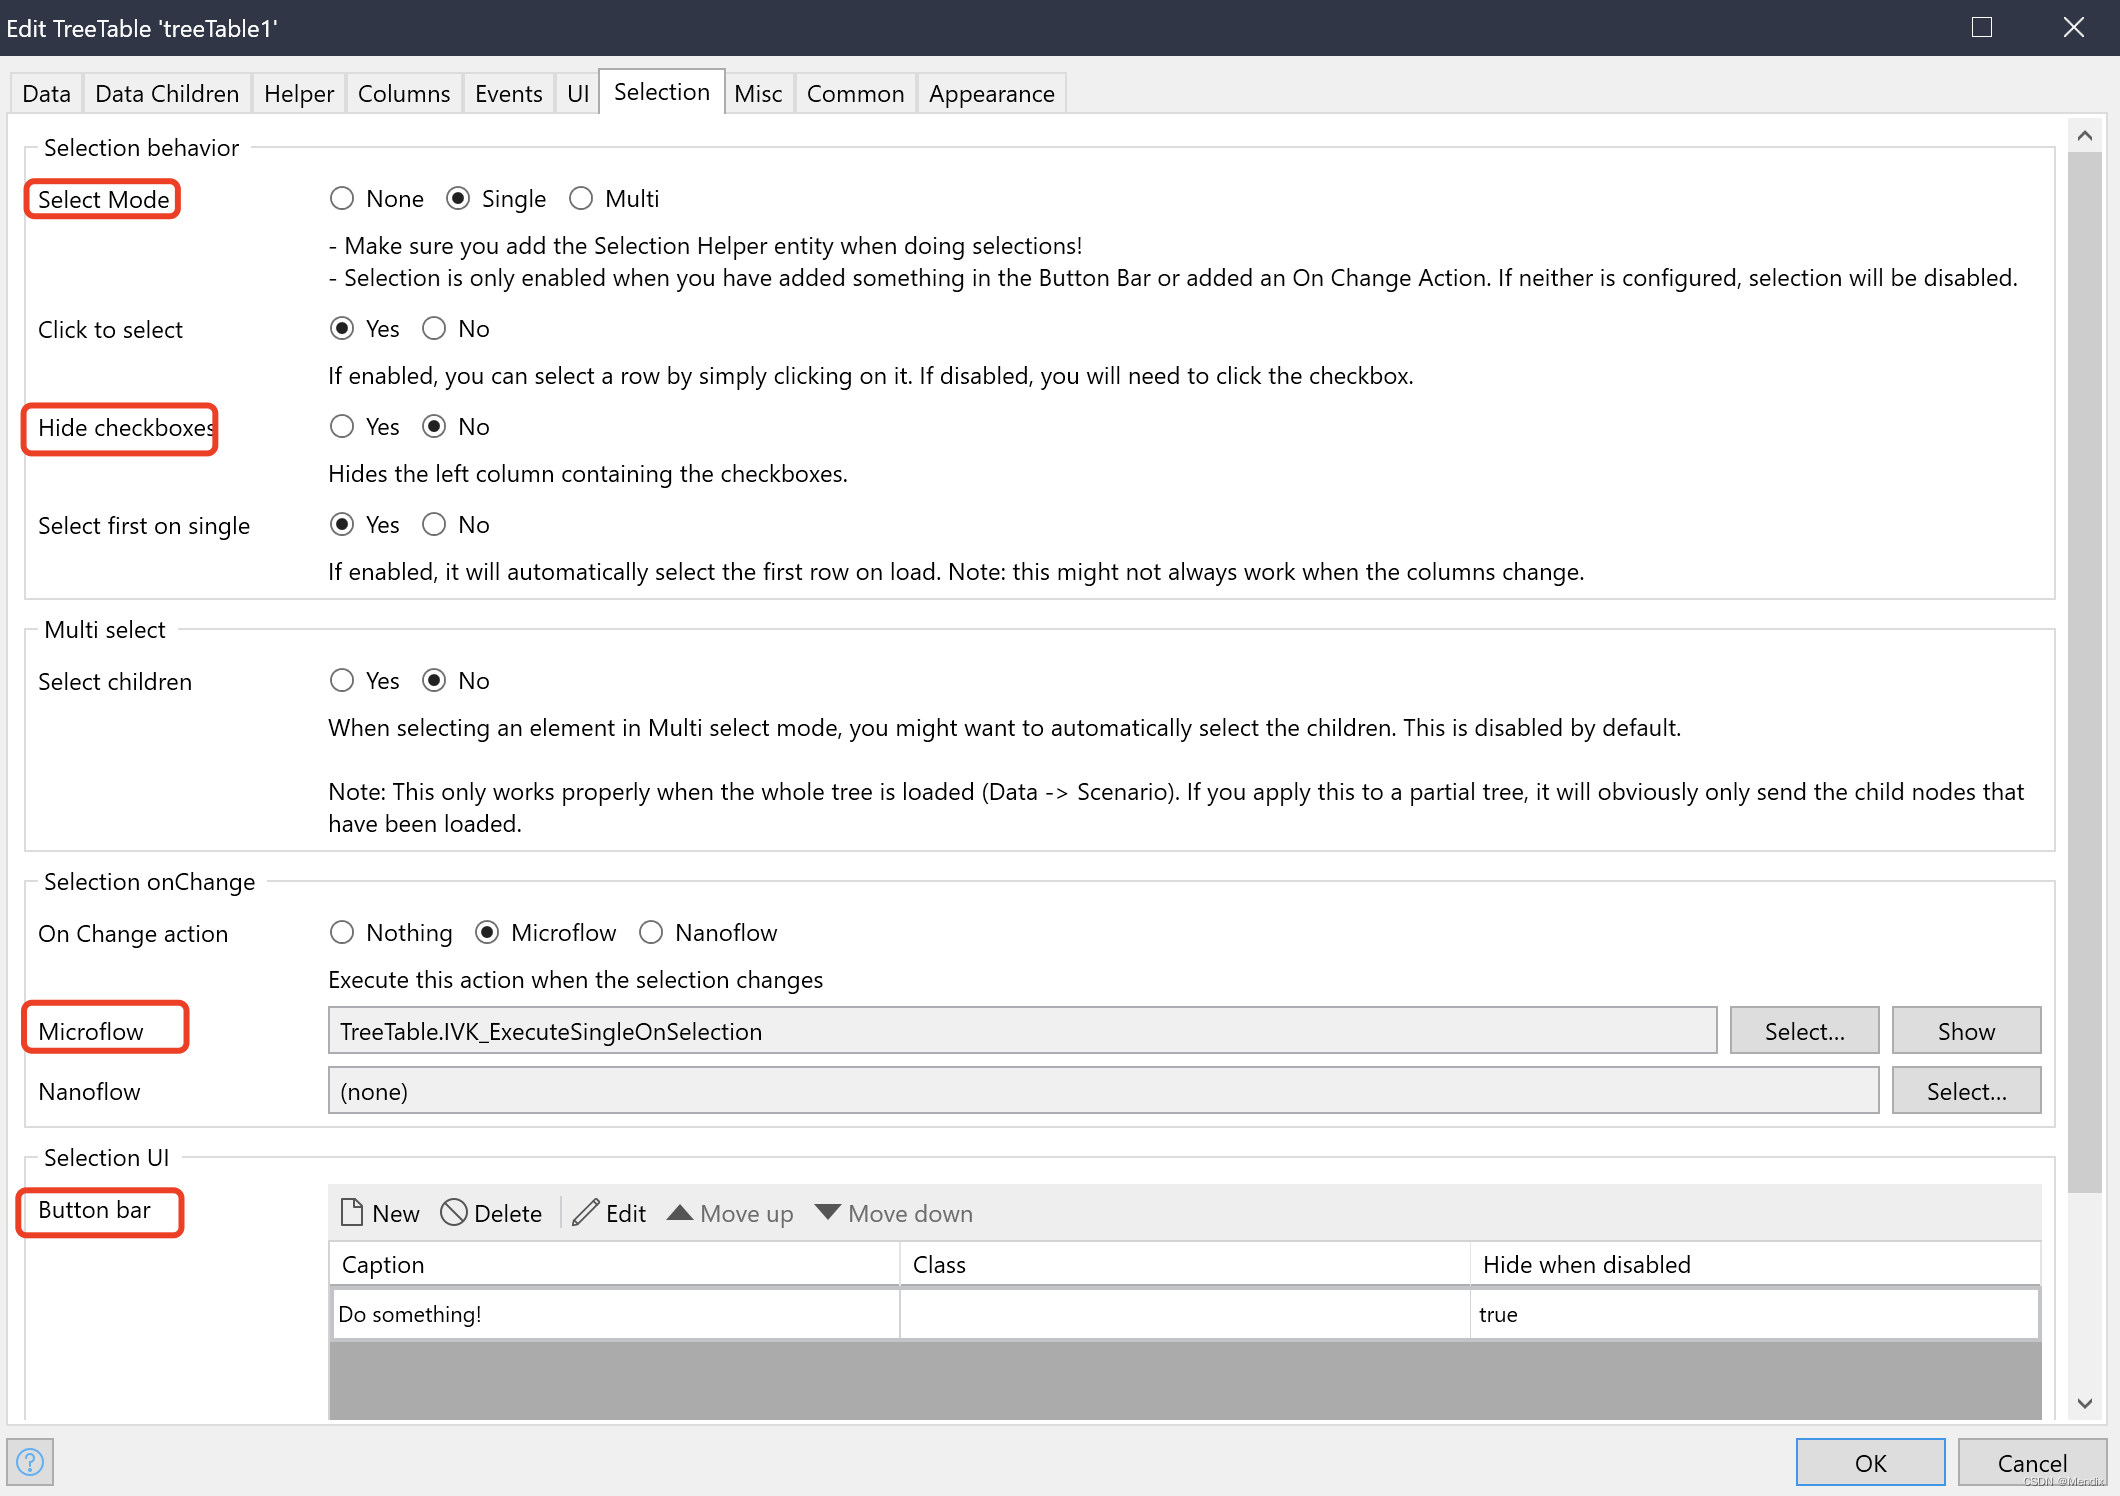
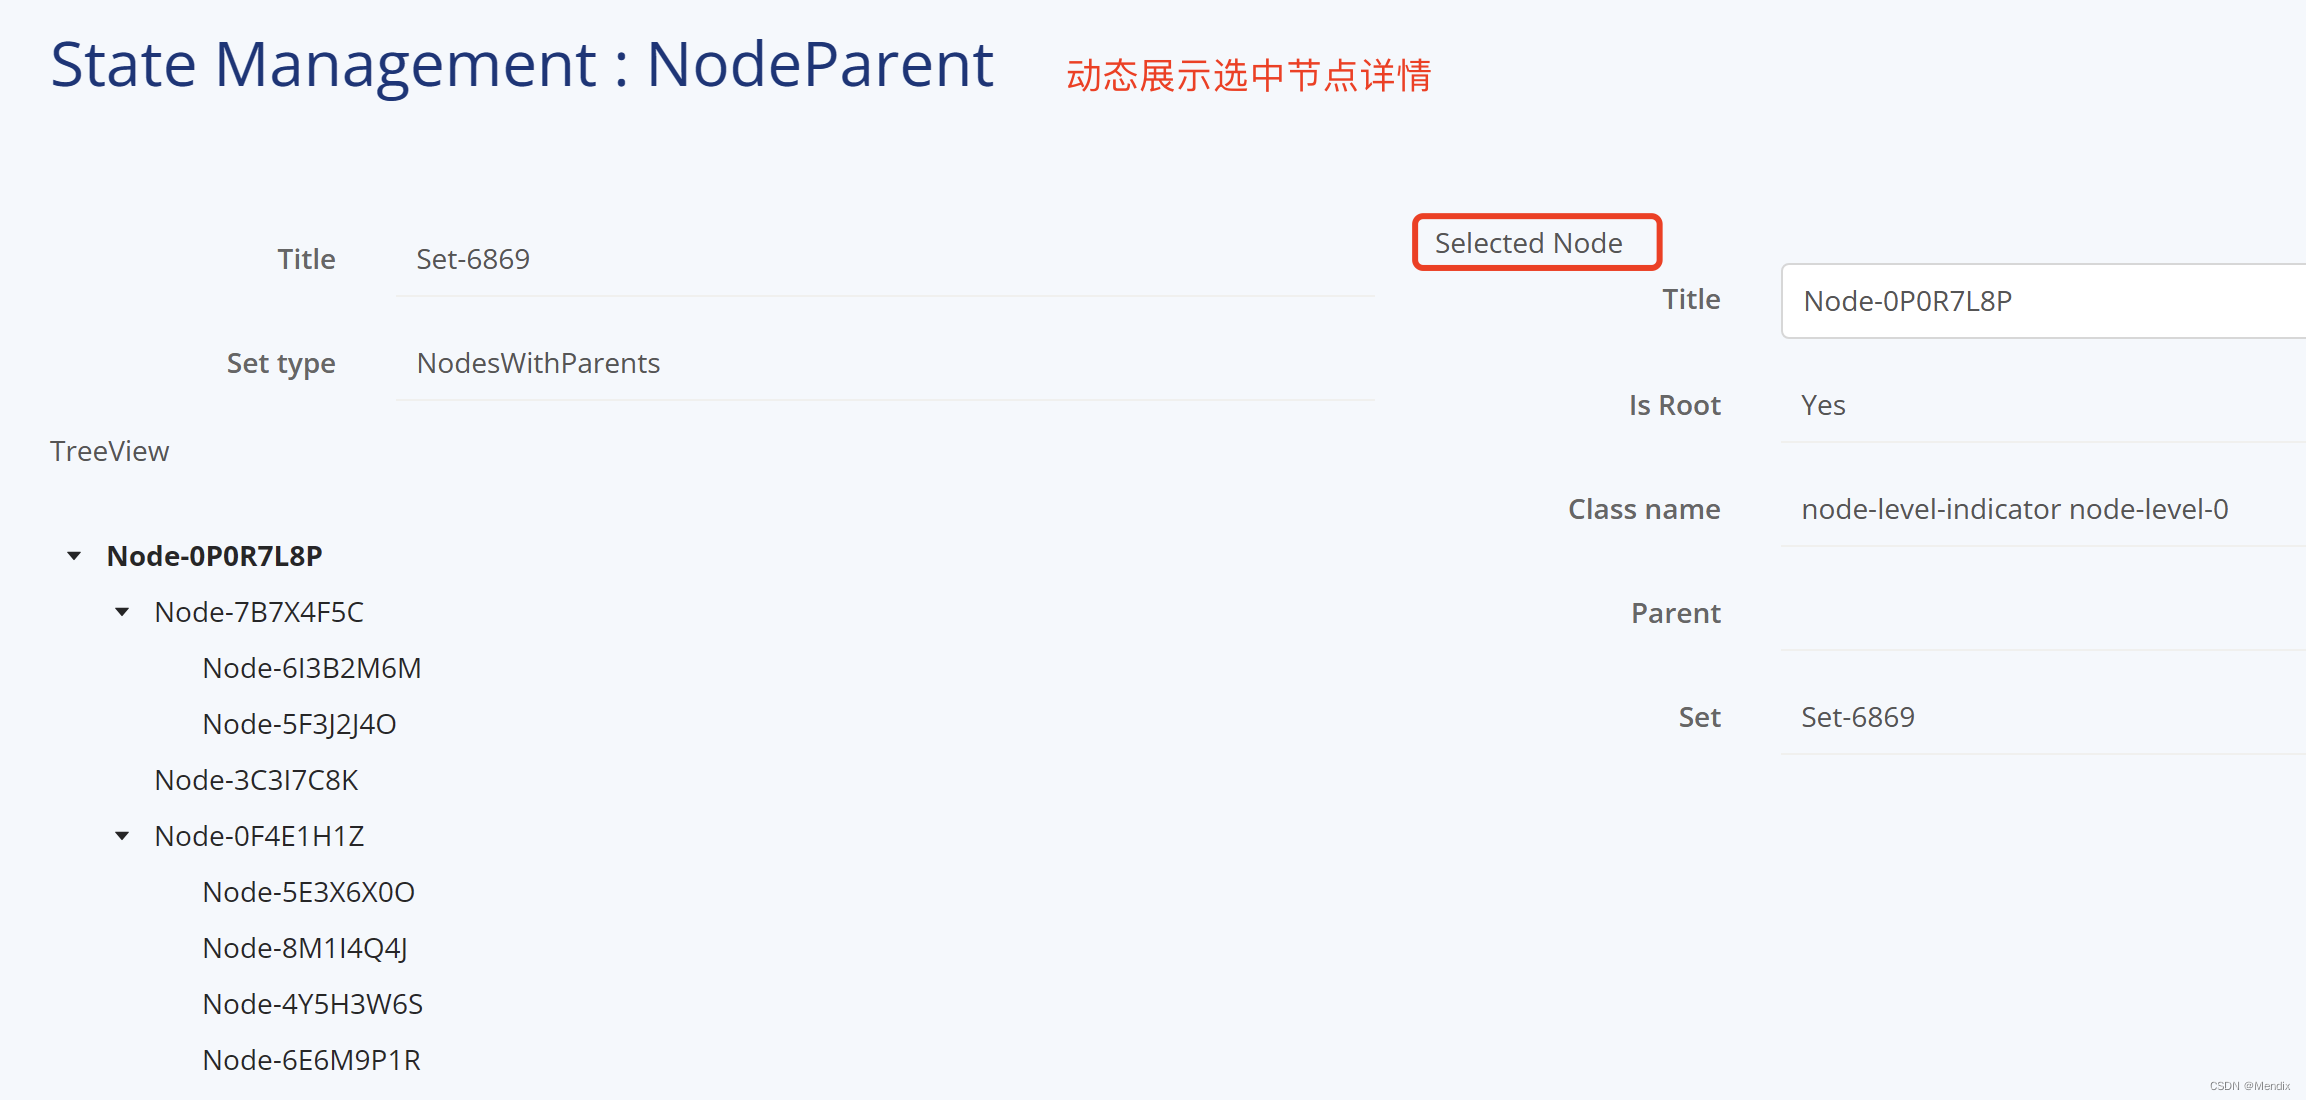
The configuration shown in the figure above realizes that when a node is checked, the details column on the right is updated with the information of the currently selected node. The key to responding to event processing here is to pass the selected node associated with the help entity E3 through the context entity E2.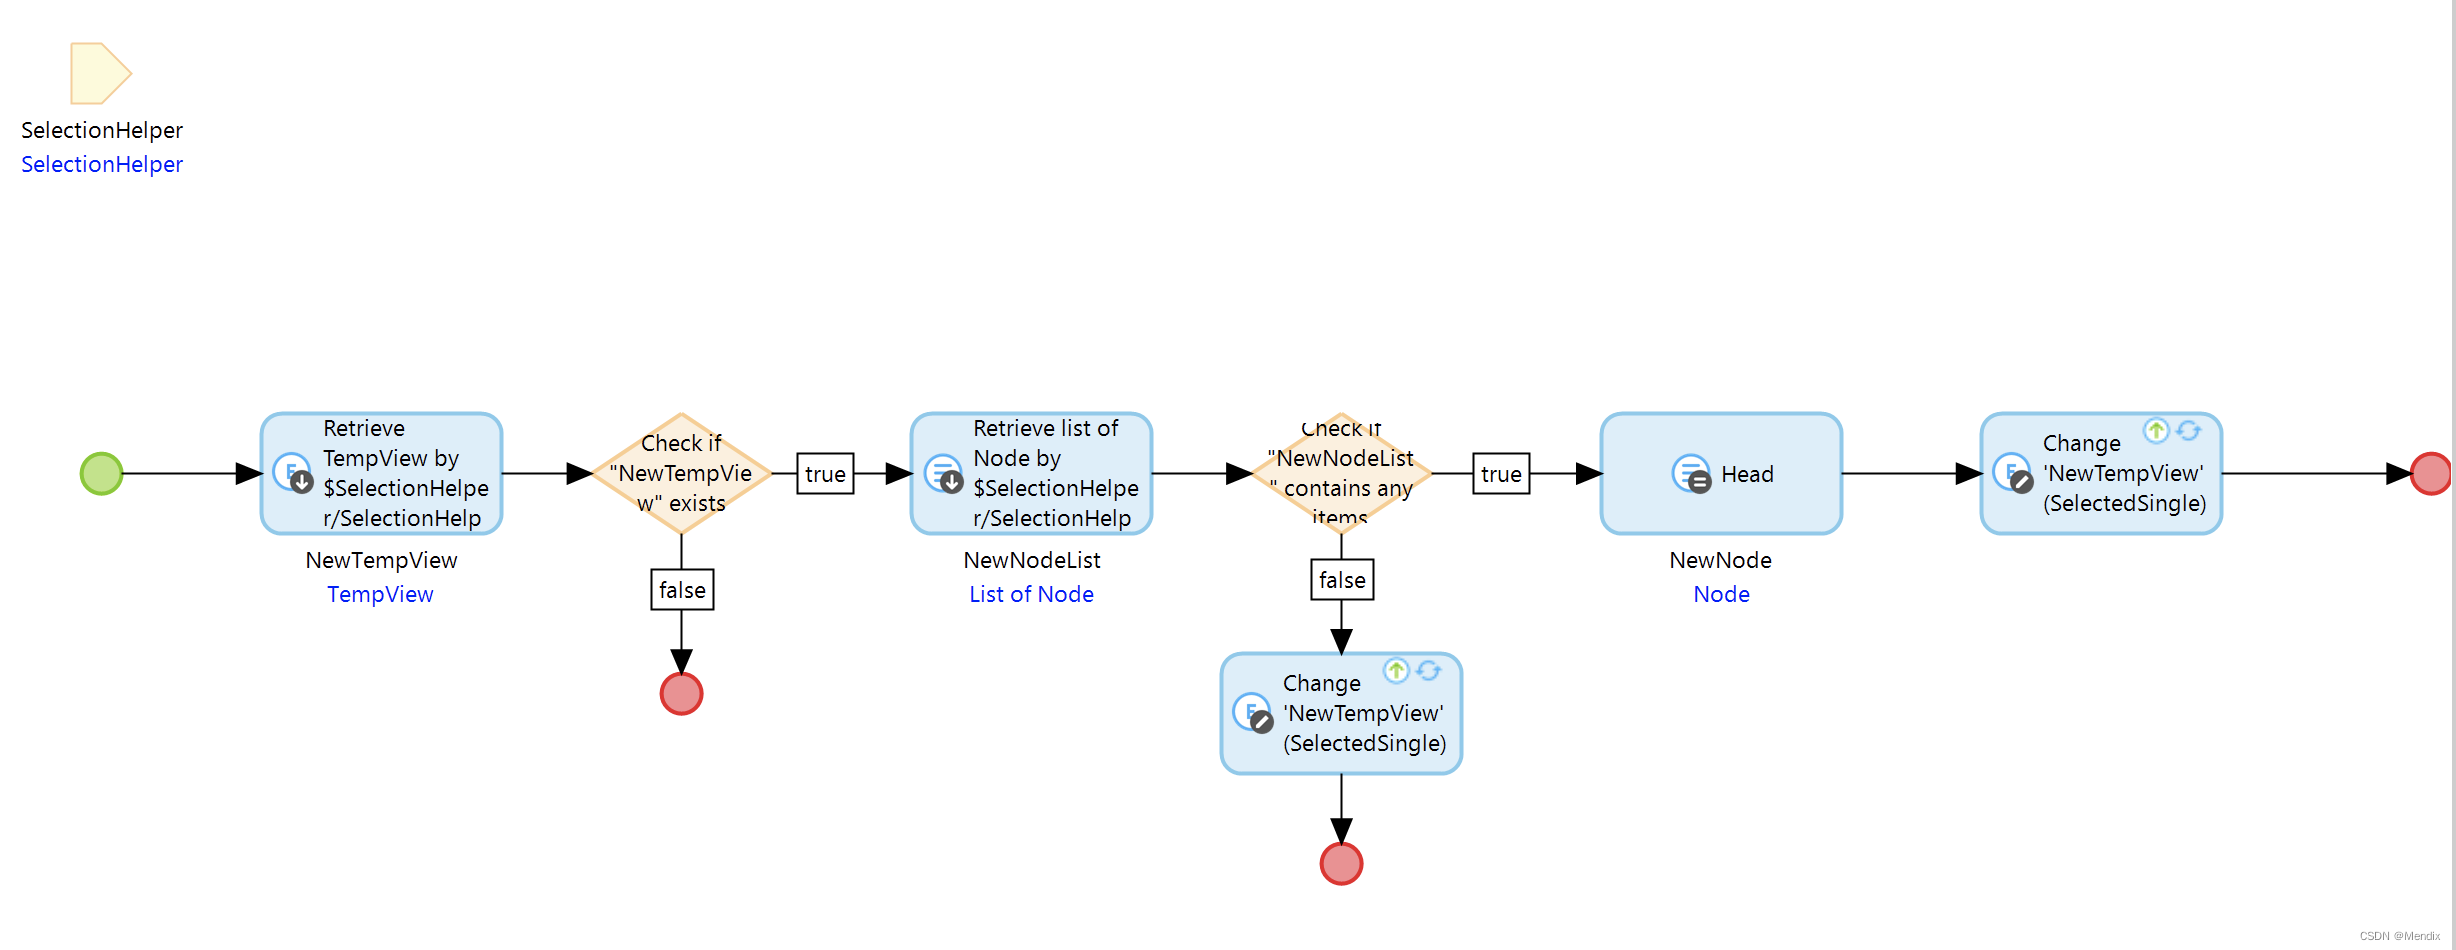
As for the Button bar, one or more buttons are allowed to be configured, and other processing logics are performed on the selected node. The core is to use the help entity E3, so I won’t go into details.
So far, the general configuration items of the Tree Table component have been introduced. In connection with the solid modeling introduced in the previous chapter, everyone must have a complete understanding of why this modeling was done in the first place. Understanding this is precisely the key to mastering this component.
Tree View
As mentioned earlier, the Tree View component and the Tree Table are very similar in logic. Here are a few differences to help you quickly grasp when exploring.
-
In terms of hierarchical relationship tracing, different from the single-pointing child node association of Tree Table, Tree View provides two modes, which support both the association from child to parent and the association from parent to child. The impact here is that there are more ways to instantiate association relationships during data creation and entry.
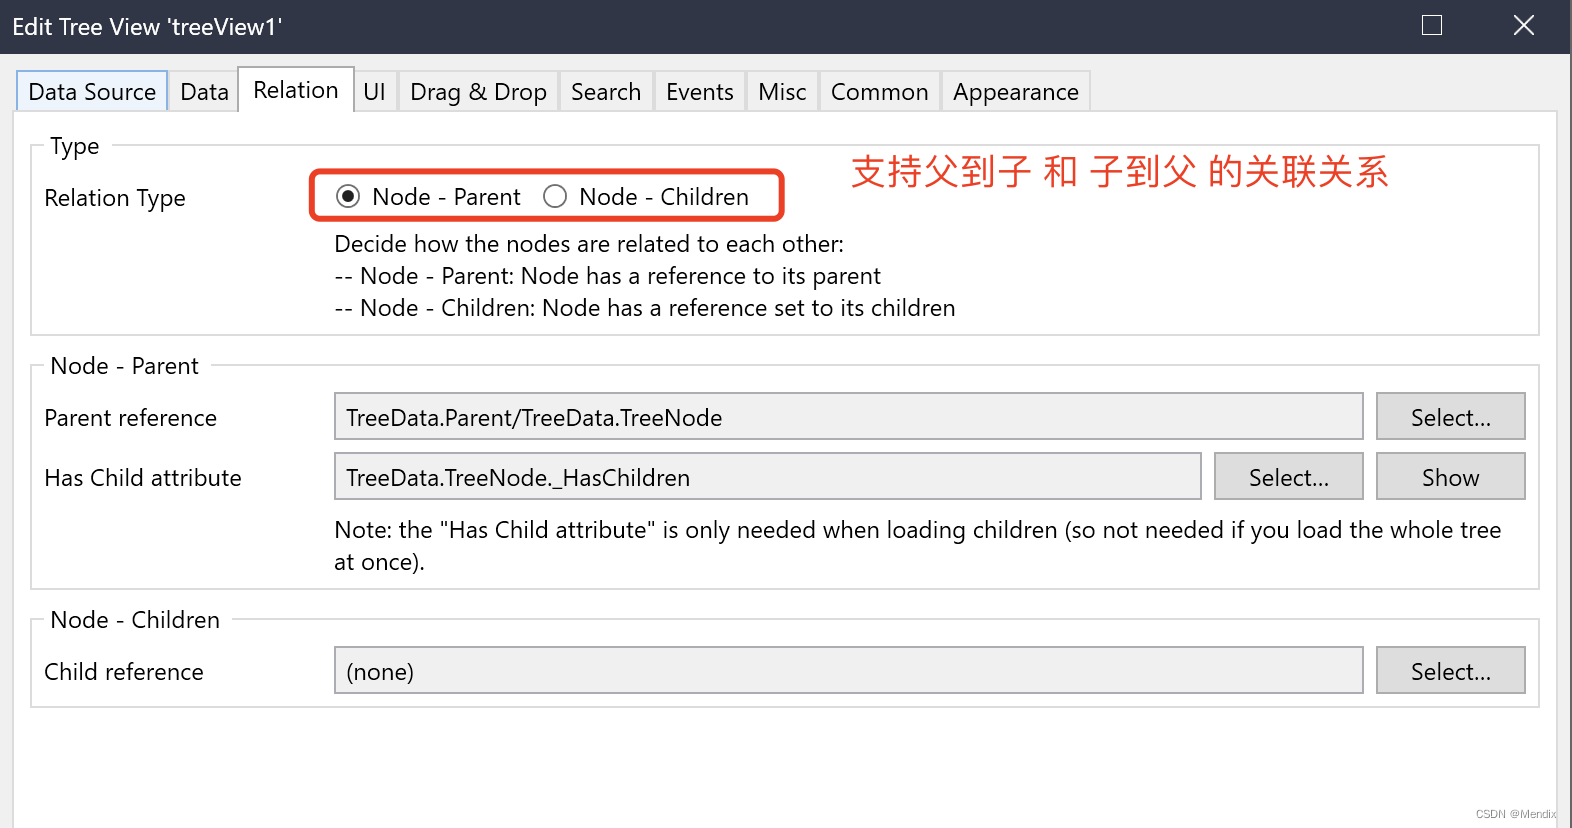
These two specified relationships correspond to two self-associated relationships at the entity modeling level.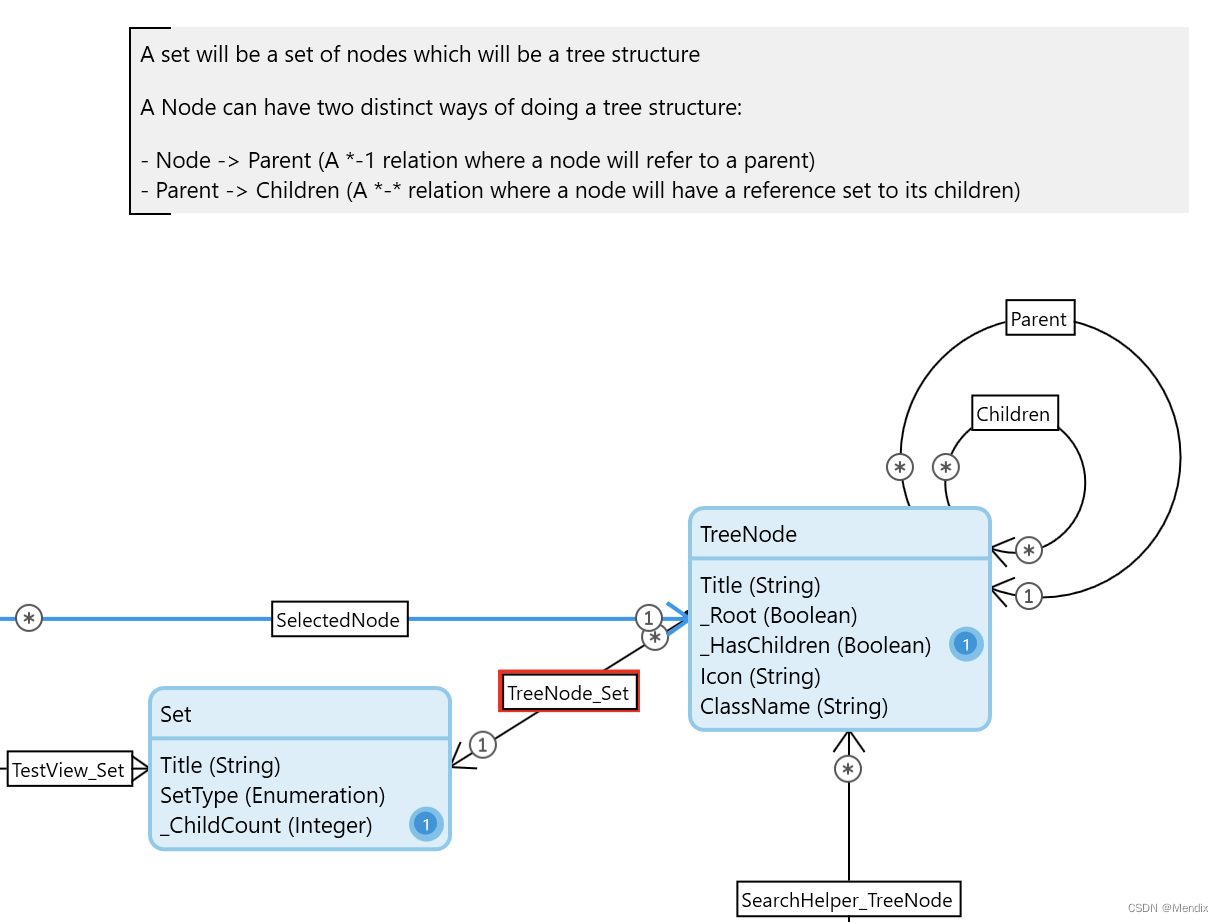
There is no selected event, there is a click event, and the selected object is directly passed to the response event without the help of the SelectionHelper entity. Also with the context entity, the clicked object can be passed to other components on the same page for use cases such as detailed display of the clicked object.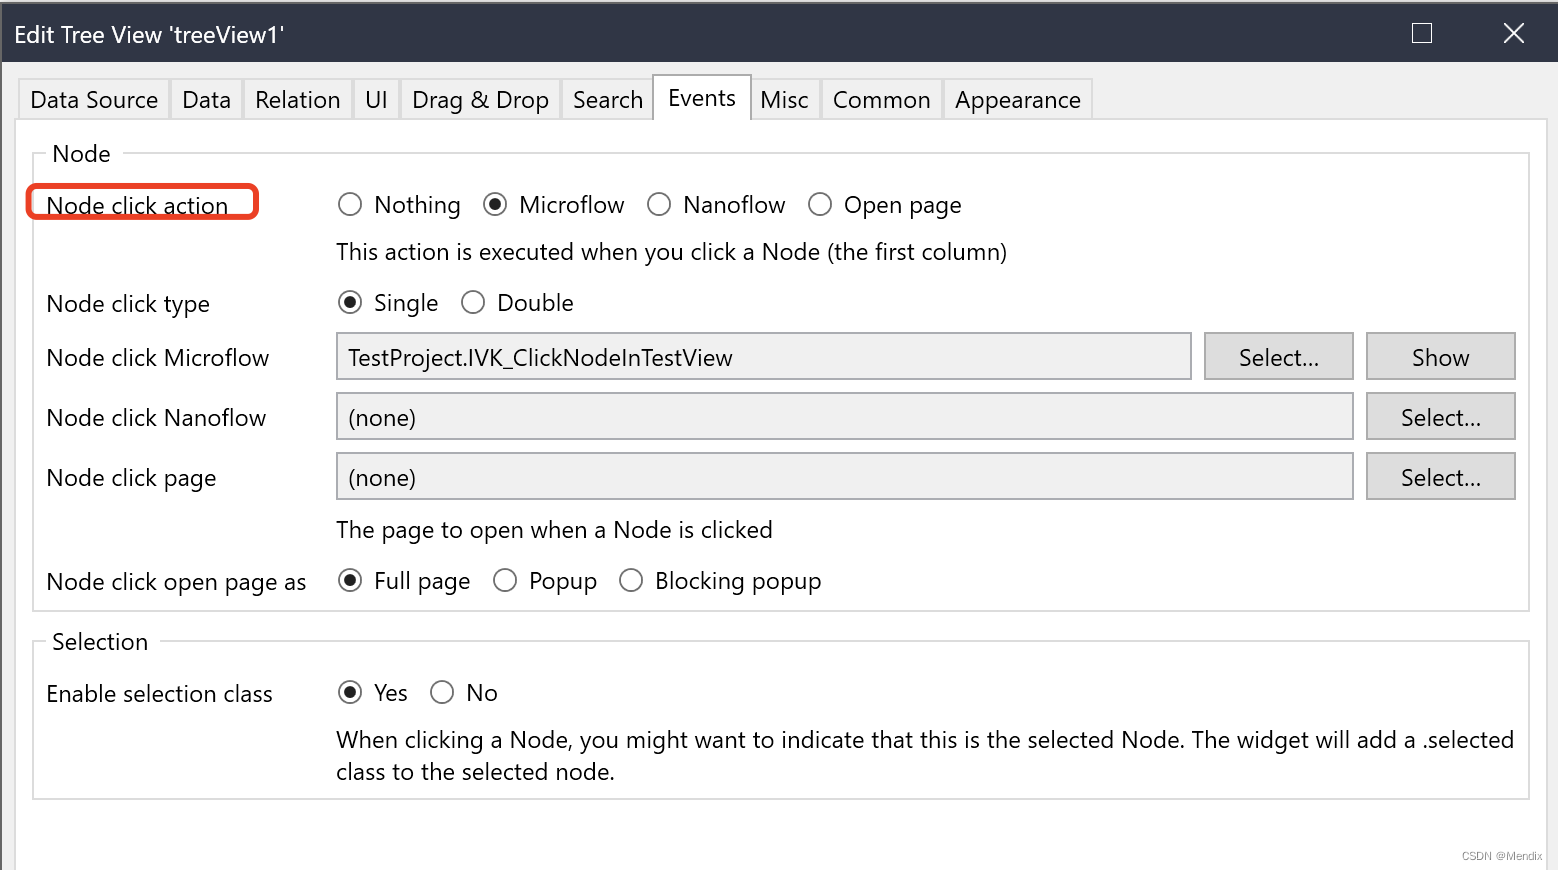
- It has more Search functions than Tree Table, and needs to use the help entity of SearchHelper.
-
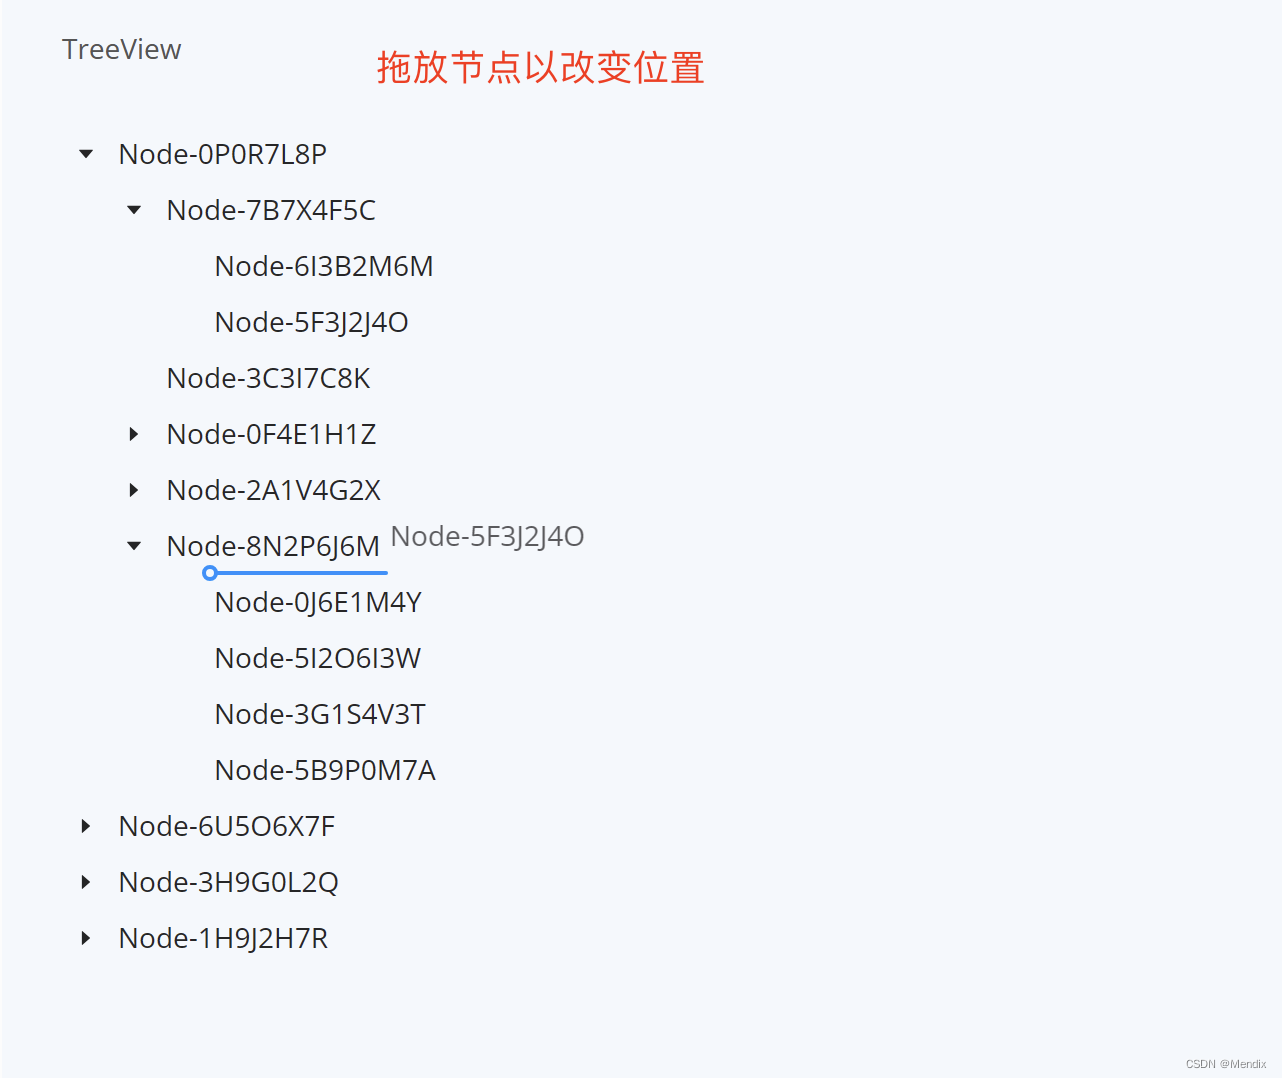
There is a Drag & Drop function, that is, you can drag a node to change its hierarchical position, which is pretty cool.
4. Application display
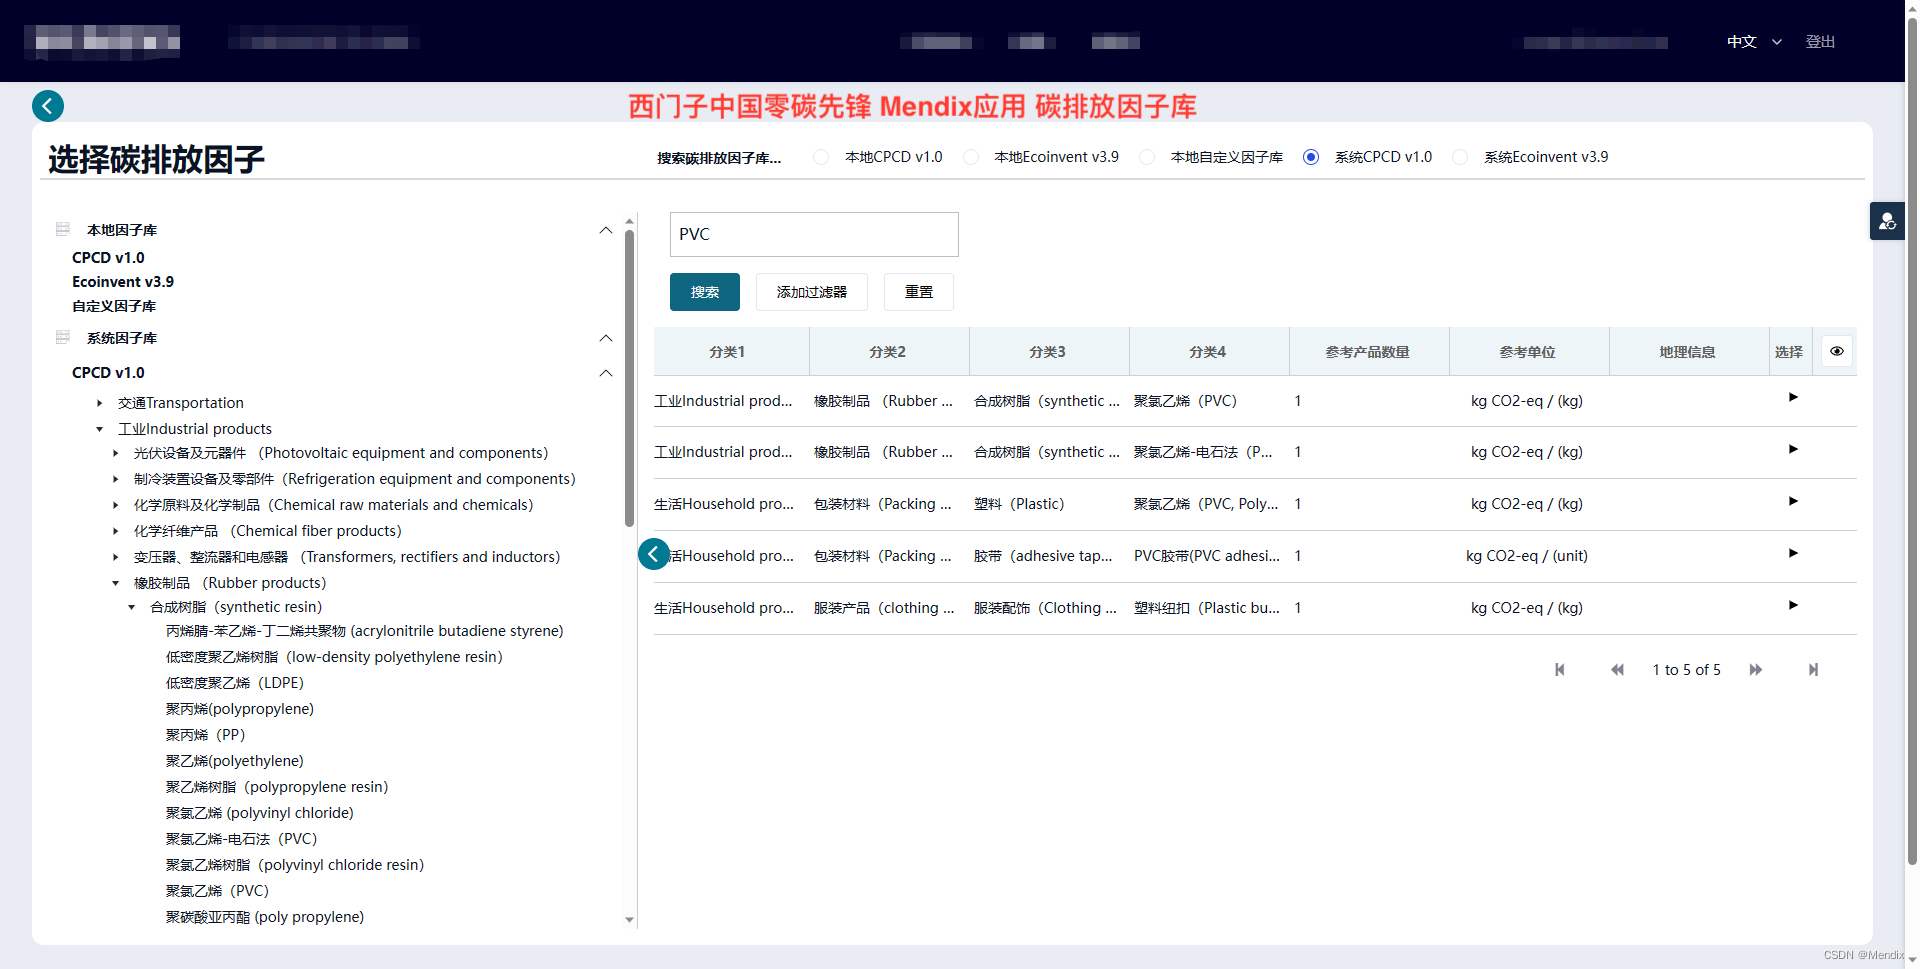
After understanding the principle and configuration method of the tree component, let's take a look at the specific implementation effect. Knowing which effects can be achieved, you will naturally be confident when encountering actual project needs. (Click for larger image)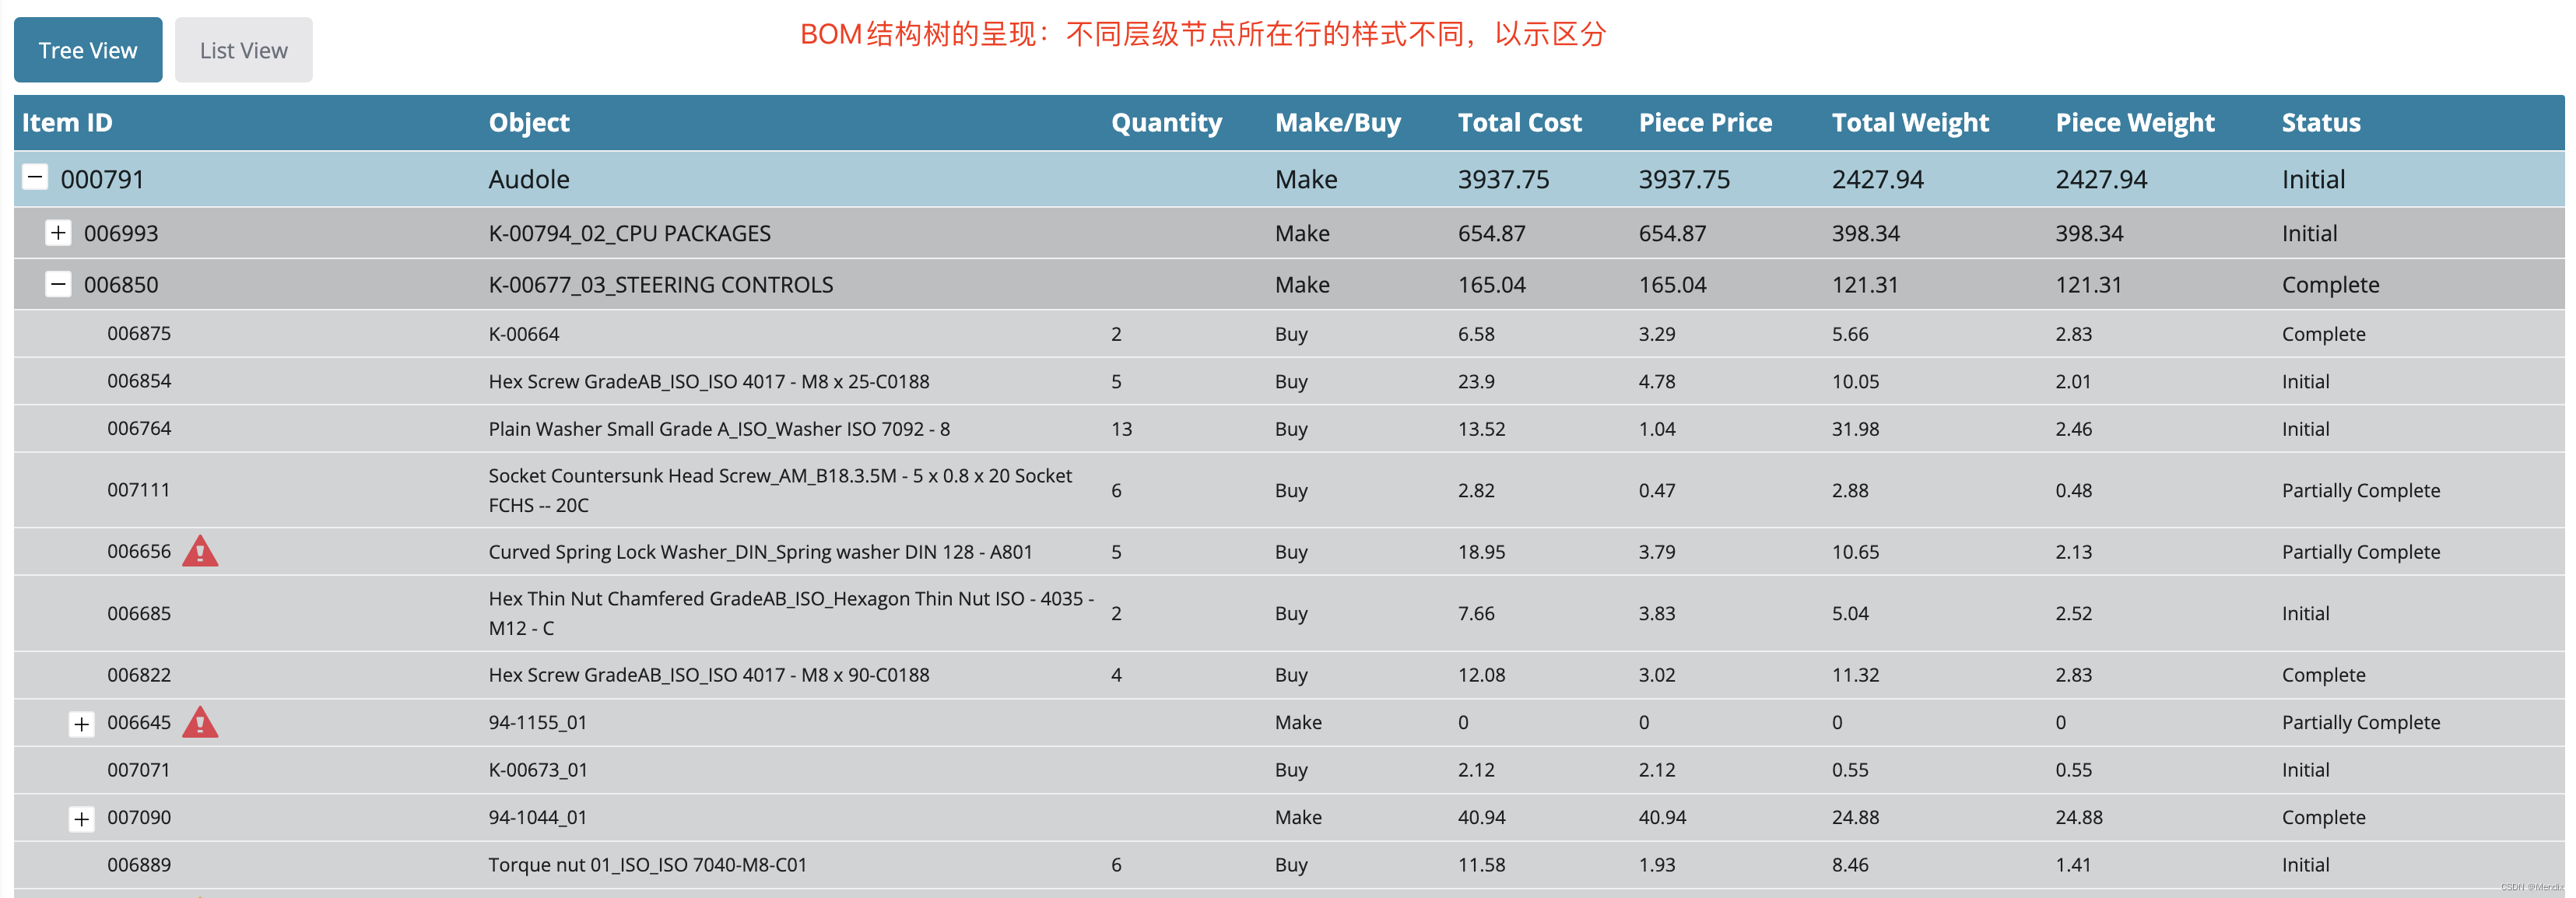


Actual project application display:

5. References
-
Introduction of Tree Table Component Marketplace
-
Tree Table Component Demo App Download
-
Introduction to Tree View Component Marketplace
-
Tree View Component Demo App Download