1 Introduction
In the previous articles, Brother Hong introduced the content and functions of the Charles interface. Today, Brother Hong will explain and share how to set up Charles, and we can happily capture sessions and capture packets. Because in the last article, many friends saw that Hongge’s Charles could see the request and response separately, but they couldn’t see it, so they were a little confused and confused. The interface displayed by the same version is different, so ask Hongge where he downloaded it in a private message, don’t be confused, don’t ask, Hongge also downloaded it from the official website. Therefore, before introducing it, let’s first solve the question that friends or children’s shoes asked Hong in private: how to set the display request and response? .
2. How to set display request and response
1. After starting Charles, click Edit — Preferences , as shown in the figure below:

If you want to learn interface automation testing, here I recommend a set of videos for you. This video can be said to be the number one interface automation testing tutorial on the entire network at station B. At the same time, the number of online users has reached 1,000, and there are notes to collect and use. Technical exchanges of various masters: 798478386
 https://www.bilibili.com/video/BV17p4y1B77x/?spm_id_from=333.337&vd_source=488d25e59e6c5b111f7a1a1a16ecbe9a
2. Pop up the setting interface, click Viewers , uncheck the box in front of Combine request and response , as shown in the figure below:
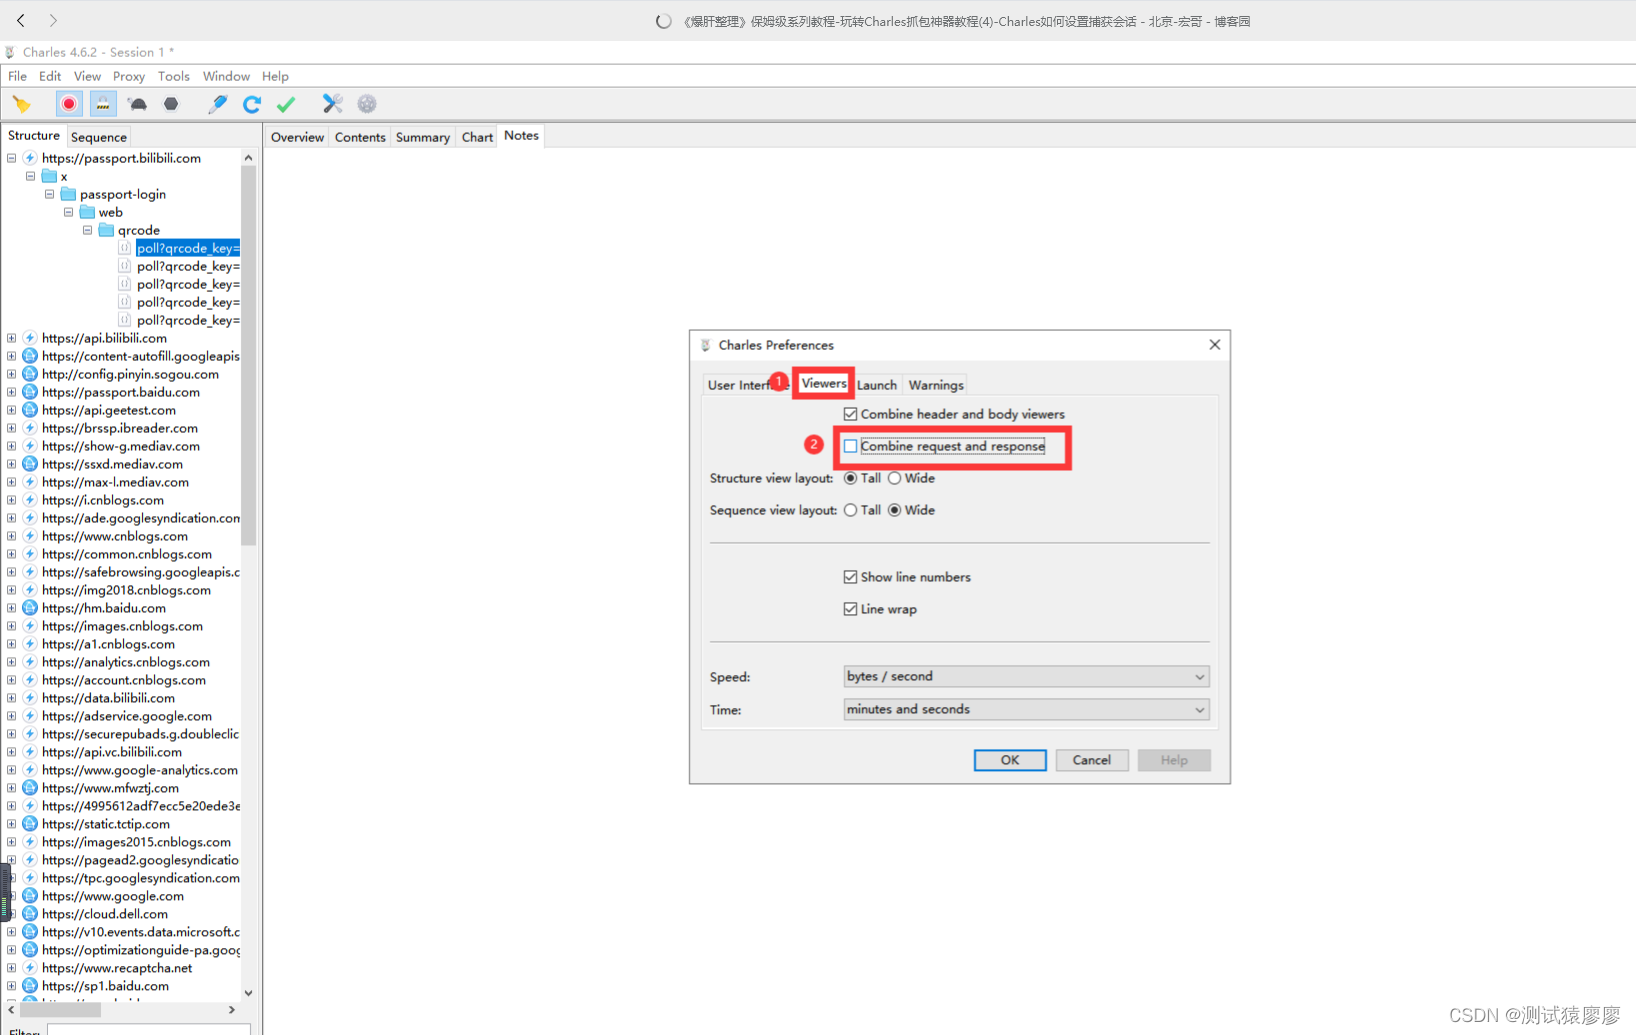
3. Click OK to save, as shown in the following figure:

4. Click OK to view the request and response of the request , as shown in the figure below:
 If you want to view the request header and request data , you can also cancel the check in front of Combine header and body viewers in step 2 , as shown in the following figure:

View the request header and request data, as shown in the following figure:

3. The device that captured the session
Common devices for capturing sessions are divided into PC (computer) end - web packet capture and mobile phone (Android and IOS Apple) end - APP packet capture.
4. PC (computer) terminal
On the computer side, we generally grab web site request and response information. So let's take a look at how to set up packet capture.
4.1 web packet capture
Charles Web packet capture is very simple. When Charles is started, it will automatically set the browser as a proxy. There is no need to make too many settings. Next, I will send a network request through the browser, and Charles will directly capture the information and response information. ,As shown below:

Careful friends or children’s shoes can see from the above picture that Hongge’s picture captures the web URL of the http protocol, because Hongge’s Charles has not been set up. If you grab the web URL of the https protocol, some errors will be reported. The demonstration was unsuccessful, so Hong Ge used the URL of the http protocol to demonstrate.
5. Mobile (mobile phone) terminal
5.1 App Capture Packet
Charles packet capture can not only capture the HTTP requests from the computer, but also capture the HTTP requests from the App, but the mobile phone packet capture needs to be configured on the computer side, and the mobile phone and the computer must be under the same network at the same time.
5.1.1 Computer settings
1. Start the installed Charles packet capture tool.
2. Check the computer IP address.
Method 1: Open "Run" (shortcut key: win+R key; or find and click "Run" in the "Search" button on the taskbar), enter "cmd" and enter the command line window, enter in the command line window "ipconfig" command to view IP, as shown below:

Method 2: View in charles: Help -> Local IP Address, as shown in the figure below:

3. Click [Proxy] –> [Proxy Settings] and we set the port number "9999" (the default port of Charles and Fiddler is also 8888). Brother Hong is here to avoid the problem of port conflict caused by both Charles and Fiddler wanting to use the port 8888 at the same time, so set it to 9999 in advance. As shown below:

4. Click Proxy-->Proxy Settings, check "Enabling transparent HTTP proxying", and click "OK". It will not affect the capture of https packages. As shown below:

5.1.2 Mobile Terminal Settings
(1) Android phone
Settings on the mobile phone: set the proxy under the same wifi, Android should long press the connected WIFI, click "Modify Network". Fill in the server address: IP of the computer (192.168.0.163), port 8888; as shown in the figure below:

(2) iOS mobile phone
1. Open the settings page of the mobile phone; select [Wireless LAN], as shown in the figure below:

2. IOS click the exclamation mark behind the connected WIFI, as shown in the figure below:

3. Click [Configure Proxy] –> [Manual], as shown in the figure below:

4. Enter the local machine [IP address (192.168.1.75)] and port number [9999], this is my local machine, configure it according to your own situation, as shown in the figure below:

5. After the configuration is complete, click [Save]! ! !
6. Next, verify the mobile phone request. When we see that the connection can be caught in Charles, it means that there is no problem with the configuration. If we see unknown, it doesn’t matter. It means that we have not installed the certificate for the mobile phone, and the HTTPS certificate is installed on the mobile phone. Brother Hong will introduce it in detail later. Here is a brief explanation of the reasons. In fact, it is similar to Fiddler and has the same idea, but at this time it should be able to grab the Http protocol package.
6. Summary
Well, today I will briefly explain some configurations and skills. Later, about the mobile terminal, Brother Hong will list separate chapters for detailed explanations. Friends or children's shoes are here to get an impression first.