Android studio builds our project through Gradle. In general, we just use Gradle to configure some functions, such as buildTypes, productFlavors and so on.
In fact, Gradle provides many useful functions that allow us to manage our projects more conveniently.
In this article, we introduce the Plugin plug-in of Gradle.
official introduction
Gradle's plugin plug-in, there are three ways:
- First, the Build script
is simply to create and write code directly in the build script (build.gradle). - Second, buildSrc project
creates a buildSrc project to store the code of the plug-in - Three, Standalone project
creates a separate project, generates and publishes a jar package containing plug-ins, tasks, etc.
Below, we will introduce how to create the plug-ins in the next three ways.
1. Build script
In this way, the plug-in code is written directly in the build.gradle file.
Benefits:
automatic compilation, no additional work required.
Disadvantage:
The generated plug-in is invisible to the outside world and can only be used under the current function.
Generally, this method is not used.
First look at the writing of the plug-in
class GreetingPlugin implements Plugin<Project> {
    void apply(Project project) {
        project.task('hello') {
            doLast {
                println 'Hello from the GreetingPlugin'
            }
        }
    }
}

// Apply the plugin
apply plugin: GreetingPlugin
Generally speaking, the plug-ins we write need to implement the Plugin interface. In the apply() method, write the plug-in code we want to implement.
Invoked by gradlew -q hello .
D:\workspace\work_studio\ObjectAnimatorTest>gradlew -q hello
Hello from the GreetingPlugin
D:\workspace\work_studio\ObjectAnimatorTest>
In this way, the result is printed out.
2. buildSrc project
This way, is to create a buildSrc module.
Because the Gradle plug-in supports groovy, java, and kotlin languages, according to the language we use, we can put the plug-in code in the following different directories rootProjectDir/buildSrc/src/main/groovy
or
rootProjectDir/buildSrc/src/main/java
or rootProjectDir/buildSrc/src/main/kotlin
For example, if we want to use the java language to develop plug-in code, we need to put our java code in the rootProjectDir/buildSrc/src/main/java directory.
Plugin benefits implemented this way:
all build scripts are visible.
Disadvantage:
Only the current project can be used, other projects cannot be used
Next, we start to implement the plug-in code.
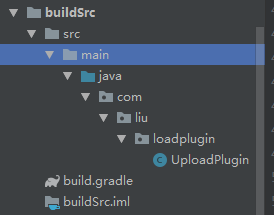
2.1 Create the module of buildSrc.
Create an Android module named buildSrc (the name must be this) .
Delete all the build folder inside, the res folder under src, etc.
The directory structure is as follows
2.2 Add dependencies through build.gradle
As mentioned above, we can use groovy, kotlin, java and other languages to develop. In general, a plugin implemented in Java or Kotlin that is statically typed will outperform the same plugin implemented in Groovy. Here, we use the most familiar Java to develop.
Add dependencies to build.gradle of the module of buildSrc
//use java library
apply plugin: 'java-library'
//groovy library
//apply plugin: 'groovy'
apply plugin: 'maven'


dependencies{
    // gradle sdk
    compile gradleApi()
    // groovy sdk
    compile localGroovy()
}

repositories{
    google()
    mavenCentral()
}
2.3 Create plug-in code
To create a plugin, you need to implement the Plugin interface.
Here, we print a sentence. After all, we're just learning to create Plugin plugins.
package com.liu.loadplugin;

import org.gradle.api.Plugin;
import org.gradle.api.Project;

public class UploadPlugin implements Plugin<Project> {

  @Override
  public void apply(Project project) {
    System.out.println("this is my first buildSrc plugin !");
  }
}
2.4 Create a properties file and associate a plug-in
We have created the plug-in. Next, we need to create a properties file and associate the name of the plug-in with the plug-in.
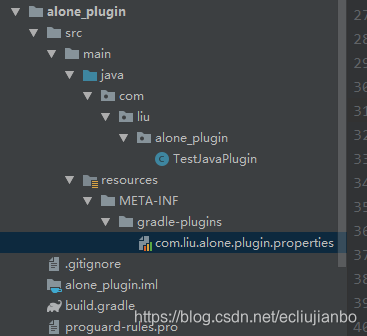
1. Create a directory and file main/META-INF/gradle-plugins/plugin name.properties file.
For example, our current plugin name is com.liu.loadplugin.properties.
As shown below
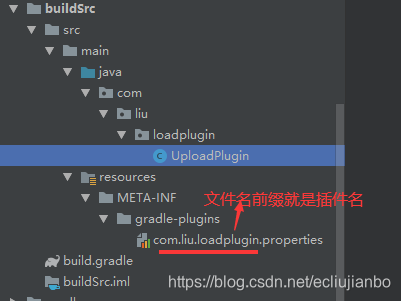
2. Add code in the properties file and associate the plug-in
implementation-class=com.liu.loadplugin.UploadPlugin
This is the full path of the associated plug-in class (click to jump to the class).
At this point, our entire buildSrc type plug-in has been developed.
2.5 Using plugins
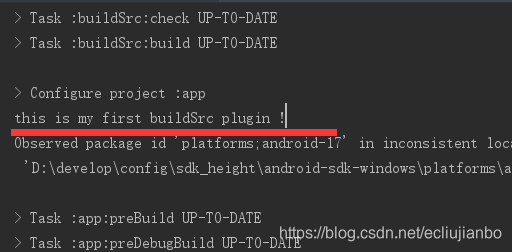
Reference the plugin in the build.gradle of our app's module.
apply plugin: 'com.liu.loadplugin'
The name here corresponds to the name of our properties.
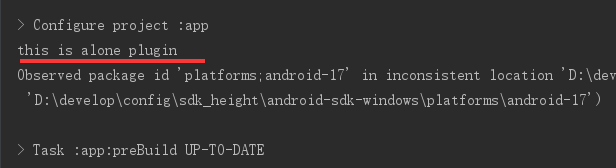
Rebuild once, and you will see that the sentence we wrote in the plug-in is printed out.
At this point, we have completed the development of plug-ins in the buildSrc method. Let's look at the independent plug-in development method.
3. Standalone project
Standalone plugin. Similar to how buildSrc is created.
However, it has several obvious advantages compared to the one above:
- The module name of the plug-in, which can be arbitrary
- In this way, we package some plug-ins, tasks, etc. we wrote together, generate jars, and use them through jar packages. Therefore, it can also be used in other projects .
Next, let's create a standalone plugin.
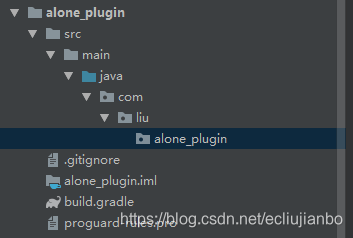
3.1 Create a plugin module
Similar to the above method, we create an Android module called alone_plugin (named randomly). Then, delete useless files such as build and res.
The structure is as follows.
3.2 Add dependencies (build.gradle)
Because, this independent plug-in method finally generates a jar package to be used by other projects. So, here is a little different from the way above.
First look at the build.gradle file
apply plugin: 'java-library'
apply plugin: 'maven'
dependencies {
    compile gradleApi()
    compile localGroovy()
}
repositories {
    mavenCentral()

}

group = 'com.liu.alone.plugin'
version = '1.0.0'
archivesBaseName = 'java-plugin'

//upload
uploadArchives {
    repositories {
        mavenDeployer {
            repository(url: uri('../repo'))
        }
    }
}
There are more ways than buildSrc below, these configurations
group = 'com.liu.alone.plugin'
version = '1.0.0'
archivesBaseName = 'java-plugin'

//upload
uploadArchives {
    repositories {
        mavenDeployer {
            repository(url: uri('../repo'))
        }
    }
}
We publish the plugin to the local repo directory through maven. We know that maven release needs to specify: groupId, artifactId, version. Through these three declarations, we can find our plugin.
3.2 Create a plug-in and properties file
These two steps are the same as our buildSrc above to create plugins. I won't write it here.
The directory structure is as follows
3.3 maven release plugin
Through the uploadArchives command under Gradle's alone_plugin.
Publish our plugin to the repo directory of the current project.
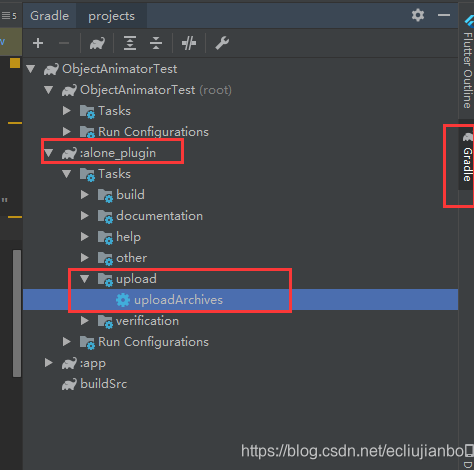
Through the above command, the plugin will be published to the repo directory under the project.
As shown below

3.4 Introducing plugins
Introduce the plugin we released in the project's build.gradle
buildscript {
    repositories {
        google()
        jcenter()
        maven{
            url uri('./repo/')
        }
    }
    dependencies {
        classpath 'com.android.tools.build:gradle:3.3.1'

        classpath 'com.liu.alone.plugin:java-plugin:1.0.0'
    }
}
By adding maven repository. Referenced in dependencies. Just import our plugin.
3.5 use
Referenced in build.gradle of app module is the same as buildSrc.
apply plugin: 'com.liu.alone.plugin'
Finally, rebuild again. It will print out the Log written in our plug-in.
At this point, the three ways to customize the Gradle plug-in are introduced.
Independent plug-ins, we just said here, are used in packaged projects. So, how should other projects be used?
3.6 Other project reference plug-ins and optimization
3.6.1 Other projects import plug-ins
The ultimate goal of independent plug-in development is to make it available to other projects. So, how to quote other projects.
Here, we allow other projects to be referenced through jar packages.
First, create a libs folder in the project that needs to be imported (this should be optional).
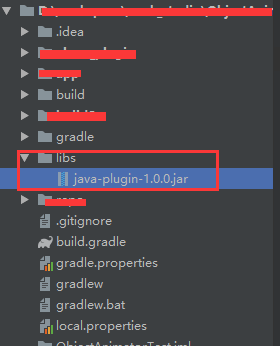
Second, modify the project's build.grandle
buildscript {
    repositories {
        google()
        jcenter()
        flatDir{dir 'libs'}
    }
    dependencies {
        classpath 'com.android.tools.build:gradle:3.3.1'

        classpath 'com.liu.alone.plugin:java-plugin:1.0.0'
    }
}
Here, we need to add libs to the warehouse, and then depend on this plugin. It can be used in other projects.
Let's think again. In this way, we need to manually copy the jar package to the required project. What's the problem?
- 1. Manual copying, not so automatic
- 2. If the plug-in is upgraded or modified, do we copy it every time?
Since it is used for multiple projects. So, can we upload to the local warehouse. Then, other projects also use local warehouses to solve the above problems.
3.6.2 Optimization, upload to local warehouse
There is no explanation here about configuring the local Maven library in the local warehouse. If you are interested, you can take a look at this: Android Studio: Building a local warehouse through Artifactory to optimize compilation speed
We start by creating a local repository. Let it depend on a group (android_depend).
Because we not only have a plug-in, but also jcenter and so on, which can be placed in the local warehouse.
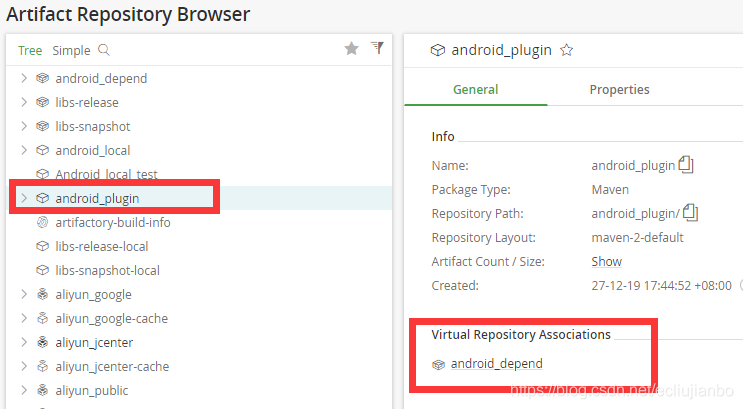
Then, modify the build.gradle of our standalone plugin alone_plugin. Make it published to the android_plugin of the local warehouse instead of the repo directory of the project.
apply plugin: 'java-library'
apply plugin: 'maven'
dependencies {
    compile gradleApi()
    compile localGroovy()
    compile 'com.android.tools.build:gradle:3.3.1'
    implementation("com.squareup.okhttp3:okhttp:3.8.1")
}
repositories {
    mavenCentral()

}

//group = 'com.liu.alone.plugin'
//version = '1.0.0'
//archivesBaseName = 'java-plugin'
//
//upload
//uploadArchives {
//    repositories {
//        mavenDeployer {
//            repository(url: uri('../repo'))
//        }
//    }
//}

//upload to local maven

uploadArchives {
    repositories {
        mavenDeployer {
            repository(url: "http://localhost:8081/artifactory/android_plugin/") {
                authentication(userName: "admin", password: "admin")
            }
            pom.version = "1.0.0"
            pom.artifactId = "java-plugin"
            pom.groupId = "com.liu.alone.plugin"
        }
    }
}
Here, we have modified the location of its release. After the release is successful, look at the local warehouse.

Here, we see that it has been published.
Then, we modify the build.gradle under the project to refer to the plugin
// Top-level build file where you can add configuration options common to all sub-projects/modules.

buildscript {
    repositories {
//        google()
//        jcenter()
        maven{
            url 'http://localhost:8081/artifactory/android_depend/'
        }
//        flatDir{dir 'libs'}
    }
    dependencies {
        classpath 'com.android.tools.build:gradle:3.3.1'

        classpath 'com.liu.alone.plugin:java-plugin:1.0.0'
    }
}

allprojects {
    repositories {
//        google()
//        jcenter()
        maven{
            url 'http://localhost:8081/artifactory/android_depend/'
        }
    }
}

task clean(type: Delete) {
    delete rootProject.buildDir
}
Doubt: It is necessary to publish to the local warehouse first; then, add the local warehouse to the group, so that there are plug-in packages in the group.
First add the local warehouse to the group, and then publish the plug-in to the local warehouse, so that the plug-in package does not exist in the group (the local warehouse has it).
Here, we see that we no longer use the libs directory, but a local repository.
In this way, if the independent plug-in is released for modification or upgrade, we don't need to manually copy the jar package. Just modify the version directly.
At this point, Gradle's plug-in development is all introduced.
Custom plug-ins are very practical. We can use custom plug-ins to realize functions such as packaging, reinforcement, uploading, and DingTalk notifications with one click.