This project is an electric vehicle helmet detection based on the SSD algorithm. The complete project is based on SSD improvement-->knowledge distillation-->self-distillation-->pruning-->trt reasoning. I wanted to use it to publish a paper, but I may not have the time and energy. Here I only select a part of the project to open source.
Table of contents
Parameter description of the project code
The two results are displayed in the same window
Single object detection display
Fine-tuning training of the model after pruning
onnx2engine[tensorRT reasoning]
Open Source Description
This project is an open source project. Recently, I found that some people use my other projects to publish paid resources. This situation is not allowed . I hope that the open source project I released will help everyone learn and communicate. I will report it later if I find out that my open source project is charged. At the same time, I will consider closing all open source projects in the future.
Another: If you want to use this project to publish papers or complete projects, etc., you need to get your consent and pay or name, otherwise you will report!
Project function description
1. Support training your own data set
2. Support pruning
3. Support fine-tuning training after pruning
4. Support mAP test
5. Support FPS test
6. Support tensorRT reasoning
7. Support detection results to be displayed in the same window
8. Support test result window display
9. Support single target detection
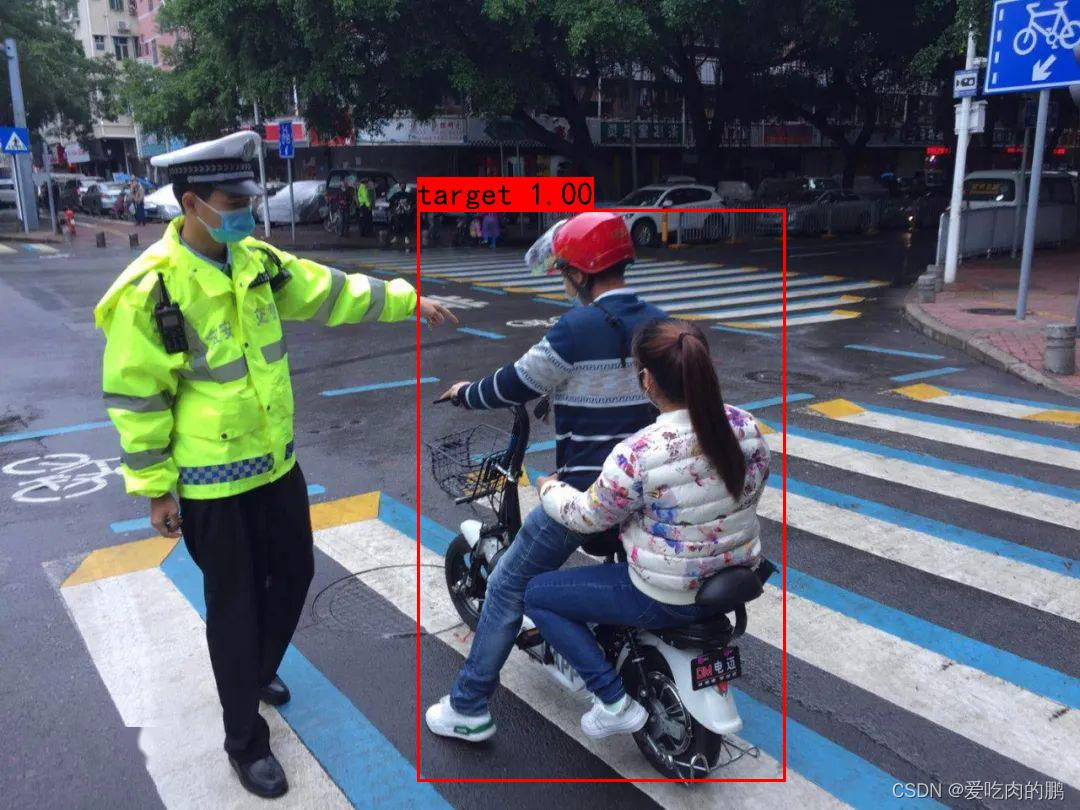
Note: The electric vehicle helmet detection I realized here is carried out in two steps (so there are multiple windows or single window display): the first step is to detect the rider and the electric vehicle as a whole ; Whether wearing a helmet is detected based on the detection result . If you want to detect in one step, you can use single-target detection.
The benefits of this detection method are:
1. It can be distinguished from ordinary pedestrians, and ordinary pedestrians will not be detected;
2. If there are multiple people in a car, helmet detection can also be realized;
Disadvantages of this detection method:
Since the detection is performed twice, the memory usage is relatively high, and real-time detection has an impact in practical applications, because the GPU will be passed twice.
Parameter description of the project code
(helmet_dectection.py)
--model: target detection model selection, now only supports SSD
--cuda: Whether to use the GPU, the default is True
--output: some functions need to specify the output path
--conf_thres: Confidence threshold, default 0.6
--iou_thres: iou threshold, default 0.5
--target_weights: The weight path of the first j-detection ( human and electric vehicle as a whole )
--helmet_weights: the second ( only for the head ) weight path, the default is EC/model_data/pruning_2th_model.pth
--fps: Test FPS, default False
# Support 300*300, 512*512 resolution input
--input_shape: The first detection input resolution, the default is 512
--input_shape2: The second detection input resolution, the default is 512
# Pruning, before pruning, you need to determine whether the model is completely saved instead of just saving the weights. If you do not save the complete network results, you need to go to tools/savemodel.py to save the complete network and weights before pruning
--pruning_model: Turn on pruning (by default, vgg trunk pruning)
--pruning_weights: The weights that need to be pruned
# training configuration
--train: Whether to enable training
--is_fine: Whether to enable fine-tuning training after pruning
--pruned_model_path: The weight path after pruning [passed in during fine-tuning training]
--batch_size: batch size
--Init_Epoch: Initialize Epoch
--Freeze_Epoch: Freeze training Epoch, the default first 50Epoch freeze training
--UnFreeze_epoch: unfreeze training, default 50-100 unfreeze training
--UnFreeze_lr: Learning rate after unfreezing
# prediction configuration
--predict: Whether to enable the prediction mode, after enabling, the default two detections are displayed in one window
--predict_2windows: The detection results are displayed in two windows (window display)
--predict_single: Only detect one target
--video: Whether to detect video
--video_path: video path
--image: Whether to detect images
--mAP: Whether to test mAP
--trt: Whether to use trt for reasoning
predict
The two results are displayed in the same window
python helmet_dectection.py --predict --video --video_path 【your video path】 --target_weights [一次检测权重路径] --helmet_weights [二次检测权重路径]The effect is as follows (the detection of the head will be displayed in the lower right corner of the consent screen):
Electric vehicle helmet detection
Image prediction can be combined with the above command input:
python helmet_dectection.py --predict --imageSplit window display
--predict_2windows --video --video_path 【视频路径】 --target_weights 【第一次检测权重】 --helmet_weights 【第二次检测权重】 --input_shape 512 --input_shape2 512At this time, two windows will be displayed to display the results of the two detections ( this function does not support trt for the time being )
I attach here the renderings from my thesis

Single object detection display
If you only want to display the first or second separate detection, you can use this function [Note to modify the content in config.py and classes.txt]. For example:
python helmet_dectection.py --predict_single --video --video_path [视频路径] --trtpruning
Enter the following command:
python helmet_dectection.py --pruning_model --pruning_weights=你需要剪枝的权重 --output=剪枝以后的权重保存在哪里for example:
python helmet_dectection.py --pruning_model --pruning_weights=model_data/whole_model.pth --output=model_data/The following information appears to indicate that the pruning is successful. The pruned model will be saved in the model_data file, named pruning_model.pth. If you need to modify the saved weight name and pruning details, go to tools/Model_Pruning.py to modify
[ <DEP: prune_conv => prune_conv on vgg.24 (Conv2d(512, 512, kernel_size=(3, 3), stride=(1, 1), padding=(1, 1)))>, Index=[1, 2, 3, 5, 8, 10, 11, 13, 17, 18, 20, 25, 28, 29, 34, 36, 38, 40
, 44, 46, 50, 53, 58, 59, 60, 63, 65, 66, 68, 69, 74, 76, 81, 82, 83, 85, 87, 91, 95, 96, 97, 99, 101, 103, 109, 113, 115, 117, 119, 123, 124, 131, 132, 133, 134, 138, 139, 141, 143, 145,
146, 147, 148, 150, 155, 158, 162, 163, 166, 173, 175, 176, 177, 179, 182, 187, 194, 195, 198, 199, 200, 201, 203, 205, 208, 212, 217, 221, 225, 228, 229, 235, 237, 240, 245, 248, 250, 2
52, 253, 255, 256, 260, 265, 267, 269, 270, 271, 273, 275, 277, 278, 280, 282, 284, 286, 287, 288, 289, 293, 294, 296, 302, 307, 308, 309, 312, 313, 317, 320, 323, 325, 330, 337, 339, 341
, 347, 349, 350, 353, 356, 359, 361, 362, 364, 365, 370, 371, 372, 379, 381, 382, 383, 384, 385, 387, 388, 396, 400, 406, 415, 418, 423, 426, 427, 431, 432, 436, 437, 438, 439, 440, 441,
442, 444, 447, 450, 452, 453, 457, 458, 459, 460, 462, 464, 465, 466, 468, 472, 475, 482, 484, 485, 486, 487, 490, 491, 494, 495, 496, 499, 502, 503, 507, 511], NumPruned=940236]
train
train your own dataset
1. If you want to train your own data set. Put the dataset image under VOCdevkit/VOC2007/JPEGImages/, and place the xml tag under VOCdevkit/VOC2007/Annotations/. Then run voc2ssd.py.
2. Then modify the classes in voc_annotation.py and run.
3. Run the following code:
python helmet_dectection.py --train --target_weights 权重路径Fine-tuning training of the model after pruning
python helmet_dectection.py --train --is_fine --pruned_model_path=你剪枝后的权重路径for example:
python helmet_dectection.py --train --is_fine --pruned_model_path=model_data/pruning_model.pth [Note: The batchsize, learning rate, and epoch of frozen network training all use the default values in the above commands, and you need to change the parameters directly]
When training, you need to modify the parameters in utils/config.py according to your own class, mainly modify the number of categories, the number of categories is the number of your own classes + 1 (including background classes), for example, your own data set has 20 classes , then num_classes=21, you can also modify min_dim [SSD supports resolutions of 300 and 512, if the resolution is modified, feature_map also needs to be modified]
If it's just normal training, you don't need to pass in is_fine to start normal training.
FPS test
python helmet_dectection.py --fpsBecause the FPS test code inherits the SSD class in tools/ssd.py, if you need to predict your own class, you need to write your own class in the classes_path path in ssd.py as follows, and pay attention to the incoming weight, for example, enter the following Command [The premise is that classes_path has been written as its own class]
mAP test
The mAP test also inherits tools/ssd.py, the classes_path is modified to its own class, and then enter:
python helmet_dectection.py --mAP --target_weights=权重路径 --conf_thres 0.5 --iou_thres 0.5The results file will be generated in the current directory, which contains mAP results and F1 value, P value and Recall
torch2onnx
Modify the ckpt_path in torch2onnx.py, the input size of sample x can generate onnx weight
Note: Since this part of the code uses the distilled network, there is a del operation to delete unnecessary layers. If you want to use the most original network, use net_student/ssd_student.py.
onnx2engine[tensorRT reasoning]
Modify the weight path of onnx2trt.py and run it to generate the corresponding engine. For a detailed tensorrt reasoning tutorial, see my other article:
Code link:
https://github.com/YINYIPENG-EN/E-bike_helmet_dectection.git
Weight link:
Link: https://pan.baidu.com/s/1mBEi5PJl7ibfwzJ8PBrAqQ
Extraction code: yypn
report error
Error 1:
conf_preds = conf_data.view(num, num_priors, self.num_classes).transpose(2, 1)
RuntimeError: shape '[1, 24656, 2]' is invalid for input of size 17464
In SSD, there are 6 prediction feature layers in total. The number of prior frames assigned to each feature layer are: 4, 6, 6, 6, 4, 4
Taking the input size as: 300×300 as an example, there are a total of 38×38×4+19×19×6+10×10×6+5×5×6+3×3×4+1×1×4 =8732 prior frames
If the input size is 512×512, there are a total of 64×64×4+32×32×6+16×16×6+8×8×6+4×4×4+2×2×4=24656 a priori box
So the above error is that the input size does not match the real model input size, need to check the input size