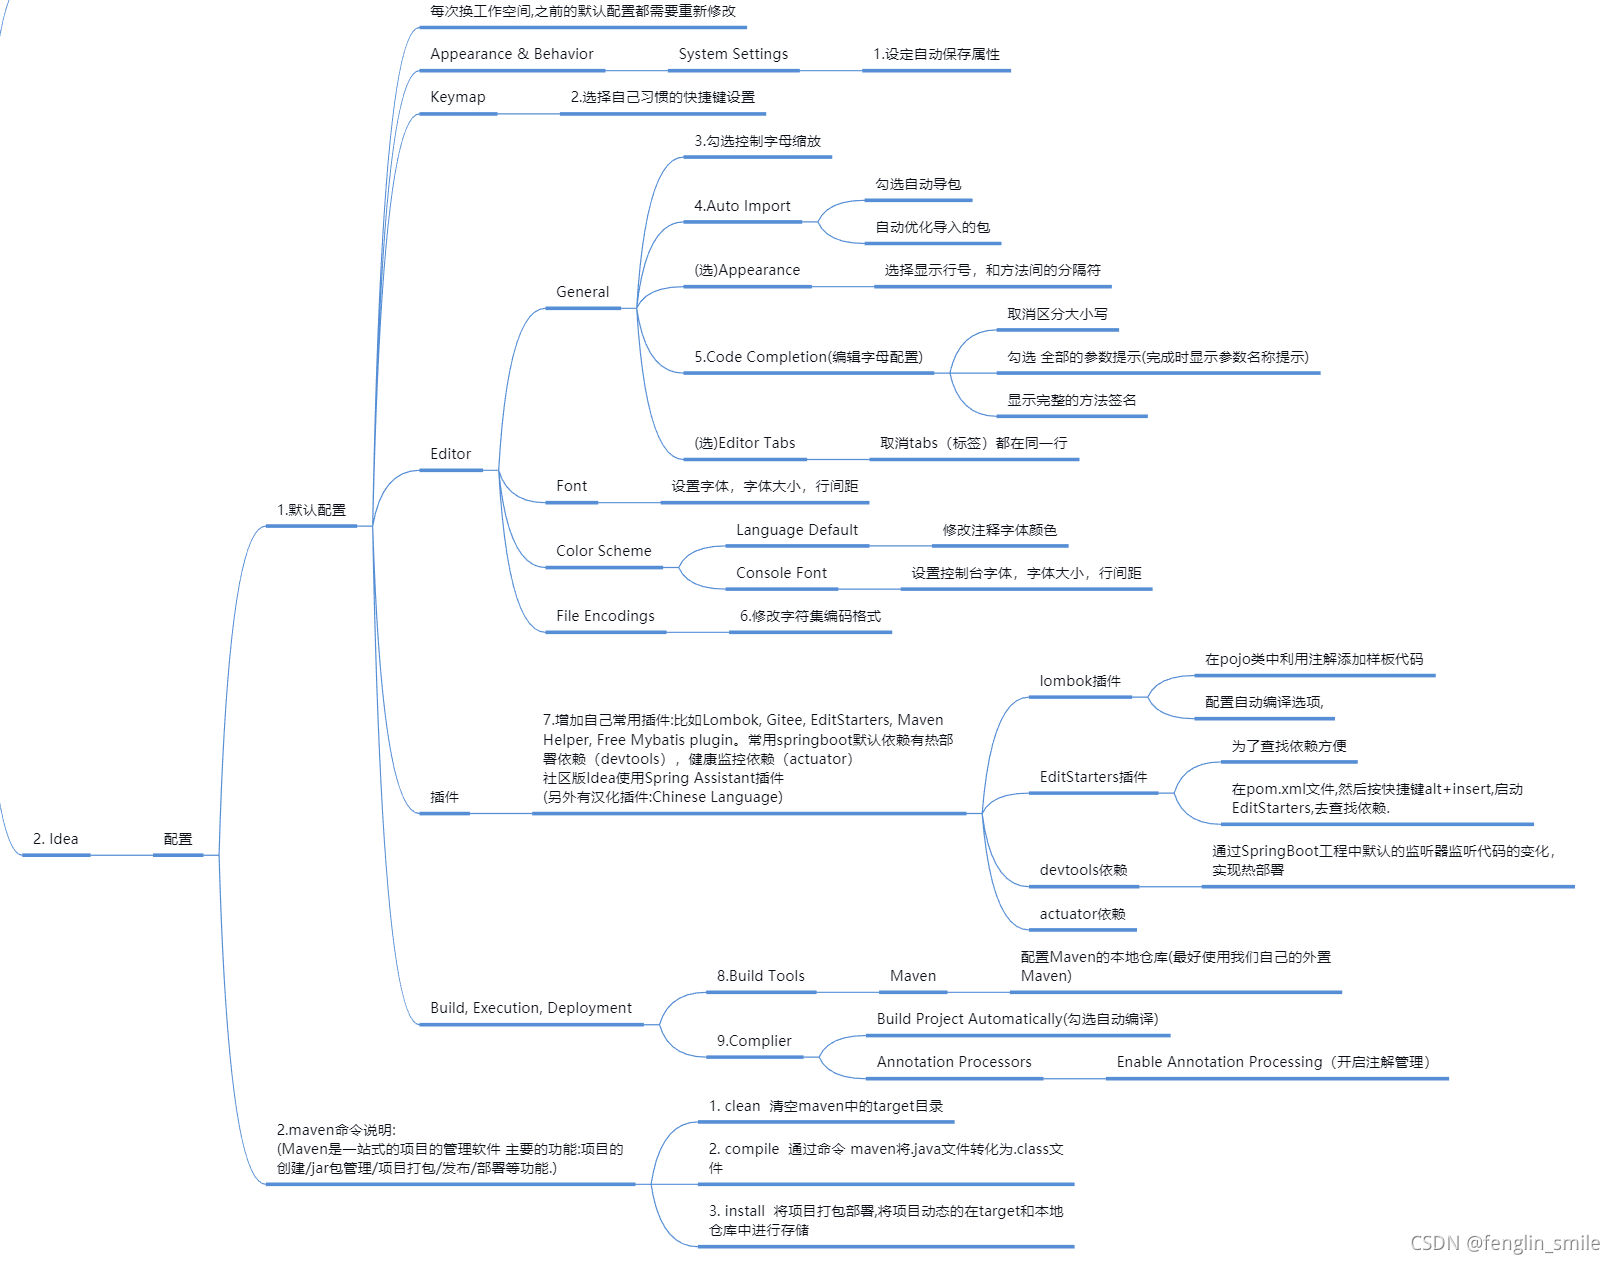
Tip:
After getting the new machine, the common configuration of idea (personal orientation), if students see it, they can choose and use it by themselves. Here I take the idea2020.3 version of my computer as an example (some places are too lazy to draw pictures and steal pictures).
Article directory
1. Set up the JDK
Setting environment variables on the computer, installing JDK, etc. will not be discussed in this article. Download the JDK from the official website and install it in a fool-proof way.
Set the JDK on the idea as follows——
Set in File -> Project Structure
Find Project Setting -> Project in the pop-up window Project Structure Find Project SDK (the place where Project SDK will also appear on the welcome interface or when importing a project, the important thing is to find here)
Select jdk1.8 will appear in the drop-down box of Project SDK, if it does not appear, select Add JDK... to add the jdk version already installed on the current computer by yourself.

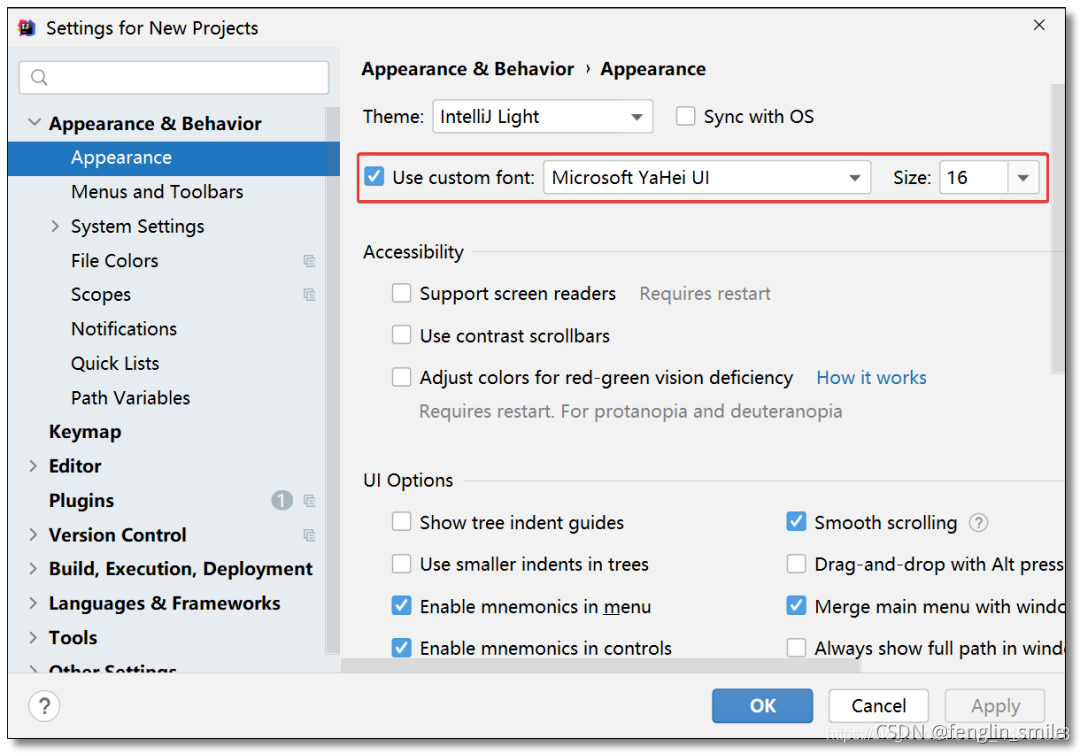
2. Appearance & Behavior
2.1 Setting the theme
Set it in Appearance & Behavior -> Appearance.
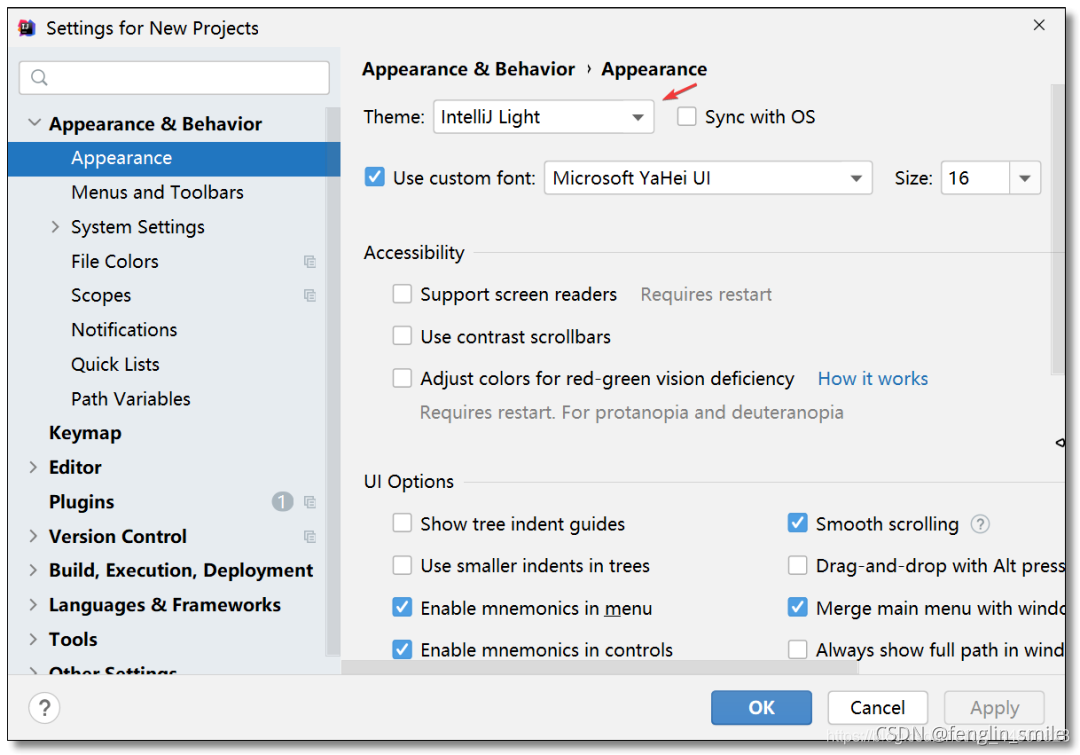
At the same time, you can also set the IDEA interface font and size here.
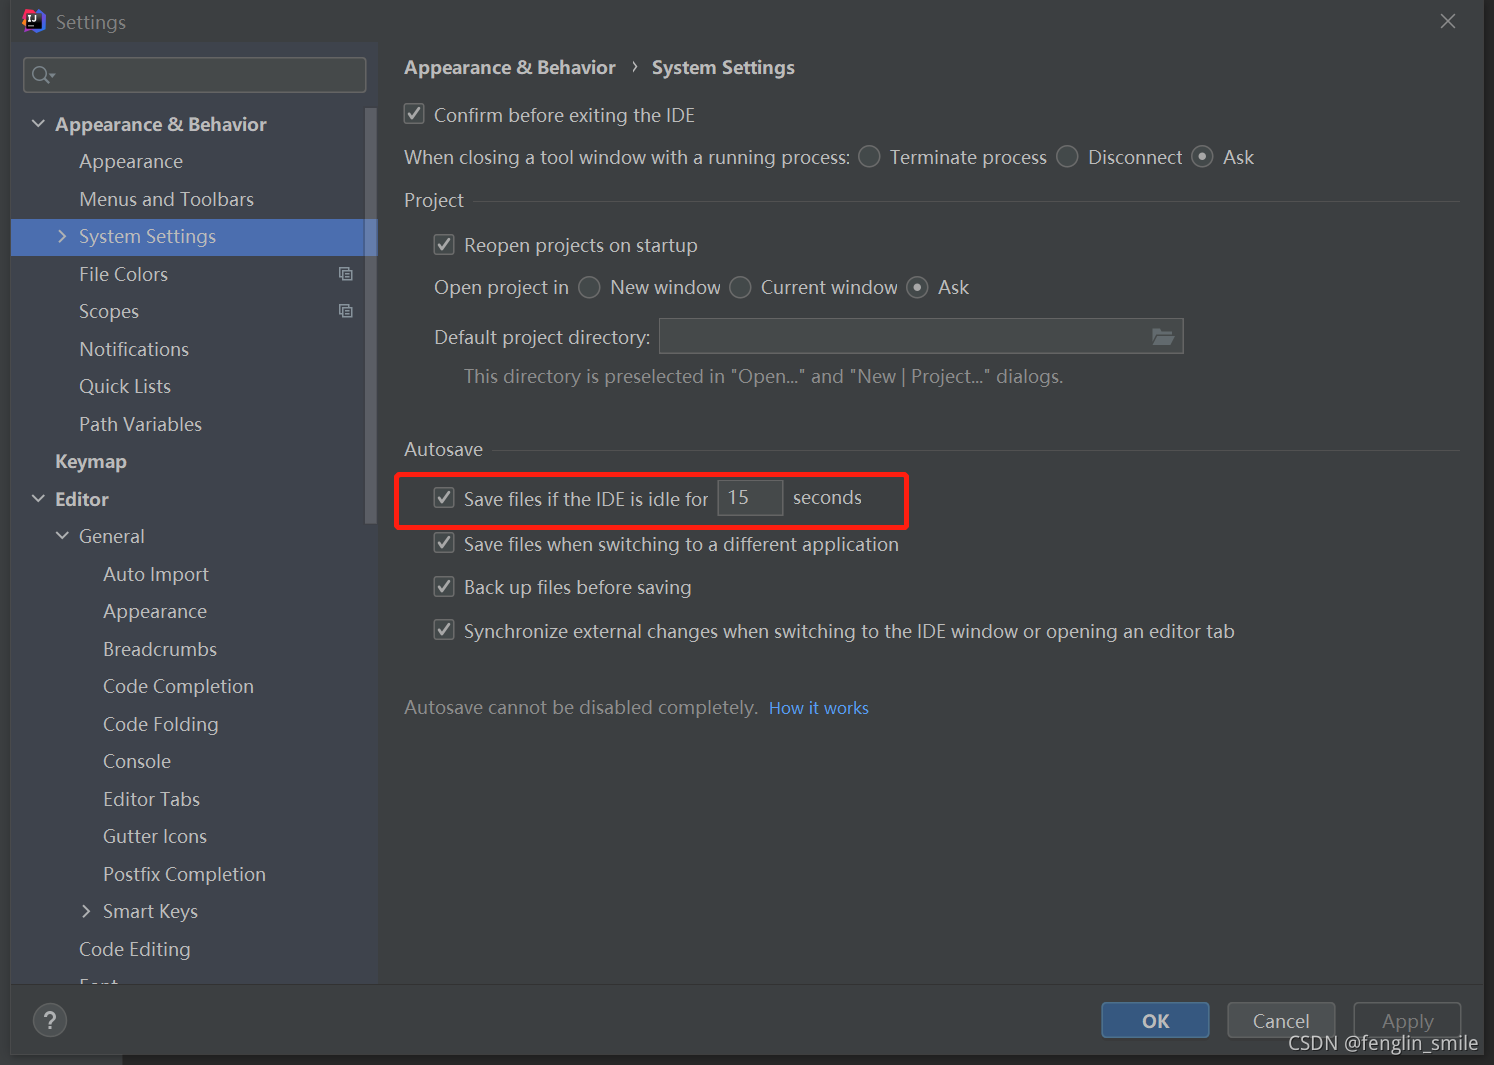
2.2 Set autosave properties
在Appearance & Behavior -> System Settings -> Autosave
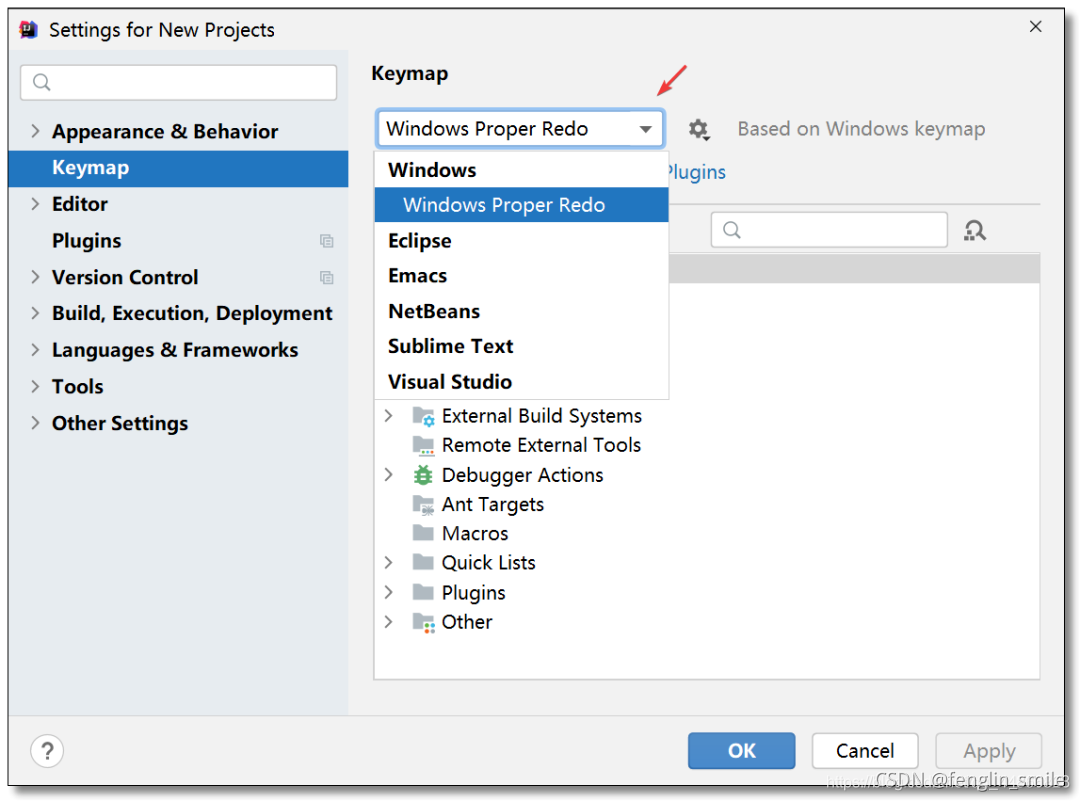
3. Keymap
In Keymap, choose the shortcut key settings you are used to, usually using Windows
4. Editor
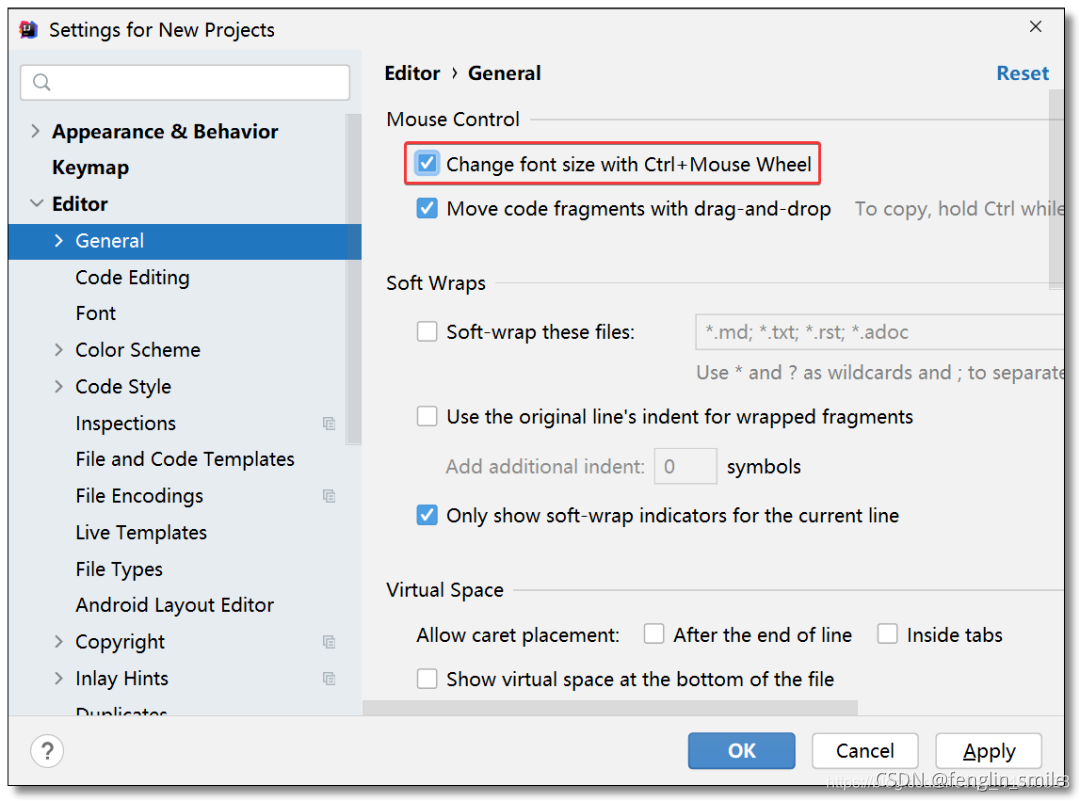
4.1 General
4.1.1 Choose whether to control letter scaling
In Editor -> General, you can click General, and you can see Mouse Control on the right. Check Change font size with Ctrl+Mouse Wheel to modify the font size through Ctrl + mouse wheel.
4.1.2 Whether to automatically import packages and automatically optimize imported packages
In Editor -> General -> Auto Import
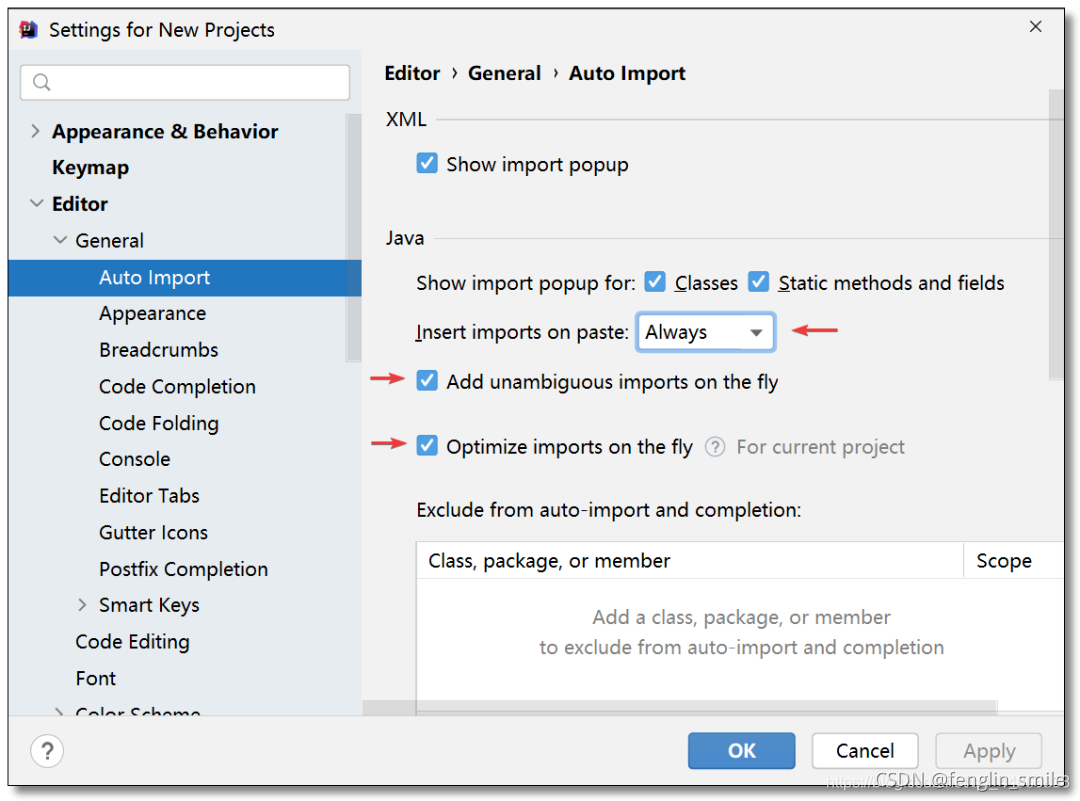
Note: In many cases, when there are too many classes imported into the same package, it will become * and import the entire package. If idea is not set, classes with more than 5 same packages will be marked with * by default.
In order to no longer have the * sign, you can set the idea. Find the position shown in the figure
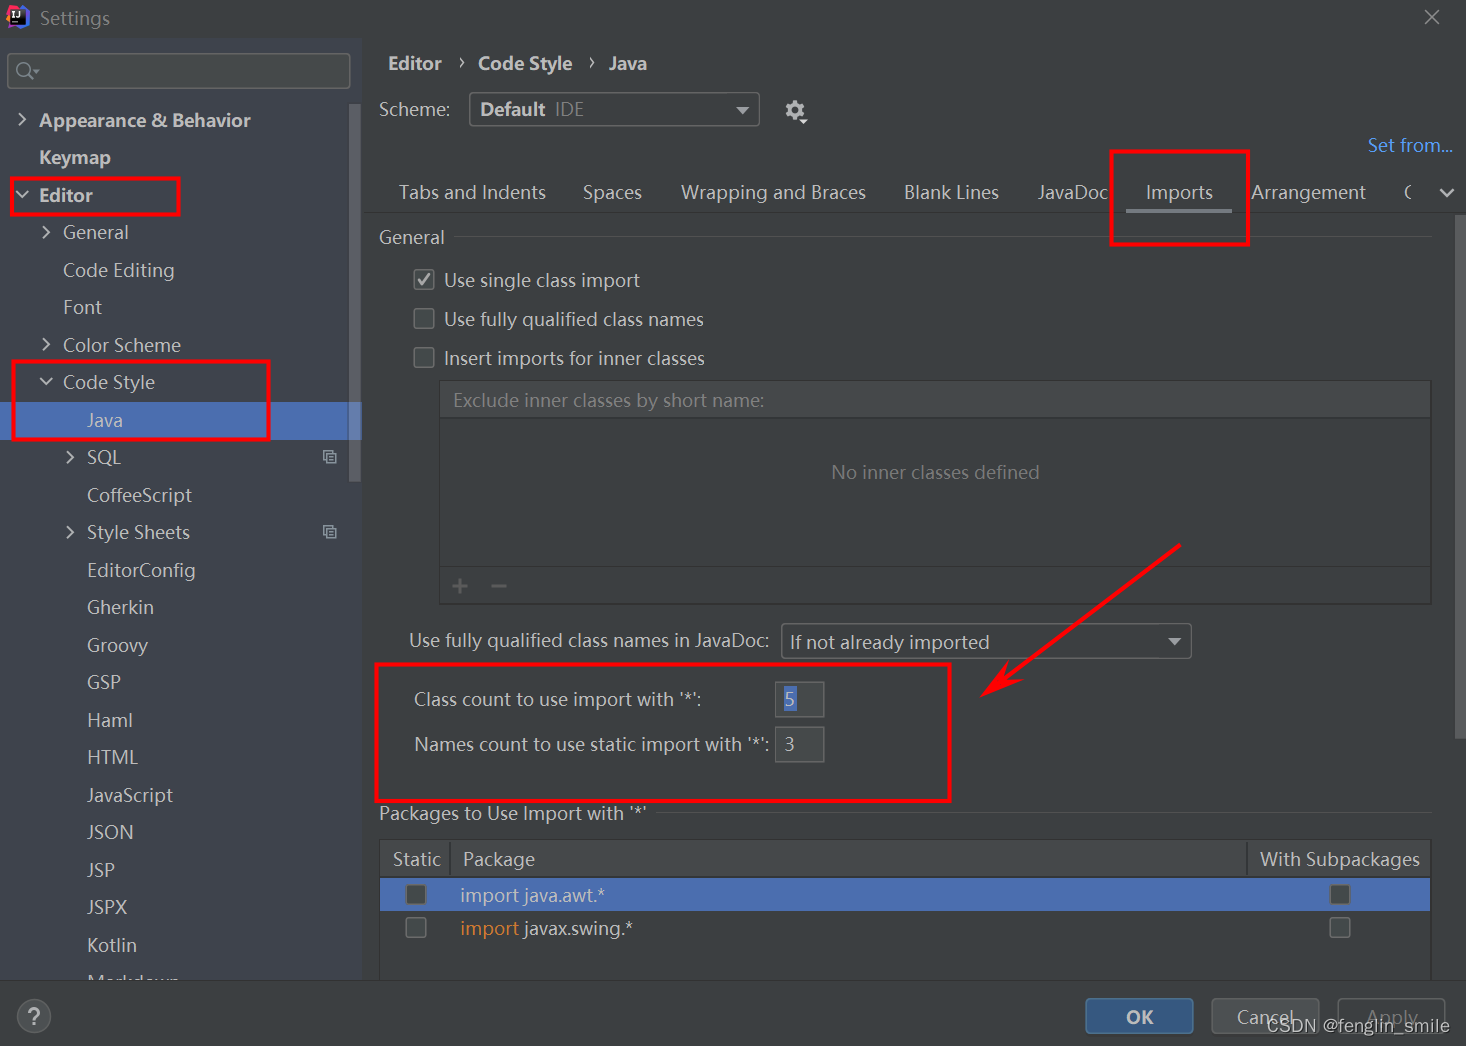
in Editor -> Code Style -> Java -> Imports , the default is 5,3.
Just modify the value here to be very large.
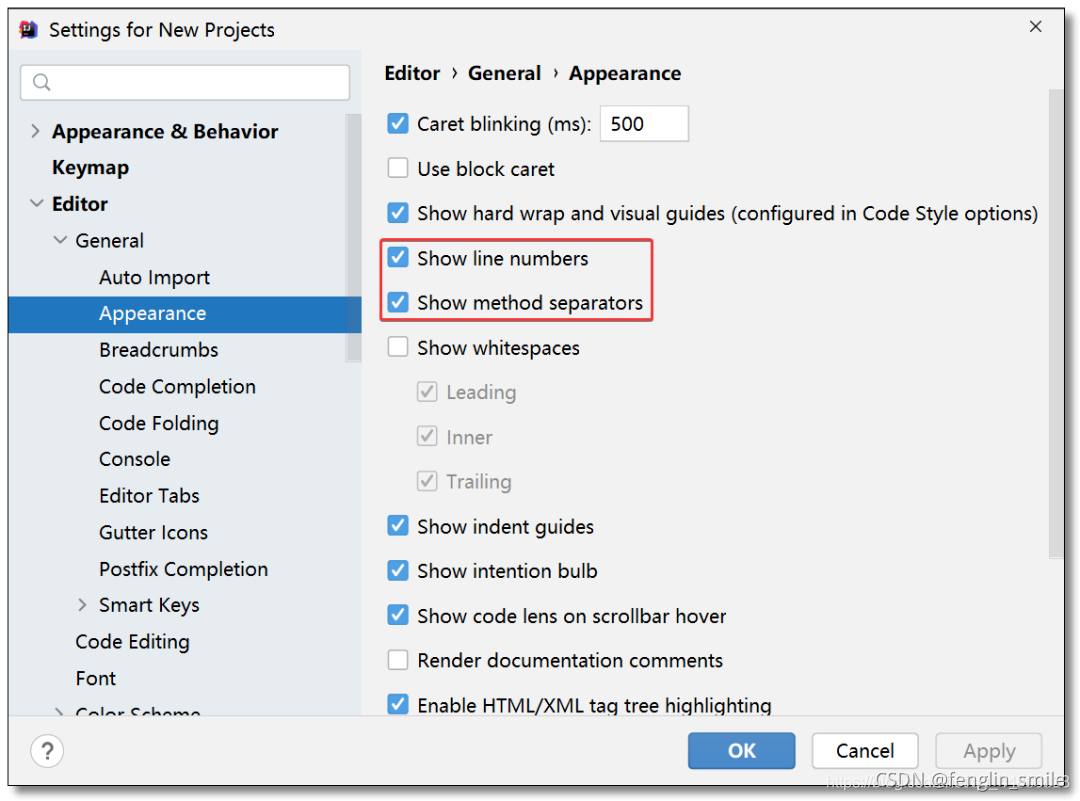
4.1.3 Select to display line numbers and separators between methods
在Editor -> General -> Appearance
4.1.4 Edit Alphabet Configuration
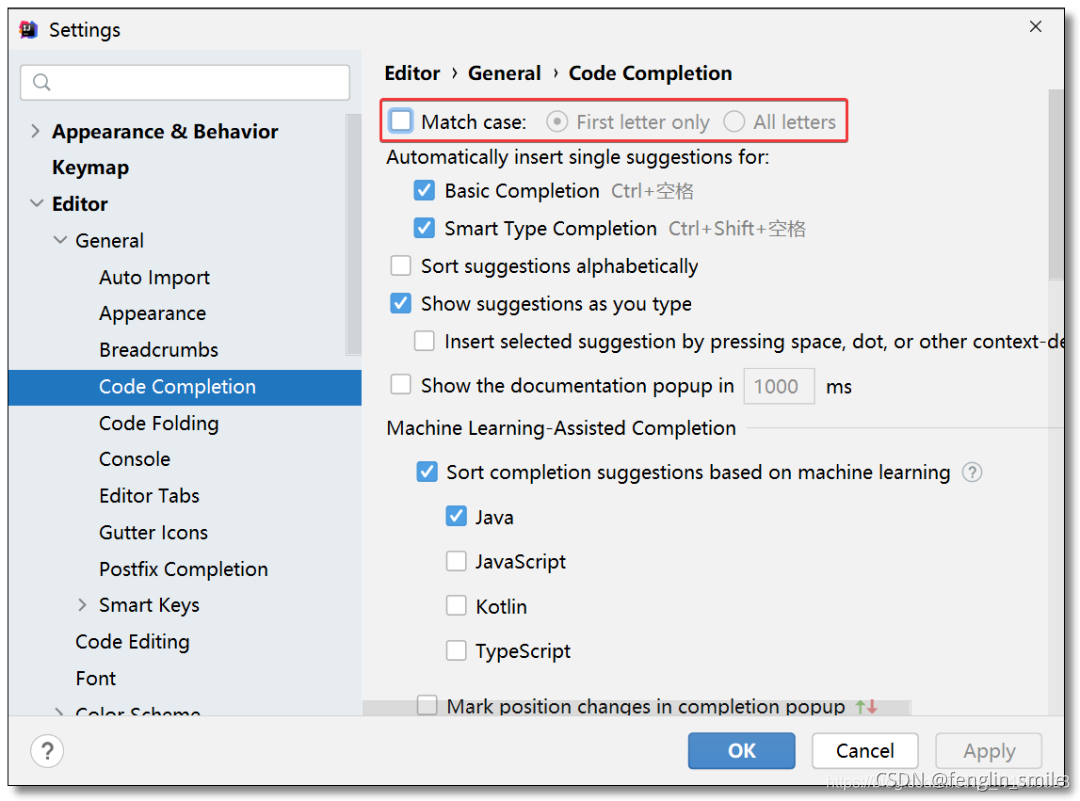
在Editor -> General -> Code Completion
-
Find and cancel Match case, cancel case sensitivity. Because when writing code, importing classes is to match all upper and lower case by default. This way uppercase and lowercase letters are ignored.
-
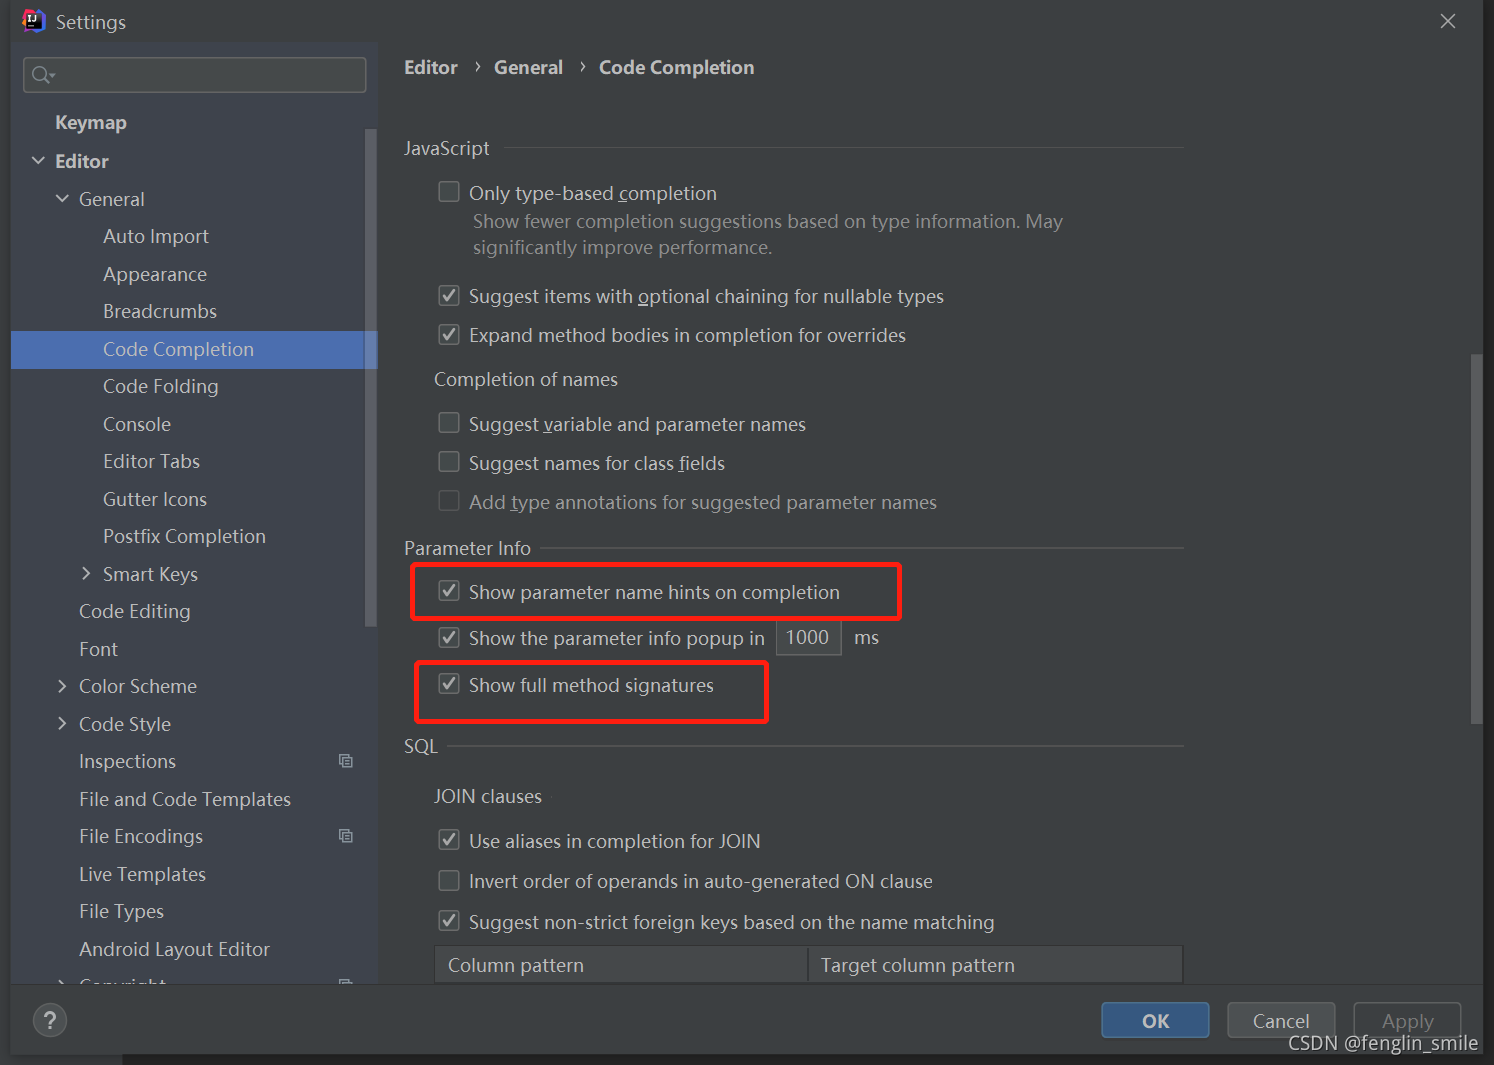
Find Parameter Info, check all parameter prompts (display parameter name prompts when complete) and display complete method signatures.
4.1.5 Cancel tabs (tags) are all on the same line
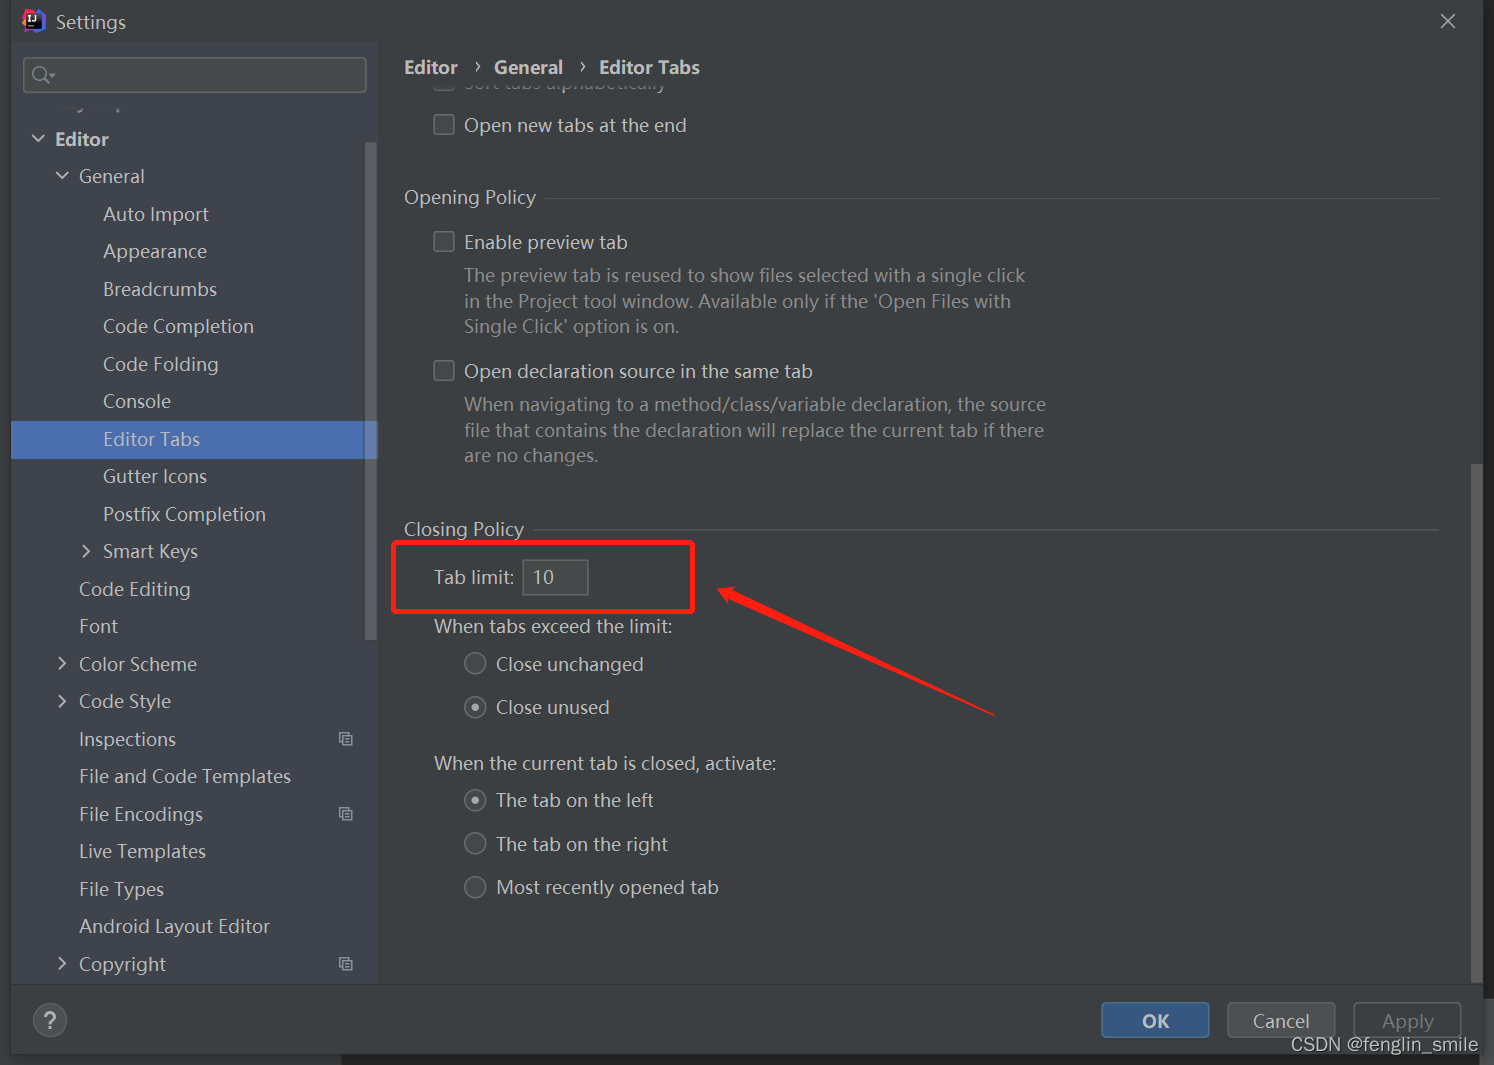
Uncheck Show tabs in one row in Editor -> General -> Editor Tabs .
Many files may be opened during development, and by default they will be piled up and displayed on one line. In this way, there is no need to pile up in one line, and it can be displayed in multiple lines.
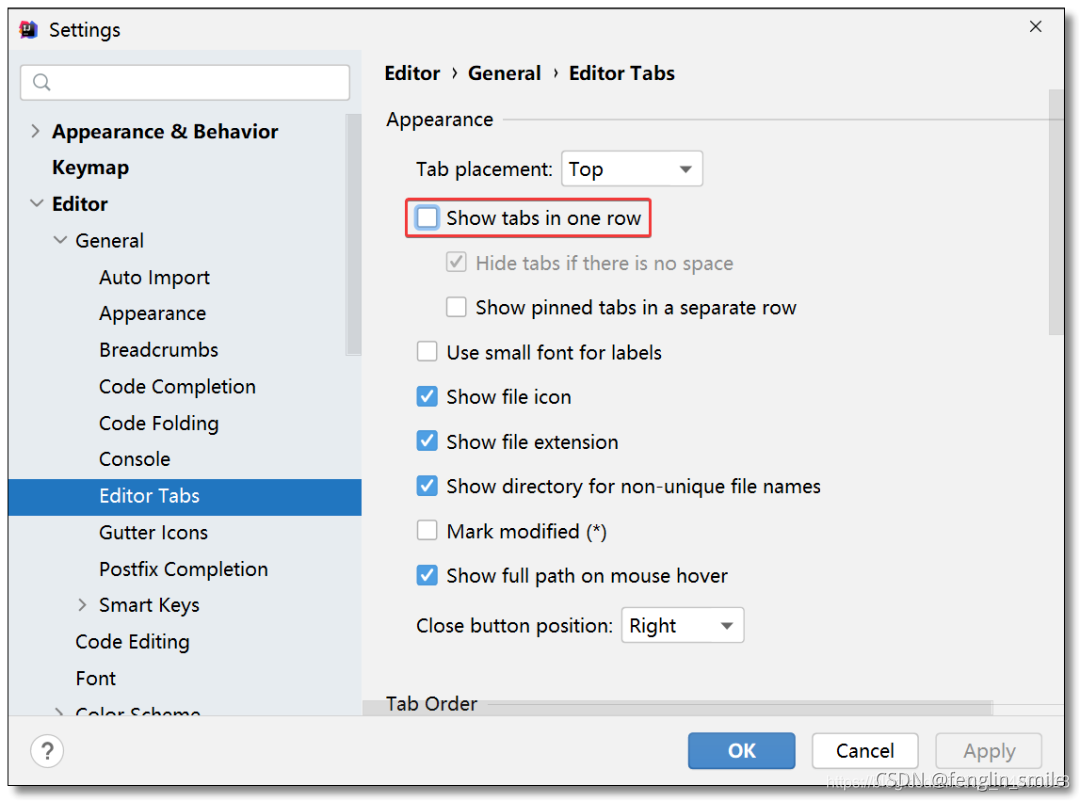
In addition, at the bottom of the same page, also in Editor -> General -> Editor Tabs, find the Tab limit in the Closing Policy of the page. The open window upper limit can be entered manually. When the number of opened windows reaches the upper limit, redundant windows will be closed.
4.2 Font
Set the font, font size, and line spacing in Editor -> Font

4.3 Color Scheme
The commonly used ones are——
4.3.1 Modify the annotation font color
在Editor -> Color Scheme -> Language Default
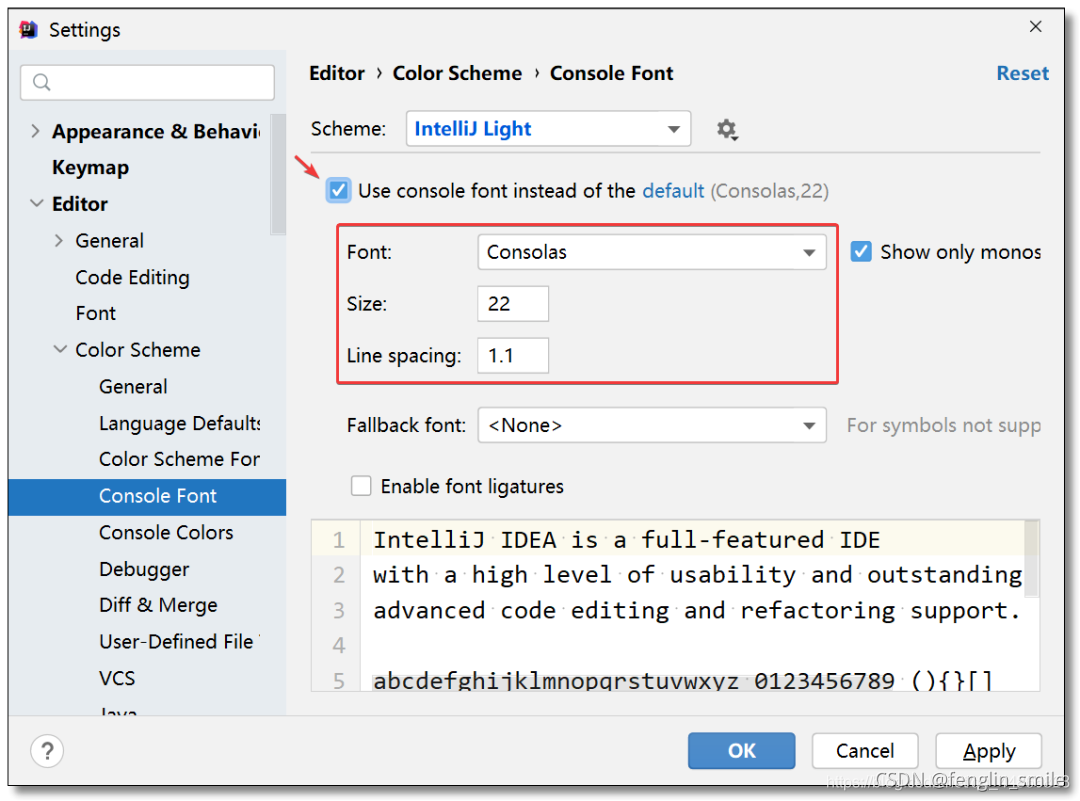
4.3.2 Set console font, font size, line spacing
In Editor -> Color Scheme -> Console Font,
no adjustment is required by default, and it will follow the Editor font to use consistent settings
4.4 File Encodings
In Editor -> File Encodings, you can modify the character set encoding format here

5. Plugins
In Plugins, you can add your own commonly used plug-ins.
Commonly used plug-ins are as follows:
- The lombok plugin can use annotations to add boilerplate code in pojo classes.
- EditStarters plug-in, in the pom.xml file, then press the shortcut key alt+insert to start EditStarters to find dependencies. It is for the convenience of finding dependencies.
In addition, there are Gitee, Maven Helper, Free Mybatis plugin, Chinese Language (Sinicization plugin), and Eval Reset plugin (detailed details below). Commonly used springboot default dependencies include hot deployment dependencies (devtools) and health monitoring dependencies (actuator).
ps: The community version of Idea uses the Spring Assistant plugin to create a springboot project.
6. Build, Execution, Deployment
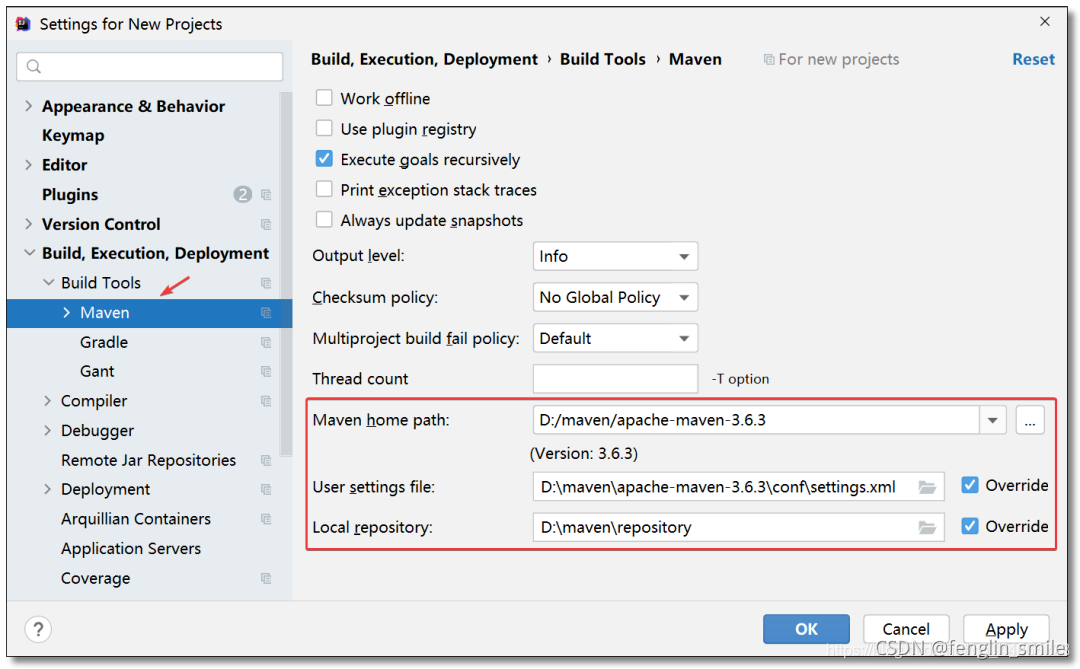
6.1 Build Tools
Configure Maven's local warehouse in Build, Execution, Deployment -> Build Tools -> Maven (it is best to use our own external Maven instead of the maven configuration that comes with idea, see maven official website for specific downloads)
6.2 Complier
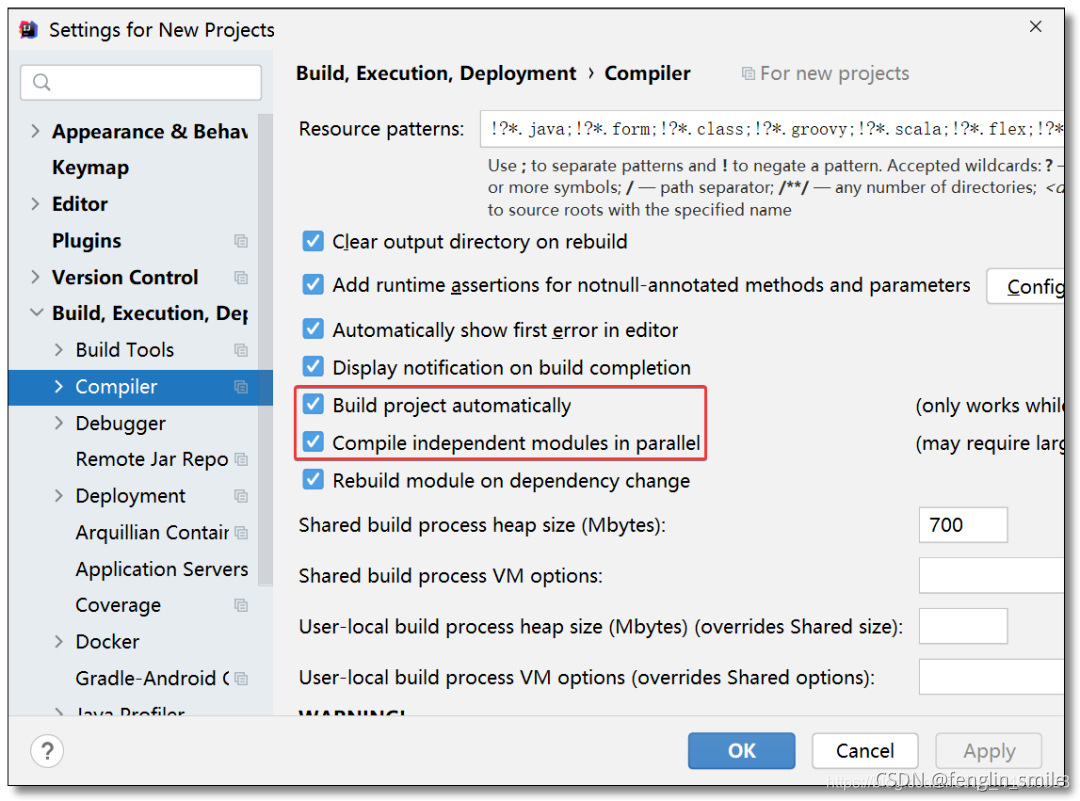
6.2.1 Automatic compilation
In Build, Execution, Deployment -> Complier, check Build Project Automatically
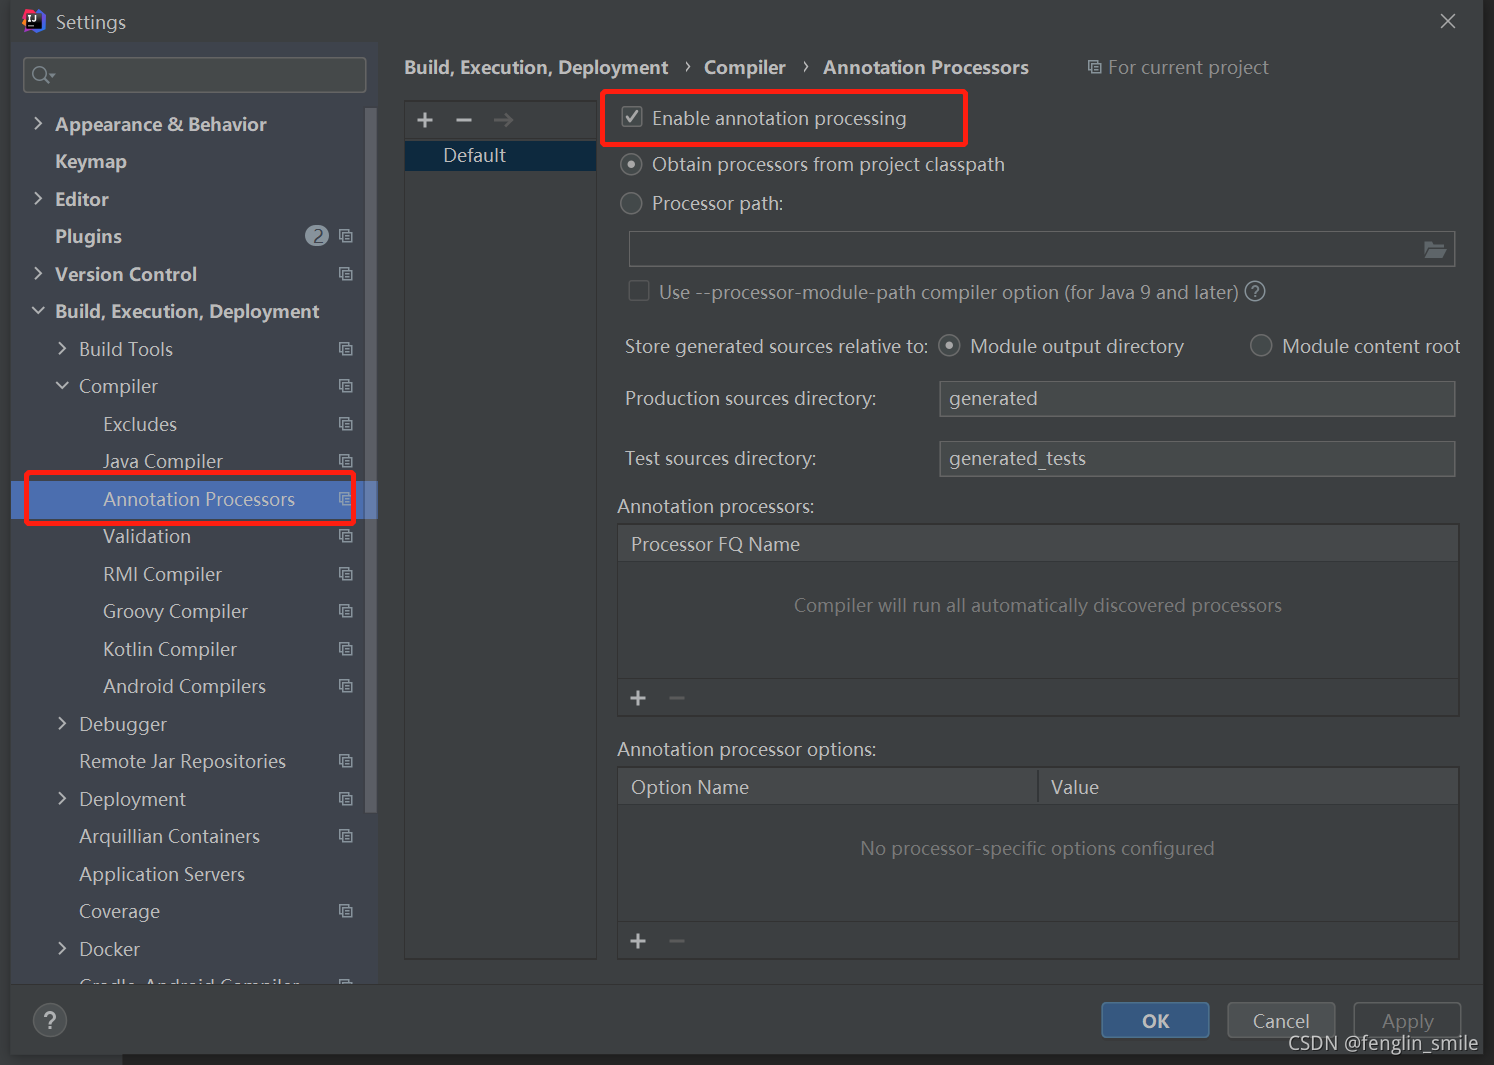
6.2.2 Enable annotation management
Find and check Enable Annotation Processing in Build, Execution, Deployment -> Complier -> Annotation Processors to enable annotation management
7. Other configuration descriptions
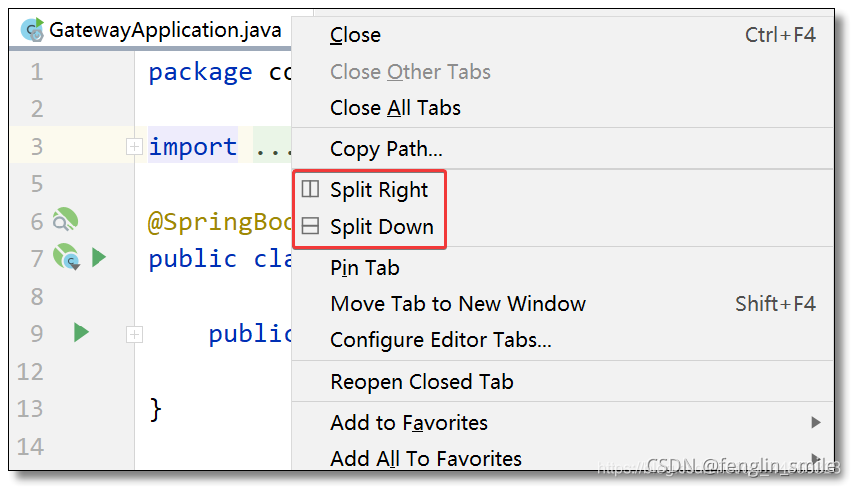
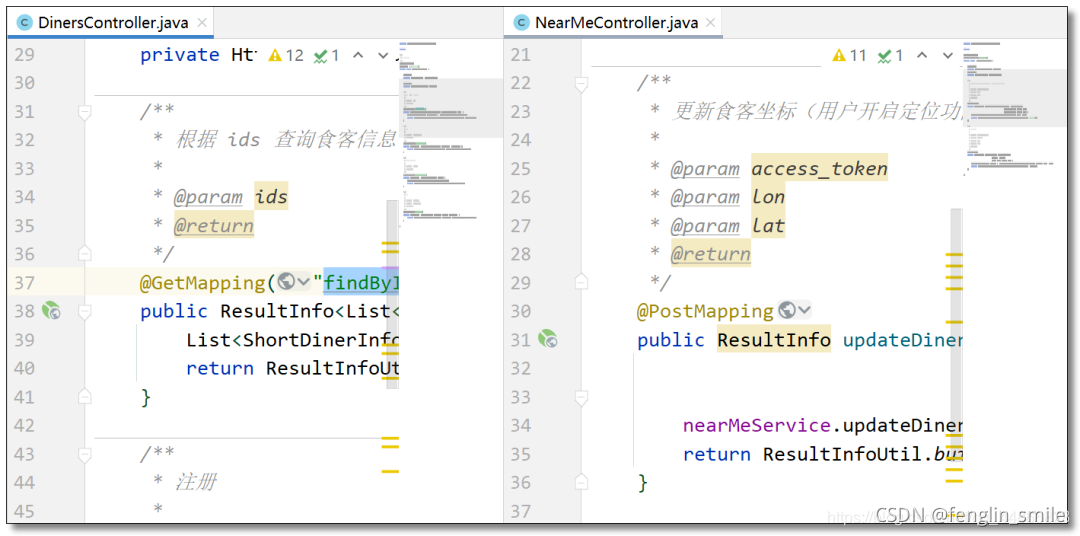
7.1 Code display mode
Multiple files can be displayed by splitting them left and right or up and down, which is more convenient when comparing files.
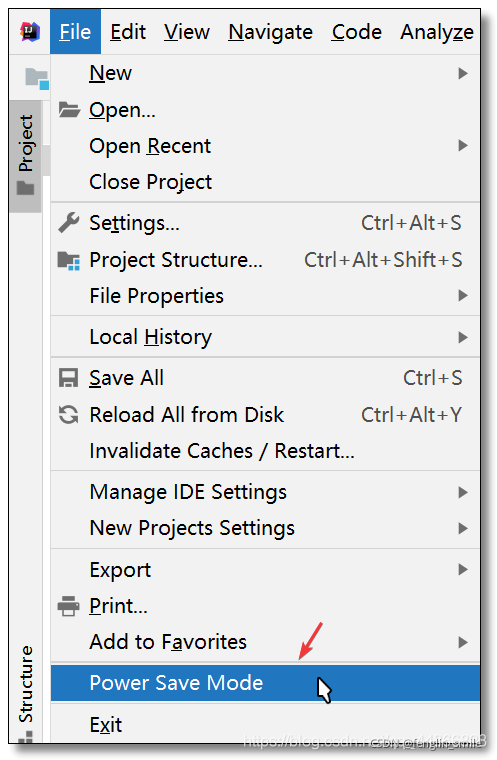
7.2 Power saving mode
Turn off functions such as code inspection and code hints. If you suddenly encounter code files that cannot be checked and prompted during development, you can check whether this option is enabled.
7.3 Set the number of history records to display
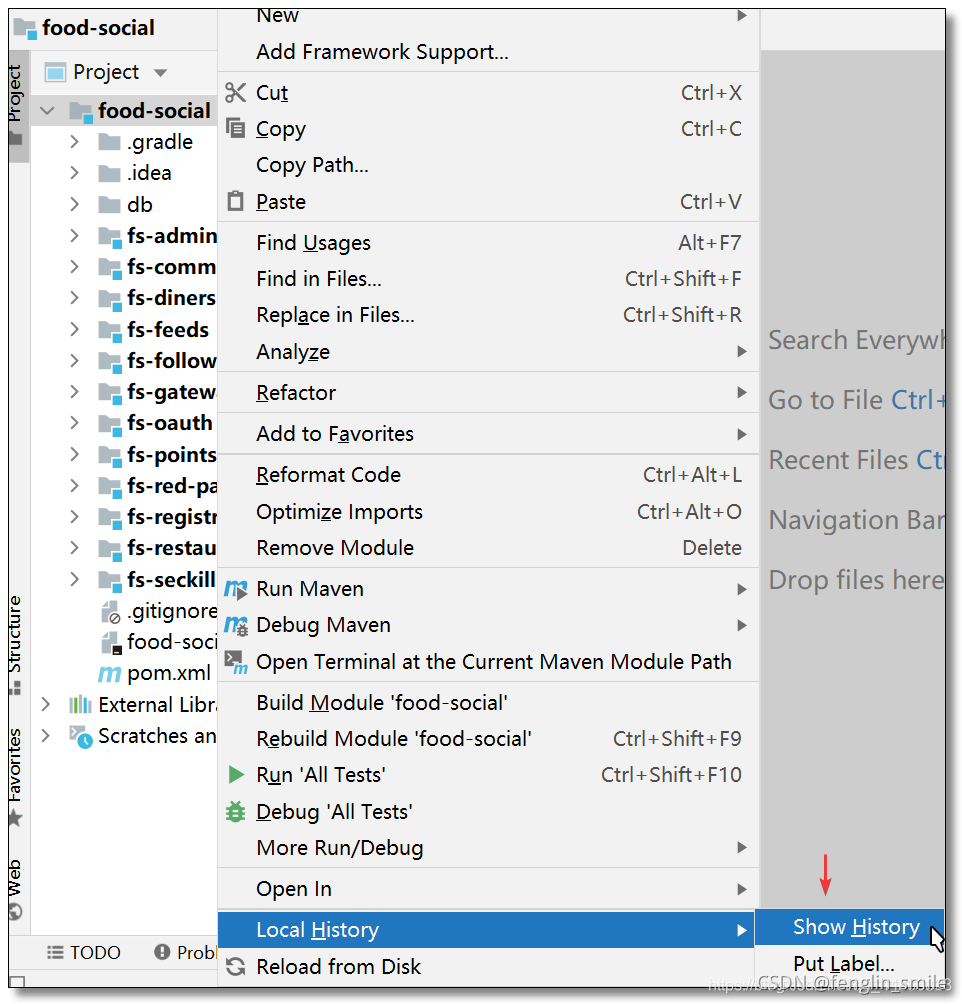
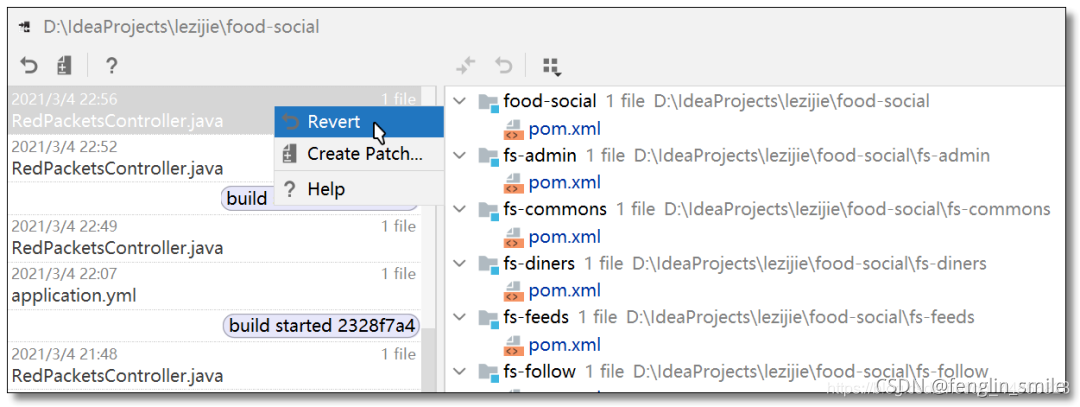
The biggest headache for development projects is code version iteration management, but this problem can be solved through version control tools such as Git and SVN. For some students who like to be lazy and open the code directly without adding version control, what should I do if I make a mistake and need to roll back? IDEA also provides a local history function for easy rollback. Right click on the project -> Local History -> Show History.
Find one of your previous timelines and right-click -> Revert to roll back.
7.4 Export/import configuration
7.4.1 Export configuration
In File -> Manage IDE Settings -> Export Settings, select the export directory and click OK, a settings.zip file will be exported.
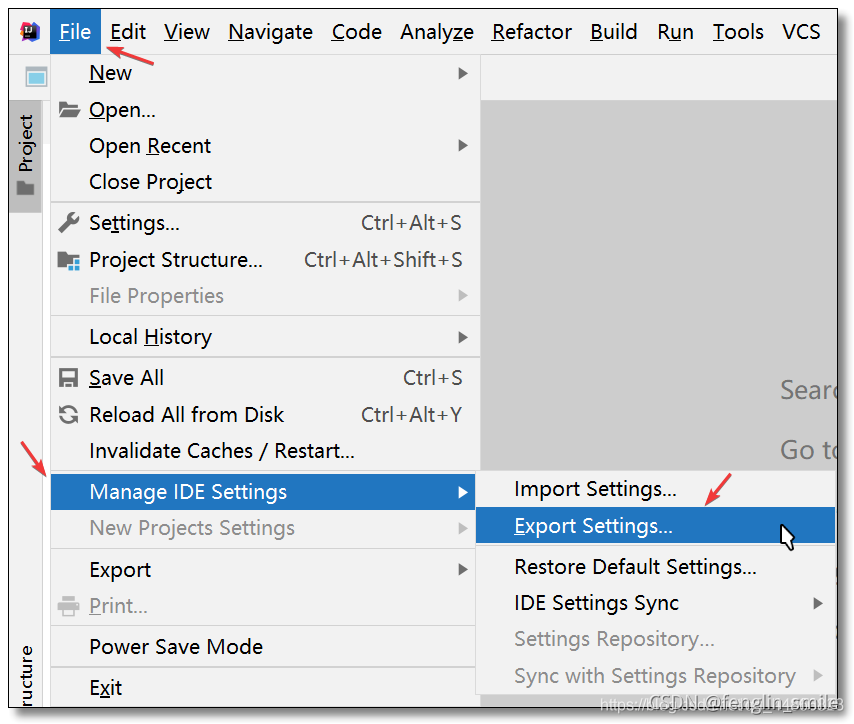
7.4.2 Import configuration
At about the same location, in File -> Manage IDE Settings -> Import Settings, select Import Configuration.

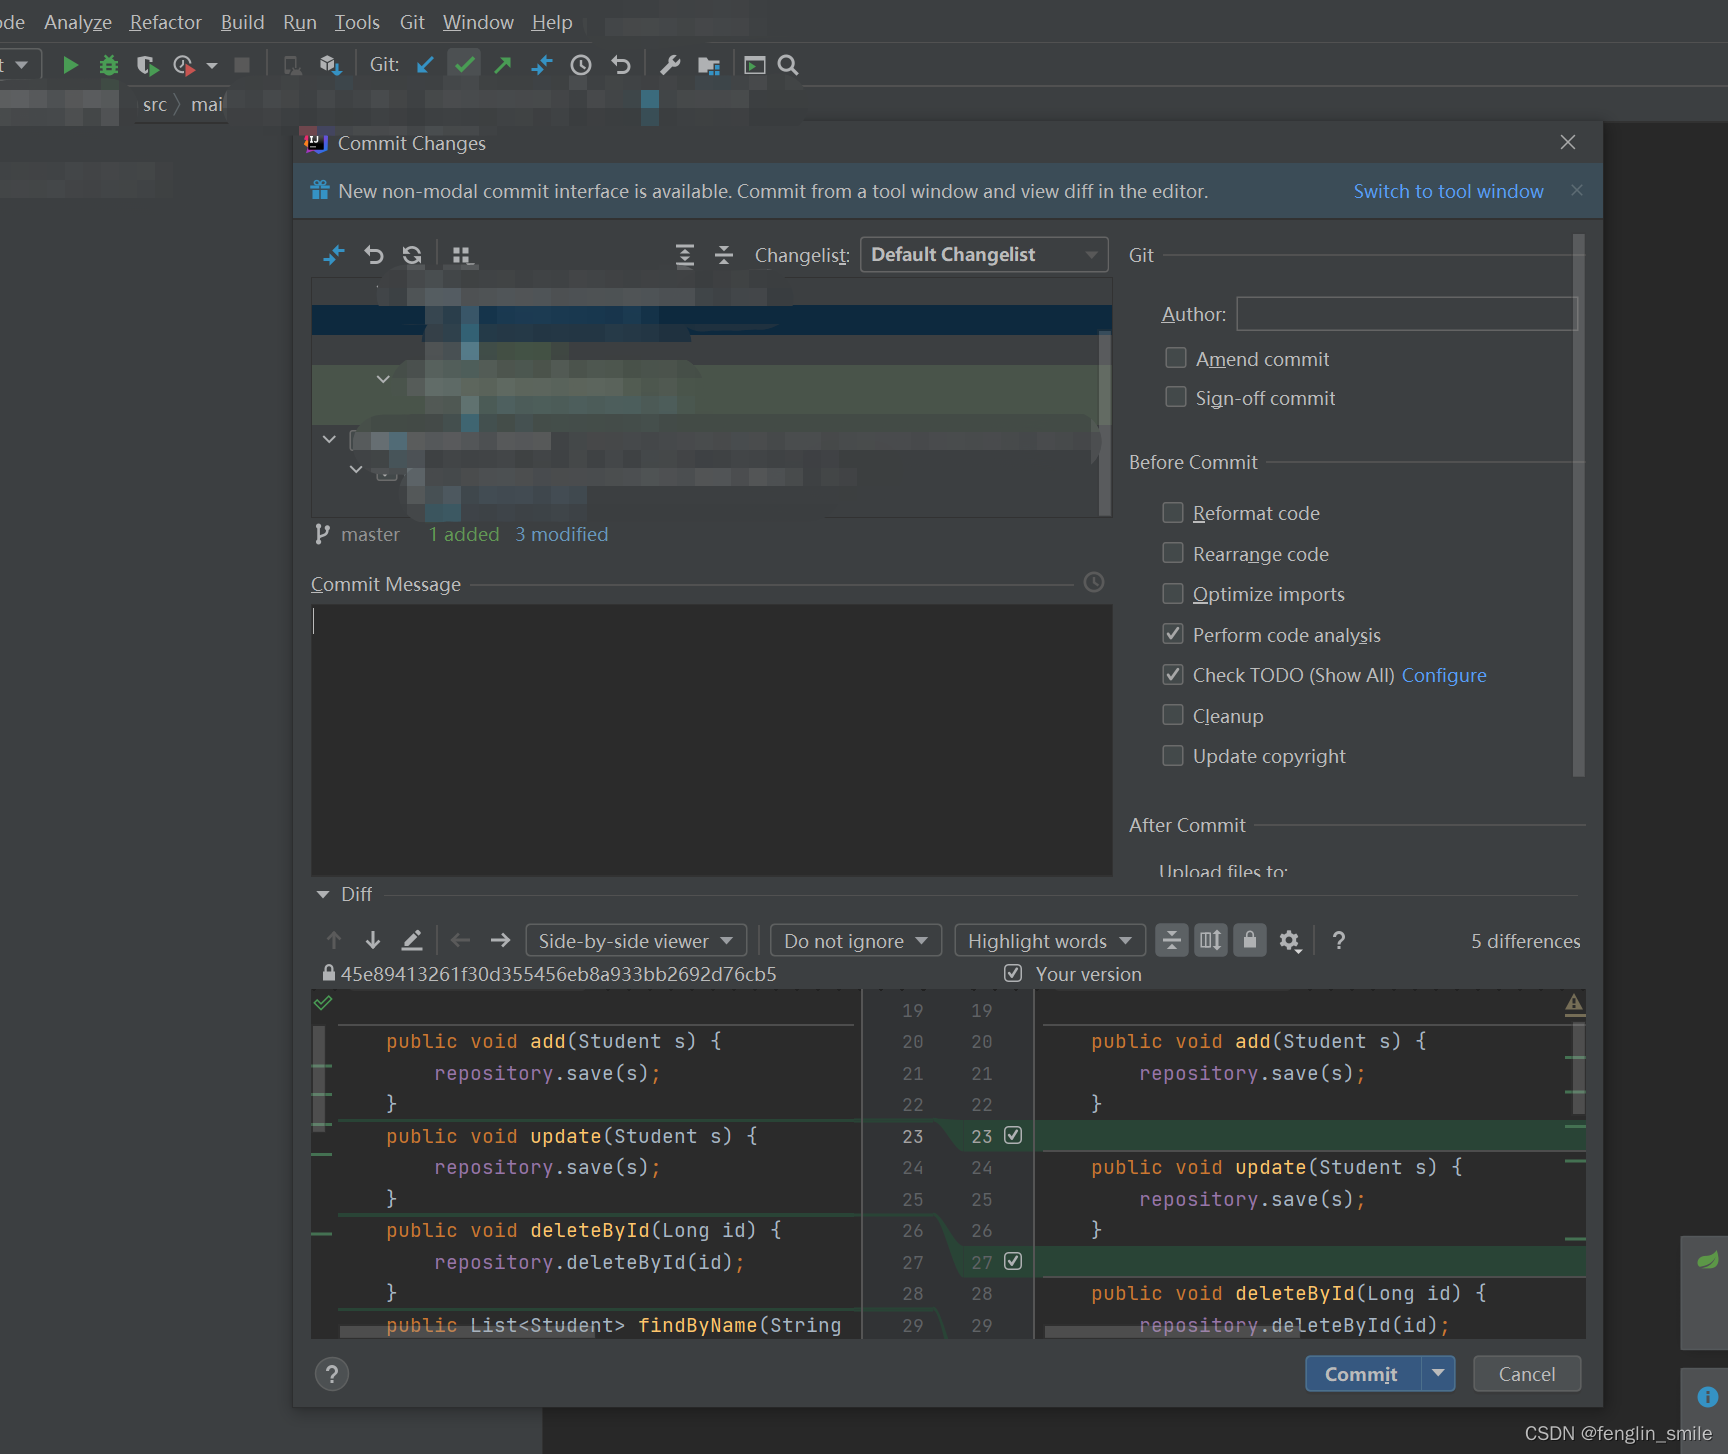
7.5 About the difference between the git commit modal box and the sidebar label
-
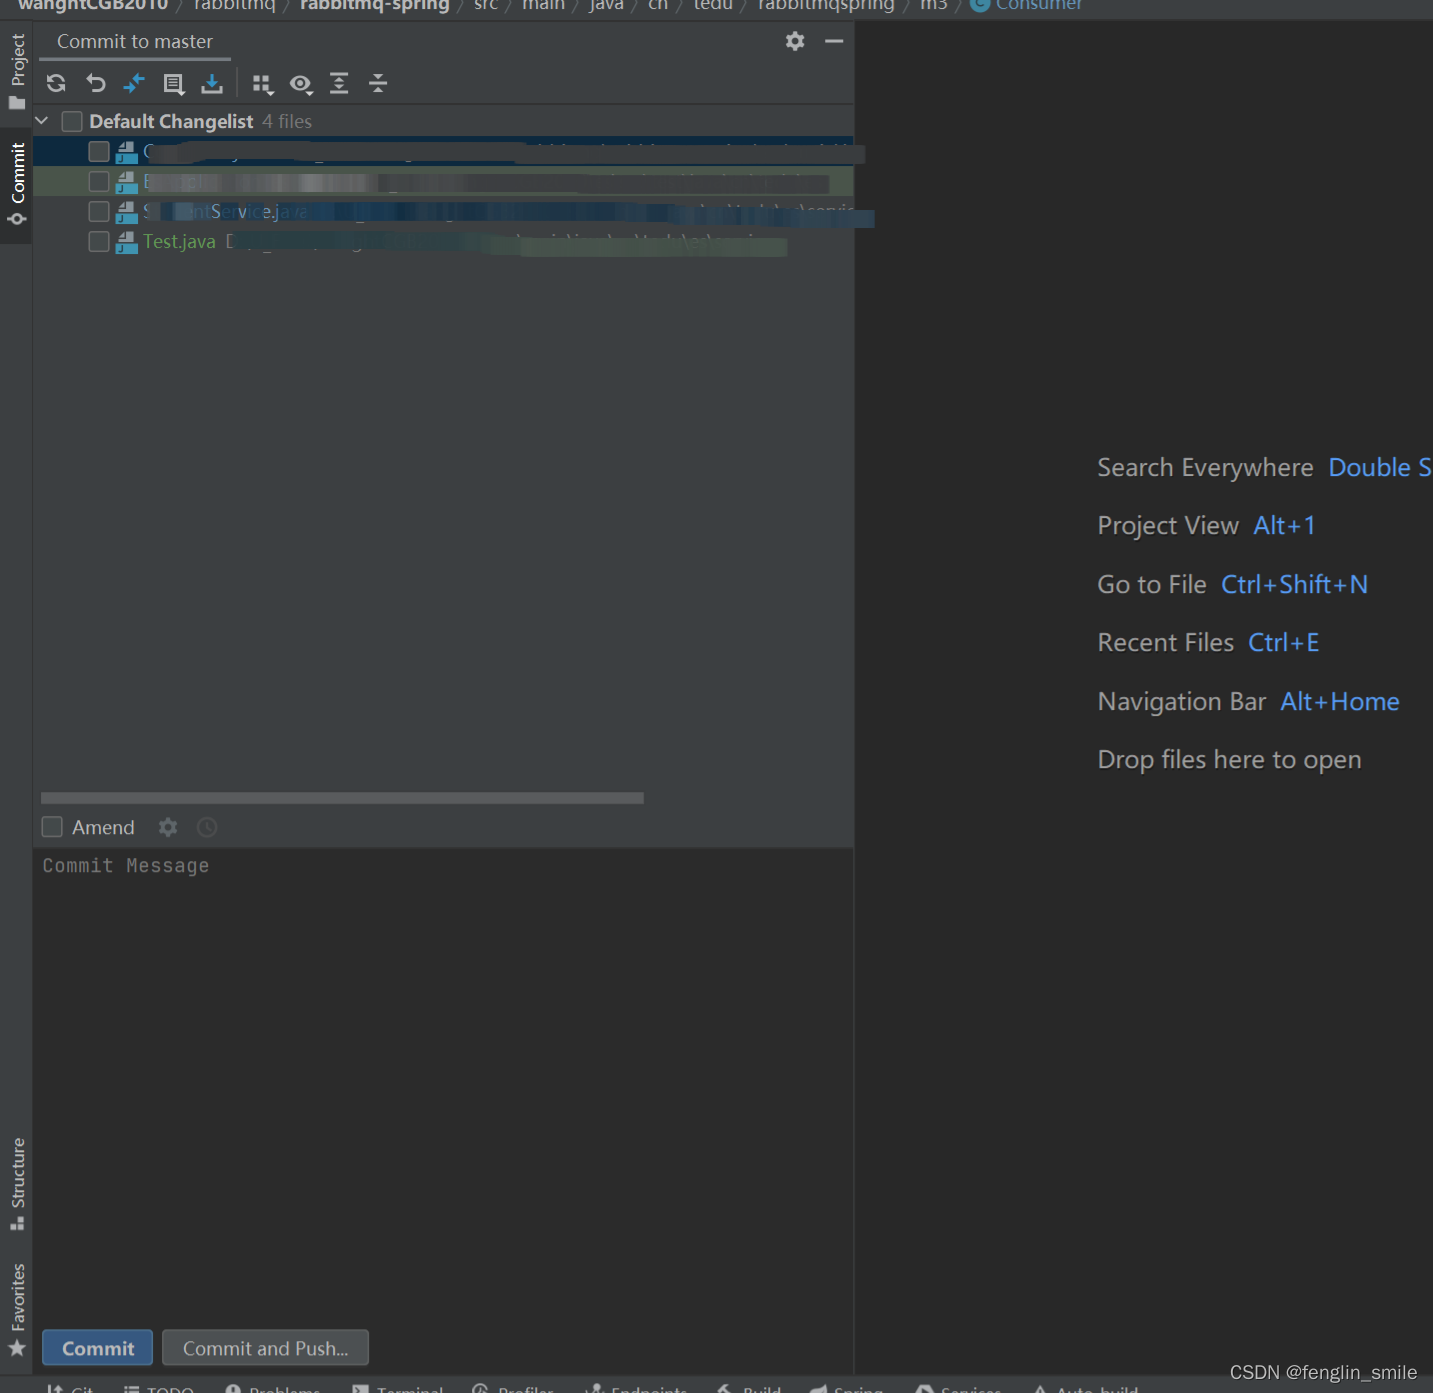
Before idea version 2020.1, git commit was displayed in a modal box, as shown in the figure.
-
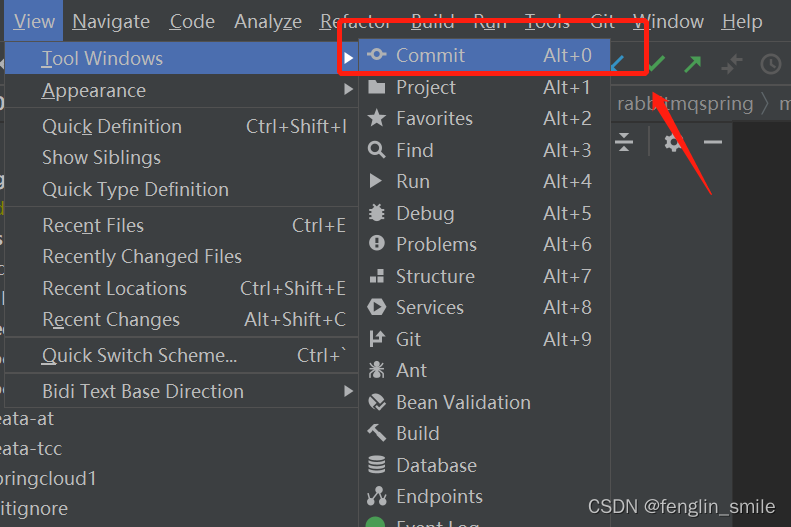
After idea version 2020.1, git commit is displayed in the sidebar by default (can be modified), as shown in the figure.
-
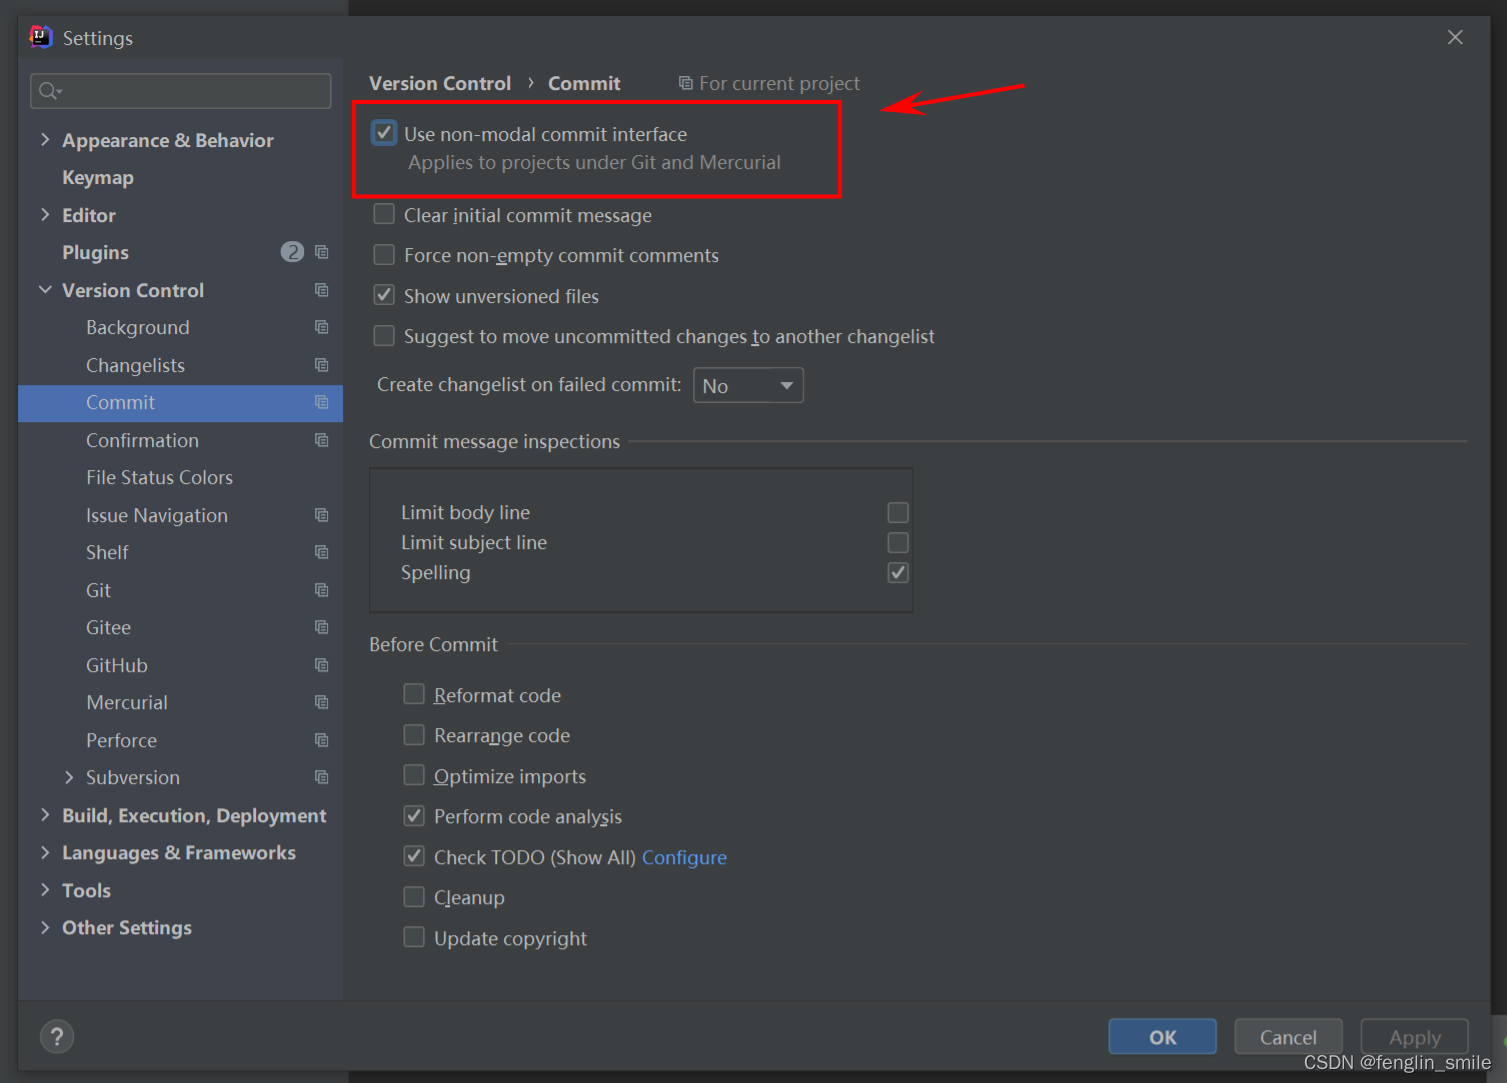
After idea version 2020.1, the conversion between the two can be modified in the settings.
In Version Control -> Commit, find Use non-modal commit interface. Check this option for a sidebar, uncheck this option for a modal box.
After idea version 2020.1, through View in the upper left corner, select the Commit window in Tool Windows to call up the git commit sidebar. (It can also be called out by the shortcut key Alt+0.)
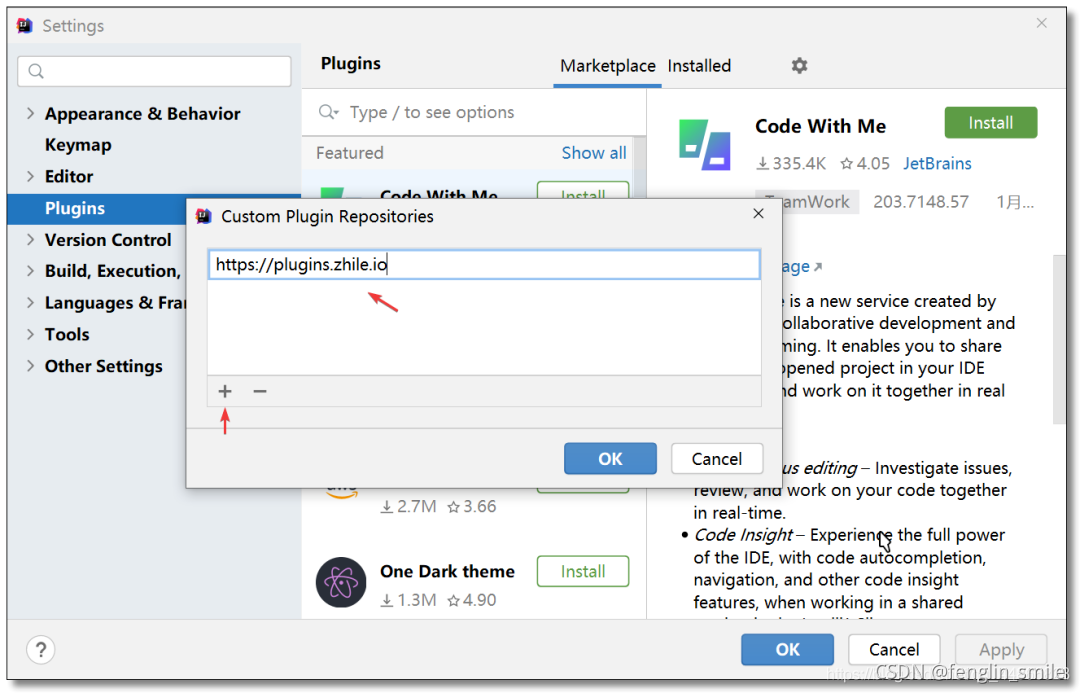
7.6 Eval Reset plugin
In the newly downloaded idea, there is a one-month trial period. After the trial period expires, you need to pay or download again. And this plugin is to help us constantly reset the trial period. (For learning use only, not for commercial use!)
-
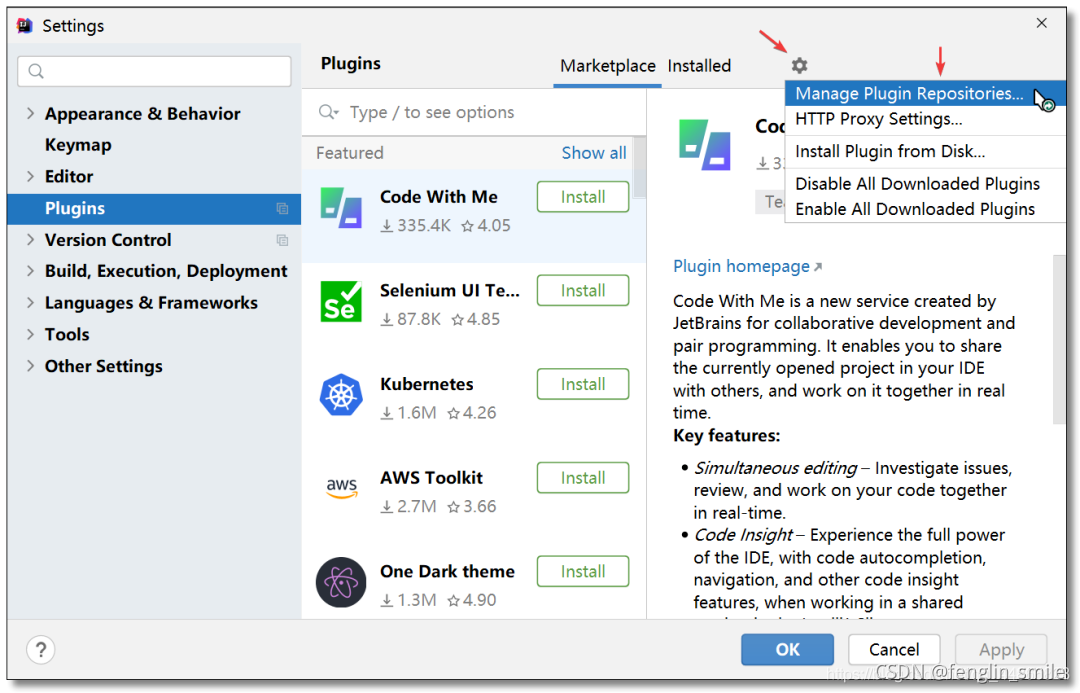
In Plugins, click on the right gear -> Manage Plugin Repositories...
-
Choose to manage the plugin warehouse and add https://plugins.zhile.io
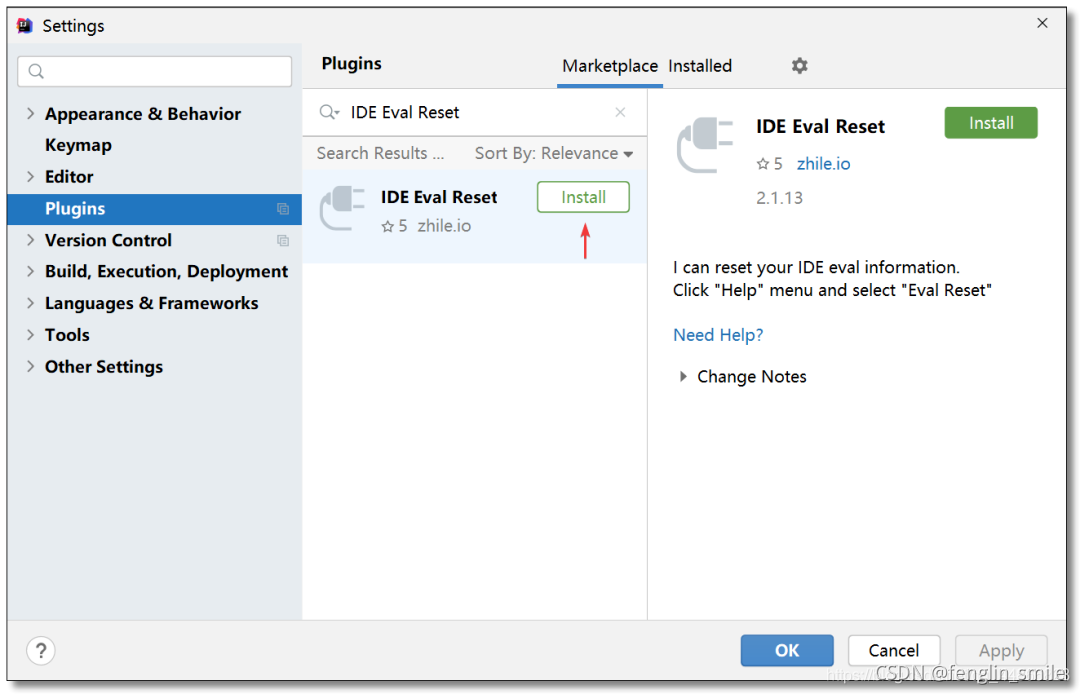
-
Search: IDE Eval Reset plugin to install.
See this link for details: Eval Reset plugin detailed usage cheats