1. Operation purpose and requirements: By configuring iSCSI shared storage for ESXi, realize the management of virtual machines, and master the system composition of iSCSI.
2. Software and hardware required for operation
1. Software VMware Workstation 14;
2. The virtual machine of Windows Server 2008;
3. ESXi 5.1 virtual machine;
2. Software VMware vSphere Client;
3. iSCSI target software installation package.
3. Operation content
1. Install the iSCSI target software on the Windows 2008 R2 operating system;
2. Create and configure iSCSI target, and create a virtual disk for shared storage;
3. Use the vSphere Client client to operate ESXi to initiate iSCSI;
4. Create a new virtual machine using shared storage. (slightly)
4. Basic steps and content of computer operation
1. Install the iSCSI target software on the Windows Server 2008 R2 operating system;
Open the Windows Server 2008 virtual machine and log in, copy the iSCSI target software installation package locally, enter the Windows Server 2008 virtual machine, and paste the installation package directly on the desktop to copy the installation package into the virtual machine.

Figure 1.1 Windows Server 2008 desktop after copying
After the copy is complete, double-click the installation package to start the installation. After selecting the installation path, click "install", as shown below:

Figure 1.2 Select iSCSI Target installation path
Since the same program has been installed before, the system prompts that the files already exist. If you want to replace these files, click "Yes to all", as shown in the following figure:

Figure 1.3 Replace file prompt
After replacing the file, the installer will open the iSCSI target-related download resource page, find "iSCSI Software Target (x64)", click to install, as shown in the following figure:

Figure 1.4 iSCSI Software Target resource page
A prompt pops up, click "Run" to start the installation directly, as shown in the following figure:
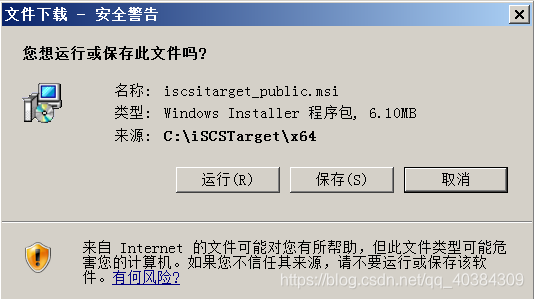
Figure 1.5 iSCSI Software Target download prompt
A prompt window pops up during the installation process, just click Next. After the installation is complete, there will be no iSCSI shortcut on the desktop. Click "Start" in the lower left corner of the desktop to see the Microsoft iSCSI Software Target software icon, as shown in the following figure:

Figure 1.6 View Microsoft iSCSI Software Target software

Figure 1.7 iSCSI Target software interface
2. Create and configure iSCSI target, and create a virtual disk for shared storage;
Open the iSCSI Target software, right-click "iSCSI Target", and click "Create iSCSI Target", as shown in the figure below:

Figure 2.1 Create an iSCSI target
Enter the "Create iSCSI Target Wizard" interface, use the IP address of the ESXi host as the identifier, and use this identifier to allow the iSCSI target to identify the iSCSI program that initiates the request for access. Click "Advanced" on the wizard interface to enter the advanced identifier configuration page. Click "Add" to enter the identifier adding page. In this page, select the identifier type as "IP address", and its value is the IP address of the ESXi host. The operation is shown in the figure below:

Figure 2.2 Create iSCSI target wizard specific operation
After adding the IP address, click "OK" to return to the wizard interface, and click "Next".

Figure 2.3 Return to the target wizard interface after configuring IP
After creating the iSCSI target, start to create a virtual disk for iSCSI, select the iSCSI target "ForESXi" just created, right-click and select "Create Virtual Disk for iSCSI", as shown in the following figure:

Figure 2.4 Create virtual disk for iSCSI target
The iSCSI virtual disk exists in the form of a virtual disk file with a suffix of .vhd. When creating a virtual disk, you must enter the full path of the file, and the file must be suffixed with ".vhd", as shown in the following figure:

Figure 2.5 Configure the virtual disk file and its path
After entering the virtual disk file path, click "Next", the virtual disk installation has been completed, click "Finish" to close the wizard page, as shown in the following figure:

Figure 2.6 The virtual disk is created
3. Use the vSphere Client client to operate ESXi to initiate iSCSI;
Open the vSphere Client and log in as the ESXi host IP and root, as shown in the following figure:

Figure 3.1 vSphere login
(1) Add a storage adapter in vSphere
After the login is successful, you need to add the iSCSI target you just created to this host, enter the "Configuration" column of the ESXi host, select "Storage Adapter", click Add, and select "Add SoftWare iSCSI Adapter", the operation is shown in the following figure:

Figure 3.2 Adding an iSCSI storage adapter to a vSphere host
After confirming the addition, the addition and configuration prompt will pop up, click "OK", as shown in the following figure:

Figure 3.3 Add storage adapter prompt
The addition is successful, and a new item "vmhba33" will be added in the storage adapter list, as shown in the following figure:

Figure 3.4 Add a new storage adapter
(2) Configure the iSCSI adapter
After adding the storage adapter, configure it, bind the storage adapter to the port group of VMKernel, select "vmhba33", right-click and select "Properties" to enter the configuration interface, and add a port group for it in "Network Configuration" , the specific operation is shown in the figure below:

Figure 3.5 Storage adapter binding port group
Add the iSCSI target in "Dynamic Discovery" or "Static Discovery", that is, the IP address of Windows Service 2008, as shown in the following figure:

Figure 3.6 vmhba33 dynamic discovery configuration

Figure 3.7 vmhba33 static discovery configuration
(4) Add iSCSI storage
To add storage, click the "Configuration" column to enter the storage, click "Add Storage", as shown in the following figure:

Figure 3.8 Add storage
To add a storage, you need to select a disk for the storage, select the corresponding disk item, and click "Next", as shown in the figure below:
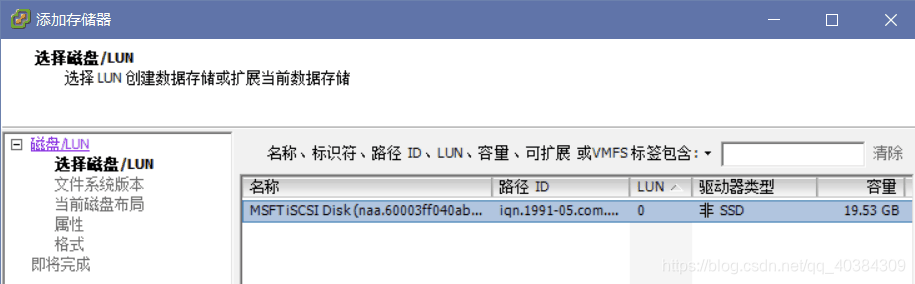
Figure 3.9 Select Disk for Storage

Figure 3.10 Naming Disk

Figure 3.11 Disk creation completion information
After the creation is complete, return to the storage interface, and the newly created storage item is added to the list, as shown in the figure below:

Figure 3.12 New storage item
After successfully configuring the iSCSI shared storage, when creating a new virtual machine in vSphere, you can select storage for the virtual machine in the storage column in the wizard. Select "diskForESXi" to select the iSCSI shared storage, as shown in the following figure:
