Table of contents
-
- Divide the dataset into training and validation sets
- **model.py**: is the model file
- **train.py**: It is the file that calls the model training
- **predict.py**: It is the file that calls the model for prediction
- **class_indices.json**: It is the label file corresponding to the training data set
- Summary of knowledge points
Divide the dataset into training and validation sets
Download the flower classification dataset: https://storage.googleapis.com/download.tensorflow.org/example_images/flower_photos.tgz
Create a new data_set folder, create a new flower_data in data_set, and unzip it.
Use the training script to divide it into a training set and a validation set:
Go back to the data_set folder, hold down shift and right-click to open powershell, and execute the file with the command python .\split_data.py.

model.py : is the model file
import torch.nn as nn
import torch


class AlexNet(nn.Module):   # 继承父类nn.Module
    def __init__(self, num_classes=1000, init_weights=False):   # 初始化函数,初始化网络在正向传播过程中需要的层结构
        super(AlexNet, self).__init__()
        self.features = nn.Sequential(      # 将一系列的层结构打包
            nn.Conv2d(3, 48, kernel_size=11, stride=4, padding=2),  # input[3, 224, 224]  output[48, 55, 55]
            nn.ReLU(inplace=True),
            nn.MaxPool2d(kernel_size=3, stride=2),                  # output[48, 27, 27]
            nn.Conv2d(48, 128, kernel_size=5, padding=2),           # output[128, 27, 27]
            nn.ReLU(inplace=True),
            nn.MaxPool2d(kernel_size=3, stride=2),                  # output[128, 13, 13]
            nn.Conv2d(128, 192, kernel_size=3, padding=1),          # output[192, 13, 13]
            nn.ReLU(inplace=True),
            nn.Conv2d(192, 192, kernel_size=3, padding=1),          # output[192, 13, 13]
            nn.ReLU(inplace=True),
            nn.Conv2d(192, 128, kernel_size=3, padding=1),          # output[128, 13, 13]
            nn.ReLU(inplace=True),
            nn.MaxPool2d(kernel_size=3, stride=2),                  # output[128, 6, 6]
        )       # 在这之后要将特征矩阵展平成一维向量,展品操作在forward函数中实现。
        self.classifier = nn.Sequential(
            nn.Dropout(p=0.5),
            nn.Linear(128 * 6 * 6, 2048),
            nn.ReLU(inplace=True),
            nn.Dropout(p=0.5),
            nn.Linear(2048, 2048),
            nn.ReLU(inplace=True),
            nn.Linear(2048, num_classes),
        )
        if init_weights:    # 初始化权重
            self._initialize_weights()

    def forward(self, x):
        x = self.features(x)
        x = torch.flatten(x, start_dim=1)   # 从index=1处开始展平,即第0维度的batch是不参与战平的
        x = self.classifier(x)
        return x

    # 其实这里不用我们对其初始化,因为在pytorch中默认在卷积和全连接层是自动用kaiming的初始化方法
    def _initialize_weights(self):
        for m in self.modules():    # 遍历self.modules模块,继承自nn.Module,会遍历我们定义的每个层结构
            if isinstance(m, nn.Conv2d):    # 判断层结构是否属于给定类型
                nn.init.kaiming_normal_(m.weight, mode='fan_out', nonlinearity='relu')
                # 用kaiming_normal的初始化变量方法对卷积权重w进行初始化
                if m.bias is not None:  # 如果偏置不为空的话,就用0对它初始化
                    nn.init.constant_(m.bias, 0)
            elif isinstance(m, nn.Linear):
                nn.init.normal_(m.weight, 0, 0.01)  # 用正态分布初始化,均值为0,方差为0.01
                nn.init.constant_(m.bias, 0)
nn.Conv2d
(128,192,kernelsize=3,padding=1),
Among them, padding can only input int or tuple.
For example, tuple: (1, 2)
1 represents a row of zeros on the top and bottom,
and 2 represents two columns of zeros on the left and right sides.
If you want to add one column on the left and two columns on the right, use nn.zeropad2d, see
nn.ZeroPad2d below
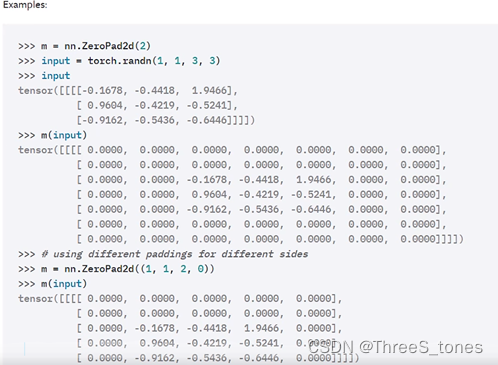
One column is added to the left side and the upper side, and two columns are added to the lower side of the right side.
train.py : is the file that calls the model training
Here, first use datasets.ImageFolder to load the dataset, whose first parameter is the path, and then use torch.utils.data.DataLoader to load, whose first parameter is dataset. There is a similar presenting relationship.
import os
import sys
import json
import torch
import torch.nn as nn
from torchvision import transforms, datasets, utils
import matplotlib.pyplot as plt
import numpy as np
import torch.optim as optim
from tqdm import tqdm
from model import AlexNet
def main():
device = torch.device("cuda:0" if torch.cuda.is_available() else "cpu")
print("using {} device.".format(device))
data_transform = {
"train": transforms.Compose([transforms.RandomResizedCrop(224),
transforms.RandomHorizontalFlip(),
transforms.ToTensor(),
transforms.Normalize((0.5, 0.5, 0.5), (0.5, 0.5, 0.5))]), # 标准化处理,使训练更容易。
"val": transforms.Compose([transforms.Resize((224, 224)), # cannot 224, must (224, 224)
transforms.ToTensor(),
transforms.Normalize((0.5, 0.5, 0.5), (0.5, 0.5, 0.5))])}
data_root = os.path.abspath(os.path.join(os.getcwd(), "../..")) # get data root path,os.getcwd()表示返回表示当前工作目录的unicode字符串(指当前项目的根目录),"../.."表示返回上上层目录,os.path.abspath(path)能得到一个文件的绝对路径。
# 其实这里应该写错了,应该写成"../"
image_path = os.path.join(data_root, "data_set", "flower_data") # flower data set path
assert os.path.exists(image_path), "{} path does not exist.".format(image_path)
train_dataset = datasets.ImageFolder(root=os.path.join(image_path, "train"),
transform=data_transform["train"]) # 用ImageFolder加载数据集,train_dataset的结构是:[(img_data,class_id),(img_data,class_id),…],每个部分都是由(tensor数据,index)组成。
train_num = len(train_dataset)
# {'daisy':0, 'dandelion':1, 'roses':2, 'sunflower':3, 'tulips':4}
flower_list = train_dataset.class_to_idx
cla_dict = dict((val, key) for key, val in flower_list.items())
# 上面两行可以用下面的两行代码代替,也可以直接用cla_dict = train_dataset.classes代替?
# flower_list = train_dataset.classes
# cla_dict = dict((i, flower_list[i]) for i in range(len(flower_list)))
# write dict into json file
json_str = json.dumps(cla_dict, indent=4) # 将字典编码成json的格式
with open('class_indices.json', 'w') as json_file: # 将上面得到的信息写入文件,方便在预测的时候读取它的信息
json_file.write(json_str)
batch_size = 32
nw = min([os.cpu_count(), batch_size if batch_size > 1 else 0, 8]) # number of workers
print('Using {} dataloader workers every process'.format(nw))
train_loader = torch.utils.data.DataLoader(train_dataset,
batch_size=batch_size, shuffle=True,
num_workers=nw) # 用dataloader载入数据集
validate_dataset = datasets.ImageFolder(root=os.path.join(image_path, "val"),
transform=data_transform["val"])
val_num = len(validate_dataset)
validate_loader = torch.utils.data.DataLoader(validate_dataset,
batch_size=batch_size, shuffle=False,
num_workers=nw)
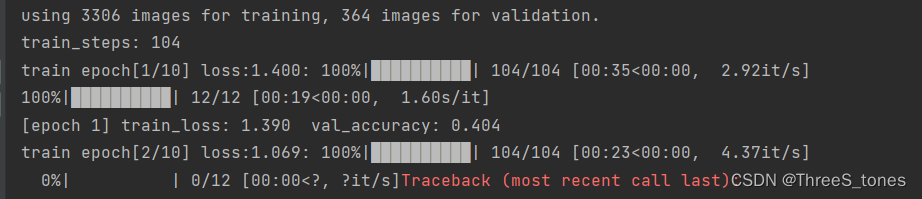
print("using {} images for training, {} images for validation.".format(train_num,
val_num))
# 如何查看我们的数据集
# test_data_iter = iter(validate_loader)
# test_image, test_label = test_data_iter.next()
#
# def imshow(img):
# img = img / 2 + 0.5 # unnormalize
# npimg = img.numpy()
# plt.imshow(np.transpose(npimg, (1, 2, 0)))
# plt.show()
#
# print(' '.join('%5s' % cla_dict[test_label[j].item()] for j in range(4)))
# imshow(utils.make_grid(test_image))
net = AlexNet(num_classes=5, init_weights=True) # 实例创建的模型
net.to(device) # 将网络指定到上面所设置的设备上
loss_function = nn.CrossEntropyLoss() # 定义损失函数,使用针对多类别的损失交叉熵函数
# pata = list(net.parameters()) # 调试用的,查看我们模型中的参数
optimizer = optim.Adam(net.parameters(), lr=0.0002) # 定义优化器adam,优化的对象是网络中可训练的参数
epochs = 10
save_path = './AlexNet.pth' # 保存权重的路径
best_acc = 0.0 # 定义最佳准确率
train_steps = len(train_loader)
for epoch in range(epochs):
# train
net.train() # 只希望在训练过程中使用dropout,所以使用net.train和net.eval来管理dropout和bn层,使用net.train就会调用dropout方法
running_loss = 0.0 # 用于累加损失值
train_bar = tqdm(train_loader, file=sys.stdout)
for step, data in enumerate(train_bar):
images, labels = data
optimizer.zero_grad() # 梯度清零
outputs = net(images.to(device)) # 开始正向传播,把训练的图像也指定到设备上,得到正向传播的输出
loss = loss_function(outputs, labels.to(device)) # 计算预测值与真实值的损失
loss.backward() # 反向传播到每个节点当中
optimizer.step() # 更新每个节点的参数
# print statistics
running_loss += loss.item() # 将loss的值累加
train_bar.desc = "train epoch[{}/{}] loss:{:.3f}".format(epoch + 1,
epochs,
loss)
# validate
net.eval() # 使用net.eval就会关闭掉dropout方法
acc = 0.0 # accumulate accurate number / epoch
with torch.no_grad(): # 禁止pytorch对参数进行跟踪,在验证过程中不计算损失梯度
val_bar = tqdm(validate_loader, file=sys.stdout)
for val_data in val_bar:
val_images, val_labels = val_data
outputs = net(val_images.to(device))
predict_y = torch.max(outputs, dim=1)[1] # 求得输出的最大值作为预测值
acc += torch.eq(predict_y, val_labels.to(device)).sum().item() # 将预测正确的次数加到acc中
val_accurate = acc / val_num # 计算预测准确率
print('[epoch %d] train_loss: %.3f val_accuracy: %.3f' %
(epoch + 1, running_loss / train_steps, val_accurate))
if val_accurate > best_acc: # 保存准确率最高是模型的参数
best_acc = val_accurate
torch.save(net.state_dict(), save_path)
print('Finished Training')
if __name__ == '__main__':
main()

predict.py : is the file that calls the model for prediction
import os
import json

import torch
from PIL import Image
from torchvision import transforms
import matplotlib.pyplot as plt

from model import AlexNet


def main():
    device = torch.device("cuda:0" if torch.cuda.is_available() else "cpu")

    data_transform = transforms.Compose(
        [transforms.Resize((224, 224)),
         transforms.ToTensor(),
         transforms.Normalize((0.5, 0.5, 0.5), (0.5, 0.5, 0.5))])

    # load image
    img_path = "../tulip.jpg"
    assert os.path.exists(img_path), "file: '{}' dose not exist.".format(img_path)
    img = Image.open(img_path)

    plt.imshow(img)
    # [N, C, H, W]
    img = data_transform(img)   # 变成(C, H, W)
    # expand batch dimension
    img = torch.unsqueeze(img, dim=0)   # 添加维度之后变成(N, C, H, W)

    # read class_indict
    json_path = './class_indices.json'
    assert os.path.exists(json_path), "file: '{}' dose not exist.".format(json_path)

    with open(json_path, "r") as f:     # 读取json文件
        class_indict = json.load(f)     # 解码,解成所需要的字典格式

    # create model
    model = AlexNet(num_classes=5).to(device)

    # load model weights
    weights_path = "./AlexNet.pth"
    assert os.path.exists(weights_path), "file: '{}' dose not exist.".format(weights_path)
    model.load_state_dict(torch.load(weights_path))     # 载入网络模型

    model.eval()    # 关闭dropout
    with torch.no_grad():   # 不计算损失
        # predict class
        output = torch.squeeze(model(img.to(device))).cpu()     # 得到输出,并将batch维度压缩
        predict = torch.softmax(output, dim=0)  # 变为概率分布
        predict_cla = torch.argmax(predict).numpy()     # 获得概率最大处对应的索引

    print_res = "class: {}   prob: {:.3}".format(class_indict[str(predict_cla)],
                                                 predict[predict_cla].numpy())
    plt.title(print_res)
    for i in range(len(predict)):
        print("class: {:10}   prob: {:.3}".format(class_indict[str(i)],
                                                  predict[i].numpy()))
    plt.show()


if __name__ == '__main__':
    main()
class_indices.json : is the label file corresponding to the training data set
Summary of knowledge points
- The file path obtained by os.path.abspath() and os.getcwd() is not the real path of the file.
os.path.abspath() and os.getcwd()
return the path after splicing the file name of the current working path , which does not necessarily exist, so the assert check is used in the above train code.
That is, filepath = os.path.join(os.path.abspath('.'),filename)
os.path.abspath('.') returns the current working path
and the current working path is the running .py file A path
example:
data_root = os.path.abspath(os.path.join("../..", "demo.py"))
print(data_root)
assert os.path.exists(data_root), "{} path does not exist.".format(data_root)

# F:\computer skills\Python\demo.py
# AssertionError: F:\computer skills\Python\demo.py path does not exist.
Although there is no such file in the path, this path will still be generated, and it does not really exist.
Reference: https://blog.csdn.net/qq_33716688/article/details/89333856
-
assert assertion function
assert os.path.exists(data_root), “{} path does not exist.”.format(data_root), no error will be reported when the comma is TRUE before the comma, and an error will be reported when it is false, and the error content will be reported after the comma -
tqdm is to set the progress bar to visualize the processing status. For objects that can be iterated, tqdm can be used to encapsulate the progress of visualization.
train_bar.desc = "train epoch[{}/{}] loss:{:.3f}".format(epoch + 1, epochs, loss)
The above code information is displayed in front of the progress bar.
- sys.stdout is the standard output stream in python, which is mapped to the console by default, that is, the information is printed to the console.