Explanation of the main functions of the penetration testing tool Burp Suite
- foreword
- 1. Proxy module
-
- 1.1 Interface Layout
-
- 1.1.1 Menu bar
- 1.1.2 Module bar
-
- (1) Module bar Dashboard (dashboard)
- (2) Module column Target (target)
- (3) Module column Proxy (proxy)
- (4) Module column Intruder (intrusion)
- (5) Module bar Repeater (replay)
- (6) Module column Sequencer (sequencer)
- (7) Module column Decoder (decoding)
- (8) Module column Comparer (comparator)
- (9) Module column Logger (log)
- (10) Module column Extender (plug-in)
- 1.2 Proxy module
- 2. Target module
- 3. Scanning module
- 4. Repeater module
- 5. Intruder module
foreword
The article is long. Before reading it, it is recommended to understand the following four questions
Question 1. What is Burp Suite?
Burp Suite is an integrated penetration testing tool that integrates a variety of penetration testing components, enabling us to better complete penetration testing and attacks on web applications automatically or manually.
In penetration testing, we use Burp Suite to make the testing work faster and more efficient
Question 2: Where is the concrete function of Burp Suite? (some examples)
1. Attack the website and obtain the user login name and password
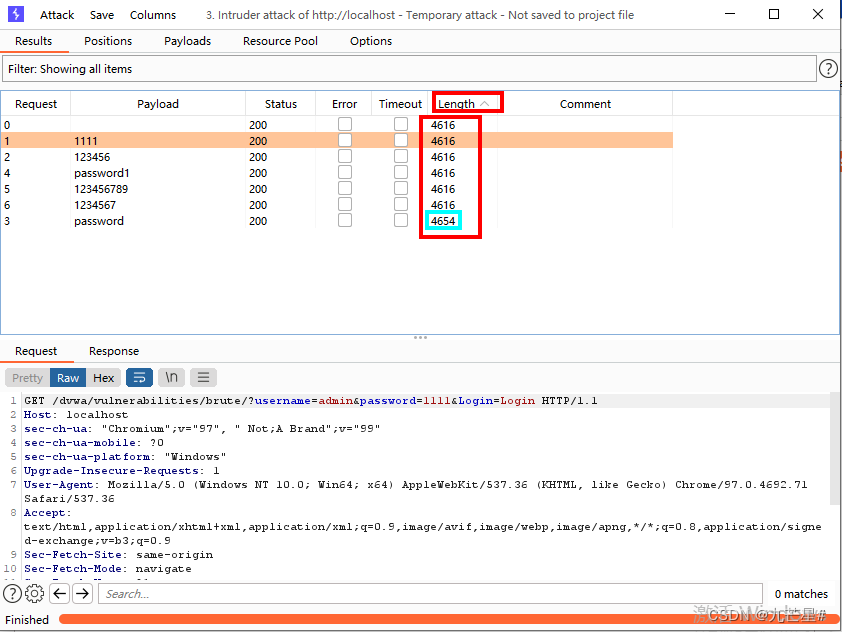
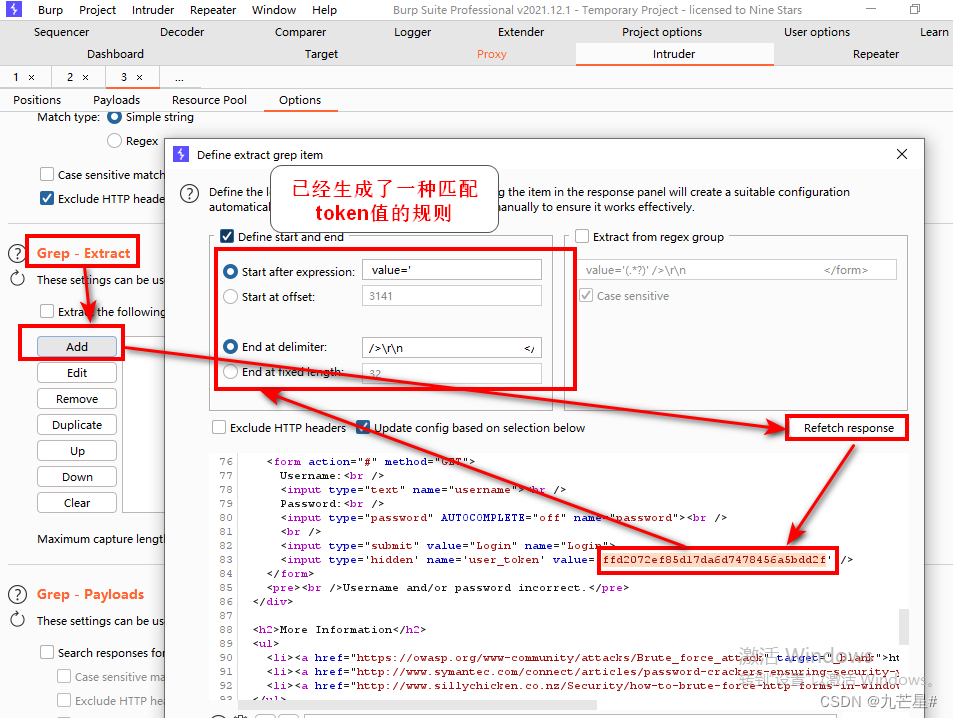
2. Attack the website to obtain password and token
Attack the website under the condition of obtaining CSRF token, get the correct user name and login password
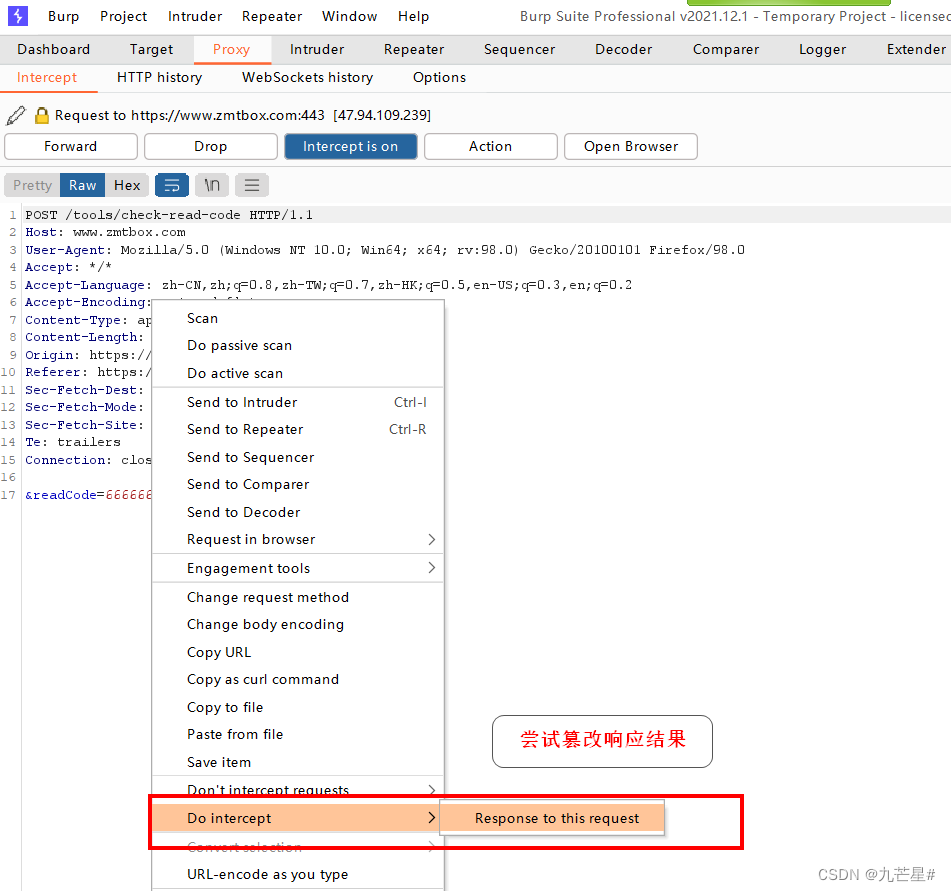
3. Attack the website, skip the verification code input stage
Tamper with the response value, skip the verification code and enter the next level of webpage
Question 3. How to install and configure Burp Suite?
Configuring Burp Suite Tutorial:
[Network Security] Burpsuite v2021.12.1 Installation & Activation & Configuration & Quick Start
Question 4. How to use Burp Suite?
The official website learning link is as follows:
https://portswigger.net/support
https://portswigger.net/burp/documentation/desktop
The official website online document has a detailed introduction to all parameters of all modules in the tool

1. Proxy module
1.1 Interface Layout
Interface Explanation Document
https://portswigger.net/burp/documentation/contents
1.1.1 Menu bar
(1) menu bar Burp
infiltrator:渗透者,对java程序中做安全扫描,生成jar包
clickbandit:点击劫持,生成一个点击劫持的工具来验证漏洞
collaborator:有些漏洞没有回显,添加一个服务器
![[External link image transfer failed, the source site may have an anti-leeching mechanism, it is recommended to save the image and upload it directly (img-fIbjWZwI-1689224384297) (C:\Users\gf5971\AppData\Roaming\Typora\typora-user-images\ image-20230706192634294.png)]](https://img-blog.csdnimg.cn/f96db6450f444eb99306616ab04ed3f6.png#pic_center)
(2) menu bar project

(3) Menu bar Intruder

(4) Menu Bar Repeater

(5) Menu bar Window
Each window on the home page can independently occupy the entire screen

(6) Menu bar Help
local documentation
![[External link image transfer failed, the source site may have an anti-leeching mechanism, it is recommended to save the image and upload it directly (img-0G61jdMd-1689224384302) (C:\Users\gf5971\AppData\Roaming\Typora\typora-user-images\ image-20230706193515543.png)]](https://img-blog.csdnimg.cn/362dce2cbf004d6dac405b3ceb6b23d8.png#pic_center)
1.1.2 Module bar
(1) Module bar Dashboard (dashboard)
Tasks (vulnerability scanning and crawling tasks)
![[External link image transfer failed, the source site may have an anti-theft link mechanism, it is recommended to save the image and upload it directly (img-R5MFjDCN-1689224384303) (C:\Users\gf5971\AppData\Roaming\Typora\typora-user-images\ image-20230706214942011.png)]](https://img-blog.csdnimg.cn/c4f8d8b8f23943a29e9c623275663e19.png#pic_center)
(2) Module column Target (target)
scope defines a scanning rule
![[External link image transfer failed, the source site may have an anti-leeching mechanism, it is recommended to save the image and upload it directly (img-cOFzFjiD-1689224384304) (C:\Users\gf5971\AppData\Roaming\Typora\typora-user-images\ image-20230706215531357.png)]](https://img-blog.csdnimg.cn/85e01f9fa9ca4f15a14884e45f32bb27.png)
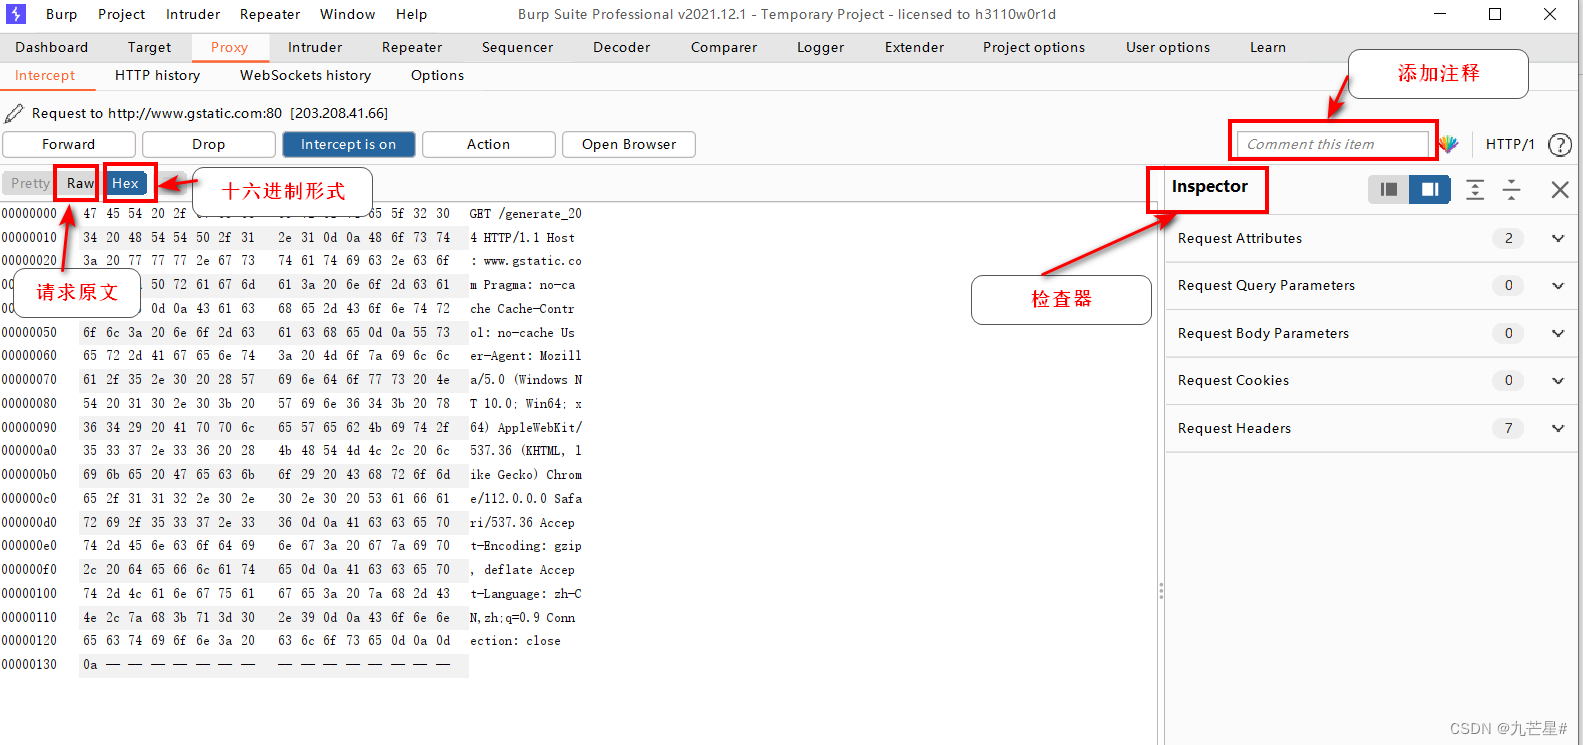
(3) Module column Proxy (proxy)
Intercept the browser's HTTP packets (including requests and responses), which is equivalent to a middleman
![[External link picture transfer failed, the source site may have an anti-theft link mechanism, it is recommended to save the picture and upload it directly (img-qsXjo1fQ-1689224384304) (C:\Users\gf5971\AppData\Roaming\Typora\typora-user-images\ image-20230706220335397.png)]](https://img-blog.csdnimg.cn/4e7461fa7e7c4c7c805c583c010967f4.png#pic_center)
Home introduction
![[External link picture transfer failed, the source site may have an anti-leeching mechanism, it is recommended to save the picture and upload it directly (img-KFY9qQYz-1689224384316) (C:\Users\gf5971\AppData\Roaming\Typora\typora-user-images\ image-20230706220009905.png)]](https://img-blog.csdnimg.cn/a1ea9c22ba804af8a1be66544d0141c3.png)
(4) Module column Intruder (intrusion)
For the intercepted request (address), set the attack load (payload), and use the dictionary for penetration testing
For example: directory scanning, password brute force cracking, stress testing, FUZZ, etc.
(5) Module bar Repeater (replay)
1. Analyze the specific request and response content of each step
2. Modify the request and response content
3. Resend request content
(6) Module column Sequencer (sequencer)
Used to evaluate whether key fields such as Token and Session can be forged (whether it is fixed or predictable)
![[External link picture transfer failed, the source site may have an anti-leeching mechanism, it is recommended to save the picture and upload it directly (img-OEIRCHoe-1689224384318) (C:\Users\gf5971\AppData\Roaming\Typora\typora-user-images\ image-20230706220843547.png)]](https://img-blog.csdnimg.cn/884e24fdf4ec493a9eb85d491dbc7296.png)
(7) Module column Decoder (decoding)
Encode and decode request data
![[External link picture transfer failed, the source site may have an anti-theft link mechanism, it is recommended to save the picture and upload it directly (img-ylS4TrVA-1689224384319) (C:\Users\gf5971\AppData\Roaming\Typora\typora-user-images\ image-20230706220946842.png)]](https://img-blog.csdnimg.cn/1c0faa86136e4a859af3c70792358e09.png#pic_center)
(8) Module column Comparer (comparator)
compare the two results
![[External link picture transfer failed, the source site may have an anti-theft link mechanism, it is recommended to save the picture and upload it directly (img-PI8rVAT7-1689224384319) (C:\Users\gf5971\AppData\Roaming\Typora\typora-user-images\ image-20230706221722071.png)]](https://img-blog.csdnimg.cn/5aab51287c1f45dc9517f5b838f2781f.png)
(9) Module column Logger (log)
![[External link image transfer failed, the source site may have an anti-leeching mechanism, it is recommended to save the image and upload it directly (img-l29iI6Ej-1689224384320) (C:\Users\gf5971\AppData\Roaming\Typora\typora-user-images\ image-20230706221708653.png)]](https://img-blog.csdnimg.cn/4a18bc417eeb4510adc6ea88a3dab58d.png)
(10) Module column Extender (plug-in)
![[External link picture transfer failed, the source site may have an anti-theft link mechanism, it is recommended to save the picture and upload it directly (img-G81f9peJ-1689224384321) (C:\Users\gf5971\AppData\Roaming\Typora\typora-user-images\ image-20230706221655097.png)]](https://img-blog.csdnimg.cn/75287ac5dbd2496cb32491c88607dcb5.png)
1.2 Proxy module
1.2.1 Browser proxy settings
web proxy
It is inconvenient for one computer to communicate with other computers
Function: break through IP restrictions, hide IP, speed up access
![[External link picture transfer failed, the source site may have an anti-theft link mechanism, it is recommended to save the picture and upload it directly (img-tbimVDtW-1689224384322) (C:\Users\gf5971\AppData\Roaming\Typora\typora-user-images\ image-20230706231203850.png)]](https://img-blog.csdnimg.cn/0e56dc402e524b4fa6051c88a24dcb65.png#pic_center)
How to transfer the data sent by the browser to the proxy on the BP, which needs to be set
![[External link picture transfer failed, the source site may have an anti-theft link mechanism, it is recommended to save the picture and upload it directly (img-mC4gIrzB-1689224384323) (C:\Users\gf5971\AppData\Roaming\Typora\typora-user-images\ image-20230706231549347.png)]](https://img-blog.csdnimg.cn/0cf00c5e835841e9a51157fb69da11ce.png#pic_center)
1.2.1.1 Computer Settings
Turn on the proxy in the computer (not recommended, affecting speed)
![[External link image transfer failed, the source site may have an anti-leeching mechanism, it is recommended to save the image and upload it directly (img-K1QPriEF-1689224384323) (C:\Users\gf5971\AppData\Roaming\Typora\typora-user-images\ image-20230706231646810.png)]](https://img-blog.csdnimg.cn/ada8776c3efe4253a78c16ec93578234.png#pic_center)
1.2.1.2 Browser Settings
Open the browser, set, search proxy
![[External link image transfer failed, the source site may have an anti-leeching mechanism, it is recommended to save the image and upload it directly (img-9p4HEhlw-1689224384324) (C:\Users\gf5971\AppData\Roaming\Typora\typora-user-images\ image-20230706231909999.png)]](https://img-blog.csdnimg.cn/9fcb0877d92b4ef297af18e6d0ea082e.png)
1.2.1.3 Browser plug-ins
(1) Firefox browser
Search for "foxy proxy" in the browser add-on component, click to install
![[External link picture transfer failed, the source site may have an anti-theft link mechanism, it is recommended to save the picture and upload it directly (img-7lRNNwLh-1689224384325) (C:\Users\gf5971\AppData\Roaming\Typora\typora-user-images\ image-20230706232124707.png)]](https://img-blog.csdnimg.cn/63c262ee77194fa8ac2c6950ee1e5661.png)
After the installation is successful, the agent appears
![[External link picture transfer failed, the source site may have an anti-theft link mechanism, it is recommended to save the picture and upload it directly (img-VTVtwhIj-1689224384326) (C:\Users\gf5971\AppData\Roaming\Typora\typora-user-images\ image-20230706232257709.png)]](https://img-blog.csdnimg.cn/7b9fe56fce2b4670b6d25d65f9c2223f.png#pic_center)
Add a proxy, click Options, enter burp proxy for the title, proxy type HTTP, proxy IP and BP are consistent, 127.0.0.1, port and BP match 8080, username and password are ignored
![[External link picture transfer failed, the source site may have an anti-theft link mechanism, it is recommended to save the picture and upload it directly (img-T52g20zJ-1689224384327) (C:\Users\gf5971\AppData\Roaming\Typora\typora-user-images\ image-20230706232517532.png)]](https://img-blog.csdnimg.cn/ae5861323c954e6aa8affb43625cf016.png)
In this way, a BP agent is obtained
(2) Google Chrome
search
crxdl.com
![[External link picture transfer failed, the source site may have an anti-leeching mechanism, it is recommended to save the picture and upload it directly (img-jmObpqXe-1689224384327) (C:\Users\gf5971\AppData\Roaming\Typora\typora-user-images\ image-20230706232939627.png)]](https://img-blog.csdnimg.cn/15b08ded22c44e2faa685883a13083f3.png)
Search in plugin search
proxy

Download one of them, then open the address in Google Chrome
chrome://extensions
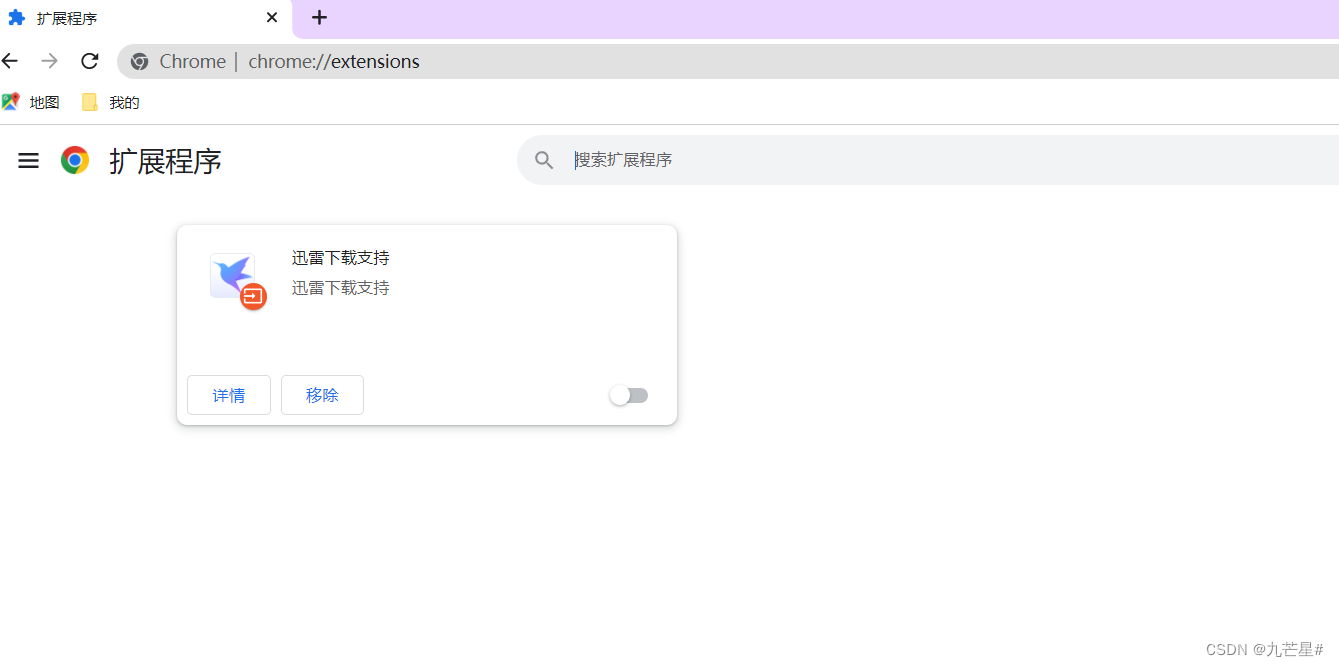
Modify the downloaded installation package to .crx file to .zip, just drag it in
If the above method reports an error, you need to open the developer mode on this page
chrome://extensions
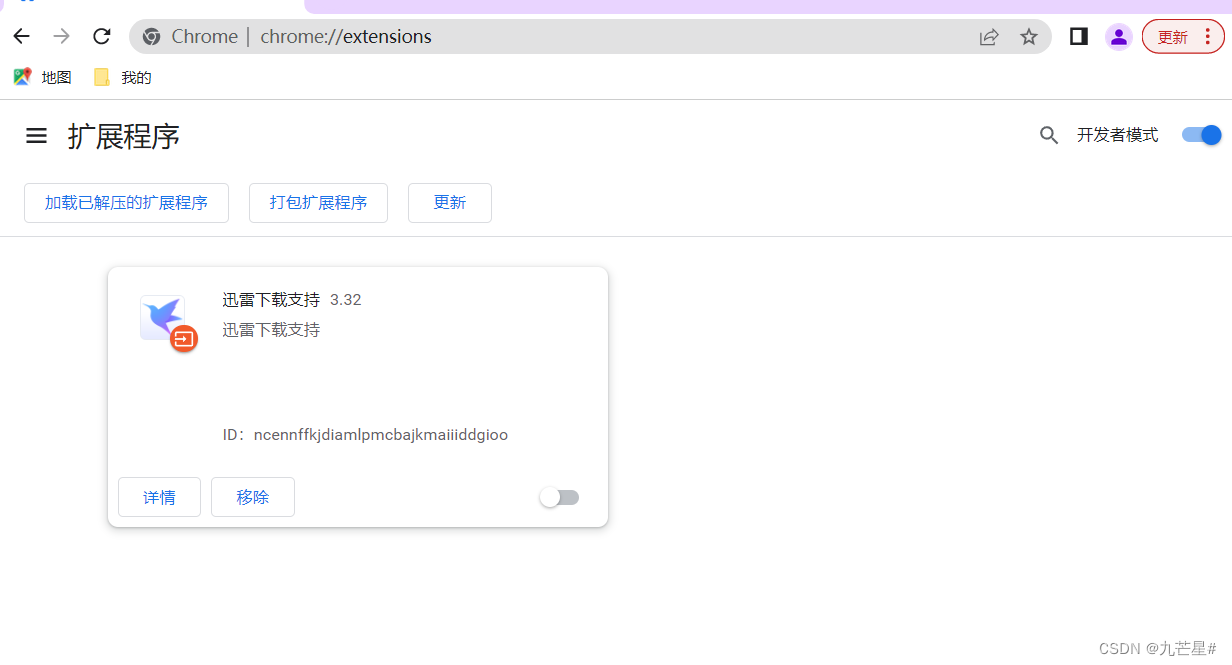
Choose to load the unpacked extension
Select the main folder, you can
1.2.2 BP proxy settings
easiest setup
The default listening port in option

Turn on interception

After opening, BP is always monitoring, and at this time, you need to open the BP proxy of the browser
initial monitoring

1.2.2.1 forward release
The following are the specific meanings

Currently in the Firefox browser, enter Baidu URL, open Baidu
baidu.com
The browser will circle and cannot open the URL
After clicking release

URL can be opened normally
1.2.2.2 drop
After discarding, the browser displays

1.2.2.3 Intercept main interface
1.2.2.4 Options

listening port
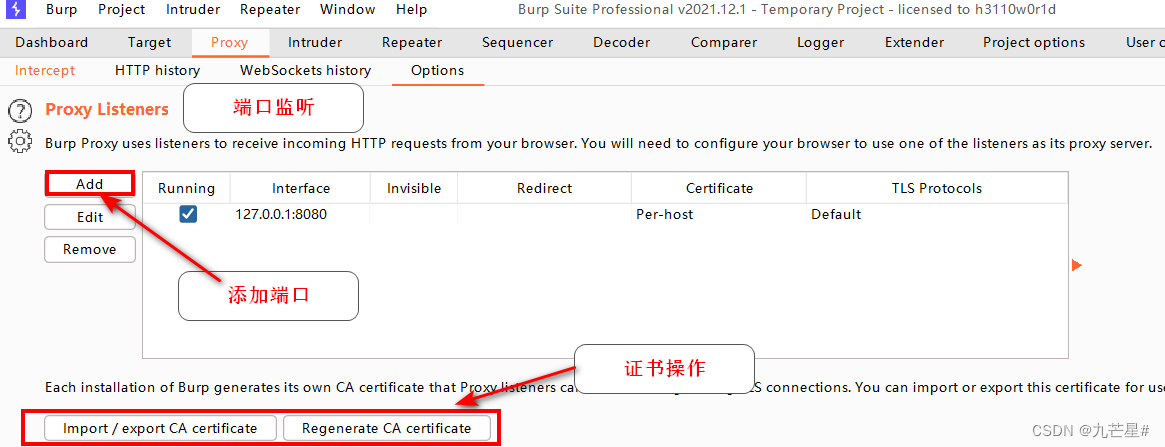
Process the data requested by the client to the server
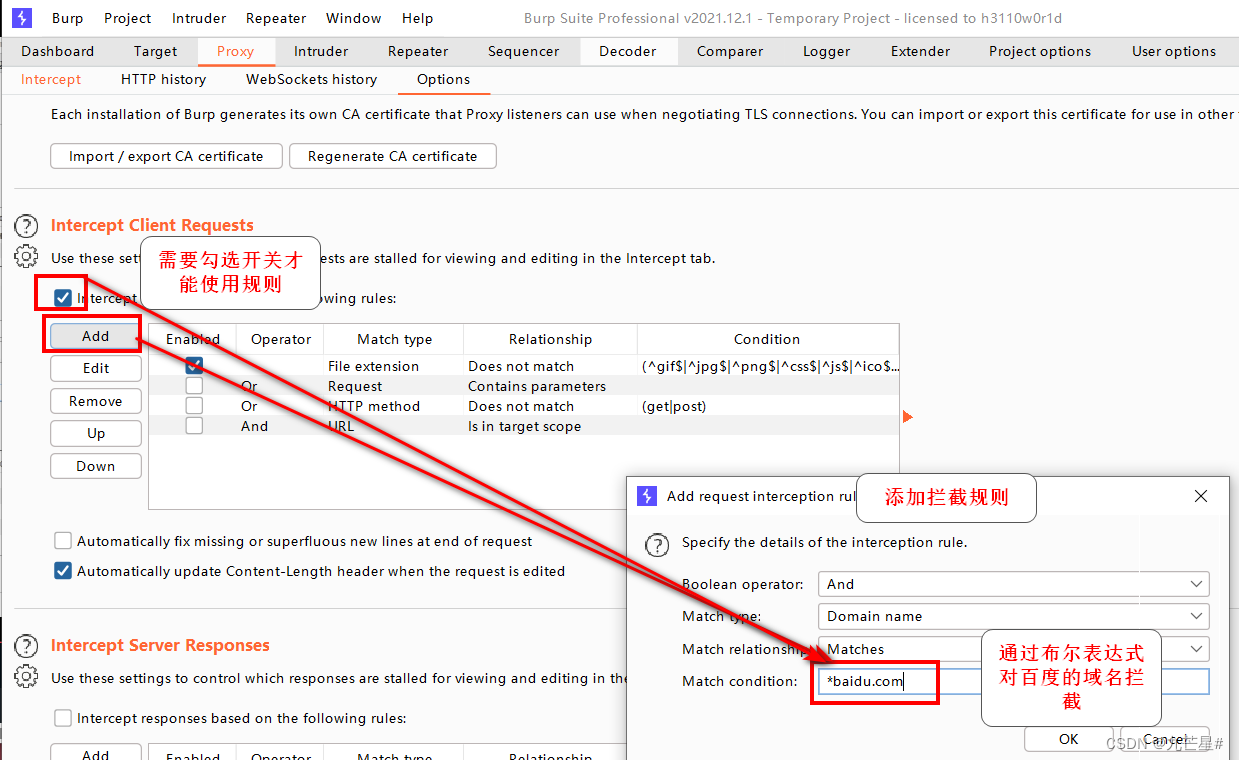
Intercept server response
![[External link picture transfer failed, the source site may have an anti-theft link mechanism, it is recommended to save the picture and upload it directly (img-FrdpmX8A-1689224384337) (C:\Users\gf5971\AppData\Roaming\Typora\typora-user-images\ image-20230707213047599.png)]](https://img-blog.csdnimg.cn/7f3757f6d4e54976affdf8d478c3028a.png)
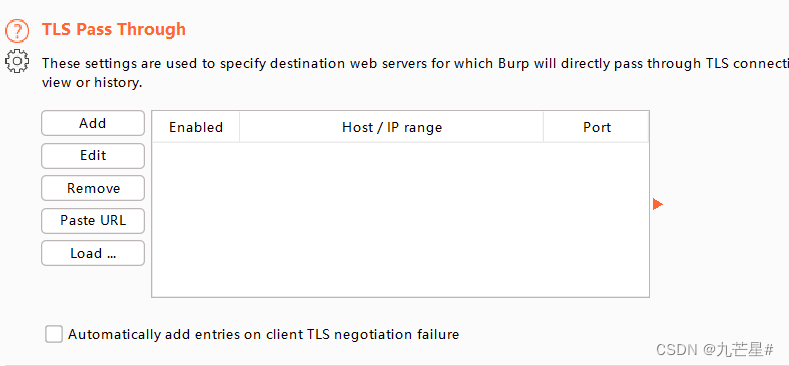
Do other automated substitutions for requests and responses

TLS penetration (without BP)
1.2.3 BP intercepts HTTPS data
Website certificate:
1. The operating system installs the root certificate, which contains the public key of the CA.
2. The certificate issued by the CA contains the public key of the organization, and signs the summary of the public key of the organization with the public key of the CA.
3. The browser uses the public key of the CA. The public key checks the abstract and confirms that the organization’s public key is legal.
4. The browser uses the organization’s public key to negotiate a session key with the server
. 5. The browser communicates with the server using the session key.
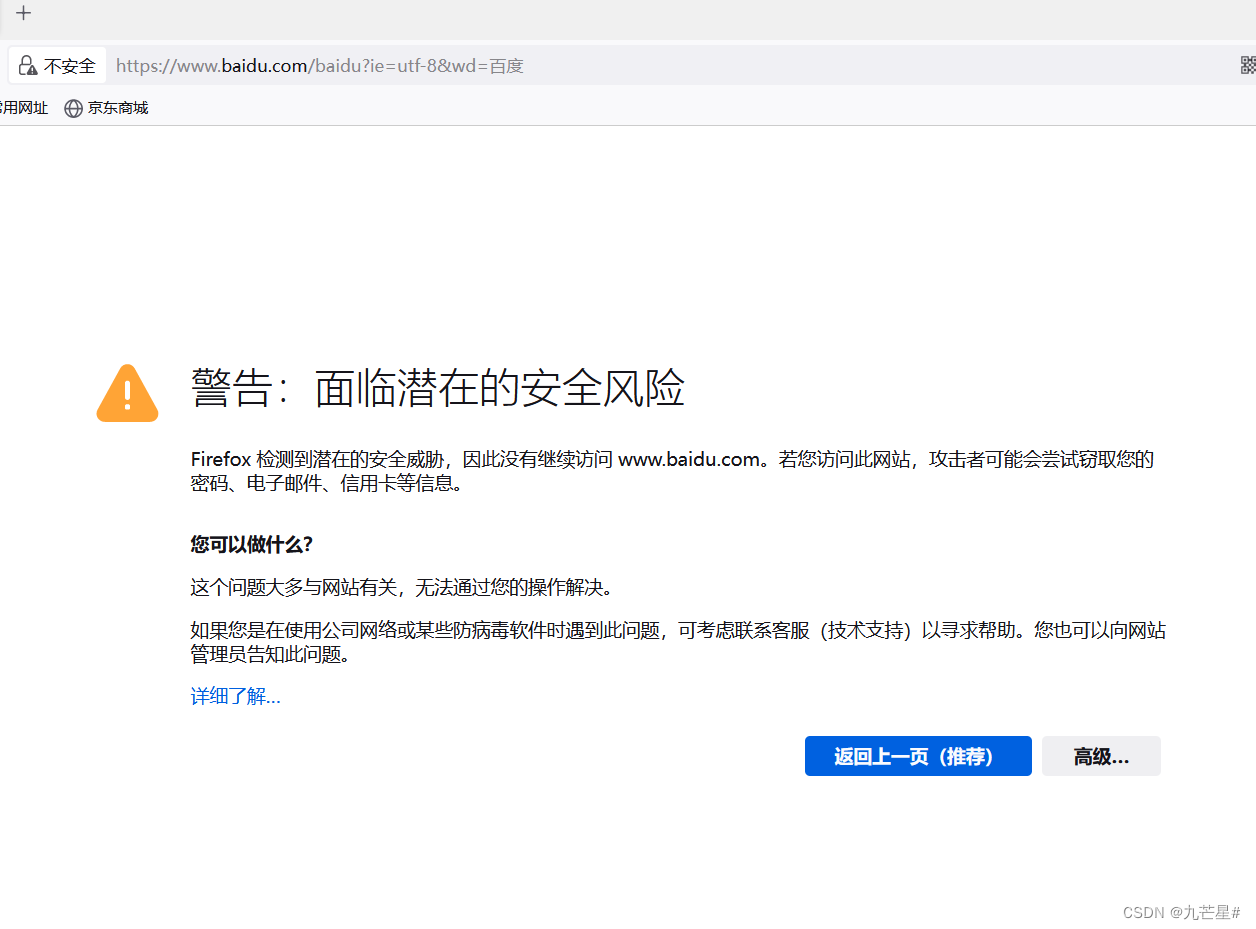
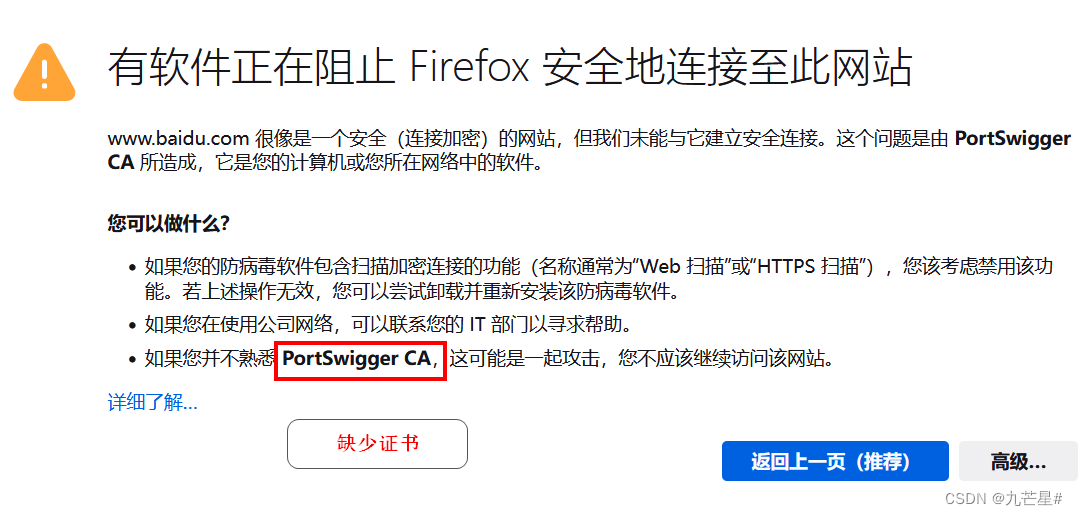
HTTPS

When the BP does not install the certificate, the browser will pop up a security warning
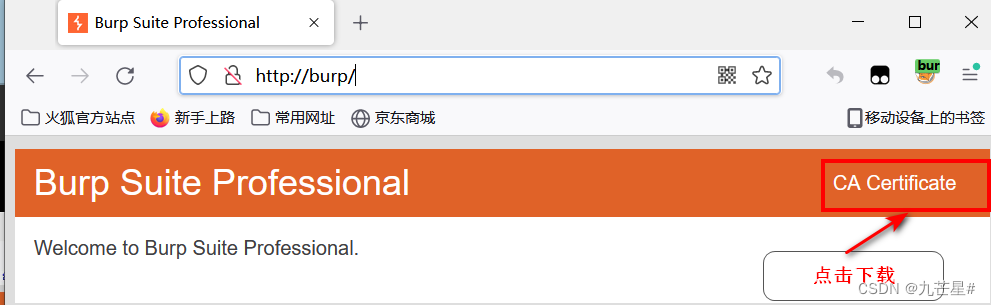
1.2.3.1 Download BP certificate method one
After the browser and BP are turned on, enter in the browser
http://burp/
1.2.3.2 Download BP certificate method 2
In BP, Proxy, Options
select export
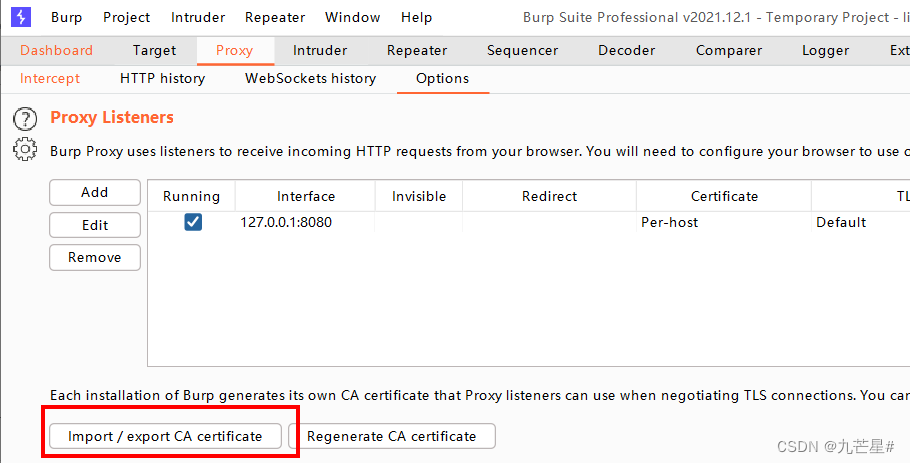
Export in DER format

After downloading, import the certificate into the browser
In the browser settings, enter "Certificates",

import in authority
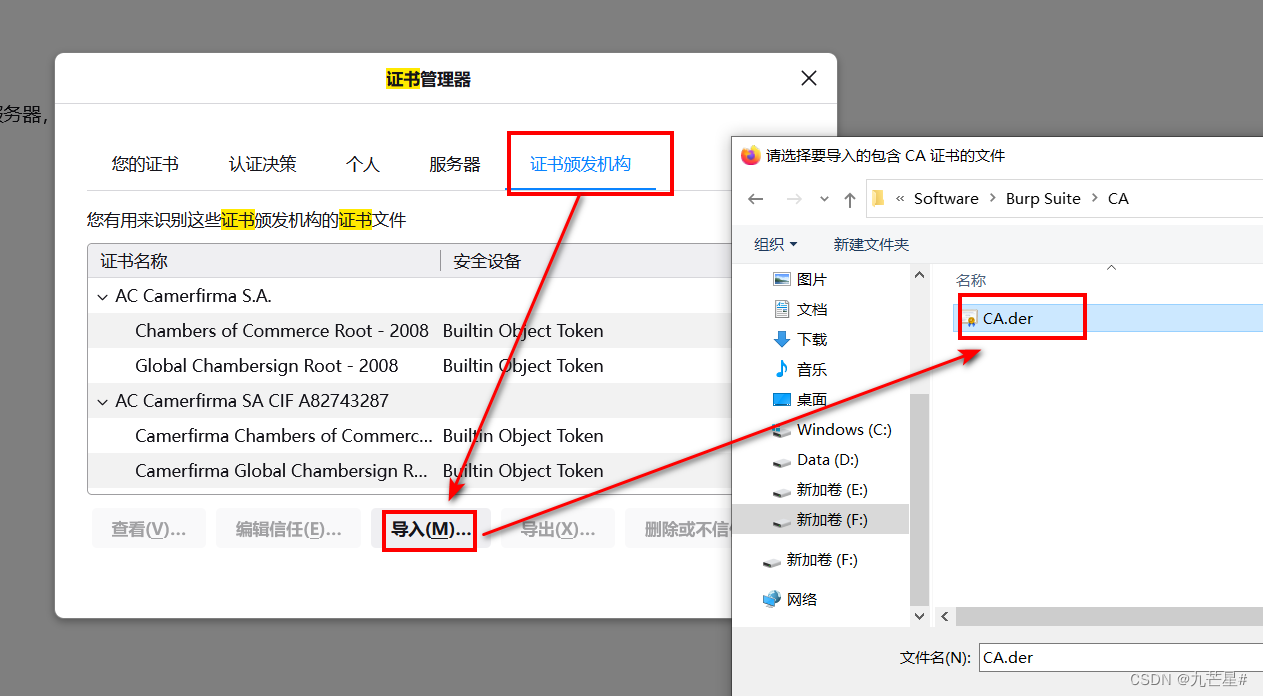
and trust

1.2.4 BP Intercepts Mobile APP Data
If you want to infiltrate the mobile app or the server of the app, you first need to catch the app

(1) Turn on the computer Burp monitor
First of all, the computer needs to be connected to WiFi instead of a wired network, so that the mobile phone and the computer can be in the same network environment (if the wired network of the desktop computer and the WiFi of the mobile phone are in the same network environment, it is also possible).
Open cmd on the computer and enter ipconfig -all to view the IPv4 address of the WLAN:

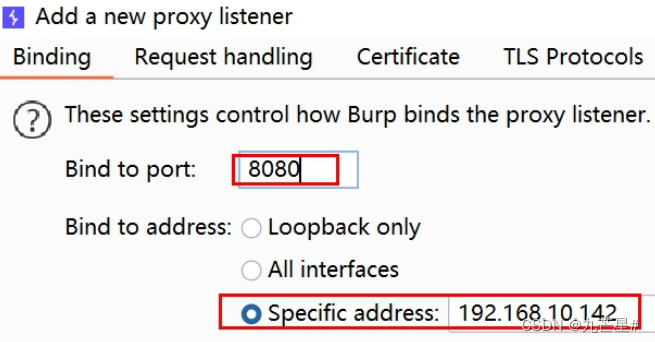
For example, the current IP is 192.168.10.142, remember it and use it later. Start Burp, open Proxy - Options - Add

In the added window that opens, fill in 8080 for the port, and select the IP address you just saw for the binding address, as shown in the figure:
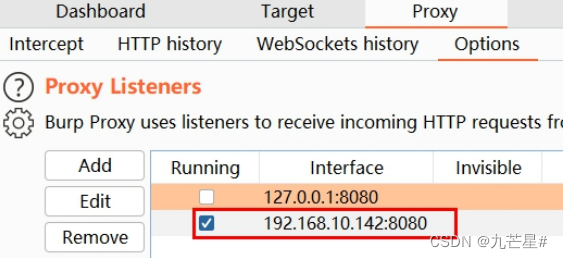
Click OK to confirm. At this time, the listener should check the new one instead of the default one:
(2) Configure mobile WiFi proxy
First connect your phone to the same WiFi as your computer. From your phone's Settings, go to Wi-Fi settings

Long press the name of the currently connected WiFi, and click the pop-up "Modify Network".

In the window that opens, check "Show advanced options"

Enable proxy: Click the proxy switch, and select "Manual" in the pop-up window.

After enabling the proxy switch, you need to configure the proxy:

The proxy has been configured. Then all network requests on the phone will be sent to Burp.
Note: It is not that you will have network requests when you are operating the App. The App on the mobile phone is accessing the network all the time, so many irrelevant packets will be caught.
It is recommended to turn on Burp's interception switch before manual operation, so that packets can be captured accurately.
Turn on the interception switch in Proxy-Intercept:

For example: when the mobile browser opens Baidu search, the communication packet is captured by Burp on the computer:

At this point, the packet capture settings are complete.
(3) Mobile phone installation certificate
For HTTPS websites, the client needs to encrypt the message with the server's key before sending it.
When the proxy is configured, the client (browser) requests a certificate from Burp, but Burp does not have a certificate, and the browser will prompt that it is not safe. Or, if the server's certificate is used to encrypt, what Burp captures is the encrypted message, which cannot be viewed or modified.
So the complete process is like this:
The client first encrypts the message with burp's key. After burp decrypts the plaintext, it encrypts the message with the server's key.
So here we need to install the burp certificate on the phone.

Select the first one, DER format certificate, click Next

It is very important to choose the saved CA path (such as the D drive) and name the file suffix .cer, because the mobile phone can only install the certificate type of .cer, and the default der format cannot be recognized and installed. Click Save, then Next

When the export is complete, close the window:

Send the file to the mobile phone, such as using WeChat's "File Transfer Assistant". "Open with another app" on your phone.

Select "Certificate Installer" to open, just one time

Write the name of the certificate, select WLAN, confirm, the installation is successful.

Search for "certificate" in the settings, user credentials, and view the certificate:

You can see the installed certificates

(4) Cancel burp capture
If you don't need to grab the phone's package anymore, and you need normal access, just cancel the proxy. Long press the WiFi name to enter the settings - display advanced options - proxy, set to "none", save, you can

2. Target module
2.1 The role of the Target module
Record all traffic passing through BP
1. HTTP History is recorded in chronological order
2. Target is classified and recorded by host or domain name
After requesting Taobao, target plans and records by site

作用
1、把握网站的整体情况

2、对一次工作的域进行分析

3、分析网站存在的攻击面
Attack surface:
A collection of attack methods that can be adopted for a software system. The larger the attack surface of a software, the greater the security risk. The
attack surface includes: fields, protocols, interfaces, services, and hardware attack points
2.2 Target sets the target scope
Purpose: What traffic is recorded and what traffic is not recorded
2.2.1 Determine the same domain
协议、域名和端口必须都相同才算一个域

目录、文件、参数可以不同
Just like in the following table, except that the two domain names in the first row are the same domain, the rest are not the same domain
The protocol in the second line is different.
The main domain name in the third line is different.
The subdomain name in the fourth line is different.
The port in the fifth line is different.
| Domain 1 | Domain 2 |
|---|---|
| http://www.baidu.com/ | http://www.baidu.com/admin?a=1 |
| http://www.baidu.com/ | https://www.baidu.com/ |
| http://www.baidu.com/ | http://www.baidu.cn/ |
| http://www.baidu.com/ | http://blog.baidu.com/ |
| http://www.baidu.com:80/ | http://www.baidu.com:7298 |
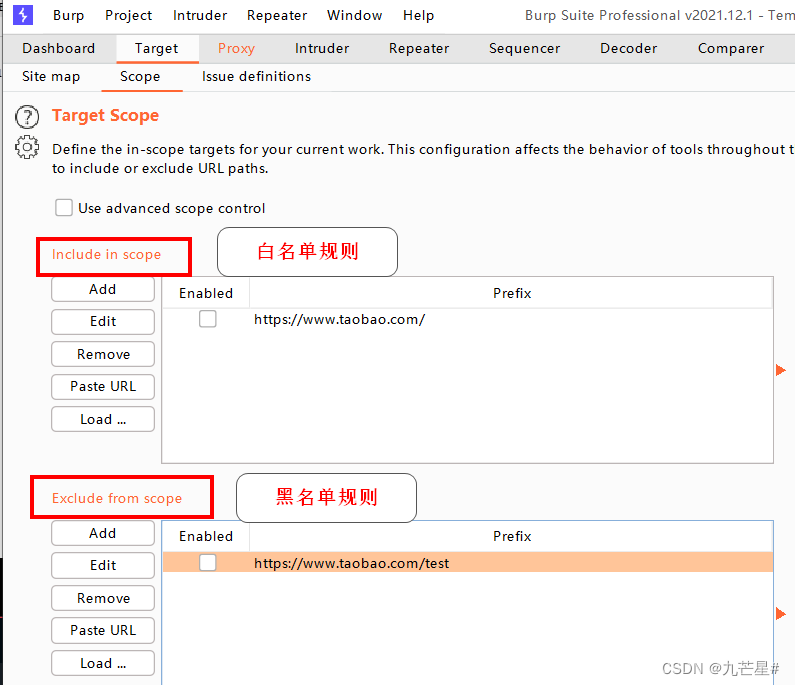
2.2.2 Limiting the scope of domains
Only intercept the site, not the content in the site
Whitelist: only these I will block
Blacklist: as long as these are not blocked
For example,
only intercept https://www.baidu.com/
but not https://www.baidu.com/blog
The blacklist path is generally a subpath of the whitelist
2.2.3 Usage Scenarios
1、限定Sitemap和HTTP history记录哪些域的内容
2、限定Spider抓取哪些域的内容
3、限定Scanner扫描哪些域的安全漏洞
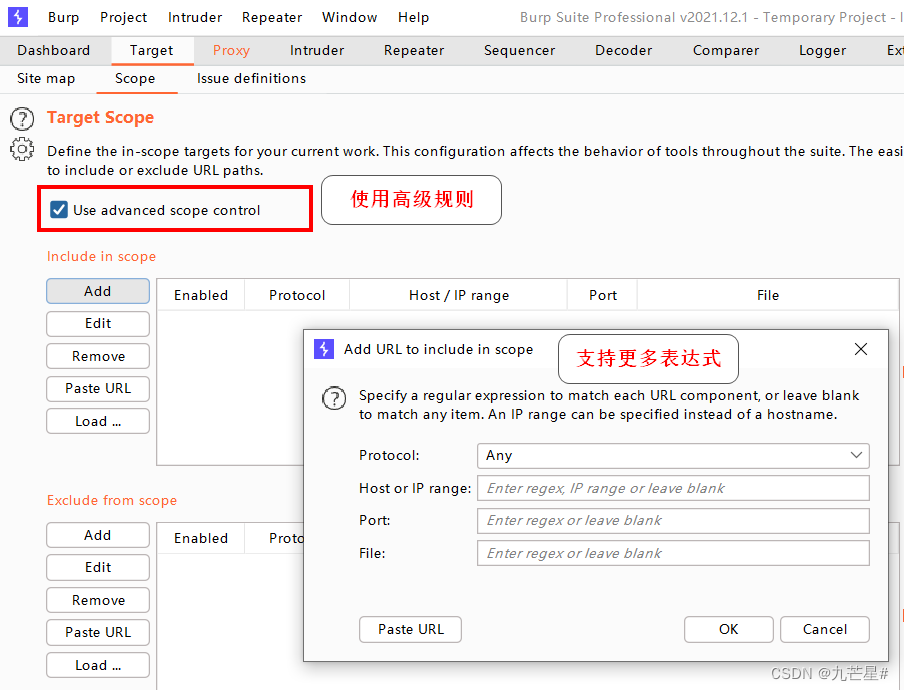
Advanced black and white list rule settings
regular expressions can be added
2.3 Sitemap Sitemap
Purpose: Recorded result preservation
2.3.1 Sitemap record type
1、自动(爬行)
	全面但耗费时间

2、手动(浏览器访问)
	只记录一次的站点地图
	要求设置好BP和浏览器的代理,并且在访问前关掉拦截
First delete the HTTP history and Target site map
In Intercept, all sitemaps will appear

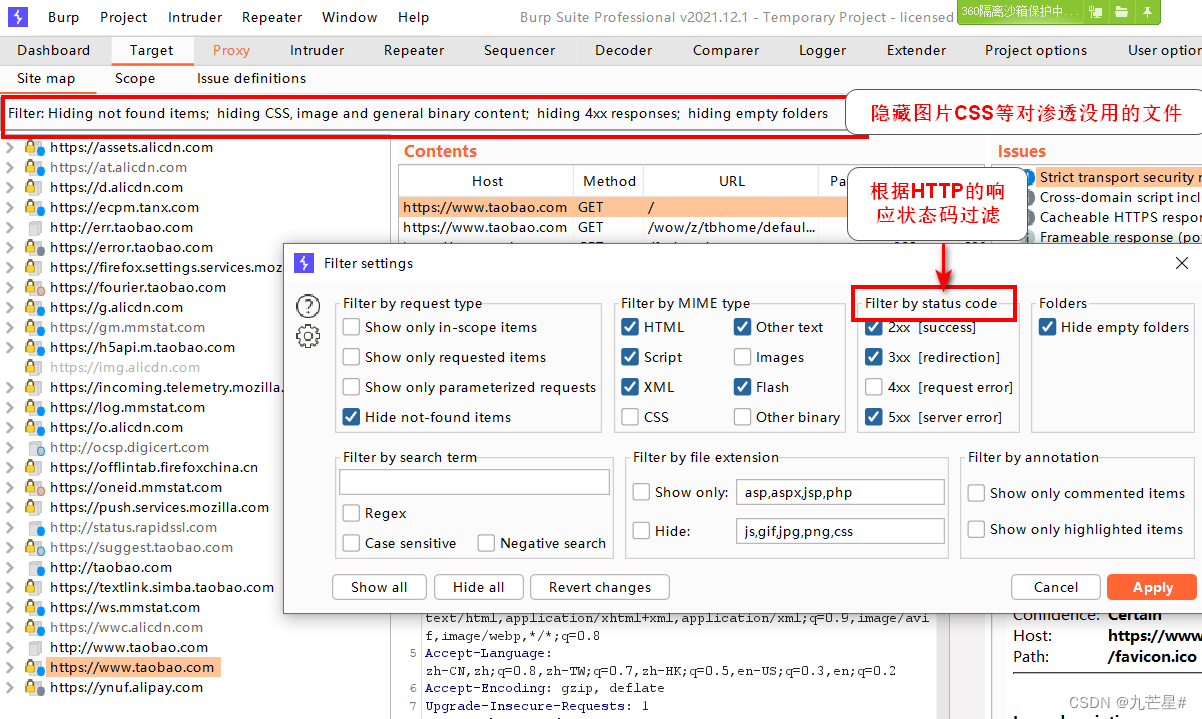
2.3.2 Default interception
Block some files by default

2.3.3 Interface
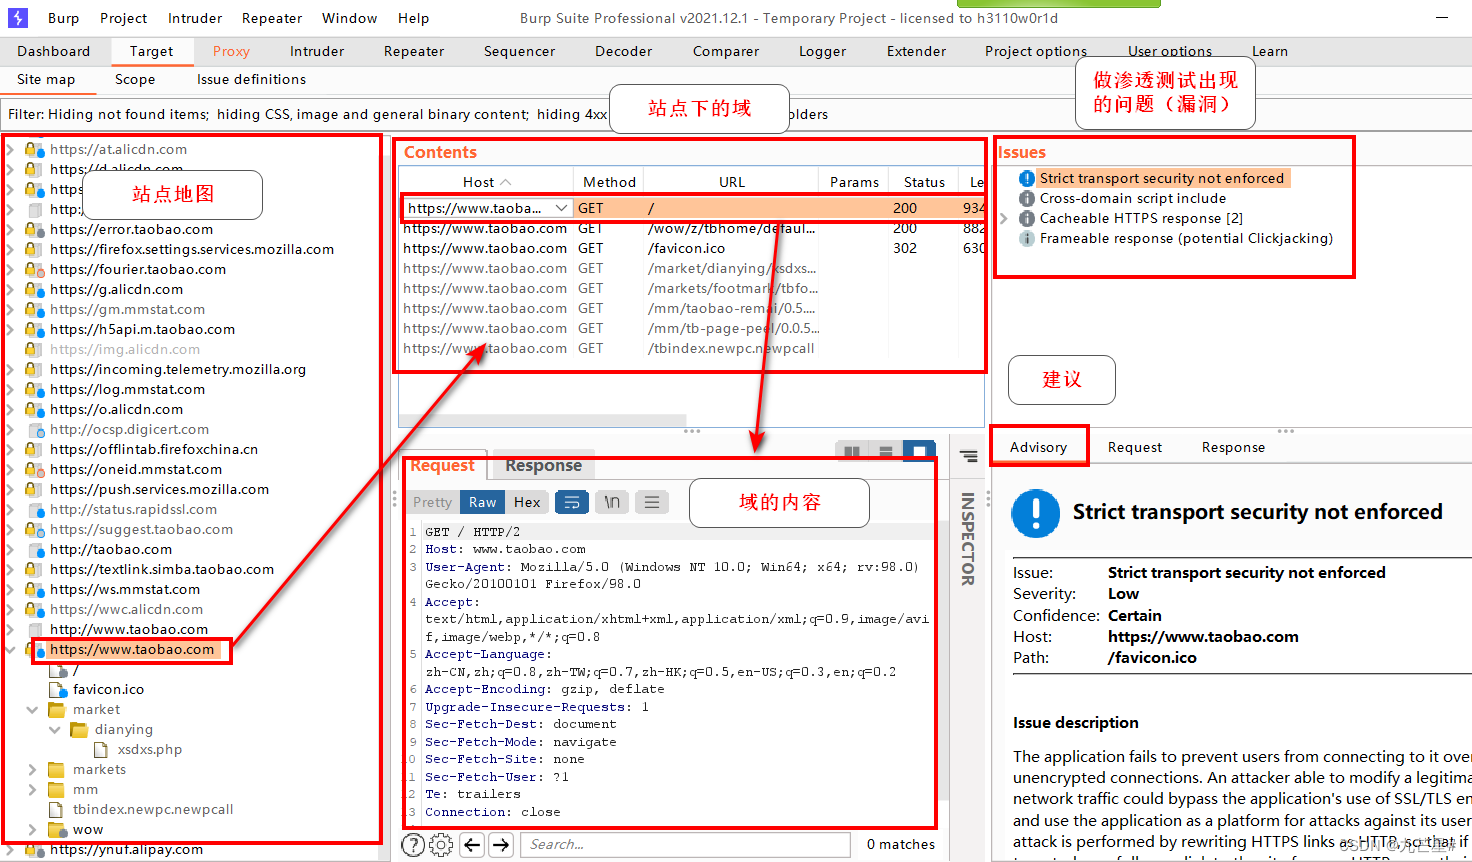
2.4 Target result operation
Just right click


2.4.1 Add to scope
It means that there is a whitelist generated for this domain name, and all content except this path will not be recorded in the sitemap
2.4.2 Send to module
sent to the corresponding module

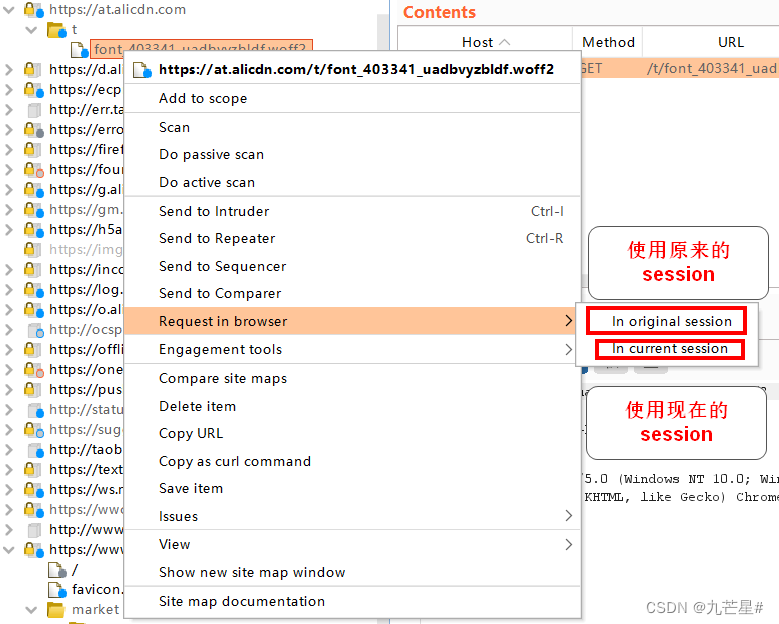
2.4.3 Request in browser
open in browser
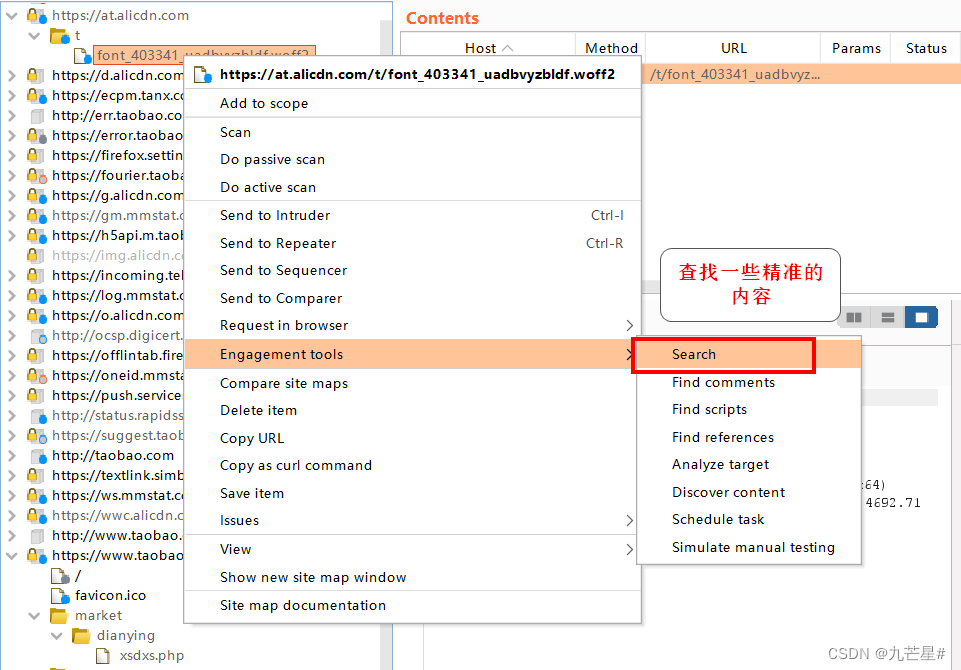
2.4.4 Engagement tools
interactive tools
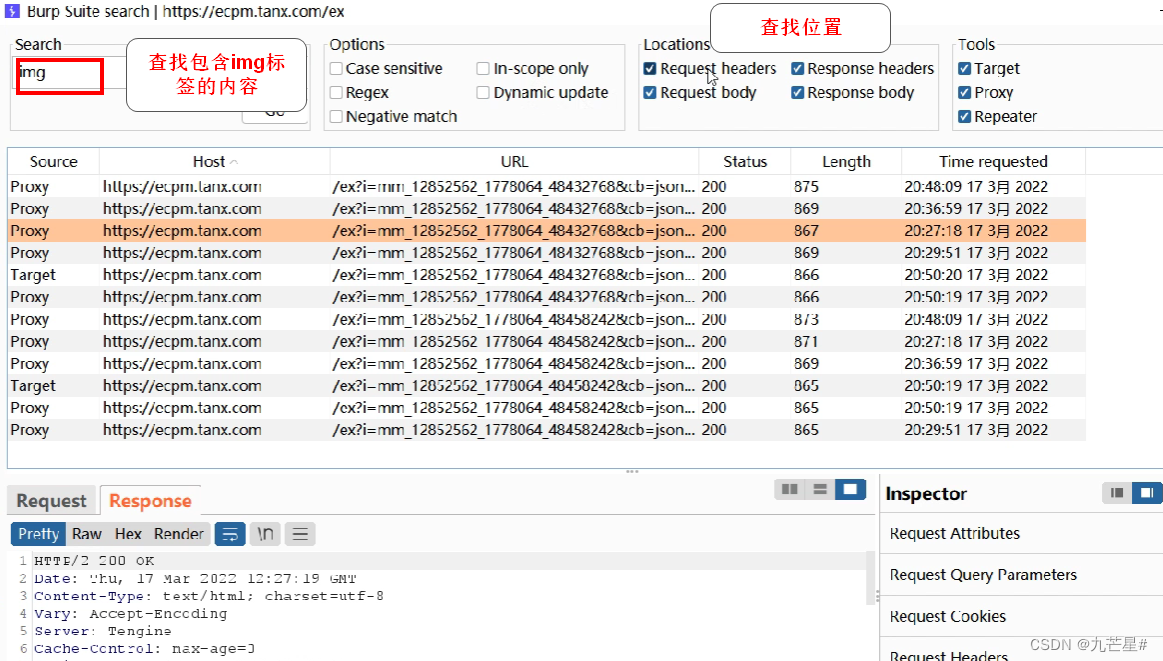
(1)search
Check the exact content
Find the img tag
(2)Find comments
find notes
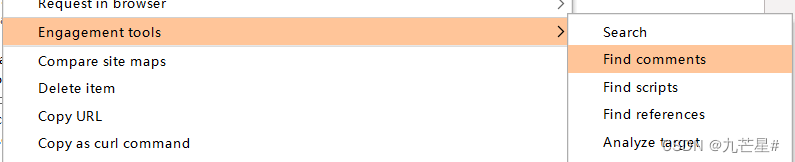

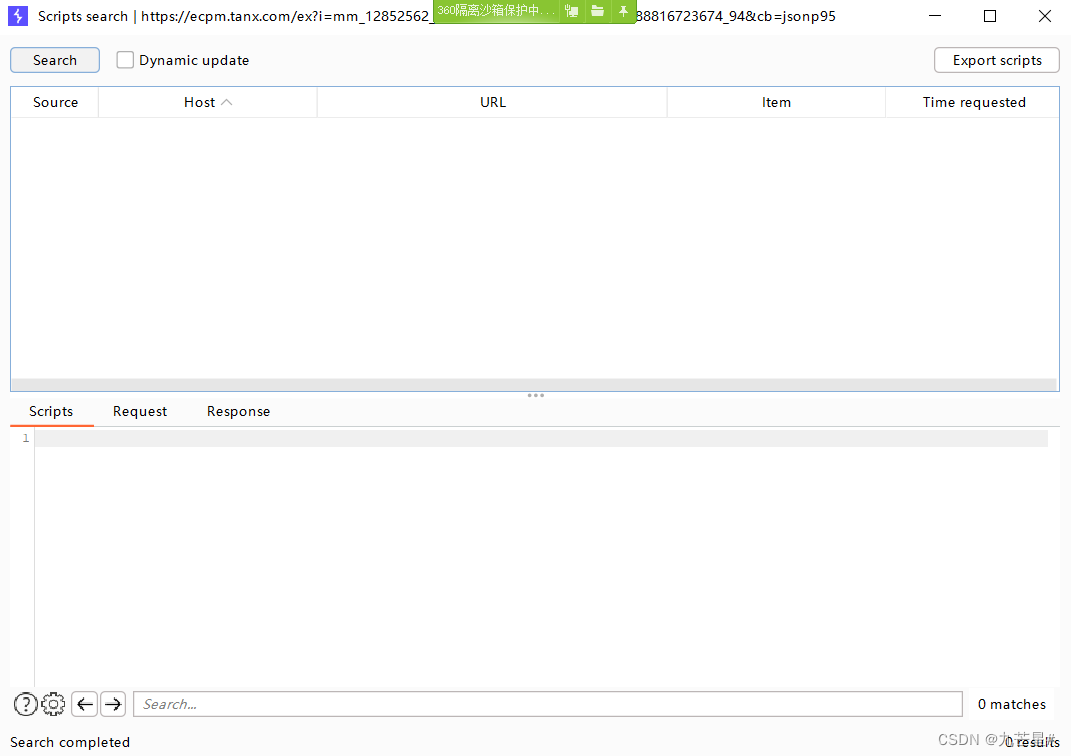
(3) Find script
Find scripts under domain
(4)Find Reference
View website source
There are many hyperlinks in the webpage, if you want to know where to jump from, you need a reference
作用:
告诉服务器当前请求是从哪个页面链接过来的

应用场景:
1、来源统计
2、防盗链
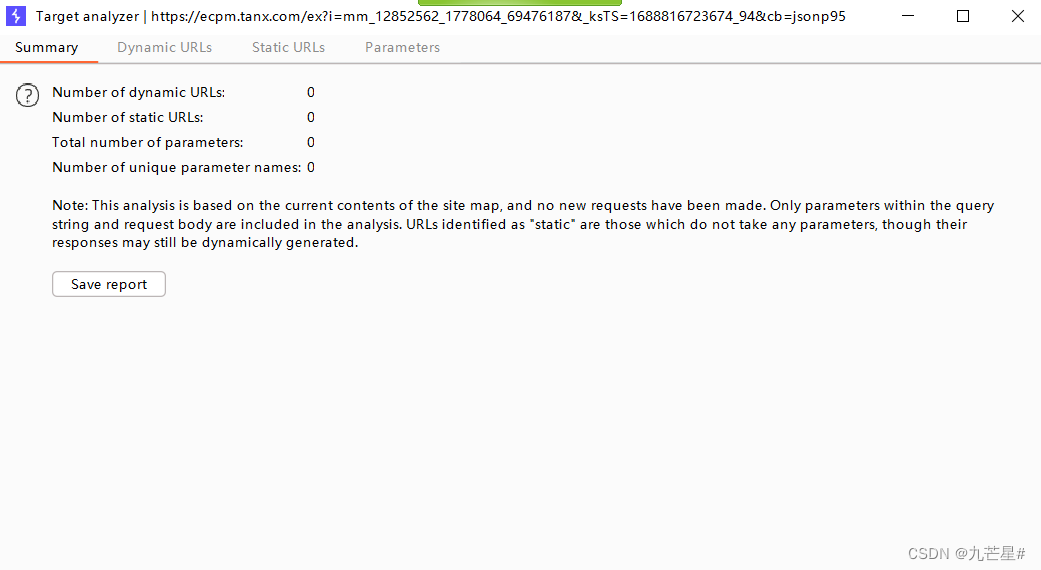
(5)Analyze target
Attack Surface Analysis

Display dynamic links, static links, how many parameters there are
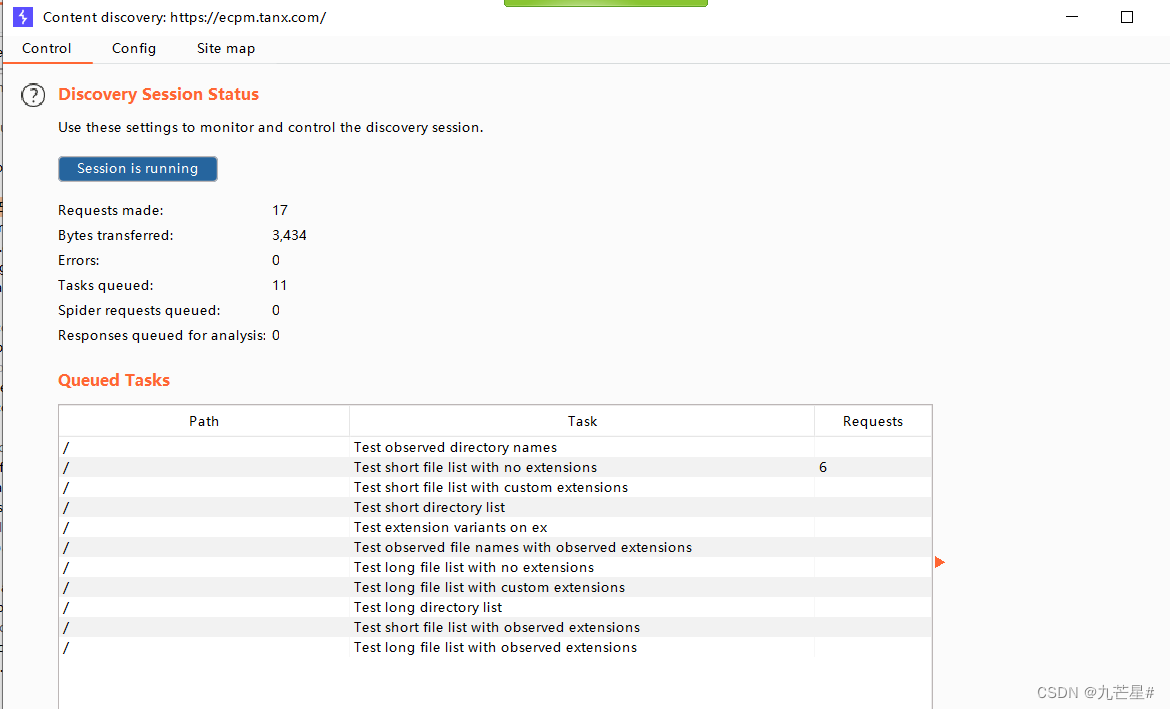
(6)Discover content
Discover content for a domain
Use the built-in dictionary to do a directory scan to determine if certain files or folders exist
(7)Schedule task
timed task

Pausing a task affects many tasks

(8)Manual testing
Manual Test Simulator

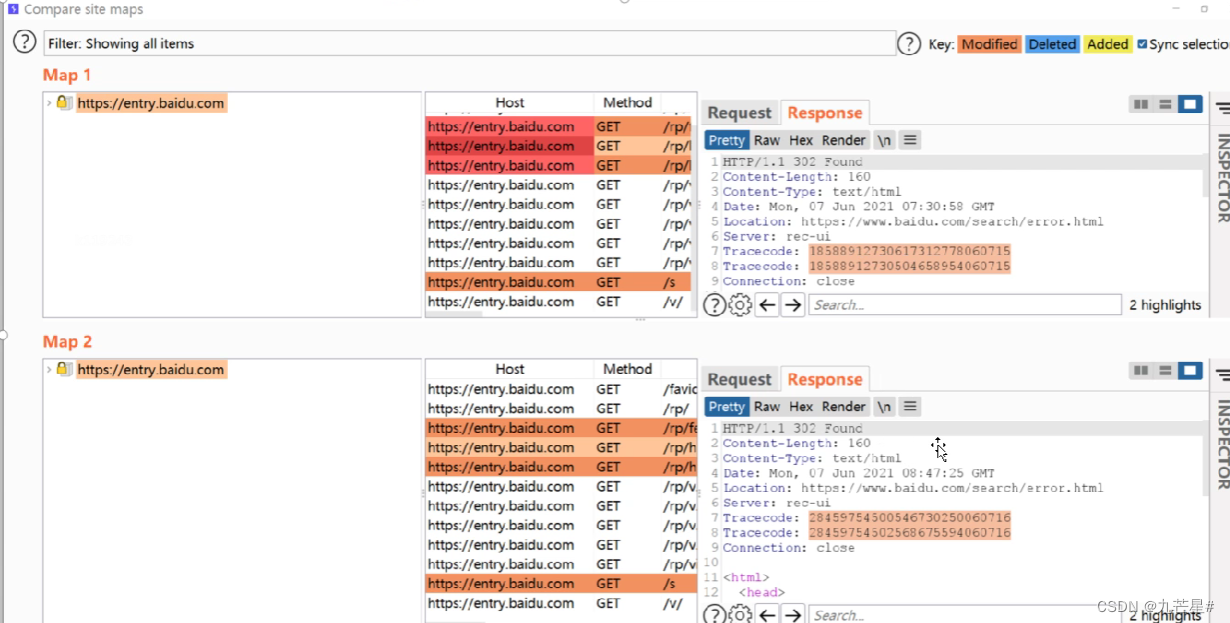
2.4.5 Compare site maps
Compare the two response results of HTTP
For example, use different accounts and log in with different parameters
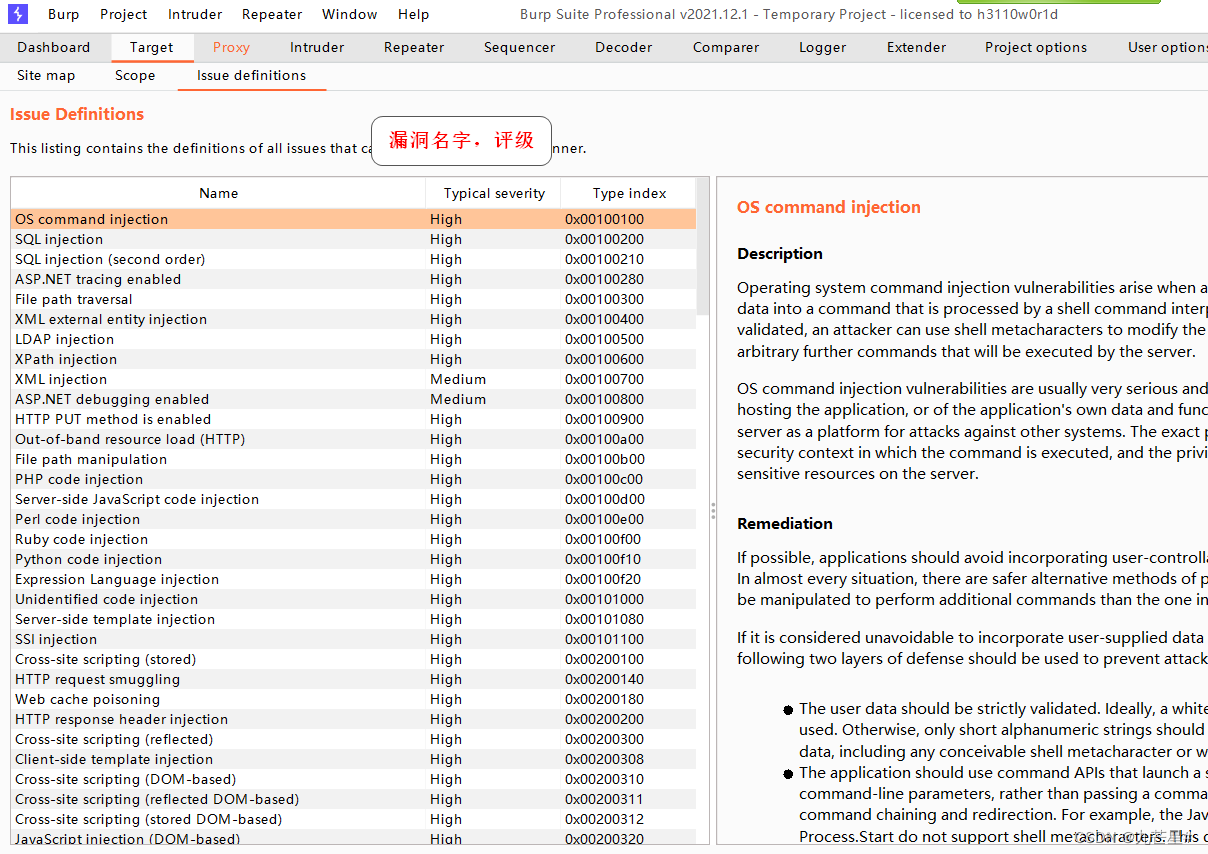
3. Scanning module
3.1 Overview of Vulnerability Scanning
漏洞扫描工具

AWVS、Appscan、Nessus、Openvas、Goby、 Xray、ZAP
3.1.1 Two major functions (Crwal&Audit)
Two functions, crawling and auditing
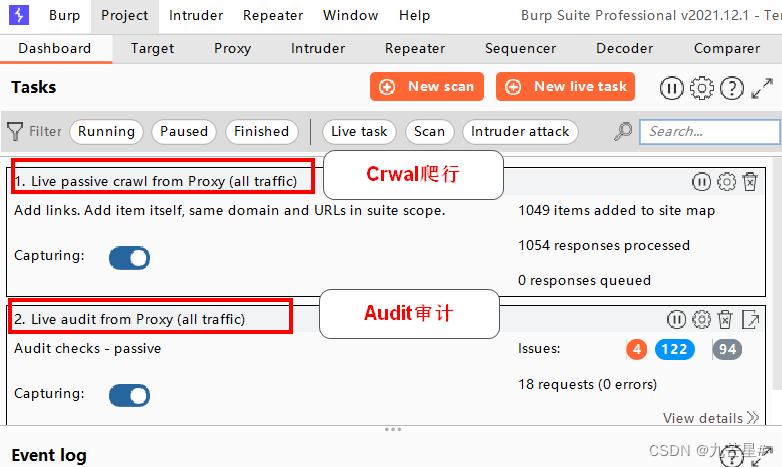
Active Scanning and Passive Scanning

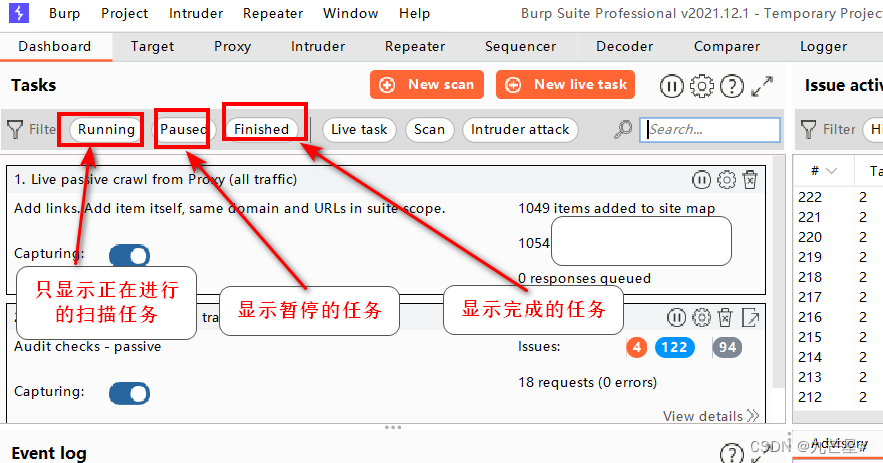
3.1.2 Three filtering states
3.1.3 Active scanning
Active scanning has a large impact area and is not recommended
Active scan:
1. Method: Crawl all links and detect vulnerabilities
2. Features: Send a large number of requests
3. Use occasions: development and test environments
4. Targeting vulnerabilities:
client-side vulnerabilities, such as XSS, HTTP header injection, and operation redirection.
Server-side vulnerabilities, such as SQL injection, command line injection, and file traversal.
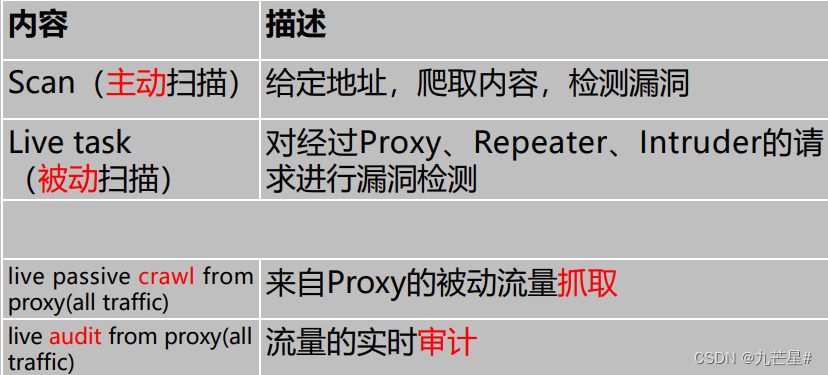
3.1.4 Passive scanning
Passive scanning:
1. Method: Only detect the address of the BP proxy server without crawling
2. Features: Send limited requests
3. Use occasion: production environment
4. For vulnerabilities:
(1) The submitted password is unencrypted plaintext.
(2) Attributes of insecure cookies, such as lack of HttpOnly and security flags.
(3) The scope of the cookie is missing.
(4) Cross-domain script inclusion and site reference leaks.
(5) Autofill form values, especially passwords.
(6) SSL-protected content caching.
(7) Directory listing.
(8) The response is delayed after submitting the password.
(9) Insecure transmission of session tokens.
(10) Leakage of sensitive information, such as internal IP addresses, email addresses, stack tracking and other information leakage.
(11) Unsafe ViewState configuration.
(12) Wrong or irregular Content-Type directive
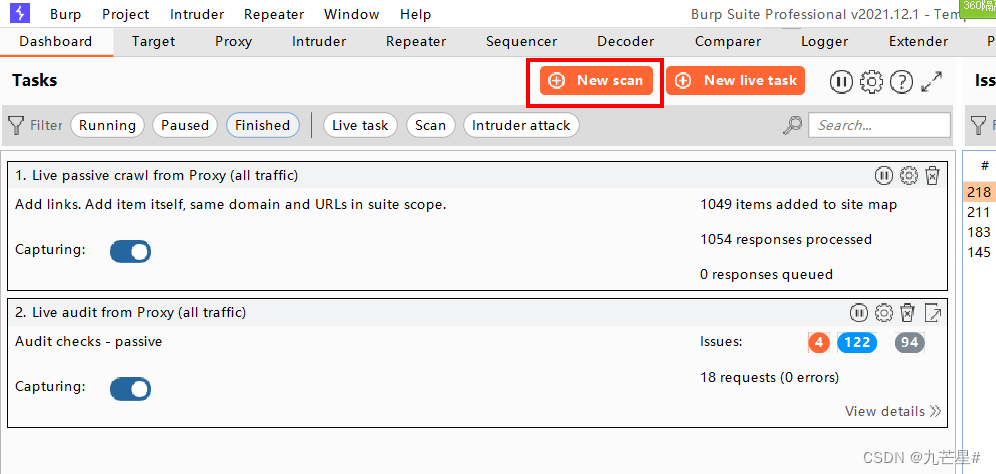
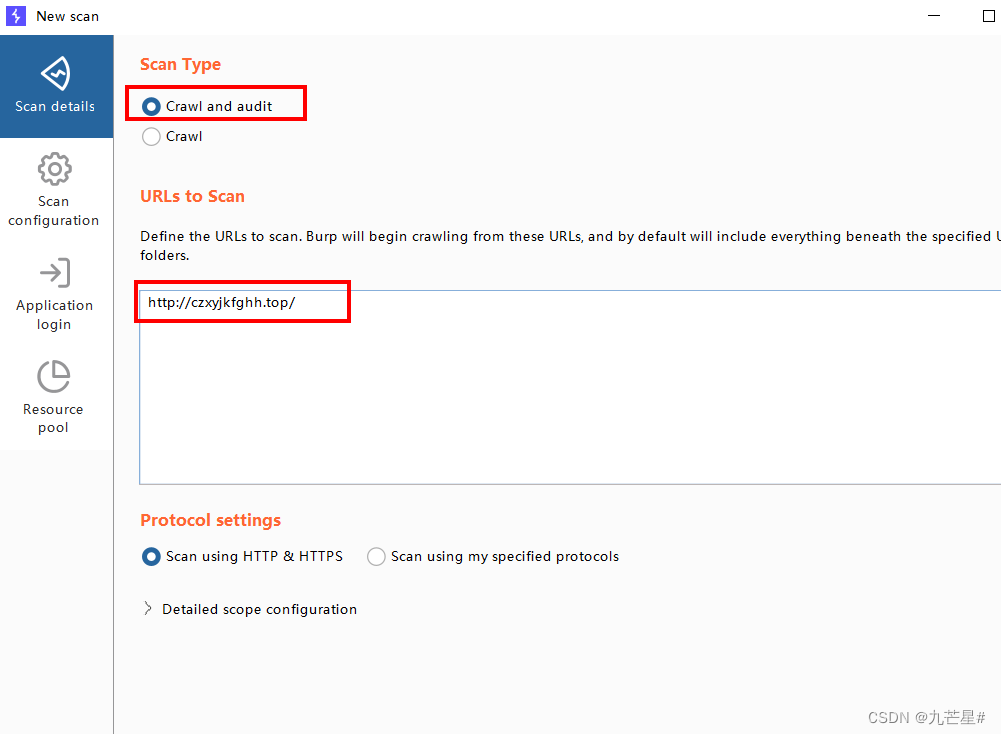
3.2 Scan function
Select New scan, select the website you built in the scan address, pupstudy
3.2.1 Scan information
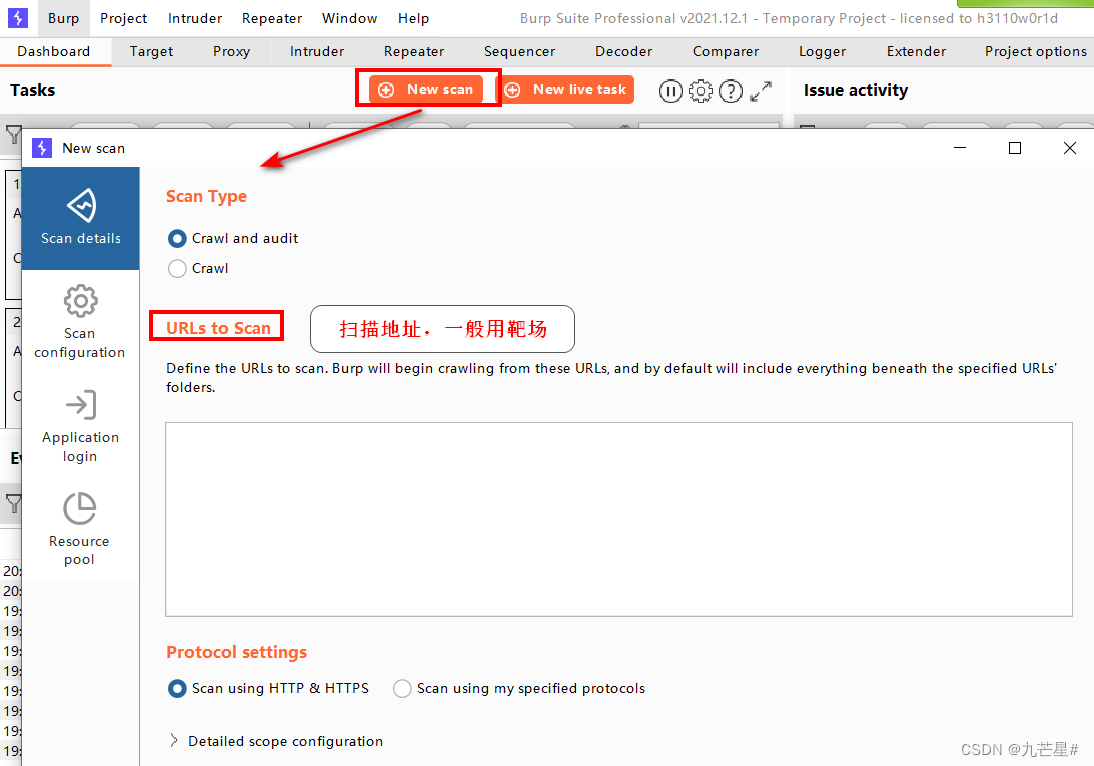
3.2.2 Detailed configuration
3.2.2.1 Crawl configuration

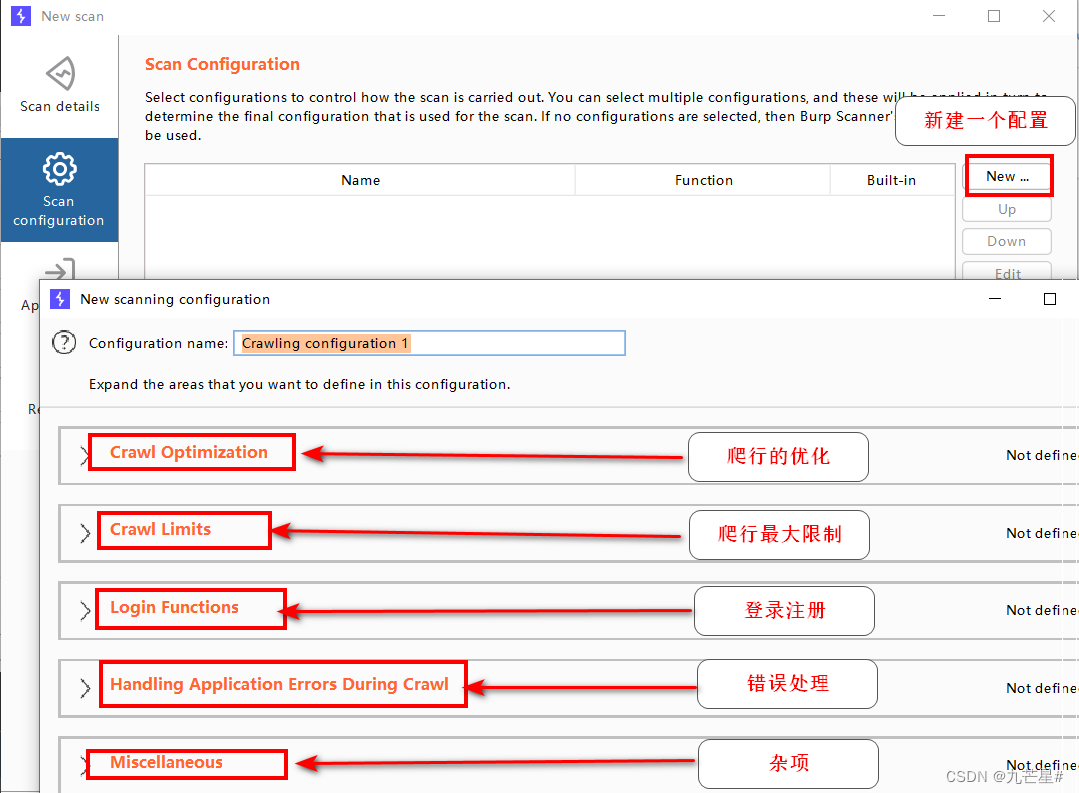
(1) Crawling operation settings

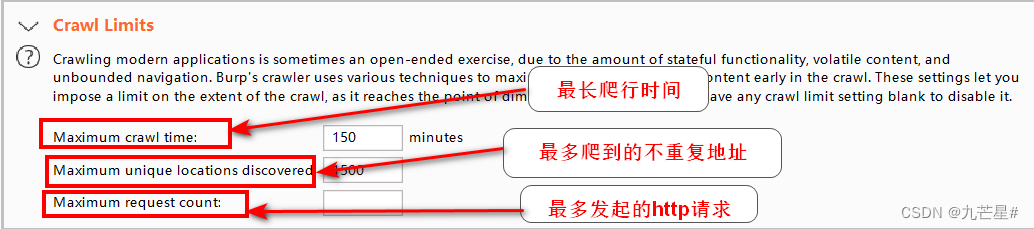
(2) Crawl limit
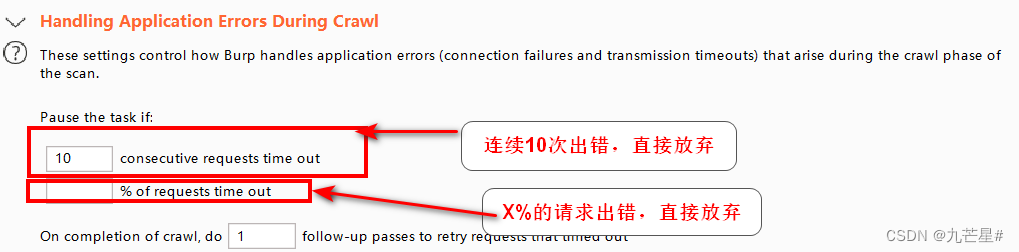
(3) Crawling error handling
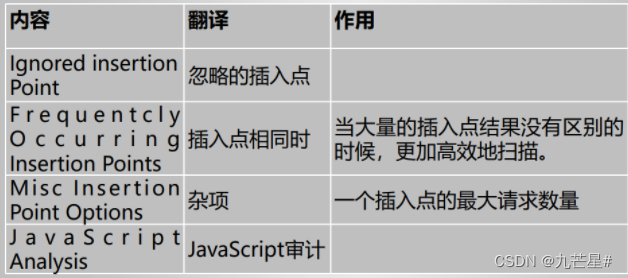
3.2.2.2 Audit Configuration
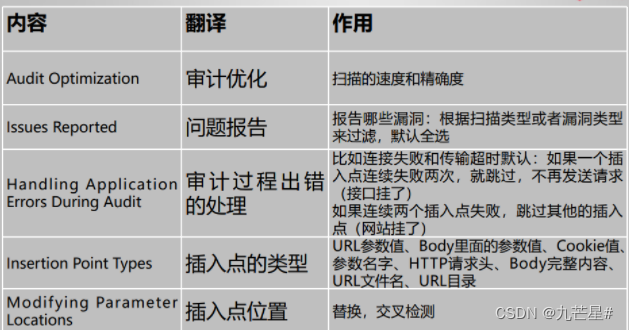
(1) Audit operation settings

(2) Scan result vulnerability report

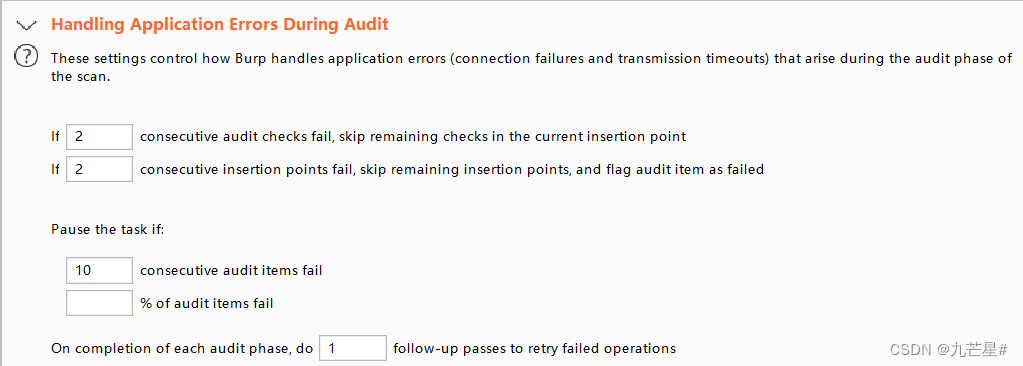
(3) Scan error handling
(4) Insertion point type

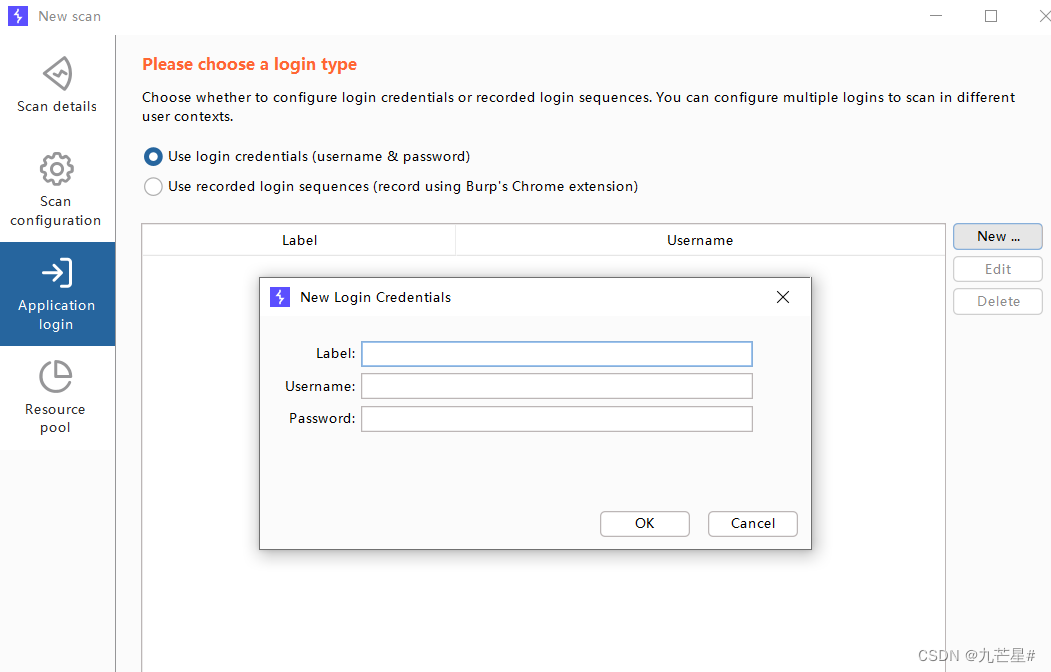
3.2.3 Login settings
If the scanned address needs to log in (backend page), you need to give the account number and password
3.2.4 Crawl crawling example
After setting it up, it has now started crawling
Select crawl in the settings
Select View details to view detailed content

Already crawled to 6 addresses
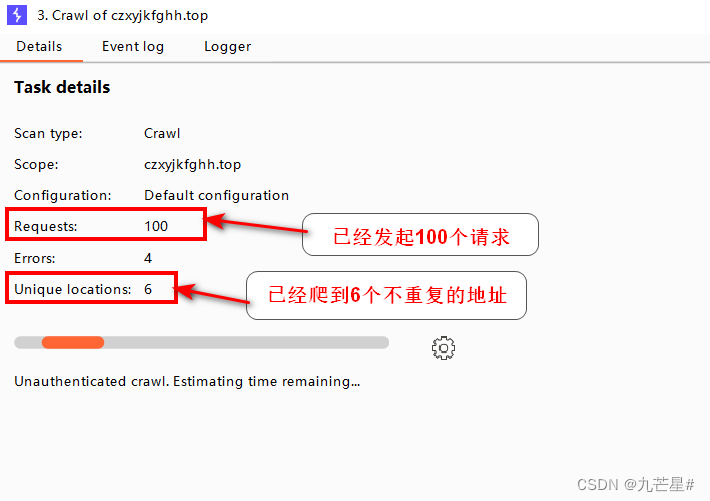
All crawled addresses are recorded in the logger

3.2.5 Example of passive crawling
Choose Passive Crawl
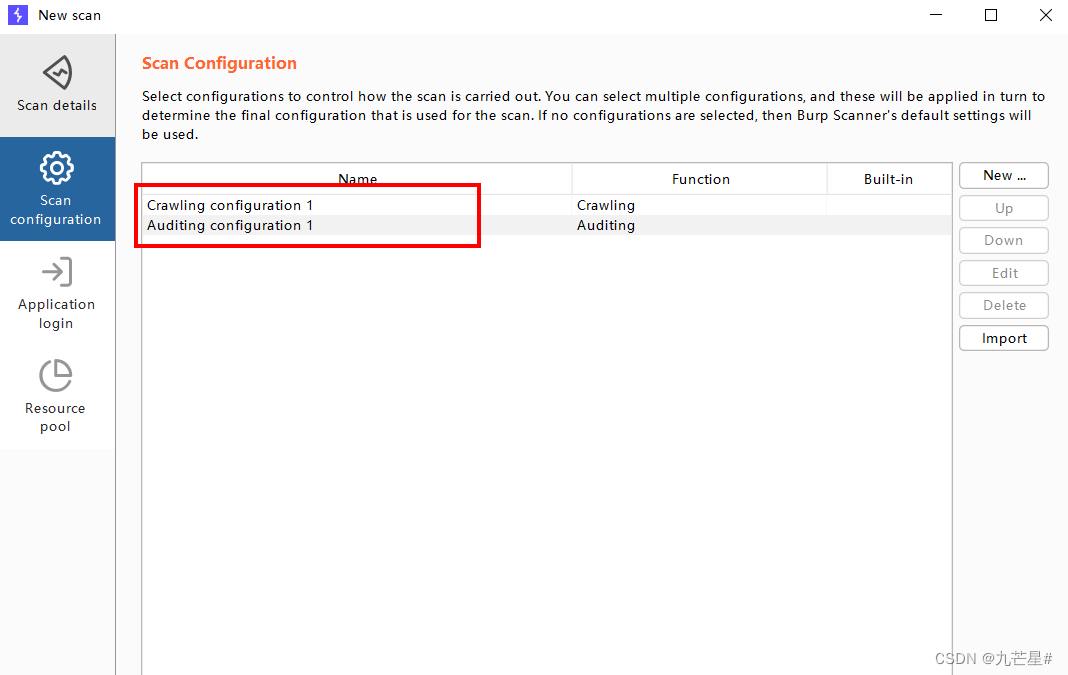
Choose the first, crawl and audit
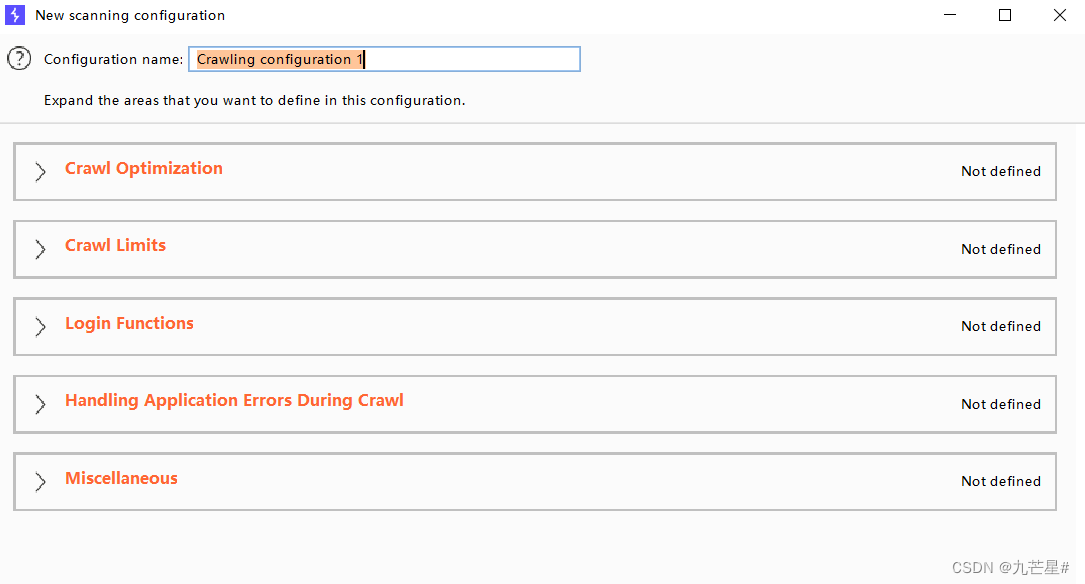
First create a crawl configuration
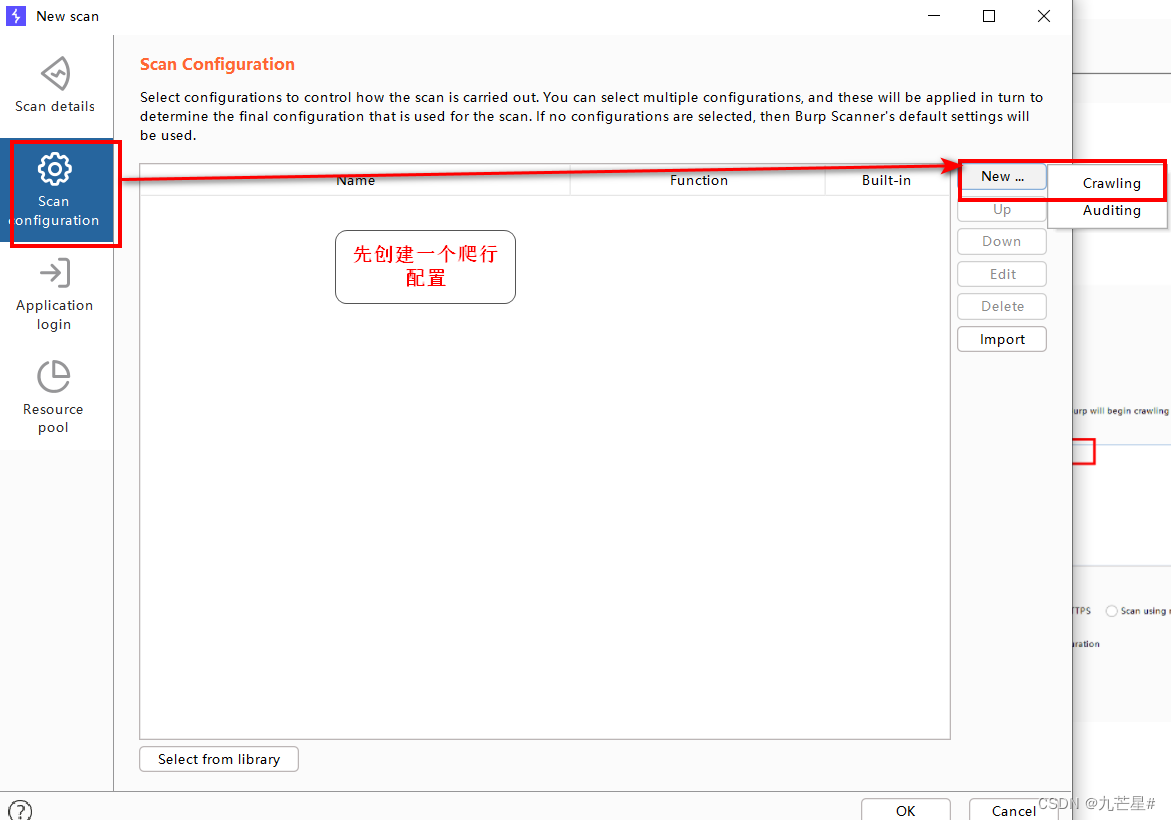
Click on these items and save
Then create a new audit configuration
It shows that it is crawling, and the audit must be performed after the crawl is over, and no loopholes will be reported before the audit
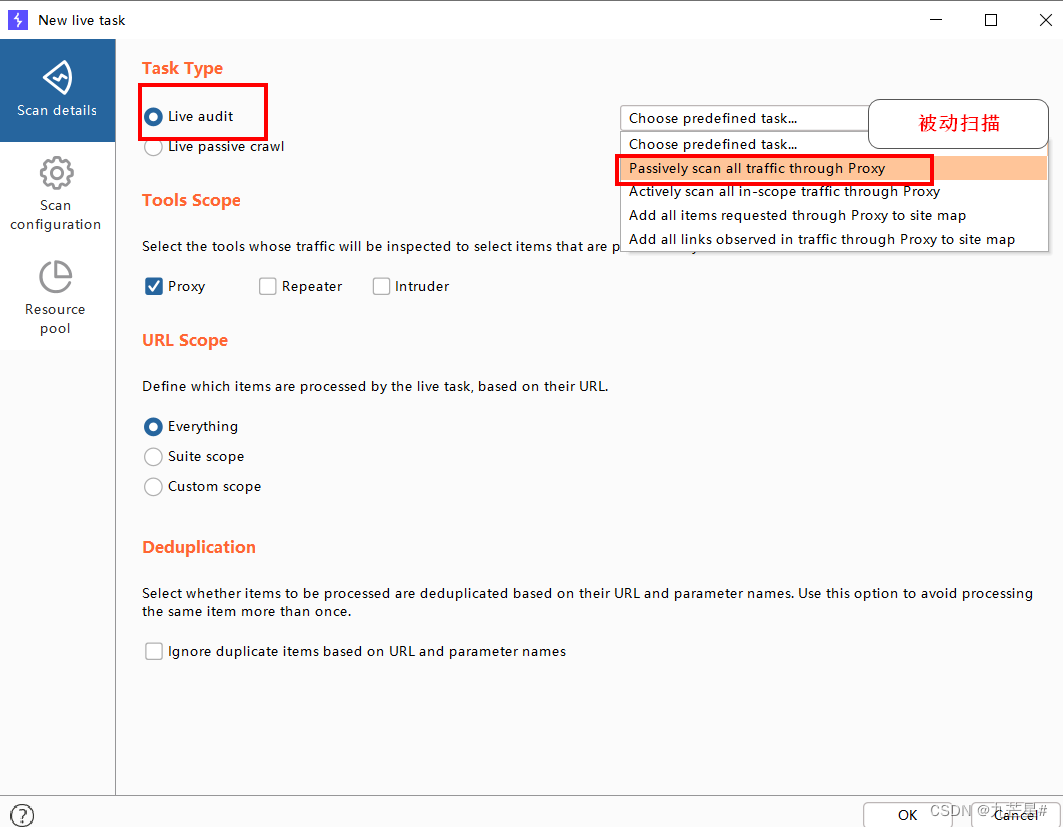
3.3 Live Scan function

Select passive scan
3.4 Generate scan report
After the task is over, the BP report can be exported (must be after the end)

4. Repeater module
4.1 Repeater function
1、发起HTTP请求,分析响应
2、重放请求
4.2 How to use
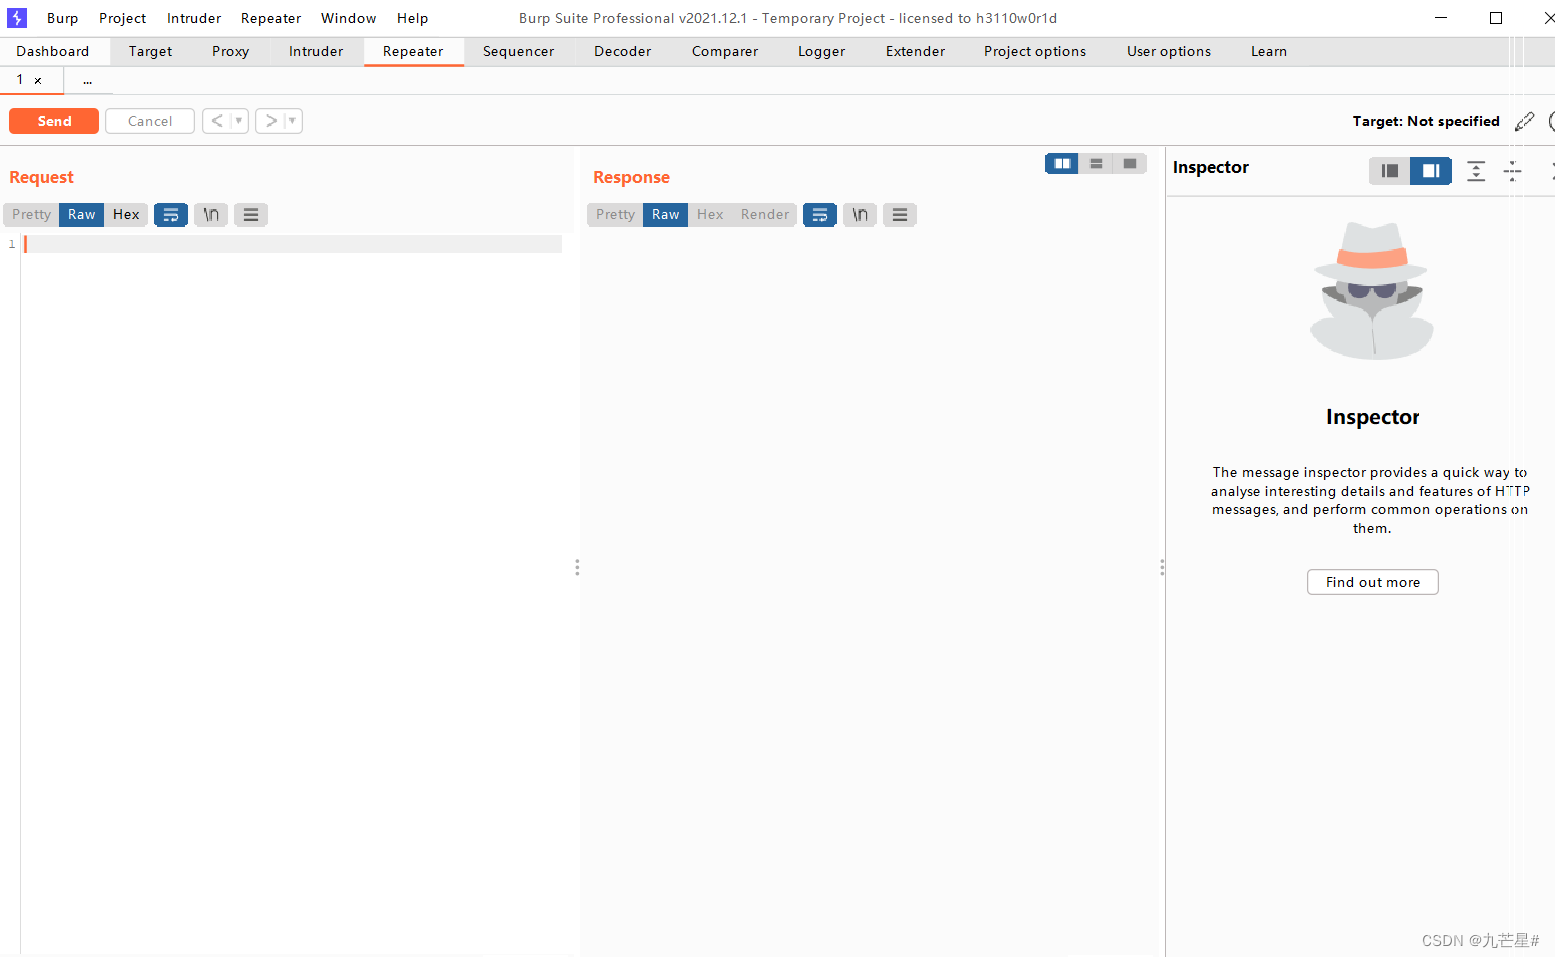
new window,

By sending to this module, point send, the content can be modified
5. Intruder module
Translation: invader
Most used for password blasting
5.1 Module function & principle
原理

请求参数进行修改,分析响应内容,获得特征数据

本质:
1、自动化发起HTTP请求
2、基于现成字典或者生成字典
用途

1、猜测用户名、密码等
2、寻找参数、目录等
3、枚举商品ID、验证码等
4、模糊测试(FUZZ)
可替代工具:
wfuzz(全部功能)、dirb(目录扫描)、hydra(暴
破)……
5.2 Password brute force combat & bypass verification code
Stay tuned. . . . . .