Machine Learning HW10 Adversarial Attacks
1. Task description
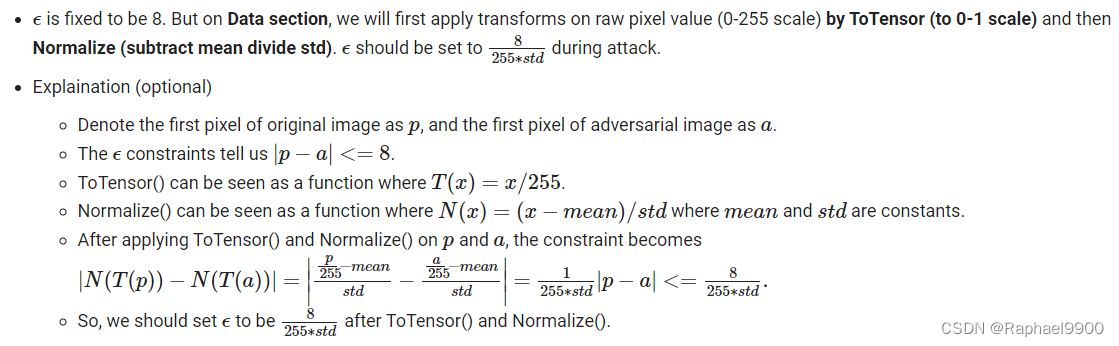
We use pytorchcv to get the CIFAR-10 pre-trained model, so we need to setup the environment first. We also need to download the data we want to attack (200 images). We will first apply a transformation (to a 0-1 scale) via ToTensor on the raw pixel values (0-255 scale), then normalize (subtract the mean and divide by the standard deviation).
# the mean and std are the calculated statistics from cifar_10 dataset
cifar_10_mean = (0.491, 0.482, 0.447) # mean for the three channels of cifar_10 images
cifar_10_std = (0.202, 0.199, 0.201) # std for the three channels of cifar_10 images

# convert mean and std to 3-dimensional tensors for future operations
mean = torch.tensor(cifar_10_mean).to(device).view(3, 1, 1)
std = torch.tensor(cifar_10_std).to(device).view(3, 1, 1)

epsilon = 8/255/std
ToTensor() also converts the image from shape(height, width, channels) to shape(channels, height, width), so we also need to transpose the shape back to the original shape.
Since our data loader samples a batch of data, we need to use np.transpose to transpose (batch_size, channel, height, width) back to (batch_size, height, width, channel).
# perform adversarial attack and generate adversarial examples
def gen_adv_examples(model, loader, attack, loss_fn):
    model.eval()
    adv_names = []
    train_acc, train_loss = 0.0, 0.0
    for i, (x, y) in enumerate(loader):
        x, y = x.to(device), y.to(device)
        x_adv = attack(model, x, y, loss_fn) # obtain adversarial examples
        yp = model(x_adv)
        loss = loss_fn(yp, y)
        train_acc += (yp.argmax(dim=1) == y).sum().item()
        train_loss += loss.item() * x.shape[0]
        # store adversarial examples
        adv_ex = ((x_adv) * std + mean).clamp(0, 1) # to 0-1 scale
        adv_ex = (adv_ex * 255).clamp(0, 255) # 0-255 scale
        adv_ex = adv_ex.detach().cpu().data.numpy().round() # 四舍五入以去除小数部分
        adv_ex = adv_ex.transpose((0, 2, 3, 1)) # transpose (bs, C, H, W) back to (bs, H, W, C)
        adv_examples = adv_ex if i == 0 else np.r_[adv_examples, adv_ex]
    return adv_examples, train_acc / len(loader.dataset), train_loss / len(loader.dataset)
Integrate multiple models as your proxy models for increased black-box portability
class ensembleNet(nn.Module):
    def __init__(self, model_names):
        super().__init__()
        self.models = nn.ModuleList([ptcv_get_model(name, pretrained=True) for name in model_names])
        self.softmax = nn.Softmax(dim=1)
    def forward(self, x):
        for i, m in enumerate(self.models):
        # TODO: sum up logits from multiple models
        # return ensemble_logits
            emsemble_logits = m(x) if i == 0 else emsemble_logits + m(x)
        return emsemble_logits/len(self.models)
Prerequisites
○Attack target: non-target attack
○Attack constraint: L-infinity and parameter ε
○Attack algorithm: FGSM/I-FGSM
○Attack mode: black box attack (perform attack on proxy network)
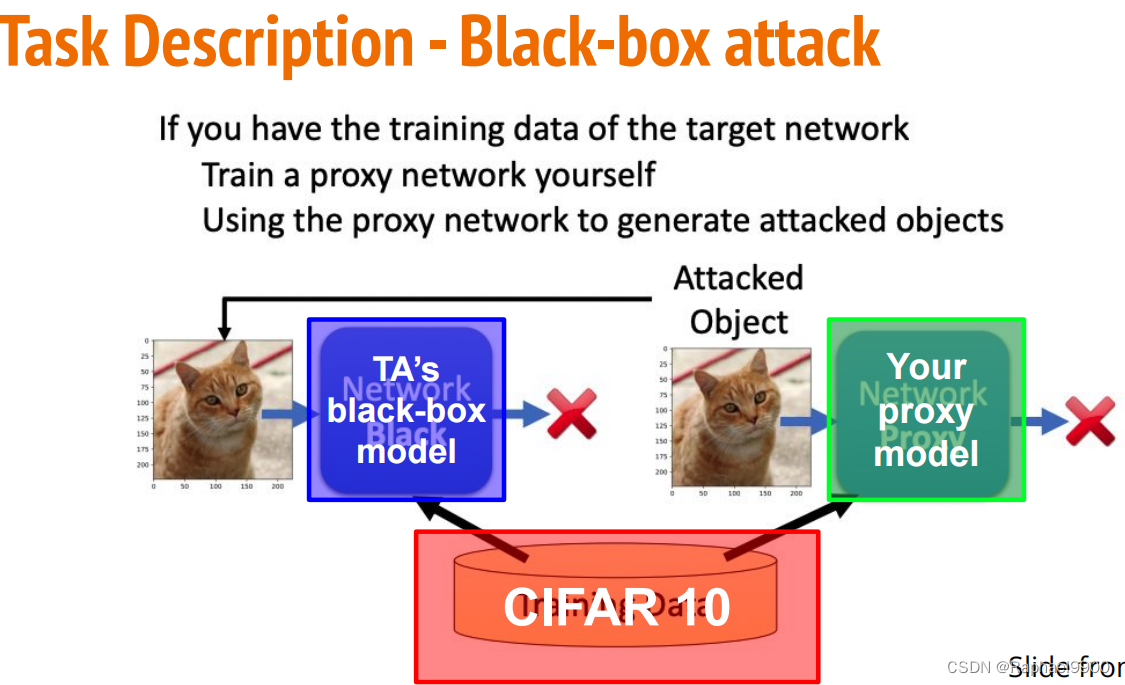
1. Select any proxy network to Attack the black-box model in TA.
2. Realize the non-target adversarial attack method
a.FGSM
bI-FGSM
c.MI-FGSM
3. Increase the transferability of the attack through different inputs (DIM)
4. Attack multiple proxy models - Ensemble attack
2. Algorithm
1、FGSM
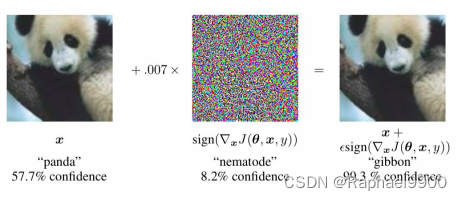
●Fast Gradient Sign Method (FGSM)
FGSM is an algorithm for generating adversarial samples based on gradients. different). When we understand the simple dp network structure, when seeking the minimum value of the loss function, we will move in the opposite direction of the gradient and use the minus sign, which is the so-called gradient descent algorithm; and FGSM can be understood as a gradient ascending algorithm, also It is to use the plus sign to maximize the loss function. The SIGN function is used to return the sign of a number. Returns 1 when the number is greater than 0, 0 when equal to 0, and -1 when less than 0. x is the original sample, θ is the weight parameter of the model (i.e. w), and y is the true class of x. Input the original samples, weight parameters and real categories, and obtain the loss value of the neural network through the J loss function. ∇x means to obtain partial derivatives for x, that is, the loss function J obtains partial derivatives for x samples. The value of ϵ (epsilon) is usually set manually, which can be understood as the learning rate. Once the disturbance value exceeds the threshold, the adversarial example will be recognized by human eyes.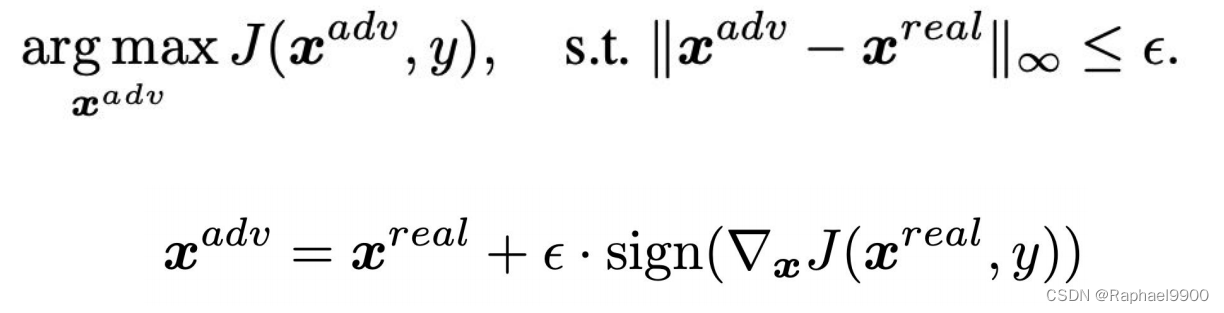
# perform fgsm attack
def fgsm(model, x, y, loss_fn, epsilon=epsilon):
    x_adv = x.detach().clone() # initialize x_adv as original benign image x
    x_adv.requires_grad = True # need to obtain gradient of x_adv, thus set required grad
    loss = loss_fn(model(x_adv), y) # calculate loss
    loss.backward() # calculate gradient
    # fgsm: use gradient ascent on x_adv to maximize loss
    grad = x_adv.grad.detach()
    x_adv = x_adv + epsilon * grad.sign()
    return x_adv
2、I-FGSM
● Iterative Fast Gradient Sign Method (I-FGSM)
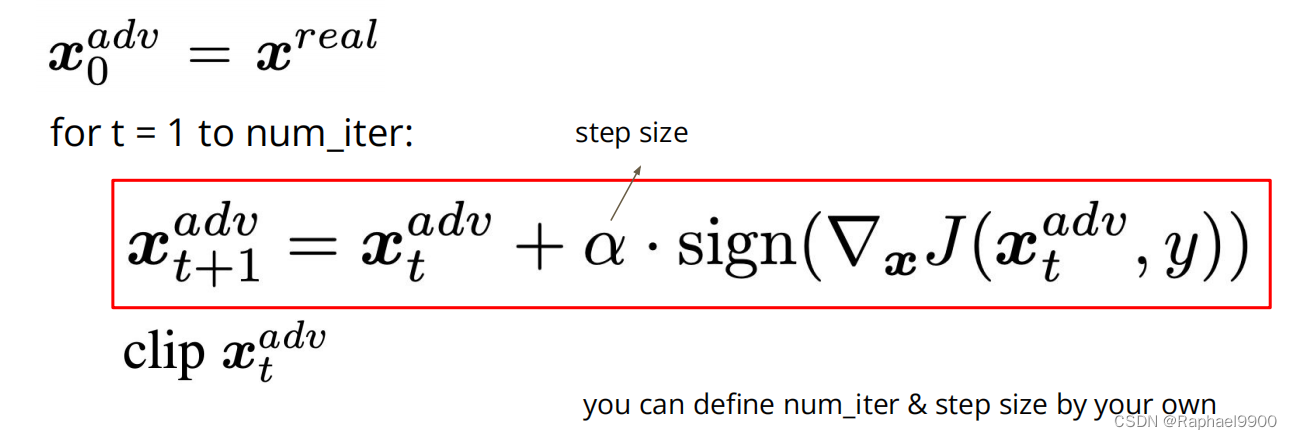
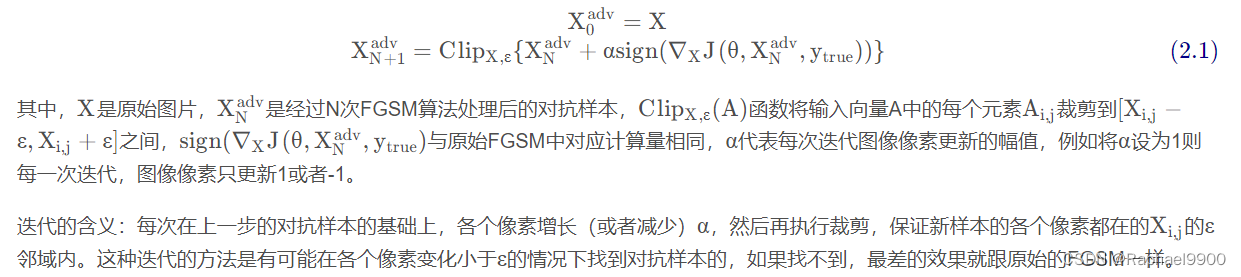
# alpha and num_iter can be decided by yourself
alpha = 0.8/255/std
def ifgsm(model, x, y, loss_fn, epsilon=epsilon, alpha=alpha, num_iter=20):
    x_adv = x
    # write a loop of num_iter to represent the iterative times
    for i in range(num_iter):
        # x_adv = fgsm(model, x_adv, y, loss_fn, alpha) # call fgsm with (epsilon = alpha) to obtain new x_adv
        x_adv = x_adv.detach().clone()
        x_adv.requires_grad = True # need to obtain gradient of x_adv, thus set required grad
        loss = loss_fn(model(x_adv), y) # calculate loss
        loss.backward() # calculate gradient
        # fgsm: use gradient ascent on x_adv to maximize loss
        grad = x_adv.grad.detach()
        x_adv = x_adv + alpha * grad.sign()

        x_adv = torch.max(torch.min(x_adv, x+epsilon), x-epsilon) # clip new x_adv back to [x-epsilon, x+epsilon]
    return x_adv
3、MI-FGSM
Augmenting adversarial attacks with momentum, using momentum to stabilize update directions and escape bad local maxima
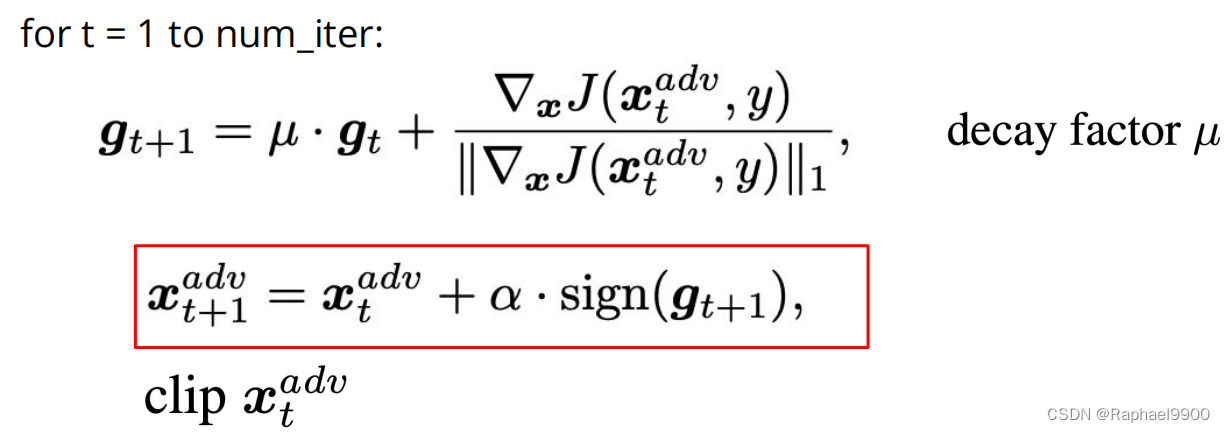
def mifgsm(model, x, y, loss_fn, epsilon=epsilon, alpha=alpha, num_iter=20, decay=1.0):
    x_adv = x
    # initialze momentum tensor
    momentum = torch.zeros_like(x).detach().to(device)
    # write a loop of num_iter to represent the iterative times
    for i in range(num_iter):
        x_adv = x_adv.detach().clone()
        x_adv.requires_grad = True # need to obtain gradient of x_adv, thus set required grad
        loss = loss_fn(model(x_adv), y) # calculate loss
        loss.backward() # calculate gradient
        # TODO: Momentum calculation
        # grad = .....
        # TODO: Momentum calculation
        grad = x_adv.grad.detach()
        grad = decay * momentum + grad/(grad.abs().sum() + 1e-8)
        momentum = grad
        x_adv = x_adv + alpha * grad.sign()
        x_adv = torch.max(torch.min(x_adv, x+epsilon), x-epsilon) # clip new x_adv back to [x-epsilon, x+epsilon]
    return x_adv
Overfitting also occurs in adversarial attacks...
IFGSM greedily perturbs the orientation sign of the image, the loss gradient is prone to fall into poor local maxima and overfitting specific network parameters.
• These overfitting adversarial examples rarely transfer to black-box models.
How to prevent overfitting proxy models and increase the transferability of black-box attacks? data augmentation
4. Multiple inputs (DIM)
1. Random resize (resizes the input image to a random size)
2. Random padding (pad zeros around the input image in a random fashion)
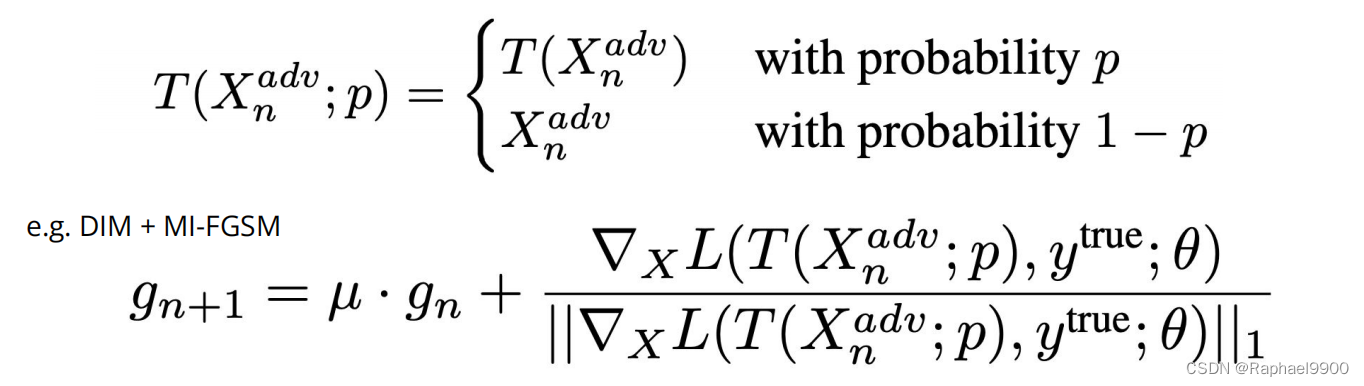
def dmi_mifgsm(model, x, y, loss_fn, epsilon=epsilon, alpha=alpha, num_iter=50, decay=1.0, p=0.5):
    x_adv = x
    # initialze momentum tensor
    momentum = torch.zeros_like(x).detach().to(device)
    # write a loop of num_iter to represent the iterative times
    for i in range(num_iter):
        x_adv = x_adv.detach().clone()
        x_adv_raw = x_adv.clone()
        if torch.rand(1).item() >= p:
            #resize img to rnd X rnd
            rnd = torch.randint(29, 33, (1,)).item()
            x_adv = transforms.Resize((rnd, rnd))(x_adv)
            #padding img to 32 X 32 with 0
            left = torch.randint(0, 32 - rnd + 1, (1,)).item()
            top = torch.randint(0, 32 - rnd + 1, (1,)).item()
            right = 32 - rnd - left
            bottom = 32 - rnd - top
            x_adv = transforms.Pad([left, top, right, bottom])(x_adv)
        x_adv.requires_grad = True # need to obtain gradient of x_adv, thus set required grad
        loss = loss_fn(model(x_adv), y) # calculate loss
        loss.backward() # calculate gradient
        # TODO: Momentum calculation
        # grad = .....
        grad = x_adv.grad.detach()
        grad = decay * momentum + grad/(grad.abs().sum() + 1e-8)
        momentum = grad
        x_adv = x_adv_raw + alpha * grad.sign()
        x_adv = torch.max(torch.min(x_adv, x+epsilon), x-epsilon) # clip new x_adv back to [x-epsilon, x+epsilon]
    return x_adv
Ensemble attack
Select a list of proxy models
Select an attack algorithm (FGSM I-FGSM etc.)
Attack multiple proxy models simultaneously
Integrated adversarial attacks: study transferable adversarial examples and black-box attacks
How to choose a suitable proxy model Black box attack:
Evaluation Index
●Parameter ε is fixed to 8
●Distance measurement: L-inf. norm
●Model accuracy is the only evaluation index
3. Experiment
1、Simple Baseline
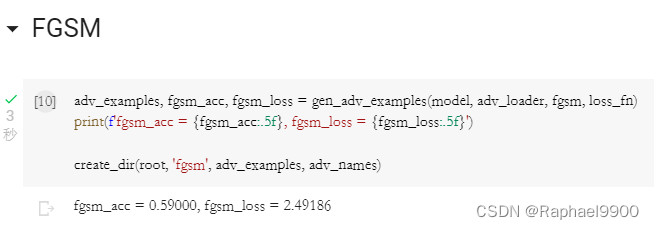
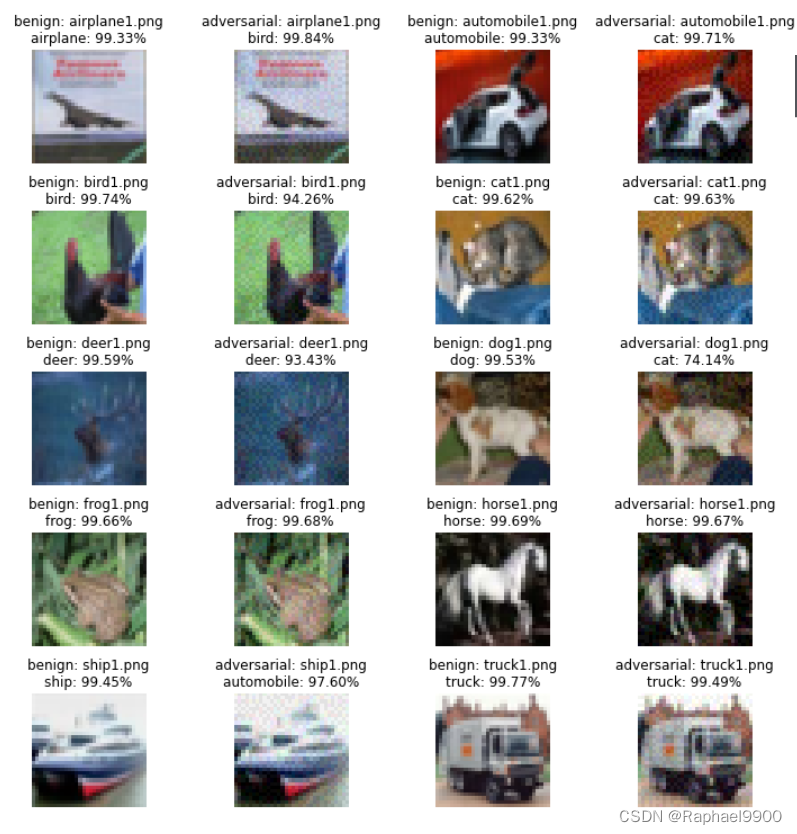
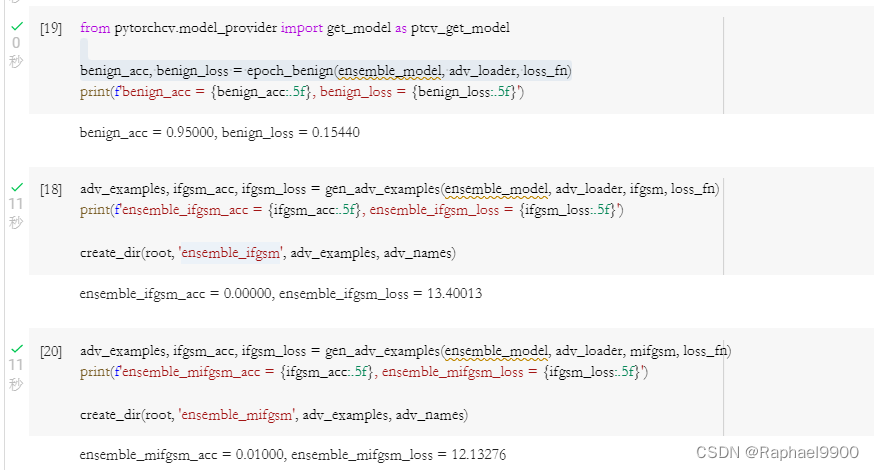
Run the FGSM method in the tutorial program directly. FGSM only attacks the picture once, the proxy models (proxy models) are resnet110_cifar10, and the accuracy in the attacked picture is benign_acc=0.95, benign_loss=0.22678. In the attack, the gen_adv_examples function is used to call the fgsm function, and the precision is reduced: fgsm_acc=0.59, fgsm_loss=2.49186.
2、Medium Baseline
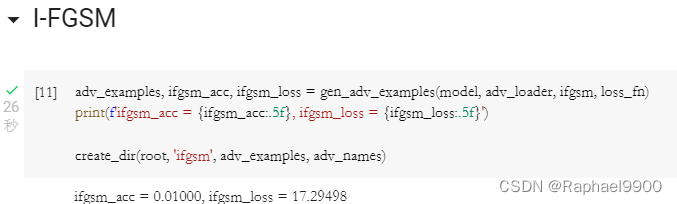
Method: I-FGSM method + Ensembel Attack. Compared with fgsm, the ifgsm method uses multiple fgsm loop attacks. In addition, Ensemble attack is used. This method uses multiple proxy models to attack, and the forward function in the ensembelNet class needs to be changed. In the attack, using the gen_adv_examples function to call emsebel_model and ifgsm, the accuracy is significantly reduced: ifgsm_acc = 0.01, ifgsm_loss=17.29498.
    def forward(self, x):
        emsemble_logits = None
        for i, m in enumerate(self.models):
            emsemble_logits = m(x) if i == 0 else emsemble_logits + m(x)
        return emsemble_logits/len(self.models)
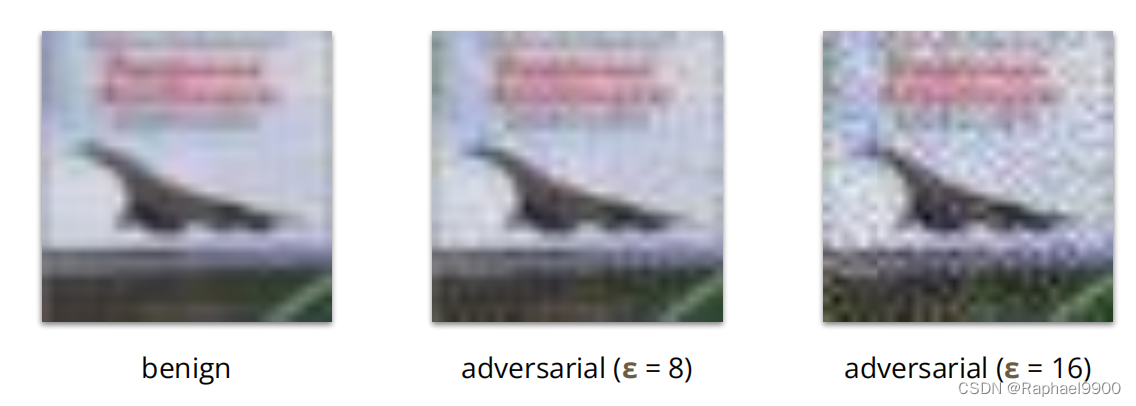
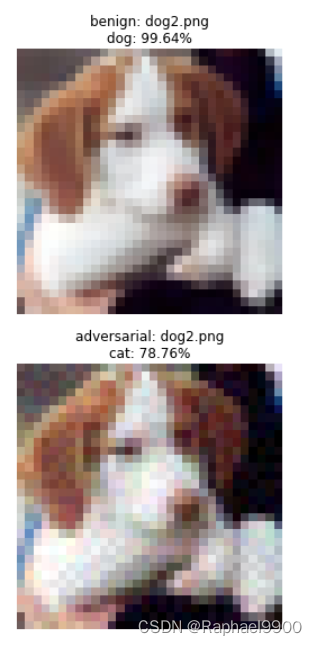
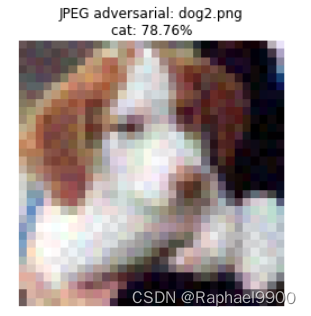
The source model is "resnet110_cifar10", and the normal fgsm attack is applied to dog2.png:
JPEG compression is performed through the imgaug package, and the compression ratio is set to 70:
3、Strong Baseline
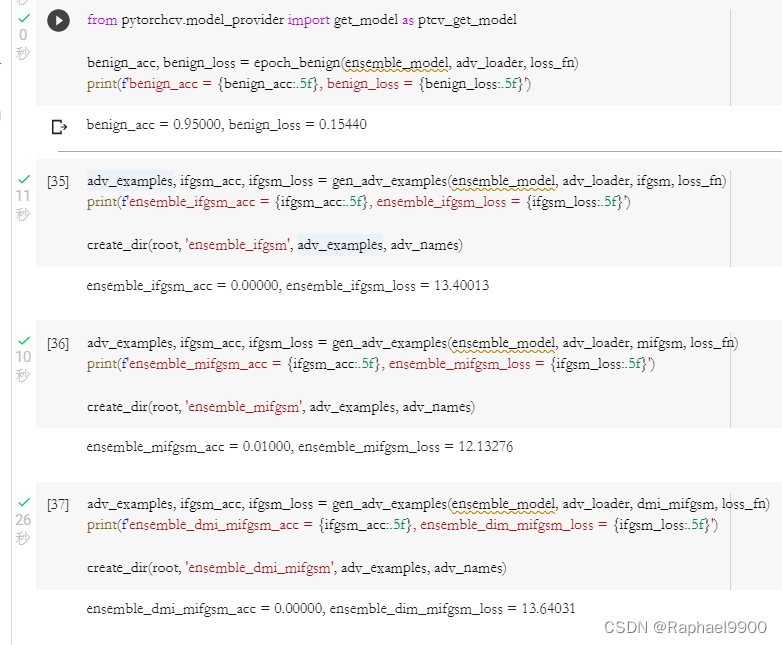
Method: MIFGSM + Ensemble Attack (pick right models). Compared with ifgsm, mifgsm has added momentum to prevent the attack from falling into local maxima. In the medium baseline, we randomly pick some surrogate models, which is blind. You can choose some models with insufficient training. The meaning of insufficient training includes two aspects: one is that the training epoch of the model is less, and the other is that the model has not reached the minimum loss in the verification set (val set). According to the paper, use the training method in https://github.com/kuangliu/pytorch-cifar, select the resnet18 model, train for 30 epochs (about 200 epochs are required for normal training to reach the best results), and add it to ensmbleNet. Accuracy and loss after attack: ensemble_mifgsm_acc = 0.01, emsemble_mifgsm_loss = 12.13276.
        # TODO: Momentum calculation
        grad = x_adv.grad.detach()
        grad = decay * momentum + grad/(grad.abs().sum() + 1e-8)
        momentum = grad
        x_adv = x_adv + alpha * grad.sign()
4、Boss Baseline
Method: DIM-MIFGSM + Ensemble Attack (pick right models). Compared with strong baseline, mifgsm is replaced by dim-mifgsm, and transform is added to the attacked image to avoid overfitting. Transform is to randomly resize the image first, and then randomly padding the image to the original size. Write the dim_mifgsm function based on the mifgsm function. In the attack, use the gen_adv_examples function to call the model, the accuracy and loss after the attack: ensemble_dmi_mifgsm_acc = 0.00, emsemble_dim_mifgsm_loss = 13.64031.
def dmi_mifgsm(model, x, y, loss_fn, epsilon=epsilon, alpha=alpha, num_iter=50, decay=1.0, p=0.5):
    x_adv = x
    # initialze momentum tensor
    momentum = torch.zeros_like(x).detach().to(device)
    # write a loop of num_iter to represent the iterative times
    for i in range(num_iter):
        x_adv = x_adv.detach().clone()
        x_adv_raw = x_adv.clone()
        if torch.rand(1).item() >= p:
            #resize img to rnd X rnd
            rnd = torch.randint(29, 33, (1,)).item()
            x_adv = transforms.Resize((rnd, rnd))(x_adv)
            #padding img to 32 X 32 with 0
            left = torch.randint(0, 32 - rnd + 1, (1,)).item()
            top = torch.randint(0, 32 - rnd + 1, (1,)).item()
            right = 32 - rnd - left
            bottom = 32 - rnd - top
            x_adv = transforms.Pad([left, top, right, bottom])(x_adv)
        x_adv.requires_grad = True # need to obtain gradient of x_adv, thus set required grad
        loss = loss_fn(model(x_adv), y) # calculate loss
        loss.backward() # calculate gradient
        # TODO: Momentum calculation
        # grad = .....
        grad = x_adv.grad.detach()
        grad = decay * momentum + grad/(grad.abs().sum() + 1e-8)
        momentum = grad
        x_adv = x_adv_raw + alpha * grad.sign()
        x_adv = torch.max(torch.min(x_adv, x+epsilon), x-epsilon) # clip new x_adv back to [x-epsilon, x+epsilon]
    return x_adv