Table of contents
DHCP overview
The following is the general workflow of DHCP:
Request: When a device joins the network, it will send a DHCP request broadcast message (DHCP Discover) to request for network configuration information.
Offer: After receiving the request, the DHCP server will reply with a DHCP offer message (DHCP Offer), which contains the available IP address and other configuration parameters, such as subnet mask, gateway, DNS, etc.
Accept: After the device receives DHCP offers, it can choose to accept one of the offers. It sends a DHCP request message (DHCP Request) to the provider, confirming acceptance of the offer.
Acknowledgment: After receiving the confirmation, the DHCP server will send a DHCP Acknowledgment message (DHCP Acknowledgment), which contains the final configuration information. After the device receives the confirmation, it applies these configuration parameters and starts using the assigned IP address.
DHCP also supports other functions such as IP address renewal and release. Before the lease period expires, the device can send a renewal request (DHCP Renew) to the DHCP server to extend the lease time. When a device no longer needs an IP address, it can send a release request (DHCP Release) to return the IP address to the server for use by other devices.
Advantages of DHCP include:
- Automation: Automatically assign IP addresses and other configuration parameters, reducing the workload of manual configuration.
- Centralized management: Centralized management and control of IP address allocation through the DHCP server to improve network management efficiency.
- Flexibility: The IP address allocation strategy and parameter configuration can be adjusted according to network requirements.
All in all, DHCP is a convenient network protocol that can automatically assign and manage IP addresses and other network configuration parameters, simplifying the management and configuration process of the network.
Configuration instructions
Configuring HDCP (High-bandwidth Digital Content Protection) in Linux is a digital copyright protection protocol for monitors and graphics cards. However, HDCP configuration is usually supported by hardware and graphics drivers, not by the operating system. Therefore, configuring HDCP in Linux may have some limitations.
Here are some possible steps and considerations, but note that this depends on your hardware and driver support:
Check hardware support: First, make sure your monitor and graphics card support HDCP. Check the device's specifications or contact the manufacturer for details.
Update Graphics Drivers: Make sure you have the latest graphics drivers installed on your Linux system. You can find and download the latest driver for your graphics card model, then follow the manufacturer's instructions to install it.
Configuring HDCP options: Some graphics card drivers may provide an interface or command-line tool for configuring HDCP options. You can try viewing and configuring HDCP settings in the graphics card control panel or using specific command line tools.
Use DRM (Direct Rendering Manager): Linux uses DRM to manage and control the communication between the monitor and the graphics card. Make sure your system is DRM enabled, and configure it accordingly if necessary.
Note that HDCP configuration and support may vary by hardware, driver, and operating system. In some cases, specific hardware and drivers may not support or provide HDCP functionality. Therefore, it is recommended to consult relevant documentation, drivers, and OS support communities for more accurate information and guidance before configuring HDCP.
CentOS DHCP configuration
-
Install the DHCP server: Install the DHCP server package (if not already installed) with the following command:
yum install dhcp -
Configure DHCP server: Edit
/etc/dhcp/dhcpd.confthe file to configure the DHCP server. You can open this file with a text editor such as vi or nano.vi /etc/dhcp/dhcpd.confIn this file, you can define the configuration parameters of the DHCP server, such as IP address pool, subnet mask, default gateway, DNS servers, etc. Here is a simple example configuration:
subnet 192.168.1.0 netmask 255.255.255.0 {
    range 192.168.1.100 192.168.1.200;
    option subnet-mask 255.255.255.0;
    option routers 192.168.1.1;
    option domain-name-servers 8.8.8.8;
}
This example configuration defines a subnet of 192.168.1.0/24, a pool of IP addresses from 192.168.1.100 to 192.168.1.200, and specifies a subnet mask, default gateway, and DNS server.
-
Start and enable DHCP service: Use the following commands to start and enable DHCP service:
systemctl start dhcpd
systemctl enable dhcpd
This will start the DHCP service and automatically enable it on system boot.
-
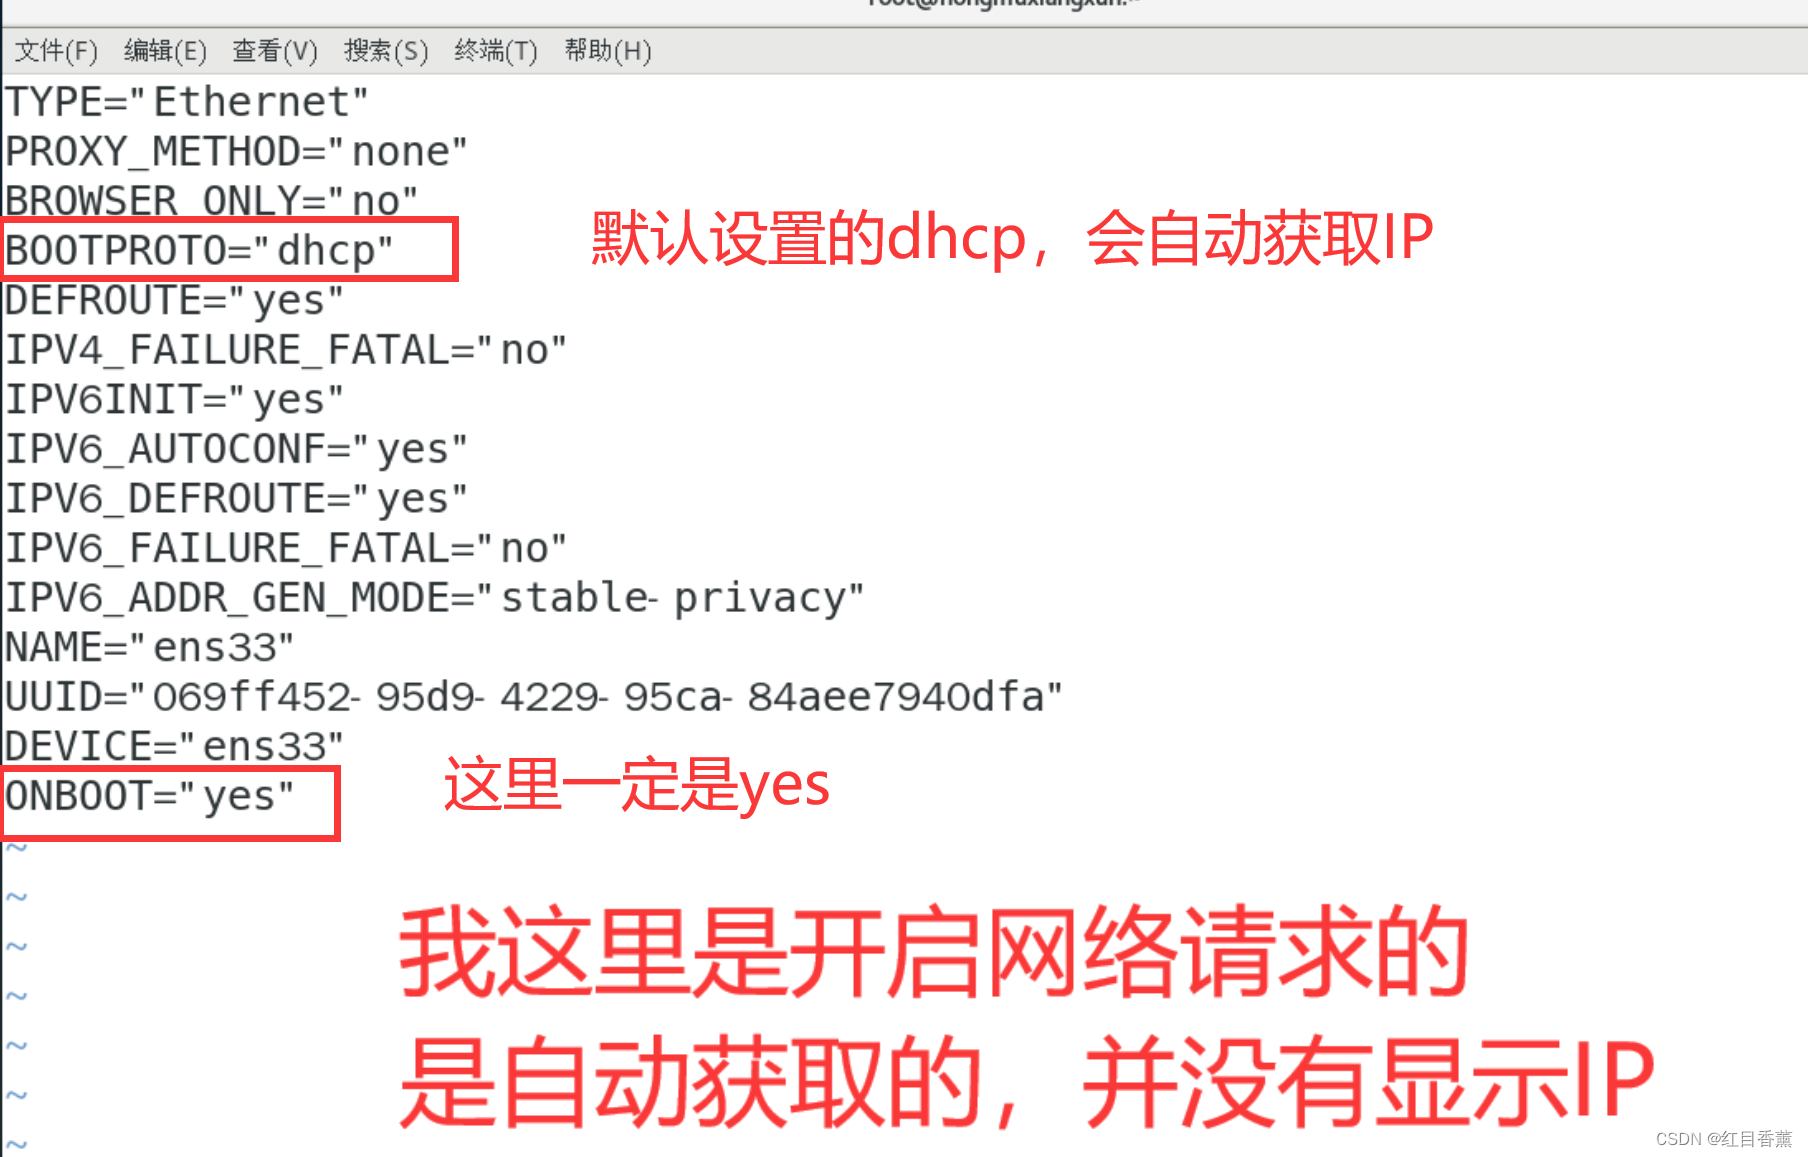
Configure the network interface: Before using a DHCP server, ensure that the network interface that will assign IP addresses to clients is properly configured. You can edit
/etc/sysconfig/network-scripts/ifcfg-<interface>the file to configure the network interface.
My name is ens33, here you need to choose according to the specific network card interface.
vi /etc/sysconfig/network-scripts/ifcfg-<interface>In the file, set
BOOTPROTOtodhcp, and save the file.BOOTPROTO=dhcp -
Restart the network service: Restart the network service with the following command for the changes to take effect:
systemctl restart network
After completing the above steps, your CentOS system should have a DHCP server configured and be able to provide IP addresses and other network configuration information to clients. Please perform proper configuration according to your network requirements and environment.