Some time ago, in the article "Based on start.spring.io, I realized the customization of Java scaffolding", I described the past and present of our company's microservice scaffolding process, and mentioned the 2.0 version of scaffolding based on spring initializr . Today I plan to share with you the implementation process and details. The project has been open sourced on Github.
start-parent:https://github.com/studeyang/start-parent
welcome star
1. Project structure introduction
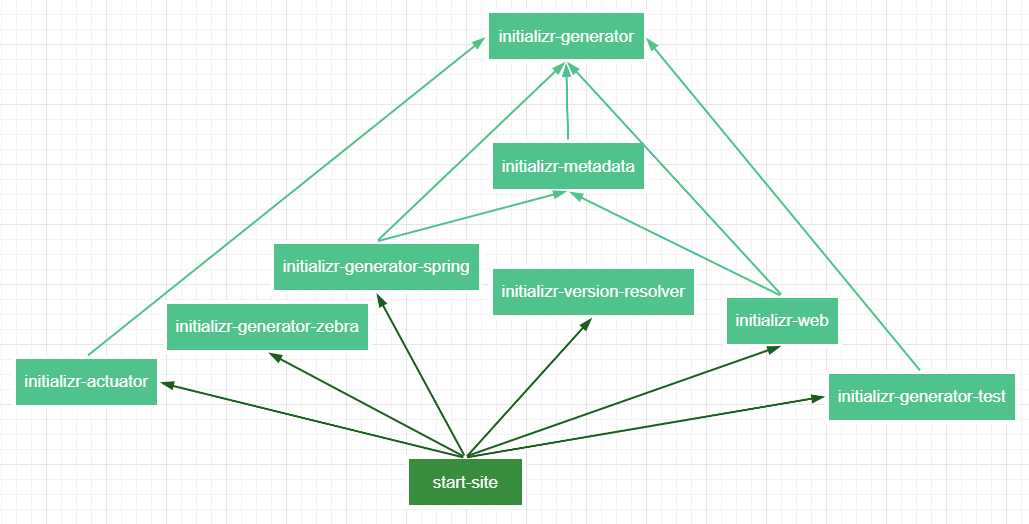
The project is divided into three parts: initializr, start-client, and start-site. The important parts are described as follows.
start-parent
  |- initializr                    代码生成
    |- initializr-actuator
    |- initializr-bom
    |- initializr-docs
    |- initializr-generator         生成基础工程代码
    |- initializr-generator-spring  生成 spring 工程代码
    |- initializr-generator-test    单元测试的封装
    |- initializr-generator-zebra   生成 zebra 分层架构
    |- initializr-metadata          工程元数据(pom 相关定义)
    |- initializr-parent
    |- initializr-service-sample
    |- initializr-version-resolver  版本解析
    |- initializr-web
  |- start-client                   脚手架前端
  |- start-site                     脚手架后端
I have simplified the dependency diagram between projects, as shown below.
After understanding the overall situation of the project, please follow my train of thought and build the project together.
2. Integrate Gitlab
If you want to use the "Create Project" function in the project, you need to configure this step. Here I take gitlab.comit as an example to introduce how to complete the integration with Gitlab.
First, we need to let Gitlab trust our application to complete the subsequent login authorization jump. Configure the scaffolding application on the Gitlab platform.
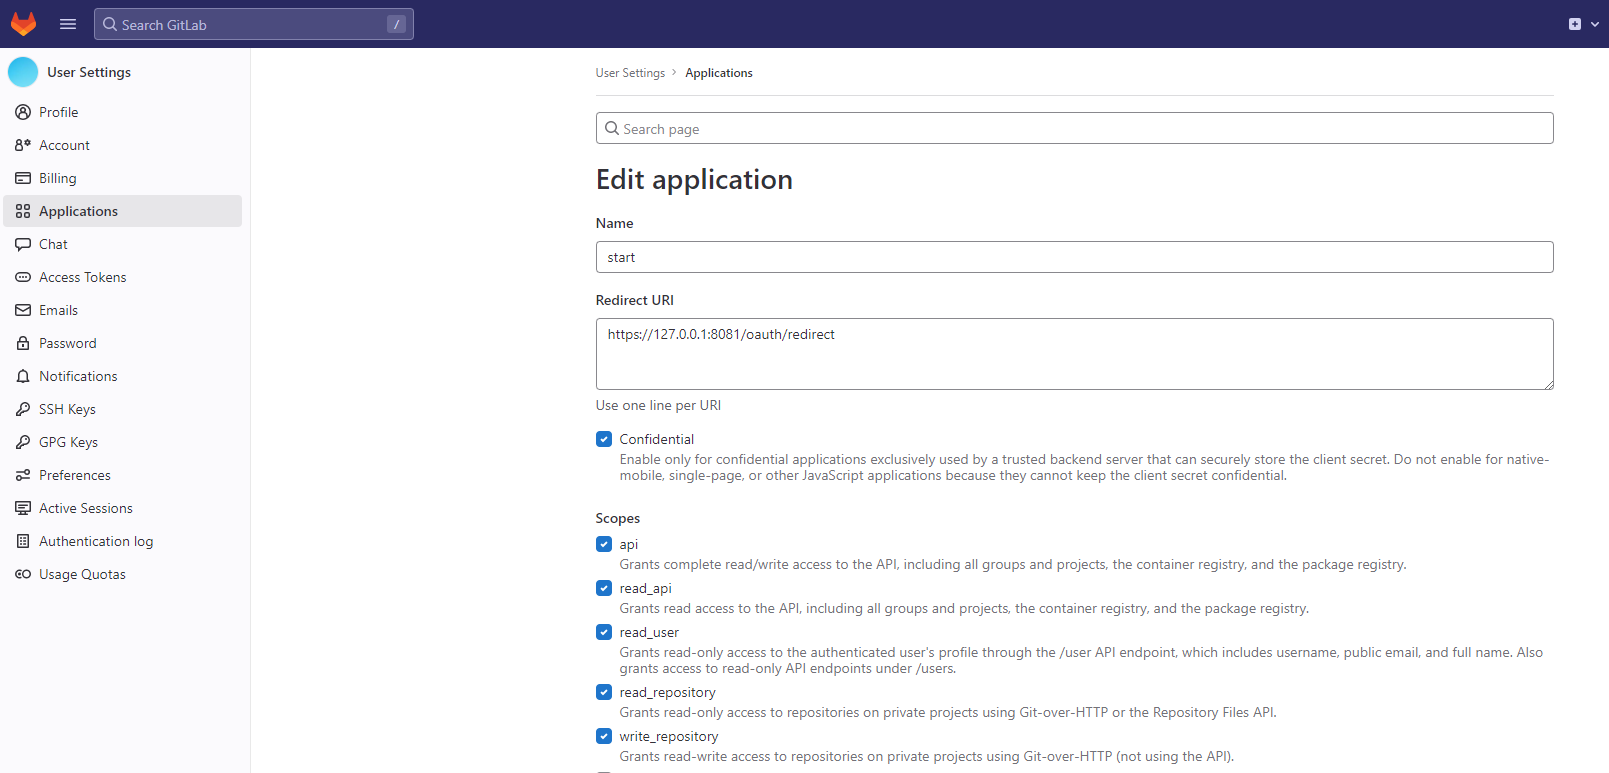
Here I have configured the Redirect URI of the local development environment. If you need to deploy to the server later, you should configure the backend address of the scaffolding server.
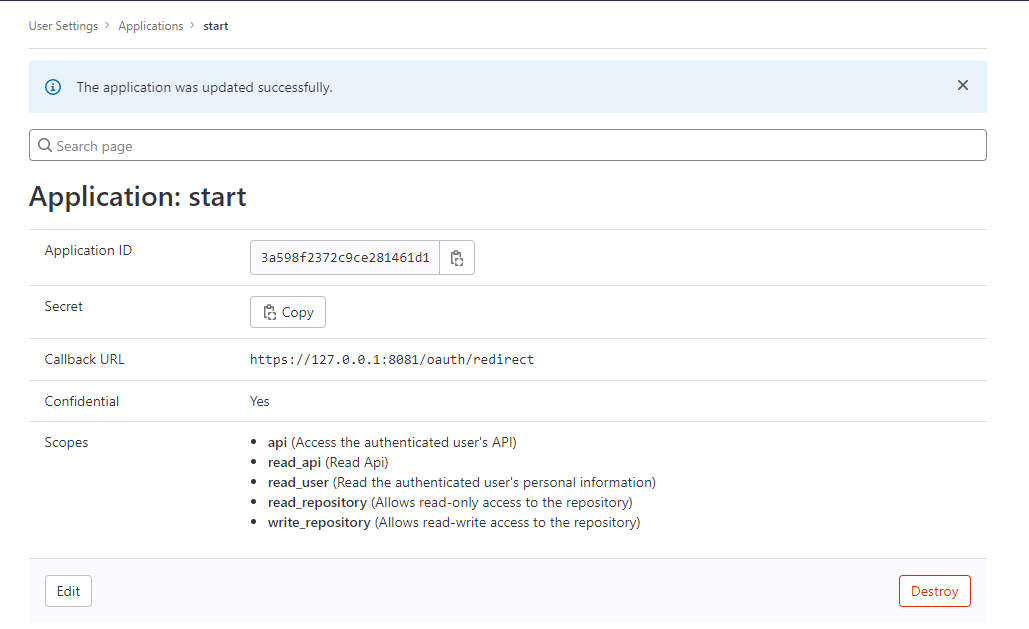
After the configuration is complete, Gitlab records our application and assigns Application ID and Secret. We need to configure the values of these two fields into the start-site application.yml file:
security:
  base-url: https://gitlab.com
  authorization-uri: ${

    security.base-url}/oauth/authorize
  token-uri: ${

    security.base-url}/oauth/token
  user-info-uri: ${

    security.base-url}/api/v4/user
  redirect-uri: http://127.0.0.1:8081/oauth/redirect
  client-id: gitlab client id
  client-secret: gitlab client secret
  admin:
    name: your gitlab admin username
    password: your gitlab admin password
Here I briefly introduce the relevant fields, authorization-uri, token-uri, user-info-uri These three fields are fixed and do not need to be configured.
- base-url: If you use
gitlabthe management project,base-urlyou can set it to the address you builtgitlab; - redirect-uri: the redirect address after gitlab authentication, the backend is used here to receive the redirect, because the redirect will carry code parameters, avoiding exposure to the browser and improving security;
- client-id: Application ID assigned by gitlab;
- client-secret: Secret assigned by gitlab;
- admin.name: gitlab account, used to create a project and submit the initial project code, it is recommended to configure an administrator account;
- admin.password: gitlab account password;
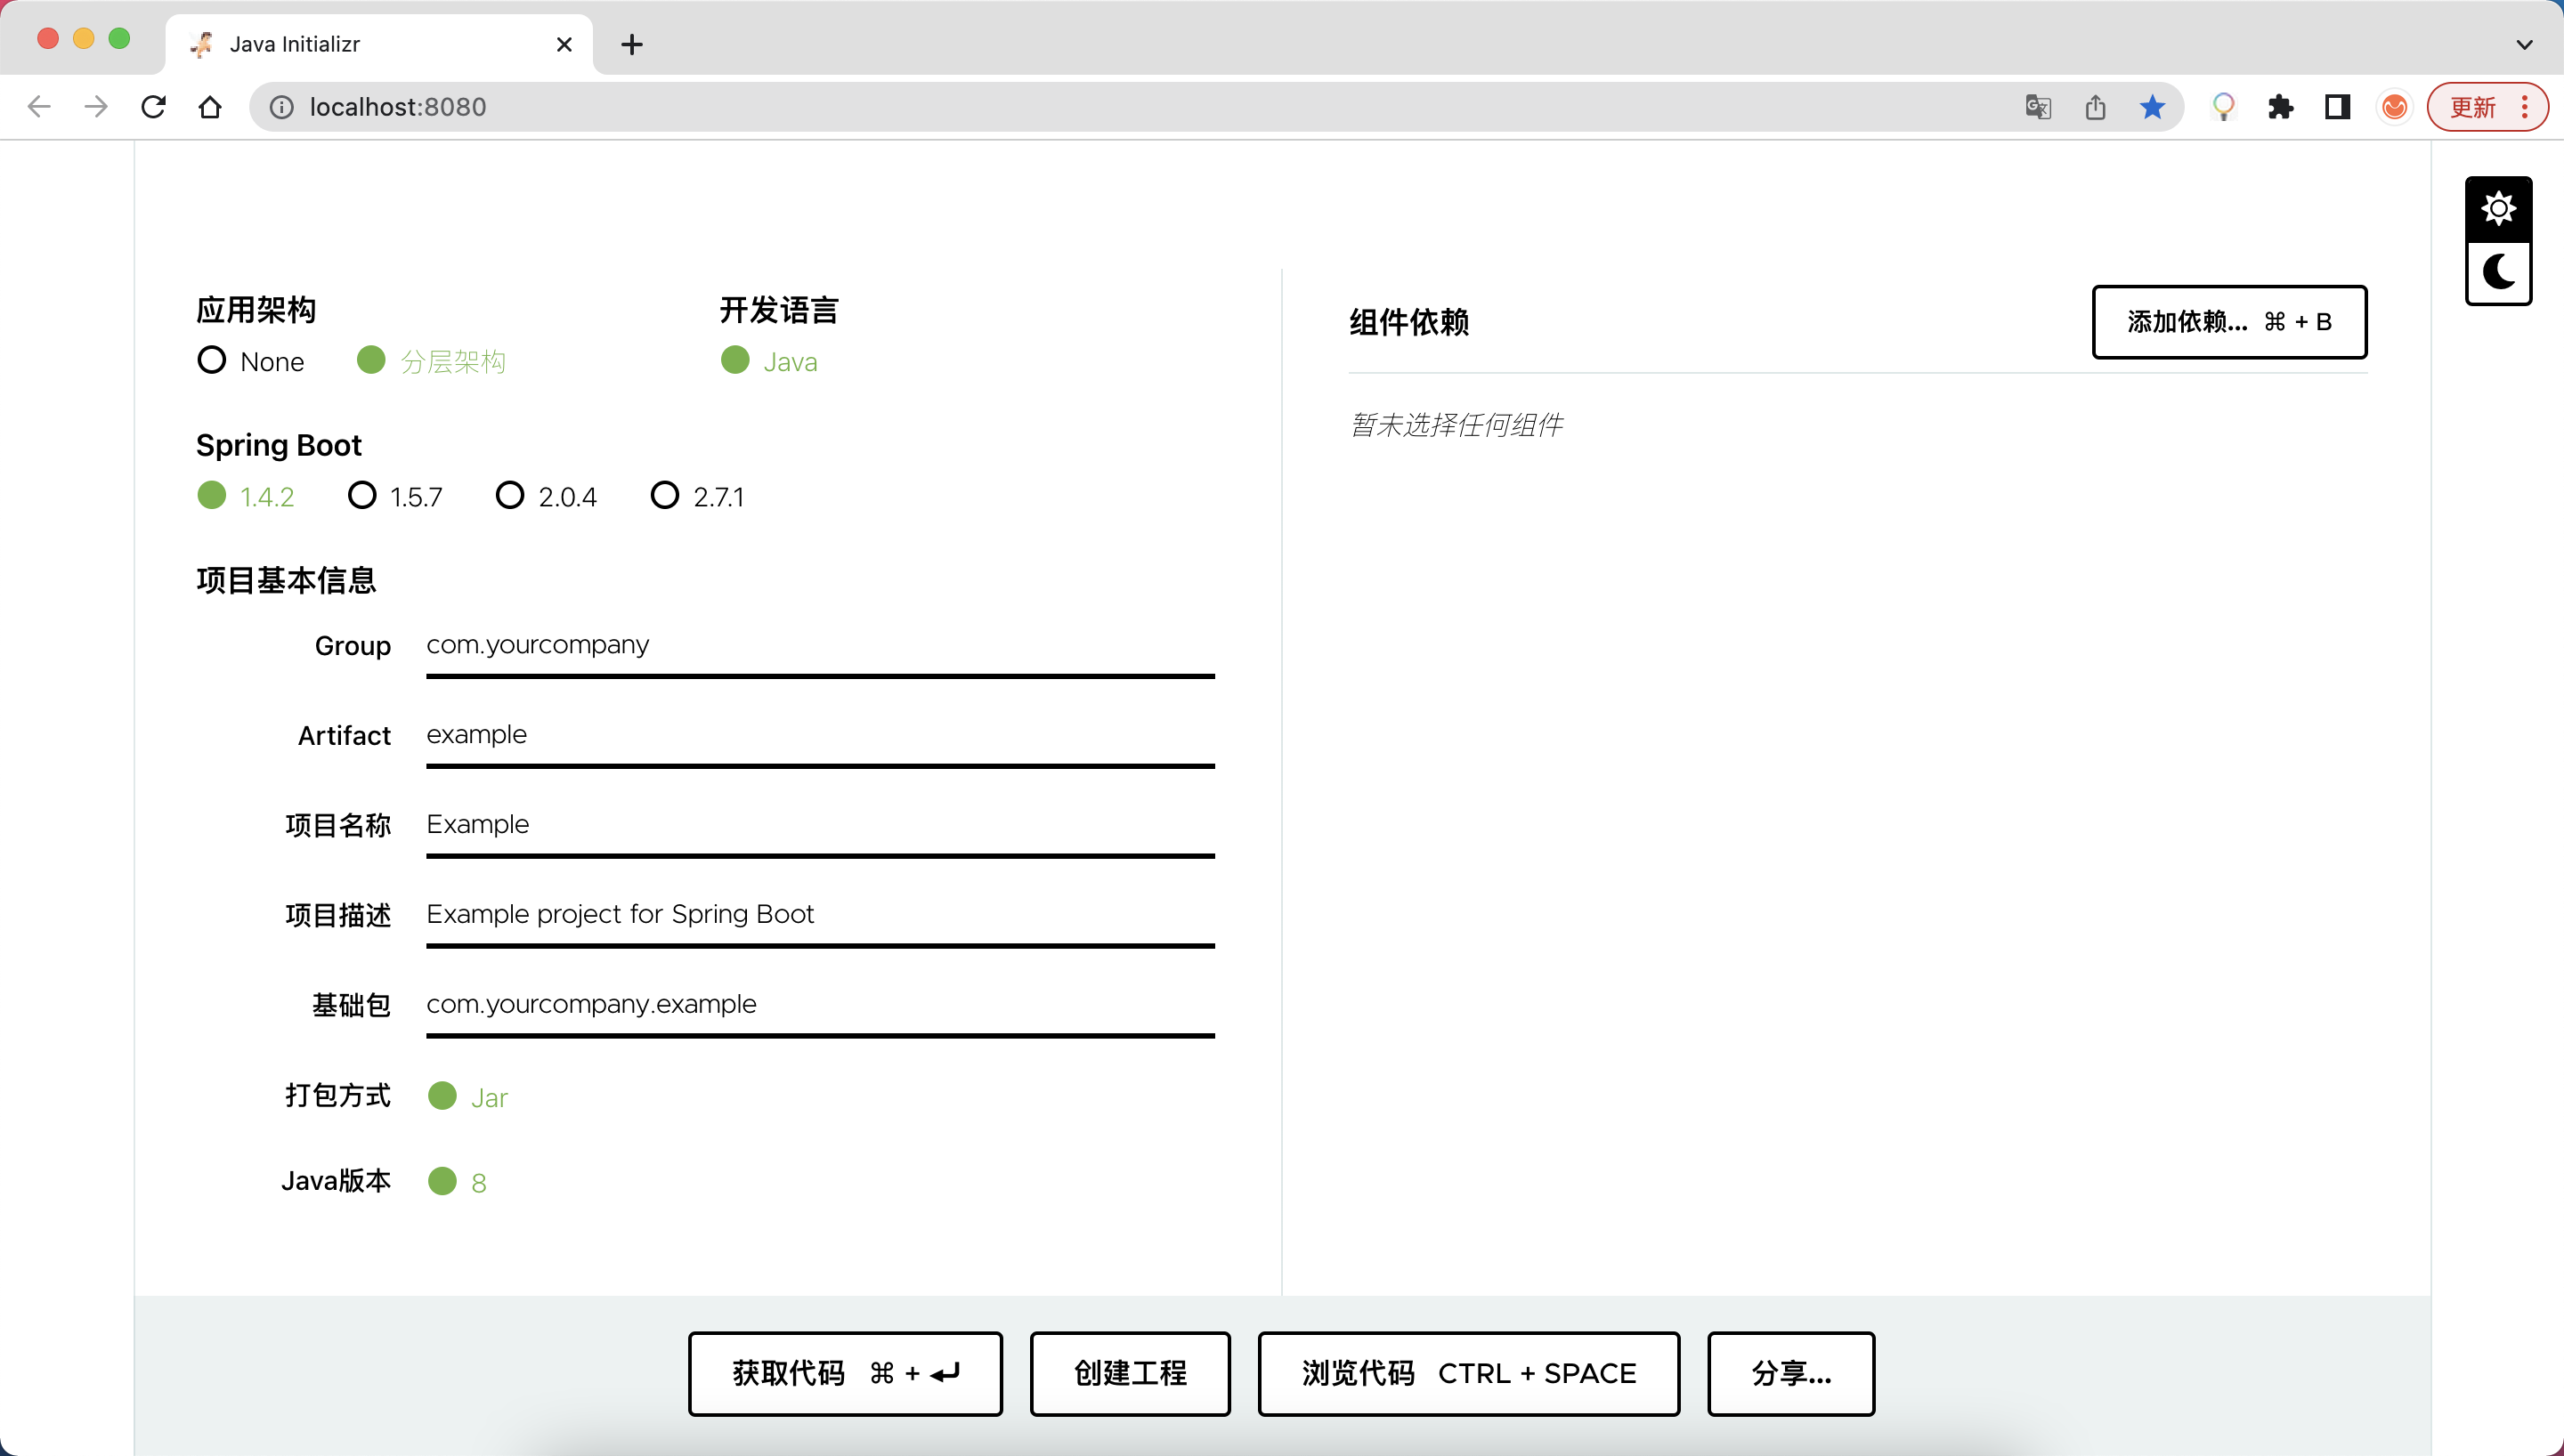
3. Add components
Next add component dependencies. Here I take casslog-spring-boot-starterthe Jar package as an example. If the component only supports some versions of SpringBoot, you can configure compatibility-range, for example:
compatibility-range: "[1.4.2.RELEASE,1.5.7.RELEASE]"
The complete configuration is as follows.
initializr:
  dependencies:
    - name: 开源基础设施
      bom: kmw
      repository: my-rep
      content:
        - name: Casslog
          id: casslog
          groupId: io.github.studeyang
          artifactId: casslog-spring-boot-starter
          description: 日志工具类
          starter: true
          compatibility-range: "[1.4.2.RELEASE,1.5.7.RELEASE]"
          links:
            - rel: guide
              href: {

    用户手册}
              description: Example 快速开始
            - rel: reference
              href: {

    参考文档}
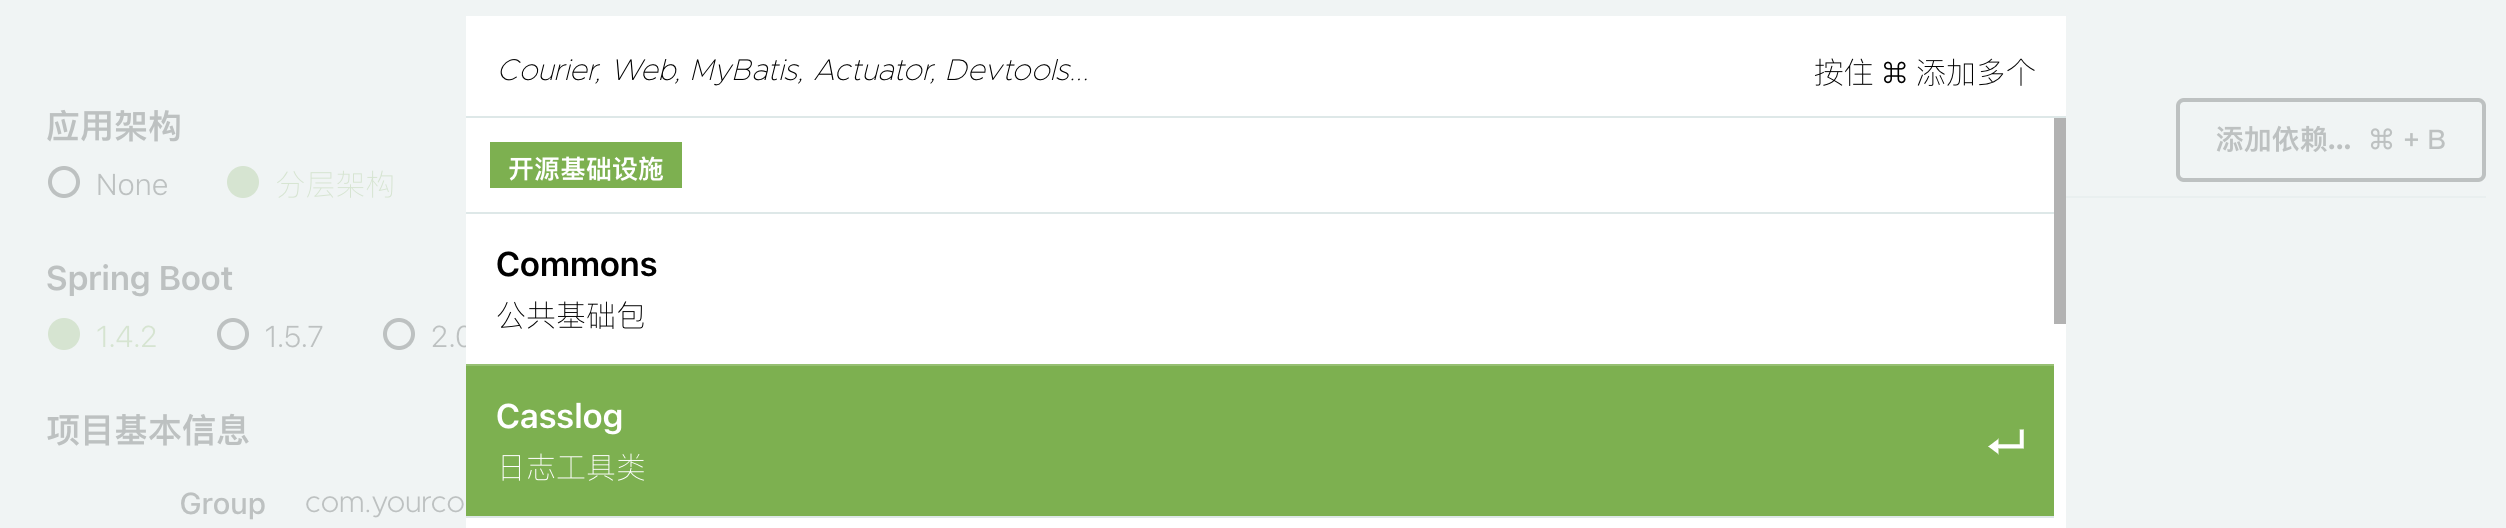
Configure dependencies.
- "name" The name of the component dependency category, for example: open source infrastructure
- "bom" dependency package management library under this category
- "repository" The repository of the dependent packages under this category
- "content" specific dependency package
Configure content.
- "name" depends on the package name
- "id" depends on the unique identifier of the package (used in the code)
- "groupId" depends on the package groupId
- "artifactId" depends on the package artifactId
- "description" depends on the package description
- Whether "starter" is spring-boot-starter
- The springboot version that "compatibility-range" depends on
- Documentation for the "links" component
The configured effect diagram is as follows.
4. Deploy the application
Next, the scaffolding can be deployed to the server.
Here is a reminder, remember to change the redirect-uri of Gitlab to the address of the scaffolding server.
4.1 Step 1: Project packaging
# 打包前端工程
cd {

    projectRoot}/start-client
sh ../mvnw install

# 打包 initializr 项目
cd {

    projectRoot}/initializr
sh ../mvnw clean install -Dmaven.test.skip=true

# 打包 start-site
cd {

    projectRoot}/start-site
sh ../mvnw clean install -Dmaven.test.skip=true
4.2 Step 2: Create a Docker image
cd {

    projectRoot}/start-site
docker build -t start-site:0.0.1 .
Just run the mirror. The effect diagram is as follows.
5. The correct posture of using scaffolding
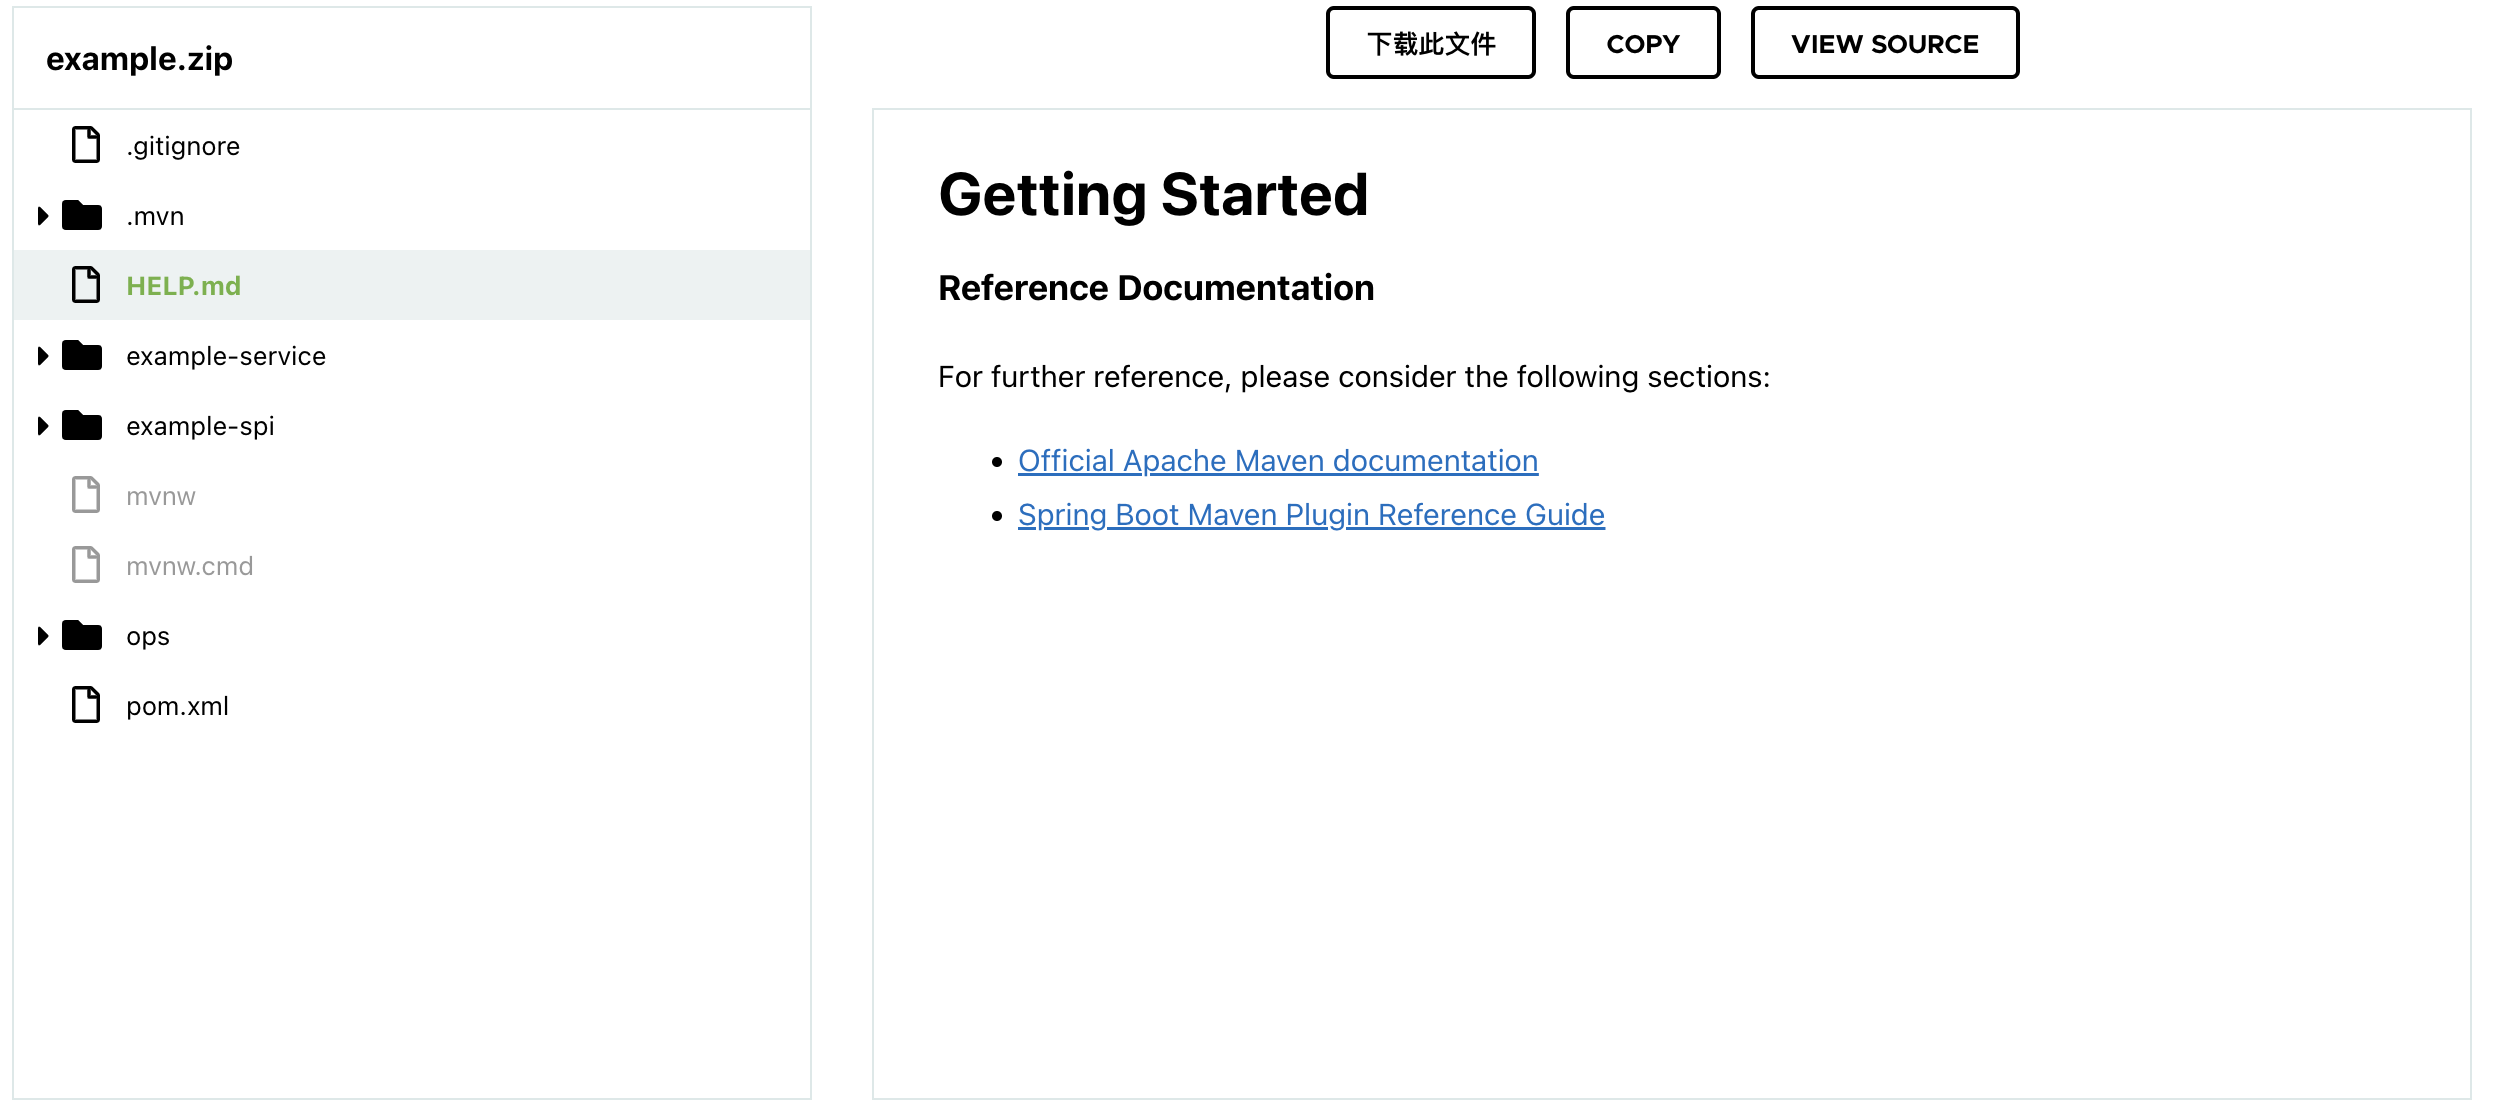
5.1 Manage and use documents through HELP.md
The document link configured in the process of "3. Adding components" will be displayed in the HELP.md file, as shown below:
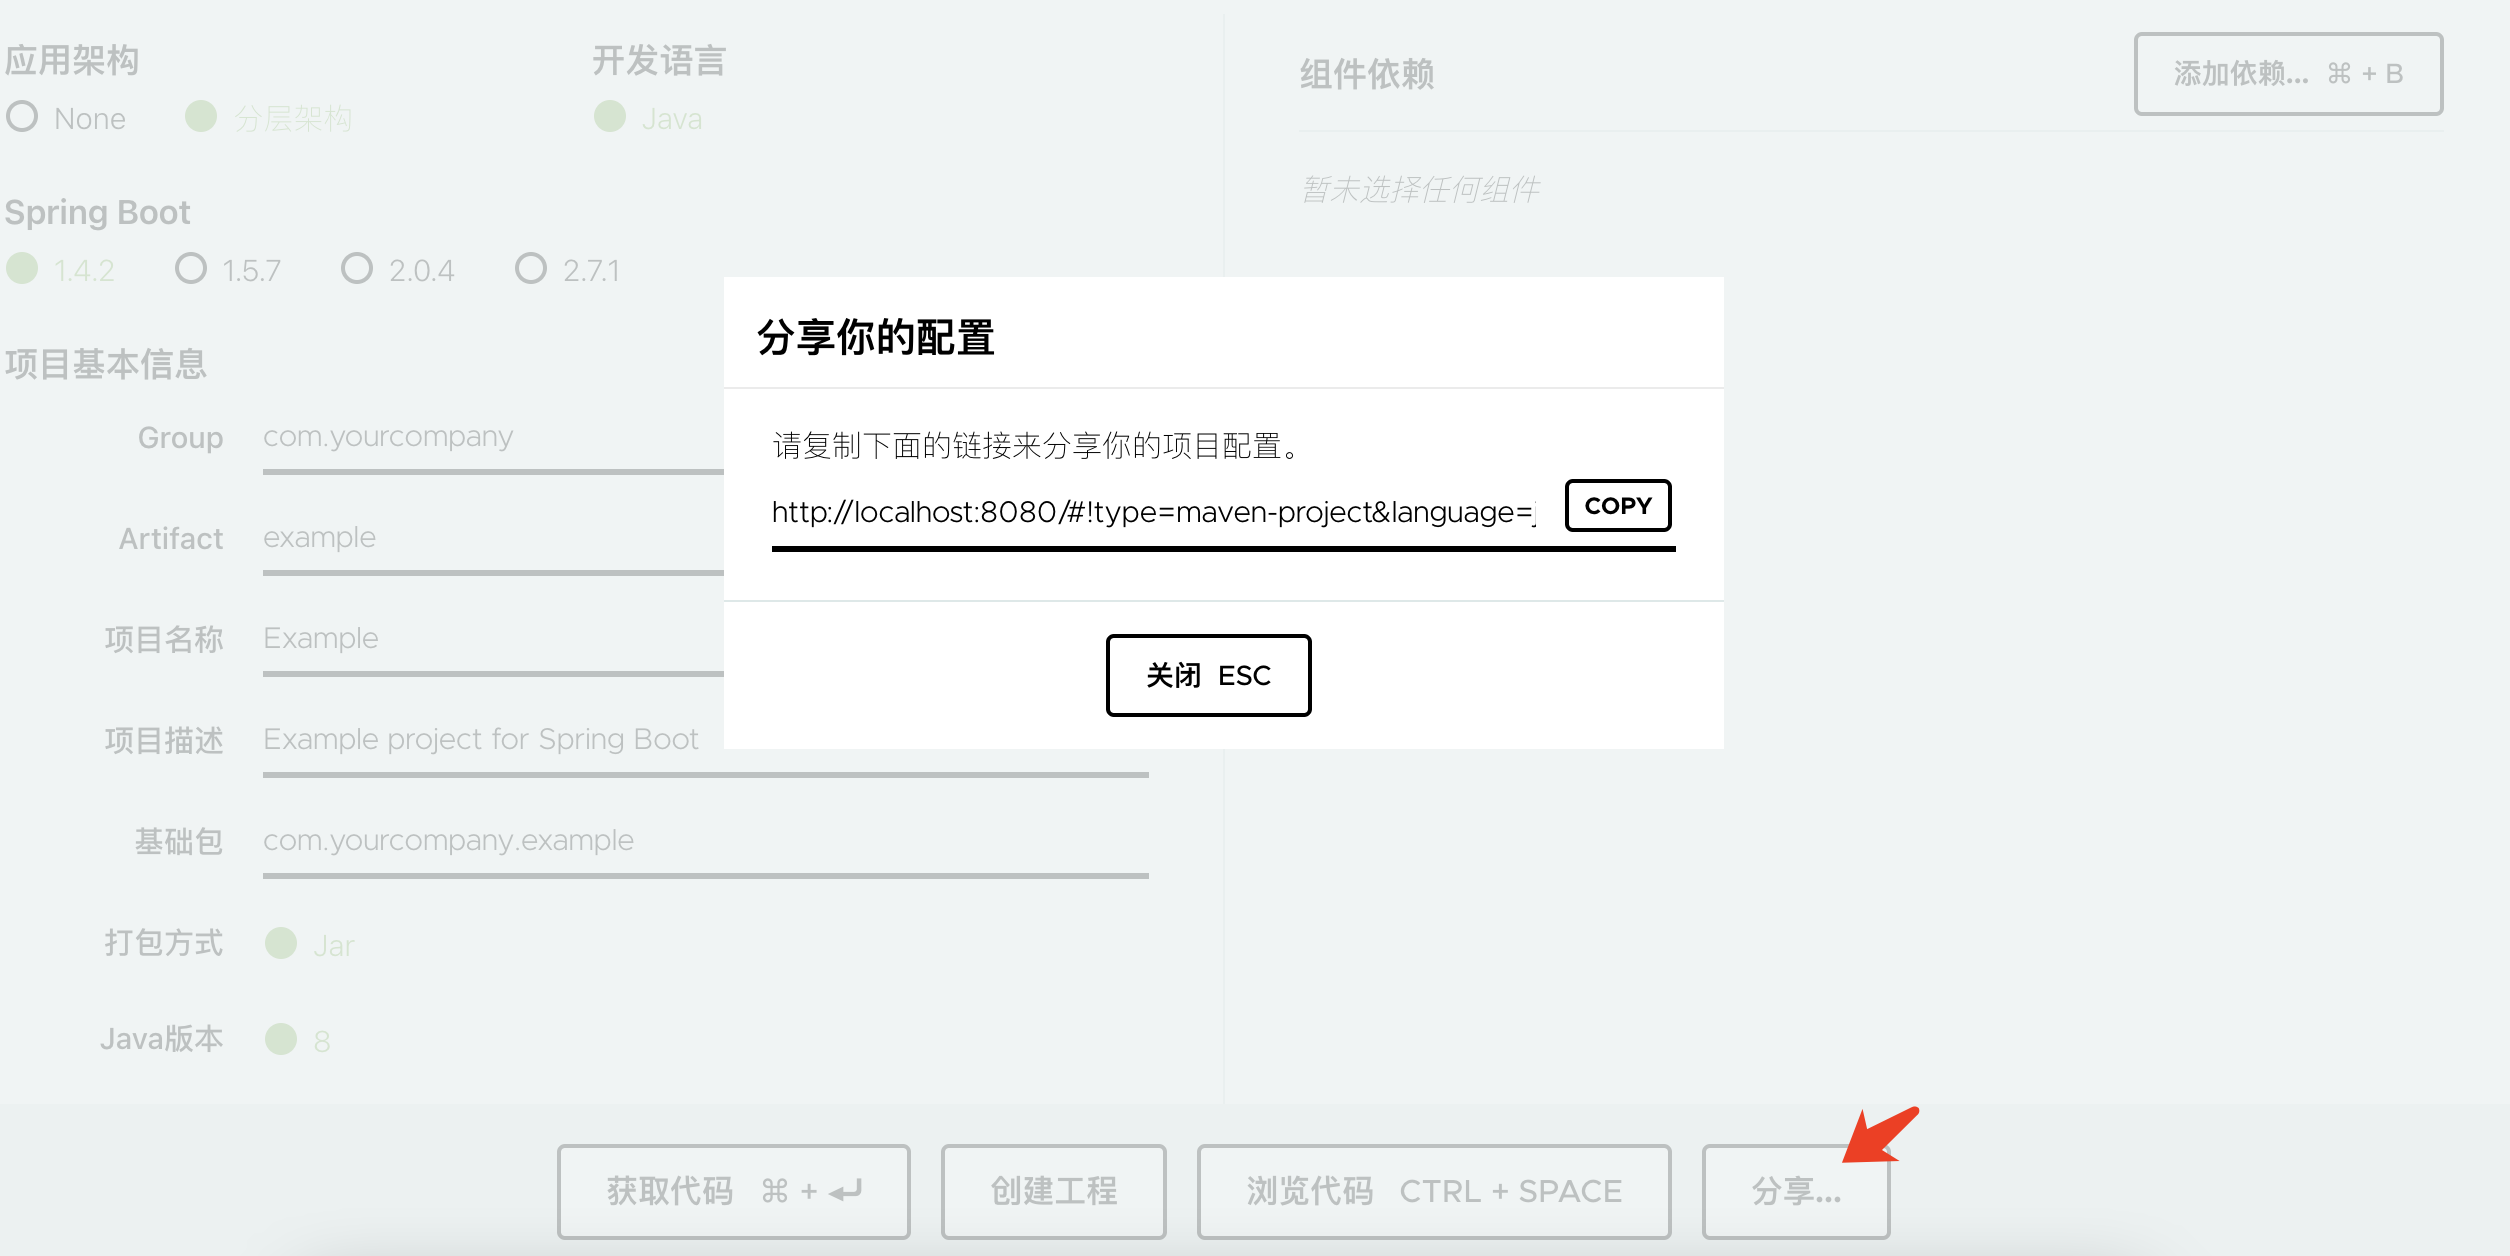
5.2 Save/Share Project
The project you configured can be saved through the "Share..." function.
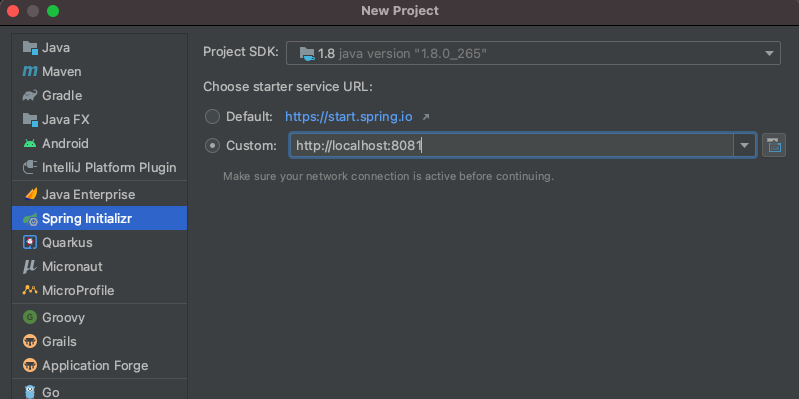
5.3 Using scaffolding in IDEA
The project can be quickly created in IDEA, only need to configure the address of the scaffolding server. It should be noted that the community version of IDEA does not have this function.
summary
This article introduces you to the construction process of Spring Initializr scaffolding. If you encounter problems during this process, you can submit an ISSUE or leave a message for me in the background of the official account "Student Yang technotes".