This project uses python-opencv to open the Azure-Kincet DK camera, and displays RGB, depth and point cloud images and KCF target tracking algorithm. Attach the
implemented code address and the system that has been successfully tested.
The code address of this article : open_azure_kinect
has been successfully tested. Operating system : windows10, and jetson-nano (Ubuntu).
Reference articles : 1. Python interface implementation of the latest generation Kinect DK (depth map + RGB + IMU)
2. Based on the installation and configuration of the Azure Kinect DK camera, obtain and save RGB, Depth, IR maps, point clouds, and point cloud fusion (Windows )
3.Azure Kinect DK depth camera, Ubuntu 18.04 system installation SDK
4.Ubuntu18.04 Azure Kinect DK debugging (SDK source code + ROS) very detailed stepping pit tutorial
5.Python calls KCF and other tracking algorithms in the opencv library
1. Install the Azure Kinect sensor SDK on the system (Windows or linux)
Azure Kinect sensor SDK download, official documentation: Azure Kinect sensor SDK
linux installs the required files as shown in the figure below for installation. Refer to articles 3 and 4 for links ( https://blog.csdn.net/denkywu/article/details/103177559 ):

Installation After the completion, plug the camera into the computer USB3.0 port. If it is a Windows system, find Azure Kinect SDK v1.4.1 under the start menu, and then click Open. The device can be searched and started successfully. If it is a linux system, after the installation is complete, execute
sudo ./k4aviewer
command to open the camera.
2. Environment configuration
ctypes: read the underlying library
numpy
opencv-python
open3d: used to display the point cloud image
Here you can configure it according to the relevant online tutorials. There are many installation tutorials and it is not complicated.
3. Complete display and tracking functions
These are the files used in this project. Let’s introduce each of these files separately.
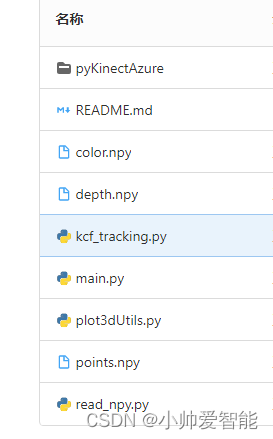
First of all, the pyKinectAzure folder is full of python interface functions called to open the camera. Here is the main reference to the big brother’s code:
https://github.com/ibaiGorordo/pyKinectAzure
ps: For some source codes that you can’t understand, you can read Microsoft c’s Source code:
https://microsoft.github.io/Azure-Kinect-Sensor-SDK/master/structk4a__device__configuration__t.html
kcf_tracking.py realizes the target tracking of kcf algorithm; plot3dUtils.py is to draw point cloud; three .npy files are saved separately RGB, depth map and point cloud map information, the read_npy.py file is to read these three files and display the image; main.py is the main function, and the program can realize the display and tracking functions by running this file.
The main function code of main.py is as follows ( note the difference between the paths of the Azure Kinect SDK in the windows and linux systems ):
import sys
import numpy
sys.path.insert(1, './pyKinectAzure/')

import numpy as np
from pyKinectAzure import pyKinectAzure, _k4a
import cv2
import kcf_tracking
# 添加 Azure Kinect SDK 路径
modulePath = 'C:\\Program Files\\Azure Kinect SDK v1.4.1\\sdk\\windows-desktop\\amd64\\release\\bin\\k4a.dll'
#modulePath = r'/usr/lib/aarch64-linux-gnu/libk4a.so' 对于linux系统的SDK路径
import plot3dUtils
#对获取的深度图像进行颜色处理
def color_depth_image(depth_image):
    depth_color_image = cv2.convertScaleAbs(depth_image,
                                            alpha=0.05)  # alpha is fitted by visual comparison with Azure k4aviewer results
    depth_color_image = cv2.applyColorMap(depth_color_image, cv2.COLORMAP_JET)

    return depth_color_image
def save_npy(color_image_list1,depth_image_list2,points_list3):
    a = numpy.array(color_image_list1)
    b = numpy.array(depth_image_list2)
    c = numpy.array(points_list3)

    numpy.save('color.npy', a)
    numpy.save('depth.npy', b)
    numpy.save('points.npy', c)
def display_all():
    # 初始化
    pyK4A = pyKinectAzure(modulePath)
    pyK4A.device_open()
    device_config = pyK4A.config
    device_config.color_format = _k4a.K4A_IMAGE_FORMAT_COLOR_BGRA32
    device_config.color_resolution = _k4a.K4A_COLOR_RESOLUTION_720P
    device_config.depth_mode = _k4a.K4A_DEPTH_MODE_WFOV_2X2BINNED
    print(device_config)

    # 开启摄像头
    pyK4A.device_start_cameras(device_config)
    #获取相机序列号
    serial_number=pyK4A.device_get_serialnum()
    print(serial_number)

    k = 0
    open3dVisualizer = plot3dUtils.Open3dVisualizer()
    list1=[] #保存RGB图像
    list2=[] #保存深度图像
    list3=[] #保存点云图
    encode_param = [int(cv2.IMWRITE_JPEG_QUALITY), 30]
    while True:
            # Get capture
            # starttime = time.time()
            pyK4A.device_get_capture()

            # 获取深度图像
            depth_image_handle = pyK4A.capture_get_depth_image()

            # 获取RGB图像
            color_image_handle = pyK4A.capture_get_color_image()
            # print(depth_image_handle)
            # 将深度图转为点云图
            point_cloud = pyK4A.transform_depth_image_to_point_cloud(depth_image_handle)
            # print(1)
            # 检查图像是否读取成功
            if depth_image_handle and color_image_handle:

                # 将获取到的图像转换为nummpy矩阵
                color_image = pyK4A.image_convert_to_numpy(color_image_handle)[:, :, :3]
                depth_image = pyK4A.image_convert_to_numpy(depth_image_handle)

                ret, point_cloud_image = pyK4A.image_convert_to_numpy(point_cloud)
                points = point_cloud_image

                points = points.reshape((-1, 3))
                depth_image = color_depth_image(depth_image)

                list1.append(color_image)
                list2.append(depth_image)
                list3.append(points)
                        # 图像显示
                open3dVisualizer(points)
                cv2.namedWindow(' Color Image', cv2.WINDOW_NORMAL)
                cv2.imshow(' Color Image', color_image)

                cv2.namedWindow(' Depth Image', cv2.WINDOW_NORMAL)
                cv2.imshow(' Depth Image', depth_image)
                k = cv2.waitKey(25)
                if k == 27:  # Esc
                    break
            pyK4A.image_release(depth_image_handle)
            pyK4A.image_release(color_image_handle)
            pyK4A.capture_release()
    save_npy(list1, list2, list3)
    pyK4A.device_stop_cameras()
    pyK4A.device_close()

def track():
    pyK4A = pyKinectAzure(modulePath)
    pyK4A.device_open()
    device_config = pyK4A.config
    device_config.color_format = _k4a.K4A_IMAGE_FORMAT_COLOR_BGRA32
    device_config.color_resolution = _k4a.K4A_COLOR_RESOLUTION_720P
    device_config.depth_mode = _k4a.K4A_DEPTH_MODE_WFOV_2X2BINNED
    print(device_config)

    # 开启摄像头
    pyK4A.device_start_cameras(device_config)
    # 获取相机序列号
    serial_number = pyK4A.device_get_serialnum()
    print(serial_number)

    k = 0
    # 选择 框选帧
    print("按 n 选择下一帧,按 y 选取当前帧")
    while True:
        # Get capture
        pyK4A.device_get_capture()

        # Get the depth image from the capture
        depth_image_handle = pyK4A.capture_get_depth_image()

        # Get the color image from the capture
        color_image_handle = pyK4A.capture_get_color_image()

        # Check the image has been read correctly
        if depth_image_handle and color_image_handle:

            # Read and convert the image data to numpy array:
            color_image = pyK4A.image_convert_to_numpy(color_image_handle)[:, :, :3]
            # depth_image=pyK4A.image_convert_to_numpy(depth_image_handle)
            # depth_image=color_depth_image(depth_image)

            _key = cv2.waitKey(0) & 0xFF
            if (_key == ord('n')):
                color_image_handle = pyK4A.capture_get_color_image()
                color_image = pyK4A.image_convert_to_numpy(color_image_handle)[:, :, :3]
            if (_key == ord('y')):
                break

            # cv2.namedWindow(' Color Image', cv2.WINDOW_NORMAL)
            color_image = cv2.resize(color_image, (1280, 720))
            cv2.rectangle(color_image, (30, 30), (100, 100), (255, 0, 0), 2, 1)
            cv2.imshow(' Color Image', color_image)
            # cv2.namedWindow(' Depth Image', cv2.WINDOW_NORMAL)
            # cv2.imshow(' Depth Image', depth_image)

            k = cv2.waitKey(25)
            if k == 27:  # Esc
                break

        pyK4A.image_release(depth_image_handle)
        pyK4A.image_release(color_image_handle)
        pyK4A.capture_release()

    cv2.destroyWindow("pick frame")
    gROI = cv2.selectROI("ROI frame", color_image, False)
    if (not gROI):
        print("空框选,退出")
        quit()

    gTracker = kcf_tracking.Tracker(tracker_type="KCF")
    gTracker.initWorking(color_image, gROI)
    while True:
        # Get capture
        pyK4A.device_get_capture()

        # Get the color image from the capture
        color_image_handle = pyK4A.capture_get_color_image()

        if color_image_handle:
            color_image = pyK4A.image_convert_to_numpy(color_image_handle)[:, :, :3]
            color_image = cv2.resize(color_image, (1280, 720))
            _item, p1, p2 = gTracker.track(color_image)
            cv2.imshow("track result", _item.getFrame())
            if _item.getMessage():
                # 打印跟踪数据
                print(_item.getMessage())
            else:
                # 丢失,重新用初始ROI初始
                print("丢失,重新使用初始ROI开始")
                gTracker = kcf_tracking.Tracker(tracker_type="KCF")
                # gTracker = Tracker(tracker_type="MOSSE")
                gTracker.initWorking(color_image, gROI)

            _key = cv2.waitKey(1) & 0xFF
            if (_key == ord('q')) | (_key == 27):
                break
            if (_key == ord('r')):
                # 用户请求用初始ROI
                print("用户请求用初始ROI")
                gTracker = kcf_tracking.Tracker(tracker_type="KCF")
                # gTracker = Tracker(tracker_type="MOSSE")
                gTracker.initWorking(color_image, gROI)
        # pyK4A.image_release(depth_image_handle)
        pyK4A.image_release(color_image_handle)

        pyK4A.capture_release()
    pyK4A.device_stop_cameras()
    pyK4A.device_close()
if __name__ == '__main__':

    display_all()
    #track()