unit test
what is it
Unit testing refers to checking and verifying the smallest testable unit in software. As for the size or scope of a "unit", there is no clear standard. A "unit" can be a method, class, functional module, or subsystem.
Unit testing is usually associated with white-box testing . If there is a difference between the two in terms of concept, but what we usually call "unit testing" and "white-box testing" are considered to be related to code, so In some contexts, the two are often considered to be the same thing. There is another way to understand that unit testing and white box testing are testing the code written by developers .
effect
1. Help understand requirements
Unit tests should reflect use cases and treat the unit under test as a black box to test its external behavior.
2. Improve the quality of implementation
Unit testing does not guarantee that the program does the right thing, but it can help ensure that the program does things correctly, thereby improving the quality of implementation.
3. Low test cost
Compared with integration test and acceptance test, unit test relies on less external environment, high degree of automation and short time, which saves test cost.
4. Fast feedback
The unit test provides fast feedback, eliminates bugs in the development stage, reduces the flow of problems to integration tests, acceptance tests and users, and reduces the cost of software quality control.
5. Conducive to refactoring
Since there are unit tests as regression test cases, it helps to prevent bugs from being introduced during the refactoring process.
6. The role of documentation
The unit test provides the usage scenario of the unit under test and plays the role of using the documentation.
7. Feedback on design
A module that is difficult to unit test is usually a signal of poor design, and unit testing can in turn guide the design of modules with high cohesion and low coupling.
When to write unit tests?
More often, code and unit tests are implemented at the same time. Because in this way, unit tests can be executed at any time to verify during the implementation process, and at the same time, it is avoided to repeatedly understand the design requirements when writing separately, which greatly improves efficiency and saves time.
One thing to emphasize here is that sometimes, writing unit tests or not writing unit tests will directly affect the design and implementation of the code. For example, if you want to write a function with many conditional branch processing, if you don't consider unit testing, you are likely to write all the logic in one function. But if you consider the simplicity of the single test implementation, you will write each branch as a function, and then write the branch logic as a function, and finally achieve the purpose of optimizing the code by accident. So one criterion for judging whether the code or design is good is to see how easy it is to test.
When can you not write unit tests?
In personal work practice, it is rare to encounter a situation where you can not write unit tests. Of course, there are times when you don't need to write them. The following are several situations that may be encountered, please weigh yourself.
-
The function logic is too complicated, and no one has ever written a unit test for it in history, and the code reviewer did not ask me to write it.
-
The importance of the code is not enough, they are all written and maintained by themselves, even if there is a problem with the code, it will not have any important impact. Some large functions of the interface, typically such as the Main function...
-
Writing the corresponding unit tests is very complicated, or even impossible to write. this time is likely
-
- Need to modify the design, you must make your design easy to unit test
- The unit testing framework needs to be enhanced, and the framework is not functional enough to support unit testing in certain scenarios.
- Can't think of anything else... Maybe some UI unit that involves user interaction?
Unit test writing specification
-
Good unit tests must obey the AIR principles . A: Automatic (automation), I: Independent (independence), R: Repeatable (repeatable)
-
Automatic (automated) unit tests should be fully automatic execution, and non-interactive . Test cases are usually executed on a regular basis, and the execution process must be fully automated to make sense. A test whose output requires human inspection is not a good unit test. System.out is not allowed to be used for human authentication in unit tests, and assert must be used for verification.
-
Independent (independence) to maintain the independence of unit tests . In order to ensure that unit tests are stable, reliable and easy to maintain, unit test cases must not call each other, nor can they depend on the order of execution.
-
Repeatable (repeatable) Unit tests can be executed repeatedly and cannot be affected by the external environment. Unit tests are usually put into continuous integration, and unit tests are executed every time a code is checked in. If the unit test is dependent on the external environment, it will easily lead to the unavailability of the continuous inheritance mechanism.
-
For unit tests, it is necessary to ensure that the test granularity is small enough to help pinpoint the problem. The single test granularity is at most the class level, generally at the method level.
-
Incremental codes for core business, core application, and core modules ensure that unit tests pass.
-
The unit test code must be written in the following project directory: src/test/java, and it is not allowed to be written in the business code directory.
-
Each unit test should have a good name , so that people can know what test it is at a glance. If the name cannot explain the problem, a complete comment should be added. For example, testSortNumbers_withDuplicated means the unit test of the SortNumbers function to verify that there are duplicate numbers.
code coverage
what is it
Code coverage is a measure of the code that is executed throughout the testing process. It can measure which statements in the source code are executed in the test and which statements have not been executed.
Why measure code coverage?
Testing is known to improve the quality and predictability of software releases. But, do you know how well your unit tests or even your functional tests are actually testing the code? Are more tests needed?
These are the questions that code coverage can attempt to answer. In summary, we need to measure code coverage for the following reasons:
- See how our test cases test the source code
- Find out if we're doing enough testing
- Maintain test quality throughout the software lifecycle
Note: Code coverage is not a panacea, and coverage measurements are not a substitute for good code review and good programming practices.
In general, we should adopt reasonable coverage goals and strive to achieve uniform coverage in all modules in the code coverage, rather than just looking at whether the final number is high enough to be satisfactory.
For example: Suppose the code coverage rate is only high in some modules, but there is not enough test case coverage in some key modules, so although the code coverage rate is high, it does not mean that the product quality is high.
Types of metrics for code coverage
Code coverage tools usually use one or more criteria to determine whether your code has been executed after being automated. Common metrics seen in coverage reports include:
- Function coverage: how many of the defined functions are called
- Statement coverage: how many statements in the program are executed
- Branch coverage: For branch statements such as if...else, case, etc., check whether all the branches designed in the code have been tested. For if (condition 1), as long as condition 1 is executed both true and false, this branch is completely covered.
- Condition coverage: Condition coverage can be seen as a complement to branch coverage. In each branch condition expression, all conditions are covered.
- Line coverage: how many lines of source code are tested
Compared with the advantages of the main method
The benefits of writing the main method test in the code:
- A series of test methods can be written to unit test all interfaces or methods of the project.
- After startup, automate the test and judge the execution results without human intervention
- You only need to look at the final result to know whether the method interface of the entire project is smooth. .
- Each unit test case is relatively independent, started by Junit, and called automatically. No need to add additional call statement.
The main method is different.
Calls to multiple methods. A print or output statement needs to be added.
Added new test methods. A method call needs to be added to the main method.
It is not possible to form an overall test result.
Human judgment is required for printing or outputting results.
JUnit
JUnit is a unit testing framework for the Java programming language. JUnit has a very important development in test-driven development. It is one of the unit testing frameworks collectively called xUnit that originated from JUnit.
annotation
JUnit provides the following annotations to write tests.
| annotation | describe |
|---|---|
@RunWith |
Used to set up the test runner. For example, we can let the test run in the Spring test environment through @RunWith(SpringJUnit4ClassRunner.class). |
@Before |
Annotated methods will be run before every test method in the test class. |
@After |
Annotated methods will be run after every test method in the test class. |
@BeforeClass |
Annotated methods will be run before all test methods in the test class. This method must be static. |
@AfterClass |
Annotated methods will be run after all test methods in the test class. This method must be static. |
@Test |
Used to mark a method as a junit test |
@Ignore |
It is used to disable or ignore a test class or method in a test suite. |
@Rule |
Reference rules, all @Test marked test methods in a class will share this Rule |
The execution order of a unit test class is:
@BeforeClass –> @Before –> @Test –> @After –> `@AfterClass
The calling order of each test method is:
@Before –> @Test –> @After
write tests
In JUnit, test methods are @Testannotated. To run the method, JUnit first constructs a new class instance and then calls the annotated method. Any exception thrown by the test will be reported as a failure by JUnit. If no exception is thrown, the test is assumed to be successful.
public class Demo1 {


	@BeforeClass
	public static void setup() {


		System.out.println("@BeforeClass");
	}

	@Before
	public void setupThis() {


		System.out.println("@Before");
	}

	@Test
	public void method() {


		System.out.println("测试");
	}

	@After
	public void tearThis() {


		System.out.println("@After");
	}

	@AfterClass
	public static void tear() {


		System.out.println("@AfterClass");
	}
}
public class Demo2 {


    @Test
    public void test1() {


        System.out.println("@Test");
    }

    @Ignore
    @Test
    public void testIgnore() {


        System.out.println("@Ignore");
    }
}
Assertion method
**Assertion (assertion)** is a kind of first-order logic in the program (such as: a logical judgment formula that the result is true or false), the purpose is to express and verify the expected result of the software developer - when the program is executed to assertion position, the corresponding assertion should be true. If the assertion is not true, the program will abort execution and give an error message.
| Method | Description |
|---|---|
| assertNull(java.lang.Object object) | Check if object is empty |
| assertNotNull(java.lang.Object object) | Check if object is not null |
| assertEquals(long expected, long actual) | Checks whether values of type long are equal |
| assertFalse(boolean condition) | checks if the condition is false |
| assertTrue(boolean condition) | checks if the condition is true |
| assertNotSame(java.lang.Object unexpected, java.lang.Object actual) | Checks that two object references do not refer to a uniform object (i.e. objects are not equal) |
case:
public class Demo3 {


   @Test
   public void testAssertNull() {


      String str = null;
      assertNull(str);
   }

   @Test
   public void testAssertNotNull() {


      String str = "hello Java!!";
      assertNotNull(str);
   }

   @Test
   public void testAssertEqualsLong() {


      long long1 = 2;
      long long2 = 2;
      assertEquals(long1, long2);
   }

   @Test
   public void testAssertTrue() {


      List<String> list = new ArrayList<>();
      assertTrue(list.isEmpty());
   }

   @Test
   public void testAssertFalse() {


      List<String> list = new ArrayList<>();
      list.add("hello");
      assertFalse(list.isEmpty());
   }

   @Test
   public void testAssertSame() {


      String str1 = "hello world!!";
      String str2 = "hello world!!";
      assertSame(str2, str1);
   }

   @Test
   public void testAssertNotSame() {


      String str1 = "hello world!!";
      String str3 = "hello Java!!";
      assertNotSame(str1, str3);
   }
}
Expected exception testing
There are two ways to achieve this:
1. @Test(expected…)
The @Test annotation has an optional parameter, "expected" which allows you to set a Throwable subclass
2. ExpectedException
If you want to use the ExpectedException class in the JUnit framework, you need to declare the ExpectedException exception.
case:
public class Demo4 {


	@Rule
	public ExpectedException thrown = ExpectedException.none();

	public void division() {


		int i = 5 / 0;
	}

	@Test(expected = ArithmeticException.class)
	public void test1() {


		division();
	}

	@Test()
	public void test2() {


		thrown.expect(ArithmeticException.class);
		division();
	}

}
priority test
When the test method is formed into a test loop, it is necessary to determine the execution order of the test method and record it.
@FixMethodOrderIt is an annotation that controls the execution order of the @Test method. She has three options
MethodSorters.JVMExecute in the order obtained by the JVM Execute
MethodSorters.NAME_ASCENDINGin the order of method names Execute
MethodSorters.DEFAULTin the default order Execute in a deterministic but unpredictable order (hashcode size)
@(MethodSorters.JVM)
public class Demo5 {


   @Test
   public void test2() {


      System.out.println("test2");
   }

   @Test
   public void test1() {


      System.out.println("test1");
   }

   @Test
   public void test3() {


      System.out.println("test3");
   }

}
parametric test
Parametric testing mainly solves the testing of multiple test cases at one time. The main idea is to test multiple test cases according to the list of {input value, output value} (the input value can be multiple).
//(1)步骤一:测试类指定特殊的运行器org.junit.runners.Parameterized
@RunWith(Parameterized.class)
public class Demo6 {


	// (2)步骤二:为测试类声明变量,分别用于存放期望值和测试所用数据。
	private final int expected;
	private final int a;
	private final int b;

	public Demo6(int expected, int a, int b) {


		this.expected = expected;
		this.a = a;
		this.b = b;
	}

	// (4)步骤四:为测试类声明一个使用注解 org.junit.runners.Parameterized.Parameters 修饰的,
	// 返回值为java.lang.Iterable 的公共静态方法,并在此方法中初始化所有需要测试的参数对。
	@Parameters
	public static Iterable<Integer[]> getTestParamters() {


		return Arrays.asList(new Integer[][]{

    {

    2, 1, 1}, {

    3, 2, 1}, {

    4, 3, 1}});
	}

	// (5)步骤五:编写测试方法,使用定义的变量作为参数进行测试。
	@Test
	public void testAdd() {


		Demo calculator = new Demo();
		System.out.println("输入参数 " + a + " and " + b + ",预期值 " + expected);
		assertEquals(expected, calculator.add(a, b));
	}
}
timeout test
If a test case takes more time than the specified number of milliseconds, Junit will automatically mark it as failed. The timeout parameter is used with @Test annotation. Now let's look at @test(timeout) in the activity.
public class Demo7 {
	@Test(timeout = 1000)
	public void testTimeout() throws InterruptedException {
		TimeUnit.SECONDS.sleep(2);
		System.out.println("Complete");
	}
}
The above test will fail and an exception will be thrown after one second org.junit.runners.model.TestTimedOutException: test timed out after 1000 milliseconds
Mock
Why use mocks
-
Mock means simulation, which can be used to isolate a system, component or class.
In the testing process, we usually focus on the function and behavior of the test object itself, and some dependencies involved in the test object only focus on the interaction between them and the test object (such as whether to call, when to call, the parameters of the call, the parameters of the call times and order, and the results returned or exceptions occurred, etc.), do not pay attention to the specific details of how these dependent objects execute this call.
Therefore, the Mock mechanism is to use the Mock object to replace the real dependent object, and simulate the real scene to carry out the test work.
The schematic diagram of using the Mock object to complete the dependency test is as follows:
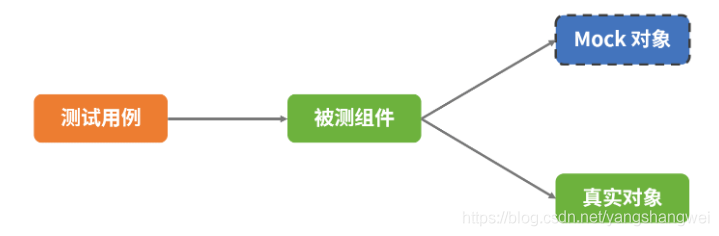
It can be seen that in form, Mock is the behavior of directly mocking the class and defining the Mock method in the test code, and usually the test code and the Mock code are put together. Therefore, the logic of the test code can be easily reflected from the code of the test case.
Common methods in Mockito
The use of Mockito generally has the following combinations:
- do/when: including doThrow(…).when(…)/doReturn(…).when(…)/doAnswer(…).when(…), used when the return value is void
- given/will:包括given(…).willReturn(…)/given(…).willAnswer(…)
- when/then: 包括when(…).thenReturn(…)/when(…).thenAnswer(…)
mock method
The mock method comes from org.mockito.Mock, which means that an object or interface can be mocked.
public static <T> T mock(Class<T> classToMock)
- classToMock: the class of the object to be mocked.
- Return the mocked class
Example: use the mock method to mock a class
Random random = Mockito.mock(Random.class);
Behavior verification and result assertion on the objects from Mock
Verification is to verify whether certain behaviors have occurred on the object to be verified. The verification method in Mockito is: verify.
	@Test
	void addTest() {


		Random random = Mockito.mock(Random.class);
		System.out.println(random.nextInt());
		Mockito.verify(random).nextInt();
		// Mockito.verify(random, Mockito.times(2)).nextInt();
	}
Use verify to verify:
Verify works with the time() method to verify the number of times certain operations occur.
	@Test
	void addTest() {


		Random random = Mockito.mock(Random.class);
		System.out.println(random.nextInt());
		Mockito.verify(random, Mockito.times(2)).nextInt();
	}
The class used for assertion is Assert.
Random random = Mockito.mock(Random.class, "test");
Assert.assertEquals(100, random.nextInt());
Output result:
org.opentest4j.AssertionFailedError:
Expected :100
Actual   :0
When using a mock object, if its behavior is not defined, the return value of the mock object method is the default value of the return type.
Pile the Mock object
Stubs, or stub codes, refer to codes used to replace associated codes or unimplemented codes. If function B is replaced by B1, then B is called the original function, and B1 is called the stub function. Stub driving is writing or generating stub code.
Pile driving can be understood as the behavior of a line specified by the mock object, so that it can perform specific operations according to our requirements. In Mockito, the common piling method is
| method | meaning |
|---|---|
| when().thenReturn() | The Mock object returns the specified value after triggering the specified behavior |
| when().thenThrow() | The mock object throws the specified exception after triggering the specified behavior |
| when().doCallRealMethod() | The mock object calls the real method after triggering the specified behavior |
thenReturn() code example
	@Test
	void addTestOngoingStubbing() {


		MockitoAnnotations.initMocks(this);
		Mockito.when(random.nextInt()).thenReturn(1); //打桩,指定返回值
		System.out.println(random.nextInt());
	}
输出1
Common annotations in Mockito
The @Mock annotation that can replace the Mock method
Shorthand for mocks creation - @Mock annotation
Important! This needs to be somewhere in the base class or a test runner:
The quick mock method uses @mockannotations.
The mock annotation needs to be used together with the MockitoAnnotations.initMocks(testClass) method.
	@Mock
	private Random random;

	@Test
	void addTestAnnotations() {


		//开启注解,否则空指针
		MockitoAnnotations.initMocks(this);
		System.out.println(random.nextInt());
		Mockito.verify(random).nextInt();
	}
Spy method and @Spy annotation
The spy() method differs from the mock() method in that
- The spy object will take the real method, but the mock object will not
- The parameter of the spy() method is the object instance, and the parameter of the mock is the class
Example: Comparison of spy method and mock method
	@Test
    void addTestMockAndSpyDifferent() {


        Demo mock = Mockito.mock(Demo.class);
        Assert.assertEquals(0, mock.add(1, 2));

        Demo spy = Mockito.spy(new Demo());
        Assert.assertEquals(3, spy.add(1, 2));
    }
output result
// 第一个 Assert 断言失败,因为没有给 Demo 对象打桩,因此返回默认值
java.lang.AssertionError: expected:<3> but was:<0>
预期:3
实际:0
@SpyCode example using annotations
	@Spy
	private Demo demo;

	@Test
	 void addTestAnnotations() {


		MockitoAnnotations.initMocks(this);
		int res = demo.add(1, 2);
		Assert.assertEquals(3, res);
		// Assert.assertEquals(4,res);
	}
Using JUnit in Spring Boot
The Spring Framework provides a dedicated test module (spring-test) for integration testing of applications. In Spring Boot, you can quickly start and use it with the spring-boot-starter-test starter.
Spring Boot test
// 获取启动类,加载配置,确定装载 Spring 程序的装载方法,它回去寻找 主配置启动类(被 @SpringBootApplication 注解的)
@SpringBootTest
// 让 JUnit 运行 Spring 的测试环境, 获得 Spring 环境的上下文的支持
@RunWith(SpringRunner.class)
public class Demo1 {


    @Autowired
    private UserService userService;

    @Test
    public void getUser() {


        User user = userService.getUser(1);
        Assert.assertEquals("bob",user.getName());
    }
}
@SpringBootTest - webEnvironment
MOCK: Load WebApplicationContext and provide a Mock Servlet environment. At this time, the built-in Servlet container has not been officially started.RANDOM_PORT: Load EmbeddedWebApplicationContext and provide a real Servlet environment, then use a random port to start the built-in container.DEFINED_PORT: This configuration also provides a real Servlet environment by loading EmbeddedWebApplicationContext, but uses the default port, and uses 8080 if no port is configured.NONE: Loads the ApplicationContext but does not provide any real Servlet environment.
In Spring Boot, the @SpringBootTest annotation is mainly used to test the ApplicationContext based on automatic configuration, which allows us to set the Servlet environment in the test context.
In most scenarios, a real Servlet environment is too heavy for testing, and the MOCK environment can alleviate the troubles caused by this environmental constraint
@RunWith annotation and SpringRunner
In the above example, we also see a @RunWith annotation provided by the JUnit framework, which is used to set up the test runner. For example, we can let the test run in the Spring test environment through @RunWith(SpringJUnit4ClassRunner.class).
Although we specify SpringRunner.class, in fact, **SpringRunner is a simplification of SpringJUnit4ClassRunner, which allows JUnit and Spring TestContext to run integratedly, and Spring TestContext provides various general support functions for testing Spring applications.
Spring MVC test
@WebMvcTestAnnotations can be used when you want to write unit test code against Spring MVC controllers . It provides a self-configuring MockMvc for quick testing of MVC controllers without having to fully start the HTTP server.
When using @WebMvcTestannotations, only a part of beans can be scanned, they are:
- @Controller
- @ControllerAdvice
- @JsonComponent
- Filter,WebMvcConfigurer,HandlerMethodArgumentResolver
- Other conventional @Component (including @Service, @Repository, etc.) beans will not be loaded into the Spring test environment context.
Notice:
- If an error is reported:
java.lang.IllegalStateException: Found multiple @SpringBootConfiguration annotated classes......, add annotations to the class@ContextConfiguration(classes = {测试启动类.class})and load the configuration class
@RunWith(SpringRunner.class)
@WebMvcTest(UserController.class)
@Slf4j
public class Demo2 {


	@Autowired
	private MockMvc mvc;

	@MockBean
	private UserService userService;

	@Before
	public void setUp() {


		//打桩
		Mockito.when(userService.getUser(1)).thenReturn(new User(1, "张三"));
	}

	@Test
	public void getUser() throws Exception {


		MvcResult mvcResult = mvc.perform(MockMvcRequestBuilders.get("/user/1"))//构建请求, 测试的相对地址
				.andExpect(status().isOk()) // 期待返回状态吗码200
				.andExpect(jsonPath("$.name").value(IsEqual.equalTo("张三"))) // 这里是期待返回值是 张三
				.andDo(print())//打印输出流
				.andReturn();//返回结果
		String content = mvcResult.getResponse().getContentAsString(Charset.defaultCharset());
		log.info("返回结果:{}", content);
	}
}
Spring Boot web testing
When you want to start a complete HTTP server to write test code for Spring Boot's web application, you can use the @SpringBootTest(webEnvironment = WebEnvironment.RANDOM_PORT) annotation to open a random available port. Spring Boot provides a TestRestTemplate template for testing REST calls, which can resolve the relative address of the linked server.
@RunWith(SpringRunner.class)
@SpringBootTest(webEnvironment = SpringBootTest.WebEnvironment.RANDOM_PORT)
@Slf4j
public class Demo3 {


    @Autowired
    private TestRestTemplate restTemplate;

    @Test
    public void getUser(){


        ResponseEntity<User> result = restTemplate.getForEntity("/user/2", User.class);
        User body = result.getBody();
        Assert.assertThat(body, Matchers.notNullValue());
        log.info("User:{}", body);
    }
}
Testing data access components using the @DataJpaTest annotation
If you need to use the database in the real environment for testing, you need to replace the default rules and use @AutoConfigureTestDatabase(replace = Replace.NONE)annotations:
@RunWith(SpringRunner.class)
@DataJpaTest
@AutoConfigureTestDatabase(replace = AutoConfigureTestDatabase.Replace.NONE)
public class Demo4 {


    @Autowired
    private UserRepository userRepository;

    @Test
    public void getUser(){


        User user = userRepository.findById(2).orElse(null);
        assert user != null;
        Assert.assertThat("tom", Matchers.is(user.getName()));
    }
}
Spring Service layer test
@RunWith(SpringRunner.class)
public class Demo6 {


	@Autowired
	private UserService userService;

	@MockBean
	private UserRepository userRepository;

	@Test
	public void testGetUser() {


		User user1 = new User(1, "zs");
		Mockito.when(userRepository.findById(1)).thenReturn(Optional.of(user1));
		User user2 = userService.getUser(1);
		Assert.assertEquals(user1.getId(), user2.getId());
	}

	@TestConfiguration
	public static class prepareOrderService {


		@Bean
		public UserService getGlobalExceptionMsgSendService() {


			return new UserService();
		}
	}

}
rElse(null);
assert user != null;
Assert.assertThat(“tom”, Matchers.is(user.getName()));
}
}
## Spring Service层测试

```java
@RunWith(SpringRunner.class)
public class Demo6 {
	@Autowired
	private UserService userService;

	@MockBean
	private UserRepository userRepository;

	@Test
	public void testGetUser() {
		User user1 = new User(1, "zs");
		Mockito.when(userRepository.findById(1)).thenReturn(Optional.of(user1));
		User user2 = userService.getUser(1);
		Assert.assertEquals(user1.getId(), user2.getId());
	}

	@TestConfiguration
	public static class prepareOrderService {
		@Bean
		public UserService getGlobalExceptionMsgSendService() {
			return new UserService();
		}
	}

}