Article directory
foreword
Hello everyone, today I will share with you how to implement a simple login and registration function in uni-app.
First of all, you need to master some knowledge points:
1. Network request uni.request
2. Page jump, page transfer parameter uni.navigateTo
3. Local cache uni.setStorageSync, uni.getStorageSync
We need to use the login and registration interfaces, so you need to know How to make network requests.
Because you still need to register, you need to jump to the page, and jump to the registration page so you need to use the page jump.
The local cache is to store the user information of your current account after you log in, and store it locally, so you need to use local storage.
Let's take a look at the specific implementation process!
1. Page layout
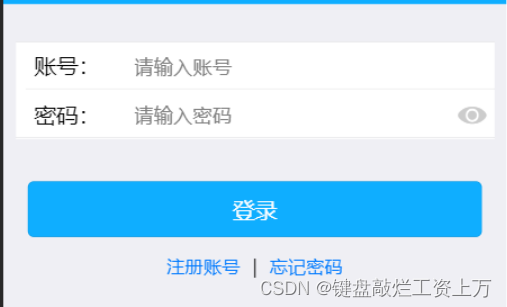
This is the basic layout of the login page. There are two input boxes, one is the account and the other is the password. Below is a login button. Below the button is a link. Clicking on the registration account will jump to the registration page for account registration.
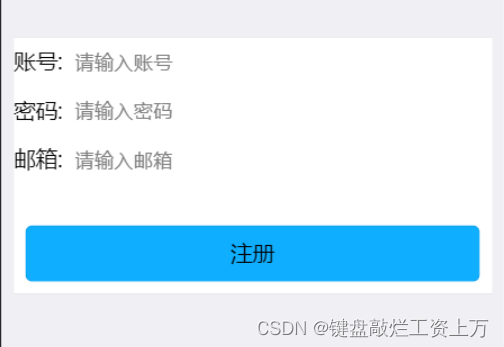
The following is the basic layout of the registration page. There are three input boxes, which are account number, password and email address. If the request parameter of the interface is not email address, you can replace it with another one. Below the input box is the registration button. Click the registration button to prompt if the registration is successful. , return to the login page after the prompt.
2. Registration page
1. Use the registration interface
The code is as follows (example):
uni.request({


	url: '',
	method: 'POST',
	data: {


	Username:this.account,
	Password:this.password,
	Email:this.email
	},
	success: res => {


	},
	fail: () => {


	},
});
2. Tips for successful registration
The code is as follows (example):
uni.showToast({


	title:"注册成功",
	duration:2000,
	success() {


	}
});
3. Jump to the successful registration page
The code is as follows (example):
setTimeout(function () {


	uni.navigateTo({


	 url: '../login/index',
	});
}, 1000);
Here we use a timer, the reason is that when you register successfully, you start to execute the code in the success callback. If you don’t add a timer, there will be a page jump before the registration success prompt appears, so we added this A timer allows the jump time to be executed after a specific time, so that the prompt can be displayed during the period when the jump page is not executed.
4. Complete code
The code is as follows (example):
methods: {


	btnReg(){


		uni.request({


			url: '',
			method: 'POST',
			data: {


				UserName:this.account,
				Password:this.password,
				Email:this.email
			},
				success: res => {


					uni.showToast({


					title:"注册成功",
					duration:2000,
					success() {


					setTimeout(function () {


					uni.navigateTo({


						 url: '../login/index',
					});
					}, 1000);
					}
					});
					},
			fail: () => {


			},
		});
	}
}
3. Login page
1. Use the login interface
The code is as follows (example):
uni.request({


	url: '',
	method: 'GET',
	data: {


		username : this.account,
		password : this.password
	},
	success: res => {


	},
	fail: () => {


	},
	});
2. Use of local storage
The code is as follows (example):
uni.setStorage({


	key: 'username',
	data: this.account,
	success:function(){


		console.log("存储成功!");
	}
})
I wrote an article about local storage before. If you want to know more, you can read it and choose whether to use synchronous or asynchronous according to your needs.
3. Complete code
The code is as follows (example):
methods: {


	uni.request({


		url: '',
		method: 'GET',
		data: {


			username : this.account,
			password : this.password
		},
		success: res => {


			console.log(res);
			if(res.code== 0){


				uni.showToast({


					icon: 'none',
					title: '密码或用户名错误',
				});
			} else {


				uni.showToast({


				icon: 'none',
				title: '登录成功',
				});
				uni.setStorage({


					key: 'username',
					data: this.account,
						success:function(){


							console.log("存储成功!");
						}
				})
				uni.reLaunch({


					url:'../index/index',
				})
			}
		},
		fail: () => {


		},
	});
}
There is a judgment in it. This judgment is to see if the login is successful. If the login fails, it will prompt the information of login failure. If the login is successful, it will prompt the login success and jump to the home page.
Summarize
The above is the whole content of this chapter, I hope it can help you.