Software Environment
- Server OS: Ubuntu 20.04 LTS
- RustDesk clients: Windows, Android
- The following tutorials use the root user provided by the server by default. If you encounter insufficient permissions, please join by yourself
sudo
use background
I have been using remote control software for a long time, but Teamviwer first, and then Todesk, have been forced to log in one after another to use it. Later, I learned that the open source remote control software RustDesk has multi-platform clients, including PCs and mobile phones. The key is that there are no restrictions on various usage conditions. Of course, open source software uses love to generate electricity. It cannot have many servers to ensure a stable connection like the above software. Although rustdesk also has public servers, it may be that there are too many users, and the servers are located abroad. The effect of use is not satisfactory, but you can build a relay server by yourself. This is the biggest feature of RustDesk. This article will use the Ubuntu 20.04 server system to build the RustDesk-Server service to achieve self-sufficiency in remote control of equipment. After the server is set up, the actual test stability is good. This tutorial was made in a hurry, and there may be some mistakes in the description. If there are any mistakes, please point them out, and the follow-up will continue to improve.
Features of the implementation method in this paper: the official recommended pm2 process management software is not used, and nohup is used in combination with systemctl to realize background operation and boot self-starting, and the simplest and simple method is used to realize the server construction, only need to install a decompression software unzip (some systems There are also self-contained), and the rest are self-contained by the server, avoiding the installation of additional software.
1. Download and installation of RustDesk-Server
1.1 Get Rustdesk-Server
Server-side software download link: Releases rustdesk/rustdesk-server (github.com)
1. Select the desired version

2. Use the wget command to obtain the server software
Enter the directory where you want to store the program files, I put it in the /home directory here
cd /home
get file
wget https://github.com/rustdesk/rustdesk-server/releases/download/1.1.7-4/rustdesk-server-linux-i386.zip
3. Unzip the file
If the server does not have unzip software, please install unzip first (commonly used decompression software may also be useful in the future)
apt install unzip
Unzip the file using unzip
unzip rustdesk-server-linux-i386.zip
change name
mv i386/ rustdesk
Execution effect
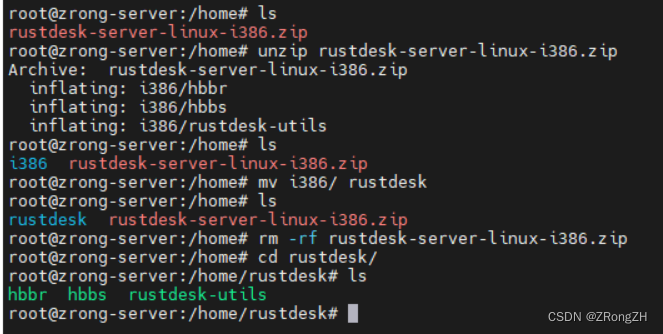
After the above steps, the RustDesk download is complete
2. Start of RustDesk-Server
1. Create a startup script
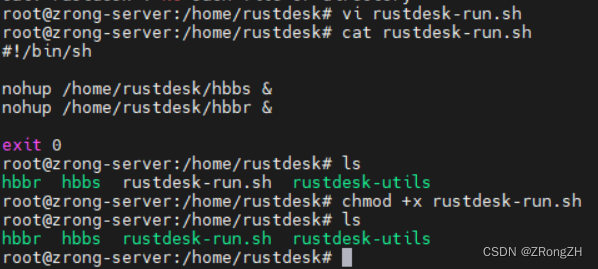
Create a new script file in the rustdesk directory to start rustdesk in the background
vi rustdesk-run.sh
add the following
#!/bin/sh

workdir=$(dirname "$0")

cd $workdir
nohup $workdir/hbbs -k _ >> $workdir/nohup.out 2>&1 &
nohup $workdir/hbbr -k _ >> $workdir/nohup.out 2>&1 &

exit 0
Don't forget to add executable permissions after the script file is modified
chmod +x /home/rustdesk/rustdesk-run.sh
The execution effect of the above steps (the content of the file in the picture has been modified, the above content shall prevail)
2. Set the script to start automatically
/etc/systemd/system/Create a self-starting service file in the path
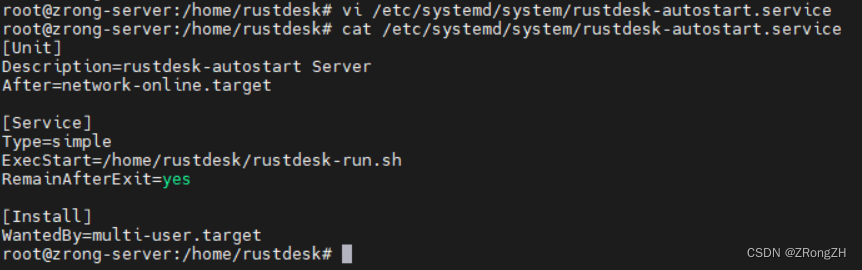
vi /etc/systemd/system/rustdesk-autostart.service
Add the following content to the file ( also pay attention to modify the path of the script file ), save and exit after editing
[Unit]
Description=rustdesk-autostart Server
After=network-online.target

[Service]
Type=simple
ExecStart=/home/rustdesk/rustdesk-run.sh
RemainAfterExit=yes

[Install]
WantedBy=multi-user.target
Execution effect
Next, enable the service to start automatically at boot
systemctl enable rustdesk-autostart.service

Finally, execute the following command to start the service. If you restart the system later, it will complete the self-starting, and there is no need to start the service manually.
systemctl daemon-reload
systemctl start rustdesk-autostart.servicesystemctl
Check whether the program is started. If you see hbbs and hbbr processes in the process, it means the startup is successful.
ps -ef | grep hbb

3. Set up a firewall
The program uses ports 21115-21119/tcp, 8000/tcp, and 21116/udp by default, and the above ports need to be released in the firewall
ufw allow 21115:21119/tcp
ufw allow 8000/tcp
ufw allow 21116/udp
ufw enable
Supplement: In this tutorial, the default value is used for the software settings, and no port is modified; when using the client connection, the server ip is directly used to connect, and there is no need to set the port number
4. Client connection test
Use windows to test connection with Android client
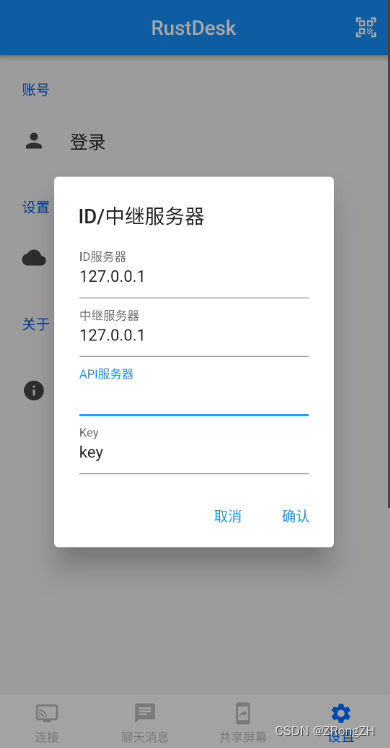
1. Windows client settings
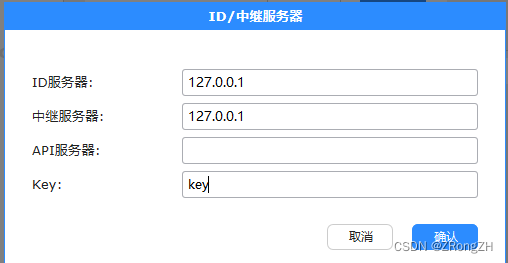
Select ID/relay server in the menu

and fill in the corresponding information in the pop-up menu, among which ID server and relay server both fill in the public network IP of your server (don’t copy mine here, fill in the public network IP of your own server ), the key in the fourth column is in the storage directory of the server software. After the program is successfully started, the key file id_ed25519and the key file will be automatically generated in the directory. id_ed25519.pubUse the cat command to view the key content. id_ed25519.pub( Pay attention to the suffix, do not read the wrong file ) Copy the content in the fourth column and fill in the key (you can leave it blank, if you don’t fill it in, the encrypted transmission will not be enabled by default, it can be used normally, but it is not recommended)
cat id_ed25519.pub
2. Android client settings
Open the software, set ID/relay server
Just fill in the same information as the windows client
Reference link: official document
Please indicate the source