Table of contents
Installation Environment:
[root@10 ~]# uname -a
Linux ip 4.19.90-24.4.v2101.ky10.x86_64 #1 SMP Mon May 24 12:14:55 CST 2021 x86_64 x86_64 x86_64 GNU/Linux
Check desktop environment
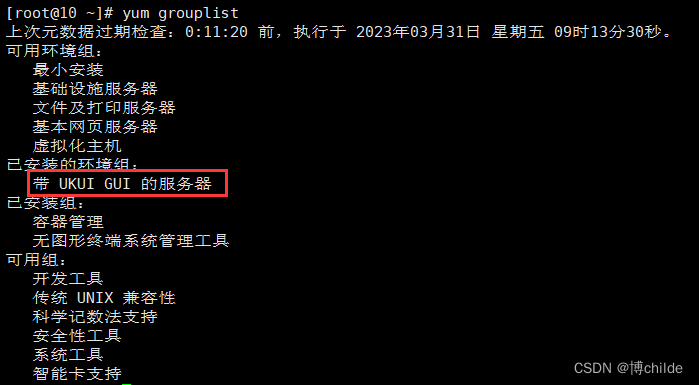
The production environment generally uses a minimal installation, and VNC needs to be run in a desktop environment. Perform the following operations to view the UKUI GUI desktop environment.
#列出的组列表里有桌面环境
[root@10 ~]# yum grouplist
Install
1. Because I have pointed the system yum source to the local, I can directly enter the following command to install:
[root@10 ~]# yum install tigervnc-server -y2. After installation, use the following command to verify whether it is successful:
[root@10 ~]# rpm -qa|grep tigervnc-server
configuration
1. Copy the VNC startup script and change the name. For example: : 1 in vncserver@:1.service means " desktop number ", the network port number corresponding to startup is 5900+desktop number , namely 5901 . If another one is 2, the port number is 5902 , and so on:
[root@10 ~]# cp /lib/systemd/system/[email protected] /etc/systemd/system/vncserver@:1.service2. Taking the root user accessing VNC as an example, edit the new file just copied:
[root@10 ~]# vim /etc/systemd/system/vncserver@:1.service
[Unit]
Description=Remote desktop service (VNC)
After=syslog.target network.target

[Service]
Type=forking
WorkingDirectory=/home/<USER>
User=<USER>
Group=<USER>

PIDFile=/home/<USER>/.vnc/%H%i.pid

ExecStartPre=/bin/sh -c '/usr/bin/vncserver -kill %i > /dev/null 2>&1 || :'
ExecStart=/usr/bin/vncserver -autokill %i
ExecStop=/usr/bin/vncserver -kill %i

Restart=on-success
RestartSec=15

[Install]
WantedBy=multi-user.target
3. Modify to the following content, after the modification is completed, press: 1.esc 2.shift+: 3.wq, save and exit
[Unit]
Description=Remote desktop service (VNC)
After=syslog.target network.target

[Service]
Type=forking

PIDFile=/root/.vnc/%H%i.pid

ExecStartPre=/bin/sh -c '/usr/bin/vncserver -kill :1 > /dev/null 2>&1 || :'
ExecStart=/usr/sbin/runuser -l root -c "/usr/bin/vncserver :1"
ExecStop=/bin/sh -c '/usr/bin/vncserver -kill :1 > /dev/null 2>&1 || :'

Restart=on-success
RestartSec=15

[Install]
WantedBy=multi-user.target
4. Set the VNC password (the password that VNC Viewer needs to use when connecting to the server). You need to enter the password twice. After the input is completed, you will be prompted whether to set a view-only password ("View-only password" password, only allowed to view, no control limit.) This can be set according to needs, and it will not be displayed when entering the password :
[root@10 ~]# vncpasswd
start service
1. Reload the system configuration file (when the system is newly added or the configuration file changes, the daemon-reload subcommand needs to be executed):
[root@10 ~]# systemctl daemon-reload2. Set the boot to start and start the service:
[root@10 ~]# systemctl status vncserver@\:1.service    #查看vnc服务状态
[root@10 ~]# systemctl start vncserver@\:1.service     #启动vnc服务
[root@10 ~]# systemctl stop vncserver@\:1.service      #停止vnc服务
[root@10 ~]# systemctl enable vncserver@\:1.service    #开机自启vnc服务
[root@10 ~]# systemctl disable vncserver@\:1.service   #停止并禁用开机自启vnc服务
3. Check the port
[root@10 ~]# netstat -ltp|grep Xvnc
firewall configuration
1. If the firewall is enabled in the system, corresponding rules need to be configured, otherwise the connection cannot be made:
[root@10 ~]# firewall-cmd --add-port=5901/tcp --permanent    #永久开启tcp5901端口
success    #成功
[root@10 ~]# firewall-cmd --reload    #重新载入防火墙配置,添加规则之后,需要执行此命令
success    #成功
So far, the entire configuration process is complete.