Table of contents
9. Calculation of graphic outline
10. Traverse the graph outline and match
For a given bank card, how can the card number of the bank card be extracted?

full code
#导入工具包
from imutils import contours
import numpy as np
import argparse
import imutils
import cv2
import myutils

#设置参数
ap=argparse.ArumentParser()
ap.add_argument("-i","--image",required=True,
    help="path to input image")#路径
ap.add_argument("-t","--template",required=True,
    help="path to template OCR-A image")#模板
args=vars(ap.parse_args())

#指定信用卡类型
FIRST_NUMBER={
    "3":"American Express",
    "4":"Visa",
    "5":"MasterCard",
    "6":,"Discover Card"
}
#绘图展示
def cv_show(name,img):
    cv2.imshow(name,img)
    cv2.waitKey(0)
    cv2.destroyAllWindows()
#读取一个模板图像
img=cv2.imread(args["template"])
cv_show('img',img)
#灰度图
ref=cv2.cvtColor(img,cv2.COLOR_BGR2GRAY)
cv_show('ref',ref)
#二值图像
ref=cv2.threshold(ref,10,255,cv2.THRESH_BINARY_INV)[1]
cv_show('ref',ref)

#计算轮廓
#cv2.findContours()函数接受的参数为二值图,即黑白的(不是灰度图),cv2.RETR_EXTERNAL只检测外轮廓,cv2.CHAIN_APPROX_SIMPLE只保留终点坐标
#返回的list中每个元素都是图像中的一个轮廓

ref_,refCnts,hierarchy=cv2.findContours(ref.copy(),cv2.RETR_EXTERNAL,cv2.CHAIN_APPROX_SIMPLE)

cv2.drawContours(img,refCnts,-1,(0,0,255),3)#-1表示画所有轮廓
cv_show('img',img)
print(np.array(refCnts).shape)
refCnts=myutils.sort_contours(refCnts,method="left-to-right")[0]#排序,从左到右,从上到下
digits={}

#遍历每一个轮廓
for (i,c) in enumerate(refCnts):
    #计算外接矩形并且resize成合适大小
    (x,y,w,h)=cv2.boundingRect(c)
    roi=ref[y:y+h,x:x+w]
    roi=cv2.resize(roi,(57,88))

    #每一个数字对应一个模板
    digits[i]=roi

#初始化卷积核
rectKernel=cv2.getStructuringElement(cv2.MORPH_RECT,(9,3))
sqKernel=cv2.getStructuringElement(cv2.MORPH_RECT,(5,5))

#读取输入图像,预处理
image=cv2.imread(args["image"])
cv_show('image',image)
image=myutils.resize(image,width=300)
gray=cv2.cvtColor(image,cv2.COLOR_BGR2GRAY)
cv_show('gray',gray)

#礼帽操作,突出更明亮的区域
tophat=cv2.morphologyEx(gray,cv2.MORPH_TOPHAT,rectKernel)
cv_show('tophat',tophat)

gradX=cv2.Sobel(tophat,ddepth=cv2.CV_32F,dx=1,dy=0,ksize=-1)#ksize=-1相当于用3*3的

gradX=np.absolute(gradX)#这里只用X比用x,y好
(minVal,maxVal)=(np.min(gradX),np.max(gradX))
gradX=(255*((gradX-minVal)/(maxVal-minVal)))
gradX=gradX.astype("uint8")

print(np.array(gradX).shape)
cv_show('gradX',gradX)

#通过闭操作(先膨胀,再腐蚀)将数字连在一起
gradX=cv2.morphologyEx(gradX,cv2.MORPH_CLOSE,rectKernel)
cv_show('gradX',gradX)
#THRESH_OTSU会自动寻找合适的阈值,适合双峰,需要把阈值参数设为0
thresh=cv2.threshold(gradX,0,255,cv2.THRESH_BINARY|cv2.THRESH_OTSU)[1]
cv_show('thresh',thresh)

#再来一个闭操作

thresh=cv2.morphologyEx(thresh,cv2.MORPH_CLOSE,sqKernel)#再来一个闭操作
cv_show('thresh',thresh)

#计算轮廓
thresh_,threshCnts,hierarchy=cv2.findContours(thresh.copy(),cv2.RETR_EXTERNAL,cv2.CHAIN_APPROX_SIMPLE)

cnts=threshCnts
cur_img=image.copy()
cv2.drawContours(cur_img,cnts,-1,(0,0,255),3)
cv_show('img',cur_img)
locs=[]

#遍历轮廓
for (i,c) in enumerate(cnts):
    #计算矩形
    (x,y,w,h)=cv2.boundingRect(c)
    ar=w/float(h)

    #选择合适的区域,根据实际任务来,这里的基本都是四个数字一组
    if ar>2.5 and ar<4.0:
        if(w>40 and w<55) and (h>10 and h<20):
            #符合的留下来
            locs.append((x,y,w,h))
#将符合的轮廓从左到右排序
locs=sorted(locs,key=lambda x:x[0])
output=[]

#遍历每一个轮廓中的数字
for (i,(gX,gY,gW,gH)) in enumerate(locs):
    #initialize the list of group digits
    groupOutput=[]

    #根据坐标提取每一个组
    group=gray[gY-5:gY+gH+5,gX-5:gX+gW+5]#将坐标向外扩一点点,别贴死
    cv_show('group',group)
    #预处理
    group=cv2.threshold(group,0,255,cv2.THRESH_BINARY|cv2.THRESH_OTSU)[1]
    cv_show('group',group)
    #计算每一组的轮廓
    group_,digitCnts,hierarchy=cv2.findaContours(group.copy(),cv2.RETR_EXTERNAL,CV2.CHAIN_APPROX_SIMPLE)
    digitCnts=contours.sort_contours(digitCnts,method="left-to-right")[0]

    #计算每一组中的每一个数值
    for c in digirCnts:
        #找到当前数值的轮廓,resize成合适的大小
        (x,y,w,h)=cv2.boundingRect(c)
        roi=group[y:y+h,x:x+w]
        roi=cv2.resize(roi,(57,88))
        cv_show('roi',roi)

        #计算匹配得分
        scores=[]

        #在模板中计算每一个得分
        for (digit,digitROI) in digits.items():
            #模板匹配
            result=cv2.matchTemplate(roi,digitROI,cv2.TM_CCOEFF)
            (_,score,_,_)=cv2.minMaxLoc(result)
            scores.append(score)

        #得到最合适的数字
        groupOutput.append(str(np.argmax(scores)))

    #画出来
    cv2.rectangle(image,(gX-5,gY-5),(gX+gW+5,gY+gH+5),(0,0,255),1)
    cv2.putText(image,"".join(groupOutput),(gX,gY-15,cv2.FONT_HERSHEY_SIMPLEX,0.65,(2,2,255),2)

    #得到结果
    output.extend(groupOutput)

#打印结果
print("Credit Card Type:{}".format(FIRST_NUMBER[output[0]]))
print("Credit Card #:{}".format("".join(putput)))
cv2.imshow("image",image)
cv2.waitKet(0)
1. Basics
#导入工具包
from imutils import contours
import numpy as np
import argparse
import imutils
import cv2
import myutils

#设置参数
ap=argparse.ArumentParser()
ap.add_argument("-i","--image",required=True,
    help="path to input image")#路径
ap.add_argument("-t","--template",required=True,
    help="path to template OCR-A image")#模板
args=vars(ap.parse_args())

#指定信用卡类型
FIRST_NUMBER={
    "3":"American Express",
    "4":"Visa",
    "5":"MasterCard",
    "6":,"Discover Card"
}
#绘图展示
def cv_show(name,img):
    cv2.imshow(name,img)
    cv2.waitKey(0)
    cv2.destroyAllWindows()
2. Template preprocessing
#读取一个模板图像
img=cv2.imread(args["template"])
cv_show('img',img)
template
#灰度图
ref=cv2.cvtColor(img,cv2.COLOR_BGR2GRAY)
cv_show('ref',ref)

Grayscale
#二值图像
ref=cv2.threshold(ref,10,255,cv2.THRESH_BINARY_INV)[1]
cv_show('ref',ref)

Binary image
3. Calculate the contour
The arrangement order of the 10 contours does not necessarily correspond to the contours of 0-9. We need to sort from small to large according to the coordinate value of the upper left corner of each contour.
#计算轮廓
#cv2.findContours()函数接受的参数为二值图,即黑白的(不是灰度图),cv2.RETR_EXTERNAL只检测外轮廓,cv2.CHAIN_APPROX_SIMPLE只保留终点坐标
#返回的list中每个元素都是图像中的一个轮廓

ref_,refCnts,hierarchy=cv2.findContours(ref.copy(),cv2.RETR_EXTERNAL,cv2.CHAIN_APPROX_SIMPLE)

cv2.drawContours(img,refCnts,-1,(0,0,255),3)#-1表示画所有轮廓
cv_show('img',img)
print(np.array(refCnts).shape)
refCnts=myutils.sort_contours(refCnts,method="left-to-right")[0]#排序,从左到右,从上到下

template outline
4. Traverse the contour
Traverse each contour object and assign corresponding values to each contour. The resize needs to be matched with the following credit card.
digits={}
#遍历每一个轮廓
for (i,c) in enumerate(refCnts):
    #计算外接矩形并且resize成合适大小
    (x,y,w,h)=cv2.boundingRect(c)
    roi=ref[y:y+h,x:x+w]
    roi=cv2.resize(roi,(57,88))

    #每一个数字对应一个模板
    digits[i]=roi
#初始化卷积核
rectKernel=cv2.getStructuringElement(cv2.MORPH_RECT,(9,3))
sqKernel=cv2.getStructuringElement(cv2.MORPH_RECT,(5,5))
5. Input image preprocessing
#读取输入图像,预处理
image=cv2.imread(args["image"])
cv_show('image',image)
image=myutils.resize(image,width=300)
gray=cv2.cvtColor(image,cv2.COLOR_BGR2GRAY)
cv_show('gray',gray)
read image

convert to grayscale
6. Operate politely
#礼帽操作,突出更明亮的区域
tophat=cv2.morphologyEx(gray,cv2.MORPH_TOPHAT,rectKernel)
cv_show('tophat',tophat)
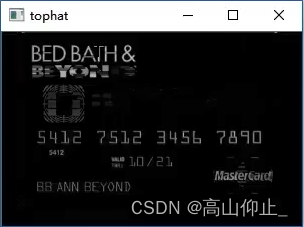
after top hat operation
7. Sobel operator operation
Edge detection, to highlight the edge.
gradX=cv2.Sobel(tophat,ddepth=cv2.CV_32F,dx=1,dy=0,ksize=-1)#ksize=-1相当于用3*3的

gradX=np.absolute(gradX)#这里只用X比用x,y好
(minVal,maxVal)=(np.min(gradX),np.max(gradX))
gradX=(255*((gradX-minVal)/(maxVal-minVal)))
gradX=gradX.astype("uint8")

print(np.array(gradX).shape)
cv_show('gradX',gradX)

The result obtained using the sobel operator
8. Close operation
After the edge operation, the numbers need to be connected into pieces, and the closing operation is required
#通过闭操作(先膨胀,再腐蚀)将数字连在一起
gradX=cv2.morphologyEx(gradX,cv2.MORPH_CLOSE,rectKernel)
cv_show('gradX',gradX)

after close operation
#THRESH_OTSU会自动寻找合适的阈值,适合双峰,需要把阈值参数设为0
thresh=cv2.threshold(gradX,0,255,cv2.THRESH_BINARY|cv2.THRESH_OTSU)[1]
cv_show('thresh',thresh)

after threshold
There are black blocks in the film, and the closing operation is strengthened again to fill in the black blocks
#再来一个闭操作

thresh=cv2.morphologyEx(thresh,cv2.MORPH_CLOSE,sqKernel)#再来一个闭操作
cv_show('thresh',thresh)

After the second closing operation
9. Calculation of graphic outline
#计算轮廓
thresh_,threshCnts,hierarchy=cv2.findContours(thresh.copy(),cv2.RETR_EXTERNAL,cv2.CHAIN_APPROX_SIMPLE)

cnts=threshCnts
cur_img=image.copy()
cv2.drawContours(cur_img,cnts,-1,(0,0,255),3)
cv_show('img',cur_img)
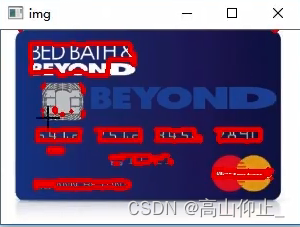
image outline
10. Traverse the graph outline and match
It is necessary to find four digital contours containing numbers among all the above contours, which may be distinguished by different lengths and widths, and also need to be sorted
locs=[]
#遍历轮廓
for (i,c) in enumerate(cnts):
    #计算矩形
    (x,y,w,h)=cv2.boundingRect(c)
    ar=w/float(h)

    #选择合适的区域,根据实际任务来,这里的基本都是四个数字一组
    if ar>2.5 and ar<4.0:
        if(w>40 and w<55) and (h>10 and h<20):
            #符合的留下来
            locs.append((x,y,w,h))
#将符合的轮廓从左到右排序
locs=sorted(locs,key=lambda x:x[0])
- Iterate over each large contour
- For each large outline, perform the same operation as processing the template, where the resize corresponds to the resize when processing the template
- For each number, template matching is done
output=[]

#遍历每一个轮廓中的数字
for (i,(gX,gY,gW,gH)) in enumerate(locs):
    #initialize the list of group digits
    groupOutput=[]

    #根据坐标提取每一个组
    group=gray[gY-5:gY+gH+5,gX-5:gX+gW+5]#将坐标向外扩一点点,别贴死
    cv_show('group',group)
    #预处理
    group=cv2.threshold(group,0,255,cv2.THRESH_BINARY|cv2.THRESH_OTSU)[1]
    cv_show('group',group)
    #计算每一组的轮廓
    group_,digitCnts,hierarchy=cv2.findaContours(group.copy(),cv2.RETR_EXTERNAL,CV2.CHAIN_APPROX_SIMPLE)
    digitCnts=contours.sort_contours(digitCnts,method="left-to-right")[0]
    #计算每一组中的每一个数值
    for c in digirCnts:
        #找到当前数值的轮廓,resize成合适的大小
        (x,y,w,h)=cv2.boundingRect(c)
        roi=group[y:y+h,x:x+w]
        roi=cv2.resize(roi,(57,88))
        cv_show('roi',roi)

        #计算匹配得分
        scores=[]

        #在模板中计算每一个得分
        for (digit,digitROI) in digits.items():
            #模板匹配
            result=cv2.matchTemplate(roi,digitROI,cv2.TM_CCOEFF)
            (_,score,_,_)=cv2.minMaxLoc(result)
            scores.append(score)

        #得到最合适的数字
        groupOutput.append(str(np.argmax(scores)))


    #画出来
    cv2.rectangle(image,(gX-5,gY-5),(gX+gW+5,gY+gH+5),(0,0,255),1)
    cv2.putText(image,"".join(groupOutput),(gX,gY-15,cv2.FONT_HERSHEY_SIMPLEX,0.65,(2,2,255),2)

    #得到结果
    output.extend(groupOutput)
first outline

Binarization result

the first number of the first contour
11. Output result
#打印结果
print("Credit Card Type:{}".format(FIRST_NUMBER[output[0]]))
print("Credit Card #:{}".format("".join(putput)))
cv2.imshow("image",image)
cv2.waitKet(0)
final result

Note the configuration path :

