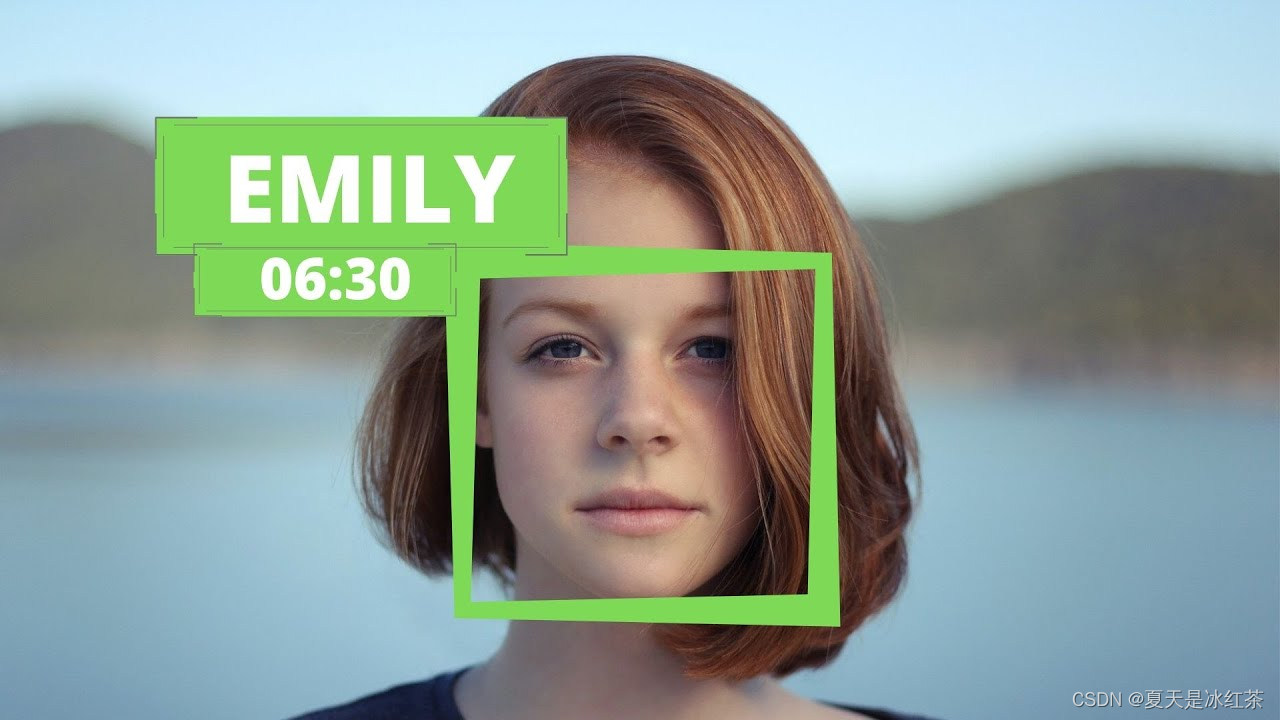
1. Effect display
Face Recognition:
Attendance effect:
2. Project introduction
Next, we'll learn how to perform facial recognition with high accuracy, starting with a brief introduction to the theory and learning the basic implementation. Then we will create an attendance project that will use webcam to detect faces and record attendance in real time in an excel sheet.
3. Project basic theory
(1) Construction of the project package
Before that, you should have read this article and completed the construction of the project package (37 messages) The easiest way for Python 3.7 to solve the problem of downloading dlib and face_recognition
In addition, we also need to install a package, just follow the steps:
pip install face_recognition_models(2) File construction
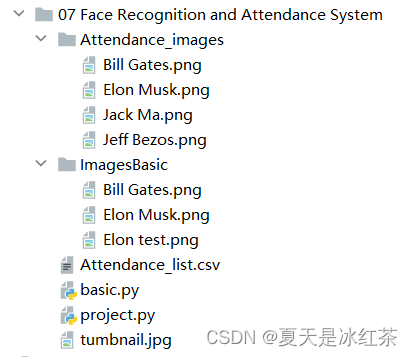
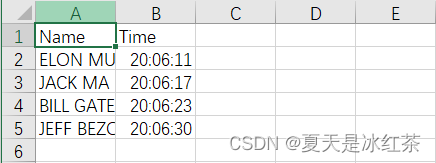
According to the configuration shown in the figure, the content in the Attendance.csv file is only (Name, Time). In the Attendance_images file, you can add pictures you want to add, preferably pictures of individual characters, and name the pictures with their English names.
(3) basic.py code display and explanation
import cv2
import face_recognition
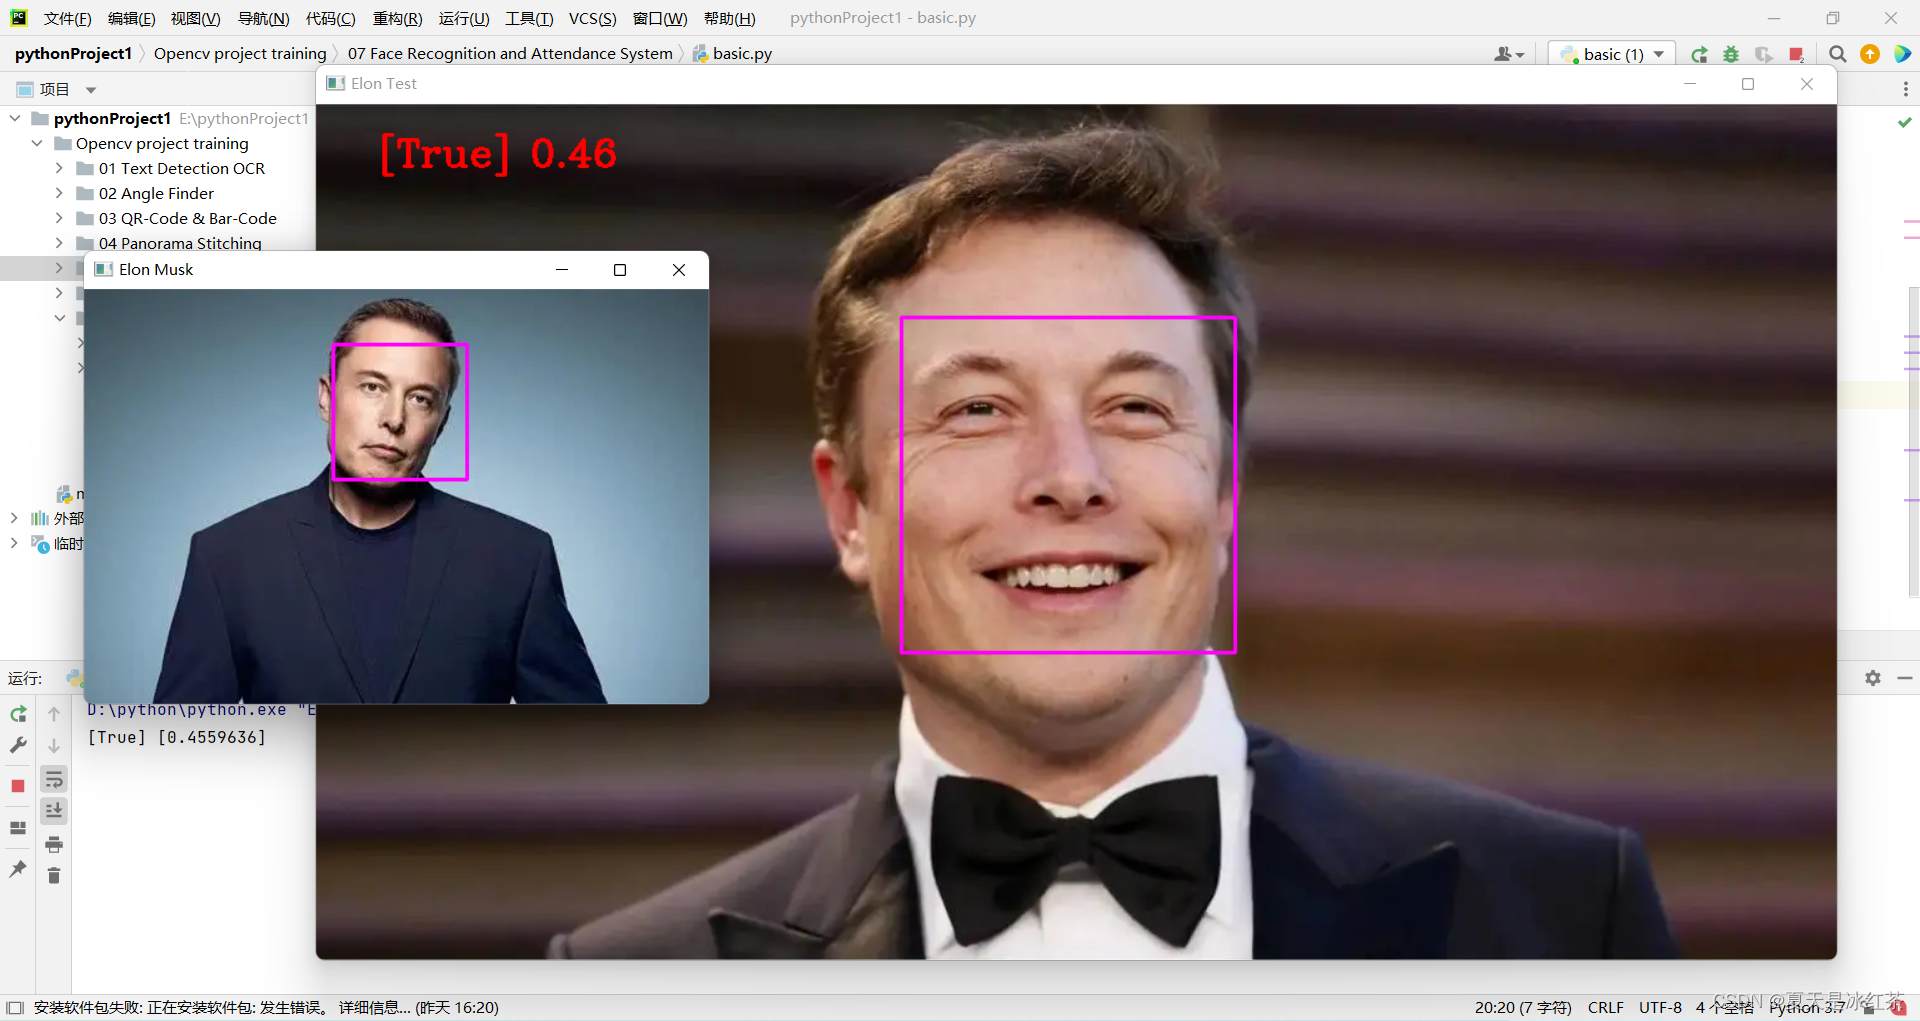
imgElon = face_recognition.load_image_file('ImagesBasic/Elon Musk.png')
imgElon = cv2.cvtColor(imgElon, cv2.COLOR_BGR2RGB)
imgTest = face_recognition.load_image_file('ImagesBasic/Elon test.png')
imgTest = cv2.cvtColor(imgTest, cv2.COLOR_BGR2RGB)
faceLoc = face_recognition.face_locations(imgElon)[0]
encodeElon = face_recognition.face_encodings(imgElon)[0]
cv2.rectangle(imgElon, (faceLoc[3], faceLoc[0]), (faceLoc[1], faceLoc[2]), (255, 0, 255), 2)
faceLocTest = face_recognition.face_locations(imgTest)[0]
encodeTest = face_recognition.face_encodings(imgTest)[0]
cv2.rectangle(imgTest, (faceLocTest[3], faceLocTest[0]), (faceLocTest[1], faceLocTest[2]), (255, 0, 255), 2)
results = face_recognition.compare_faces([encodeElon], encodeTest)
faceDis = face_recognition.face_distance([encodeElon], encodeTest)
print(results, faceDis)
cv2.putText(imgTest, f'{results} {round(faceDis[0], 2)}', (50, 50), cv2.FONT_HERSHEY_COMPLEX, 1, (0, 0, 255), 2)
cv2.imshow('Elon Musk', imgElon)
cv2.imshow('Elon Test', imgTest)
cv2.waitKey(0)
We'll use Mr. Musk's picture as a standard test, 'Elon Musk.png'. The other two pictures are of Mr. Bill Gates and Mr. Musk.
Today's explanation will be divided into two parts, this is the basic part of the explanation.
- First, import the pictures in these two codes. We use the load_image_file function in face_recognition, which will load the image files (.jpg, .png, etc.) into the numpy array, and the default mode='RGB' format, So there is a transformation here.
- Secondly, faceLoc accepts the bounding box array of the face in the image returned by the face_locations() function, please see Note 1, take the first number, it will wait until a tuple, we have to press css (up, right, down, left ) list of tuples of face positions found sequentially. The encodeElon() function returns a 128-dimensional face encoding list (one for each face in the image), why is it 128-dimensional? See Note 2. After this, it is the frame operation again. I believe that those who have read my previous articles must be too familiar with it. Enter the coordinates according to Note 3.
- After that, compare_faces() compares the list of face encodings with the candidate encodings to see if they match, remember, only the first is a list and it will return a list of true/false values; face_distance() requires a given face encoding list, compare it with known face encodings, and obtain the Euclidean distance for each compared face. Distance will tell you how similar the faces are. Again, only the first one is a list. See Note 4 above.
- Finally, place the framed information in a suitable location to display the image.
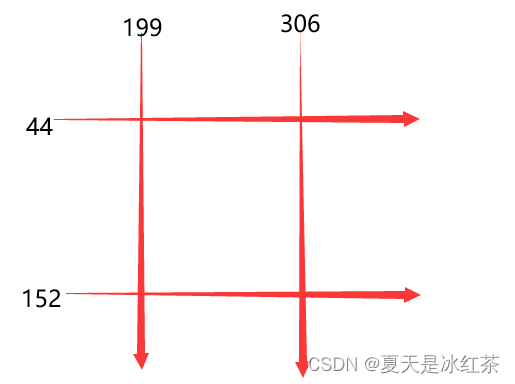
Note 1: [(44, 306, 152, 199)]
Note 2: Machine learning is fun! Part 4: Modern Face Recognition and Deep Learning - Fintech Ranking (fintechranking.com) by Adam Geitgey .
Note 3: Coordinate diagram
Note 4: [True] [0.4559636]
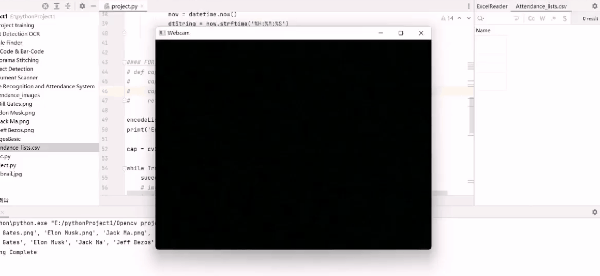
(5) Effect display
By modifying the code here, we have initially implemented face recognition.
imgTest = face_recognition.load_image_file('ImagesBasic/Bill Gates.png')
imgTest = cv2.cvtColor(imgTest, cv2.COLOR_BGR2RGB)
4. Project code display and explanation
import cv2
import numpy as np
import face_recognition
import os
from datetime import datetime

# from PIL import ImageGrab

path = 'Attendance_images'
images = []
classNames = []
myList = os.listdir(path)
print(myList)
for cl in myList:
    curImg = cv2.imread(f'{path}/{cl}')
    images.append(curImg)
    classNames.append(os.path.splitext(cl)[0])
print(classNames)


def findEncodings(images):
    encodeList = []
    for img in images:
        img = cv2.cvtColor(img, cv2.COLOR_BGR2RGB)
        encode = face_recognition.face_encodings(img)[0]
        encodeList.append(encode)
    return encodeList


def markAttendance(name):
    with open('Attendance_lists.csv', 'r+') as f:
        myDataList = f.readlines()
        nameList = []
        for line in myDataList:
            entry = line.split(',')
            nameList.append(entry[0])
        if name not in nameList:
            now = datetime.now()
            dtString = now.strftime('%H:%M:%S')
            f.writelines(f'\n{name},{dtString}')


#### FOR CAPTURING SCREEN RATHER THAN WEBCAM
# def captureScreen(bbox=(300,300,690+300,530+300)):
#     capScr = np.array(ImageGrab.grab(bbox))
#     capScr = cv2.cvtColor(capScr, cv2.COLOR_RGB2BGR)
#     return capScr

encodeListKnown = findEncodings(images)
print('Encoding Complete')

cap = cv2.VideoCapture(1)

while True:
    success, img = cap.read()
    # img = captureScreen()
    imgS = cv2.resize(img, (0, 0), None, 0.25, 0.25)
    imgS = cv2.cvtColor(imgS, cv2.COLOR_BGR2RGB)

    facesCurFrame = face_recognition.face_locations(imgS)
    encodesCurFrame = face_recognition.face_encodings(imgS, facesCurFrame)

    for encodeFace, faceLoc in zip(encodesCurFrame, facesCurFrame):
        matches = face_recognition.compare_faces(encodeListKnown, encodeFace)
        faceDis = face_recognition.face_distance(encodeListKnown, encodeFace)
        # print(faceDis)
        matchIndex = np.argmin(faceDis)

        if matches[matchIndex]:
            name = classNames[matchIndex].upper()
            # print(name)
            y1, x2, y2, x1 = faceLoc
            y1, x2, y2, x1 = y1 * 4, x2 * 4, y2 * 4, x1 * 4
            cv2.rectangle(img, (x1, y1), (x2, y2), (0, 255, 0), 2)
            cv2.rectangle(img, (x1, y2 - 35), (x2, y2), (0, 255, 0), cv2.FILLED)
            cv2.putText(img, name, (x1 + 6, y2 - 6), cv2.FONT_HERSHEY_COMPLEX, 1, (255, 255, 255), 2)
            markAttendance(name)


    cv2.imshow('Webcam', img)
    cv2.waitKey(1)
Some of the operations here have been mentioned in my previous blog, and I have explained it very clearly, so I will briefly talk about it.
- First, read the name of the image in the Attendance_images file, note that it has .png, and our naming does not require it, so take a [0].
- Second, write findEncodings() to store the encodings of standard images, in the form of a list. The markAttendance() function is used to read the file information of Attendance_lists.csv and write it to Excel, where the time can also be written.
- Then, for the rest, I believe there should be no problem referring to the above explanation. Let's talk about y1, x2, y2, x1 = y1 * 4, x2 * 4, y2 * 4, x1 * 4, why multiply by 4, remember the resize above, it does not require pixel changes, but shrinks The ratio is exactly 0.25.
5. Project materials
6. Project summary
Today's project is still more difficult than the previous object detection. For me, the current efficiency is not very high. The download of the dlib and face_recognition packages yesterday was really not done. I changed a project temporarily, and I did it today long time.
So hope you have fun with this project! !